Ac Infinity IonFrame Grow Light System AC-IF3K User Manual
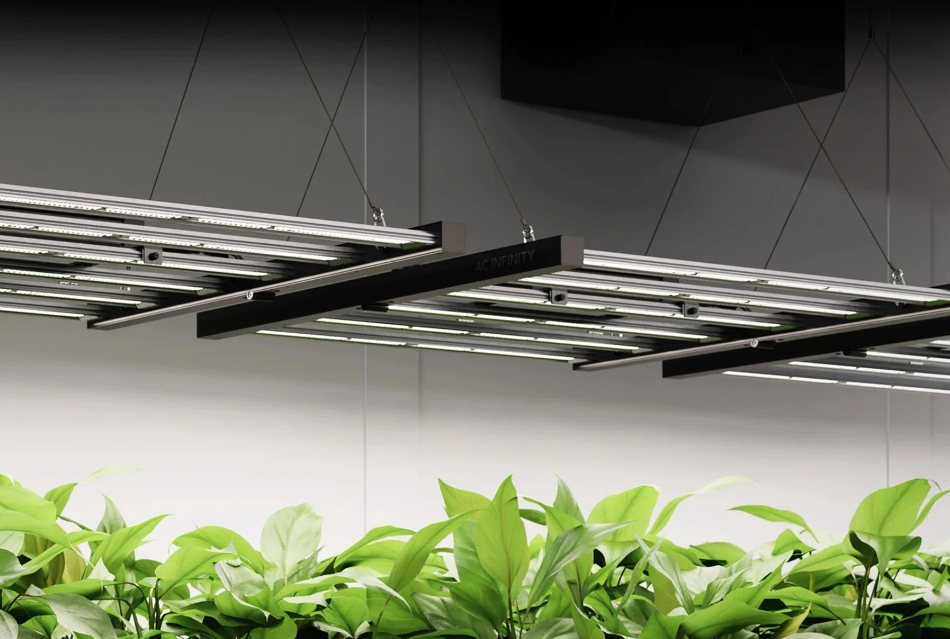
Content
AC Infinity IonFrame EVO3 Grow Light System AC-IF3K
Introducing the IonFrame Grow Light is a high-performance LED grow light designed for indoor gardening. Utilizing advanced Samsung LM301H EVO diodes, it delivers full-spectrum lighting with optimal efficiency, making it suitable for various plant growth stages. The system features programmable controls for sunrise/sunset dimming and multiple brightness levels, ensuring precise light management. Priced at approximately $452.95, it combines innovative technology with user-friendly features for effective indoor cultivation.
Specifications
- LED Light Spectrum: Full-spectrum LED light with adjustable settings for different growth stages.
- Power Consumption: 300W with high-efficiency LEDs.
- Coverage Area: Up to 4x4 feet for flowering and 5x5 feet for vegetative growth.
- Dimmable: Adjustable brightness and spectrum settings via remote control or app.
- Durability: Aluminum frame with IP65 water resistance rating.
- Cooling System: Passive cooling with heat sinks to prevent overheating.
- Warranty: 5-year warranty on LEDs and 3-year warranty on other components.
Description
The AC Infinity IonFrame EVO3 Grow Light System AC-IF3K boasts a robust aluminum frame that is both durable and lightweight, making it easy to install and move around. The system uses high-efficiency LEDs that are designed to provide a balanced spectrum of light, which is crucial for healthy plant growth. The LEDs are cooled by an efficient passive cooling system, ensuring long life and consistent performance. The dimmable feature allows growers to adjust the light intensity and spectrum according to the specific needs of their plants at different growth stages.
The system also comes with a user-friendly remote control and mobile app, allowing growers to monitor and adjust the lighting settings remotely. This feature is particularly useful for those who manage multiple grow rooms or need to make adjustments without physically being present.
PRODUCT WARNING
TO REDUCE THE RISK OF FIRE, ELECTRIC SHOCK, OR INJURY TO PERSONS, OBSERVE THE FOLLOWING:
- Ensure your power source conforms to the electrical requirements of this product.
- Check your local code restrictions for additional safety measures that may be needed for a proper code compliant installation.
- Read all instructions before installing and using this product.
- If you are unfamiliar or have doubts about performing this product’s installation, seek the services of a qualified, trained, and licensed professional. Inappropriate installation will void this product’s warranty.
- Do not attempt to hardwire this product. Performing any retrofitting actions may result in personal injury and/or electrical damage, and will void this product's warranty.
- This product must not be used in potentially hazardous locations such as flammable, explosive, chemical-laden or wet atmospheres.
- Do not cover power cords with rugs or other fabric materials.
- Safety precautions should be exercised during the installation, operation, and maintenance of this product.
- Do not block or tamper with this product in any manner while it is in operation as it may cause electric shock, fire, or damage to this product.
- Do not depend on the on/off programming as the sole means of shutting power from this product. Unplug the power cord before installing, servicing, or moving this product.
- Do not operate this product while its cord is damaged, or if it malfunctions, has been dropped, or is damaged in any manner.
KEY FEATURES
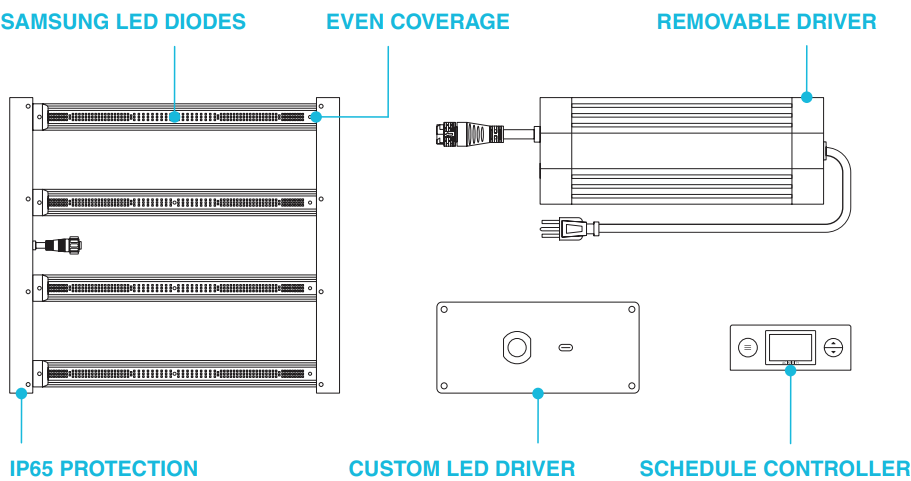
- SAMSUNG LED DIODES
Commercial-grade Samsung LM301H EVO LEDs deliver full-spectrum lighting to achieve greater growth rates. - EVEN COVERAGE
Algorithmically spaced diodes achieve wider light spread for optimized use in all grow stages while eliminating hot spots. - REMOVABLE DRIVER
Detachable LED driver allows for flexible placement along grow tent walls or positioning outside of the tent. - IP65 PROTECTION
Sealed to Ingress Protection 65 standards against liquids and dust for excellent performance in grow tent environments. - CUSTOM LED DRIVER
Designed to reliably deliver high-wattage power and enables PWM control of its power output. - SCHEDULE CONTROLLER
Digital controller features SCHEDULE and SUNSET/RISE modes that trigger activation in ten light intensity levels.
PRODUCT CONTENTS
ALL MODELS
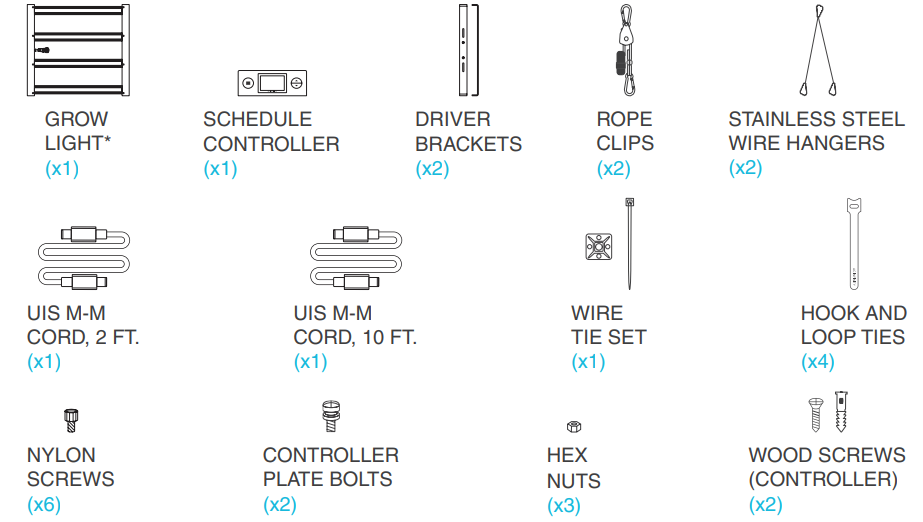
IONFRAME EVO3

INSTALLATION
DRIVER MOUNTING (FRAME)
- STEP 1
Align the brackets' mounting holes with the driver's mounting points located on the driver's underside, making sure the brackets' legs are pointing up.
Secure the brackets by screwing in the driver screws using a Phillips screwdriver.
Repeat this process with the second driver if you have the IONFRAME EVO10. STEP 2
Flip the driver over and place it over the two* center columns of your grow light.
Secure the brackets to the columns by screwing in the nylon screws using a flathead screwdriver._ac_infinity_ionframe_grow_light_system_ac-if3k.png)
STEP 3
Connect the driver socket to the grow light connector. This will lock the connection in place.
Twist the lock and pull the connector out to disconnect it from the driver's socket._of_ac_infinity_ionframe_grow_light_system_ac-if3k.png)
DRIVER MOUNTING (WALL)
- STEP 1
Align the brackets' mounting holes with the driver's mounting points located on the driver's underside, making sure the brackets' legs are pointing down.
Secure the brackets by screwing in the driver screws using a Phillips screwdriver. STEP 2
Mark your desired mounting position using the brackets' mounting slots._ac_infinity_ionframe_grow_light_system_ac-if3k.png)
- STEP 3
Drill four holes into the marked locations. Make sure your mounting area is structurally sound and free from obstruction. STEP 4
If you are mounting onto anything other than a wood support or stud, insert the included four wall anchors into the drilled mounting holes.
You may need to use a hammer to secure them through the holes._of_ac_infinity_ionframe_grow_light_system_ac-if3k.png)
- STEP 5
Align the bracket’s holes with the wall anchors. Screw in four wood screws with a screwdriver or drill to secure the brackets. STEP 6
Connect the driver socket to the grow light connector using the driver extension cord.
Twist the lock and pull the connector to disconnect it from the driver's socket._of_the_ac_infinity_ionframe_grow_light_system_ac-if3k.png)
HANGING
- STEP 1
Clip the lanyard hooks onto the four anchors located at the corners of your grow light. STEP 2
Clip the two carabiners onto your grow tent's roof support beams.
You may also use rope clip hangers to hang your grow light lower.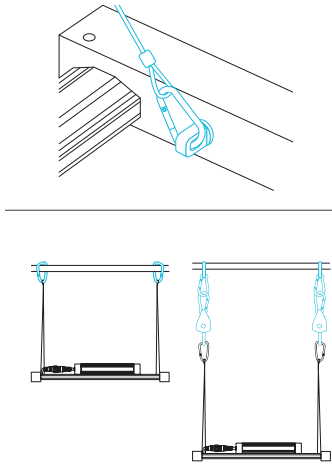
SUPPLEMENTAL LIGHTING
IONBEAM LED light bars (not included) can magnetically mount to the frame to adjust the light spectrum, introduce new spectrums (UV/IR), and increase the light intensity output.

- STEP 1
Magnetically mount the LED light bars onto the frame of your grow light. STEP 2
You may connect the LED light bars' controller to the schedule controller using a UIS extension cord to match its schedule with your grow light's schedule.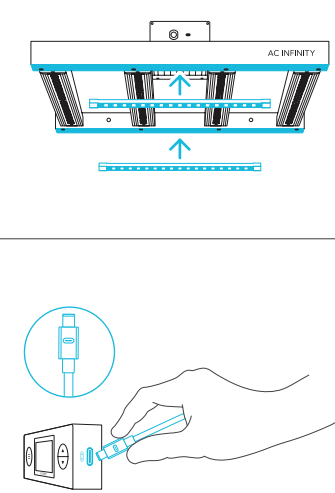
POWERING AND SETUP
SINGLE DRIVER
- STEP 1
Plug the power cord into an AC power outlet to power your grow light. STEP 2
Plug one end of the UIS extension cord into the LED driver, and the other end into the schedule controller.
You may alternatively use another UIS controller to set smart programming.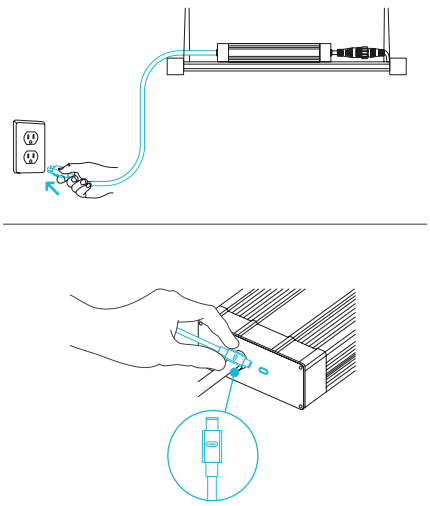
DUAL DRIVER
- STEP 1
Connect the driver sockets to the dual driver power cord connectors.
Plug the power cord into an AC power outlet to power your grow light. STEP 2
Plug the male end of the daisy-chain adapter into one of the LED drivers.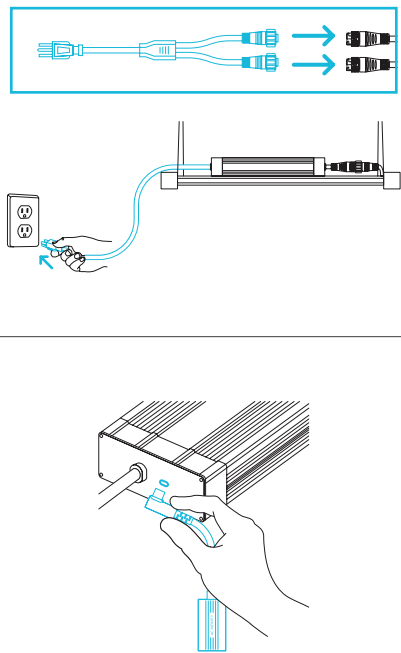
- STEP 3
Plug one end of the 1 ft. M-M UIS cord into the second LED driver, and the other end into the daisy-chain adapter's OUTPUT port. STEP 4
Connect the daisy-chain adapter's INPUT port to the schedule controller using the 2 ft. or 10 ft. M-M UIS cord.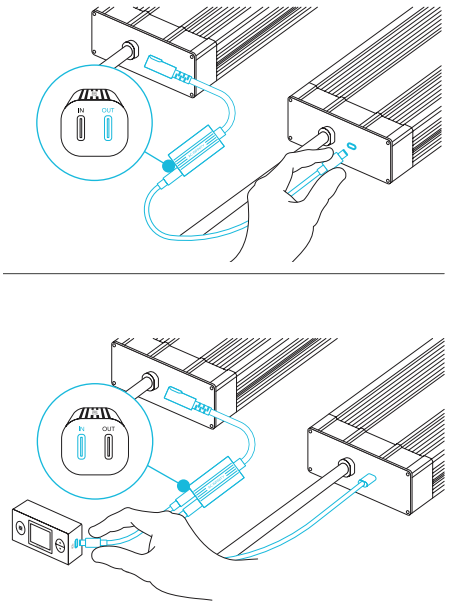
CONTROLLER MOUNTING
- STEP 1 — WALL MOUNTING
Locate a spot free of obstruction and secure the anchor into your wall. Twist the wood screw into the anchors. STEP 2 — WALL MOUNTING
Hang the controller by the screw using the holes on the backside.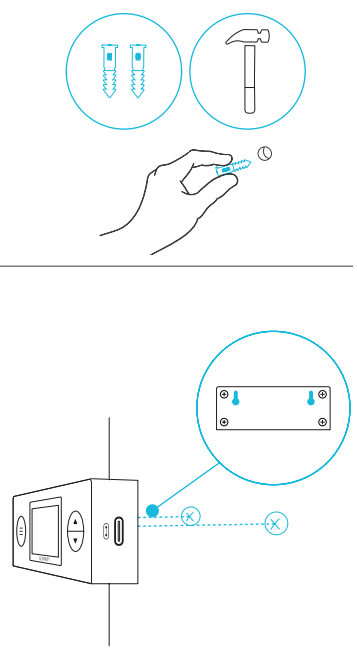
MAGNET MOUNTING
Magnetically mount the schedule controller onto the frame of your grow light or a controller mounting plate.
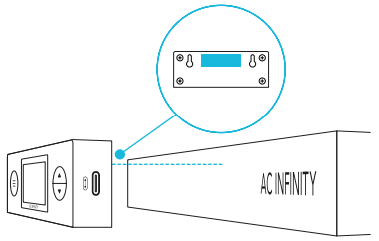
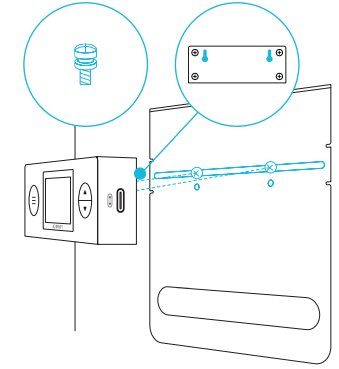
PLATE MOUNTING*
Screw the controller plate bolts into the slot or mounting holes at the upper half of the plate.
Hang the controller by the bolts using the holes on the backside.
STARTER GUIDE
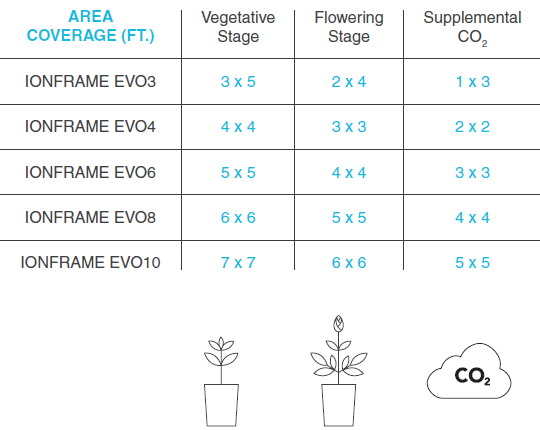
The chart below lists the coverage area of each grow light size in each growth stage. The supplemental CO2 column refers to sealed grow spaces that use a CO2 enrichment system with a 1200+ PPM.
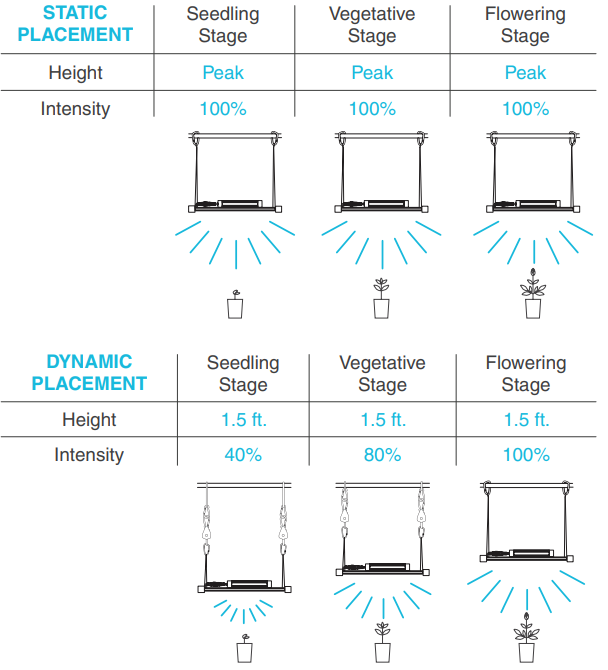
The charts below offer suggested mounting heights and light intensities for each stage in the growing process of your preferred method. These factors will vary based on the plant you are growing. In dynamic placement, "height" refers to distance from the canopy (tip of the plant).
UISTM PLATFORM
The UISTM platform enables you to connect a single central controller with several grow devices simultaneously. By creating this fully integrated system, you can power and program all your devices together or separately for optimized grow tent management.
Your grow system can be regulated using your controller hub or remotely on the AC Infinity app (paired with compatible controllers), where you will have access to automation programming and climate data.
You can also connect your favorite grow light and outlet device to integrate them into the UIS platform using our RJ11/12 adapter and control plug module.
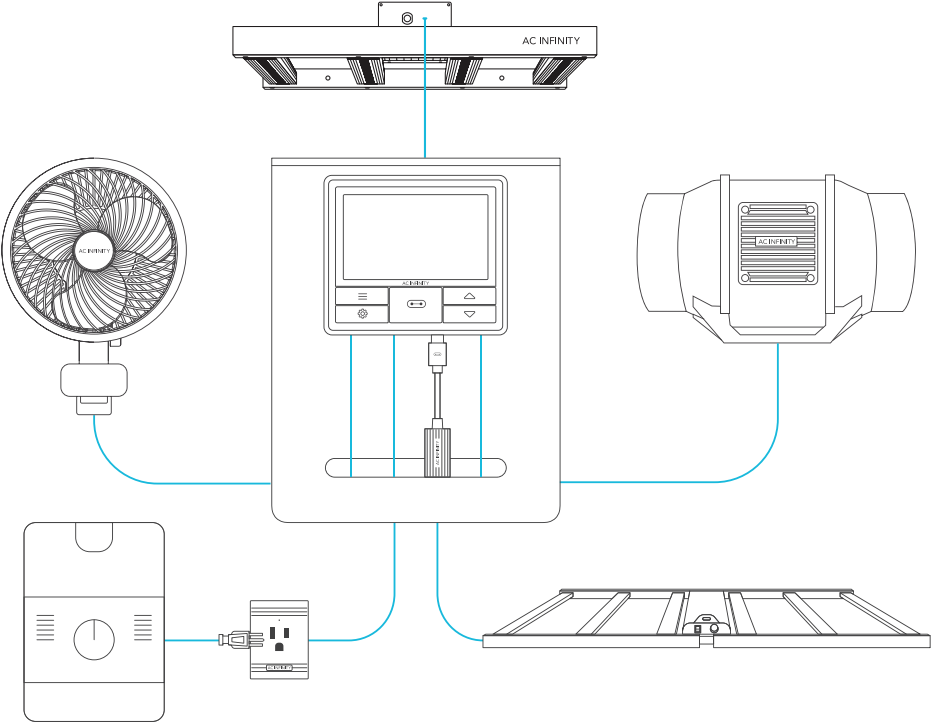
Central controller and grow devices will be sold separately and may still be in development at the time of your purchase of this product.
UISTM COMPATIBILITY
MOLEX ADAPTER
Use the included Molex adapter to plug inline fans with 4-pin Molex connectors into this controller. Plug your fan's Molex connector into the adapter. Then plug the adapter into the controller.

EXTENSION CABLE
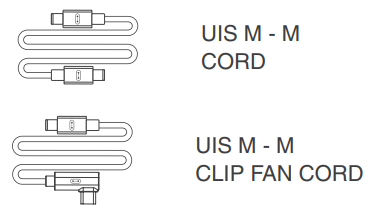
Use male-to-male UIS extension cords to connect devices with female UIS ports at an extended range from your controller. Included with UIS-compatible devices.
EXPANSION SPLITTER
The expansion splitter will allow you to connect 4 devices with a single port and can support additional splitters to create up to 3 tiers of expansion ports (up to 64 units supported with the use of 20 splitters). Intended for exclusive use with AC Infinity controllers with UIS ports.

ADDING MORE LIGHTS
- AC Infinity UIS controllers are equipped with multiple ports to add more grow lights and share the same programming. Refer to the diagram below to learn how to connect additional units.
- Smart grow light controllers can program light intensity levels and scheduled activations of all grow lights plugged into its UIS ports.
An expansion dongle (sold separately) will allow you to connect additional grow lights past the number of units your controller can support.
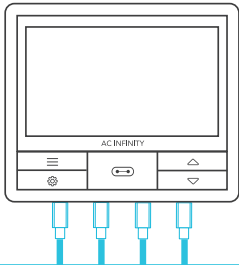
Multi-Light Connection

EXTENDING THE CHAIN
Plug the male end of the splitter* into your UIS controller. Connect a UIS device or power adapter to the first port of each tier to power your controller and the hub. Ports 2-4 can connect to additional splitters or UIS devices. All devices plugged into this chain must be of the same type (ex. grow lights of any size) regardless of the length of the dongle chain. This splitter is not compatible with UIS adapters such as the RJ11 Lighting Adapter.
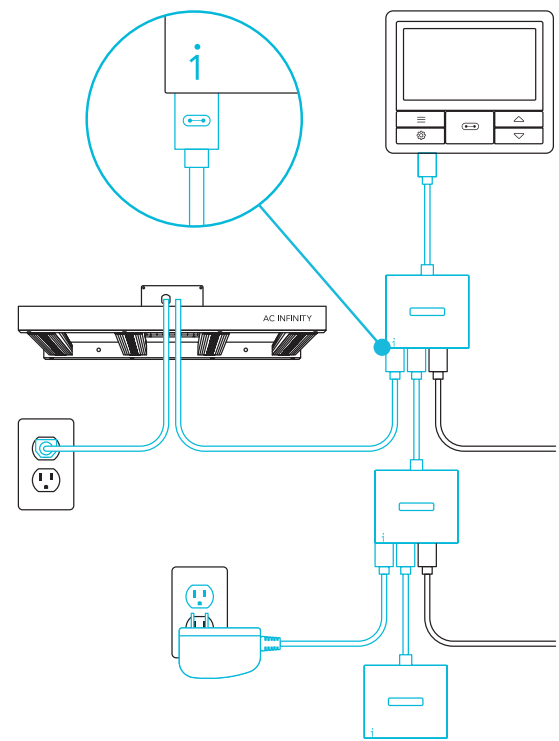
Not included
DAISY-CHAINING
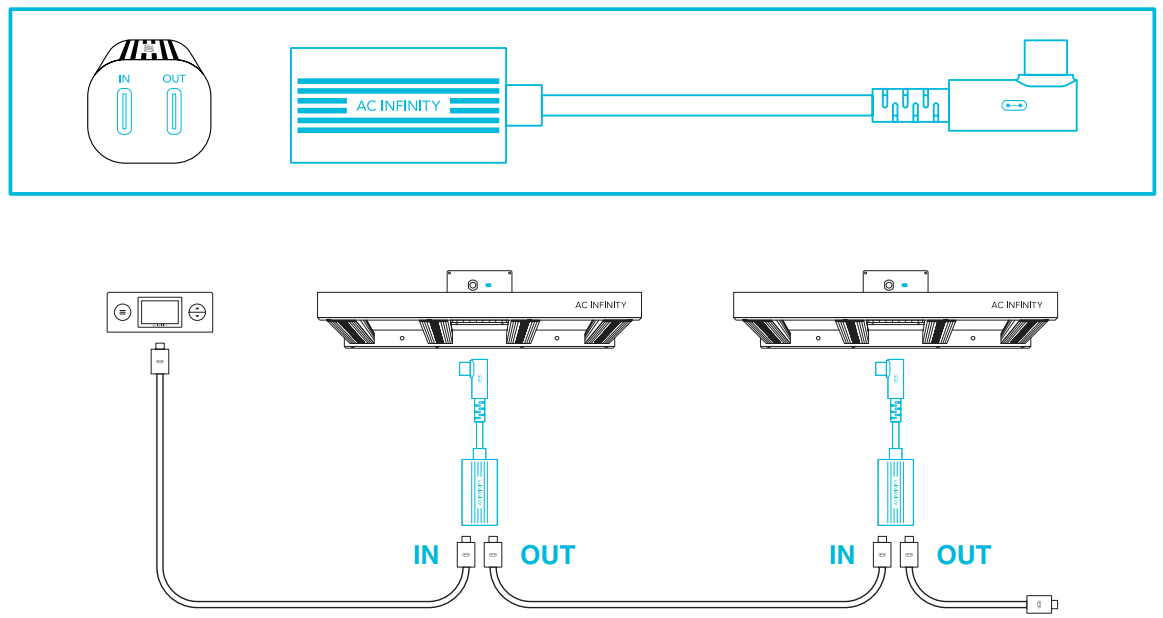
- Each of the included controller's ports can support up to 16 grow lights using a daisy-chain adapter*. All grow lights chained together must be from the same series.
- Plug the male end of the daisy-chain adapter into your device.
- Connect your UIS controller to the daisy-chain adapter’s INPUT port using a M-M connector cord.
Using an extension cord, attach the daisy-chain adapter's OUTPUT port to another adapter's INPUT port. You can also link the OUTPUT port to another UIS device to end the chain.
PROGRAMMING
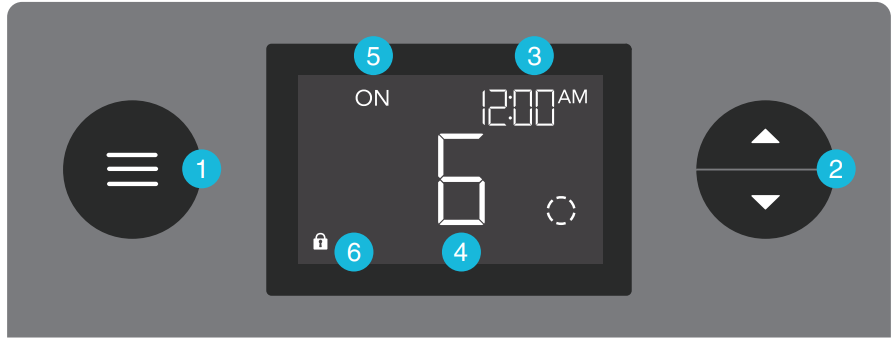
- MODE BUTTON
Cycles through each of the controller modes: OFF, ON, SCHEDULE, SUNSET/RISE, and CLOCK. Holding this button will lock the controller; pressing this button afterwards will turn off the display. - UP/DOWN BUTTON
Adjusts the setting of your current mode. - CURRENT TIME
Displays the current time. The internal battery sustains the clock so it does not default to 00:00 if power is cut off. - USER SETTING
Displays the grow light's intensity level as well as countdown timers of the Schedule modes. - CONTROLLER MODE
Displays the controller's current mode. Pressing the mode button cycles through the available modes. - LOCK ICON
Displays the controller lock status of the controller.
CONTROLLER MODES
Pressing the mode button will cycle through the controller’s available programming modes and settings: OFF, ON, SCHEDULE, SUNSET/RISE, and CLOCK.
OFF MODE
Your grow light will not activate while in this mode. The intensity level set here establishes the minimum intensity level in the SCHEDULE mode. When it is triggered to turn off, it will instead shine at the level set here.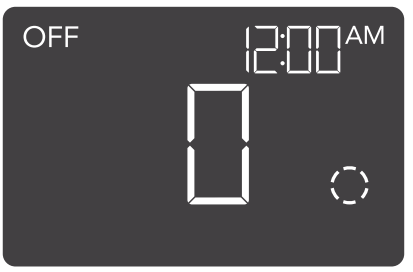
ON MODE
Your grow light will activate to the intensity level set here. The ON mode also serves as the maximum intensity level the SCHEDULE mode will shine in.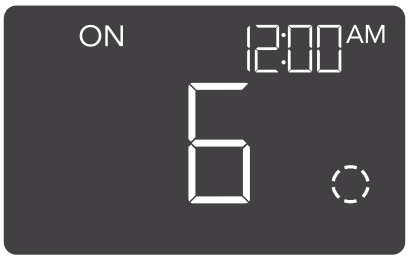
SCHEDULE MODE (ON & OFF)
- Sets an on clock-time and an off clock-time schedule for your grow light to follow daily.
- Press the up or down button to first set up an on clock-time to turn your grow light on, then press the mode button to set an off clock-time to turn your grow light off. Please be sure to set the current clock time under settings.
- When your grow light turns on, it will run at your set maximum level. When your grow light turns off, it will run at your set minimum level.
- The countdown will begin if no buttons are pressed for 5 seconds. Leaving the SCHEDULE mode while the countdown is running will pause it until you return to this mode.
Resetting the off clock-time will result in your grow light staying on until you actively turn it off.
_ac_infinity_ionframe_grow_light_system_ac-if3k.png)
The grow light will shine at your set OFF mode level while it is off, and at your set ON mode level while it is on.
_of_ac_infinity_ionframe_grow_light_system_ac-if3k.png)
SUNSET/RISE SETTING
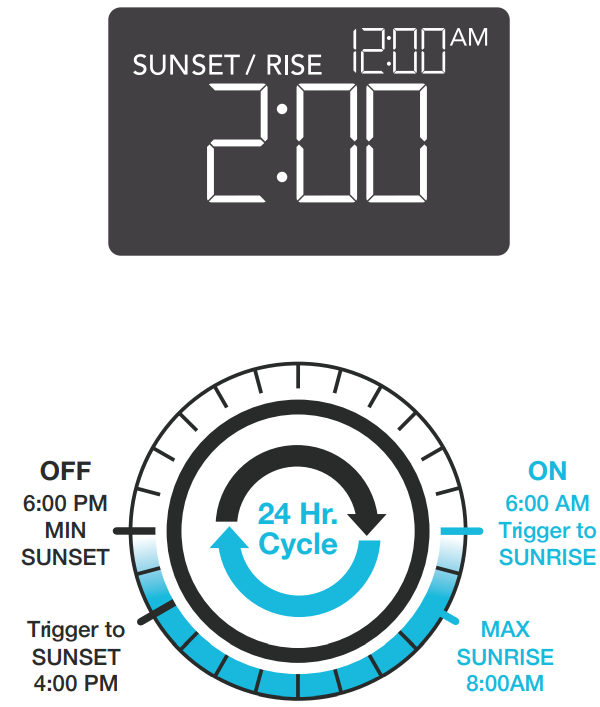
- Sets a sunrise and sunset time for your grow light to brighten and dim, respectively. This setting only applies to SCHEDULE mode.
- Press the up or down button to set a duration between 0:00 – 6:00 hours for your grow light to brighten and dim. For this setting to activate, you must return to SCHEDULE mode.
- When your grow light is triggered to turn on, it will begin brightening up to your maximum level. It will then begin dimming down to your minimum level before it is triggered to turn off.
- In this example, your grow light is set to turn on at 6:00 AM and turn off at 6:00 PM. The SUNSET/RISE setting is set to 2:00 hours. At 6:00 AM, your grow light will begin gradually brightening until it reaches your maximum level at 8:00 AM. Your grow light will then begin dimming at 4:00 PM until it reaches your minimum level at 6:00 PM.
You may deactivate this mode by setting the SUNSET/RISE timer to 0:00.
CLOCK MODE
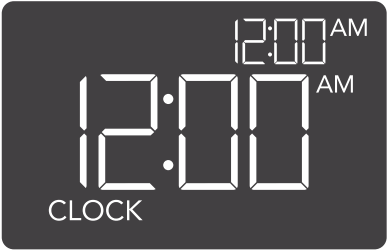
Adjusts the current clock time. Use the up and down buttons to adjust the time. Once you cycle through 12:00 each time, the units will automatically change to AM or PM. The clock time is located at the center of the display and the upper right hand corner.
TOGGLING THE DISPLAY
- Lock the controller by holding the mode button.
- Press the mode button to turn the display off. Pressing the mode button again will turn the display back on.
- Programs will still run in the background while the LCD screen is off.
Setup Guide
- Unpack the grow light system and all included components carefully.
- Mount the light to your grow room's ceiling or frame using the provided hanging kit.
- Connect the power cord to a wall outlet and ensure it is securely plugged in.
- Use the remote control or mobile app to turn on the light and adjust settings as needed.
- Configure the light's schedule and spectrum settings according to your plant's growth stage.
- Regularly check and clean the light to ensure optimal performance.
OTHER SETTINGS
FACTORY RESET
Holding the mode and up/down buttons together for 5 seconds will reset your controller and restore factory settings. This will clear all user set parameters of each controller mode and setting.
RESET TO OFF/DEFAULT
Holding the up and down buttons together for 2 seconds will reset the value of your current mode to its default setting. In SCHEDULE mode, pressing the up or down button after resetting will return it to its previous value.
CONTROLLER LOCK
Holding the mode button will lock the controller in your current mode. While your controller is locked, no parameters may be adjusted nor will you be able to switch modes. Holding the mode button again will unlock the controller.
HIDE SCREEN
Lock the controller so no settings can be adjusted. See above. Then press the mode button to turn the display off. Pressing the mode button again will turn the display back on. Programs will still run in the background while the LCD screen is off.
AC INFINITY PRODUCTS
Advance Grow Tents
The CLOUDLAB series is a line of grow tents designed to create ideal growing conditions and facilitate indoor plant cultivation year-round. Features 2000D thick oxford canvas lined with inner diamond patterned mylar that maximizes grow light luminosity, and a reinforced frame with 150 lb. weight capacity. Includes a mounting plate to install your AC Infinity controller onto.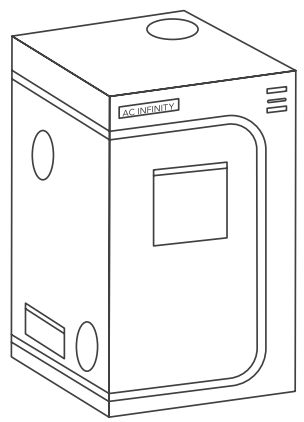
Inline Duct Fans
The CLOUDLINE series is a line of duct fans designed to quietly ventilate AV rooms and closets, as well as various DIY air circulation and exhaust projects. Features a thermal controller with intelligent programming that will automatically adjust duct fan speeds in response to changing temperatures.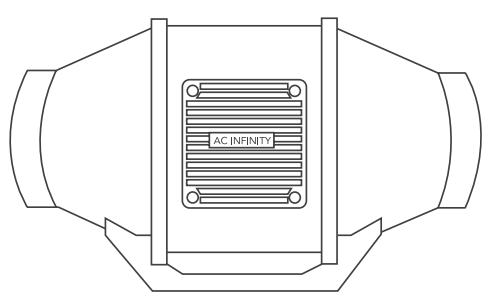
Circulator Clip Fans
The CLOUDRAY series is a line of clip fans designed to provide precise air circulation for all stages of a plant’s growth cycle. Features digital controls to achieve ten speed levels, as well as a heavy-duty clamp constructed to tightly grip onto grow tent poles of all sizes.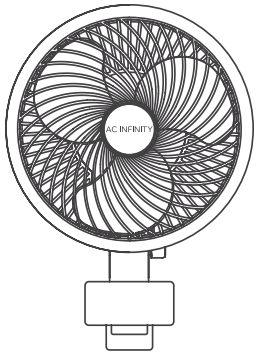
Troubleshooting
- No Power: Check if the power cord is properly plugged in and if there are any issues with the electrical outlet.
- Ensure that all connections are secure and clean. If the issue persists, contact customer support.
WARRANTY
This warranty program is our commitment to you, the product sold by AC Infinity will be free from defects in manufacturing for a period of two years from the date of purchase. If a product is found to have a defect in material or workmanship, we will take the appropriate actions defined in this warranty to resolve any issues.
Pros & Cons
Pros:
- High Efficiency: Uses high-efficiency LEDs to minimize energy consumption while maximizing light output.
- Adjustable Spectrum: Allows for tailored light settings based on the plant's growth stage.
- Durable Construction: Made from high-quality aluminum with IP65 water resistance rating.
- User-Friendly Interface: Easy-to-use remote control and mobile app for remote monitoring and adjustments.
- Warranty Coverage: Comprehensive warranty covering LEDs and other components.
Cons:
- Cost: May be more expensive than other grow light options on the market.
- Complex Setup for Some Users: While generally easy to set up, some users may find the initial configuration process complex.
- App Compatibility Issues: Some users may experience compatibility issues with certain devices or operating systems.
Customer Reviews
Customers have praised the AC Infinity IonFrame EVO3 Grow Light System AC-IF3K for its robust build quality, efficient energy consumption, and versatile lighting options. Many have noted significant improvements in plant growth and health since switching to this system. However, some users have reported minor issues with app connectivity and initial setup complexity.
The most common complaints include occasional app glitches and the need for more detailed setup instructions. Despite these minor issues, the overall feedback has been highly positive, with many recommending the product to fellow growers.
Faqs
What is the coverage area of the IonFrame?
Is the AC-IF3K dimmable?
What type of cooling system does the AC Infinity use?
Does theGrow Light System AC-IF3K come with a warranty?
Can I control the System remotely?
What materials is the Grow Light System made from?
How much power does the IonFrame AC-IF3K consume?
Is the Grow Light suitable for all stages of plant growth?
How do I troubleshoot common issues with the Light AC-IF3K?
Can I use the AC Infinity Light System in a humid environment?
Leave a Comment
