How to Setup: Aclas Receipt Printer PP7MX User Manual
Content
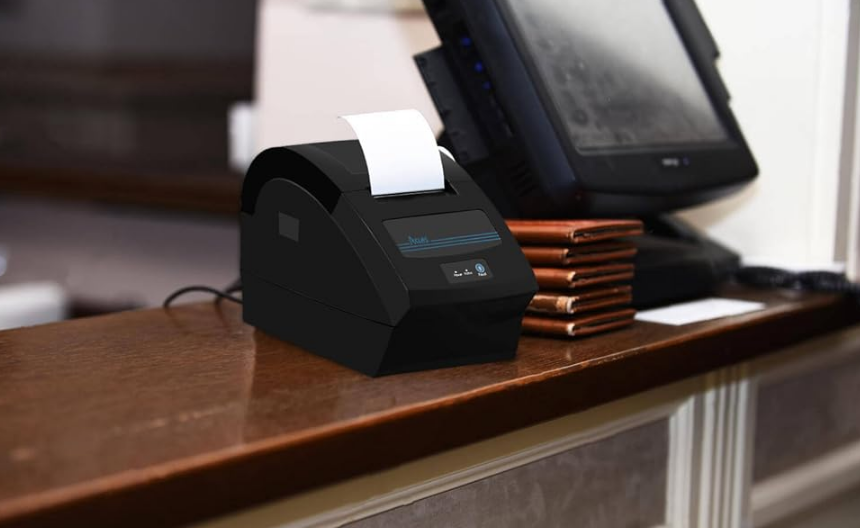
ACLAS Receipt Printer PP7MX Introduction
A high-performance thermal printer, the ACLAS Receipt Printer PP7MX is ideal for service businesses including hotels, restaurants, and retail. It has multiple connection options, including as USB, Ethernet, and RS232, and can print at speeds of up to 250 mm/s. The printer's 203 dpi resolution and 80 mm maximum print width make for crisp and clear receipts. Ideal for heavy-traffic areas, the PP7MX offers dependable receipt printing with its auto-cutter and compatibility with Mac and Windows computers.
Specifications
Optional type | PP7M31HX | |
Speed | 250mm/s | |
Power Supply | 24V | |
Print Method | thermal print | |
Resolution | 203dpi | |
Paper | Paper type | Thermal paper |
Paper width | 79.5±0.5mm | |
Paper roll diameter | Max. 80mm | |
Paper installation type | Easy paper loading | |
Character print | Character set | ANK character set, Chinese GB2312, Traditional ChineseBIG5, 12×24 dots,24×24 dots |
Number of columns | 48 columns | |
Barcode type | UPC-A, UPC-E, Code128, EAN128.Jan8, Jan13(EAN), Interleaved 2 of 5, Codabar | |
Data receiving buffer | 16KB | |
Flash memory | 16Mbit | |
Interface | USB+RS232; Ethernet+USB | |
Cash drawer driver | 1 ports (compatible with EPSON) | |
Printer head life | 150km (recommend to use high quality thermal paper, such as OJI, PD-160R or Aclas paper.) | |
Paper-cutter life | 1,000,000 times | |
Cash drawer impulse | 24V | |
Work Temperature | 0℃ ~ 40℃ | |
Work Humidity | 5%R.H. ~ 85%R.H. | |
Driver | Win8X, WinME, Win2000, WinNT, WinXP | |
Printingcommand | Support command ESC/POS | |
Size | 145*194*135.8mm | |
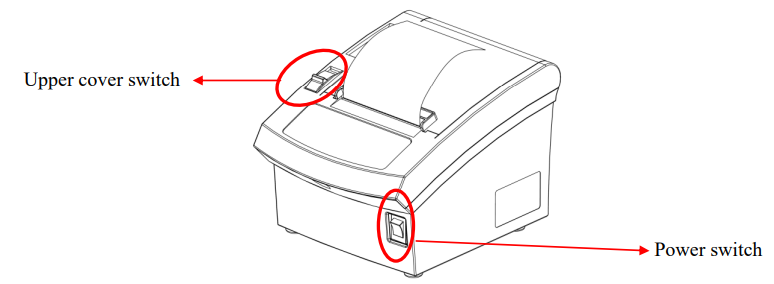
Appearance
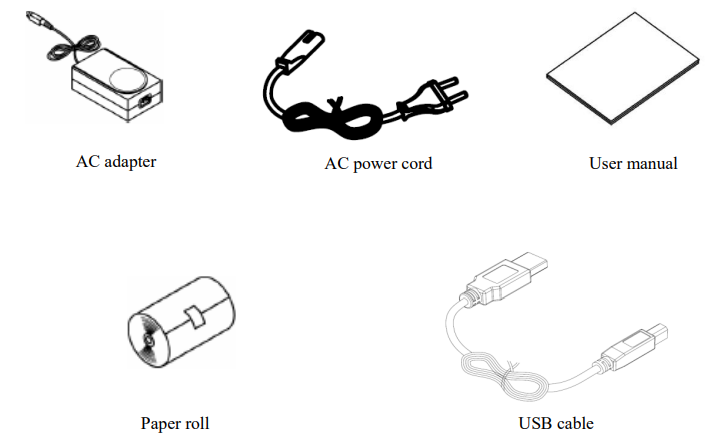
Accessories
Paper Installation
Note: Bad quality thermal paper with a rough surface and low sensitivity may reduce the lifetime of the printer head. Please use high-quality thermal paper, such as OJI, PD 160R, or Aclas paper.
- Make sure that the printer is not receiving data; otherwise, data may be lost.
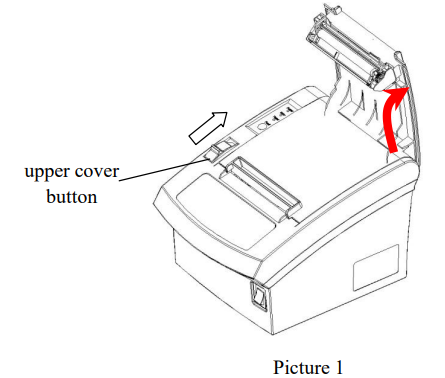
Open the printer upper cover by pressing the cover button as shown in Picture 1.
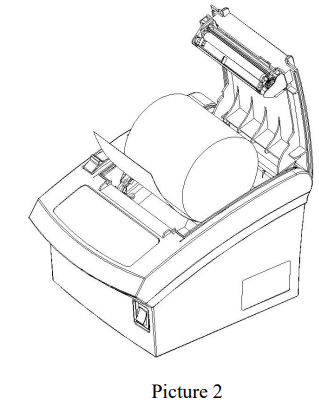
Insert the paper roll into the printer as shown in Picture 2.
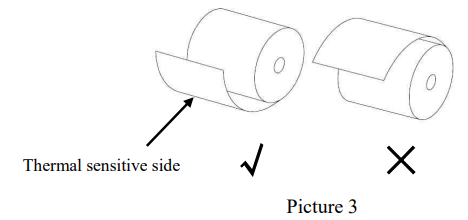
Ensure the paper comes off the roll in the correct direction as shown in Picture 3.
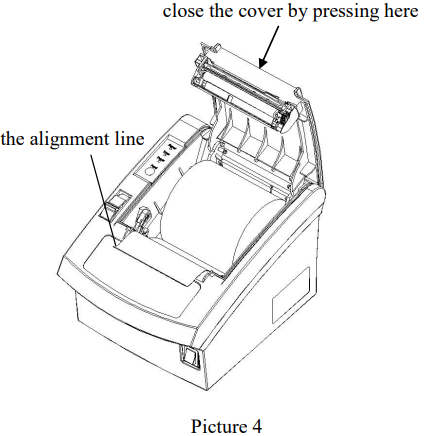
Pull out a small amount of paper to make it parallel with the alignment line as shown in Picture 4, then close the upper cover by pressing its front middle part until you hear a ‘click’ sound.
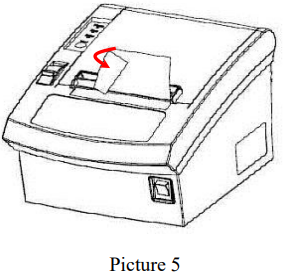
After closing the upper cover, tear off the paper as shown in Picture 5.
Setting the Printer
Using the Printer
Connecting the Computer
- Power off the printer.
- Plug the communication cable securely into the printer, then attach the other end of the cable to the computer.
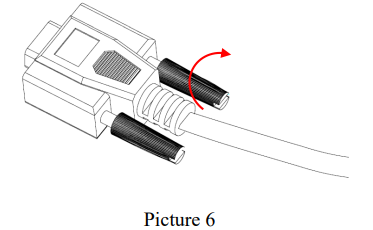
If the cable connector is as shown in Picture 6, tighten the two screws on both sides of the cable connector after connecting.
Connecting the Power Supply
CAUTIONS
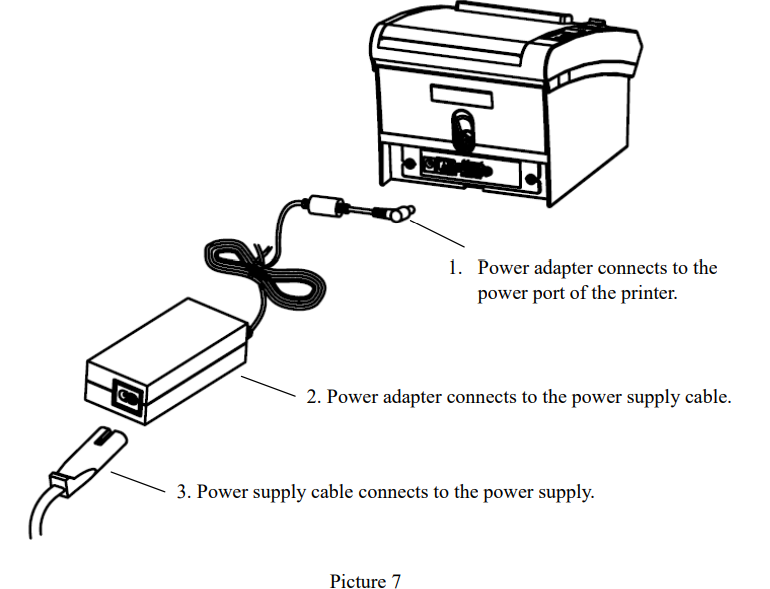
When connecting the power supply to the printer, first connect the power supply cable to the printer, then connect the power supply cable to the power supply. When disconnecting, reverse the order. Otherwise, you may damage the power supply or the printer.
If the power supply’s rated voltage and your outlet’s voltage do not match, contact your dealer for assistance. Do not plug in the power cord. Otherwise, you may damage the power supply or the printer.
- When not using the printer, make sure that the printer’s power switch is turned off, and the power supply’s power cord is unplugged from the electrical outlet.
- Make sure the switch is off when plugging or unplugging the power.
- Check the label on the power supply to ensure that the voltage required by the power supply matches that of your electrical outlet.
Plug in the power supply’s cable as shown in Picture 7.
Description
Printing at a speed of up to 250 millimeters per second, the ACLAS Receipt Printer PP7MX is a printer that is both compact and resistant to wear and tear. Because it has a print resolution of 203 dots per inch, it guarantees that the receipts that are generated are legible and easy to recognize. The paper roll may be easily replaced owing to the printer's drop-in paper loading method, which makes the process quite simple. The fact that it is equipped with both a USB 2.0 and a Serial interface makes it simple to connect to point-of-sale (POS) systems.
Printer Tool Instruction
Double-click to open 'Printertool.exe'. Use the software to set printer parameters and test functions.
Communication Setting
First, you need to do communication test. Click Communication Setting in the Quick Navigation menu. Do select the right communicati on method according to your printer communication interface.
Ethernet Printer
If your printer is Ethernet, select TCP/IP as the following picture.
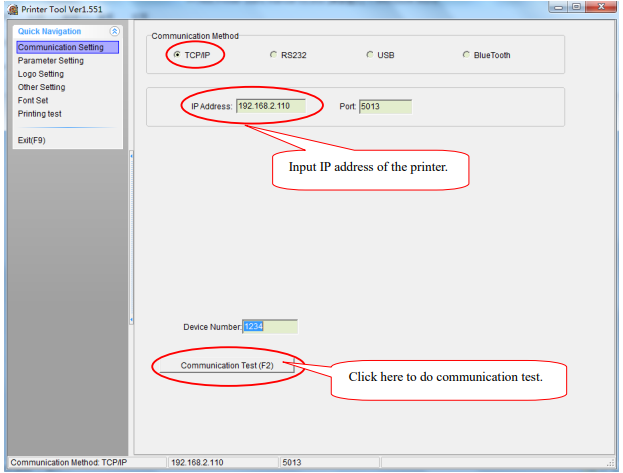
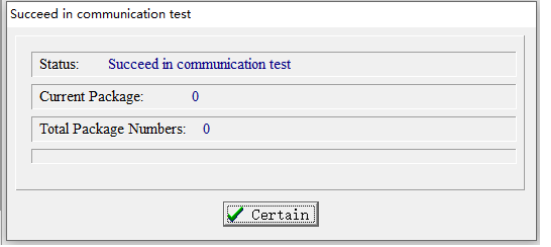
Click Communication Test ( to test communication . If there are no error s, pop up window will be shown as follows.
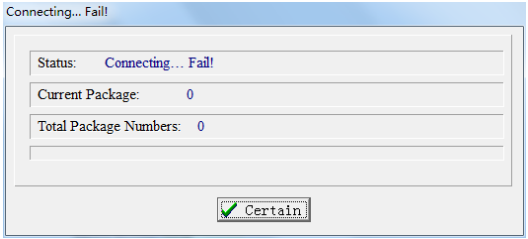
Otherwise, the failure window will be displayed. Users should correct the communication setting until pass the communication test.
Serial Printer
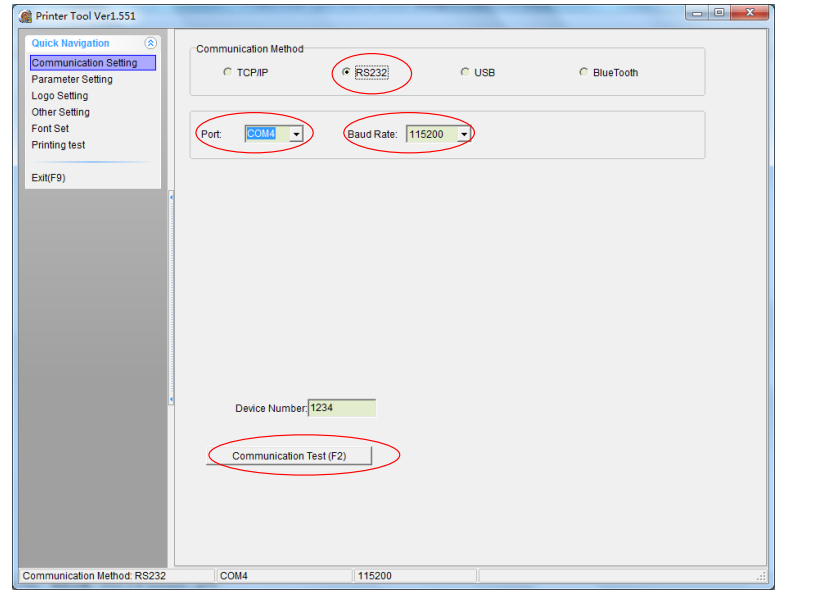
Ifyour printer is seria l printer, select RS232 as the following picture.
Note
- Port: Select the COM Port from the Port drop down list according to your communication port.
- Baud Rate: Select the baud rate from the drop down list according to the baud rat e of your printer
- Communication Test (F2) Refer to chapter 7 .1.1 in this manual
USB Printer
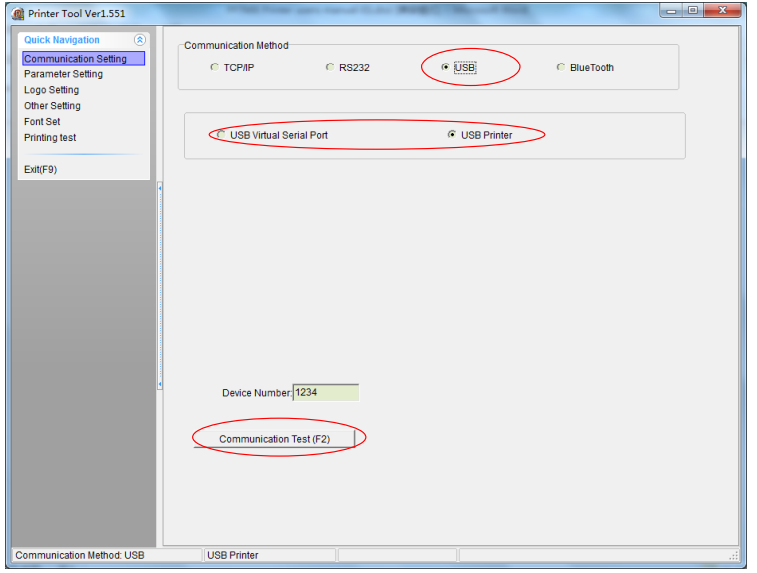
If your printer is a USB printer, select USB as shown in the following picture.
Note
- When the USB printer is equipped with a USB virtual serial port, select "USB Virtual Serial Port". Otherwise, select "USB Printer".
- Communication Test (F2): Refer to chapter 7.1.1 in this manual.
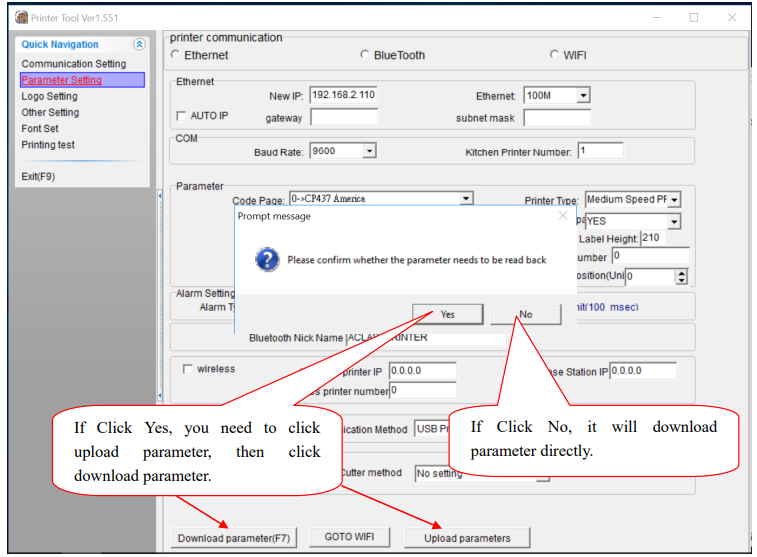
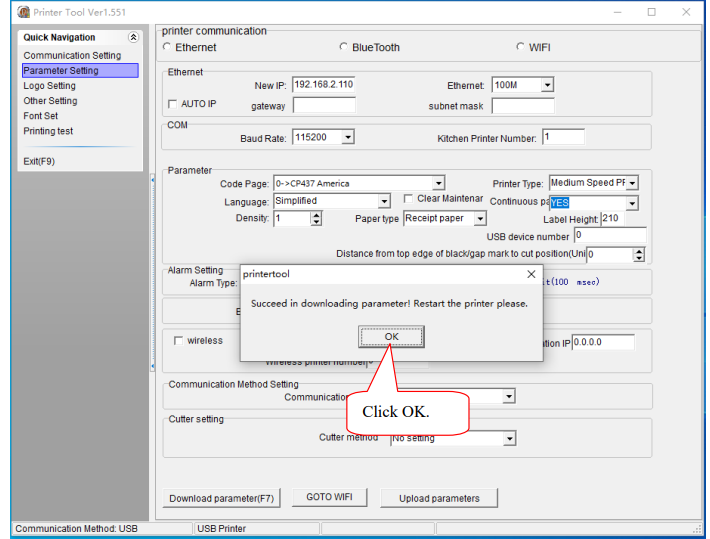
Parameter Setting
Click "Parameter Setting" in the Quick Navigation menu. The window is displayed as follows.
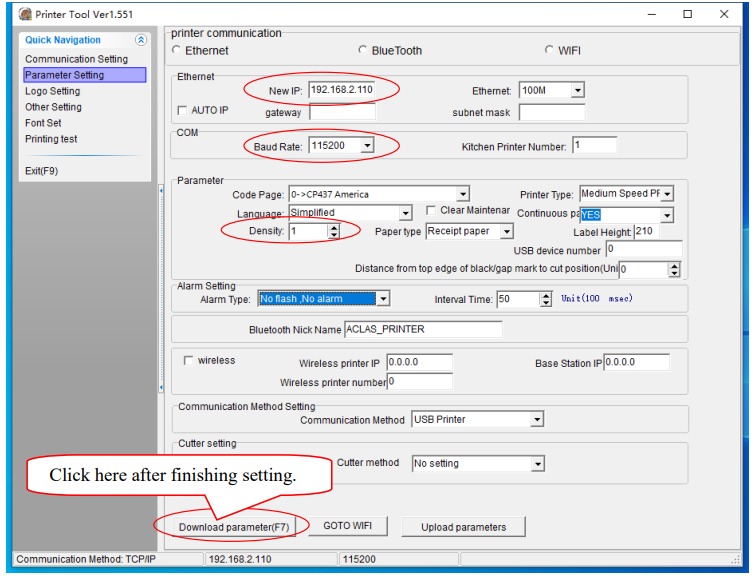
Note
- Input the new IP address according to the actual IP address.
- Choose the baud rate according to the actual need.
Density is used to adjust the printer density. It is usually set to 1.
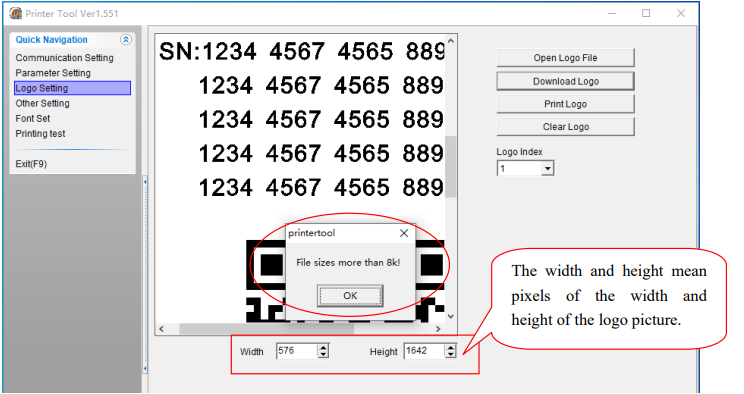
Logo Setting
If you want to set a logo, click "Logo Setting" in the Quick Navigation menu. The window is displayed as follows.
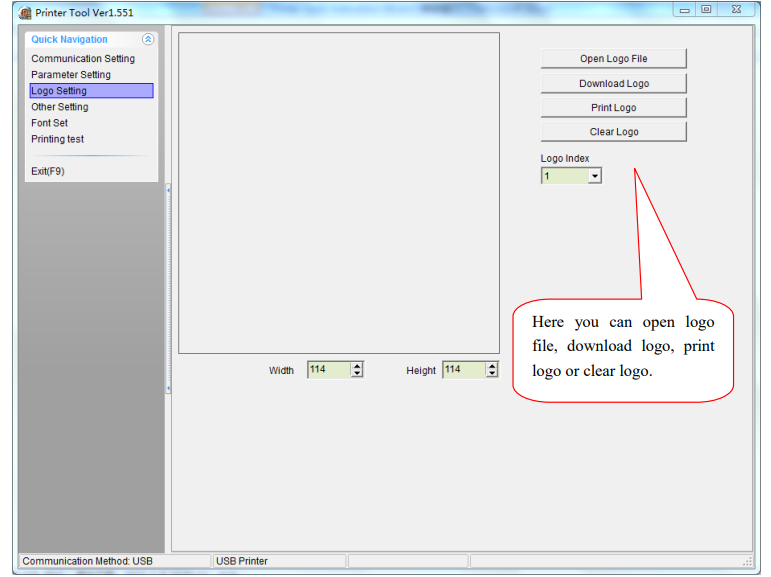
Note: The size of the logo file should be less than 8KB as shown in the following picture.
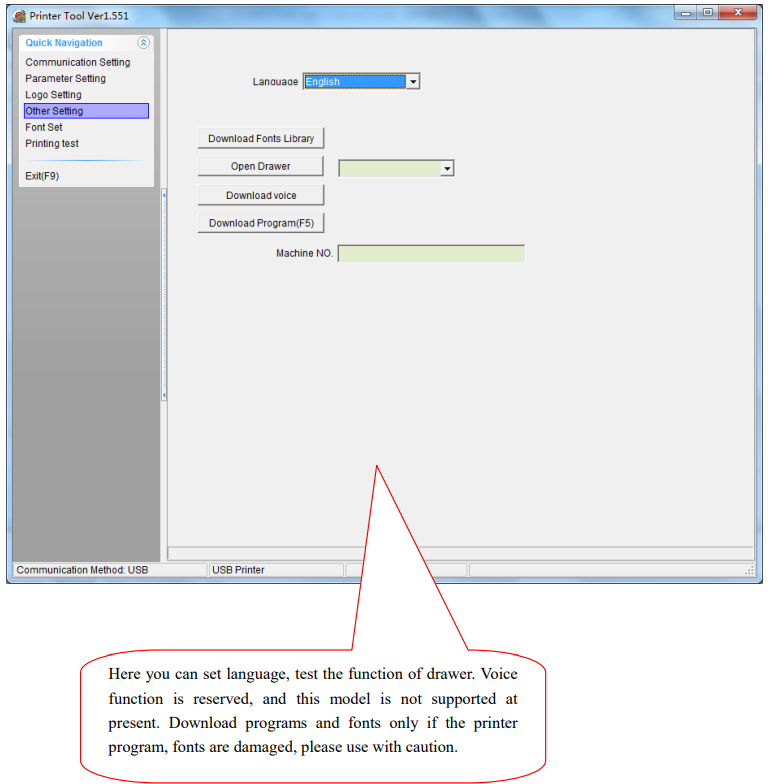
Other Setting
Click "Other Setting" in the Quick Navigation menu. The window is displayed as follows.
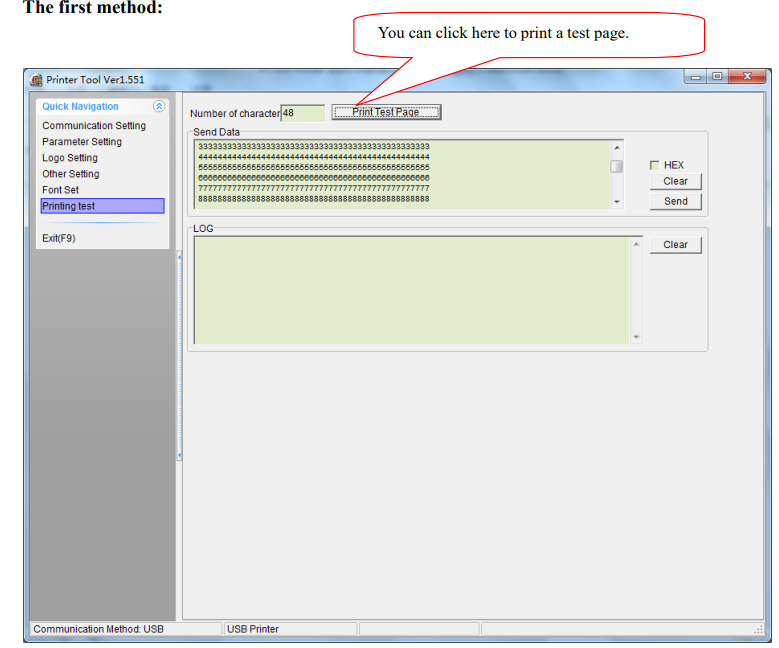
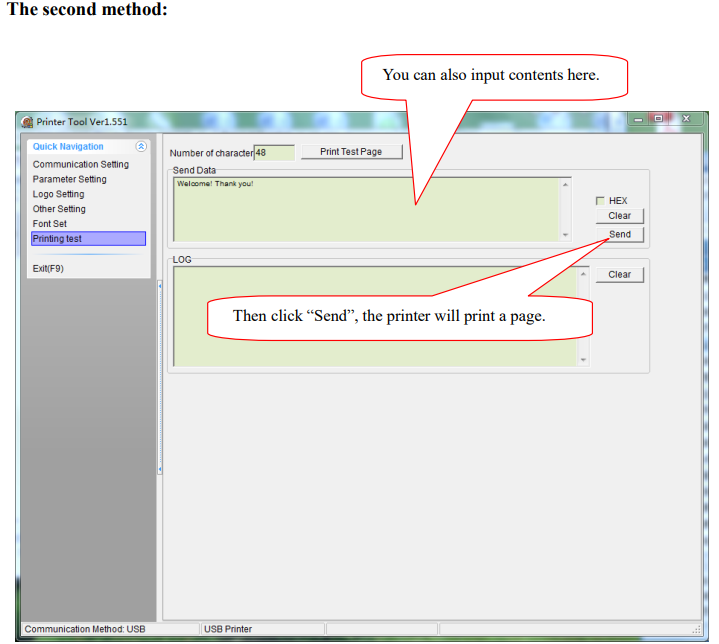
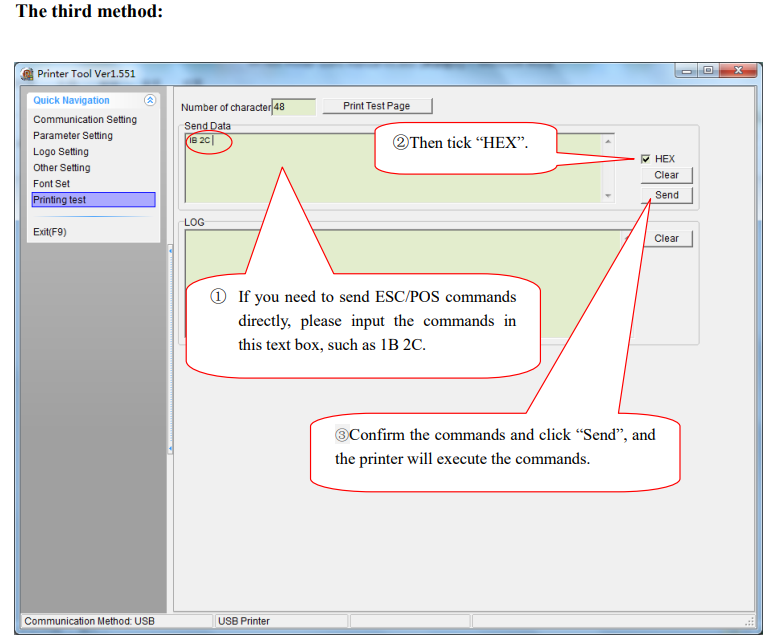
Printing Test
To test the printing effect, click "Printing Test" in the Quick Navigation menu. The window is displayed as follows.
There are three methods to test printing.
Printer Driver Installation Instruction
Note: You need to install this driver only if you do not know how to use the ESC commands.
This driver is suitable for Windows XP, Windows 7, Windows 8, and Windows 10.
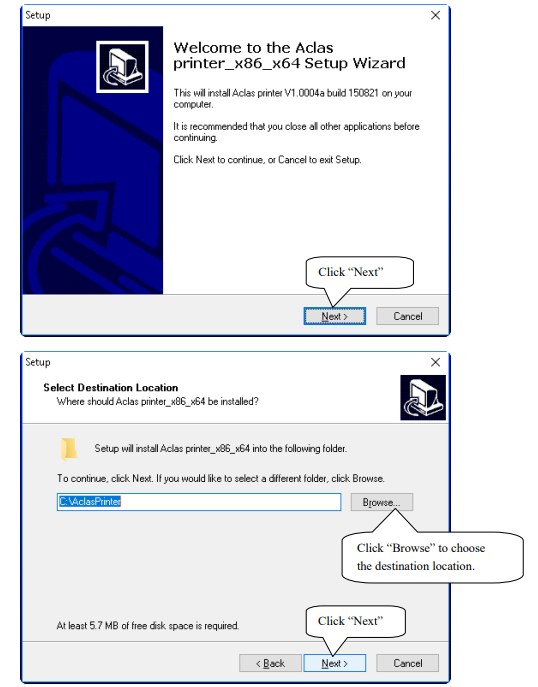
Printer Driver Installation
Connect the printer to the PC, and double-click the file "Aclas_printer_x86_x64.exe" to install the printer driver.
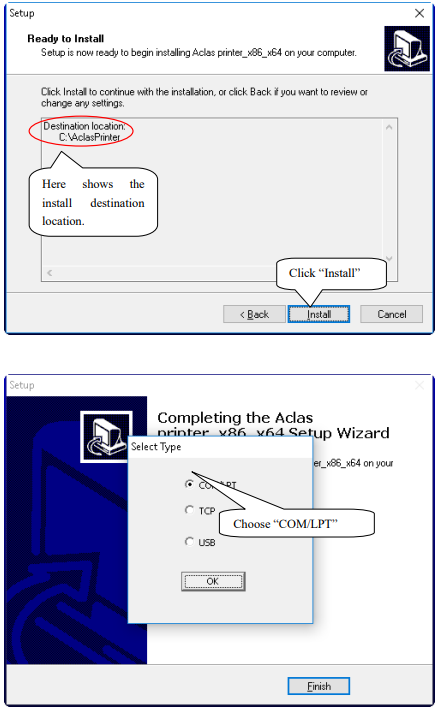
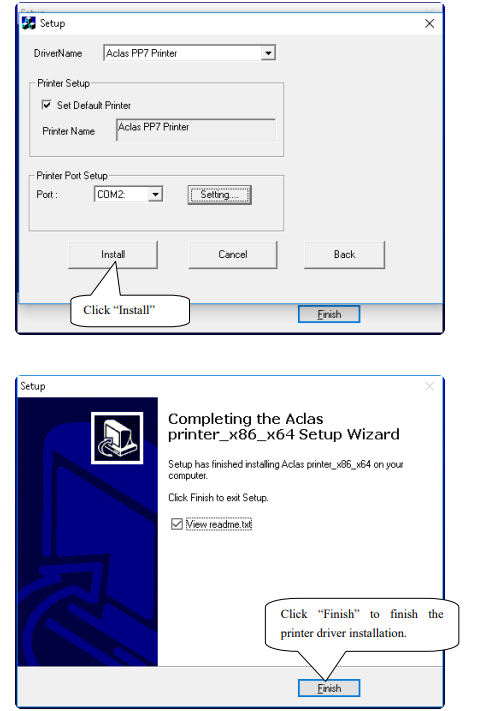
Note: After installing the printer driver, you can use the printer. If the printer does not work, refer to Chapter 8.2 to see the connecting port and ensure the connecting port you choose is correct and is not being used; then refer to Chapter 8.3 to configure the port.
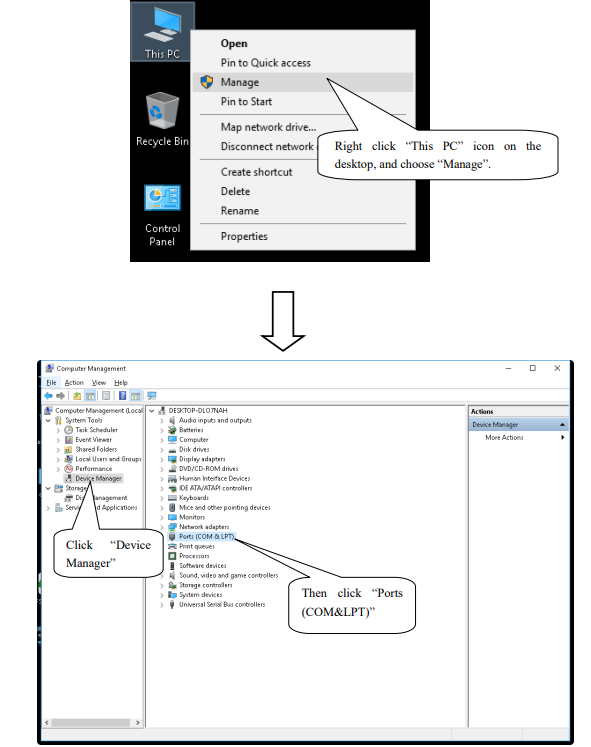
How to Know the Connect Port
Connect the printer to the computer, and follow the steps below to know which port is connected.
Serial printer connect port:

USB printer connect port:

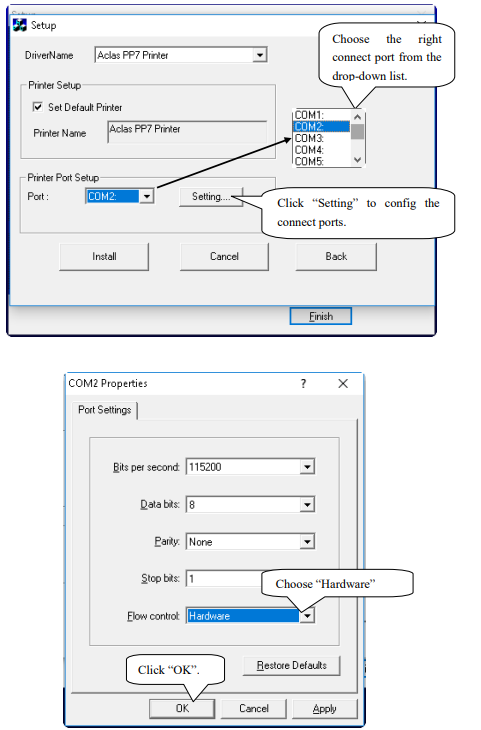
How to Configure Connect Port
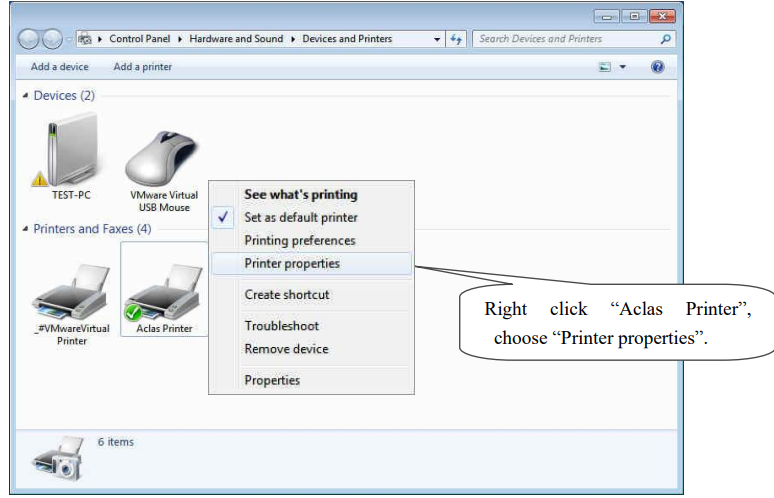
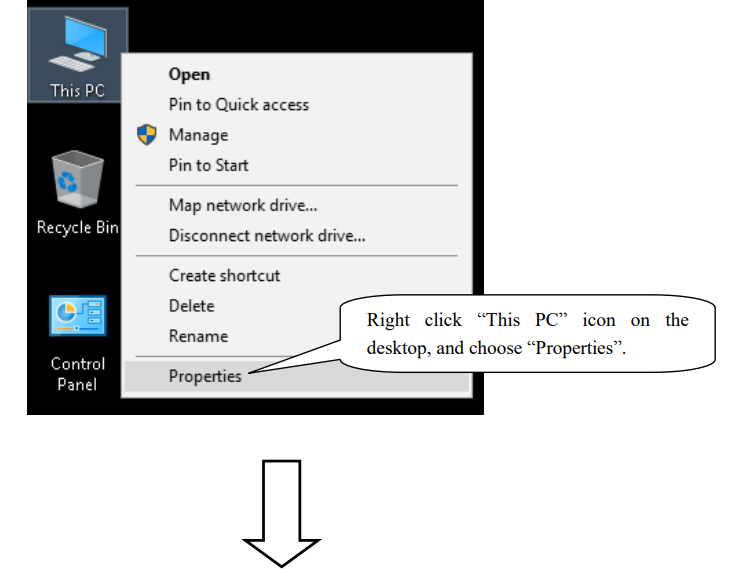
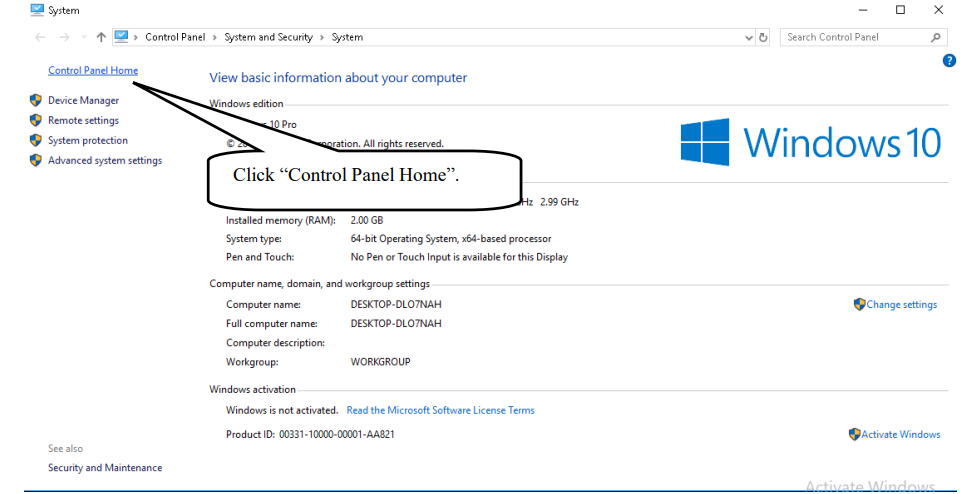
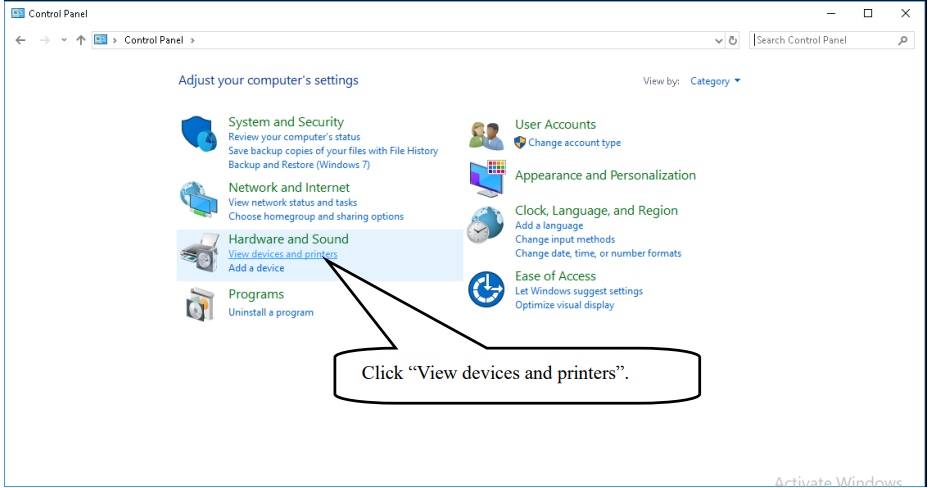
- Enter the Printer properties interface of the printer first to configure the port after knowing the connecting port. (The location of "Printer properties" varies slightly from system to system. No matter what system your PC has, the goal is to find the location of "Printer properties").
If your PC is installed with WIN7 system: Follow the steps below to enter the Printer properties interface.
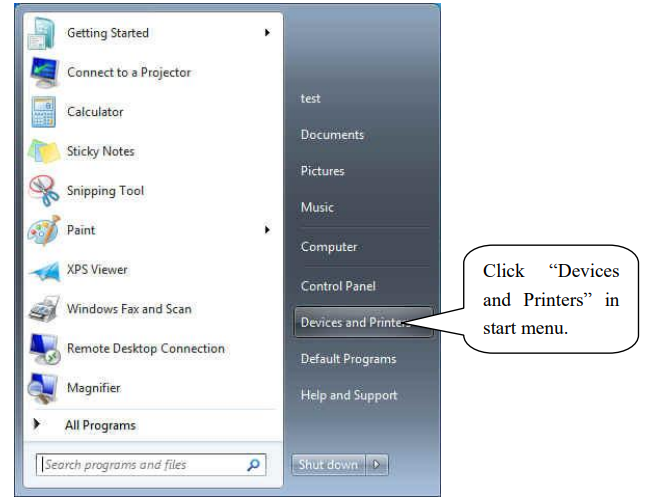
If your PC is installed with WIN10 system: Follow the steps below to enter the Printer properties interface.

Choose connecting port
Choose the connecting port known from Chapter 8.2. For example, if the connecting port of the printer known from Chapter 8.2 is COM2, you should choose COM2 in the following interface.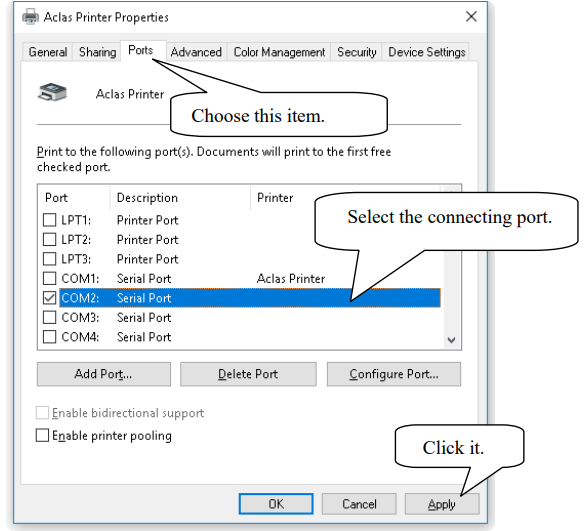
Configure the port.

Note: USB printers can skip this step and go to Step 4 directly.
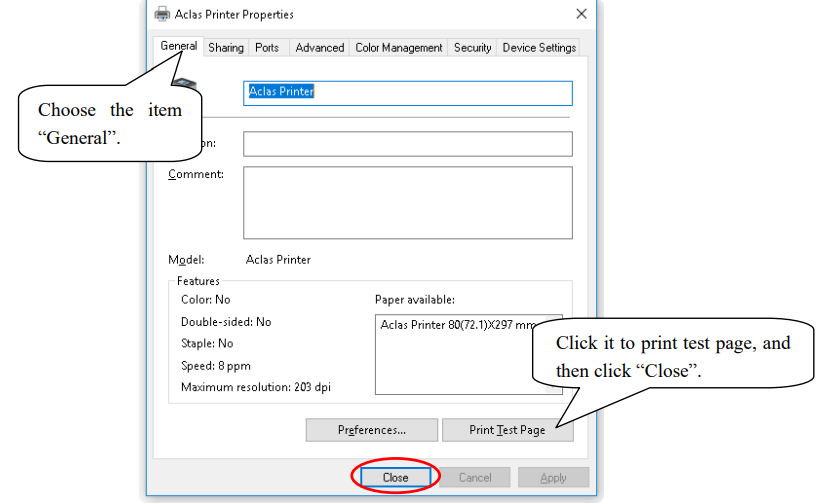
- Finish port configuration.
Setup Guide
Setting up the ACLAS Receipt Printer PP7MX is easy and straightforward. Follow these steps to get started:
- Install the driver for the printer on your POS system.
- Connect the printer to your POS system using the USB 2.0 or Serial interface.
- Load the paper roll into the printer by dropping it into the paper loading slot.
- Turn on the printer and wait for it to initialize.
- Test the printer by printing a receipt from your POS system.
SELF TEST
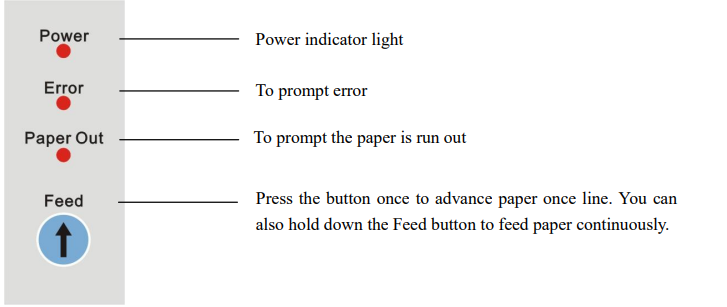
Press key Feed and hold it, and then power on the machine at the same time, it will print a piece of Test Page. T he information of this Test Page includes the printer s model, version , IP address (Ethernet port), ID etc
MAINTENANCE
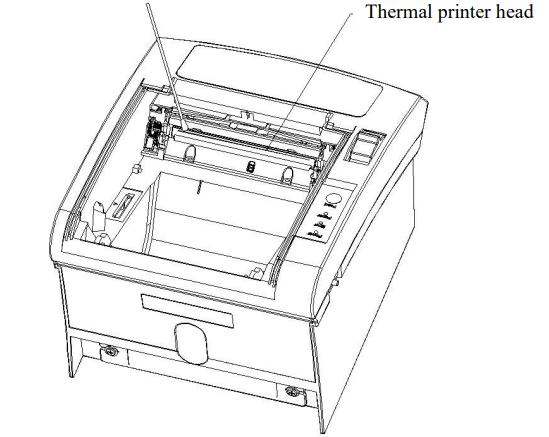
Paper dust inside the printer may lower the print quality. The thermal printer head is probably dirty if part of the letters is not printed distinctly. Follow these steps to clean the printer head:
Note
If the dust is not cleaned in time, it will lead to defective cooling. High-quality thermal paper can reduce the possibility of polluting the printer head, almost eliminating the need to clean it.
- Open the printer cover and remove any existing paper.
- Clean the printer head with a cotton swab moistened with alcohol solvent.
- Clean the platen roller and paper end sensor with a cotton swab moistened with water.
Insert a paper roll and close the printer cover.
Attention
- Do not touch the thermal printer head.
- The paper cutter will become blunt after a period of time. Please ask a maintenance technician to replace the paper cutter in time.
Safety Precautions
Before using this appliance, please follow the safety regulations below to prevent any hazards or material damage.
WARNING
- Connect the printer with a reliable grounded power receptacle. Do not plug large electronic machines into one multi-outlet, as this can provoke power fluctuation, overheating, or even a fire.
- Only use the supplied adapter.
- Do not keep the machine in a hot, wet, or polluted place.
- Do not plug in or unplug with wet hands.
- Do not pull the cable to unplug it. This can damage the cable, which can cause a fire or printer breakdown.
CAUTIONS
- Install the printer on a stable surface. If the printer falls, it may break and cause injury.
- If you notice strange smoke, odor, or noise from the printer, unplug it immediately and contact your dealer.
- Do not try to disassemble, repair, or remodel it yourself. Contact your dealer if you need these services.
- Do not let water or other foreign objects into the printer. If this happens, switch off and unplug the printer before contacting your dealer.
- Switch off the printer if you will not use it for a long time.
- Make sure the switch is off when plugging or unplugging the power.
- Do not use the printer when it is out of order. Switch off and unplug the printer before contacting your dealer.
- Keep this manual for future use.
TROUBLESHOOTING
- The printer is out of paper.
If the printer is out of paper, the “Paper out” indicator light will light up. In this case, the printer will stop printing. Install a new paper roll, and the printer will continue printing. - The printer could self-test but could not print.
Make sure the connection cable between the PC and the printer connects securely.
Make sure the connecting port of the printer is not being used. Otherwise, remove the port.
If the problem still exists, contact our after-sales service center. - Removing paper deviation
Press the paper feed key to feed paper, which will adjust the paper automatically; otherwise, turn off the power, open the paper cover, and reinstall the paper.
Note: Using high-quality thermal paper with standard width and smooth surface could avoid paper deviation. - The printed character is unclear.
Check that the thermal printer head is clean enough. Otherwise, refer to Chapter 5 to clean it.
Make sure the used paper meets the required specification.
Note: Using high-quality thermal paper with standard width and smooth surface could avoid this problem. If the problem still exists, contact our after-sales service center. - Some columns could not be printed.
Make sure the printer head is not stuck with dust. Otherwise, refer to Chapter 5 to clean it.
Make sure there is no paper jam. If there is, remove it. c. If the problem still exists, contact our after-sales service center. - Paper feeding unsteadily
Make sure the rubber platen is not stuck with foreign matter. If it is, clean it with a cotton swab moistened with water.
If the problem still exists, ensure the motor gear of the platen is not broken. If it is, contact our after-sales service center. - Removing a paper jam
Turn off the power.
Open the paper cover and remove the jammed paper.
Reinstall the paper correctly into the printer, and close the paper cover. Ensure the paper cover is closed securely (refer to Chapter 2).
Note: Using high-quality thermal paper with standard width and smooth surface could avoid paper jams. - Removing the cutter jam
Push down the cover lever about 8 times to open the printer cover.
Push down the cover lever 2 more times, which will reset the cutter to its normal position.
Note: Closing the upper cover securely could avoid cutter jams. If the problem still exists, contact our after-sales service center. - The temperature of the printer head is too high. Power off the printer, and then restart it after it cools down.
Sample of Test Page
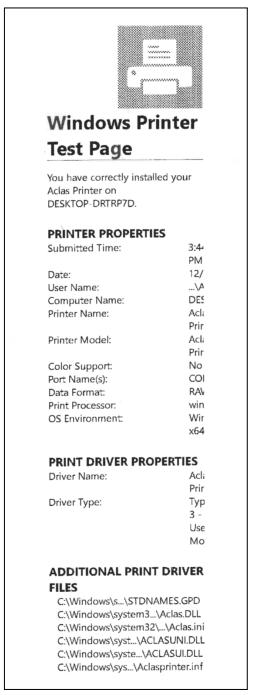
Note: The test page contains information about the computer name, printer name, and port name, etc. The printer can now be used.
Pros & Cons
Pros
- High printing speed of up to 250mm/second
- Clear print resolution of 203dpi
- Compatible with various POS systems
- Easy to set up and use
- Robust and durable design
Cons
- May be more expensive than some other receipt printers on the market
- Does not have a wireless connectivity option
Customer Reviews
Customers have praised the ACLAS Receipt Printer PP7MX for its fast printing speed, clear print quality, and ease of use. However, some customers have noted that the printer can be expensive and that it does not have a wireless connectivity option. Overall, the PP7MX has received positive reviews and is highly recommended for businesses that require a reliable and high-quality receipt printer.
Common Complaints
The most common complaints about the ACLAS Receipt Printer PP7MX are its high price and lack of wireless connectivity. Some customers have also noted that the printer can be loud and that the paper roll can sometimes jam.
Faqs
What kinds of papers can the ACLAS Receipt Printer PP7MX?
What is the PP7MX's widest print width?
What kinds of ports does the PP7MX have for connecting?
Do both Windows and Mac computers work with the ACLAS Receipt Printer PP7MX?
Can color be printed on the ACLAS?
How fast does the ACLAS PP7MX print?
Can barcodes be printed on the PP7MX?
How clear is the text on the ACLAS Receipt Printer PP7MX?
Does the PP7MX have a function that cuts itself?
How do I troubleshoot the ACLAS Receipt Printer PP7MX?
Leave a Comment