Acurite Atlas Indoor Display Sensor 06061 User Guide

Content
Introduction
The AcuRite Atlas Indoor Display Sensor 06061 is a sophisticated environmental monitoring device designed to provide real-time data on indoor and outdoor conditions. This touchscreen display connects wirelessly to outdoor sensors, offering insights into temperature, humidity, wind speed, and more. With features like customizable alerts and historical data logging, it enhances your ability to track weather changes. The cost of the AcuRite Atlas Indoor Display is approximately $99.99.
Package Contents
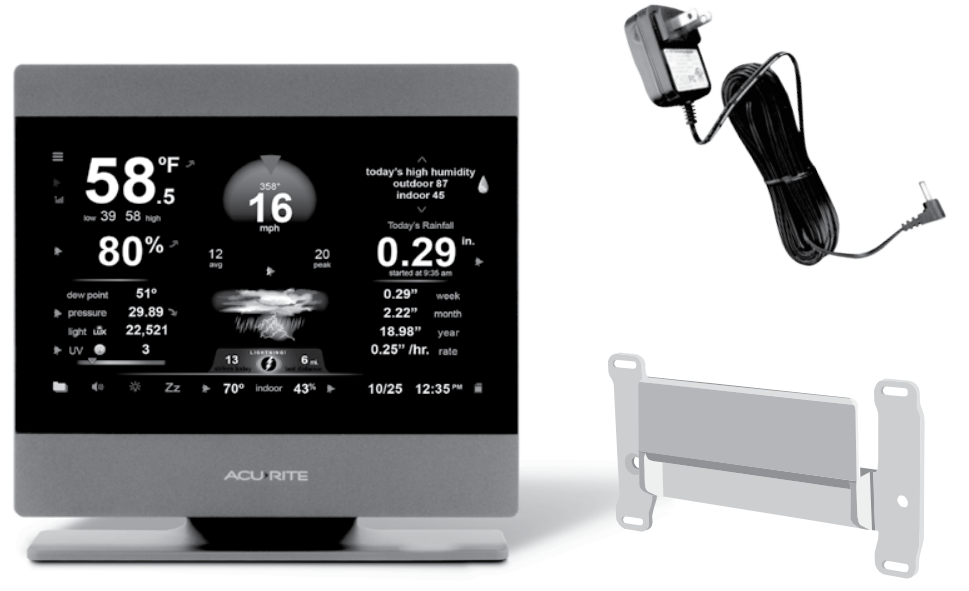
- AcuRite AtlasTM Indoor HD Display
- AC Power Adapter for Display
- Wall Mounting Bracket (optional)
Specifications for Indoor Display Sensors
- TEMPERATURE RANGE
Indoor: 32ºF to 122ºF; 0ºC to 50ºC - HUMIDITY RANGE
Indoor: 1-100% RH - BAROMETRIC PRESSURE
16 to 32.50 inHg
How It Works
AcuRite Atlas is an environmental monitoring station that delivers key information on current outdoor conditions in your exact location. The outdoor device contains sensors that read temperature, humidity, wind speed and direction, rainfall, UV, light intensity, and optionally lightning (requires optional Lightning Detection Sensor; may be purchased separately). These readings are transmitted over a 433 MHz wireless radio frequency (RF) to be received by the AcuRite Atlas indoor touchscreen display.
NOTE: To view your outdoor readings online from My AcuRite an AcuRite® AccessTM is required; may be purchased separately.
Description
The Acurite Atlas Indoor Display Sensor 06061 is engineered to deliver precise readings of indoor environmental conditions. Its compact design allows it to blend seamlessly into any home décor, while its user-friendly interface makes it easy to interpret data. The sensor communicates wirelessly with the Acurite Atlas weather station, providing real-time updates on temperature and humidity levels. This device is particularly useful for monitoring conditions in areas where temperature and humidity are critical, such as basements or attics.
How To Add An Outdoor Device
To view your AcuRite outdoor device readings from an indoor display, the device must be added to the display. Note: This procedure is also required to be completed if you are replacing an outdoor device.
- Verify the outdoor device is powered on.
- From the top-left section of the indoor display, select the Menu icon (
 )
) - Select Sensors.
Note: If you’re replacing an outdoor device, select Remove A Sensor and remove the batteries and power from the outdoor device that is being replaced. - Select Add A New Sensor. The indoor display searches for any outdoor devices in wireless range. This may take a couple of of minutes.
- Once the outdoor device has been located, select Add A Sensor. If more than one outdoor device has been detected, you may need to scroll up and down to select the appropriate device.

Features & Settings

Time And Date Settings
You can set the indoor display’s time and date settings, including the time zone, Daylight Saving Time, and the time and date format.\
How To Set Time and Date Formats
- From the top-left section, select the Menu icon ().
- Select Setup.
- From the time and date setting section, set the settings. Follow the on-screen instructions.
- Select Save.
Note: The selected hour determines whether the time is a.m. or p.m.
Unit Of Measurement Settings
You can set the unit of measurement displayed for barometric pressure, temperature, wind direction, wind speed, rainfall, and lightning distance.
How To Change Unit Of Measurement Settings
- From the top-left section, select the Menu icon ().
- Select Units.
- Select the unit setting(s).
- Select Save.
Display Appearance Settings
You can set the indoor display’s brightness, contrast,, and tint levels, backlight dimming and sleep mode, and how often the display rotates between the main screen and records.
How To Change Display Appearance Settings
- From the top-left section, select the Menu icon ().
- Select Display.
- Adjust the display settings:
- Adjust Display Set the display’s brightness, contrast, and tint levels.
- Display Mode Set how often the display rotates between the main screen and the records screen.
- Backlight Set the backlight, auto-dim, and sleep mode settings. 7
Charts & Monthly Records
The indoor display stores in its local memory the last 48 hours of readings that are displayed in charts and the monthly reading records.
- Charts Available for Indoor and Outdoor Temperature and Humidity, Barometric Pressure, Light Intensity, UV, Wind Speed, Lightning, and Rainfall.
- Monthly Reading Records Show high, low, and accumulation reading records by month.
How To View A 6 Or 48-Hour Reading Chart
- From the main screen, select a reading type.
- From the top section of the screen, select the last 48 hours or the last 6 hours.
How To View Monthly Reading Records
- From the top-left section, select the Menu icon ().
- Select Records > Calendar.
- To change the month displayed, use the left or right arrow to select a month.
How To Delete Today’s Records
You can delete the current day’s readings This feature is commonly accessed when inaccurate readings occur during the setup procedure or due to outdoor device mounting changes.
- From the top-left section, select the Menu icon ().
- Select Records.
- Select Clear Today’s Records. Today’s records for all reading types are permanently deleted.
Save Extended Historical Readings (Optional SD Card)
The indoor display stores the last 48 hours of readings in its local memory. If you want to save detailed historical readings, you can automatically log the readings on an SD Card (not supplied).
- The indoor display can use an SD Card with up to 32 GB of space.
- Readings are saved to the SD Card every 10 seconds.
- Calibrations made to readings on the indoor display will also be reflected in readings sent to the SD Card.
ALARMS
Alarms provide a quick and easy way to know when a condition you are monitoring has reached a certain threshold. When a condition set in an alarm is reached, the indoor display activates an alarm notification – including an audible alarm and a flashing alarm indicator on the display.
About The Alarm Features
- Alarms can be set for temperature, humidity, rainfall, wind speed, time, and forecasted storms.
- Set the audible alarm volume or set the volume to off.
- Set a single alarm or all alarms to be disabled for those times you do not want to be disturbed.
How To Set An Alarm
- From the top-left section, select the Menu icon ().
- Select Alarms.
- Select Indoor to configure alarms on readings taken by the display.
Select Outdoor to configure alarms on readings taken by the outdoor device. - Using the left and right arrows, select an alarm type > select Next.
- Set the condition that activates the alarm. When the condition is reached, an alarm notification is activated .
- Verify the alarm icon is set to ON.
- Select Save and Exit.

How To Adjust The Alarm Volume
- From the bottom-left of the display, locate the alarm volume
 icon.
icon. To adjust the alarm volume, press the alarm volume icon to the desired level.

To turn off the audible alarm, adjust the level until
 is displayed. When set to off, only the active alarm notification icon flashes as a visual notification that an alarm is active.
How To Silence An Active Alarm
- Push anywhere on the screen to clear the current notification. The alarm will trigger again the next time the parameter is reached.
Press the button twice to disable the alarm. The alarm press TWO TIMES to turn off the alarm will not trigger again unless it is turned back on in Alarm Settings.

How To Disable A Single Alarm
- From the top-left section, select the Menu icon ().
- Select Alarms.
- Select Indoor to configure alarms on readings taken by the display.
Select Outdoor to configure alarms on readings taken by the outdoor device. - Using the left and right arrows, select the reading type of the alarm to be disabled > select Next.
Select the alarm icon until it displays OFF.

How To Disable All Alarms
- Select Alarms.
- Select Indoor to configure alarms on readings taken by the display.
Select Outdoor to configure alarms on readings taken by the outdoor device. - Using the left and right arrows, select Turn All Alarms Off.
- Select Next. All alarms are disabled.
- Select Save and exit.
READING CALIBRATIONS
When placement or an environmental factor may impact temperature, humidity, or barometric pressure readings, setting a calibration adjustment can improve accuracy.
Note: Calibration adjustments are only applied to readings displayed on the indoor display and stored on the optional SD card. If your outdoor device readings are also sent to My AcuRite, the calibration adjustments set in the indoor display are not sent to My AcuRite or Weather Underground.
How To Set A Reading Calibration
- From the top-left section, select the Menu icon ().
- Select Calibrate.
- Select Indoor to adjust readings taken by the display.
Select Outdoor to adjust readings taken by the outdoor device. - Using the up and down arrows, select the reading type to be calibrated > select next.
- Using the up and down arrows, set an adjustment.
- To save the calibration adjustment, select Done.
Set Up Your Indoor Display
Plug-In
Plug in the power adapter. Once the display is powered on, it will help guide you through the next steps.
Lift Antenna
On the top of the display, lift the antenna for optimal signal reception.
Install Batteries
In the battery compartment of the AcuRite® AtlasTM outdoor device, install four AA alkaline or lithium batteries. Lithium batteries are recommended in low-temperature conditions, especially below -4oF / -20oC.
Note: Heavy-duty or rechargeable batteries are not recommended.
- Mount Outdoor
Device For more details on outdoor device setup and placement, see the outdoor device instruction manual.- Find a suitable place to mount the outdoor device:
- At least 5 feet (1.5 meters) off the ground
- Rear solar panel facing south OR
- Away from heat and humidity sources
- Level for accurate rain reporting
Remove the rain gauge stabilizer from the outdoor device.

- Find a suitable place to mount the outdoor device:
Set Up Display
Follow the on-screen prompts to set the time, date, and units of measurement.
Troubleshooting
If you encounter any issues with your Acurite Atlas Indoor Display Sensor 06061, here are some common problems and solutions:
- No Signal: Ensure the sensor is within range of the weather station. Check for obstructions and move the sensor closer if necessary.
- Inaccurate Readings: Verify that the sensor is placed in an area with stable temperature and humidity. Avoid placing it near heating vents or air conditioning units.
- Battery Issues: Replace batteries if they are low or expired.
Limited One (1) Year Warranty
AcuRite is a wholly owned subsidiary of Chaney Instrument Company. For purchases of AcuRite products, AcuRite provides the benefits and services set forth herein. For purchases of Chaney products, Chaney provides the benefits and services set forth herein. We warrant that the AcuRite Atlas Environmental Monitoring station premium product we manufacture and cover under this warranty is of good material and workmanship and, when properly installed and operated, will be free of defects for a period of one (1) year from the date of purchase.
The AcuRite Atlas Environmental Monitoring station which, under normal use and service, is proven to breach the warranty contained herein within ONE (1) YEAR from the date of sale will, upon examination by us, and at our sole option, be repaired or replaced by us.
Pros & Cons
Pros
- Accurate Readings: Provides precise temperature and humidity measurements.
- Ease of Use: Simple setup process and intuitive interface.
- Compact Design: Fits well in any room without being obtrusive.
- Wireless Connectivity: Seamless communication with the Acurite Atlas weather station.
Cons
- Battery Replacement: Requires periodic battery replacements which can be inconvenient for some users.
- Range Limitations: May experience signal loss if placed too far from the weather station.
- No Additional Features: Limited to basic temperature and humidity monitoring without additional features like barometric pressure readings.
Customer Reviews
Customers have generally been satisfied with the performance of the Acurite Atlas Indoor Display Sensor 06061. Many praise its accuracy and ease of use. However, some users have noted issues with battery life and signal strength. Here are some common complaints:
- Some users report occasional drops in signal strength which affect data reliability.
- A few customers mention that battery life could be longer, especially if using high-drain batteries.
Faqs
What's the purpose of the Acurite Atlas Indoor Display Sensor 06061?
For the Acurite Atlas Indoor Display Sensor 06061, how do I set it up?
Can I monitor what kinds of data with the Acurite Atlas 06061?
Are additional Acurite sensors and the Acurite Atlas 06061 compatible?
Acurite Atlas Indoor Display Sensor 06061: How precise is it?
What is the Acurite Atlas 06061's display range?
Is it possible to connect my tablet or smartphone to the Acurite Atlas 06061?
How is the Acurite Atlas Indoor Display Sensor 06061 calibrated?
Is there a guarantee for the Acurite Atlas 06061?
Leave a Comment