Aidapt Electric Exercise Bike VP159R Instruction Guide
Content
Introduction
Introducing the Aidapt Electric Exercise Bike VP159R, a revolutionary way to stay fit and active from the comfort of your own home. This electric exercise bike is designed with simplicity and practicality in mind, making it an ideal choice for people of all ages and fitness levels. The estimated price of the Aidapt Electric Exercise Bike VP159R is around $300 to $400, and it is now available for purchase in various online and offline stores.
TECHNICAL SPECIFICATION
- Power supply: 230 V ~
- Power consumption: 70 W
- Maximum Operating current: 0.3 A
- Average running cost: 1p/3 hours
Description
The Aidapt Electric Exercise Bike VP159R is a high-quality exercise bike that is perfect for people who want to stay active and healthy without leaving their homes. Its sturdy frame and adjustable seat make it a comfortable choice for users of all ages and fitness levels, while its quiet motor and adjustable resistance provide a smooth and challenging workout. The bike's LCD display makes it easy to track your progress, while its safety sensor adds an extra layer of protection for users of all ages.
Assembly Instructions
Take the unit out of the box and place it on the floor as shown in Figure 1. The assistance of a second person is advisable for the assembly work. Make sure that you have all of the pieces:
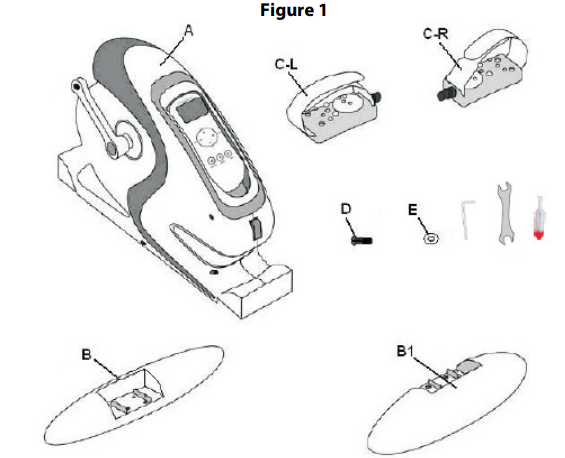
- A (Main Body)
- C-L (Left Pedal)
- C-R (Right Pedal)
- B (Stabiliser Bar)
- B1 (Rear Stabiliser Bar)
- D (Screw M-4x25)
- E (Grover Washer M-4)
- Pedal Combination Spanner
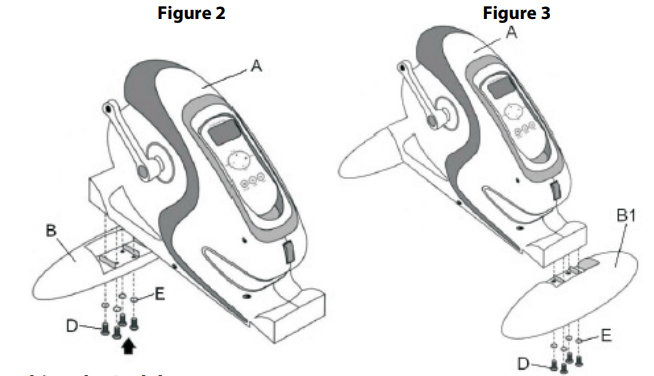
Fitting the Stabilisers
Take the stabiliser (B) marked with the letter (A) and place it at the front of the unit marked with the letter (A), as shown in Figure 2. Insert the M-4x25 screws (D). Take the rear stabiliser (B1) marked with the letter (B) and go through the same fitting procedure as with the front stabiliser. Refer to Figure 3.
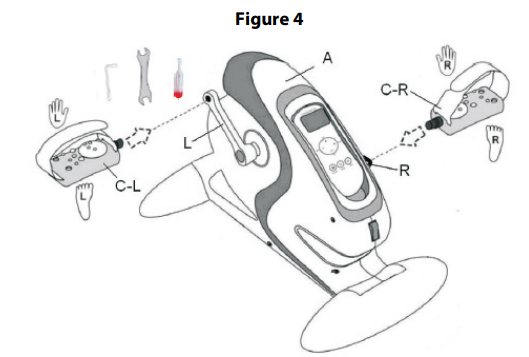
Attaching the Pedals
Right and left refer to the position that the user adopts when exercising. Insert the right-hand pedal (C-R), marked with the letter (R), onto the right-hand crank, also marked with an (R). Using the spanner provided, turn the bolt on the pedal in an anti-clockwise direction until the pedal is firmly in position. Check the pedal is secure before applying any weight. Insert the left-hand pedal (C-L), marked with the letter (L), onto the left-hand crank, also marked with an (L). See Figure 4. Using the spanner provided, turn the bolt on the pedal in an anti-clockwise direction until the pedal is firmly in position. Check the pedal is secure before applying any weight.
REMOTE CONTROL
Display Indicator
Speed, Time, Distance (Distance travelled km), Calories, Scan (random display).
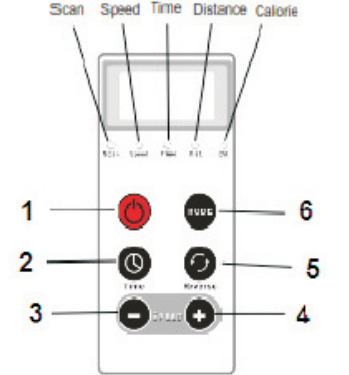
Power On/Off
- Time (Time selection button; 1-15 min)
- Decrease Speed (12 settings)
- Increase Speed (12 settings)
- Forward/Reverse (Pedal direction)
- Mode (Press to display speed, time, distance, or calories)
Note: For faster adjustment of Time or Speed press and hold the relevant button.
SWITCHING ON/OFF
- Plug the socket into the wall. Switch the red button below the remote control support to position I. To switch the machine on press (1) on the remote control.
- To switch the machine off press (1) on the remote control. Switch the red button below the remote control support to position 0 and then unplug the unit from the wall.
EXERCISES
Position 1: Seated (Lower Body)
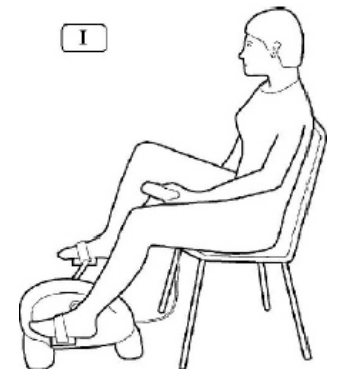
- Use a stable, sturdy chair.
- Place the unit at a comfortable distance from the chair to avoid overstretching your legs.
- Make sure that your lower back is supported; we recommend that you place a small cushion at the base of your back.
- Sit on the chair and place your feet on the pedals.
- Remove the Remote Control from the surround on the unit. Follow the instructions for switching the unit on/off and use of the Remote Control.
Position 2: Lying
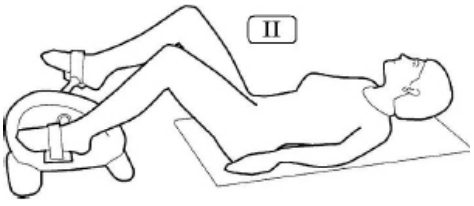
- When lying down place the unit at a comfortable distance to avoid overstretching your legs.
- Make sure that your lower back is supported; we recommend that you place a small cushion at the base of your back.
- Place your feet on the pedals.
- Remove the Remote Control from the surround on the unit. Follow the instructions for switching the unit on/off and use of the Remote Control.
- When you finish the session, continue lying in the same position for a few moments and then get up slowly.
Position 3: Seated (Upper Body)
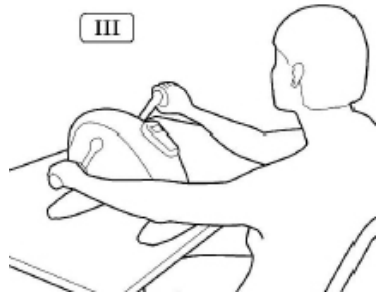
- Use a raised, fixed surface such as a table so that the unit is at chest height with the Remote Control area facing you and sit on a stable chair.
- Place the unit at a comfortable distance to avoid overstretching your arms.
- Follow the steps for Position 1 to begin the session.
CLEANING
Switch off and unplug the unit, then clean using a non-abrasive cleaner or mild detergent with a soft cloth. Abrasive cleaners and/or abrasive cleaning pads may seriously damage the product beyond repair and should not be used. Always ensure that you wipe dry the equipment after cleaning.
CARE & MAINTENANCE
Please make a safety check of the product at regular intervals or if you have any concerns. Pay particular attention to fastening elements and tighten if necessary. If in doubt about the safety of the unit, do not use it. Please contact your supplier in the first instance for Technical Assistance and if you require spare parts to replace worn components.
PAT TESTING
When used in a workplace, this product must be safety-tested yearly by a qualified electrician (PAT Tested) in order to comply with the Electricity at Work Regulations. We recommend that it is PAT tested regularly when used in a domestic environment.
GENERAL SAFETY REQUIREMENTS
Domestic wiring must be tested periodically by a qualified electrician at least once every 10 years or at every change of occupancy. For office and retail premises, and buildings such as village halls, the wiring must be inspected at least once every 5 years. It is recommended that all buildings be fitted with smoke alarms (it is mandatory for new buildings). If the mains lead is damaged, it must be replaced by the manufacturer or an authorized service center. If the mains plug needs to be replaced, proceed as follows:
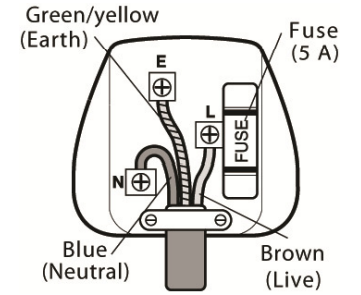
- Connect the brown wire to the terminal labelled "L".
- Connect the blue wire to the terminal labelled "N".
- Connect the green/yellow to the terminal labelled with the earth symbol or "E".
- Make sure that the cord-grip is positioned correctly (over the outer sheath of the cable) and it is fully tightened.
- If the plug is fitted with a 13 A fuse, replace it with a 5 A fuse.
IMPORTANT INFORMATION
The information given in this instruction booklet must not be taken as forming part of or establishing any contractual or other commitment by Aidapt Bathrooms Limited, Aidapt (Wales) Ltd or its agents or its subsidiaries and no warranty or representation concerning the information is given. Please exercise common sense and do not take any unnecessary risks when using this product; as the user, you must accept liability for safety when using the product. Please do not hesitate to contact the person who issued this product to you or the manufacturer (detailed below) if you have any queries concerning the assembly/use of your product.
Setup Guide
Setting up the Aidapt Electric Exercise Bike VP159R is a breeze. Simply follow these steps to assemble and configure your new bike:
- Unpack the bike and lay out all the components.
- Attach the stabilizer bars to the bottom of the frame.
- Install the seat post and adjust the seat to your preferred height.
- Attach the pedals to the crank arms.
- Plug in the power cord and turn on the bike.
- Adjust the resistance level to your preference.
- Start pedaling and enjoy your workout!
Before Use
- Carefully remove all packaging. Avoid using any knives or other sharp instruments as this may damage the surface of the product.
- Check the product and its mains lead for any signs of damage. If you see any damage do not use and contact your supplier for support.
Intended Use
The mini cycle exerciser from Aidapt can help to improve circulation and muscle strength and is ideal for those who need to exercise from the comfort of their own homes. It can be used to exercise your legs seated or lying down, or on a table for arm exercises.
Product Safety
Carefully read through the instructions contained in this manual. It provides you with important information about safety, use, and maintenance of the appliance.
- Make sure that the mains supply Voltage is suitable for the machine before plugging it in (230V). The holes in the wall socket must match the pin configuration for the plug on the machine. If this is not the case, please contact your supplier.
- This unit has been designed for indoor and home use only.
- Do not leave the unit unattended when it is plugged in. Unplug it from the wall socket after each exercise session.
- Place the appliance on a firm flat stable surface with at least 0.5 meters free to the sides and rear of the unit before use.
- Periodically check this product and its mains lead for any signs of damage and wear. If you see any signs of damage stop using this product immediately and contact your supplier.
- There are no user-serviceable parts in this product.
- Do not use in bathrooms, or in wet or damp locations.
- To unplug the mains lead, first switch to the “0” position and then unplug from the wall socket.
- Always seek medical professional advice before undertaking a new form of exercise or starting an exercise program.
- If you feel any pain or discomfort, do not use the machine if you feel unwell or movements are uncomfortable.
- Always use the appliance with an adequate Warm Up before and Cool Down after exercising.
- Wear suitable clothing and footwear.
- Do not touch or insert any objects into the moving parts while the machine is in use.
- This appliance can be used by children aged from 8 years and above and persons with reduced physical, sensory, or mental capabilities or lack of experience and knowledge if they have been given supervision or instruction concerning the use of the appliance in a safe way and understand the hazards involved.
- Children shall not play with the appliance.
- Cleaning and user maintenance shall not be made by children without supervision.
- Do not place the mains lead beneath a carpet or rug.
- Ensure that the cable does not come into contact with the pedals while in use.
Troubleshooting
Here are some common problems and solutions that may arise when using the Aidapt Electric Exercise Bike VP159R:
- Problem: The bike is not turning on.
- Solution: Check that the power cord is properly plugged in and that the outlet is working.
- Problem: The bike is making strange noises.
- Solution: Check that all the components are properly tightened and that the bike is on a level surface.
- Problem: The resistance is too high or too low.
- Solution: Adjust the resistance level using the buttons on the LCD display.
Pros & Cons
Pros
- Sturdy and durable frame
- Adjustable seat and resistance levels
- LCD display that tracks essential workout information
- Quiet and efficient motor
- Safety sensor for added protection
Cons
- May be too expensive for some users
- Limited features compared to higher-end exercise bikes
Customer Reviews about Aidapt Electric Exercise Bike VP159R
Customers who have purchased the Aidapt Electric Exercise Bike VP159R have praised its sturdy frame, adjustable seat, and quiet motor. Some have noted that the bike is easy to assemble and provides a smooth and comfortable ride. However, some users have complained that the bike is too expensive for its limited features and that the resistance levels could be more challenging.
Faqs
What are the key features of the Aidapt Electric Exercise Bike VP159R?
How do I assemble the Aidapt Electric Exercise Bike VP159R?
What is the maximum weight capacity of the Aidapt Electric Exercise Bike VP159R?
How do I maintain the Aidapt Electric Exercise Bike VP159R for optimal performance?
Is the Aidapt Electric Exercise Bike VP159R adjustable for different user heights?
How do I adjust the resistance on the Aidapt Electric Exercise Bike VP159R?
What type of display does the Aidapt Electric Exercise Bike VP159R have?
How do I maintain the Aidapt Electric Exercise Bike VP159R?
What type of power source does the Aidapt Electric Exercise Bike VP159R use?
What is the warranty period for the Aidapt Electric Exercise Bike VP159R?
Leave a Comment