How to Control : Amcrest Skyview Drone A4-W User Manual
Content

Introducing the Amcrest Skyview Drone A4-W
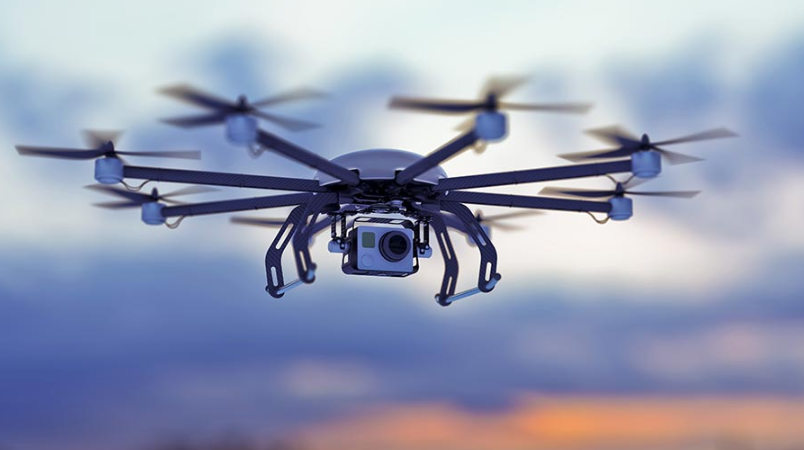
The Amcrest Skyview Drone A4-W is a powerhouse of aerial capabilities, designed to captivate your imagination and elevate your photography game. With an estimated price range of $200 to $300 and a projected launch date in mid-2023, this drone is perfect for hobbyists and professionals alike. Its sleek design, intuitive controls, and impressive features are sure to make it a must-have gadget for anyone looking to explore the skies.
Amcrest Detailed Specifications
The Amcrest Skyview Drone A4-W boasts an array of impressive specifications:
- Dimensions: 12.9 x 12.9 x 2.8 inches
- Weight: 1.1 pounds
- Flight time: Up to 25 minutes
- Charging time: Approximately 120 minutes
- Max speed: 17.9 mph (28.8 km/h)
- Transmission range: 328 ft (100 m)
- Camera resolution: 1080p HD
- GPS-enabled: Yes
- Obstacle avoidance: Yes
- Return-to-home function: Yes
- Flight Time: 7 minutes
- Charge Time: 90 minutes
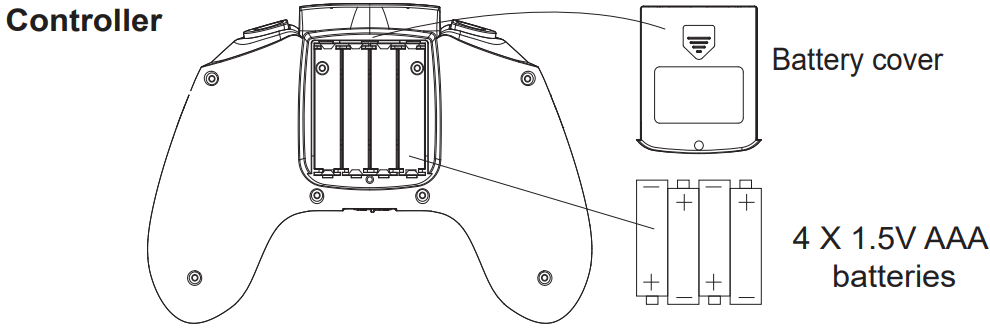
- Battery requirements for transmitter: 4 X 1.5V “AAA” size batteries (not included)
Safety Precautions
- Do not leave the battery near a direct heat source such as fire or space heaters.
- Do not strike or throw the battery against any hard surface.
- Do not immerse the battery in water. Always store the battery in a cool dry place.
- When recharging the device, only use the battery charger intended for this product.
- Do not allow the battery to set on the charger for over 90 minutes.
- Do not operate your drone without a fully charged battery.
- Do not directly solder the battery to the device or pierce it with a nail or other sharp object.
- Do not transport or store the battery together with other metal objects.
- Never leave a charging battery unattended.
- Please read through the manual before using.
- To avoid a choking hazard, keep all small parts out of reach of small children.
- Never leave the drone unattended during battery charging.
- Never throw any batteries in a fire.
- Never fly the drone near other people.
- Keep all body parts away from the drone while the rotor blades are spinning.
- Never try to repair circuitry. No serviceable circuitry are located inside the drone or transmitter.
- To avoid a choking hazard, keep all deteach able parts out of reach of small children.
- The drone is very powerful when taking off. Make sure to move the throttle forward gradually to avoid it rising too quickly.
- After initial flight, turn off the drone first before you turn off the controller.
- Do not put the battery in high temperature or near extreme heat source.
- To avoid injury or damage, the drone should be flown 2 meters / 7 feet from people or other obstacles.
- Children should only fly the drone under adult supervision. Always keep the drone in clear sight while operating.
- Always make sure to turn off the power of the controller and drone when not in use.
Battery Protection of Amcrest Skyview Drone
The drone is equipped with low-voltage protection. When the batteries for the drone are low, the internal programmed control system will automatically stop electrical supply to the drone’s rotors. When the batteries are low, bring the drone to an area where you can begin charging the battery. Allow the battery to charge fully before flying the device again.
Battery Installation & Charging
- To install the batteries: Open the cover of battery case, insert 4 X 1.5V AAA batteries, according to indicated polarity (batteries not included). Battery installation should be done under adult supervision only!
- Do not mix old and new batteries.
- Do not mix different types of batteries.
Charging
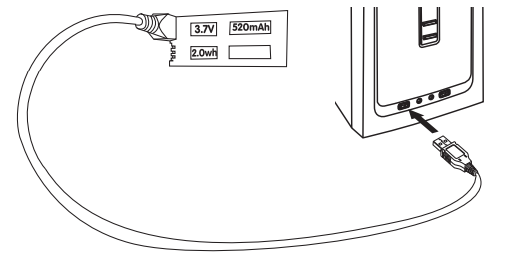
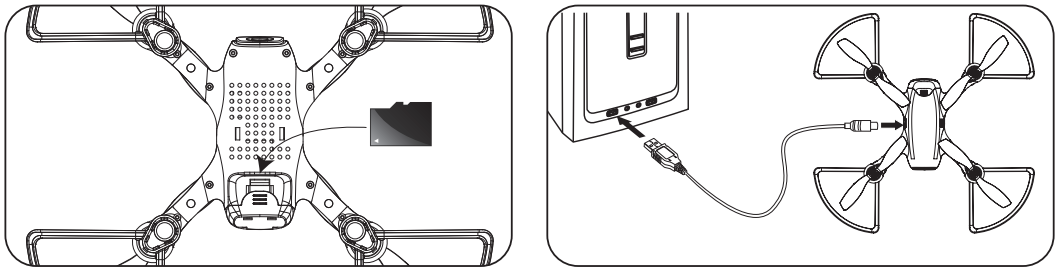
Remove the battery from the drone and insert one side of the USB connector into the battery, and the other side into any computer USB port. Allow the battery to charge fully before operation. A fully charged battery will provide about 7 minutes of flight time per charge. When the green light on the battery disappears, the battery will be fully charged and ready for use. Charging a battery should take no longer than 90 minutes.
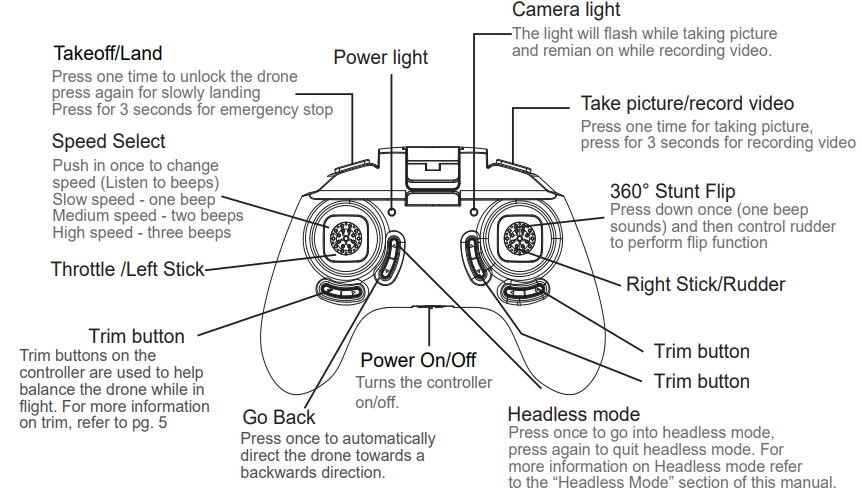
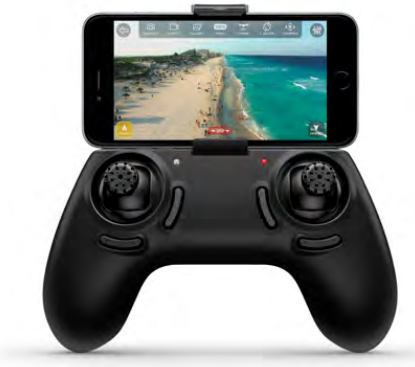
Drone A4-W Controller
Note: There are two ways you can operate the drone, one with the included controller and one via the Amcrest Sky View app. For more information on how to setup your drone on the Amcrest Skyview app.
Drone
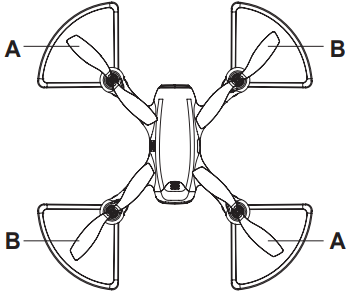
The drone will come with a set of 4 replacement rotor blades. These rotor blades will be denoted by two different types; (A) type and (B) type rotors. You will see the “A” and “B” letters on the canopy of the unit. When replacing the blades of the device be sure to replace the new blades into the rotors on the motor according to their specific rotor types.
Amcrest Skyview Drone Quick Flight
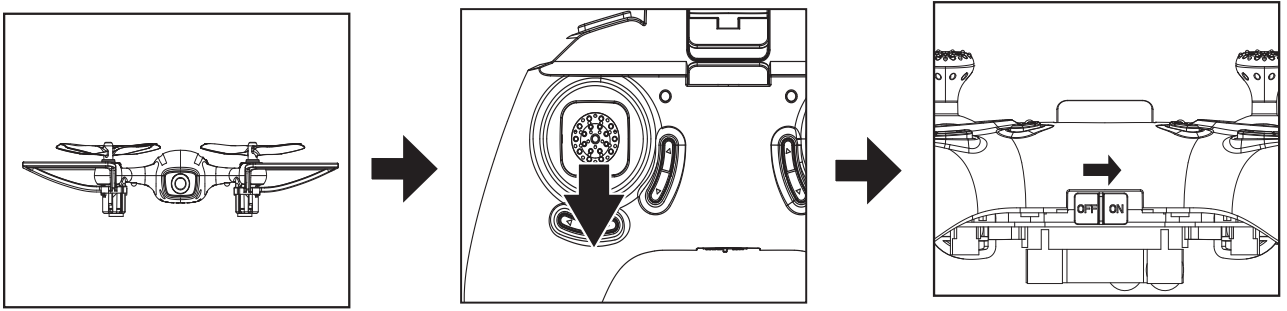
- Place the drone onto a level surface.
- Hold the left stick/throttle down on the controller. Continue holding until the end of step 3.
- Turn on the controller. The power button is on the bottom of the controller. Release the left stick/throttle.
Turn on the drone. The power button is on the side of the drone. Once the drone is turned on the LED lights will begin to flash indicating the drone is ready to be paired to the controller.
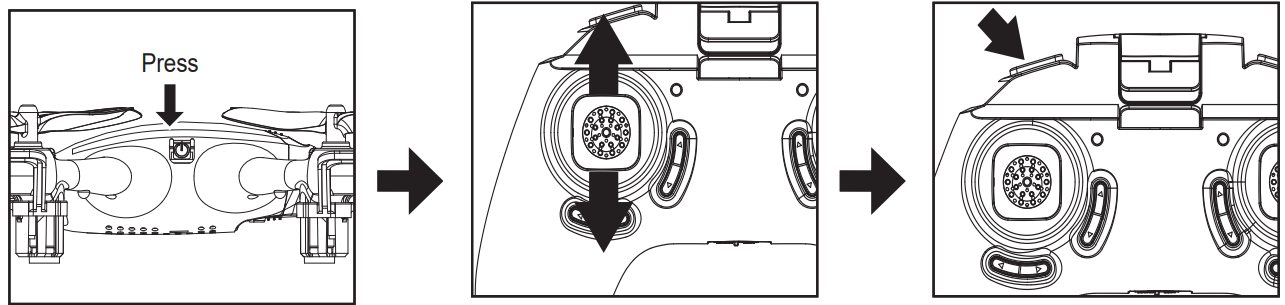
- To pair the drone, move the left stick/throttle up and down. If successful, the LED lights on the drone will stop flashing and stay solid. If unsuccessful, turn off each device and restart from step 2.
After the drone is paired to the controller, press the takeoff/land button on the top left of the controller to start the motor.
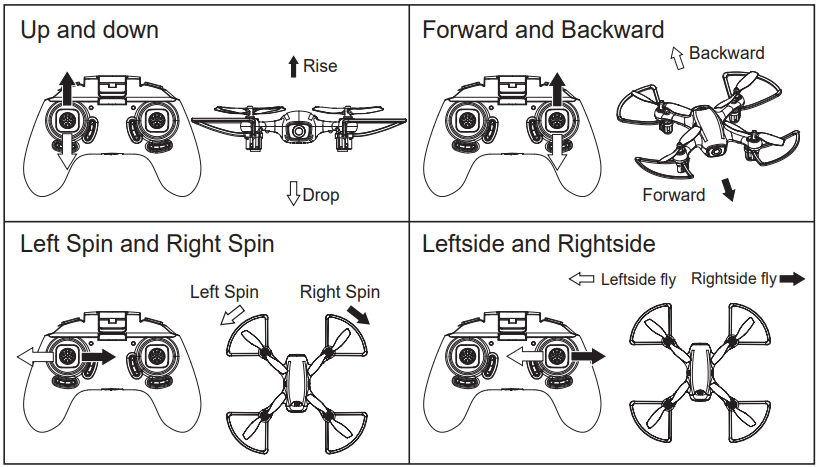
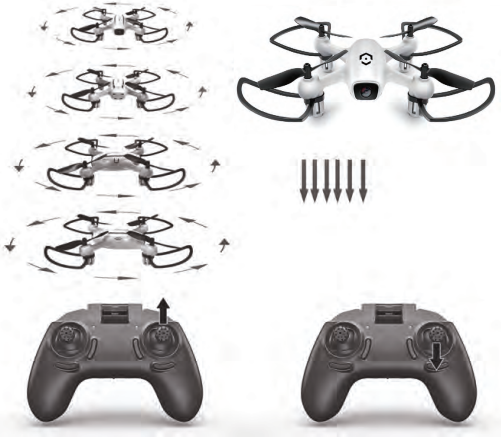
- To launch, move the left stick/throttle up.
- To land, press the takeoff/land button.
WARNING: The red LED lights indicate the front of the drone, the green LEDs lights indicate the rear of the drone.
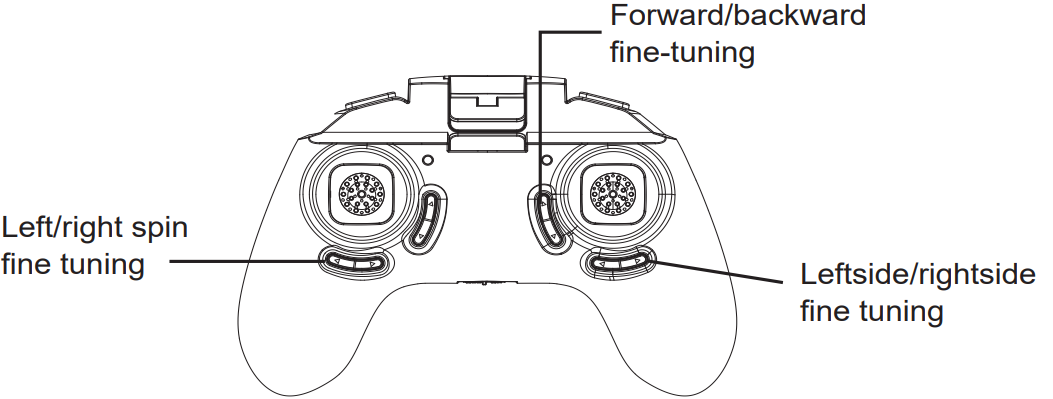
Operation and Control
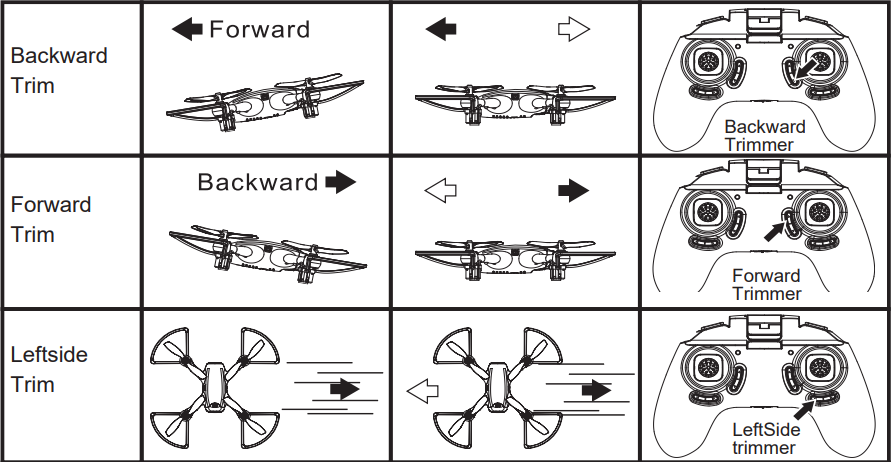
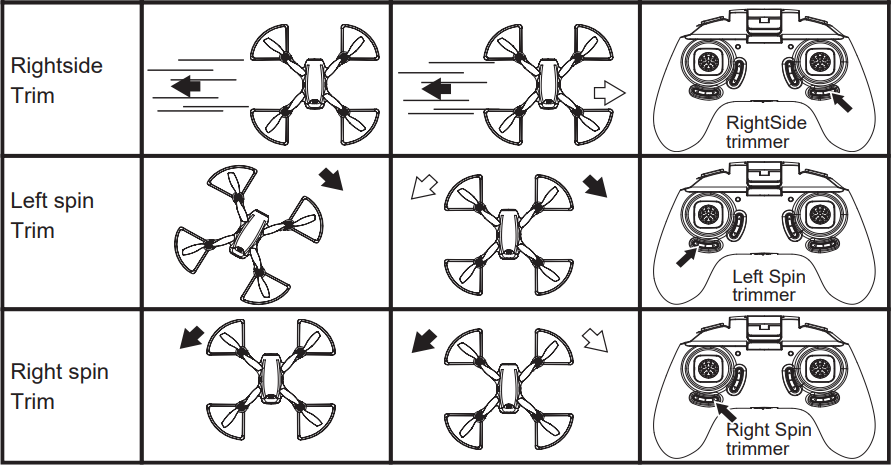
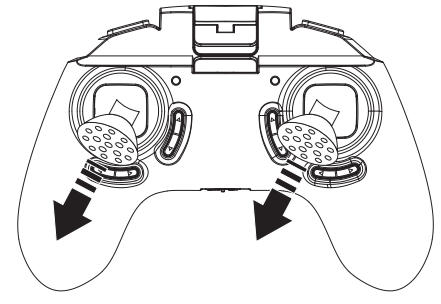
Trim Fine Tuning
Radical Flips & Rolls Drone A4-W
You can perform flips and rolls with your drone in any speed setting. To perform a flip or roll with your drone push in on the right stick/rudder. You will hear a click and a beep will sound. Move the right stick/rudder in the direction you want to flip or roll.
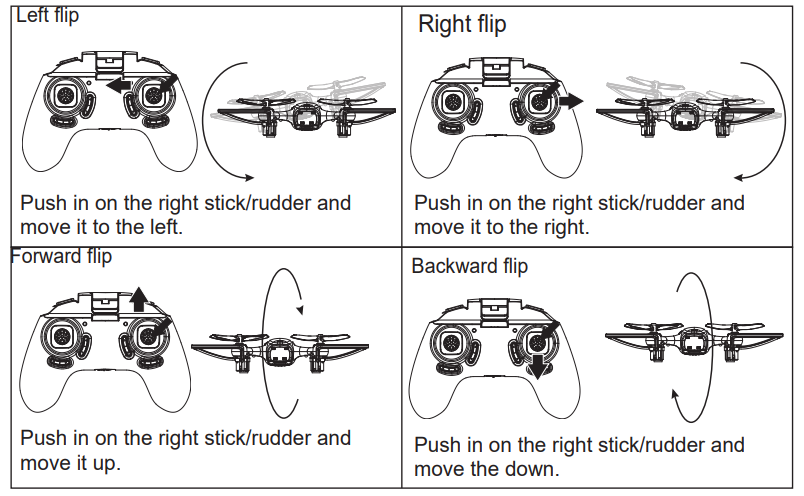
WARNING: Before you perform a flip or roll on your drone, make sure you have enough space to prevent damage or injury to others.
Auto Calibration
To enable this function, turn on the drone and the controller. Press the throttle and rudder sticks both to a 45° angle as shown in the image to the right. Hold this position for 10 seconds and a light will flash on the drone. Release the throttle and rudder. The lights on the drone will remain on until the calibration process is complete.
Go Back Function
While in flight, locate the Go Back button on your controller and press the button once to initiate. Once initiated, the drone will automatically be directed towards a backwards direction. To control the drone up and down when using the Go Back function, use the Left Stick/Throttle. To cancel this function, move the Right Stick/Rudder in any direction.
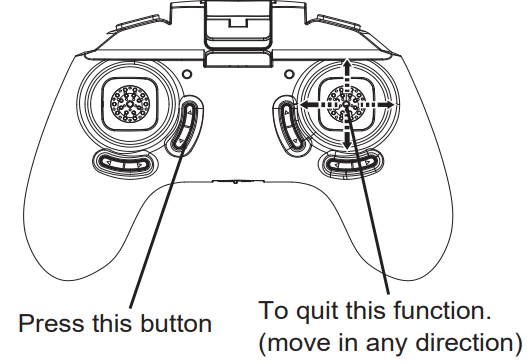
WARNING: This is not a GPS drone. This feature will not return or land in its original location when pressed. Keep your eyes on the drone when using this feature.
Description
The Amcrest Skyview Drone A4-W is a feature-rich, user-friendly drone that caters to both beginners and seasoned pilots. Its compact and lightweight design allows for easy transportation, while the 1080p HD camera captures stunning images and videos. The drone's intelligent flight modes, such as follow-me, orbit, and waypoints, make it an ideal choice for capturing dynamic footage. Additionally, the built-in GPS and obstacle avoidance systems ensure safe and stable flights, while the return-to-home function guarantees that your drone always returns to its starting point.
Headless Mode of Amcrest Skyview Drone
Headless mode is used to align the drone’s movements to be relative to the controller no matter which way the drone is facing.
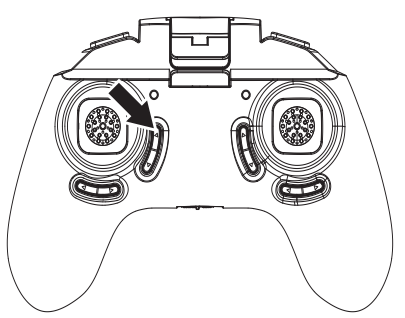
HOW TO GET ENABLE/DISABLE HEADLESS MODE?
Press the button on controller(as shown in Figure A on the right) when pressed you will hear a beep sound indicating the drone is in headless mode. To quit headless mode, press it again and you will hear another beep sound indicating that headless mode has been disabled.
HOW TO RECOGNIZE THE " FORWARD SIDE" UNDER HEADLESS MODE?
Left When the drone initially takes off and the LED lights on the device stop flashing the drone will have its front side to the front direction of the controller. The red LEDs on the drone indicate the front/forward side, the green LEDs indicate the rear of the drone. If you want to reset the orientation of headless mode, you need to turn off the device and auto calibrate it.
Amcrest Camera Drone A4-W
Normal camera
The drone comes equipped with a built-in 720p (1280*720) camera which can be used to record data during flight. This camera is located on the front side of the drone. To store data retained during flight, the drone also has a built-in microSD card slot which can support up to a 32GB microSD card. All data retained by the device will be stored via a microSD card and can be viewed via a mobile device or computer.
HOW TO REVIEWING PHOTOS/VIDEOS ON A COMPUTER
- Insert the microSD card into device.
Note: The drone is not compatible with microSD cards above 32GB To review photos and videos, please insert one end of the data cable into the USB port of the drone. Insert the other end into a USB port on the computer. Open "File Explorer" and locate the related file from which you can view photos and videos.
Recording/Snaphot
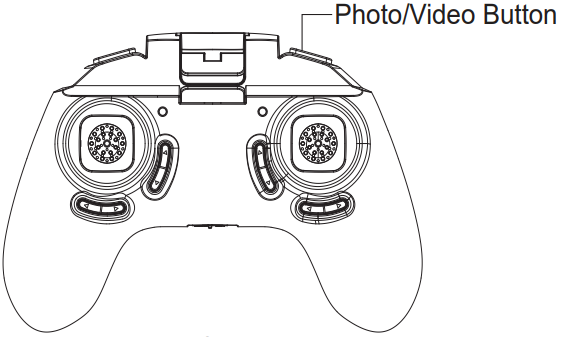
- To record video while using the drone’s controller, you must enable record mode on the drone. Record mode can be enabled by flying the drone or by pressing and holding the Photo/Video button, located on the top right corner of the drone’s controller for 3 seconds.
- Once recording mode has been enabled, press and hold the Photo/Video button for 3 seconds to start recording video. Once recording has begun, the drone will have a flashing blue light on the bottom. This indicates the drone is actively recording video. To store the recording, you must end the recording. If you do not end the recording properly the footage will not be saved to the microSD card.
- To end a recording, press and hold the Photo/Video button again for 3 seconds. This will stop the drone from recording video. Once a recording has been stopped the flashing blue light will disappear and a solid red light will be visible on the bottom of the drone.
- Once the recording has been stopped, the footage will be saved to the microSD card and will be available to review.
App User Amcrest Guide
SOFTWARE DOWNLOAD AND INSTALLATION
Search ‘Amcrest SkyView’ from App Store or Google Play Store.
Download and install it to your mobile device.
USING INSTRUCTION
- Insert a fully charged battery into the drone and turn it on. (The power button is on the side of the drone.)
- The drone will begin to flash red and green indicating the drone is ready to be synced.
- To sync the drone to the app, go to “Settings” on your mobile device and enable WI-FI.
- Locate the hotspot network for your drone. It will be labeled, “SKYVIEW 720P XXXXXX”.
- Tap on the network and allow your mobile device to connect to the hotspot for your drone.
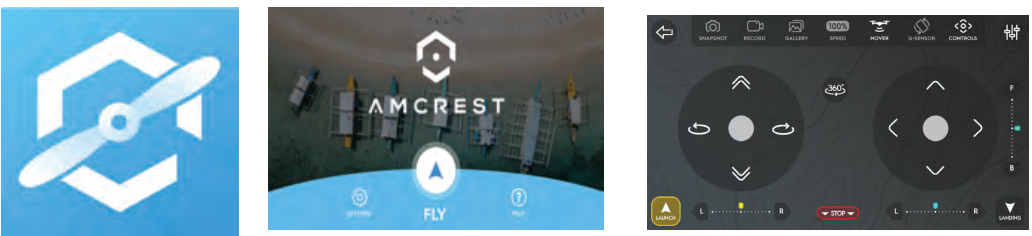
Open the Amcrest SkyView app and tap the “FLY” icon on the main menu to access
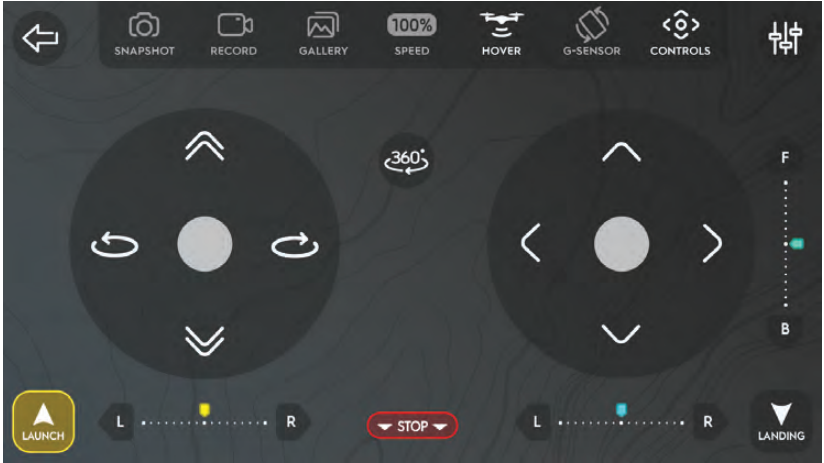
Launch Functions of Amcrest Skyview Drone
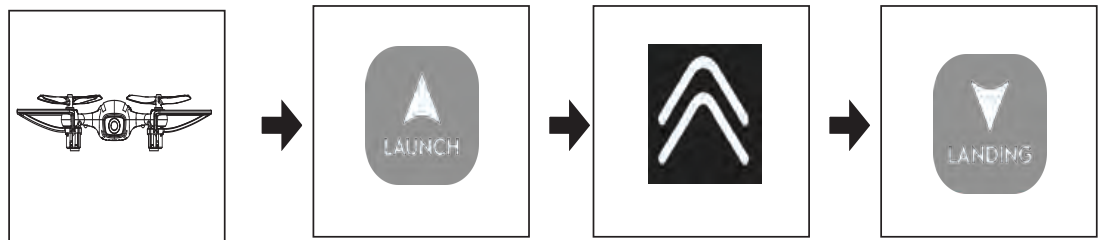
- Make sure the drone is placed on a level surface.
- Tap on the Launch button in the lower left hand corner of the screen to start the drone. (The rotor blades will begin to spin.)
- Use the forward throttle button to launch the drone. (For more information on flight controls, refer to the flight controls section of the manual.)
When you are ready to land the drone, find a clear, safe place to land and tap on the Landing button. (To perform an emergency landing, press the STOP button.
Flight Controls Drone A4-W
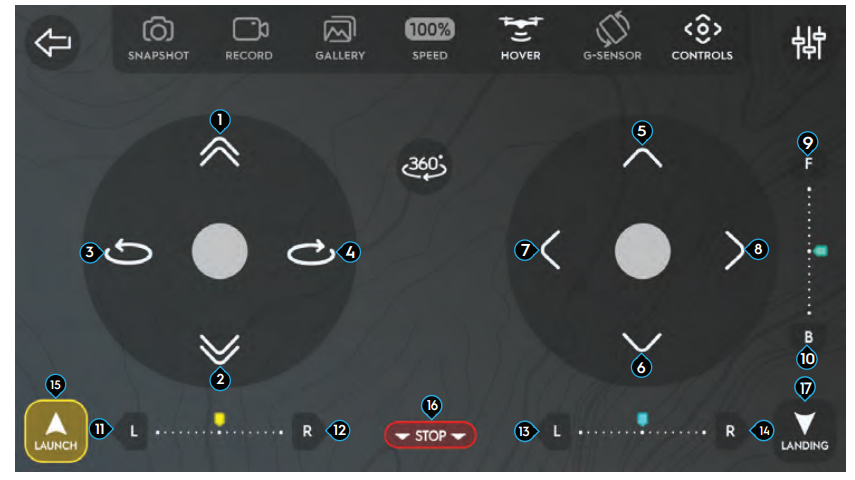
- Throttle: Use throttle to initially launch the drone. Moves the drone upward.
- Throttle Down: Moves the drone downward.
- Rotate Left- Rotates the drone head to the left.
- Rotate Right: Rotates the drone head to the right.
- Forward: Moves the drone forward.
- Back: Moves the drone backward.
- Move Left: Moves the drone to the left.
- Move Right: Moves the drone to the right.
- Forward Trim: Used to balance the drone while flying in a forward direction.
- Backward Trim: Used to balance the drone while flying in a backward direction.
- Left Rotate Trim: Used to balance the drone when performing a left rotation.
- Right Rotate Trim: Used to balance the drone when performing a right rotation.
- Left Trim: Used to balance the drone when performing a left turn.
- Right Trim: Used to balance the drone when performing a right turn.
- Launch: Used to start the motor on the drone.
- Stop: Used as an emergency stop. Will stop the drone completely while in operation.
- Landing: Used to land the drone while in flight.
App Functions
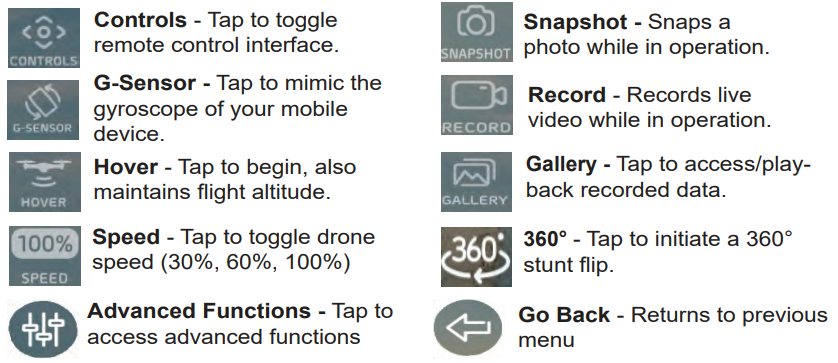
Advanced Functions Amcrest Skyview Drone
Advanced functions in the app include; Camera flip, VR, Headless, and Calibrate. Provided is a brief explanation of each function:
 Camera Flip: Allows you to vertically flip the live view image. This is useful if your phone is mounted in different positions when operating
 VR: Sets the app into VR mode which allows you to utilize virtual reality technology for a more immersive visual experience.
  Headless: Used to align the drone’s movements to be relative to the operator no matter which way the drone is facing.
 Calibrate: Allows you to automatically calibrate the device before initial operation begins.
Data File Operation
- Take a Photo: Press the snapshot button
 once. The photo will then be retained and accessed via the mobile app.
 - Take a Video: Press the video button
 once to start filming video. To recording video, press the video button again. The video taken will then be retained and accessed via the mobile app.
 - Access Photos/Videos: Press the gallery button
 once to access the media storage interface. Press the Photos icon to access photos. Press the Videos button to access stored videos. Press the SD Card button to access data stored on an inserted SD card.
 - Back Button: Press the Back Button
 once to return to the real-time app interface.
FPV Using Controller and App
It is possible to use both the controller and the app simultaneously, however, for the process to work you must first sync the drone to the controller and then to the app. For more information on how to perform the procedure, please refer to the steps provided below.
- Turn the Drone on and pair the controller to the drone. The drone lights will stop blinking, as it is synced to the controller.
- Go to your mobile device and open the WiFi settings and connect to Skyview 720 XXXXXX
Open the Amcrest Sky View app and press "Fly". You will now have control of the drone via the controller and still maintain the video feed from the app.
Maintenance
- Clean the drone with a clean, dry soft cloth only.
- To avoid irreparable damage, keep the drone dry and away from water. Do not fly in rainy conditions.
- Check the drone and accessories for any damage. If damage is found, do not use the drone until it is repaired.
Troubleshooting of Amcrest Skyview Drone A4-W
Here are some common issues and solutions for the Amcrest Skyview Drone A4-W:
- Issue: Drone won't take off
Solution: Check if the propellers are securely attached and if there is enough battery power. - Issue: Drone loses signal or connection
Solution: Make sure you are within the transmission range and that there are no physical obstructions between the drone and the controller. - Issue: Video footage is shaky or distorted
Solution: Calibrate the drone's gyroscope and ensure that the drone is flying in a stable and level manner.
Pros & Cons
Pros
- Affordable price point
- Compact and portable design
- Several intelligent flight modes
- Built-in obstacle avoidance and GPS systems
- Long flight time and fast charging
Cons
- Limited transmission range compared to other high-end drones
- Camera resolution slightly lower than some competitors
- May not handle high wind conditions
Customer Reviews
The Amcrest Skyview Drone A4-W has received positive feedback from customers, with users praising its user-friendly interface, long flight time, and stable flights. However, some customers have noted that the drone can struggle in high wind conditions and that the camera resolution could be improved.
Faqs
What advanced flight features does the Amcrest Skyview Drone A4-W offer to enhance piloting experience?
How does the Auto Calibration function work on the Amcrest Skyview Drone A4-W and how often should I use it?
What is the flight time of the Amcrest Skyview Drone A4-W and how does it compare to other drones in its class?
What type of camera does the Amcrest Skyview Drone A4-W come with and how does it enhance the drone's utility?
Can the Amcrest Skyview Drone A4-W perform aerial acrobatics, and what are the steps to activate this feature?
How user-friendly is the control system of the Amcrest Skyview Drone A4-W for beginners?
How can I maximize the battery life and efficiency when using the Amcrest Skyview Drone A4-W?
How does the First Person View (FPV) feature on the Amcrest Skyview Drone A4-W immerse users in the flying experience?
How does the Amcrest Skyview Drone A4-W headless mode assist new pilots in controlling the drone?
What is the process to connect the Amcrest Skyview Drone A4-W to the mobile app, and what benefits does the app provide?
Leave a Comment