Setup: Asrock Motherboard H61OM-ITX/ac User Manual
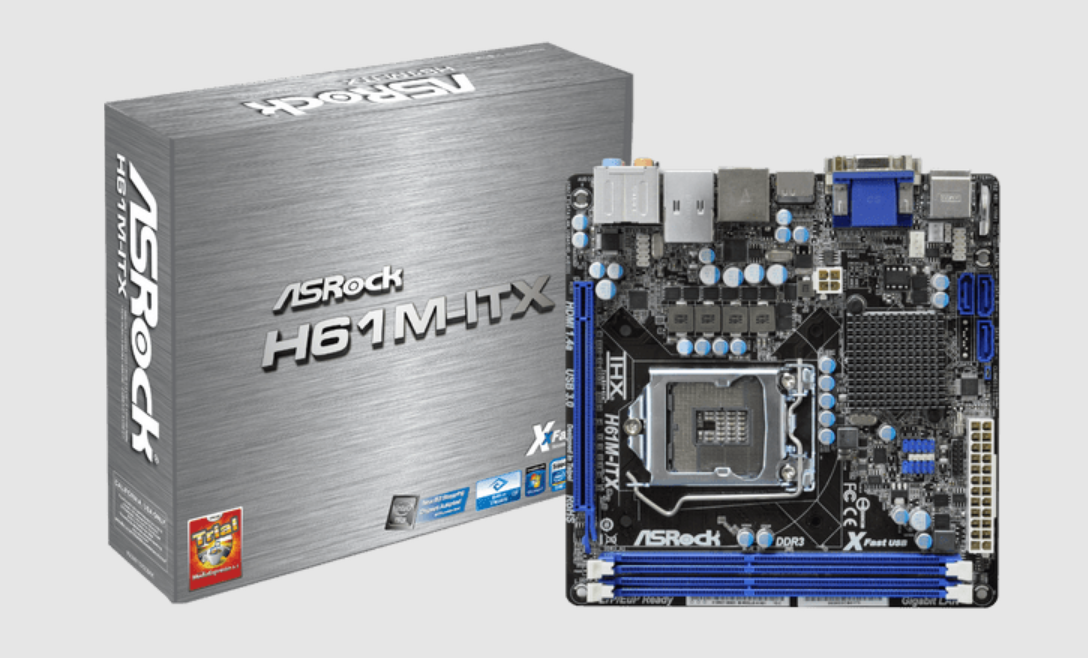
Content
ASRock Motherboard H61OM-ITX/ac Introduction
The ASRock H61OM-ITX/ac motherboard is a compact yet powerful Mini-ITX solution designed to support Intel's 12th to 14th generation Core processors. Featuring the Intel H610 chipset, it offers dual-channel DDR4 memory support up to 3200MHz and multiple connectivity options, including HDMI and DisplayPort outputs for high-resolution displays. With integrated 802.11ac WiFi and Bluetooth capabilities, this motherboard ensures seamless connectivity. The ASRock H61OM-ITX/ac is priced at approximately $99.99.
Package Contents
- ASRock H610M-ITX/ac Motherboard (Mini-ITX Form Factor)
- ASRock H610M-ITX/ac Quick Installation Guide
- ASRock H610M-ITX/ac Support CD
- 2 x Serial ATA (SATA) Data Cables (Optional)
- 1 x I/O Panel Shield
- 2 x ASRock WiFi 2.4/5 GHz Antennas (Optional)
- 1 x Screw for M.2 Socket (Optional)
Specifications
Platform |
|
CPU |
|
Chipset |
|
Memory |
* Please refer to Memory Support List on ASRock's website for more information. (http://www.asrock.com/)
|
Expansion Slot |
* Supports NVMe SSD as boot disks
|
Graphics | * Intel® UHD Graphics Built-in Visuals and the VGA outputs can be supported only with processors which are GPU integrated.
|
|
DisplayPort 1.4 Ports |
Audio |
|
LAN |
|
Wireless LAN |
|
Rear Panel I/O |
|
Storage |
* If M2_1 is occupied by a SATA-type M.2 device, SATA3_0 will be disabled.
** Supports Intel® VolumeManagement Device (VMD) ** Supports NVMe SSD as boot disks ** Supports ASRock U.2 Kit |
Connector |
* Supports in total up to 5V/3A, 15W LED Strip
* The CPU Fan Connector supports the CPU fan of maximum 1A (12W) fan power.
* The Chassis Fan Connector supports the chassis fan of maxi- mum 1A (12W) fan power.
|
BIOS Feature |
|
Hardware Monitor |
|
OS |
|
NOTE
Please realize that there is a certain risk involved with overclocking, including adjusting the setting in the BIOS, applying Untied Overclocking Technology, or using third-party overclocking tools. Overclocking may affect your system’s stability, or even cause damage to the components and devices of your system. It should be done at your own risk and expense. We are not responsible for possible damage caused by overclocking.
Motherboard Layout
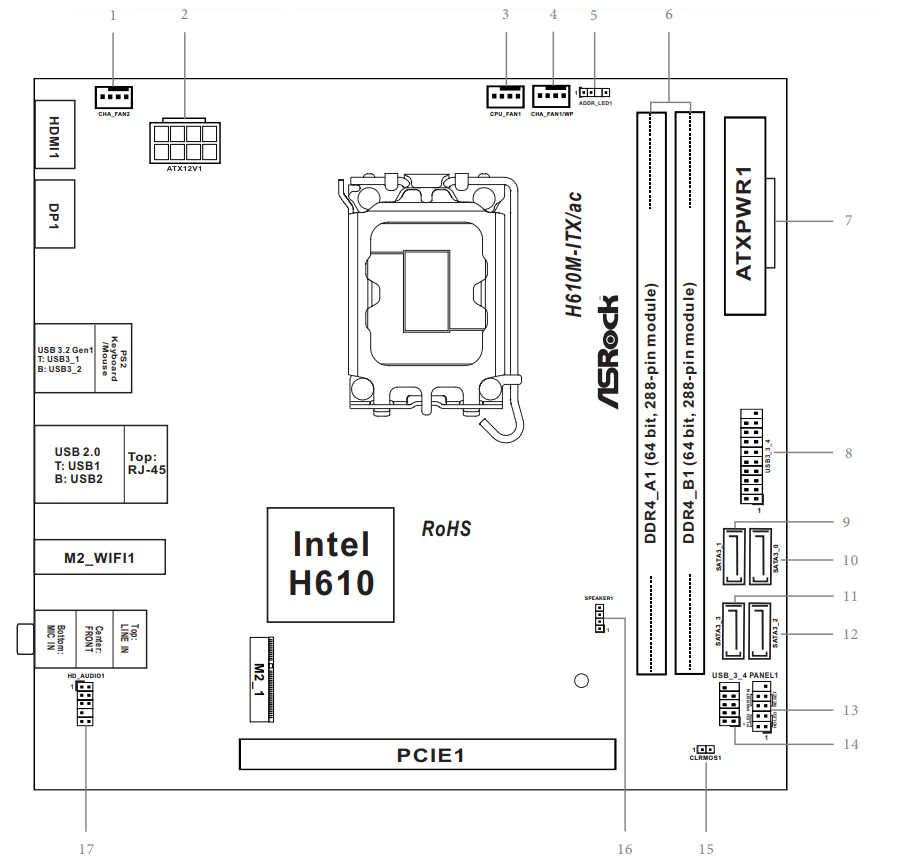
No. | Description |
1 | Chassis Fan Connector (CHA_FAN2) |
2 | ATX 12V Power Connector (ATX12V1) |
3 | CPU Fan Connector (CPU_FAN1) |
4 | Chassis/Waterpump Fan Connector (CHA_FAN1/WP) |
5 | Addressable LED Header (ADDR_LED1) |
6 | 2 x 288-pin DDR4 DIMM Slots(DDR4_A1, DDR4_B1) |
7 | ATX Power Connector (ATXPWR1) |
8 | USB 3.2 Gen1 Header (USB3_3_4) |
9 | SATA3 Connector (SATA3_1) |
10 | SATA3 Connector (SATA3_0) |
11 | SATA3 Connector (SATA3_3) |
12 | SATA3 Connector (SATA3_2) |
13 | System Panel Header (PANEL1) |
14 | USB 2.0 Header (USB_3_4) |
15 | Clear CMOS Jumper (CLRMOS1) |
16 | Chassis Speaker Header (SPEAKER1) |
17 | Front Panel Audio Header (HD_AUDIO1) |
I/O Panel
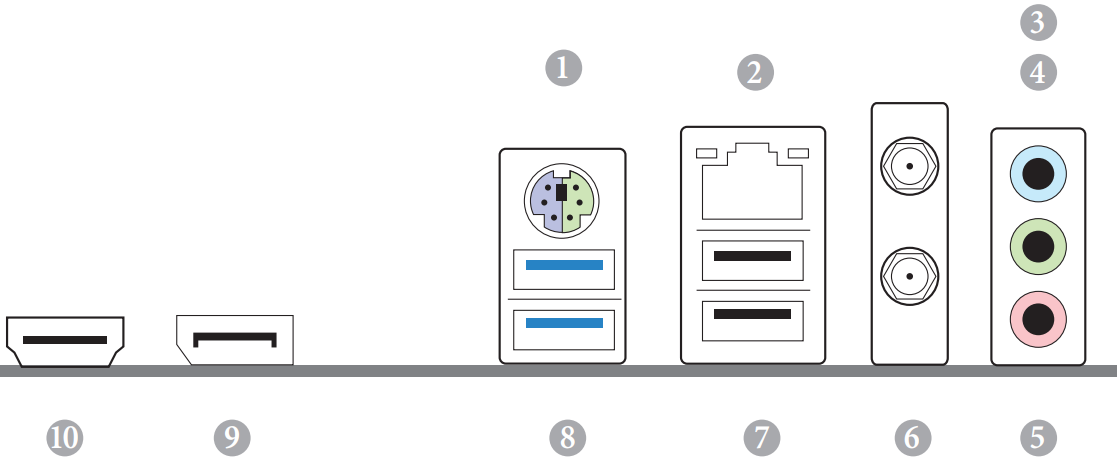
No. | Description | No. | Description |
1 | PS/2 Mouse/Keyboard Port | 6 | Antenna Ports |
2 | LAN RJ-45 Port* | 7 | USB 2.0 Ports (USB12) |
3 | Line In (Light Blue)** | 8 | USB 3.2 Gen1 Ports (USB3_12) |
4 | Front Speaker (Lime)** | 9 | DisplayPort 1.4 |
5 | Microphone (Pink)** | 10 | HDMI Port |
There are two LEDs on each LAN port. Please refer to the table below for the LAN port LED indications.
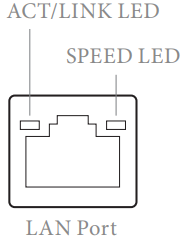
Activity / Link LED | Speed LED | ||
Status | Description | Status | Description |
Off | No Link | Off | 10Mbps connection |
Blinking | Data Activity | Orange | 100Mbps connection |
On | Link | Green | 1Gbps connection |
The function of the Audio Ports in 7.1-channel Configuration:
Port | Function |
Light Blue (Rear panel) | Rear Speaker Out |
Lime (Rear panel) | Front Speaker Out |
Pink (Rear panel) | Central /Subwoofer Speaker Out |
Lime (Front panel) | Side Speaker Out |
WiFi-802.11ac Module and ASRock WiFi 2.4/5 GHz Antennas
WiFi-802.11ac + BT Module
This motherboard comes with an exclusive WiFi 802.11 a/b/g/n/ac + BT module (pre-installed on the rear I/O panel) that offers support for WiFi 802.11 a/b/g/n/ac connectivity standards and Bluetooth. WiFi + BT module is an easy-to-use wireless local area network (WLAN) adapter to support WiFi + BT. Bluetooth standard features Smart Ready technology that adds a whole new class of functionality into the mobile devices. BT also includes Low Energy Technology and ensures extraordinary low power consumption for PCs.
The transmission speed may vary according to the environment.
Description
The ASRock H61M-ITX/ac motherboard is designed to offer a balance of performance and compactness. It features a robust power delivery system and high-quality components to ensure stable operation. The integrated Wi-Fi and Bluetooth make it easy to connect to networks and devices wirelessly. The motherboard also includes high-quality audio capacitors for enhanced sound quality. With its small form factor, it is perfect for building into compact cases or enclosures.
The motherboard supports a wide range of 2nd and 3rd generation Intel Core processors, making it versatile for various applications. It also includes multiple SATA ports and an mSATA slot for flexible storage options. Overall, the H61M-ITX/ac is a solid choice for anyone looking to build a compact, feature-rich PC.
WiFi Antennas Installation Guide
- Step 1
Prepare the WiFi 2.4/5 GHz Antennas that come with the package. - Step 2
Connect the two WiFi 2.4/5 GHz Antennas to the antenna connectors. Turn the antenna clock-wise until it is securely connected. Step 3
Set the WiFi 2.4/5 GHz Antenna as shown in the illustration.
You may need to adjust the direction of the antenna for a stronger signal.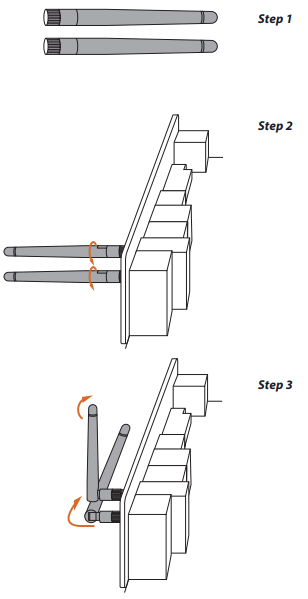
Software and Utilities Operation
Installing Drivers
The Support CD that comes with the motherboard contains necessary drivers and useful utilities that enhance the motherboard’s features.
- Running The Support CD
To begin using the support CD, insert the CD into your CD-ROM drive. The CD automatically displays the Main Menu if “AUTORUN” is enabled in your computer. If the Main Menu does not appear automatically, locate and double click on the file “ASRSETUP.EXE” in the Support CD to display the menu. - Drivers Menu
The drivers compatible to your system will be auto-detected and listed on the support CD driver page. Please click Install All or follow the order from top to bottom to install those required drivers. Therefore, the drivers you install can work properly. - Utilities Menu
The Utilities Menu shows the application software that the motherboard supports. Click on a specific item then follow the installation wizard to install it.
ASRock Motherboard Utility (A-Tuning)
ASRock Motherboard Utility (A-Tuning) is ASRock’s multi purpose software suite with a new interface, more new features and improved utilities.
Installing ASRock Motherboard Utility (A-Tuning)
ASRock Motherboard Utility (A-Tuning) can be downloaded from ASRock Live Update & APP Shop. After the installation, you will find the icon “ASRock Motherboard Utility (A-Tuning)“ on your desktop. Double-click the “ASRock Motherboard Utility (A-Tuning)“ icon, ASRock Motherboard Utility (A-Tuning) main menu will pop up.
Using ASRock Motherboard Utility (A-Tuning)
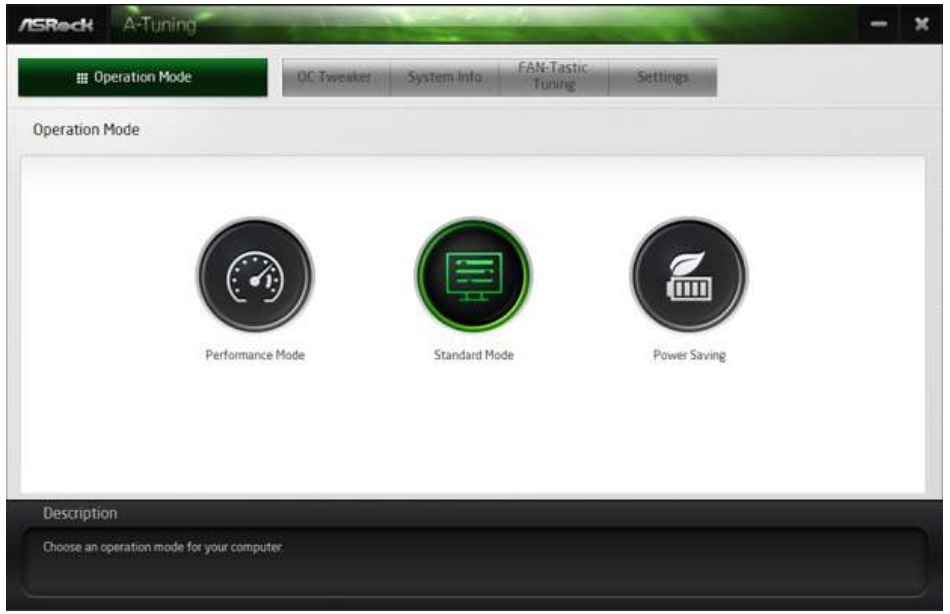
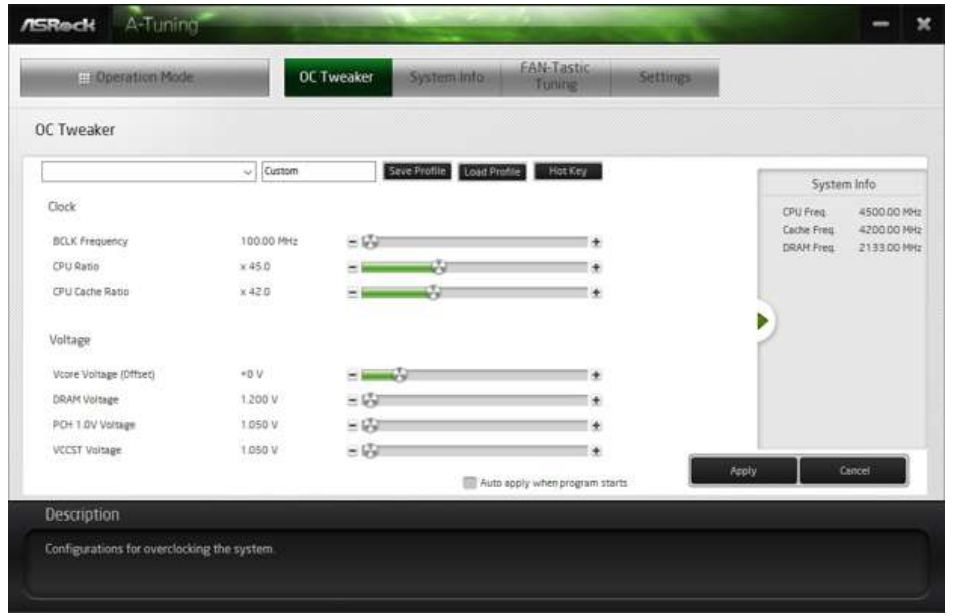
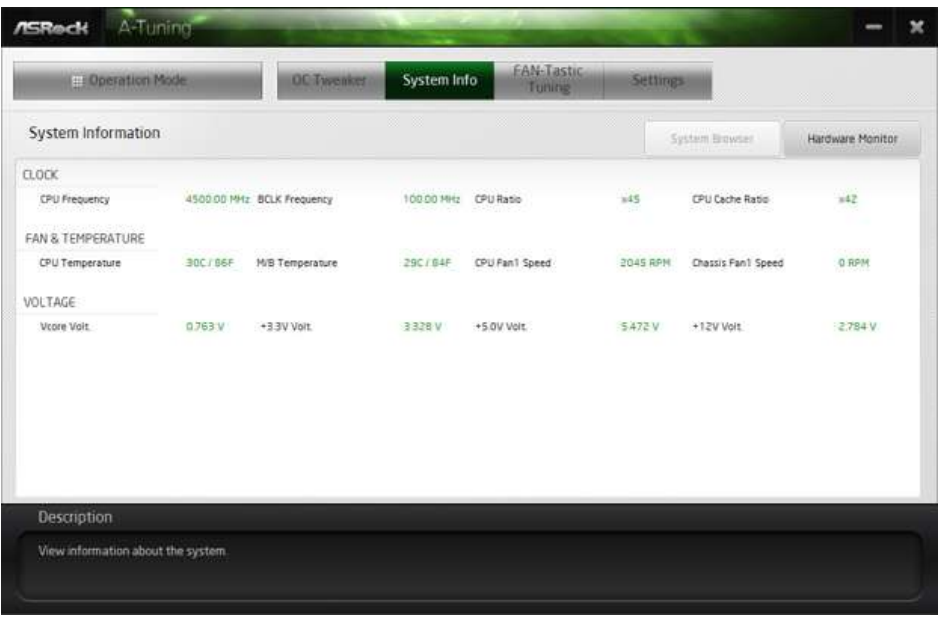
There are five sections in ASRock Motherboard Utility (A-Tuning) main menu: Operation Mode, OC Tweaker, System Info, FAN-Tastic Tuning and Settings.
Operation Mode
Choose an operation mode for your computer.
OC Tweaker
Configurations for overclocking the system.
System Info about ASRock Motherboard H61OM-ITX/ac
View information about the system.
*The System Browser tab may not appear for certain models.
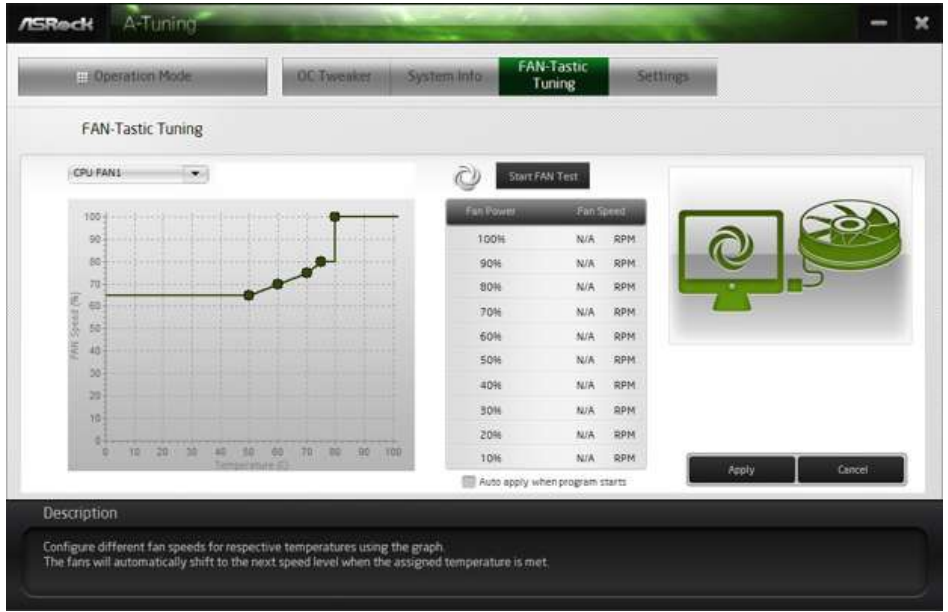
FAN-Tastic Tuning
Configure up to five different fan speeds using the graph. The fans will automatically shift to the next speed level when the assigned temperature is met.
Settings
Configure ASRock ASRock Motherboard Utility (A-Tuning). Click to select "Auto run at Windows Startup" if you want ASRock Motherboard Utility (A-Tuning) to be launched when you start up the Windows operating system.

ASRock Live Update & APP Shop
The ASRock Live Update & APP Shop is an online store for purchasing and downloading software applications for your ASRock computer. You can quickly and easily install various apps and support utilities. With ASRock Live Update & APP Shop, you can optimize your system and keep your motherboard up to date simply with a few clicks.
Double-click![]() on your desktop to access ASRock Live Update & APP Shop utility.
on your desktop to access ASRock Live Update & APP Shop utility.
*You need to be connected to the Internet to download apps from the ASRock Live Update & APP Shop.
UI Overview
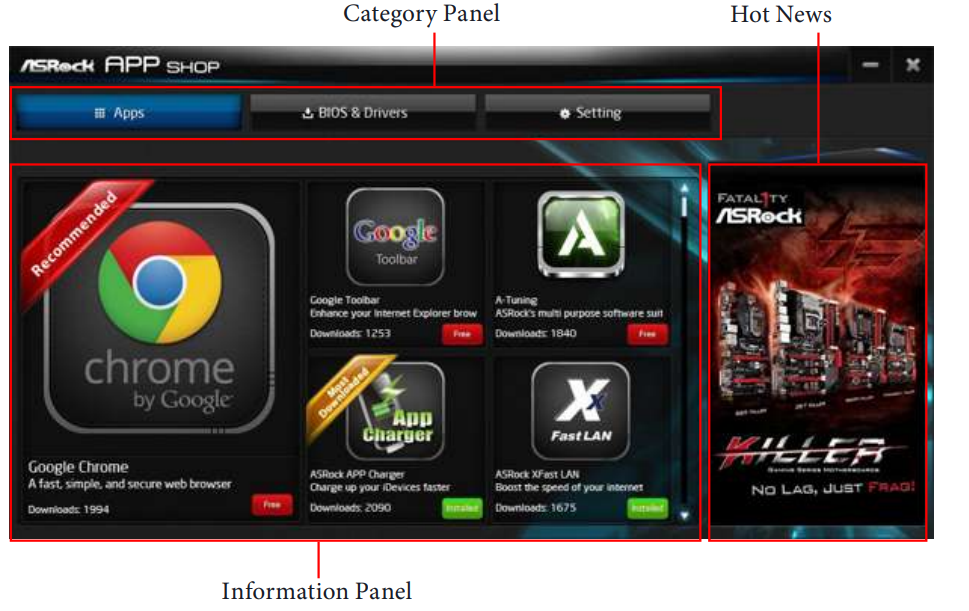
- Category Panel: The category panel contains several category tabs or buttons that when selected the information panel below displays the relative information.
- Information Panel: The information panel in the center displays data about the currently selected category and allows users to perform job-related tasks.
- Hot News: The hot news section displays the various latest news. Click on the image to visit the website of the selected news and know more.
Apps
When the "Apps" tab is selected, you will see all the available apps on screen for you to download.
Installing an App
Step 1
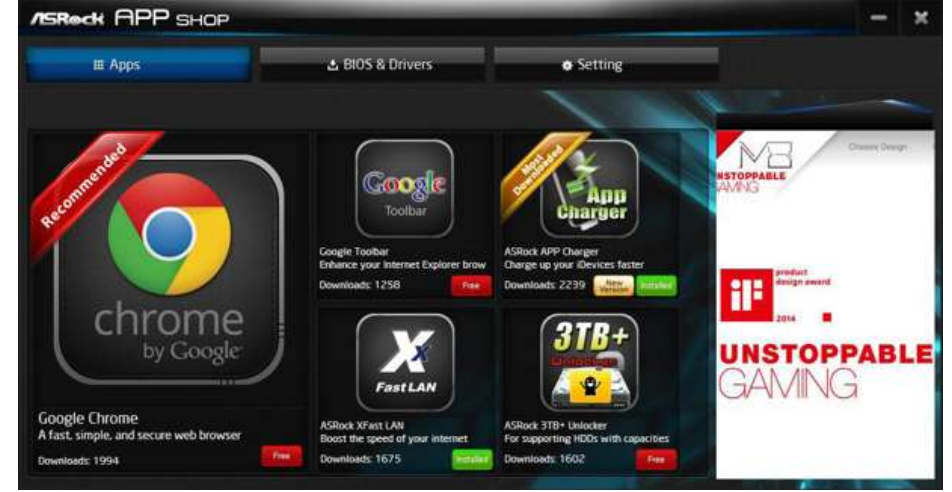
Find the app you want to install.
The most recommended app appears on the left side of the screen. The other various apps are shown on the right. Please scroll up and down to see more apps listed.
You can check the price of the app and whether you have already intalled it or not. The red icon displays the price or "Free" if the app is free of charge.
 The green "Installed" icon means the app is installed on your computer.
- Step 2
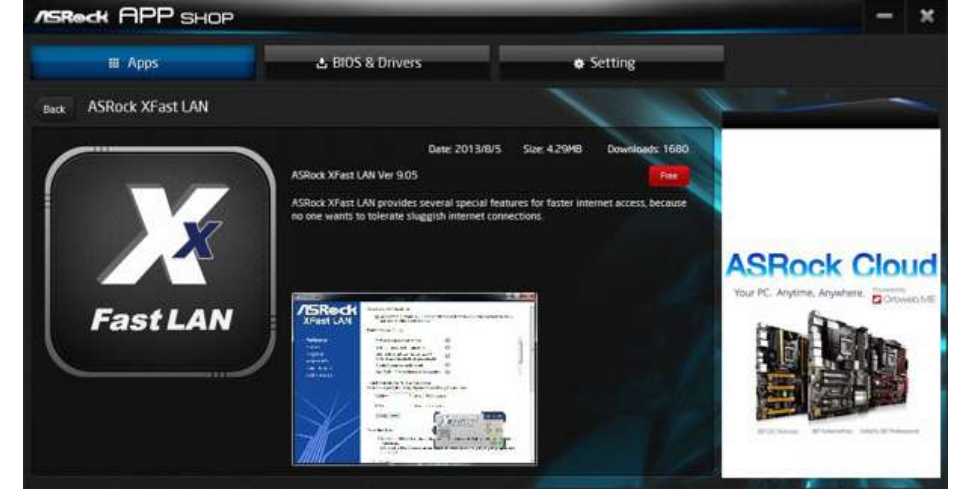
Click on the app icon to see more details about the selected app. Step 3
If you want to install the app, click on the red icon to start downloading.
Step 4
When installation completes, you can find the green "Installed" icon appears on the upper right corner.
To uninstall it, simply click on the trash can icon .
.
*The trash icon may not appear for certain apps.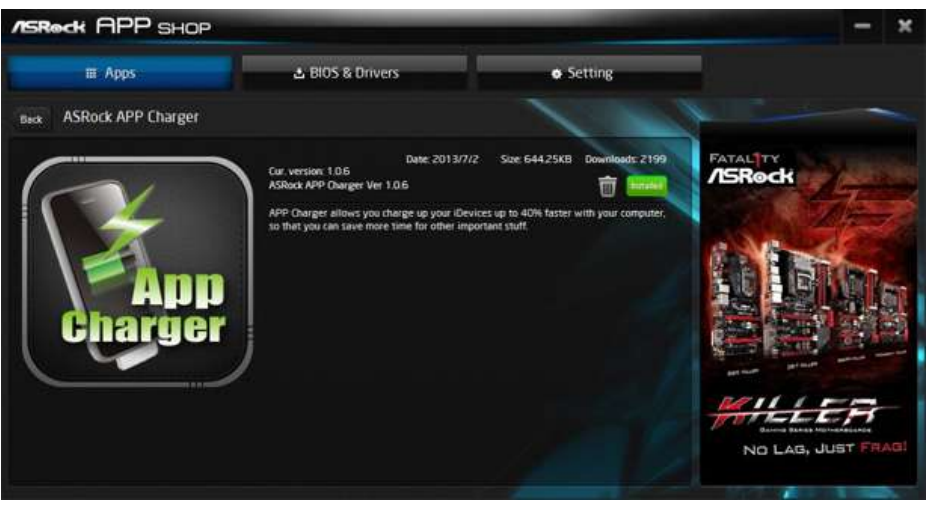
Upgrading an App
You can only upgrade the apps you have already installed. When there is an available new version for your app, you will find the mark of "New Version"![]() appears below the installed app icon.
appears below the installed app icon.
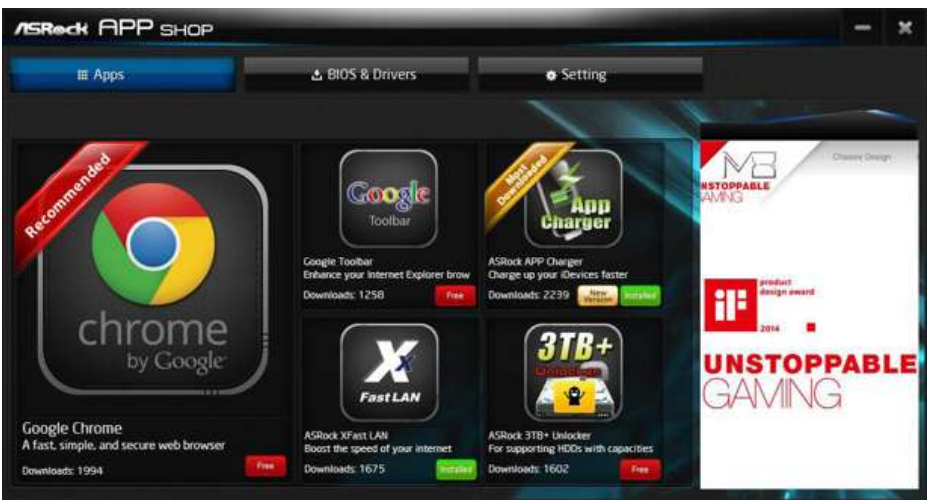
- Step 1
Click on the app icon to see more details. - Step 2
Click on the yellow icon to start upgrading.
BIOS & Drivers
Installing BIOS or Drivers
When the "BIOS & Drivers" tab is selected, you will see a list of recommended or critical updates for the BIOS or drivers. Please update them all soon.
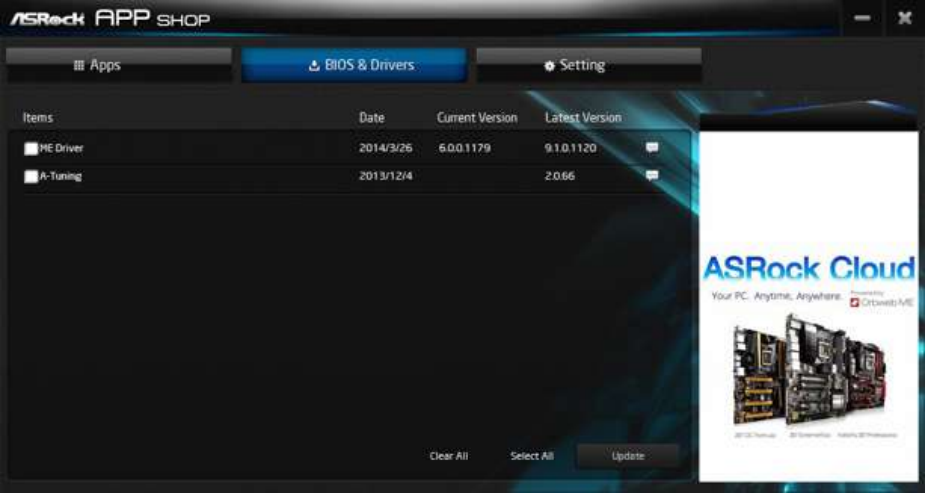
- Step 1
Please check the item information before update. Click on to see more details. - Step 2
Click to select one or more items you want to update. - Step 3
Click Update to start the update process.
Setting
In the "Setting" page, you can change the language, select the server location, and determine if you want to automatically run the ASRock Live Update & APP Shop on Windows startup.

ASRock Polychrome SYNC
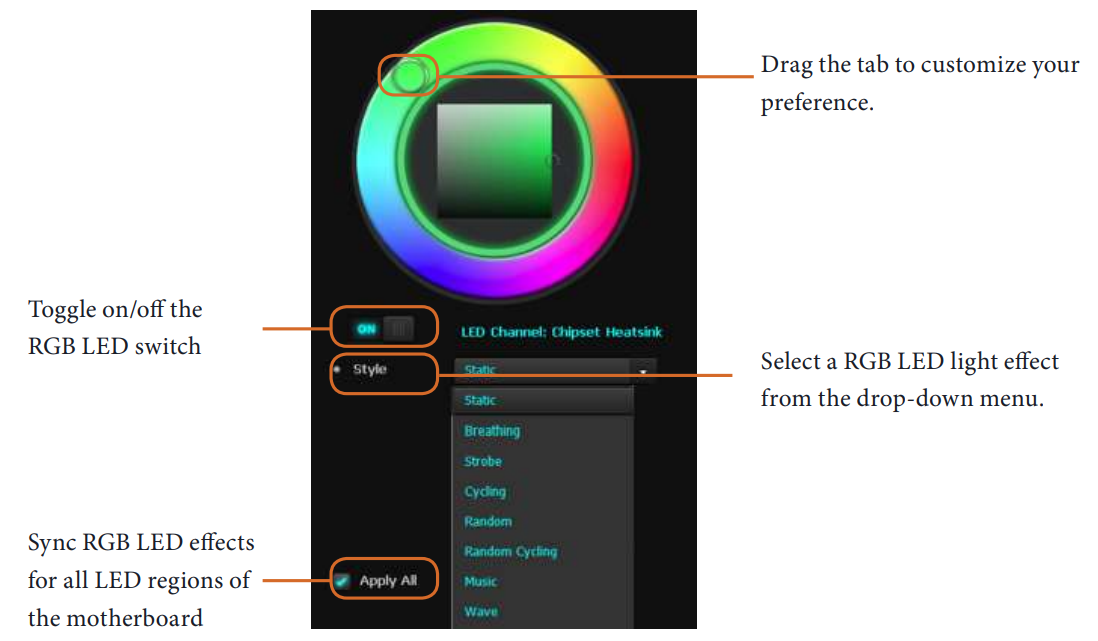
ASRock Polychrome SYNC is a lighting control utility specifically designed for unique indi-viduals with sophisticated tastes to build their own stylish colorful lighting system. Simply by connecting the LED strip, you can customize various lighting schemes and patterns, including Static, Breathing, Strobe, Cycling, Music, Wave and more.
Connecting the Addressable RGB LED Strip
Connect your Addressable RGB LED strips to the Addressable LED Header (ADDR_LED1) on the motherboard.
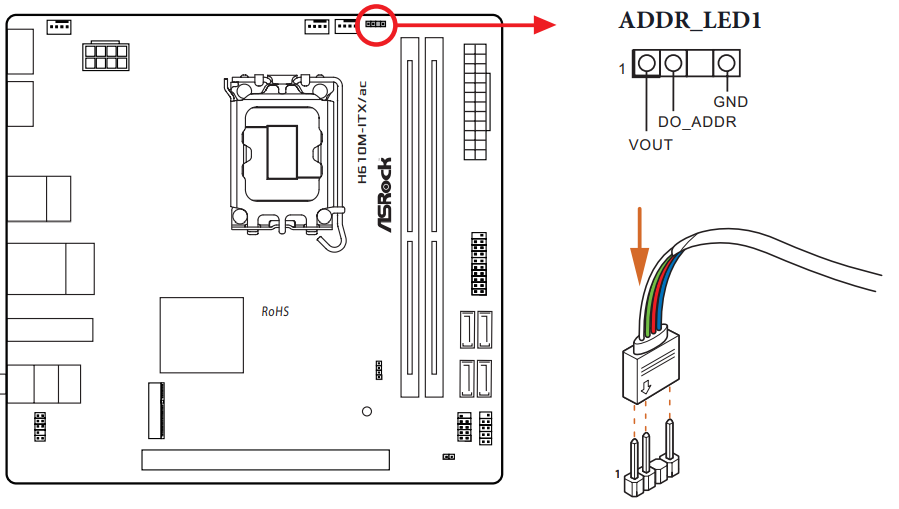
NOTE
- Never install the RGB LED cable in the wrong orientation; otherwise, the cable may be damaged.
- Before installing or removing your RGB LED cable, please power off your system and unplug the power cord from the power supply. Failure to do so may cause dam-ages to motherboard components.
TIPS
- Please note that the RGB LED strips do not come with the package.
- The RGB LED header supports WS2812B addressable RGB LED strip (5V/Data/GND), with a maximum power rating of 3A (5V) and length within 2 meters.
ASRock Polychrome SYNC Utility
Now you can adjust the RGB LED color through the ASRock Polychrome SYNC Utility. Download this utility from the ASRock Live Update & APP Shop and start coloring your PC style your way!
Troubleshooting
If your system does not boot,
- Check if all cables are properly connected to the correct ports.
- Ensure that the RAM is seated correctly and that there are no loose connections.
If you encounter issues with Wi-Fi or Bluetooth connectivity,
- Check that these features are enabled in the BIOS settings and that drivers are installed correctly.
For audio issues,
- Ensure that audio output is selected correctly in your operating system's sound settings and that no other devices are conflicting with the audio ports.
Pros & Cons
Pros:
- Compact mini-ITX form factor ideal for small builds
- Integrated Wi-Fi and Bluetooth for wireless connectivity
- High-quality audio capacitors for enhanced sound quality
- Supports up to 16GB of DDR3 memory
- Affordable price point
Cons:
- Limited expansion slots due to mini-ITX form factor
- No support for newer CPU generations beyond 3rd Gen Intel Core
- No USB-C ports or newer USB standards
- Older chipset may limit performance compared to newer models
Customer Reviews
Customers have generally praised the ASRock H61M-ITX/ac for its reliability and ease of use. Many have noted its compact size as a major advantage for building small PCs or media centers. However, some users have complained about the limited upgrade options due to its older chipset.
Common complaints include issues with Wi-Fi connectivity and the lack of newer features such as USB-C ports or more recent CPU support.
Faqs
What is the form factor of the Motherboard?
Which CPU socket does the ASRock use?
Does the ASRock support wireless connectivity?
How much RAM can the ASRock support?
What type of storage ports does the ASRock H61M-ITX/ac have?
How do I troubleshoot if my system does not boot with this motherboard?
What are some common issues users face with this motherboard?
Does the ASRock H61M-ITX/ac have any high-quality audio features?
Can I use this motherboard for building a media center or HTPC?
Leave a Comment
