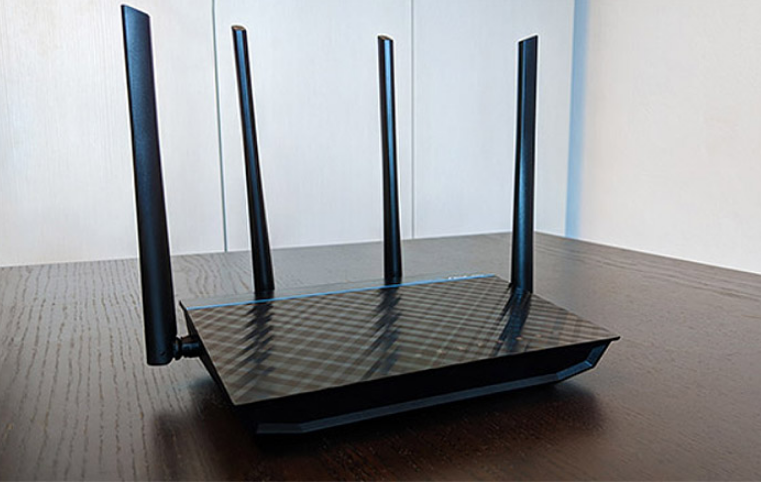
Asus AC1700 Wireless Gigabit Router RT-ACRH17 User Guide
Content
Introduction
Wireless Gigabit Router RT-ACRH17 is a powerful dual-band router designed to enhance home networking with speeds up to 1700 Mbps. It features advanced MU-MIMO technology, allowing multiple devices to connect simultaneously without sacrificing performance. The router is equipped with a quad-core processor and four Gigabit LAN ports, ensuring efficient data management and connectivity. Priced at approximately $129.99, it offers excellent value for those seeking robust wireless performance.
Specifications
| Specification | Details |
|---|---|
| DC Power Adapter | |
| DC Output | +12V with max 2A current |
| Operating Temperature | 0~40°C |
| Storage Temperature | 0~70°C |
| Operating Humidity | 50~90% |
| Storage Humidity | 20~90% |
Getting to know your wireless router
The ultra-thin and stylish RT-ACRH17 features both 2.4GHz and 5GHz dual bands which delivers super fast gigabit wireless-AC speeds up to 1400 Mbps on the 5 GHz band & 300 Mbps on the 2.4 GHz band concurrently.
Package contents
- RT-ACRH17 Wireless Router
- Power adapter
- Network cable (RJ-45)
- Quick Start Guide
NOTES:
- If any of the items are damaged or missing, contact ASUS for technical inquiries and support, Refer to the ASUS Support Hotline list at the back of this user manual.
- Keep the original packaging material in case you would need future warranty services such as repair or replacement.
Your wireless router
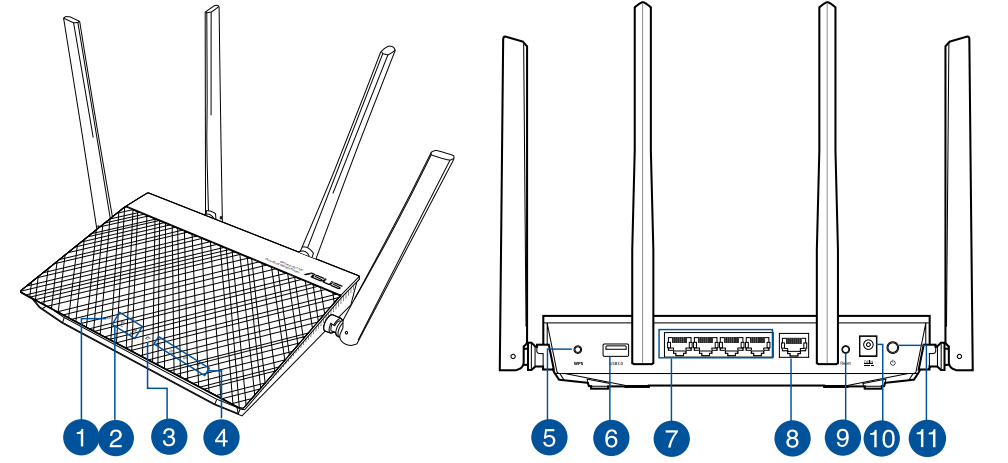
- Power LED
Off: No power.
On: Device is ready.
Flashing slow: Rescue mode
Flashing quick: WPS is processing. - 2.4GHz LED / 5GHz LED
Off: No 2.4 GHz or 5 GHz signal.
On: Wireless system is ready.
Flashing: Transmitting or receiving data via wireless connection. - WAN (Internet) LED
Off: No power or no physical connection.
On: Has physical connection to a wide area network (WAN). - LAN LED
Off: No power or no physical connection.
On: Has physical connection to a local area network (LAN). - WPS button
This button launches the WPS Wizard. - USB 3.0 port
Insert a USB 3.0 device such as USB hard disks or USB flash drives into this port. - LAN 1 ~ 4 ports
Connect network cables into these ports to establish LAN connection. - WAN (Internet) port
Connect a network cable into this port to establish WAN connection. - Reset button
This button resets or restores the system to its factory default settings. - Power (DC-IN) port
Insert the bundled AC adapter into this port and connect your router to a power source. - Power button
Press this button to power on or off the system.
NOTES: Use only the adapter that came with your package. Using other adapters may damage the device.
Positioning your router
For the best wireless signal transmission between the wireless router and the network devices connected to it, ensure that you:
- Place the wireless router in a centralized area for maximum wireless coverage for the network devices.
- Keep the device away from metal obstructions and away from direct sunlight.
- Keep the device away from 802.11b/g or 20MHz only Wi-Fi devices, 2.4GHz computer peripherals, Bluetooth devices, cordless phones, transformers, heavy-duty motors, fluorescent lights, microwave ovens, refrigerators, and other industrial equipment to prevent signal interference or loss.
- Always update to the latest firmware. Visit the ASUS website at http://www.asus.com to get the latest firmware updates.
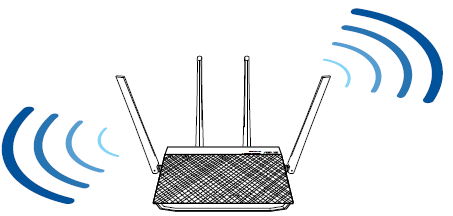
To ensure the best wireless signal, orient the four antennas as shown in the drawing below.
Setup Requirements
To set up your wireless network, you need a computer that meets the following system requirements:
- Ethernet RJ-45 (LAN) port (10Base-T/100Base-TX/1000Base-TX)
- IEEE 802.11a/b/g/n/ac wireless capability
- An installed TCP/IP service
- Web browser such as Internet Explorer, Firefox, Safari, or Google Chrome
NOTES:
- If your computer does not have built-in wireless capabilities, you may install an IEEE 802.11a/b/g/n/ac WLAN adapter to your computer to connect to the network.
- With its dual band technology, your wireless router supports 2.4GHz and 5GHz wireless signals simultaneously. This allows you to do Internet-related activities such as Internet surfing or reading/writing e- mail messages using the 2.4GHz band while simultaneously streaming high-definition audio/video files such as movies or music using the 5GHz band.
- Some IEEE 802.11n devices that you want to connect to your network may or may not support 5GHz band. Refer to the device's manual for specifications.
- The Ethernet RJ-45 cables that will be used to connect the network devices should not exceed 100 meters.
Router Setup
IMPORTANT!
- Use a wired connection when setting up your wireless router to avoid possible setup problems.
- Before setting up your ASUS wireless router, do the following:
- If you are replacing an existing router, disconnect it from your network.
- Disconnect the cables/wires from your existing modem setup. If your modem has a backup battery, remove it as well.
- Reboot your cable modem and computer (recommended).
Wired connection
NOTE: You can use either a straight-through cable or a crossover cable for wired connection.
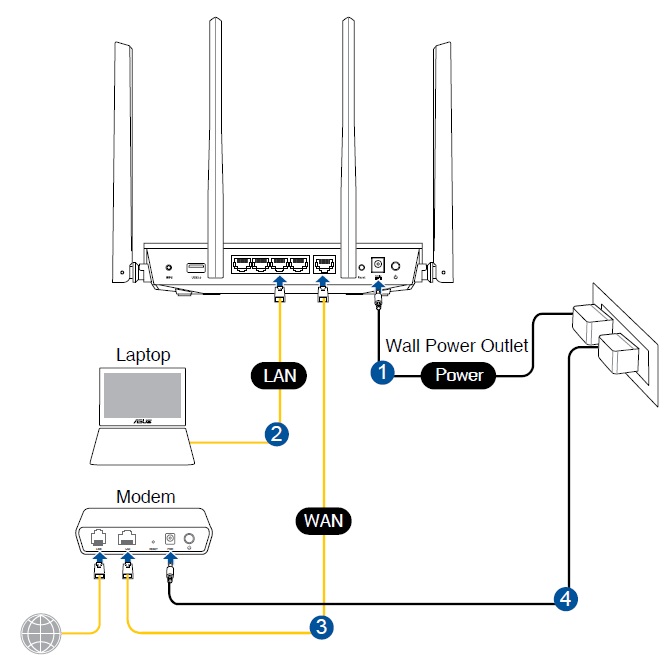
To set up your wireless router via wired connection:
- Insert your wireless router’s AC adapter to the DC-IN port and plug it to a power outlet.
- Using the bundled network cable, connect your computer to your wireless router’s LAN port.
IMPORTANT! Ensure that the LAN LED is blinking. - Using another network cable, connect your modem to your wireless router’s WAN port.
- Insert your modem’s AC adapter to the DC-IN port and plug it to a power outlet.
Wireless connection
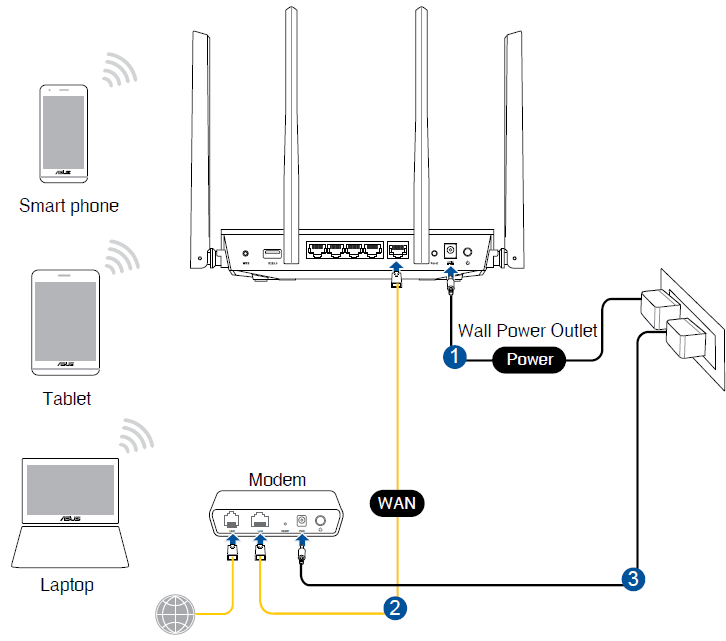
To set up your wireless router via wireless connection:
- Insert your wireless router’s AC adapter to the DC-IN port and plug it to a power outlet.
- Using the bundled network cable, connect your modem to your wireless router’s WAN port.
- Insert your modem’s AC adapter to the DC-IN port and plug it to a power outlet.
Description
The AC1700 Gigabit boasts a sleek and compact design that fits easily into any home decor. The router's dual-band capability allows it to operate on both the 2.4 GHz and 5 GHz frequencies, reducing interference and ensuring a smoother internet experience. The AiRadar beamforming technology enhances the Wi-Fi signal, directing it toward connected devices for improved coverage and reliability.
The device also comes with an ASUSWRT web-based interface, which provides an intuitive way to manage and customize your network settings. Additionally, features like Quality of Service (QoS) and Parental Controls make it easy to prioritize traffic and restrict access to certain websites or services.
Getting started
Logging into the Web GUI
Your ASUS wireless router comes with an intuitive web graphical user interface (GUI) that allows you to easily configure its various features through a web browser such as Internet Explorer, Firefox, Safari, or Google Chrome.
NOTE: The features may vary with different firmware versions.
To log into the web GUI:
- On your web browser.
- On the login page, key in the default user name (admin) and password (admin).
- You can now use the Web GUI to configure various settings of your ASUS Wireless Router.

NOTE: If you are logging into the Web GUI for the first time, you will be directed to the Quick Internet Setup (QIS) page automatically.
Quick Internet Setup (QIS) with Auto- detection
The Quick Internet Setup (QIS) function guides you in quickly setting up your Internet connection.
NOTE: When setting the Internet connection for the first time, press the Reset button on your wireless router to reset it to its factory default settings.
To use QIS with auto-detection:
Log into the Web GUI. The QIS page launches automatically.
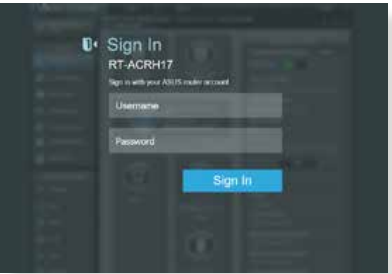
NOTES:
- By default, the login username and password for your wireless router's Web GUI is admin. For details on changing your wireless router's login username and password, refer to section 4.6.2 System.
- The wireless router's login username and password is different from the 2.4GHz/5GHz network name (SSID) and security key. The wireless router's login username and password allows you to log into your wireless router's Web GUI to configure your wireless router's settings. The 2.4GHz/5GHz network name (SSID) and security key allows Wi-Fi devices to log in and connect to your 2.4GHz/5GHz network.
The wireless router automatically detects if your ISP connection type is Dynamic IP, PPPoE, PPTP and L2TP. Key in the necessary information for your ISP connection type.
IMPORTANT! Obtain the necessary information from your ISP about the Internet connection type.
NOTES:
- The auto-detection of your ISP connection type takes place when you configure the wireless router for the first time or when your wireless router is reset to its default settings.
- If QIS failed to detect your Internet connection type, click Skip to manual setting and manually configure your connection settings.
- Assign the wireless network name (SSID) and security key for your 2.4GHz and 5 GHz wireless connection. Click Apply when done.
- Your Internet and wireless settings are displayed. Click Next to continue.
Read the wireless network connection tutorial. When done, click Finish.

Connecting to your wireless network
After setting up your wireless router via QIS, you can connect your computer or other smart devices to your wireless network.
To connect to your network:
- On your computer, click the network icon
 in the notification area to display the available wireless networks.
 - Select the wireless network that you want to connect to, then click Connect.
- You may need to key in the network security key for a secured wireless network, then click OK.
- Wait while your computer establishes a connection to the wireless network successfully. The connection status is displayed and the network icon displays the connected
 status.
NOTES:
- Refer to the next chapters for more details on configuring your wireless network's settings.
- Refer to your device's user manual for more details on connecting it to your wireless network.
Wireless Gigabit Router RT-ACRH17 Utilities
Device Discovery
Device Discovery is an ASUS WLAN utility that detects an ASUS wireless router device, and allows you to configure the wireless networking settings.
To launch the Device Discovery utility:
From your computer’s desktop, click Start > All Programs > ASUS Utility > Wireless Router > Device Discovery.
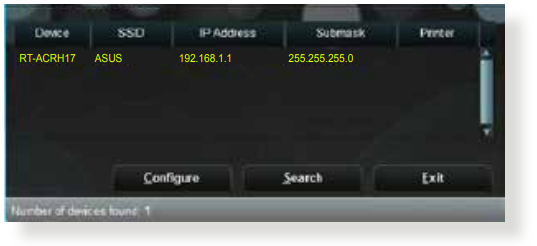
NOTE: When you set the router to Access Point mode, you need to use Device Discovery to get the router’s IP address.
Firmware Restoration
Firmware Restoration is used on an ASUS Wireless Router that failed during its firmware upgrading process. It uploads the firmware that you specify. The process takes about three to four minutes.
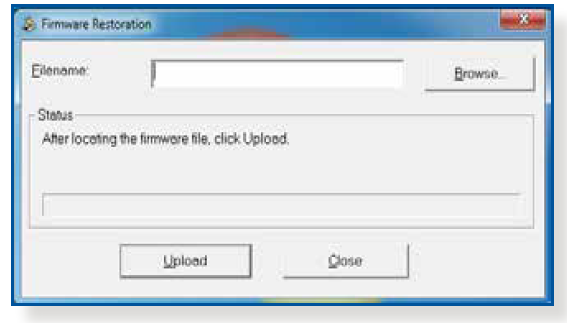
IMPORTANT: Launch the rescue mode on the router before using the Firmware Restoration utility.
NOTE: This feature is not supported on MAC OS.
Setup Guide
To set up the Wireless Gigabit Router RT-ACRH17,
- Start by connecting it to your modem using an Ethernet cable.
- Power on the router and connect to it using a computer or mobile device via Wi-Fi or Ethernet.
- Open a web browser and navigate to the default IP address (usually 192.168.1.1) to access the ASUSWRT interface.
- Follow the on-screen instructions to configure your network settings, including setting up your SSID, password, and other preferences.
- For wireless devices, simply search for the router's default SSID in your device's Wi-Fi settings and connect using the default password provided in the user manual.
Troubleshooting
This chapter provides solutions for issues you may encounter with your router. If you encounter problems that are not mentioned in this chapter.
Basic Troubleshooting
If you are having problems with your router, try these basic steps in this section before looking for further solutions.
Upgrade Firmware to the latest version.
Launch the Web GUI. Go to Advanced Settings > Administration > Firmware Upgrade tab. Click Check to verify if the latest firmware is available.
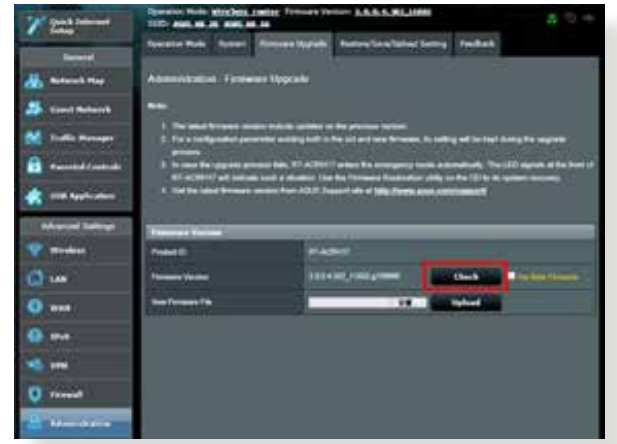
- If the latest firmware is available, visit the ASUS global website at http://www.asus.com/Networks/Wireless_Routers/ to download the latest firmware.
- From the Firmware Upgrade page, click Browse to locate the firmware file.
- Click Upload to upgrade the firmware.
Restart your network in the following sequence:
- Turn off the modem.
- Unplug the modem.
- Turn off the router and computers.
- Plug in the modem.
- Turn on the modem and then wait for 2 minutes.
- Turn on the router and then wait for 2 minutes.
- Turn on computers.
Check if your Ethernet cables are plugged properly.
- When the Ethernet cable connecting the router with the modem is plugged in properly, the WAN LED will be on.
- When the Ethernet cable connecting your powered-on computer with the router is plugged in properly, the corresponding LAN LED will be on.
Check if the wireless setting on your computer matches that of your computer.
- When you connect your computer to the router wirelessly, ensure that the SSID (wireless network name), encryption method, and password are correct.
Check if your network settings are correct.
Each client on the network should have a valid IP address. ASUS recommends that you use the wireless router’s DHCP server to assign IP addresses to computers on your network.
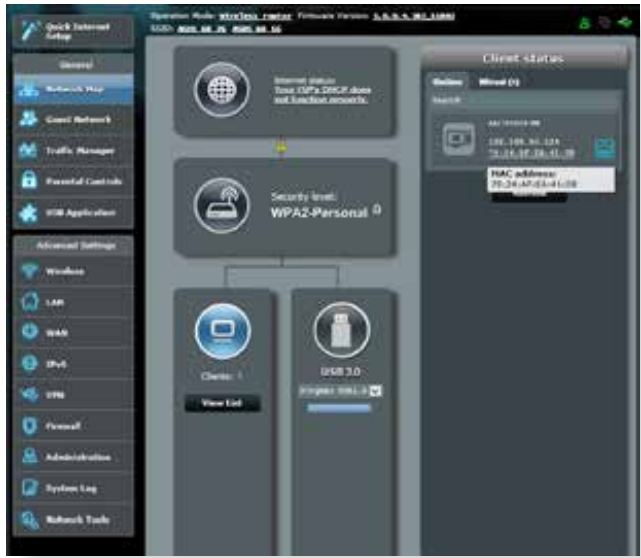
- Some cable modem service providers require you to use the MAC address of the computer initially registered on the account. You can view the MAC address in the web GUI, Network Map > Clients page, and hover the mouse pointer over your device in Client Status.
I cannot access the router GUI using a web browser
- If your computer is wired, check the Ethernet cable connection and LED status as described in the previous section.
- Ensure that you are using the correct login information. The default factory login name and password is “admin/admin”. Ensure that the Caps Lock key is disabled when you enter the login information.
- Delete the cookies and files in your web browser.
For Internet Explorer 8, follow these steps:
- Launch Internet Explorer 8, then click Tools > Internet Options.
In the General tab, under Browsing history, click Delete…, select Temporary Internet Files and Cookies then click Delete.

NOTES:
- The commands for deleting cookies and files vary with web browsers.
- Disable proxy server settings, cancel the dial-up connection, and set the TCP/IP settings to obtain IP addresses automatically. For more details, refer to Chapter 1 of this user manual.
- Ensure that you use CAT5e or CAT6 ethernet cables.
The client cannot establish a wireless connection with the router.
NOTE: If you are having issues connecting to 5Ghz network, make sure that your wireless device supports 5Ghz or features dual band capabilities.
- Out of Range:
- Move the router closer to the wireless client.
- Try to adjust antennas of the router to the best direction as described in section 1.4 Positioning your router.
- DHCP server has been disabled:
- Launch the web GUI. Go to General > Network Map> Clients and search for the device that you want to connect to the router.
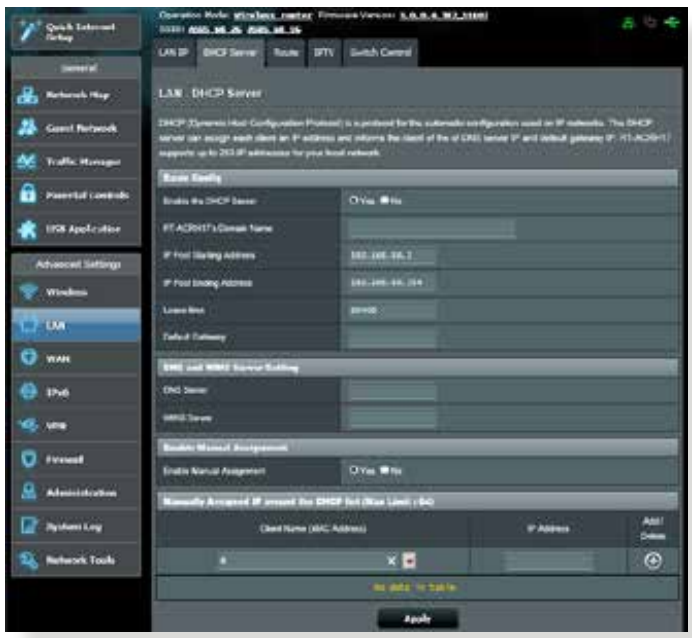
If you cannot find the device in the Network Map, go to Advanced Settings > LAN > DHCP Server, Basic Config list, select Yes on the Enable the DHCP Server.
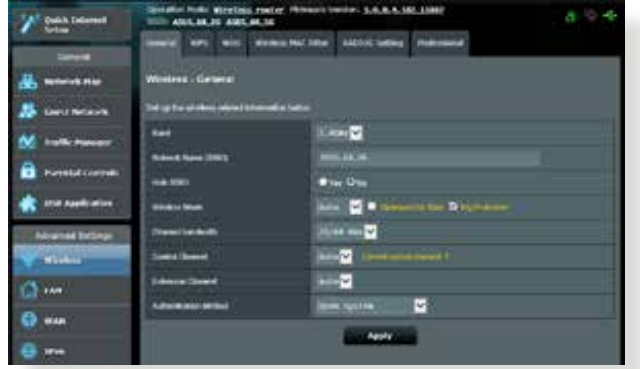
SSID has been hidden. If your device can find SSIDs from other routers but cannot find your router’s SSID, go to Advanced Settings > Wireless > General, select No on Hide SSID, and select Auto on Control Channel.
- If you are using a wireless LAN adapter, check if the wireless channel in use conforms to the channels available in your country/area. If not, adjust the channel, channel bandwidth, and wireless mode.
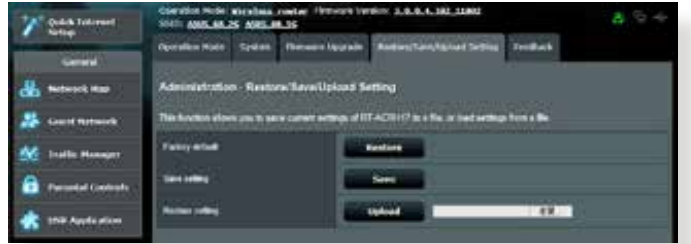
If you still cannot connect to the router wirelessly, you can reset your router to factory default settings. In the router GUI, click Administration > Restore/Save/Upload Setting and click Restore.
Internet is not accessible.
- Check if your router can connect to your ISP’s WAN IP address. To do this, launch the web GUI and go to General> Network Map, and check the Internet Status.
If your router cannot connect to your ISP’s WAN IP address, try restarting your network as described in the section Restart your network in following sequence under Basic Troubleshooting.

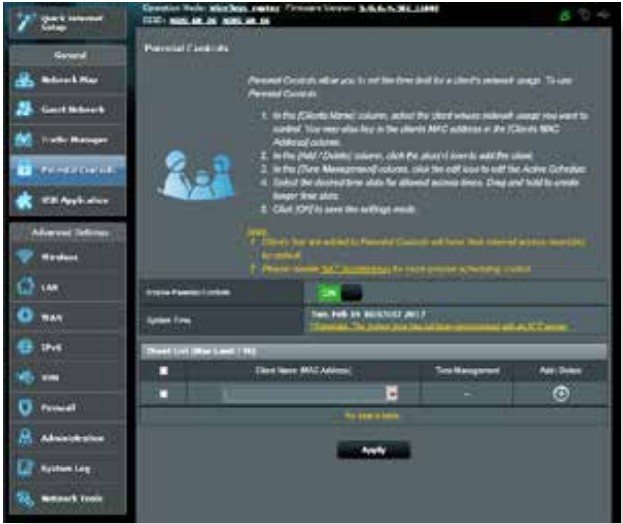
The device has been blocked via the Parental Control function. Go to General > Parental Control and see if the device is in the list. If the device is listed under Client Name, remove the device using the Delete button or adjust the Time Management Settings.
- If there is still no Internet access, try to reboot your computer and verify the network’s IP address and gateway address.
- Check the status indicators on the ADSL modem and the wireless router. If the WAN LED on the wireless router is not ON, check if all cables are plugged properly.
You forgot the SSID (network name) or network password
- Setup a new SSID and encryption key via a wired connection (Ethernet cable). Launch the web GUI, go to Network Map, click the router icon, enter a new SSID and encryption key, and then click Apply.
- Reset your router to the default settings. Launch the web GUI, go to Administration > Restore/Save/Upload Setting, and click Restore. The default login account and password are both “admin”.
How to restore the system to its default settings?
Go to Administration > Restore/Save/Upload Setting, and click Restore.
The following are the factory default settings:
- User Name: admin
- Password: admin
- SSID (2.4GHz): Refer to the label at the bottom of the router
- SSID (5GHz): Refer to the label at the bottom of the router
Firmware upgrade failed.
Launch the rescue mode and run the Firmware Restoration utility. Refer to section 5.2 Firmware Restoration on how to use the Firmware Restoration utility.
Cannot access Web GUI
Before configuring your wireless router, do the steps described in this section for your host computer and network clients.
A. Disable the proxy server, if enabled.
NOTE: The screenshots provided are for Windows 7 only. The steps and options may be different for Windows® 8 and Windows® 8.1.
Windows 7/8
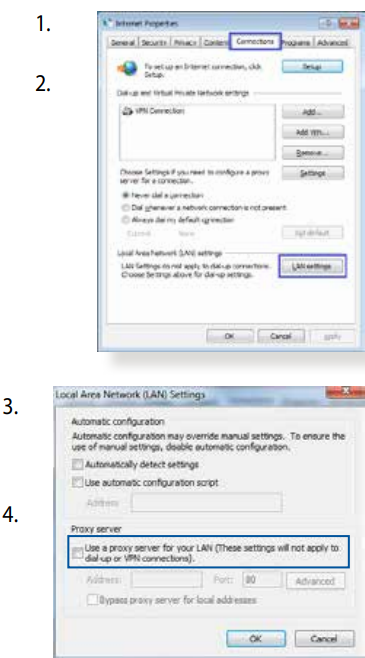
- Click Start > Internet Explorer to launch the browser.
- Click Tools > Internet options > Connections tab > LAN settings.
- From the Local Area Network (LAN) Settings screen, untick Use a proxy server for your LAN.
Click OK when done.
MAC OS
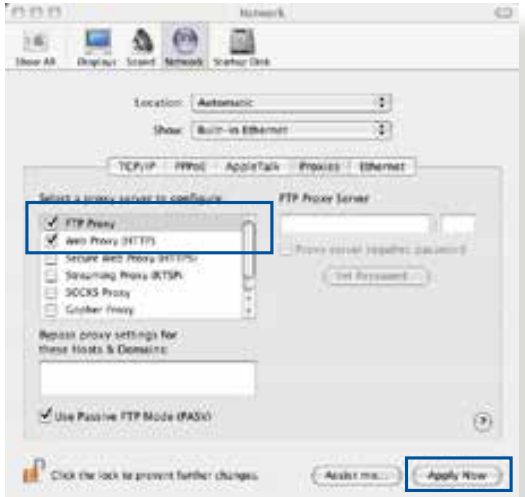
- From your Safari browser, click Safari > Preferences > Advanced > Change Settings...
- From the Network screen, deselect FTP Proxy and Web Proxy (HTTP).
Click Apply Now when done.
B. Set the TCP/IP settings to automatically obtain an IP address.
Windows 7/8
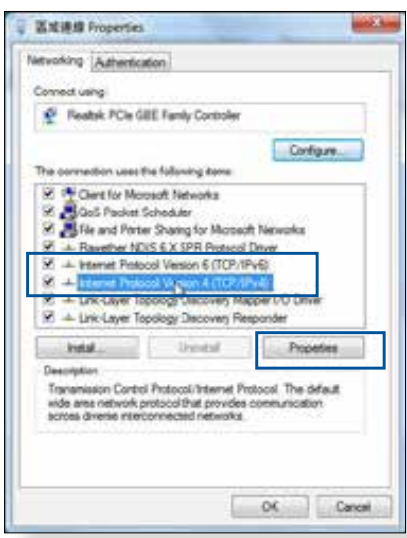
- Click Start > Control Panel > Network and Internet > Network and Sharing Center > Manage network connections.
Select Internet Protocol Version 4 (TCP/IPv4) or Internet Protocol Version 6 (TCP/IPv6), then click Properties.
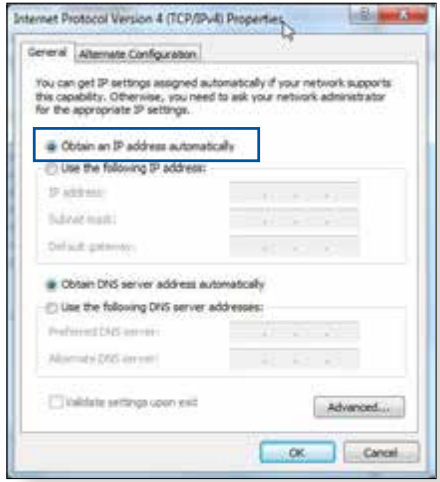
- To obtain the IPv4 IP settings automatically, tick Obtain an IP address automatically.
To obtain the IPv6 IP settings automatically, tick Obtain an IPv6 address automatically. Click OK when done.
MAC OS
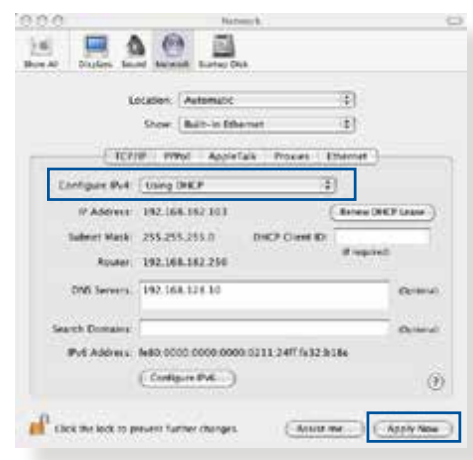
- Click the Apple icon located on the top left of your screen.
- Click System Preferences > Network > Configure...
- From the TCP/IP tab, select Using DHCP in the Configure IPv4 dropdown list.
Click Apply Now when done.
Disable the dial-up connection, if enabled.
Windows 7/8
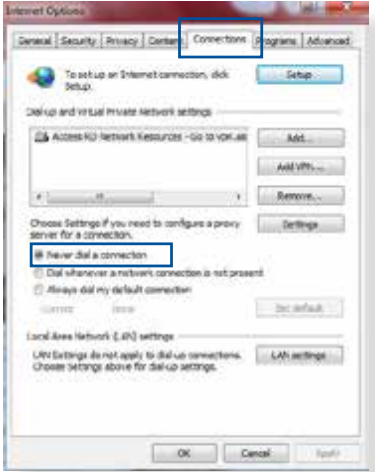
- Click Start > Internet Explorer to launch the browser.
- Click Tools > Internet options > Connections tab.
- Tick Never dial a connection.
Click OK when done.
Pros & Cons
Pros
- Strong and stable Wi-Fi coverage
- High-speed internet with dual-band support
- User-friendly ASUSWRT interface
- Multiple Gigabit Ethernet ports and USB ports for connectivity
- Affordable price point
Cons
- Lacks AiMesh support for mesh networking
- Some users report firmware update issues
- Average USB storage performance
Customer Reviews
Common complaints include occasional drops in connectivity and the lack of advanced features like MU-MIMO technology. Despite these minor drawbacks, the router remains a popular choice for its balance of performance and affordability.
Faqs
What is the maximum wireless speed of the ASUS AC1700?
How many Ethernet ports does the Wireless Gigabit Router have?
What kind of security features does the Router RT-ACRH17 offer?
How do I update the firmware of my AC1700 Gigabit Router?
Can I use the AC1700 as a repeater or access point?
What is the purpose of AiRadar beamforming technology in the ASUS RT-ACRH17?
How many USB ports does the ASUS AC1700 Wireless Gigabit Router RT-ACRH17 have?
Is the ASUS Wireless Router suitable for online gaming?
Can I set up parental controls on the Wireless Router?
Leave a Comment
