How to Use: Asus Notebook PC Laptop E14566 User Manual
Content
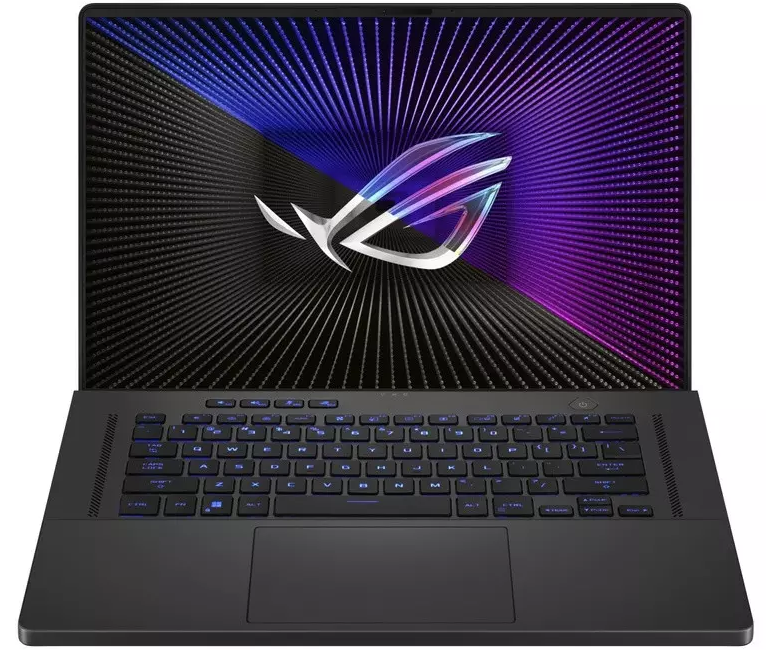
Introducing the ASUS Notebook PC Laptop E14566
The E14566 boasts a sleek and lightweight design, making it highly portable and perfect for on-the-go use latest Intel or AMD processors, this laptop delivers robust performance for multitasking, productivity, and entertainment. The high-resolution display ensures crisp and clear visuals, while the ergonomic keyboard provides a comfortable typing experience. With ample storage options and long battery life, the ASUS E14566 is built to handle your daily computing tasks efficiently. Additionally, it comes with a variety of connectivity options, including USB-C, HDMI, and Wi-Fi 6, ensuring you stay connected and productive. Whether you need a reliable laptop for work, study, or casual use, the ASUS Notebook PC Laptop E14566 is designed to deliver exceptional performance and convenience.
Detailed Specifications
The ASUS Notebook PC Laptop E14566 boasts a 14-inch Full HD display, Intel i7-1165G7 processor, 16GB DDR4 RAM, and a 512GB NVMe SSD. Its NVIDIA GeForce MX450 graphics card supports high-performance gaming and creative applications. The laptop features a sleek, lightweight design, weighing just 3.3 lbs and offering a battery life of up to 10 hours. Additionally, the E14560 supports Wi-Fi 6 and Bluetooth 5.1 for seamless connectivity.
Hardware Setup
Getting to know your Notebook PC
Top View
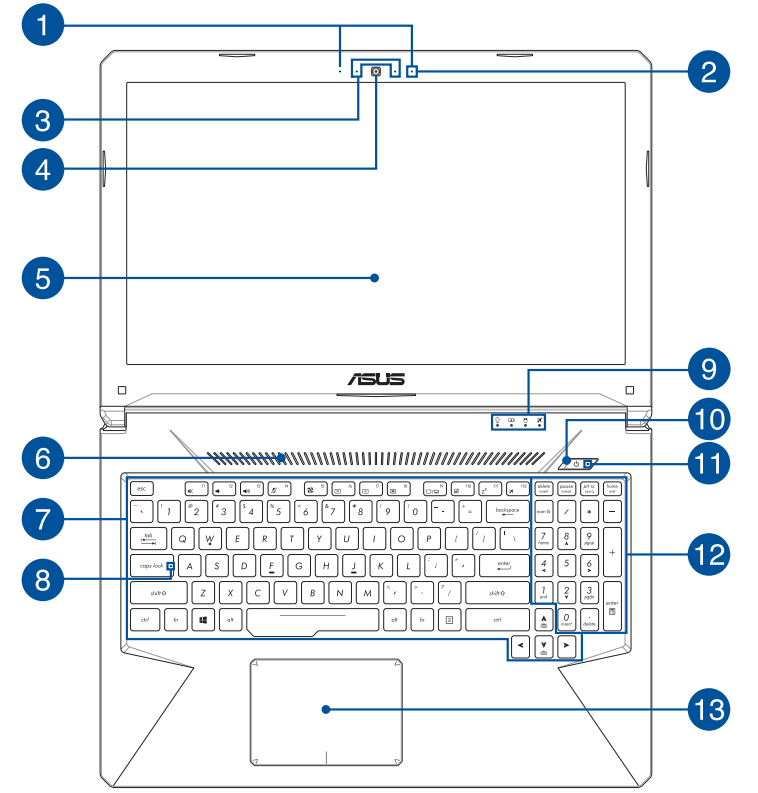
NOTE: The keyboard’s layout may vary per region or country. The Notebook view may also vary in appearance depending on the Notebook PC model.
- Array microphones (on selected models): The array microphones feature echo canceling, noise suppression, and beam forming functions for better voice recognition and audio recording.
- Microphone: The built-in microphone can be used for video conferencing, voice narrations, or simple audio recording.
- Camera indicator: The camera indicator lights up when the built-in camera is in use.
- Camera: The built-in camera allows you to take pictures or record videos using your Notebook PC.
- Display panel: This high-definition display panel provides excellent viewing features for photos, videos, and other multimedia files on your Notebook PC.
- Air vents: The air vents allow cool air to enter and warm air to exit the Notebook PC.
WARNING! Ensure that paper, books, clothing, cables, or other objects do not block any of the air vents or else overheating may occur. - Keyboard: The keyboard provides full-sized QWERTY keys with a comfortable travel depth for typing. It also enables you to use the function keys, allows quick access to Windows®, and controls other multimedia functions.
NOTE: The keyboard layout differs by model or territory. - Capital lock indicator: This indicator lights up when the capital lock function is activated. Using capital lock allows you to type capitalized letters (such as A, B, C) using your Notebook PC’s keyboard.
Status indicators: The status indicators help identify the current hardware status of your Notebook PC.

- Power indicator: The power indicator lights up when the Notebook PC is turned on and blinks slowly when the Notebook PC is in sleep mode.
Two-color battery charge indicator: The two-color LED provides a visual indication of the battery’s charge status. Refer to the following table for details:
Color Status Solid White The Notebook PC is plugged into a power source and the battery power is between 95% and 100%. Solid Orange The Notebook PC is plugged into a power source, charging its battery, and the battery power is less than 95%. Blinking Orange The Notebook PC is running on battery mode and the battery power is less than 10%. Lights off The Notebook PC is running on battery mode and the battery power is between 10% to 100%. - Drive activity indicator: This indicator lights up when your Notebook PC is accessing the internal storage drives.
- Airplane mode indicator: This indicator lights up when the Airplane mode in your Notebook PC is enabled.
NOTE: When enabled, the Airplane mode disables all wireless connectivity.
- Power button: Press the power button to turn your Notebook PC on or off. You can also use the power button to put your Notebook PC to sleep or hibernate mode and wake it up from sleep or hibernate mode. In the event that your Notebook PC becomes unresponsive, press and hold the power button for at least four (4) seconds until your Notebook PC shuts down.
- Power indicator: The power indicator lights up when the Notebook PC is turned on and blinks slowly when the Notebook PC is in sleep mode.
- Numeric keypad: The numeric keypad toggles between these two functions: for numeric input and as pointer direction keys.
NOTE: For more details, refer to the Using the numeric keypad section in this manual. - Touchpad: The touchpad allows the use of multi-gestures to navigate onscreen, providing an intuitive user experience. It also simulates the functions of a regular mouse.
NOTE: For more details, refer to the Using the touchpad section in this manual.
Bottom
NOTE: The bottom side may vary in appearance depending on the model.
WARNING! The bottom of the Notebook PC can get warm to hot while in use or while charging the battery pack. When working on your Notebook PC, do not place it on surfaces that can block the vents.
IMPORTANT!
- Battery time varies by usage and by the specifications for this Notebook PC. The battery pack cannot be disassembled.
- Purchase components from authorized retailers to ensure maximum compatibility and reliability. Consult an ASUS service center or authorized retailers for product service or assistance on proper disassembly or assembly of the product.
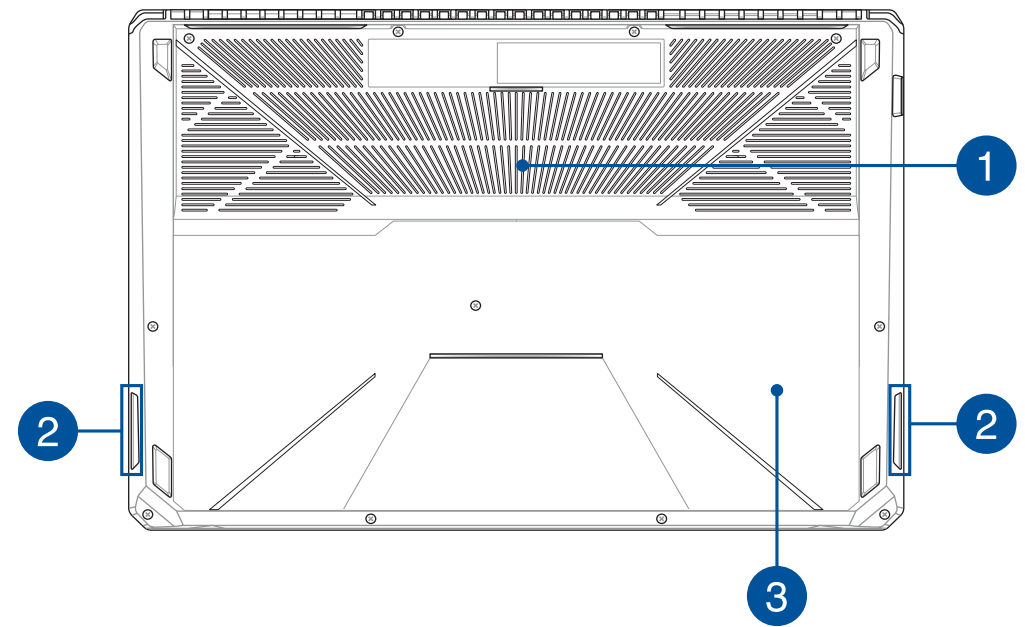
- Air vents: The air vents allow cool air to enter and warm air to exit the Notebook PC.
- WARNING! Ensure that paper, books, clothing, cables, or other objects do not block any of the air vents or else overheating may occur.
- Audio speakers: The built-in audio speakers allow you to hear audio straight from your Notebook PC. Audio features are software-controlled.
- Compartment cover: This cover protects the reserved spaces in your Notebook PC for the removable SSD (M.2 2280 slot), HDD (Hard Disk Drive), and RAM (Random Access Memory) modules.
NOTE:
- For more details, refer to the Chapter 5: Upgrading your Notebook PC section in this manual.
- The M.2 2280 slot supports both PCIe (NVMe) SSD and SATA SSD.
Right Side
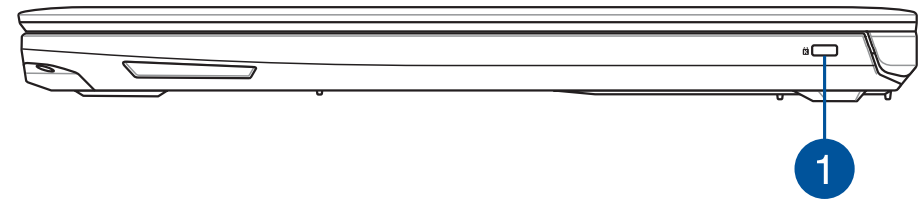
- Kensington security slot: The Kensington® security slot allows you to secure your Notebook PC using Kensington® compatible Notebook PC security products.
Left Side
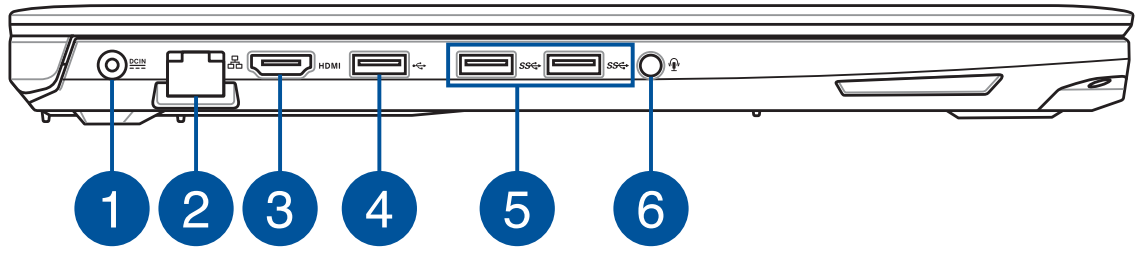
- Power (DC) input port: Insert the bundled power adapter into this port to charge the battery pack and supply power to your Notebook PC.
WARNING! The adapter may become warm to hot while in use. Do not cover the adapter and keep it away from your body while it is connected to a power source.
IMPORTANT! Use only the bundled power adapter to charge the battery pack and supply power to your Notebook PC.
- LAN port: Insert the network cable into this port to connect to a local area network.
- HDMI port: This port is for the HDMI (High-Definition Multimedia Interface) connector and is HDCP compliant for HD DVD, Blu-ray, and other protected content playback.
- USB 2.0 port: The USB (Universal Serial Bus) port is compatible with USB 2.0 or USB 1.1 devices such as keyboards, pointing devices, flash disk drives, external HDDs, speakers, cameras, and printers.
- USB 3.1 Gen 1 port: The USB 3.1 (Universal Serial Bus 3.1) Gen 1 port provides a transfer rate of up to 5 Gbit/s and is backward compatible with USB 2.0.
- Headphone/Headset/Microphone jack: This port allows you to connect amplified speakers or headphones. You can also use this port to connect your headset or an external microphone.
Product Description
The ASUS Notebook PC Laptop E14566 is a high-performance laptop perfect for professionals and entertainment enthusiasts alike. Its powerful specs enable smooth multitasking, efficient workflows, and immersive gaming experiences. The laptop's ergonomic design, coupled with its vivid display and high-quality audio, makes it an ideal companion for streaming movies and music. Furthermore, its robust security features, such as a fingerprint reader, ensure safe and secure access to your digital world.
Using your Notebook PC
Getting started
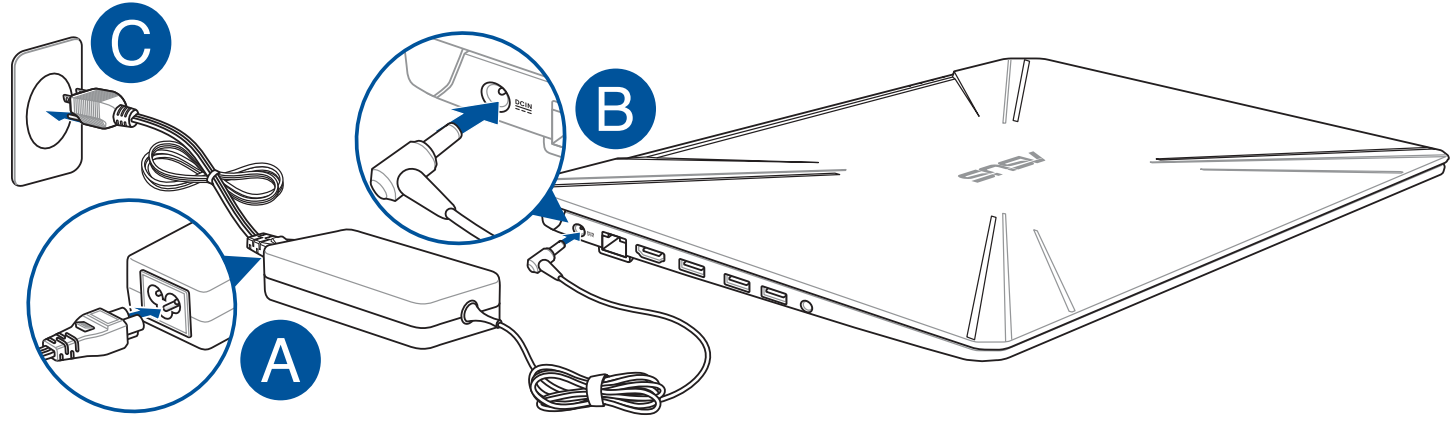
Charge your Notebook PC
- Connect the AC power cord to the AC/DC adapter.
- Connect the DC power connector into your Notebook PC’s power (DC) input port.
- Plug the AC power adapter into a 100V~240V power source. Charge the Notebook PC for 3 hours before using it in battery mode for the first time.
NOTE: The power adapter may vary in appearance, depending on models and your region.
IMPORTANT!
Power adapter information:
- Input voltage: 100-240Vac
- Input frequency: 50-60Hz
- Rating output current: 7.7A (150W)
- Rating output voltage: 19.5V
IMPORTANT!
- Locate the input/output rating label on your Notebook PC and ensure that it matches the input/output rating information on your power adapter. Some Notebook PC models may have multiple rating output currents based on the available SKU.
- Ensure that your Notebook PC is connected to the power adapter before turning it on for the first time. We strongly recommend that you use a grounded wall socket while using your Notebook PC on power adapter mode.
- The socket outlet must be easily accessible and near your Notebook PC.
- To disconnect your Notebook PC from its main power supply, unplug your Notebook PC from the power socket.
WARNING! Read the following precautions for your Notebook PC’s battery:
- Only ASUS-authorized technicians should remove the battery inside the device (for non-removable battery only).
- The battery used in this device may present a risk of fire or chemical burn if removed or disassembled.
- Follow the warning labels for your personal safety.
- Risk of explosion if the battery is replaced by an incorrect type.
- Do not dispose of in fire.
- Never attempt to short-circuit your Notebook PC’s battery.
- Never attempt to disassemble and reassemble the battery (for non-removable battery only).
- Discontinue usage if leakage is found.
- The battery and its components must be recycled or disposed of properly.
- Keep the battery and other small components away from children.
Lift to open the display panel
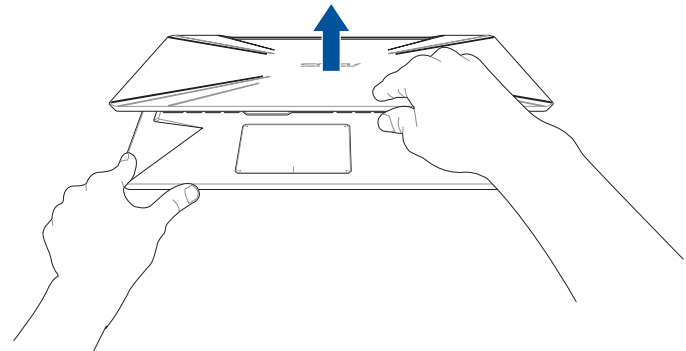
NOTE: For better heat dissipation, we recommend that you open the display panel to at least 60 degrees while in use.
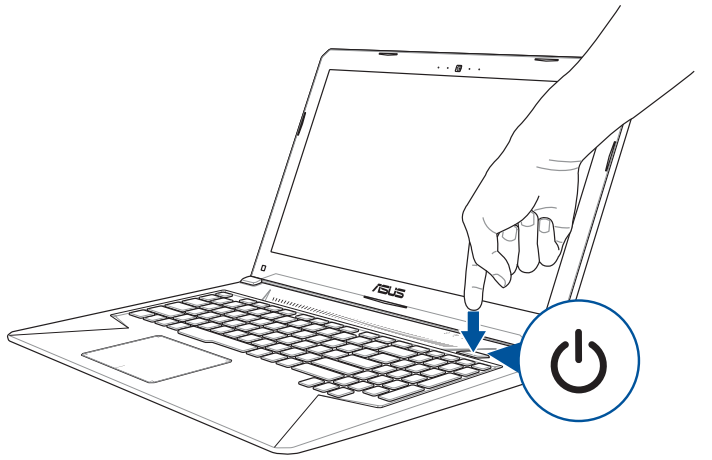
Press the power button
Using the touchpad
Moving the pointer: You can tap anywhere on the touchpad to activate its pointer, then slide your finger on the touchpad to move the pointer onscreen.
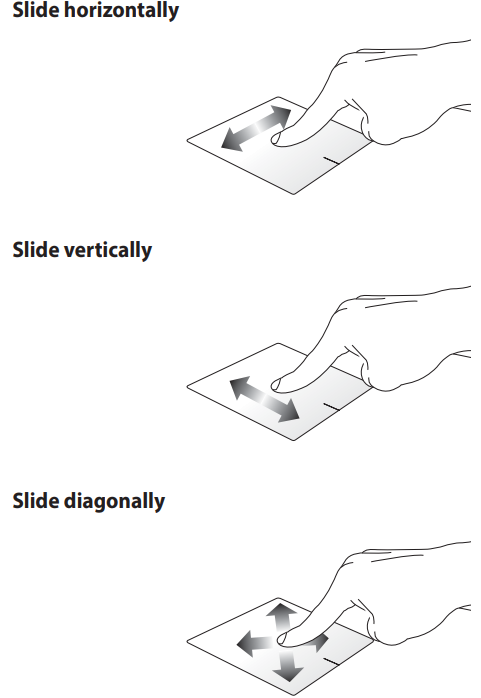
- Slide horizontally
- Slide vertically
- Slide diagonally
One-finger gestures
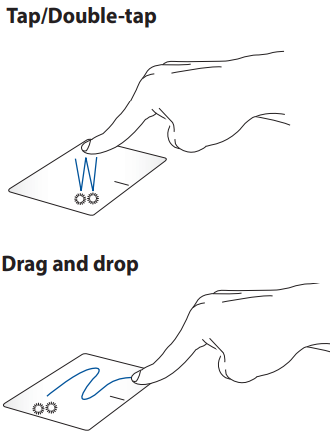
- Tap/Double-tap:
- Tap an app to select it.
- Double-tap an app to launch it.
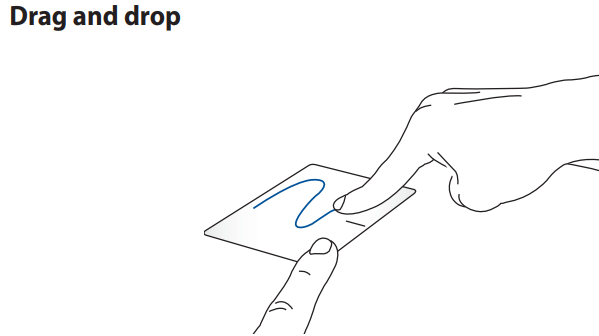
Drag and drop: Double-tap an item, then slide the same finger without lifting it off the touchpad. To drop the item to its new location, lift your finger from the touchpad.
- Left-click:
- Click an app to select it.
- Double-click an app to launch it.
- Right-click:
Click this button to open the right-click menu.
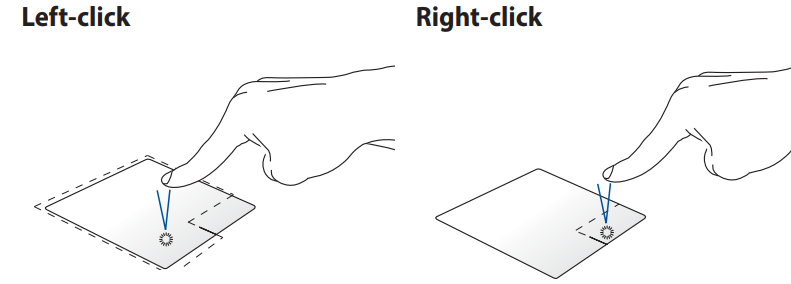
NOTE: The areas inside the dotted line represent the locations of the left mouse button and the right mouse button on the touchpad.
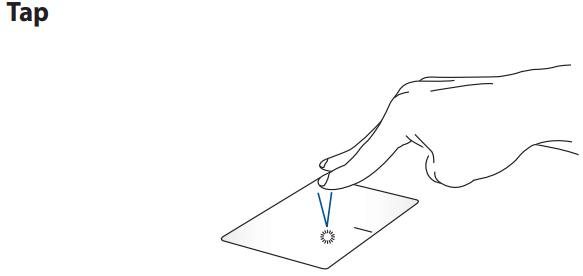
Two-finger gestures
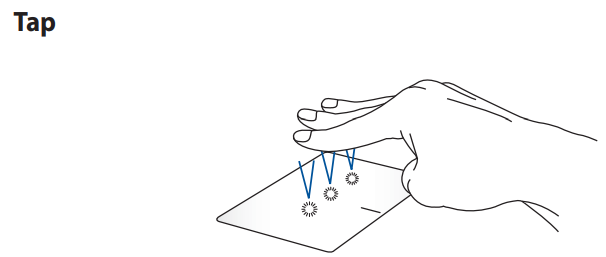
Tap: Tap two fingers on the touchpad to simulate the right-click function.
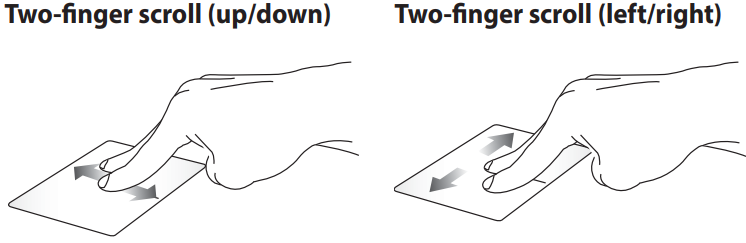
- Two-finger scroll (up/down): Slide two fingers to scroll up or down.
Two-finger scroll (left/right): Slide two fingers to scroll left or right.
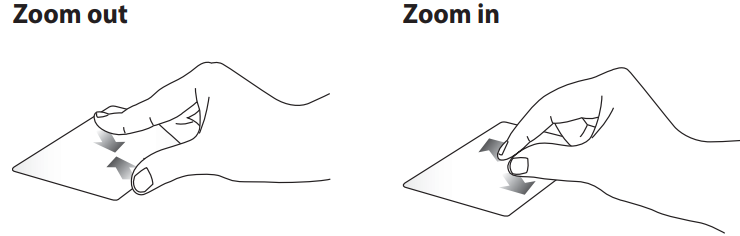
- Zoom out: Bring together your two fingers on the touchpad.
Zoom in: Spread apart your two fingers on the touchpad.
Drag and drop: Select an item then press and hold the left button. Using your other finger, slide on the touchpad to drag the item, lift your finger off the button to drop the item.
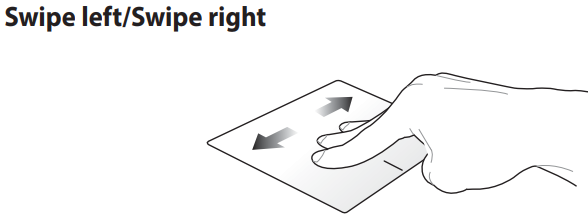
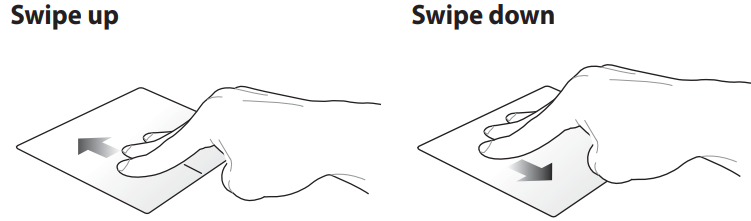
Three-finger gestures
Tap: Tap three fingers on the touchpad to invoke Cortana.
- Swipe left/Swipe right: If you opened multiple apps, swipe three fingers left or right to switch between these apps.
Swipe up: Swipe up to see an overview of all the apps currently opened.
Swipe down: Swipe down to show the desktop.
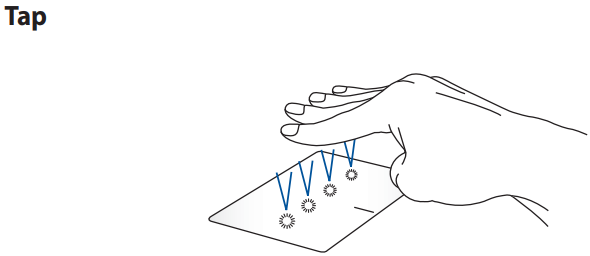
Four-finger gestures
- Tap: Tap four fingers on the touchpad to invoke Action Center.
Customizing your touchpad
- Launch All settings from the Action Center.
- Select Devices, then select Mouse & touchpad.
- Adjust the settings to your preference.
Setup Guide
To get started with your ASUS Notebook PC Laptop E14566, follow these simple steps:
- Unbox the laptop, removing any protective packaging.
- Press and hold the power button for 3-5 seconds to turn on the device.
- Follow the on-screen instructions to set up your user account, language, and regional preferences.
- Connect to Wi-Fi and update the system software and drivers for optimal performance.
- Install your preferred applications and explore the ASUS E14560's features.
Using the keyboard
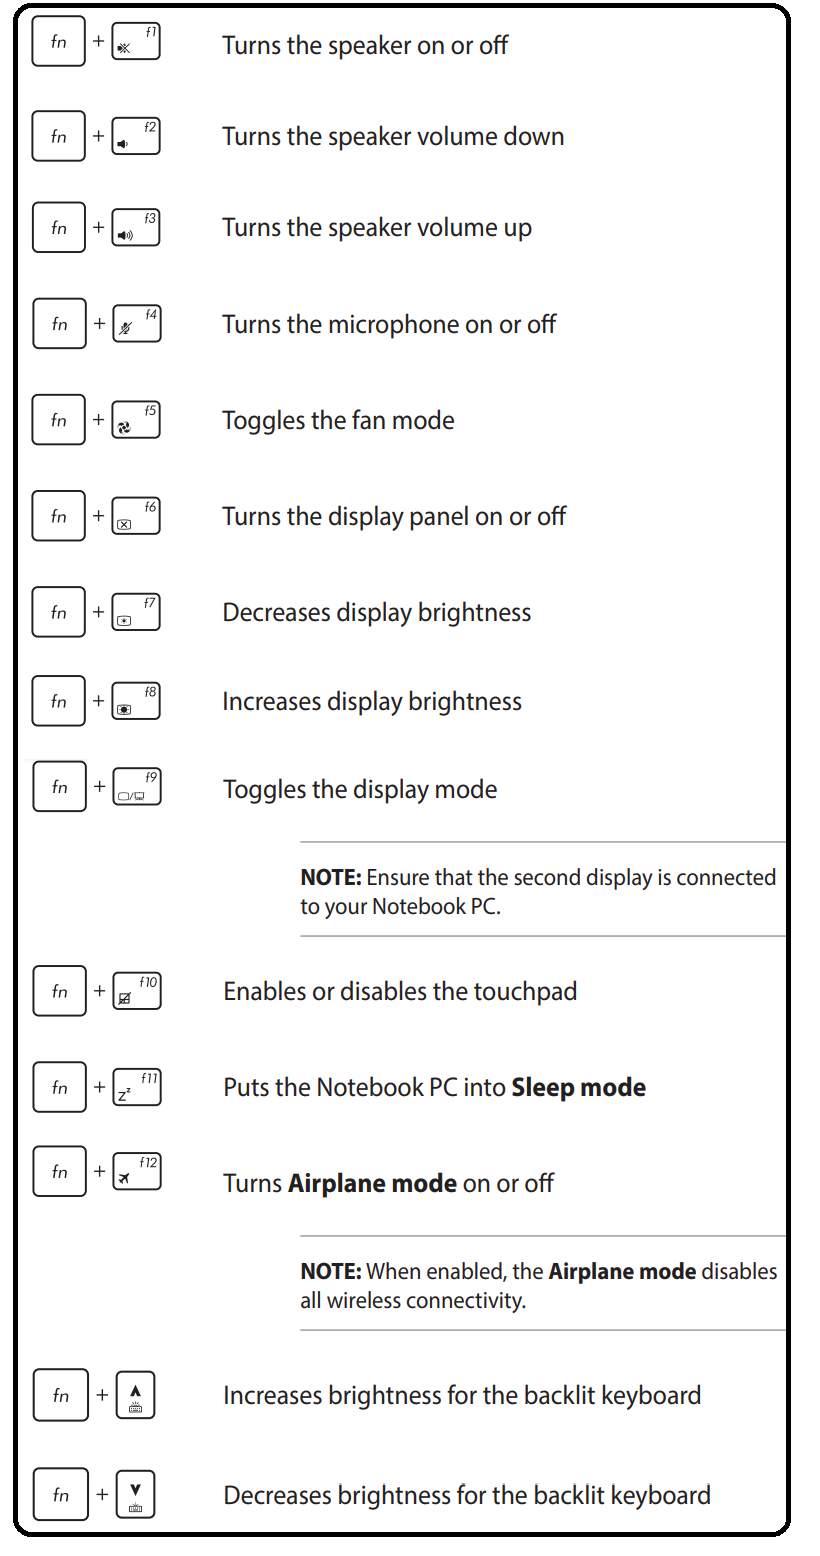
Function keys
The function keys on your Notebook PC’s keyboard can trigger the following commands:
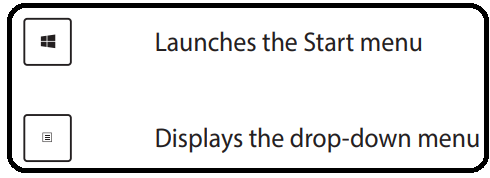
Windows 10 keys
There are two special Windows® keys on your Notebook PC’s keyboard used as below:
Upgrading your Notebook PC
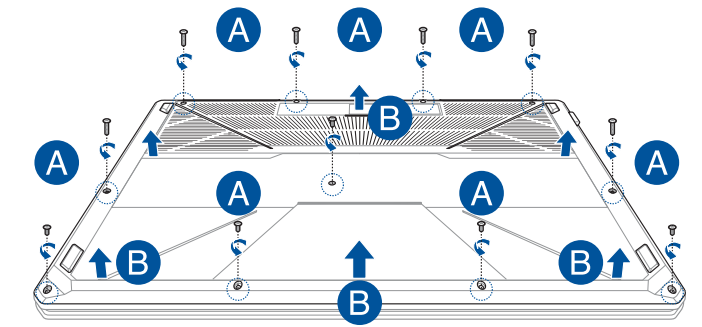
Removing the compartment cover
- Remove the screws from the Notebook PC’s compartment cover.
- Pull out the compartment cover and remove it completely from your Notebook PC.
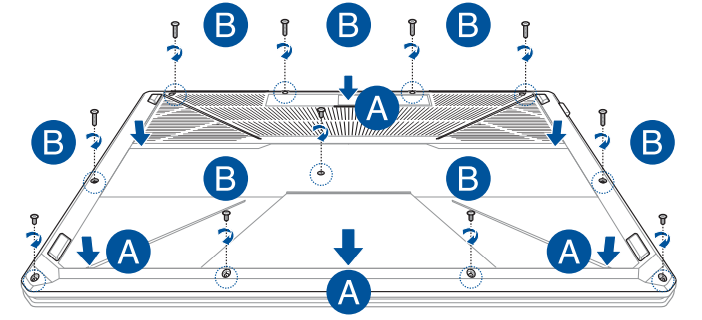
To reattach the compartment cover:
- Align and reattach the cover of the compartment.
- Secure the cover using the screws you removed earlier.
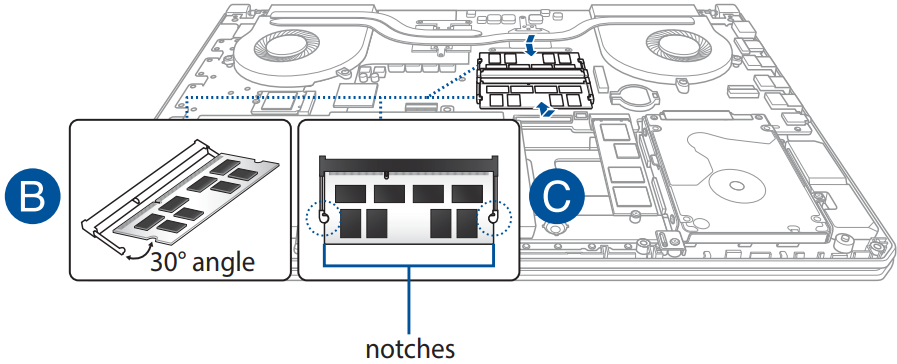
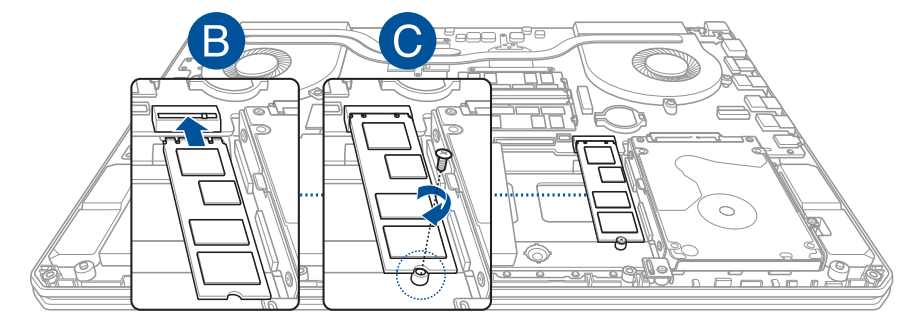
Installing a RAM module
Upgrade the memory capacity of your Notebook PC by installing a RAM (Random Access Memory) module in the memory module compartment. The following steps show you how to install a RAM module into your Notebook PC:
WARNING! Disconnect all the connected peripherals, any telephone or telecommunication lines, and power connector (such as external power supply, battery pack, etc.) before removing the compartment cover.
IMPORTANT! Visit an authorized service center or retailer for information on RAM module upgrades for your Notebook PC. Purchase RAM modules from authorized retailers of this Notebook PC to ensure maximum compatibility and reliability.
NOTE:
- The appearance of your Notebook PC’s bottom side and RAM module may vary per model but the RAM module installation remains the same.
- It is recommended that you install the RAM module under professional supervision. You may also visit an authorized service center for further assistance.
- Remove the compartment cover.
NOTE: For more details, refer to the Removing the compartment cover section in this manual. - Align and insert the RAM module into the RAM module slot.
- Push down the RAM module until it clicks in place.
Installing the Hard Disk Drive
Refer to the following steps if you need to install a new HDD (Hard Disk Drive) to your Notebook PC:
IMPORTANT! Purchase an HDD from authorized retailers of this Notebook PC to ensure maximum compatibility and reliability.
WARNING! Disconnect all the connected peripherals, any telephone or telecommunication lines, and power connector (such as external power supply, battery pack, etc.) before removing the compartment cover.
NOTE: The appearance of your Notebook PC’s bottom side and HDD may vary per model but the HDD installation remains the same. It is recommended that you replace the HDD under professional supervision. You may also visit an authorized service center for further assistance.
- Remove the compartment cover.
NOTE: For more details, refer to the Removing the compartment cover section in this manual. Remove the screws securing the HDD bay to the compartment.
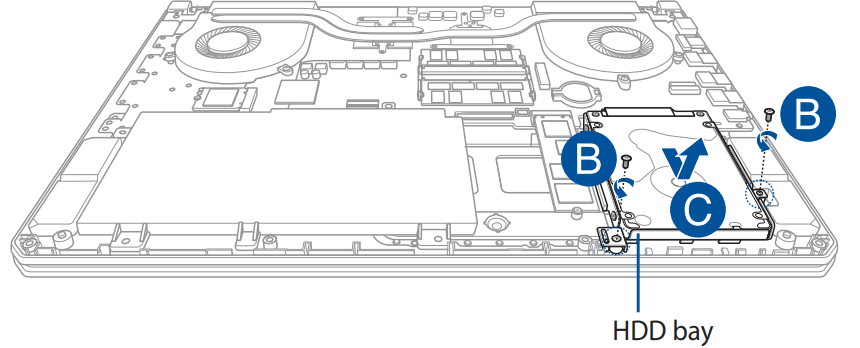
(Optional) If an HDD is currently installed in your Notebook PC, disconnect the HDD bay from the HDD port as shown in the illustration below.
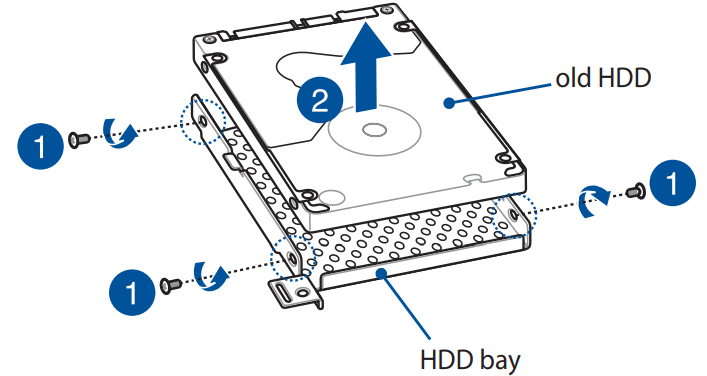
- (Optional) If an HDD is currently attached to the HDD bay, refer to the following steps on how to remove the old HDD:
- Remove all the screws on the sides of the HDD bay.
- Remove the old HDD from the HDD bay then place it on a flat dry surface with its PCB (Printed Circuit Board) facing up, as shown in the illustration below.
Place the new HDD with its PCB (Printed Circuit Board) facing the HDD bay. Ensure that the port connectors of your HDD are not obstructed by any part of the HDD bay.
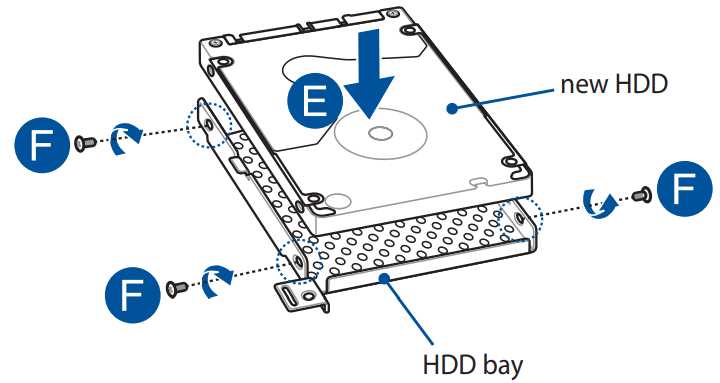
- Reattach and secure the HDD with the screws you removed earlier.
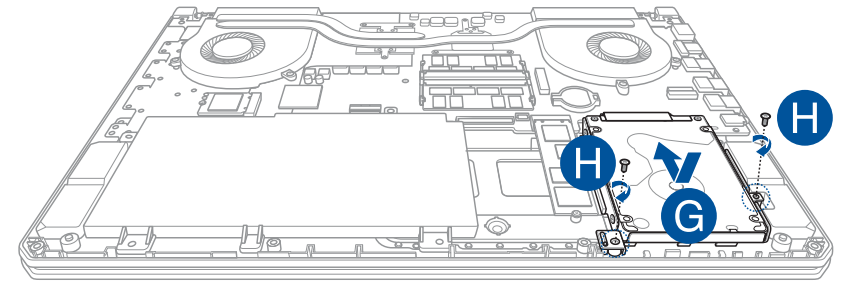
- Replace the HDD bay back in the compartment with the HDD connector aligned with the Notebook PC’s HDD port. Push the HDD bay until it connects with the Notebook PC.
Secure the HDD bay with the screws you removed earlier.
Installing an M.2 card
Refer to the following steps when installing a compatible M.2 card in your Notebook PC:
IMPORTANT! Purchase your M.2 card from authorized retailers of this Notebook PC to ensure maximum compatibility and reliability.
WARNING! Disconnect all the connected peripherals, any telephone or telecommunication lines, and power connector (such as external power supply, battery pack, etc.) before removing the compartment cover.
NOTE:
- The appearance of your Notebook PC’s bottom side and M.2 card may vary per model but the module installation remains the same.
- It is recommended that you install the M.2 card under professional supervision. You may also visit an authorized service center for further assistance.
- The M.2 2280 slot supports both PCIe (NVMe) SSD and SATA SSD.
- Remove the compartment cover.
- NOTE: For more details, refer to the Removing the compartment cover section in this manual.
- Align and insert the M.2 card into its card module slot.
- Secure the M.2 card in place using the bundled screw.
Useful tips for your Notebook PC
To help you maximize the use of your Notebook PC, maintain its system performance, and ensure all your data are kept secured, here are some useful tips that you can follow:
- Update Windows® periodically to ensure that your applications have the latest security settings.
- Use anti-virus software to protect your data and keep this updated too.
- Unless absolutely necessary, refrain from using force shutdown to turn off your Notebook PC.
- Always back up your data and make it a point to create a backup in an external storage drive.
- Refrain from using the Notebook PC at extremely high temperatures. If you are not going to use your Notebook PC for a long period of time (at least a month), we recommend that you take out the battery if the battery is removable.
- Disconnect all external devices and ensure you have the following items prior to resetting your Notebook PC:
- Product key for your operating systems and other installed applications
- Backup data
- Log in ID and password
- Internet connection information
Troubleshooting
Here are some common issues and solutions for the ASUS Notebook PC In Search of Incredible E14566:
- Problem: Slow performance or freezing
Solution: Restart the laptop and ensure all updates are installed. Reduce the number of running applications and check for malware using a reputable antivirus program. - Problem: Poor battery life
Solution: Adjust power settings, disable unnecessary background applications, and lower screen brightness to conserve battery life.
Pros & Cons
- Pro: High-performance components for productivity and gaming
- Pro: Sleek and lightweight design
- Pro: Robust security features
- Con: Premium price point
- Con: No optical drive
Customer Reviews
Users praise the ASUS Notebook PC Laptop E14566 for its blazing-fast performance, stunning visuals, and premium build quality. Some report minor software issues, which can typically be resolved with updates. The laptop's battery life and price are also frequently mentioned as potential drawbacks. However, overall, customers are impressed with the E14560's capabilities and recommend it for those seeking a powerful and versatile laptop.
Faqs
What kind of CPU does the ASUS Notebook PC Laptop E14566 come with?
To what extent is the ASUS Notebook PC E14566 compatible with RAM?
Which storage choices does the ASUS Notebook PC Laptop offer?
Is the keyboard of the ASUS Notebook PC E14566 backlit?
Which ports does the ASUS Notebook PC have access to?
How do I go back to the factory settings on my ASUS Notebook PC Laptop E14566?
Leave a Comment