How to Connect: Asus LCD Monitor VZ239 Guide
Content
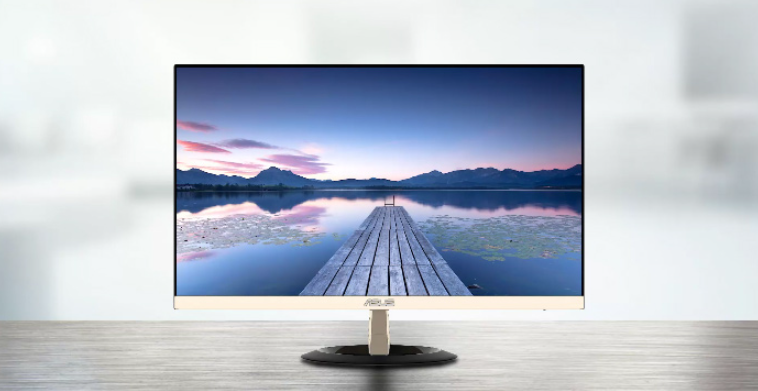
Introduction of ASUS LCD Monitor VZ239
The ASUS VZ239 is a 23-inch Full HD IPS monitor designed to deliver stunning visuals and an immersive viewing experience. Launched in 2021, this LCD monitor is a perfect blend of style, performance, and affordability, with an estimated price range of $150 to $200. Its ultra-slim profile and frameless design make it an ideal choice for multi-monitor setups in home offices, gaming stations, or professional workstations.
Specifications
Model | VZ239H | VZ239HR | VZ239HE | VZ239N | VZ239Q | |
Panel Size | 23 inches diagonal (Active Display Area: 509.18 (H) x 286.42(V) mm) | |||||
Max. Resolution | 1920 x 1080 | |||||
Brightness(Typ.) | 250 cd/m2 | |||||
Contrast Ratio (Typ.) | 1000:1 | |||||
Viewing Angle (CR≤10) | 178°(V); 178°(H) | |||||
Display Colors | 16.7M colors (6 bits + Advanced-FRC) | |||||
Response Time | 5ms (GTG) | |||||
Terminals |
Inputs: | VGA x 1, HDMI x 1 | VGA x 1, HDMI x 1 | VGA x 1, HDMI x 1 | VGA x 1, DVI x 1 | VGA x 1, HDMI x 1, DP x 1 |
Audio input: | Yes | Yes | N/A | N/A | Yes | |
Audio Speaker | Speaker output: | 1.5W x 2 | 1.5W x 2 | N/A | N/A | 1.5W x 2 |
Power consumption** | 24W (Max) in Test Line Pattern with audio | 24W (Max) in Test Line Pattern with audio | 21W (Max) in Test Line Pattern without audio | 20W (Max) in Test Line Pattern without audio | 24W (Max) in Test Line Pattern with audio | |
Standby power consumption | < 0.5W at AC110V~ AC220V | |||||
Power off power consumption | < 0.5W at AC110V~ AC220V | |||||
Phys. Dimension (incl. base) (HxWxD) | 387 x 531 x 211 mm | |||||
Box Dimension (HxWxD) | 500 x 597x 125 ±5 mm | |||||
Net Weight (incl. stand) | 2.7 ±1.0 kg | |||||
Gross Weight (Esti.) | 4.2 ±1.0 kg | |||||
Voltage Rating | Delta: ADP-40KD BB, 19Vdc 2.1A, AC100~240V at 50/60Hz Delta: ADP-33W A/B/C,19Vdc 1.75A, AC100~240V at 50/60Hz (VZ239HR/VZ239HE) Lite-on: PA1330-39 AE/AC/AU, 19Vdc 1.75A, AC100~240V at 50/60Hz (VZ239HR/VZ239HE) | |||||
Temperature | Operating temperature: 0 ~ 40˚C Storage temperature: -30 ~ 65˚C | |||||
Accessories Compliance and Standards | Adaptor, Power cord (optional), VGA cable, Quick Start Guide, Warranty card, DVI cable (optional), HDMI cable (optional), Audio cable (optional), DP cable (optional) Ukr SEPRO, CE, CB, BSMI,FCC, CCC, VCCI,RCM(C-tick), UL/ cUL, MSIP(KCC), Energy Star 7.0, HDMI, DP, Windows Vista &7/8/10 WHQL, China Energy Label, E-Standby, KC, TCO 7.0, GEMS, EPEAT Silver, RoHS(China RoHS,J-Moss), WEEE, ErP( Energy Saving Only),CU | |||||
Package Contents
- Check your package for the following items:
- LCD monitor
- Monitor base
- Quick Start Guide
- Warranty card
- Adapter
- Power cord (optional)
- VGA
- Cable DVI cable (optional)
- HDMI cable (optional)
- Audio cable (optional)
- DP cable (optional)
 If any of the above is damaged or missing, please contact the seller immediately.
 CAUTION!

Assembling the Monitor Base
Place the monitor face down on a table.
Attach the base to your hand.
Turn the screw clockwise to secure the base. Then adjust your monitor to the angle that is most comfortable for you.
We recommend covering the table surface with a soft cloth to avoid damaging the monitor.

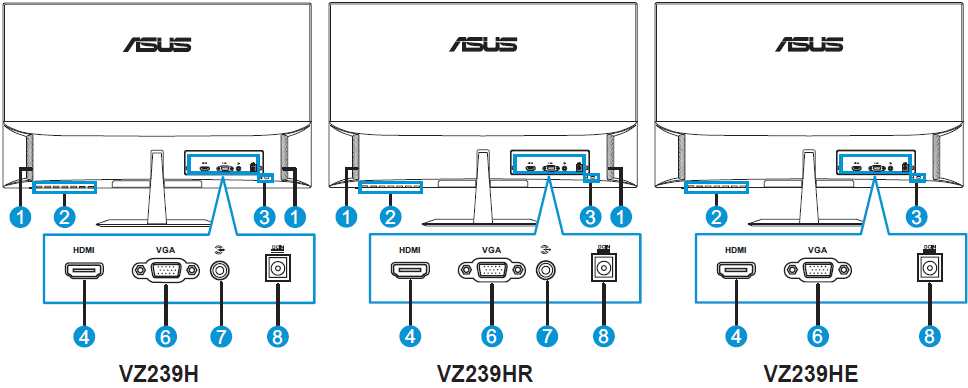
ASUS LCD Monitor VZ239 Connect cables
Rear of LCD monitor

SPEAKERS
Control buttons
Kensington Lock
HDMI port
DisplayPort
VGA port
Audio input
DC-IN port
DVI port
Monitor Introduction
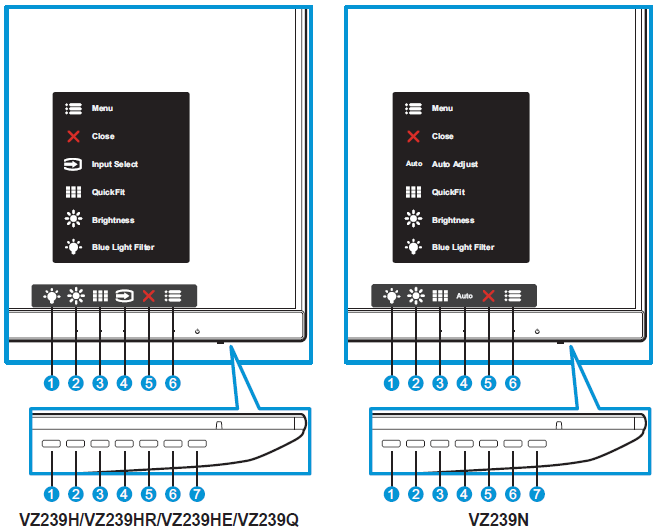
Using the control buttons
Use the control buttons at the bottom of the monitor to adjust picture settings. Press keys 1-6 to activate the key list page.
 Keyboard shortcut 2
This is a shortcut key. The default is a blue light filter. Keyboard Shortcut 1
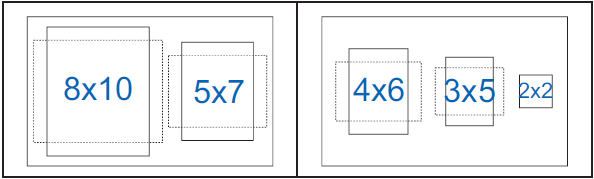
This is a hotkey. The default setting is Brightness. QuickFit Button:
This is a hotkey to activate the QuickFit alignment feature.
QuickFit provides several options for overall grid pattern, paper size, and photo size. See pages 1–6 for details. Input Button (VZ239H/VZ239HR/VZ239HE/VZ239Q): Switches the input source.
Auto Setup Button (VZ239Nonly): Performs Auto Setup automatically (only available for VGA input). Close button:
Exit the OSD menu. Menu button:
Enter OSD menu. Power Button/Power Indicator:
Press this button to turn the monitor on/off.
The definition of the power indicator color is shown in the table below.
| Status | Description |
| White | ON |
| Amber | Standby mode |
| OFF | OFF |
QuickFit function
The QuickFit feature contains three templates: (1) grid (2) paper size (3) photo size.
Grid pattern: Helps designers and users organize content and layout on a single page and achieve a consistent look and feel.

Paper Size: Allows users to view their documents in actual size on the screen.
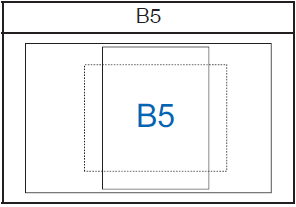
Photo Size: Allows photographers and other users to accurately view and edit their photos in real size on the screen.
Adjusting the monitor
For optimal view, we recommend that you look at the monitor completely and then adjust it to the angle that is most comfortable for you.
Hold the stand to prevent the monitor from falling when changing the angle.
You can adjust the monitor angle from -5˚ to 22˚.

 It is normal for the monitor to shake slightly when adjusting the view angle.
On Screen Display Menu
How to reconfigure
Press the Menu button to activate the OSD menu.
Press
 and
and  buttons to switch between options in the menu. As you move from one icon to another, the option name is highlighted.
To select the highlighted menu item, press the button.
Press
and buttons to select the desired option.Press
 the button to enter the slider, and then use the and buttons in accordance with the menu indicators to make changes.
Select
 return to previous menu or accept and return to previous menu.
ASUS LCD Monitor VZ239 Description
The ASUS VZ239 features a 23-inch Full HD (1920 x 1080) IPS panel, boasting a 178° wide-viewing angle and a 75Hz refresh rate. The monitor supports a 5ms response time (Gray to Gray) and adaptive-sync technology, ensuring smooth visuals and minimizing motion blur during fast-paced gaming or video playback. Its built-in stereo speakers provide decent audio quality, while the monitor's sleek and modern design complements any workspace.
OSD Function Introduction
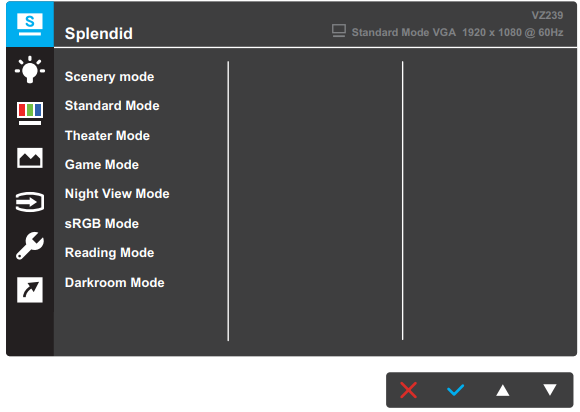
Splendid
This function contains eight sub-functions that you can select for your preference. Each mode has the Reset selection, allowing you to maintain your setting or return to the preset mode.
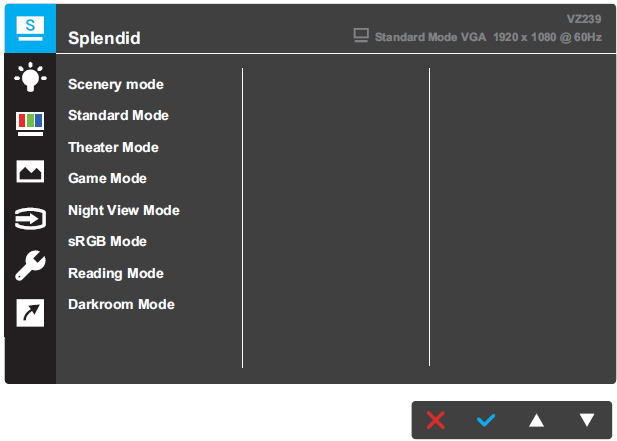
- Scenery mode: This is the best choice for scenery photo displaying with SPLENDID Video Intelligence Technology.
- Standard Mode: This is the best choice for document editing with SPLENDID Video Intelligence Technology.
- Theater Mode: This is the best choice for movie watching with SPLENDID Video Intelligence Technology.
- Game Mode: This is the best choice for game playing with SPLENDID™ Video Intelligence Technology.
- Night View Mode: This is the best choice for playing dark-scene game or watching dark-scene movie with SPLENDID™ Video Intelligence Technology.
- sRGB Mode: This is the best choice for viewing photos and graphics from PCs.
- Reading Mode: This is the best choice for book reading with SPLENDID Video Intelligence Technology.
- Darkroom Mode: This is the best choice for a weak ambient light environment with SPLENDID Video Intelligence Technology.
- In the Standard Mode, the Saturation, Skin Tone, Sharpness, and ASCR functions are not user-configurable.
- In the sRGB, the Saturation, Color Temp., SkinTone, Sharpness, Brightness, Contrast, and ASCR functions are not user-configurable.
- In the Reading Mode, the Saturation, SkinTone, ASCR, Contrast, and Color Temp. functions are not user-configurable.
Blue Light Filter
Reduce the energy level of blue light emitted from LED backlight.
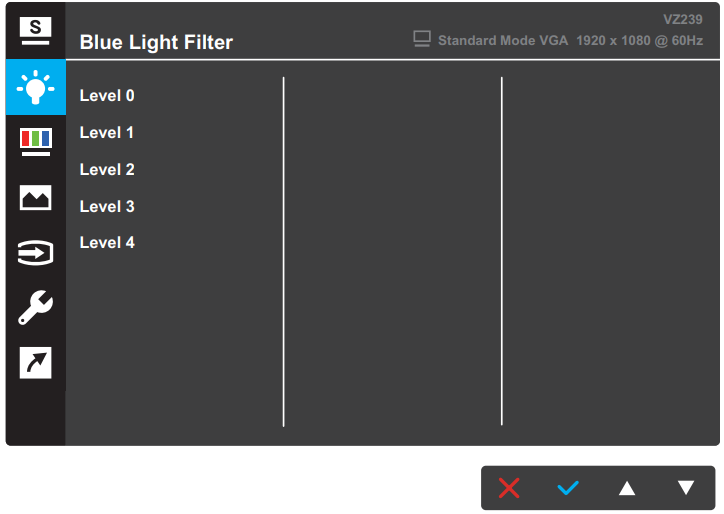
Level 0: No change.
Level 1~4: The higher the level, the more blue light will be reduced.
- When Blue Light Filter is enabled, the default Standard Mode settings are automatically imported.
From level 1 to level 3, the brightness function is user adjustable.
Level 4 is an optimized setting. Complies with TUV Low Blue Light certification. The brightness function is not user adjustable.
To reduce eye strain, rest your eyes for fifteen minutes every two hours you spend in front of a screen. Frequent blinking and eye exercises help keep your eyes moist and prevent them from drying out. Additionally, your computer screen should be 20 to 28 inches (50 to 70 cm) away from you.
Color
Select your desired image color using this function.
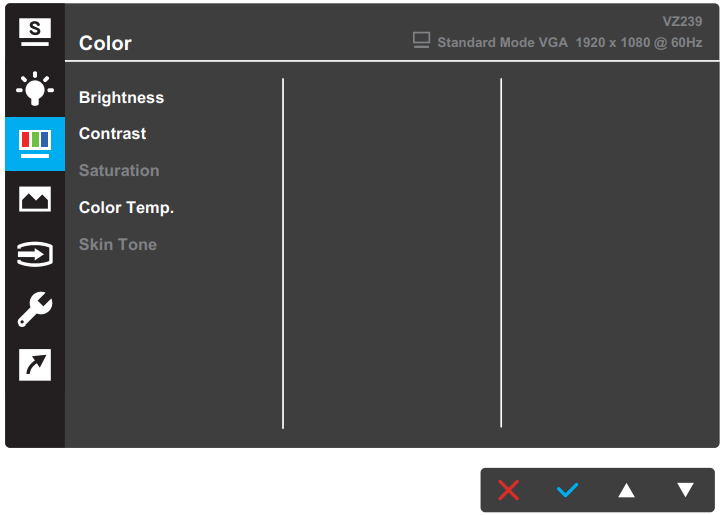
Brightness: Adjust the brightness level. Adjustment range from 0 to 100.
Contrast: Adjust the contrast level. Adjustment range from 0 to 100.
Saturation: Adjust the saturation level. Adjustment range from 0 to 100.
Colorful temperature. : Select your desired color temperature. Available options are Cool, Normal, Warm, and User Mode.
- In the User Mode, colors of R (Red), G (Green), and B (Blue) are user-configurable; the adjusting range is from 0 ~ 100.
Skin Tone: Select your desired skin color. Available options: reddish, natural and yellowish.
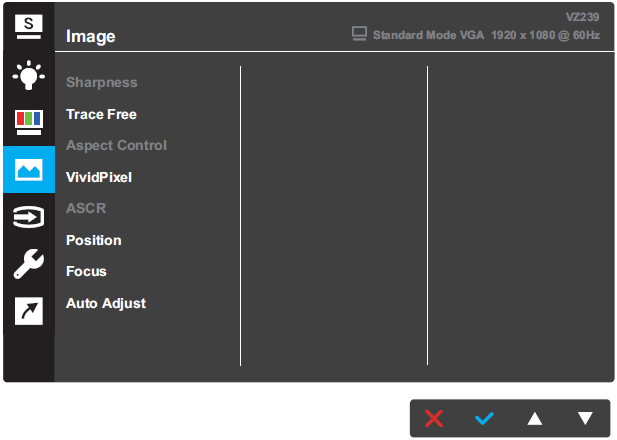
Image
You can adjust the image Sharpness, Trace Free, Aspect Control, VividPixel, ASCR, Position, Focus, and Auto Adjust from this main function.
VZ239N/VZ239H/VZ239HR/VZ239HE
VZ239Q
Sharpness: Adjusts the sharpness of the image. Adjustment range from 0 to 100.
Trace Free: Speed up response times with Over Drive technology. Adjustment range: from slower 0 to faster 100.
Aspect Ratio Control: Adjust the aspect ratio to Full, 4:3 or Overscan.
- 4:3 aspect ratio is only available when the input source is 4:3 aspect ratio.
Over Scan is only available for HDMI input.
Vivid Pixel: Exclusive ASUS technology that delivers life-like images for crystal clear and detailed enjoyment. Adjustment range from 0 to 100.
ASCR: Select ON. Or OFF to enable or disable the dynamic contrast feature.
Adaptive-Sync (VZ243Q only): Select ON or OFF to enable or disable the dynamic refresh rate range from 40Hz to 60Hz over DisplayPort 1.2 stream.
Position: Adjust the horizontal position (H-Position) and vertical position (V-Position) of the image. Setting range is from 0 to 100 (only available for VGA input).
- More (for VZ239Q model only): Return the next page of Image Setting.
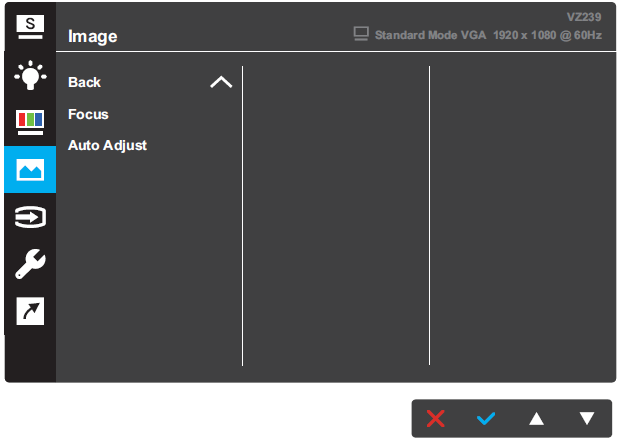
- Back (for VZ239Q model only): Return the previous page of Image Setting.
- Focus: Reduce the Horizontal-line noise and Vertical-line noise of the image by adjusting (Phase) and (Clock) separately. The adjusting range is from 0 to 100 (only available for VGA input).
- Auto Adjust: Automatically perform Auto Adjust (only available for VGA input).
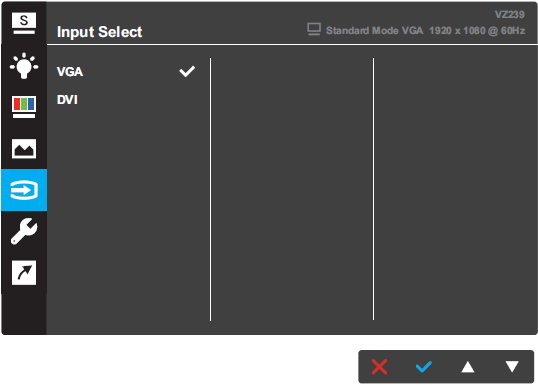
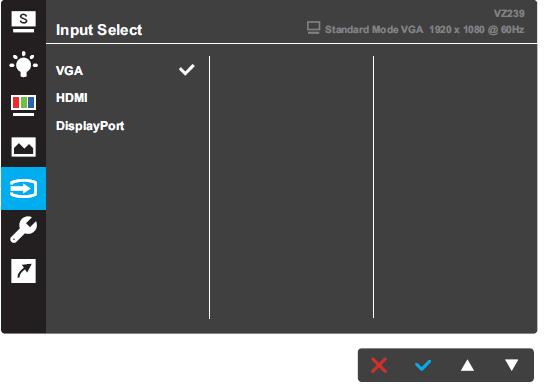
Input selection
Select the input source.
VZ239H/VZ239HR/VZ239HE

VZ239N
VZ239Q
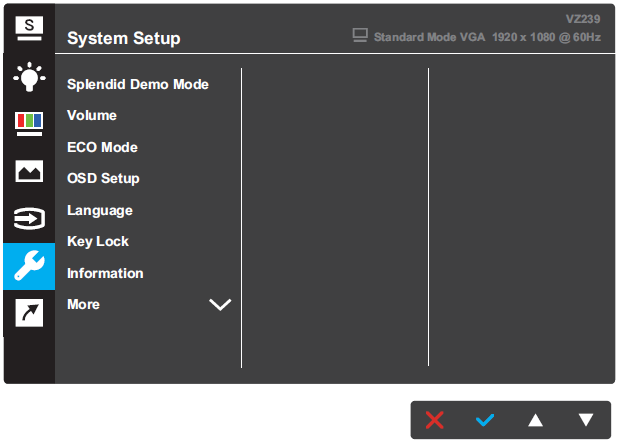
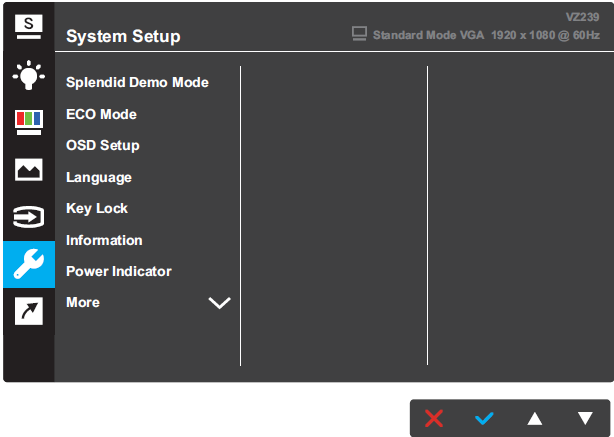
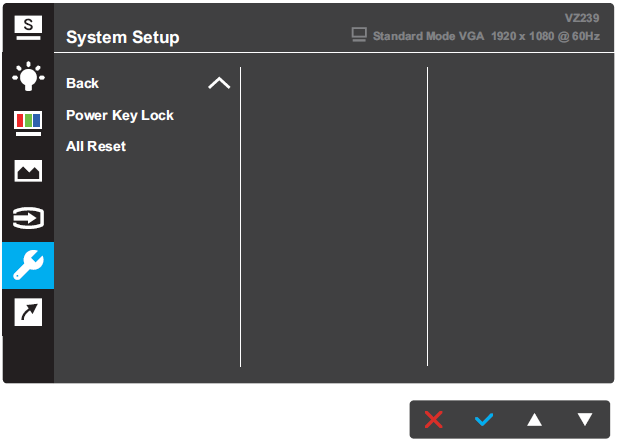
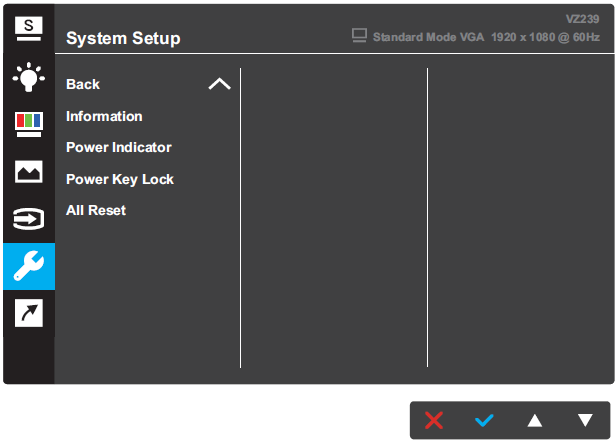
System Setup
Adjust the system configuration.
VZ239H/VZ239HR
VZ239N/VZ239HE
VZ239Q
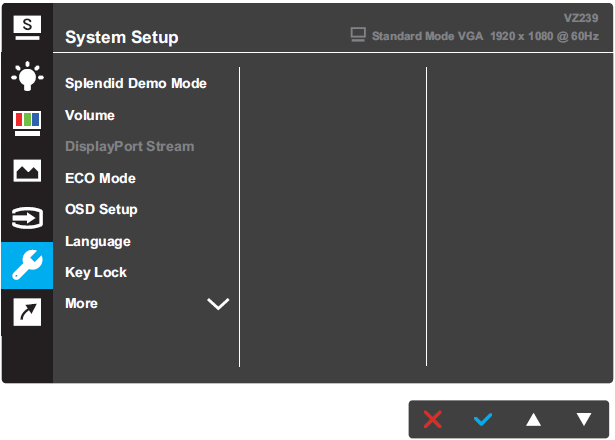
- Splendid Demo Mode: Activate the demo mode for the Splendid function.
- Volume (for VZ239H/VZ239HR/VZ239Q models only): Adjust the volume level.
- DisplayPort Stream (for VZ239Q model only): Select DP 1.1 or DP 1.2.
- ECO Mode: Activate the ecology mode for power saving.
- OSD Setup: Adjust the OSD Timeout, DDC/CI, and Transparency of the OSD screen.
- Language: Select the OSD language.
- Key Lock: Pressing the second button on the right for more than five seconds to activate the key lock function.
- Information: Display the monitor information.
- More: Return the next page of System Setting.
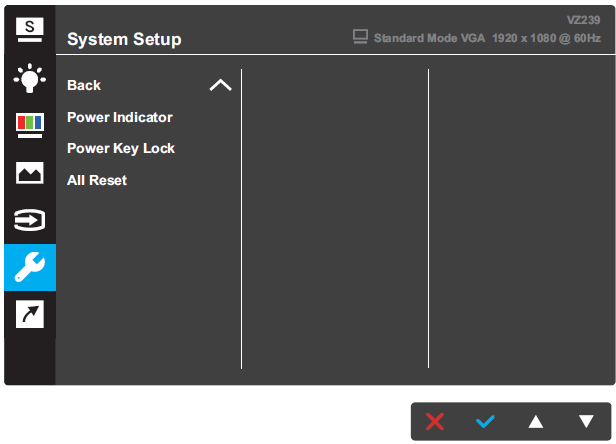
- Back: Return the previous page of System Setting.
- Power Indicator: Turn the power LED indicator on/off.
- Power Key Lock: Disable/Enable the power key.
- All Reset: Select YES to revert all settings to the factory default mode.
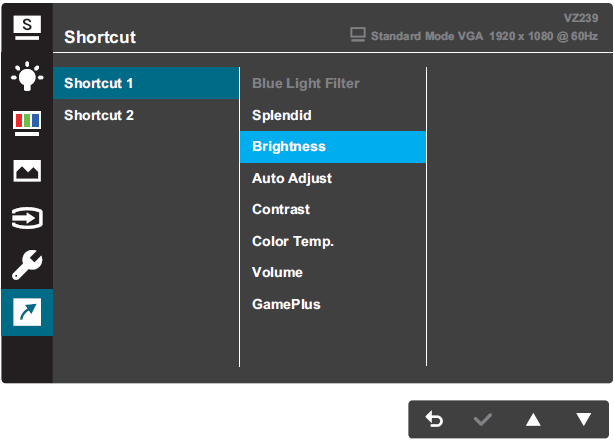
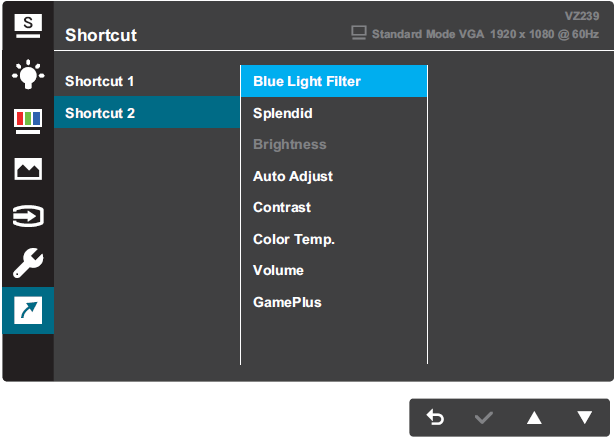
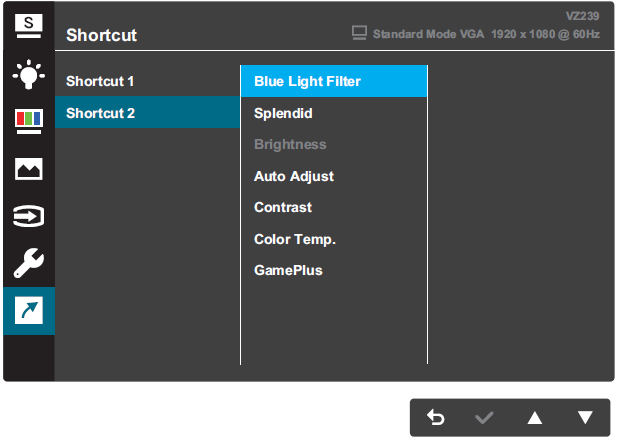
Shortcut
Assign the specific function to the two shortcut keys.
VZ239H/VZ239HR/VZ239Q
VZ239N/VZ239HE
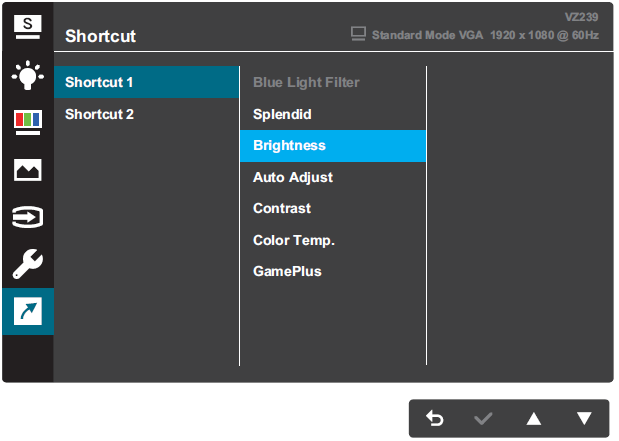
- Shortcut 1: Assign a function to the Shortcut Key1. Available options: Blue Light Filter, Splendid, Brightness, Auto Adjust, Contrast, Color Temp., Volume (for VZ239H/VZ239HR/VZ239Q models only), and GamePlus. The default setting is Brightness.
- Shortcut 2: Assign a function to the Shortcut Key2. Available options: Blue Light Filter, Splendid, Brightness, Auto Adjust, Contrast, Color Temp., Volume (for VZ239H/VZ239HR/VZ239Q models only), and GamePlus. The default setting is Blue Light Filter.
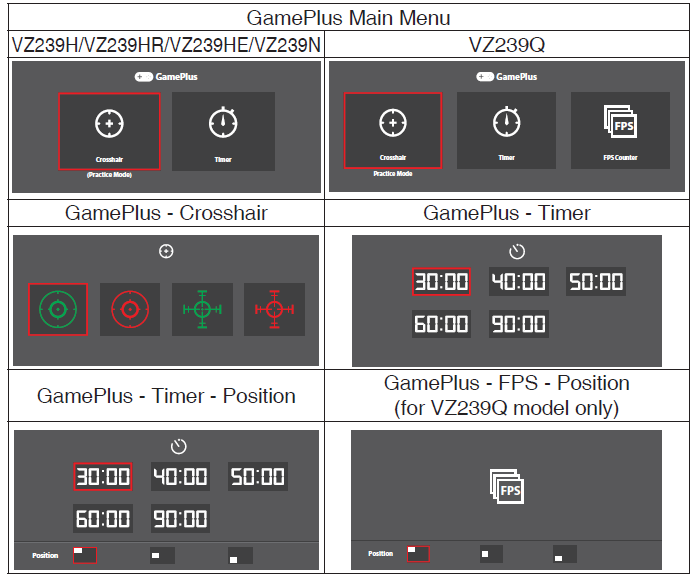
GamePlus Function
The GamePlus Function provides a toolkit and creates a better gaming environment for users when playing different types of games. The Crosshair overlay with four different crosshair options lets you choose the one that best suits the game you’re playing. The onscreen Timer can be positioned on the left of the display to keep track of the elapsed gaming time. The FPS (frames per second) counter lets you know how smooth the game is running (for VZ239Q model only).
To activate GamePlus
Press the Menu button to activate the OSD menu.
Press
the or button to select a Shortcut. Then click the button to enter the context menu.Press
the or button to select Shortcut 1 or Shortcut 2.Press
the button to enter the “Shortcut 1” or “Shortcut 2” submenu.Press
the or button to select GamePlus. Then press the button to confirm the GamePlus submenu.Press
the or button to select Aim, Timer, or FPS Counter (VZ243Q only). Then press the button to confirm your selection.Press
the button several times to exit the OSD menu.Press the assigned Shortcut Key1 or Shortcut Key2 to activate the GamePlus main menu.
Setup Guide
To set up the ASUS VZ239 LCD monitor, follow these steps:
- Unbox the monitor, remove any protective packaging, and assemble the base following the instruction manual.
- Connect the monitor to a power source using the included power cable and adapter.
- Choose your preferred video input, such as HDMI or VGA, and connect the corresponding cable to the monitor and your computer or laptop.
- Press the power button on the monitor to turn it on.
- Configure the monitor settings by pressing the "Menu" button on the monitor's control panel. Adjust brightness, contrast, and other settings to your liking.
Safety Information
- Before setting up the monitor, carefully read all the documentation that came with the package.
- To prevent fire or shock hazard, never expose the monitor to rain or moisture.
- Never try to open the monitor cabinet. The dangerous high voltages inside the monitor may result in serious physical injury.
- If the power supply is broken, do not try to fix it by yourself. Contact a qualified service technician or your retailer.
- Before using the product, make sure all cables are correctly connected and the power cables are not damaged. If you detect any damage, contact your dealer immediately.
- Slots and openings on the back or top of the cabinet are provided for ventilation. Do not block these slots. Never place this product near or over a radiator or heat source unless proper ventilation is provided.
- The monitor should be operated only from the type of power source indicated on the label. If you are not sure of the type of power supply to your home, consult your dealer or local power company.
- Use the appropriate power plug which complies with your local power standard.
- Do not overload power strips and extension cords. Overloading can result in fire or electric shock.
- Avoid dust, humidity, and temperature extremes. Do not place the monitor in any area where it may become wet. Place the monitor on a stable surface.
- Unplug the unit during a lightning storm or if it will not be used for a long period of time. This will protect the monitor from damage due to power surges.
- Never push objects or spill liquid of any kind into the slots on the monitor cabinet.
- To ensure satisfactory operation, use the monitor only with UL listed computers which have appropriate configured receptacles marked between 100-240V AC.
- The socket-outlet shall be installed near the equipment and shall be easily accessible.
- If you encounter technical problems with the monitor, contact a qualified service technician or your retailer.
- This product may contain chemicals known to the State of California to cause cancer, and birth defects or other reproductive harm. Wash hands after handling.
- This product complies with the “India E-Waste (Management) Rules, 2016” and prohibits use of lead, mercury, hexavalent chromium, polybrominated biphenyls (PBBs) and polybrominated diphenyl ethers (PBDEs) in concentrations exceeding 0.1 % by weight in homogenous materials and 0.01 % by weight in homogenous materials for cadmium, except for the exemptions listed in Schedule II of the Rule.
Care and cleaning
Before lifting or moving the monitor, it is best to disconnect the cables and power cord. Use proper lifting technique when installing the monitor. When lifting or carrying the monitor, hold the edges of the monitor. Do not lift the display by the stand or cord.
Cleaning. Turn off the monitor and unplug the power cord. Clean the surface of the monitor with a lint-free, non-abrasive cloth. Stubborn stains can be removed with a cloth d.amp treated with a mild detergent.
Avoid using cleaning products containing alcohol or acetone. Use a cleaner designed for LCD display. Never spray cleaner directly onto the screen as it may get inside the monitor and cause an electric shock.
The following symptoms are normal for the monitor:
The screen may flicker during initial use due to the nature of fluorescent light. Turn off the power switch and turn it on again to make sure the flickering goes away.
You may notice uneven screen brightness depending on the desktop wallpaper you are using.
When the same image is displayed for several hours, a residual image of the previous screen may remain after switching the image. The screen will recover slowly, or you can turn off the power switch for a few hours.
If the screen turns black, flickers, or no longer works, contact your dealer or service center to have it fixed. Do not repair the screen yourself!
Conventions used
 WARNING: Information about how to avoid injury while performing a task.
CAUTION: Information to help prevent damage to components when attempting to complete a task.
IMPORTANT: Information you MUST follow to complete the task.
NOTE: Tips and additional information to help you complete the task.
ASUS LCD Monitor VZ239 Troubleshooting
Problem | Possible Solution |
Power LED is not ON |
|
The power LED lights amber and there is no screen image |
|
Screen image is too light or dark |
|
Screen image bounces or a wave pattern is present in the image |
|
Screen image has color defects (white does not look white) |
|
No sound or sound is low |
|
Supported Timing List
VESA / IBM Modes Support Timing
Mode | Resolution (active dot) | Resolution (total dot) | Horizontal Frequency (KHz) | Vertical Frequency(Hz) | Nominal Pixel Color (MHz) |
DOS | 720x400@70Hz | 900 x 449 | 31.469 | 70.087 | 28.322 |
VGA | 640x480@60Hz | 800 x 525 | 31.469 | 59.940 | 25.175 |
640x480@72Hz | 832 x 520 | 37.861 | 72.809 | 31.500 | |
640x480@75Hz | 840 x 500 | 37.500 | 75.000 | 31.500 | |
SVGA | 800x600@56Hz | 1024 x 625 | 35.156 | 56.250 | 36.000 |
800x600@60Hz | 1056 x 628 | 37.879 | 60.317 | 40.000 | |
800x600@72Hz | 1040 x 666 | 48.077 | 72.188 | 50.000 | |
800x600@75Hz | 1056 x 625 | 46.875 | 75.000 | 49.500 | |
XGA | 1024x768@60Hz | 1344 x 806 | 48.363 | 60.004 | 65.000 |
1024x768@70Hz | 1328 x 806 | 56.476 | 70.069 | 75.000 | |
1024x768@75Hz | 1312 x 800 | 60.023 | 75.029 | 78.750 | |
VESA | 1152x864@75Hz | 1600 x 900 | 67.5 | 75.000 | 108.00 |
SXGA | 1280x1024@60Hz | 1688 x 1066 | 63.981 | 60.020 | 108.000 |
1280x1024@75Hz | 1688 x 1066 | 79.976 | 75.025 | 135.00 | |
1280x960@60Hz | 1800 x 1000 | 60.000 | 60.000 | 108.00 | |
WXGA | 1280x800@60Hz | 1680 x 831 | 49.702 | 59.810 | 83.500 |
1280x720@60Hz | 1650 x 750 | 45.00 | 60.000 | 74.25 | |
1280x768@60Hz | 1664 x 798 | 47.776 | 59.870 | 79.5 | |
1360x768@60Hz | 1792 x 795 | 47.712 | 60.015 | 85.500 | |
1366x768@60Hz | 1792 x 798 | 47.712 | 59.790 | 85.500 | |
WXGA+ | 1440x900@60Hz | 1904 x 934 | 55.935 | 59.887 | 106.500 |
UXGA | 1600x1200@60Hz | 2160 x 1250 | 75.000 | 60.000 | 162.000 |
WSXGA+ | 1680x1050@60Hz | 2240 x 1089 | 65.290 | 59.954 | 146.250 |
WUXGA | 1920x1080@60Hz | 2200 x 1125 | 67.500 | 60.000 | 148.500 |
MAC | 864 x 525 | 35 | 66.66 | 30.24 | |
SVGA | 832x624@75Hz | 1152 x 667 | 49.714 | 74.533 | 57.27 |
Modes not listed in the table may not be supported. For optimal resolution, we recommend that you choose a mode listed in the table above.
Pros & Cons
Pros
- Slim and modern design
- Full HD IPS panel with wide viewing angles
- Affordable price
- Built-in speakers
- Adaptive-sync technology
Cons
- No USB hub or other connectivity options
- Limited ergonomic adjustments (tilt only)
- 5ms response time may not be sufficient for professional gaming or competitive eSports
Customer Reviews about ASUS LCD Monitor VZ239
Customers generally praise the ASUS VZ239 for its sleek design, sharp visuals, and affordability. The monitor's wide viewing angles and adaptive-sync technology are particularly appreciated by users. However, some customers have expressed disappointment with the limited ergonomic adjustments and the absence of additional connectivity options, such as a USB hub.
Faqs
What is the ASUS LCD Monitor VZ239 response time?
What is the recommended resolution for the ASUS LCD Monitor VZ239?
How do I adjust the brightness or contrast on my ASUS LCD Monitor VZ239?
What type of video inputs does the ASUS LCD Monitor VZ239 support?
How do I calibrate the ASUS LCD Monitor VZ239?
How do I reduce eye strain while using this ASUS LCD Monitor VZ239?
What is the power consumption of the ASUS LCD Monitor VZ239?
How do I perform a factory reset on the ASUS LCD Monitor VZ239?
What is the viewing angle of this ASUS LCD Monitor VZ239?
What warranty does the ASUS LCD Monitor VZ239 come with?
Leave a Comment