How to Adjust your Monitor: Benq E Series LCD Monitor User Manual
Content
Introduction
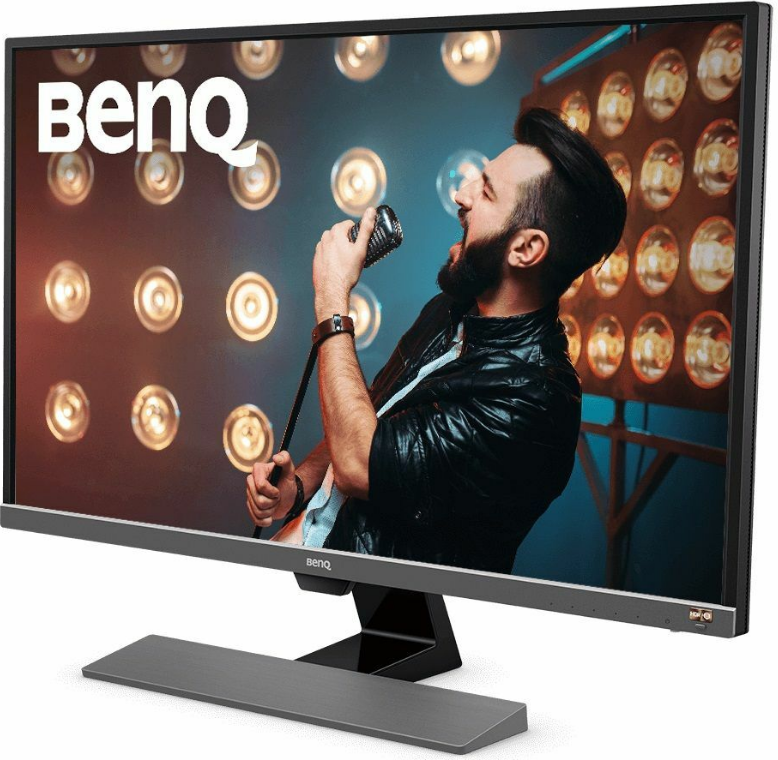
The BenQ E Series LCD Monitor is designed to deliver exceptional visual performance for both work and entertainment. Featuring advanced display technology, it provides vibrant colors and sharp details, making it ideal for graphic design, gaming, and general use. The monitor is equipped with multiple connectivity options, including HDMI and VGA ports, ensuring compatibility with various devices. The BenQ E Series LCD Monitor is priced at approximately $199.99, offering great value for its features.
Specifications
The BenQ E Series boasts several key features that make it a top choice in its category. Here are some of the detailed specifications:
- Display Size and Resolution: Available in 22", 24", 27", and 32" sizes with resolutions up to 4K UHD.
- Panel Type: IPS or VA panels for excellent color accuracy and wide viewing angles.
- Refresh Rate: Up to 144Hz refresh rate for smooth visuals.
- Connectivity Options: Multiple HDMI ports, DisplayPort, USB ports, and an audio jack.
- Ergonomic Adjustments: Tilt, height, and swivel adjustments for optimal comfort.
- Eyecare Technology: Built-in eye care features like Blue Light Filter and Flicker-free technology.
BenQ ecoFACTS
BenQ has been dedicated to the design and development of greener product as part of its aspiration to realize the ideal of the "Bringing Enjoyment 'N Quality to Life" corporate vision with the ultimate goal to achieve a low-carbon society. Besides meeting international regulatory requirement and standards pertaining to environmental management, BenQ has spared no efforts in pushing our initiatives further to incorporate life cycle design in the aspects of material selection, manufacturing, packaging, transportation, using and disposal of the products. BenQ ecoFACTS label lists key eco-friendly design highlights of each product, hoping to ensure that consumers make informed green choices at purchase. Check out BenQ's CSR Website at http://csr.BenQ.com/ for more details on BenQ's environmental commitments and achievements.
BenQ E Series LCD Monitor Getting started
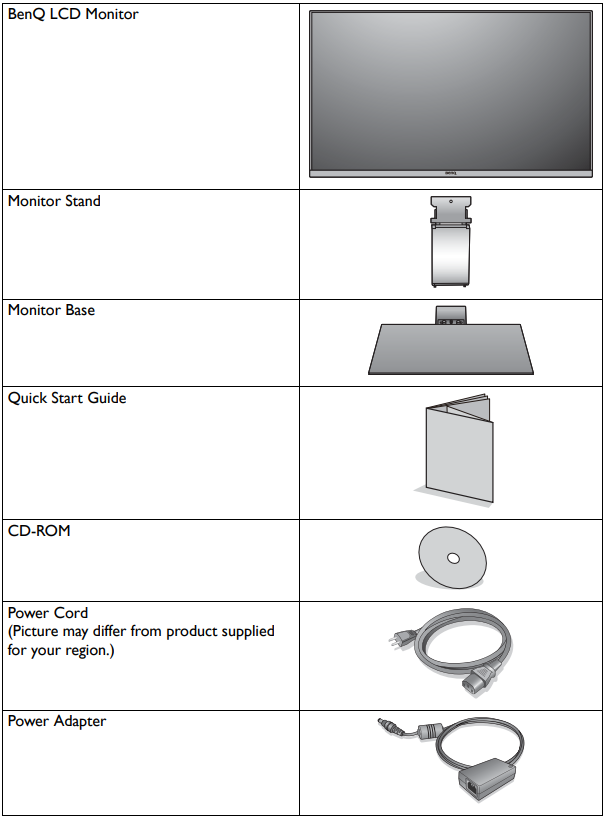
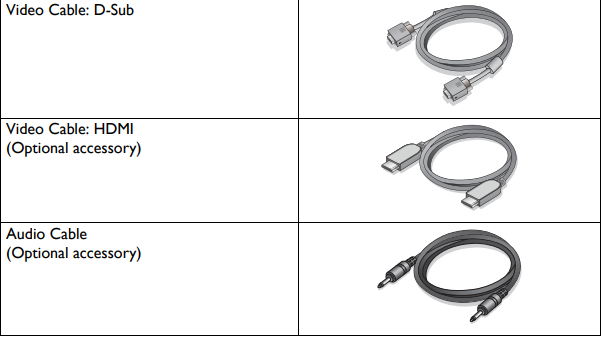
When unpacking please check you have the following items. If any are missing or damaged, please contact the place of purchase for a replacement.
TIP
- Available accessories and the pictures shown here may differ from the actual contents and the product supplied for your region. And the package contents may subject to change without prior notice. For cables that are not supplied with your product, you can purchase them separately.
- Consider keeping the box and packaging in storage for use in the future when you may need to transport the monitor. The fitted foam packing is ideal for protecting the monitor during transport.
NOTE
Always keep the product and accessories out of reach of small children.
Know your monitor
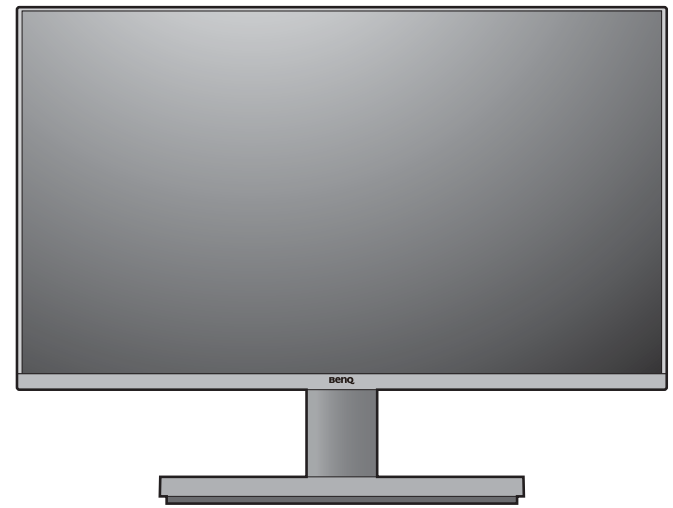
Front view
Back view
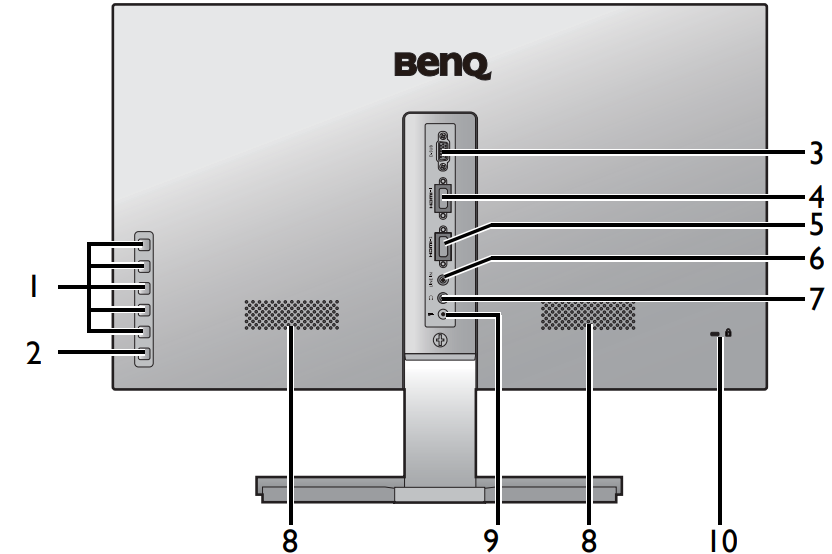
- Control buttons
- Power button
- D-Sub socket
- HDMI-1 socket
- HDMI-2 socket
- Audio Line In
- Headphone jack
- Speakers
- DC power input jack
- Kensington lock slot
TIP
- Above diagram may vary depending on the model.
- Picture may differ from product supplied for your region.
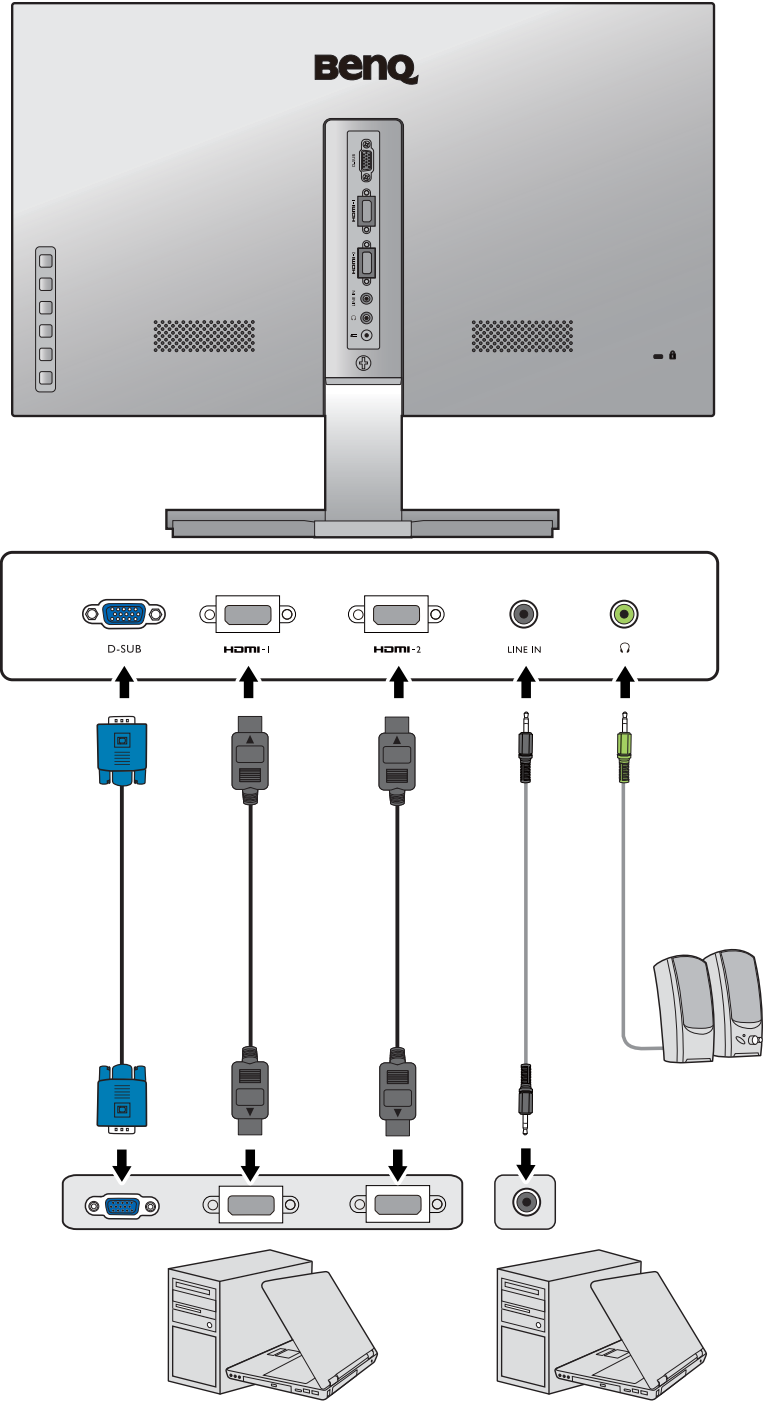
Connection
The following connection illustrations are for your reference only. For cables that are not supplied with your product, you can purchase them separately.
Description
The BenQ E Series LCD Monitor is designed with both performance and comfort in mind. The monitor's ergonomic design allows for easy adjustments to tilt, height, and swivel, ensuring users can find their optimal viewing position. The monitor also features BenQ's proprietary Eyecare technology, which includes a Blue Light Filter and Flicker-free technology to reduce eye strain over extended periods of use.
The display itself offers vibrant colors and crisp visuals, thanks to its high-quality IPS or VA panels. Whether you're working on documents, watching movies, or gaming, the BenQ E Series provides an immersive viewing experience. Additionally, the monitor's slim bezels and minimalist design make it a stylish addition to any workspace or home office.
How to assemble your monitor hardware
TIP
- If the computer is turned on you must turn it off before continuing.
- Do not plug-in or turn-on the power to the monitor until instructed to do so.
Attach the monitor base.
NOTE: Please be careful to prevent damage to the monitor. Placing the screen surface on an object like a stapler or a mouse will crack the glass or damage the LCD substrate voiding your warranty. Sliding or scraping the monitor around on your desk will scratch or damage the monitor surround and controls.
Protect the monitor and screen by clearing a flat open area on your desk and placing a soft item like the monitor packaging bag on the desk for padding.
Gently lay the screen face down on a flat clean padded surface
Attach the monitor stand to the monitor base as illustrated until it locks in place.
Tighten the screw on the bottom of the monitor base as illustrated.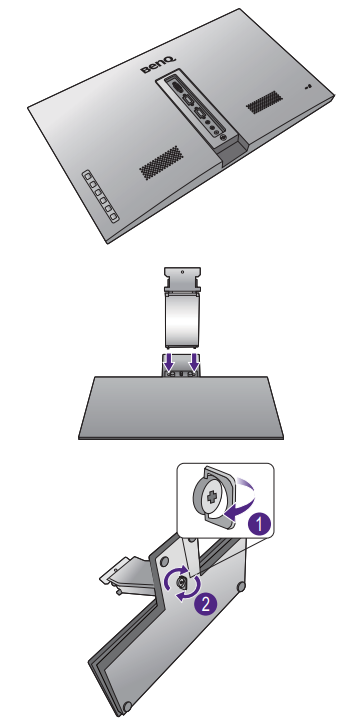
Orient and align the stand arm with the monitor, then push them together until they click and lock into place.
Tighten the screw that fixes the stand to the monitor.
TIP: To secure or release a screw, a screwdriver or a coin is required.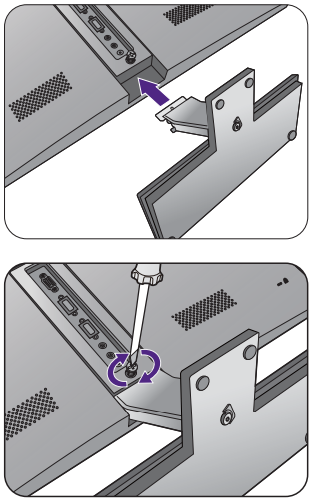
Carefully lift the monitor, turn it over and place it upright on its stand on a flat even surface.
TIP: You should position the monitor and angle the screen to minimize unwanted reflections from other light sources.
NOTE: Your monitor is an edge to edge monitor and should be handled with care. Adjust the screen angle by placing your hands on the top and on the base of the monitor as illustrated. Excessive force on the display is prohibited.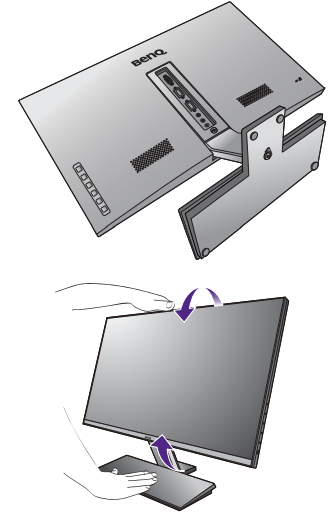
Connect the PC video cable.
To Connect the D-Sub Cable
Connect the plug of the D-Sub cable (at the end without the ferrite filter) to the monitor video socket. Connect the other end of the cable (at the end with the ferrite filter) to the computer video socket.
Tighten all finger screws to prevent the plugs from accidently falling out during use.
To Connect the HDMI Cable
Connect the plug of the HDMI cable to the HDMI port on the monitor. Connect the other end of the cable to the HDMI port of a digital output device.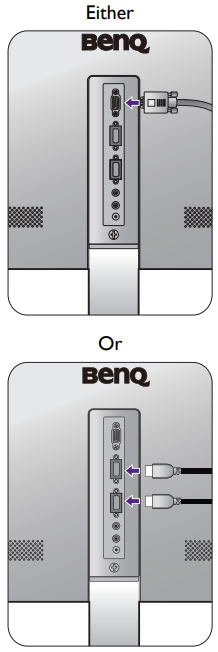
TIP: If there is more than one video transmission method available to you, you might want to take the picture quality of each video cable into consideration before making the connection.
Better quality: HDMI
Good quality: D-Sub
NOTE: The video cables included in your package and the socket illustrations on the right may vary depending on the product supplied for your region.Connect the audio cable.
Connect the audio cable between the socket on the rear of the monitor (Line In) and your computer audio outlet.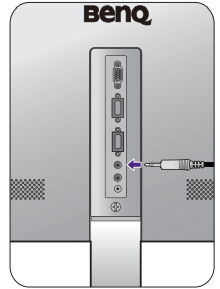
You may connect headphones to the headphone jack found next to the Line In jack of the monitor.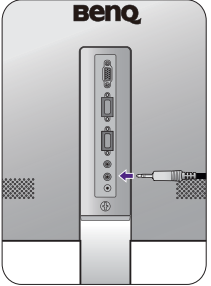
Connect the power cable to the monitor.
Connect the power cord to the power adapter. Plug one end of the power cord into the socket labelled on the rear of the monitor. Do not connect the other end to a power outlet just yet.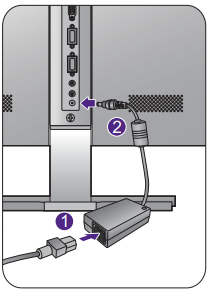
Connect-to and turn-on the power.
Plug the other end of the power cord into a power outlet and turn it on.
NOTE: Picture may differ from product supplied for your region.
Turn on the monitor by pressing the power button on the monitor.
Turn on the computer too, and follow the instructions in Getting the most from your BenQ monitor install the monitor software.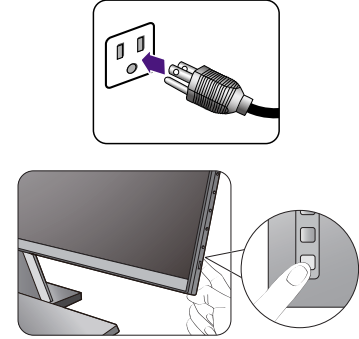
TIP: To extend the service life of the product, we recommend that you use your computer's power management function.
Setup Guide
Setting up the BenQ E Series LCD Monitor is straightforward and user-friendly. Here’s a step-by-step guide:
- Unboxing and Assembly: Carefully unpack the monitor and stand from the box. Attach the stand to the monitor using the provided screws and follow the included instructions.
- Connectivity: Connect your computer or other devices to the monitor using HDMI, DisplayPort, or USB cables.
- Power On: Plug in the power cord and turn on the monitor. The display should automatically detect and adjust to the connected device's output.
- Adjustments: Adjust the monitor's tilt, height, and swivel to your preferred viewing position.
- On-Screen Display (OSD): Access the OSD menu to adjust settings like brightness, contrast, and input source.
How to adjust your monitor
The control panel
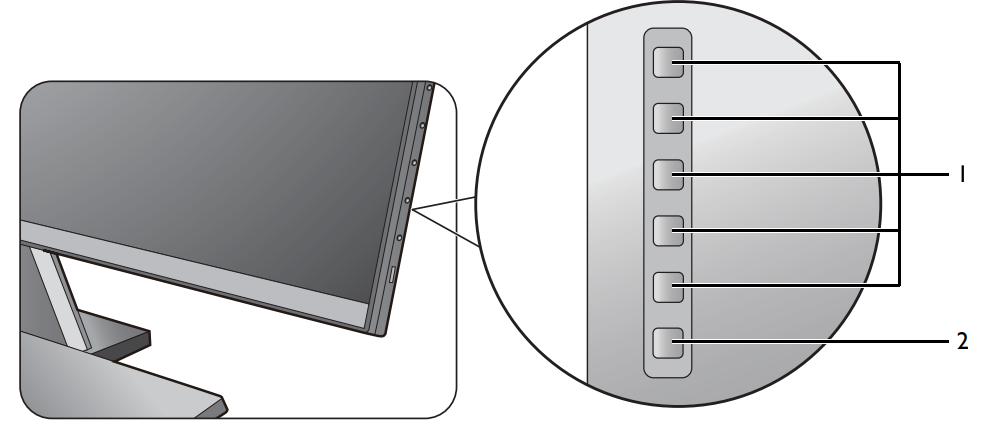
No. | Name | Description |
1. | Control keys | Accesses thefunctions or menuitems displayed on the screen, right next to each key. |
2. | Power key | Turns the poweron or off. |
Basic menu operation
All OSD (On Screen Display) menus can be accessed by the control keys. You can use the OSD menu to adjust all the settings on your monitor.
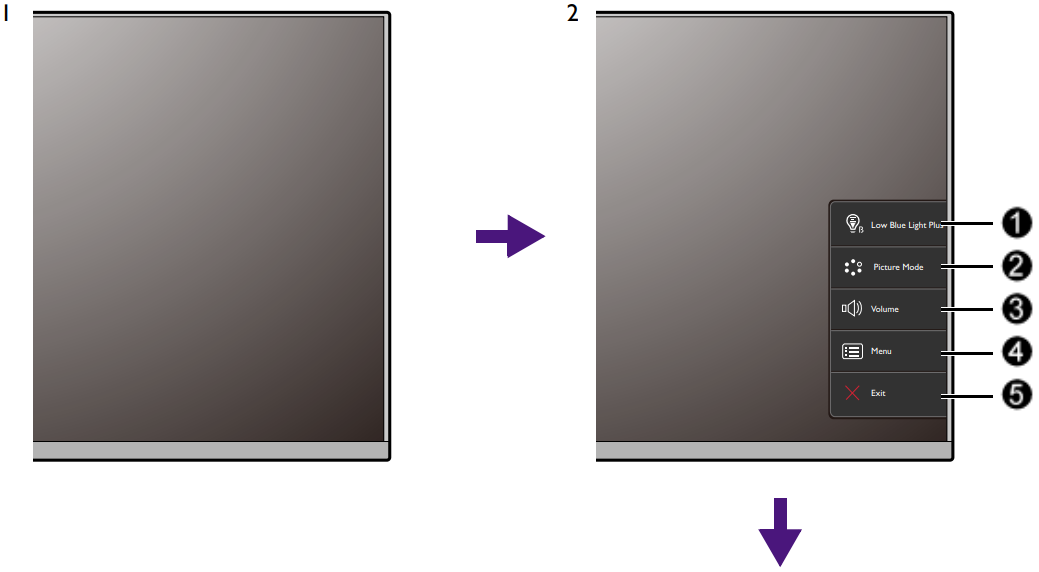
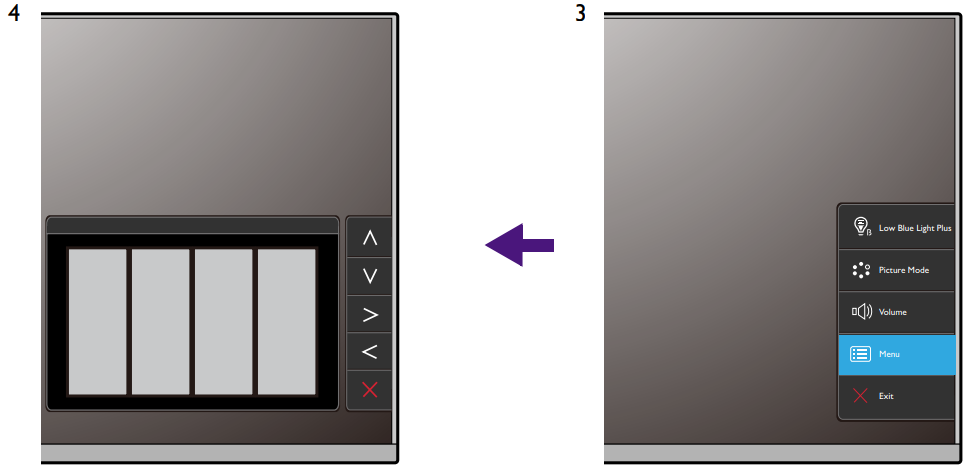
- Press any of the control keys.
- The hot key menu is displayed. The top three controls are custom keys and are designated for particular functions.
- Select (Menu) to access the main menu.
- In the main menu, follow the icons next to the control keys to make adjustments or selection.
No. | OSD in hot key menu | OSD icon in main menu |
Function |
| Custom Key 1 |
|
|
| Custom Key 2 |
|
|
| Custom Key 3 |
|
|
| Menu |
|
|
| Exit |
| Exits OSD menu. |
TIP
- OSD = On Screen Display.
The hot keys only operate while the main menu is not currently displaying. Hot key displays will disappear after a few seconds of no key activity. - To unlock the OSD controls, press and hold any key for 10 seconds..
Picture optimization
The easiest way to obtain an optimal display from an analog (D-Sub) input is to use the Auto Adjustment function. Go to Display and Auto Adjustment to optimize the currently displayed image to the screen.
TIP: When you connect a digital input signal using a digital (HDMI) cable to your monitor, the Auto Adjustment function will be disabled, because the monitor will automatically display the best image.
NOTE: Please ensure that the connected graphic card on your computer is set to the native resolution of the monitor when you use the Auto Adjustment function.
If you wish, you can always adjust the screen geometric settings manually using geometry menu items. To assist you in this endeavour, BenQ has provided a screen test image utility which you can use to check for screen color, grayscale and line gradient display.
- Run the test program auto.exe from CD-ROM. You could also use any other image, such as the desktop of your operating system. However, we recommend that you use auto.exe. As you run auto.exe, a test pattern displays.
- Press any of the control keys to bring up the hot key menu. Select (Menu) to access the main menu.
- Go to Display and Auto Adjustment.
- If you notice a vertical noise (like a curtain effect-shimmering of vertical lines), select Pixel Clock and adjust the monitor until the noise disappears.
- If you notice a horizontal noise, select Phase and adjust the monitor until the noise disappears.
Customizing the hot keys
The top 3 control keys (also called custom keys) perform as hot keys to provide direct access to pre-defined functions. You can change the default setting and designate different functions for these keys.
- Press any of the control keys to bring up the hot key menu, and press
 (Menu) to access the main menu.
 - Go to System
- Select the custom key you want to change.
- In the sub menu, select a function that can be accessed by this key. A pop-up message will appear, showing that the setup is complete.
Adjusting display mode
To display images of aspect ratio other than 16:9 and size other than the panel size of your purchased model, you can adjust the display mode on the monitor.
- Press any of the control keys to bring up the hot key menu, and press
 (Menu) to access the main menu.
 - Go to Picture Advanced and Display Mode.
- Select an appropriate display mode. The setting will take effect immediately.
Choosing an appropriate picture mode
Your monitor provides various picture modes that are suitable for different types of images for all the available picture modes.
Go to Picture Advanced and Picture Mode for a desired picture mode. If Low Blue Light / Low Blue Light Plus is preferred, press the first control key (Custom Key 1) and select one of the low blue light modes from the list.
Connecting the monitor to your MacBook series product
While the monitor is connected to your MacBook series product, switch to M-book mode which represents MacBook’s color matching and visual representation on your monitor.
- Connect your monitor to the MacBook series product.
- Go to Picture Advanced and Picture Mode.
- Select M-book. The setting will take effect immediately.
Power Safety
Please follow these safety instructions for best performance, and long life for your monitor.
- The AC plug isolates this equipment from the AC supply.
- The power supply cord serves as a power disconnect device for pluggable equipment. The socket outlet should be installed near the equipment and be easily accessible.
- This product should be operated from the type of power indicated on the marked label. If you are not sure of the type of power available, consult your dealer or local power company.
- An approved power cord greater or equal to H03VV-F or H05VV-F, 2G or 3G, 0.75mm2 must be used.
- For EW2445ZH/EW2440ZH/EW2440ZE, the power adapter is manufactured by Asian Power Devices (DA-40C19).
- Use only the power adapter supplied with your LCD Monitor. Use of another type of power adapter will result in malfunction and/or danger.
- Allow adequate ventilation around the adapter when using it to operate the device or charge the battery. Do not cover the power adapter with paper or other objects that will reduce cooling. Do not use the power adapter while it is inside a carrying case.
- Connect the power adapter to a proper power source.
- Do not attempt to service the power adapter. There are no service parts inside. Replace the unit if it is damaged or exposed to excess moisture.
Care And Cleaning
- Cleaning. Always unplug your monitor from the wall outlet before cleaning. Clean the LCD monitor surface with a lint-free, non-abrasive cloth. Avoid using any liquid, aerosol or glass cleaners.
- Slots and openings on the back or top of the cabinet are for ventilation. They must not be blocked or covered. Your monitor should never be placed near or over a radiator or heat source, or in a built-in installation unless proper ventilation is provided.
- Never push objects or spill liquid of any kind into this product.
Troubleshooting of BenQ E Series LCD Monitor
The image is blurred.
- Read the instructions on the link "Adjusting the Screen Resolution" on the CD, then select the correct resolution, refresh rate, and make adjustments based on these instructions.
How do you use a VGA extension cable?
- Remove the extension cable for the test. Is the image now in focus? If not, optimize the image by following the instructions in the "Adjusting the Refresh Rate" section on the link "Adjusting the Screen Resolution".
- It is normal for blurring to occur due to conduction losses in extension cables. You can minimize these losses by using an extension cable with better conduction quality or with a built-in booster.
Does the blurring only occur at resolutions lower than the native (maximum) resolution?
- Read the instructions on the link "Adjusting the Screen Resolution" on the CD and select the native resolution.
Pixel errors can be seen.
- One or more pixels may be permanently black, white, red, green, blue, or another color.
- Clean the LCD screen.
- Cycle the power on and off.
- These are pixels that are permanently on or off, a natural defect in LCD technology.
The image has faulty coloration (yellow, blue, or pink appearance).
- Go to Picture > Reset Color, and then choose YES to reset the color settings to factory defaults.
- If the image still isn't correct and the OSD has faulty coloration, it means one of the three primary colors is missing in the signal input. Check the signal cable connectors, and if any pin is bent or broken off, contact your dealer for support.
No image can be seen.
- Is the LED indicator illuminated in green?
- If yes, and a message "Out of Range" appears on the screen, you're using a display mode the monitor doesn't support. Change the setting to a supported mode (see "Preset display modes" on the link "Adjusting the Screen Resolution").
Faint shadow from a static image is visible on the screen.
- Activate the power management function to let your computer and monitor go into a low-power "sleep" mode when not in use.
- Use a screensaver to prevent image retention.
Is the LED illuminated in orange?
- If yes, the power management mode is active. Press any button on the computer keyboard or move the mouse.
- If that doesn’t help, check the signal cable connectors. If any pin is bent or broken off, contact your dealer for support.
Is the LED not illuminated at all?
- Check the power supply, mains socket, external power supply, and mains switch.
The image is distorted, flashes, or flickers.
- Read the instructions on the link "Adjusting the Screen Resolution" on the CD, and then select the correct resolution and refresh rate.
The image is still distorted at the native resolution.
- Images from different input sources may appear distorted or stretched. To optimize display performance, use the Display Mode function to set a proper aspect ratio for the input source (see Display Mode on page 32 for details).
The image is displaced in one direction.
- Read the instructions on the link "Adjusting the Screen Resolution" on the CD, and then select the correct resolution and refresh rate.
The OSD controls are inaccessible.
- To unlock the OSD controls, press and hold any key for 10 seconds.
No sound can be heard from the built-in speakers.
- Ensure the audio cable is properly connected (see Connect the audio cable on page 11 for details).
- Increase the volume (it may be muted or too low).
- Remove any headphones or external speakers, as connecting them automatically mutes the built-in speakers.
No sound can be heard from the connected external speakers.
- Remove any connected headphones.
- Check whether the headphone jack is properly connected.
- If the external speakers are USB-powered, ensure the USB connection is secure.
- Increase the volume on the external speakers (it may be muted or too low).
Sound cannot be muted.
- Restart your computer.
- Update the graphics and/or audio driver.
LCD Monitor Pros & Cons
Pros
- Excellent Image Quality: Vibrant colors and crisp visuals make for an immersive viewing experience.
- Ergonomic Design: Easy adjustments for tilt, height, and swivel ensure optimal comfort.
- Eye Care Technology: Built-in features reduce eye strain over extended use.
- Multiple Connectivity Options: Multiple HDMI ports, DisplayPort, USB ports, and an audio jack provide flexibility.
Cons
- Cost: While generally affordable, higher resolution models can be pricey.
Customer Reviews
Customers have generally praised the BenQ E Series for its excellent image quality, comfortable ergonomic design, and robust build. Many users have noted that the monitor's Eyecare technology significantly reduces eye strain during long hours of use. However, some users have mentioned that higher resolution models can be more expensive than anticipated.
A common complaint among some users is the lack of built-in speakers in certain models, which may require additional setup with external speakers.
Faqs
What are the available sizes for the BenQ E Series LCD Monitor?
Does the BenQ E Series support 4K resolution?
What type of panel does the BenQ E Series use?
Can I adjust the height and tilt of the BenQ E Series monitor?
Does the BenQ E Series have built-in speakers?
How do I enable Eyecare features on my BenQ E Series monitor?
What connectivity options are available on the BenQ E Series?
Is it easy to set up the BenQ E Series LCD Monitor?
What if I encounter a 'No Signal' issue with my BenQ E Series monitor?
Can I reset my BenQ E Series monitor to its default settings?
Leave a Comment


