Blomberg Appliances Front-Loading Dryer DV 17542 User Guide
Content
Introduction
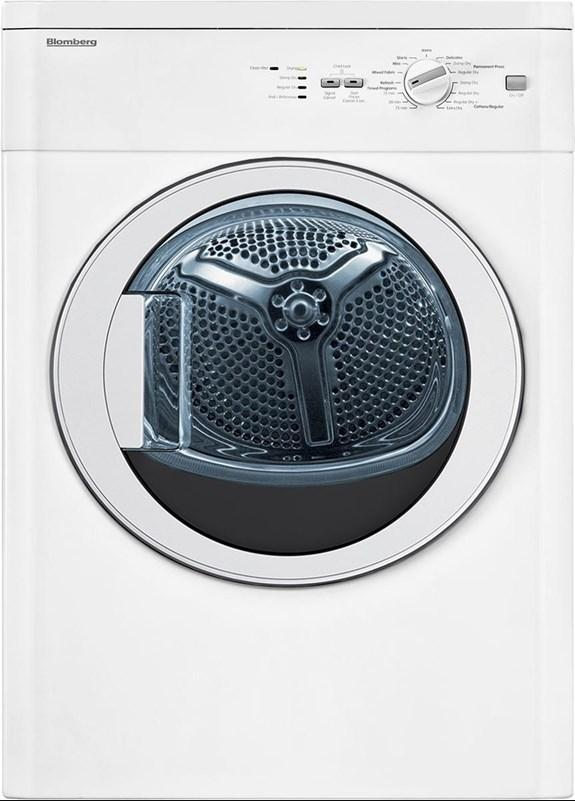
The Blomberg Appliances Front-Loading Dryer DV 17542 is a compact and efficient solution for modern laundry needs. With a generous 7.0 cu. ft. capacity, this electric dryer features 15 different drying programs, allowing for customized care of various fabrics, from cotton to delicates. Designed with user convenience in mind, it includes a clean filter indicator and a glass-irreversible door for easy monitoring. The DV 17542 is stackable, making it an ideal choice for smaller spaces. Priced at approximately $899, it combines functionality with sleek design, ensuring your laundry is dried effectively and efficiently.
Your Dryer
Overview
Figure 1
- Control Panel 4
- Loading Door
- Lint Filter
- Type label
- Adjustable Feet
NOTE: Specifications of this appliance may change without notice to improve the quality of the product. Drawings in this manual are schematic and may not match your product exactly. Values stated on the dryer labels or in the documentation accompanying it are obtained in the laboratory in accordance with relevant standards. Depending on operational and environmental conditions of the appliance, values may vary.
Technical Specifications
| Specification | Value |
|---|---|
| Model | Vented Dryer with electronic sensor control |
| Height (in) | 33 1/4 |
| Width (in) | 23 3/8 |
| Depth (in) | 20 7/8 |
| Height adjustment of feet (in) | 1/5 |
| Net weight (plastic front door usage) (lbs) | 73 |
| Net weight (glass front door usage) (lbs) | 78.5 |
| Voltage / Frequency | 208-240V ~ 60 Hz |
| Connected load | 2000-2400 W |
| Dry Load Capacity | 7 kg / 15.5 lb |
| Capacity | 3.7 cu-ft |
Description
The Blomberg DV 17542 features a modern design with a stainless steel interior and a sleek exterior that fits seamlessly into any laundry room. The front-loading design allows for easy loading and unloading of clothes, and the large capacity drum ensures that you can dry more clothes in fewer cycles. The dryer includes several advanced features such as automatic moisture control, anti-crease function, and a silent operation mode. The intuitive control panel makes it easy to select the right cycle for your needs, and the dryer's LED display keeps you informed about the status of your drying cycle.
Installation Instructions
WARNING: Failure to follow these instructions could result in a risk of fire
The clothes dryer (“appliance”) installation must be performed by a qualified installer.
- Install the appliance according to the manufacturer’s instructions and local codes.
- Do not install a clothes dryer with flexible plastic venting materials. If flexible metal (foil type) duct is installed, it must be of a specific type identified by the appliance manufacturer as suitable for use with clothes dryers. Flexible venting materials are known to collapse, be easily crushed, and trap lint. These conditions will obstruct the clothes dryer’s airflow and increase the risk of fire.
SAVE THESE INSTRUCTIONS
Electrical Connection
Connect the appliance to a grounded outlet protected by a fuse or circuit breaker of suitable capacity.
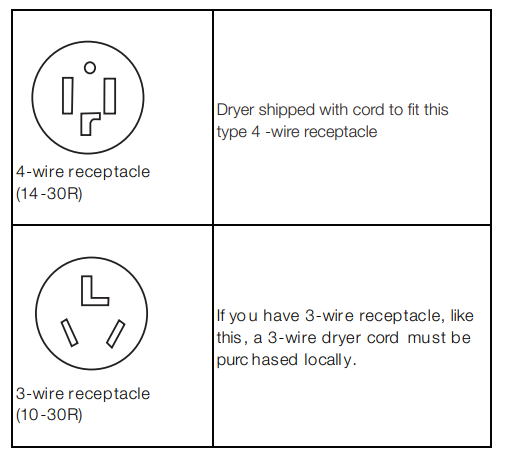
A neutral connection is not used in this product.
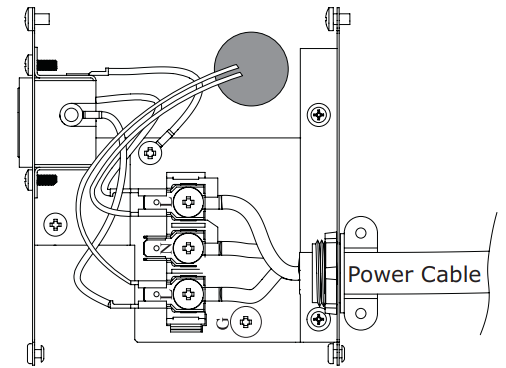
3-Wire Electrical Connection
If your receptacle is a 3-wire receptacle as shown below, you must obtain a 3-wire dryer cord. A dryer cord can usually be found at your local hardware supply, electrical supply, or home center. The cord should have closed-loop or upturned end wire terminating connectors. The cord kit must be marked "For Use with Clothes Dryers".
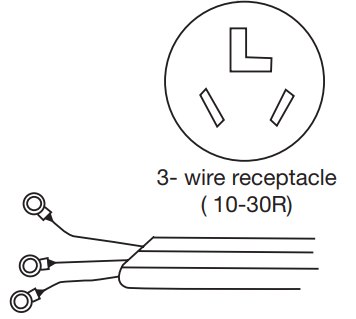
Typical 3-Wire Dryer Cord
240V/30 amp NEMA 10-30 Type SRDT
- If the dryer is installed in a mobile home, recreational vehicles, new branch-circuit installations, or in areas where local codes do not permit grounding through the neutral conductor, only a 4-wire power supply cord shall be used.
To Change the Cord:
- Make sure that the dryer is not plugged into any power outlet.
DO NOT plug the end of the dryer power cord into a live receptacle before connecting the dryer power cord to dryer terminals and closing the junction/splitter box as described below.
DO NOT repair old power supply cords. Power cord must be changed only by a qualified person. There is a risk of electric shock! - Remove the screw from the cover of the junction box located at the top rear of the dryer.
- Remove the red, white, and black wire from the terminal block.
- Remove the green ground wire from the ground terminal.
- Loosen the strain relief clamp holding the 4-wire cable.
- Thread the 4-wire cable out through the strain relief clamp.
- Thread the new 3-wire dryer cord through the strain relief clamp.
- Attach the power cord Ground conductor (the center wire) to the terminal labeled N. Connect the terminal labeled N and the Ground terminal labeled G with the supplied short cable. Tighten the terminals so that they securely hold the conductors.
- Attach the two remaining power cord outer conductors to the 2 terminals labeled L. Tighten both screws so that the power conductors are securely held in place.
- Tighten the strain relief so that the power cord cannot be moved.
Replace the cover on the junction box and fasten it in place.

The dryer is now ready to be plugged into the 3-wire receptacle of the proper rating. The receptacle should be located so that the plug and receptacle will be accessible with the dryer in its installed position.
Grounding Instructions
This appliance must be grounded. In the event of malfunction or breakdown, grounding will reduce the risk of electric shock by providing a path of least resistance for electric current. This appliance is equipped with a cord having an equipment-grounding conductor and a grounding plug. The plug must be plugged into an appropriate outlet that is properly installed and grounded in accordance with all local codes and ordinances.
- The power cord plug must be within easy reach after installation.
- The voltage and the allowed fuse/breaker protection are specified in the section “Technical Specifications.”
- The stated voltage must match your mains voltage.
- Connection via extension cords or multiplugs should not be made.
- The main fuse/breaker and switches must have a contact distance of a minimum of 3 mm.
WARNING: A damaged power cable must be replaced by a qualified electrician.
WARNING: Improper connection of the equipment-grounding conductor can result in a risk of electric shock. Check with a qualified electrician or service representative if you are in doubt as to whether the appliance is properly grounded. Do not modify the plug provided with the appliance: if it will not fit the outlet, have a proper outlet installed by a qualified electrician.
WARNING: The appliance must not be operated unless it is repaired! There is a risk of electric shock!
Appropriate Installation Location
- Install your appliance in environments that have no risk of freezing and are in a stable and level position.
- Do not place your appliance on a high pile rug or on similar surfaces.
- Operate your appliance in a well-ventilated, dust-free environment.
- Do not block the air ducts in front of and under the dryer.
IMPORTANT:
- Make sure that your appliance is not placed on the power cable.
- Keep the appliance at least 0.6” (1.5 cm) from the edges of other furniture.
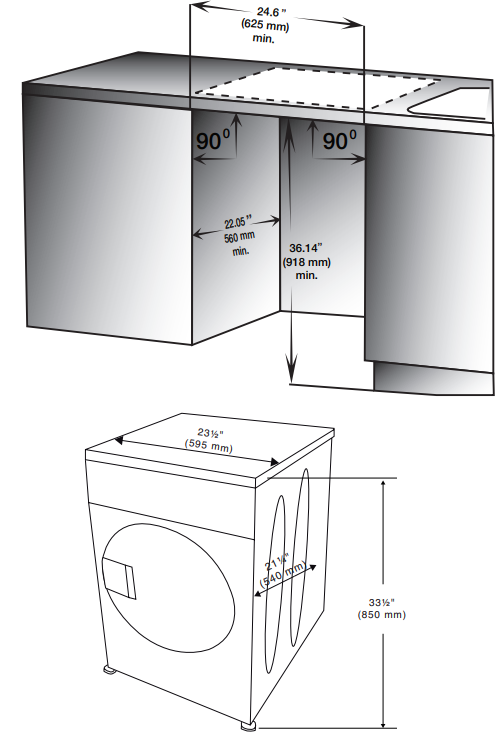
Minimum Installation Clearances
| Location | Alcove or Built-under Closet |
|---|---|
| Sides | 0.59 in. (15 mm) |
| Top | 2.68 in. (68 mm) |
| Rear | 0.59 in. (15 mm) |
| Front | 0.20 in. (5 mm) |
Ventilation Requirements
The closet door must have 2 openings:
- One located 3.2 inches (8 cm) from the bottom of the door with a minimum area of 16 square inches (103 cm²).
- Another located 3 inches (7.5 cm) from the top of the door with a minimum area of 46 square inches (294 cm²).
Use on Top of a Washer
- A stacking kit (Part no: 296 710 0100) should be used between the washer and dryer for use on top of a washer. The stacking kit should be installed by an Authorized Service provider.
- Place the appliance on a solid floor. If it is to be placed on top of a washer, the approximate weight together may reach 397 lbs (180 kg) when they are full. Therefore, the floor must be capable of carrying the load placed on it!
Adjusting the Feet
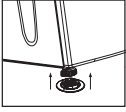
In order to ensure that your appliance operates almost silently and vibration-free, it must stand level and balanced on its feet. The front feet of the appliance can be adjusted. Balance the appliance by adjusting the feet.
IMPORTANT:
- Do not use any tools to loosen the adjustable feet. Otherwise, they may be damaged.
- Never unscrew the adjustable feet from their housings.
Two plastic pieces supplied with the Operating Instructions prevent your appliance from slipping on wet and slippery surfaces. To install these plastic parts:
- Tilt the appliance backwards.
- Fit the plastic parts to the front adjustable feet. Press on the plastic parts to fix them in their places.
- Check the balance of the appliance again and readjust the adjustable feet if necessary.
- Loosen the feet by hand.
Adjust them until the appliance stands level and firmly.
Ventilation Duct and Connection
The ventilation duct ensures the exhaust of air from inside the appliance. The vented dryer has 1 air outlet.
IMPORTANT: Only rigid or flexible metal duct should be used for exhausting.
- In Canada, the diameter of the duct to be used should be 4” (102 mm). In the United States, the regulation for the required exhaust duct diameter must be followed.
- Maximum duct length is given in the table below:
| Metal Rigid Duct | Maximum Length |
|---|---|
| Maximum Length | 72 ft (21.9 m) + 2 elbows |
To connect a ventilation duct:
- Connect the air outlet metal duct to the spacer by turning it counter-clockwise.
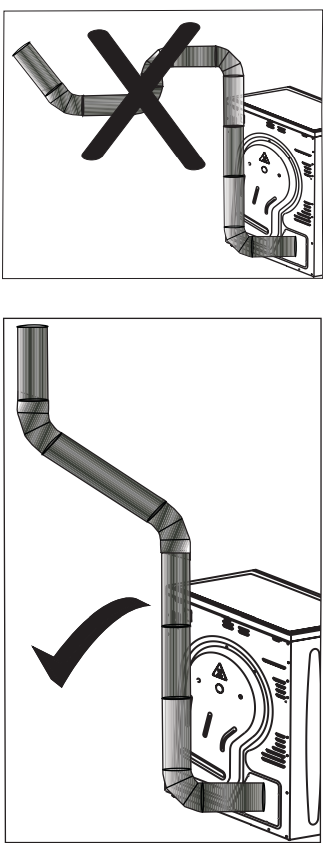
- Make the duct passages as shown in the illustration below.
IMPORTANT:
- Exhaust of humid air from the dryer into the room is to be avoided, as it may damage the walls and furniture in the room.
- The ventilation duct can be routed outdoors via a window or it can be connected to the air outlet in a bathroom.
- Air outlet duct must be extended directly outdoors. There must be a limited number of elbows to not hinder airflow.
- To prevent water accumulation in the duct, make sure it is not folded on the floor.
IMPORTANT for Canada: Only those foil-type flexible ducts, if any, specifically identified for use with the appliance by the manufacturer shall be used.
IMPORTANT for the United States: Only those foil-type flexible ducts, if any, specifically identified for use with the appliance by the manufacturer and that comply with the Outline for Clothes Dryer Transition Duct, Subject 2158A, shall be used.
WARNING: The appliance should not be vented into a chimney, a wall, a ceiling, an attic, a crawl space, or a concealed space of a building.
IMPORTANT:
- Do not operate the appliance at the same time with heaters such as a coal or gas stove. Airflow may cause the chimney to flare up.
- Care must be taken not to pinch or bend the ducts.
- The end of the hose should not be bent, stepped on, or folded between the drain and the dryer.
- The total length of flexible metal duct shall not exceed 7.8 feet (2.4 m).
- The duct shall not be assembled with screws or other fastening means that extend inside the duct to catch lint.
WARNING: The appliance should not be vented into a chimney, a wall, a ceiling, an attic, a crawl space, or a concealed space of a building.
Destroying Packaging Material
WARNING: Packaging material can be dangerous to children. Keep the packaging materials out of the reach of children or dispose of them accordingly.
Do not dispose of them together with normal domestic waste. Packaging materials of your appliance are manufactured from recyclable materials.
Setup Guide
Setting up the Blomberg DV 17542 is relatively straightforward. Here are the steps to follow:
- Unpacking: Carefully remove the dryer from the packaging and ensure all protective film is removed.
- Placement: Position the dryer in a well-ventilated area, ensuring it is level and secure.
- Installation: Connect the dryer to a power source and ensure the venting system is properly installed according to the manufacturer's instructions.
- Initial Run: Perform an initial run without clothes to ensure the dryer is functioning correctly and to remove any manufacturing residue.
- Configuration: Familiarize yourself with the control panel and select the appropriate cycle for your first load of laundry.
Quick Start-up Instructions
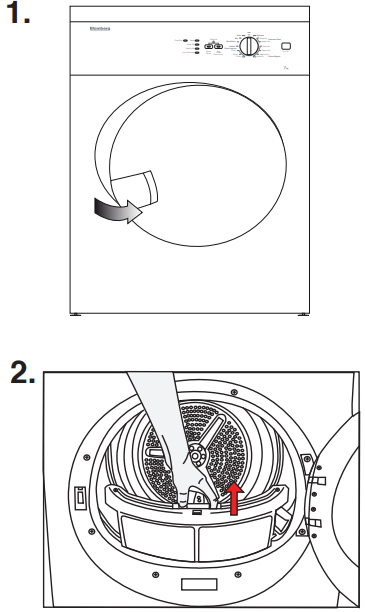
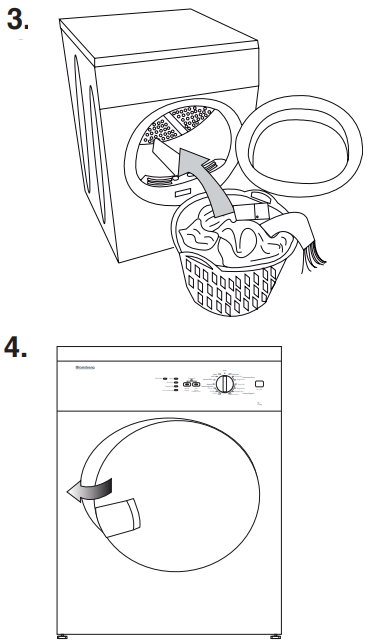
- Open loading door.
Check filter.
- Load laundry loosely into the drum.
Push loading door closed. Ensure no items are caught in the door
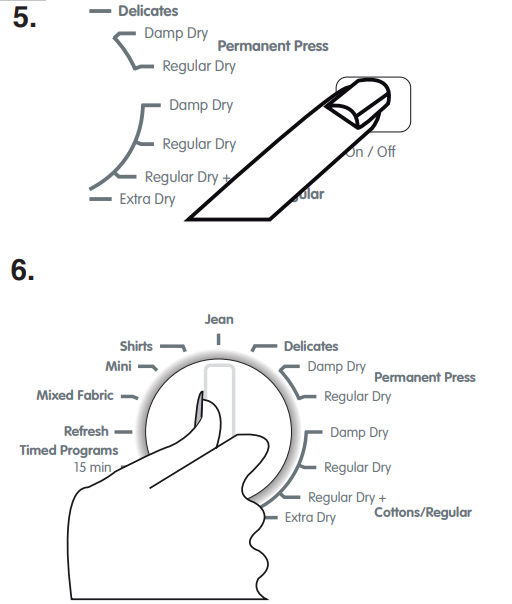
- Push the ON / OFF button to ON.
Select the appropriate Program.
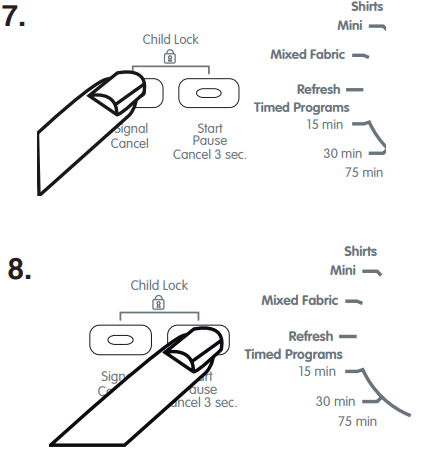
- If necessary, select additional functions.
Push the start button
User maintenance and cleaning instructions
Lint Filter
Lint and fibers released from the laundry into the air during the drying cycle are collected in the “Lint Filter.” Fibers and lint are formed during wearing and washing.
WARNING: Always clean the filter after each drying cycle.

To clean the filter:
- Open the loading door.
- Remove the lint filter by pulling it up and open the filter.
- Clean lint, fibers, and debris by hand or with a soft piece of cloth.
- Close the filter and put it back in place.
You can clean the filter and filter area with a vacuum cleaner.
Clogging may occur on the filter surface after using your dryer for some time; if this happens, wash the filter with water and dry it before using again.
Sensor
Your dryer has humidity sensors that detect whether the laundry is dry or not.
For sensor cleaning:
- Open the loading door.
- Allow the dryer to cool off if drying has been done recently.
Wipe the metal sensors with a soft cloth dampened with vinegar and dry the sensors afterwards.
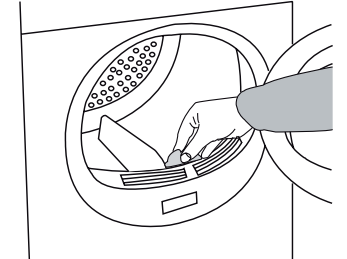
Clean the metal sensors at regular intervals (4 times a year).
WARNING: Never use solvents, cleaning agents, or similar substances when cleaning, as these might cause fire and/or an explosion!
Important Safety Instructions
WARNING: To reduce the risk of fire or electric shock resulting in serious injury or death when using this appliance, follow the basic precautions including the following:
- Read all instructions before using the appliance. Failure to follow these instructions will increase the risk of fire or electric shock and will void the warranty.
- This product has been designed for home use only.
- The appliance must be operated at temperatures between +5°C and +35°C (41°F and +95°F).
- The appliance must not be installed behind a lockable door, a sliding door, or a door with the hinges on the opposite side to that of the tumble dryer.
- Do not install or store this appliance where it will be exposed to weather.
- Do not tamper with the controls.
- Do not repair or replace any part of the appliance or attempt any servicing unless specifically recommended in the user-maintenance instructions or in published user-repair instructions that you understand and have the skills to carry out.
- Never wash the appliance with water.
- Never touch the plug with wet hands.
- Never pull from the cable to unplug the dryer.
- Do not operate the appliance if the power cord or plug is damaged.
- For malfunctions that cannot be solved by information in the operating manual: Turn off and unplug the appliance and call an authorized service provider.
Grounding Instructions
- This appliance must be grounded. In the event of malfunction or breakdown, grounding will reduce the risk of electric shock by providing a path of least resistance for electric current. This appliance is equipped with a cord having an equipment-grounding conductor and a grounded plug. The plug must be plugged into an appropriate outlet that is properly installed and grounded in accordance with all local codes and ordinances.
WARNING: Improper connection of the equipment-grounding conductor can result in a risk of electric shock. Check with a qualified electrician or service representative if you are in doubt as to whether the appliance is properly grounded. - The power cord plug must be within easy reach after installation.
- To reduce the risk of fire or electric shock, do not use extension cords, multi-plugs, or an adapter to connect the dryer to electrical mains.
- Do not modify the plug provided with the appliance: if it will not fit the outlet, have a proper outlet installed by a qualified electrician.
- If the power supply cord is damaged, it must be replaced by the manufacturer, its service agent, or similarly qualified persons in order to avoid an electrical hazard.
- The appliance must not be operated unless it is repaired!
- Ventilation openings in the base must not be obstructed by carpets, etc.
- Exhaust air must not be discharged into a flue used for exhausting fumes from appliances burning gas or other fuels.
- Adequate ventilation must be provided to avoid the backflow of gases into the room from appliances burning other fuels, including open fires.
Usage Warnings
- Do not dry articles that have been previously cleaned in, washed in, soaked in, or spotted with gasoline, dry-cleaning solvents, or other flammable or explosive substances as they give off vapors that could ignite or explode.
- Do not use the tumble dryer if industrial chemicals have been used for cleaning what you want to dry.
- Do not dry unwashed items in the tumble dryer.
- Do not place items exposed to cooking oils in your dryer. Items contaminated with cooking oils may contribute to a chemical reaction that could cause a load to catch fire.
- Items such as foam rubber (latex foam), shower caps, waterproof textiles, rubber-backed articles, and clothes or pillows fitted with foam rubber pads should not be dried in the tumble dryer.
- Do not use fabric softeners or products to eliminate static unless recommended by the manufacturer of the fabric softener or product.
- The appliance may only be used for the drying of textiles that are marked accordingly.
- Undergarments that contain metal reinforcements should not be placed in a tumble dryer. Damage to the tumble dryer can result if any of the metal reinforcement comes loose during drying.
- Before loading, check all garments for lighters, coins, metal pieces, needles, etc.
- The use of fabric softener sheets is not recommended.
- The final part of a tumble dryer cycle occurs without heat (the cool-down cycle) to ensure that the items are left at a temperature that ensures the items are not damaged by getting too hot.
WARNING: Never stop the tumble dryer before the end of the drying cycle unless all items are quickly removed and spread out to dissipate heat.
Troubleshooting
| Problem | Cause | Explanation / Solution |
|---|---|---|
| Drying process takes too long. | Lint filter may not have been cleaned. | * Clean the lint filter. |
| * Meshes of the filter may be clogged. Wash with water. | ||
| Dryer does not switch on or the program does not start. Dryer does not start when set. | It may not be plugged in. | * Make sure that the dryer is plugged in. |
| The loading door may be ajar. | * Make sure the loading door is properly closed. | |
| Program may not be set or the “Start/Pause/Cancel” button may not have been pressed. | * Make sure the program has been set and it is not in “Pause” mode. | |
| “Childproof lock” may be activated. | * Deactivate the childproof lock. | |
| Program is interrupted for no reason. | The loading door may be ajar. | * Make sure the loading door is properly closed. |
| Electricity may be cut off. | * Press the “Start/Pause/Cancel” button to start the program. | |
| Laundry has shrunk, become felted, or has deteriorated. | A program not suitable for the laundry type might have been used. | * Dry only the laundry which is suitable for drying in the dryer. First check the labels on the clothes. |
| * Select a program with a suitable low temperature setting for the laundry type to dry the clothes. | ||
| “End / Anticrease” LED flashes. | The 2-hour anti-creasing program to prevent laundry from wrinkling may have been activated. | * Turn off the dryer and take the laundry out of the dryer. |
| “End / Anticrease” LED is on. | Program has come to an end. | * Turn off the dryer and take the laundry out of the dryer. |
| “Filter cleaning” LED flashes. | Lint filter may not have been cleaned. | * Clean the lint filter. |
| * Meshes of the filter may be clogged. Wash with water. | ||
| The “Drying” LED flashes. | A heat sensor failure has occurred. Dryer ends the program without heating. | * Turn off the dryer and remove the laundry. Call the authorized service. |
Note: Call an authorized service if the problem persists
Blomberg DV 17542 Pros & Cons
Pros:
- Energy Efficiency: The Blomberg DV 17542 is Energy Star certified, making it an eco-friendly choice that also saves on utility bills.
- Advanced Sensors: The dryer's advanced sensors ensure clothes are dried perfectly without over-drying or under-drying.
- Large Capacity: The 7.0 cubic foot capacity makes it ideal for handling large household laundry loads.
- Multiple Cycle Options: Includes various cycle options to cater to different fabric types and drying needs.
- Silent Operation: The silent operation mode ensures minimal noise disturbance during operation.
Cons:
- High Price Point: The estimated price range of $800 to $1,200 may be a deterrent for budget-conscious consumers.
- Complex Features: The advanced features and multiple cycle options can be overwhelming for some users.
- Venting Requirements: Proper venting installation is crucial for optimal performance, which may add to the overall cost and complexity of setup.
Customer Reviews
Customer reviews for the Blomberg DV 17542 have been generally positive, with many praising its efficiency, capacity, and quiet operation. Some users have noted that the initial setup can be a bit complex due to the advanced features, but overall satisfaction with the product's performance is high. Common complaints include the higher price point and the need for precise venting installation.
Warranty
1 year *++ limited warranty from date of first installation Blomberg will repair or replace at no cost to the consumer any defective parts of the dryer if used under normal household conditions (warranty is void if the product is used commercially e.g., bed + breakfast, nursing home etc.). Service must also be performed by an authorized Blomberg service agency. (Cosmetic defects must be reported within 10 business days from installation) The accessories have 1 year warranty but not labor. Consumer is responsible for labor to install accessory.
2-year * ++ limited warranty from date of first installation (Parts only) Blomberg will repair or replace any parts at no cost to the consumer if material defects or workmanship have caused the damage or failure of these components. Again the dryer must have been used under normal household conditions and not commercially as stated above (Labor charges are the responsibility of the consumer).
5 year * ++ limited warranty from date of first installation (parts only 2-5 years) Blomberg will repair or replace any circuit boards or dryer drum (excluding any plastic attachments) at no cost to the consumer if material defects or workmanship have caused the damage or failure of these components. The dryer must have been used under normal household conditions and not commercially (Labor charges are the responsibility of the consumer).
Faqs
What is the capacity of the Blomberg?
Is the Blomberg Appliances Front-Loading energy efficient?
What advanced features does the Blomberg Appliances DV 17542 have?
How do I set up the Blomberg Appliances Front-Loading Dryer DV 17542?
What are the common complaints about the Blomberg?
Does the Blomberg come with multiple cycle options?
Is the DV 17542 quiet during operation?
What is the estimated price range of the DV 17542?
Leave a Comment
