Bosch Compact Washer Machine WAW285H1UC User Guide
Content
Introduction of Washer Machine
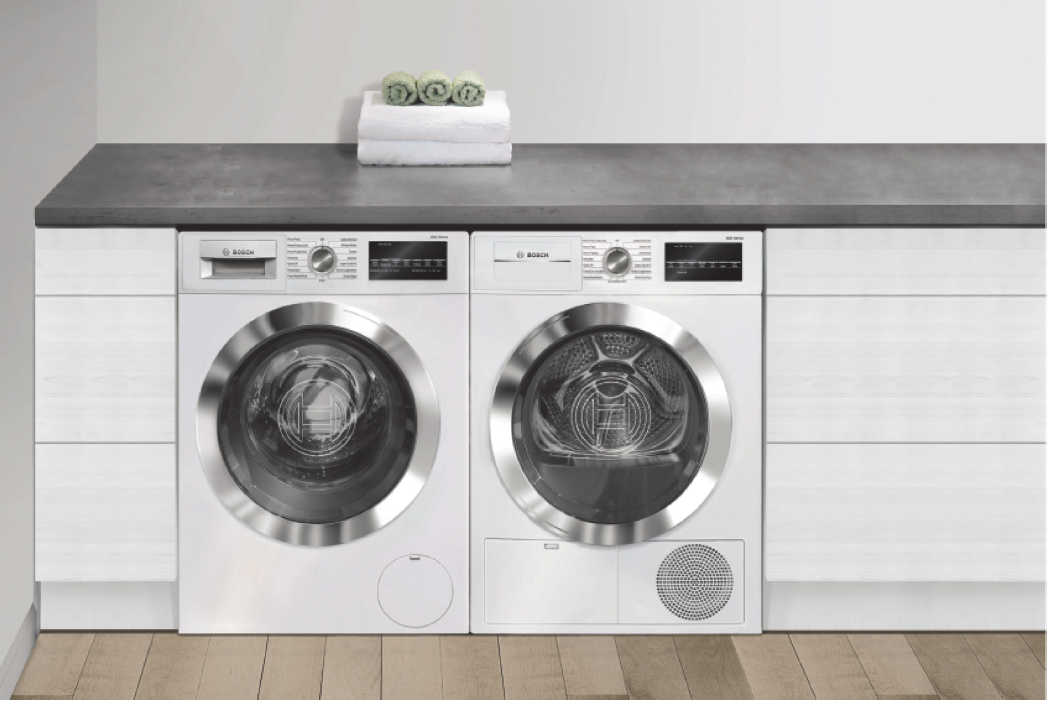
The Bosch Compact Washer Machine WAW285H1UC is a highly efficient front-load washer designed for smaller spaces without sacrificing performance. With a 2.2 cu. ft. capacity and 14 wash cycles, it caters to various laundry needs while maintaining a quiet operation thanks to its brushless motor. This model features a wave-shaped drum that ensures a gentle yet effective clean. The cost of the Bosch WAW285H1UC typically ranges around $1,099.
Getting to know your appliance
Control panel
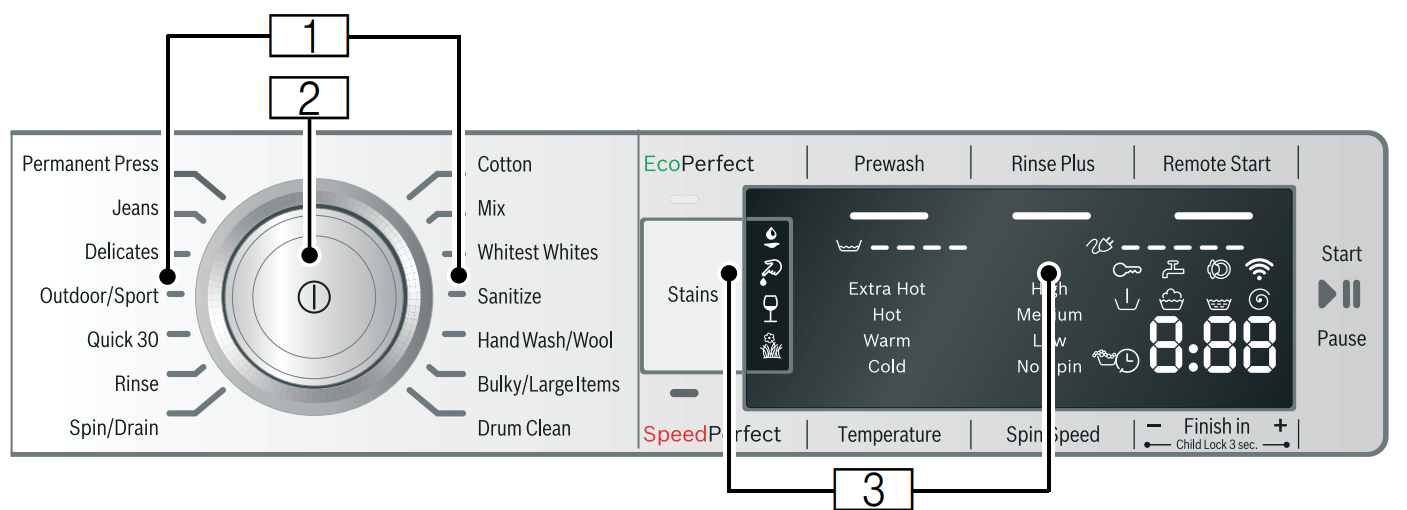
- Programs
- Program Selector
Center is pressed to power the appliance ON or OFF and dial turns in both directions to select a program. - Display Panel with Buttons
Display area
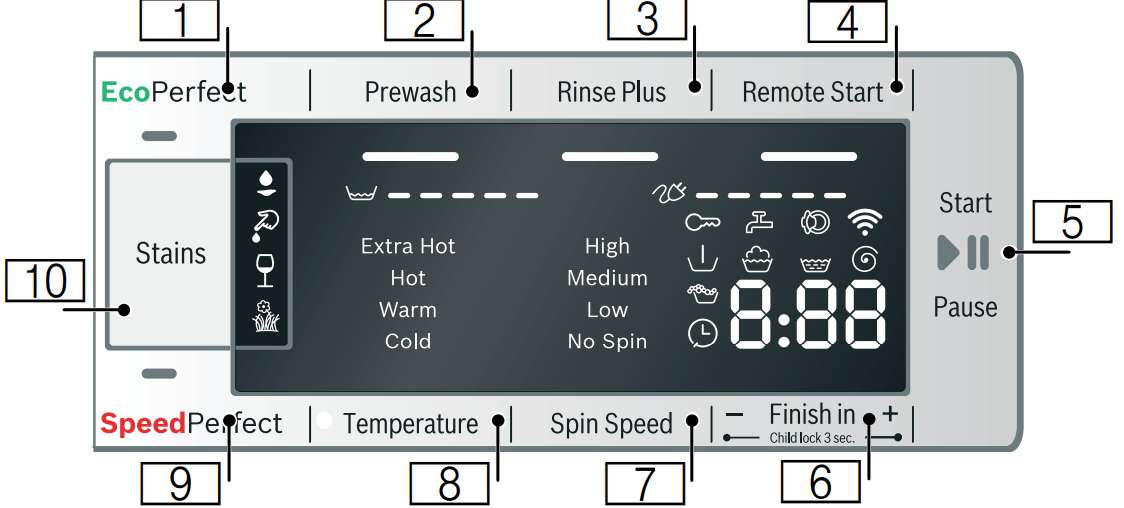
Buttons
Here is the table formatted as it appears in the image:
| Button | Description | Indicator |
|---|---|---|
| 1 | Select EcoPerfect™ | ⎯ |
| 2 | Select Prewash | ⎯ |
| 3 | Select Rinse Plus | ⎯ |
| 4 | Select Remote Start Remote start and Home Connect® settings | ⎯ |
| 5 | Select Start/Pause - Starts or pauses the selected cycle; - Indicator lamp on (steady) - cycle running, can be paused (if Child lock is not activated); - Indicator lamp blinking - option settings can be changed; Ready state (door closed, cycle can be started); cycle is paused (press to restart). | ▶⏸ |
| 6 | Select Finish in. End of program ("Finish in" time) after...h (hours) Press Finish in − and ⊕ at once for approximately 3 seconds to activate or deactivate Child lock 3 sec. | e.g. ⏲ 1h ⇆ |
| 7 | Select Spin Speed. High Medium Low No Spin | |
| 8 | Select Temperature. Extra Hot Hot Warm Cold | |
| 9 | Select SpeedPerfect® | ⎯ |
| 10 | Select Stains. 🫗 (Oils, food based) 🩸 (Blood) 🍷 (Red wine) 🌱 (Grass) |
Tools needed
The following tools may be helpful during installation of your washer.
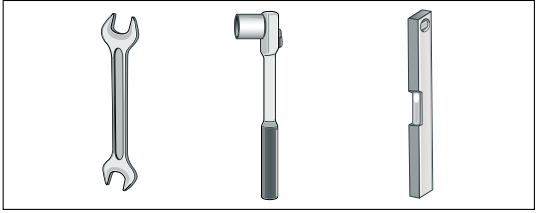
- 13mm socket for removing the transport bolts.
- 17mm wrench for adjusting the appliance feet.
- Bubble level for leveling the appliance.
Waste disposal
Disposal of Packaging Materials
After unpacking your new appliance dispose of the protective packaging materials in an environmentally friendly way. Ask your dealer or inquire with your local authority regarding currently acceptable means of disposal.
WARNING
WARNINGS FOR CHILDREN
Do not let children play with packaging and associated parts to avoid risk of choking or suffocation.
Disposal of Your Old Appliance
Your old appliance can be recycled if it is no longer to be used. Prior to disposing of your old appliance observe the following precautions to reduce safety risks.
WARNING: TO AVOID RISK OF INJURY OR DEATH, DO THE FOLLOWING
- after unplugging the old appliance, remove the electric power cord and dispose of properly.
- remove the door or permanently disable the door lock to prevent children from being locked inside.
Parts provided with your washer
Back side of the washing machine
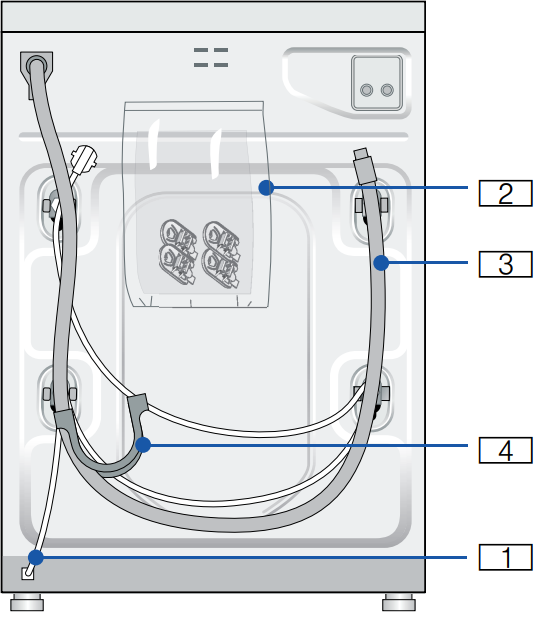
- Power cord with plug
- Literature pack; contents:
- User manual
- Covers
- Drain hose
- Elbow to form the hose to fit the drain pipe
Washer drum contents
Two AquaShield water supply hoses are shipped in the washer drum. Be sure to remove each of these and use these new hoses for the installation.
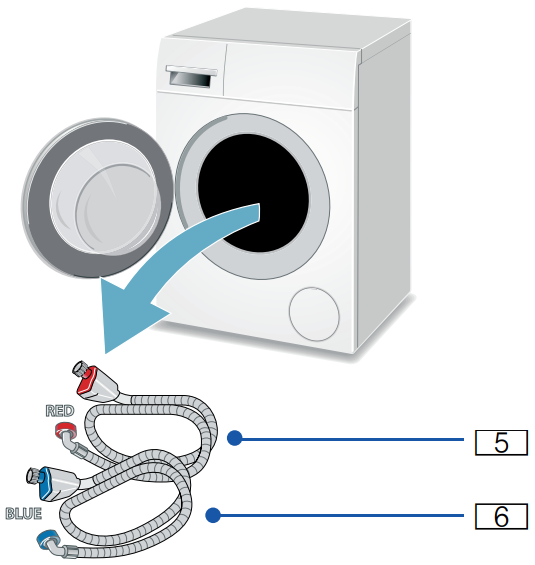
- 5. H Hot water AquaShield hose
- 6. Coldwater AquaShield hose
NOTICE: If any parts are missing please notify your dealer immediately.
Set up on a pedestal with a drawer
Pedestal item number: WMZ20490 or replacement WMZPW20W Mount the washer on the pedestal according to the instructions in the pedestal installation kit.
Specifications
- Capacity: 1.7 cu. ft.
- Dimensions: 24 inches wide, 33.5 inches tall, and 25 inches deep
- Energy Efficiency: Energy Star certified
- Cycles: Multiple wash cycles including Delicate, Normal, Heavy Duty, and more
- Spin Speed: Up to 1400 RPM
- Voltage/Power: 120V, 60 Hz
- Noise Reduction: Anti-vibration design for reduced noise
Dimensions and clearances required
Appliance dimensions
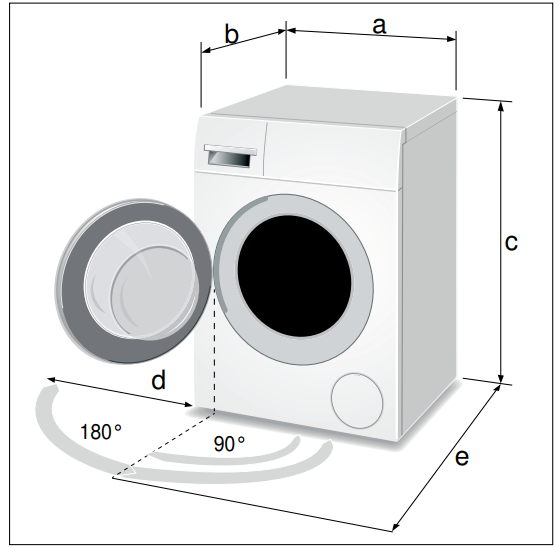
| Label | Dimension | U.S. | Metric |
| a | width | 23.6 in. | 60 cm |
| b | depth (to front of door) | 25 in. | 64 cm |
| c | height (minimum*) height (maximum*) | 33.2 in. 33.8 in. | 85 cm 86 cm |
| d | side clearance (door open 180°) | 15.8 in. | 40 cm |
| e | depth (door open 90°) | 42.5 in. | 108 cm |
| Weight | approximate gross | 164 lbs. | 77.2 kg |
height of the appliance depends on the extension of the height height-adjustable appliance feet.
Length of power cord and water supply hoses
Length of power | To left of washer U.S. | Metric | To right of washer U.S. | Metric |
| Electric power cord | 40 in. | 102 cm | 57 in. | 145 cm |
| Water supply hoses | 43 in. | 109 cm | 28 in. | 71 cm |
| Drain Hose | 19 in. | 48 cm | 40 in. | 102 cm |
All distances are measured from the indicated side when facing the front of the washer.
Installation types
Stacked washer and dryer
A Bosch dryer of the same dimensions can be stacked on top of the washer to save space.
CAUTION
- Use only the dryer stacking kit noted in the Bosch Dryer User Manual in the accessoires section.
- Do not stack washer on the top of the dryer.
- Do not stack washer on the top of another washer.
- Ensure washer transportation bolts have been removed and washer does not vibrate excessively.

Clearance requirements (Minimum)
| A Both | Sides | 0.6 in. | 1.5 cm |
| B | Top | 6.3 in. | 16 cm |
| C | Rear* | 2.5 in. | 6.4 cm |
| D | Front | 2.4 in. | 6.1 cm |
Rear clearance as close to wall as venting or water connection will allow. For a stacked installation arrange-ment a greater rear clearance for the dryer venting is required.
Ventilation area (Minimum)
| E | Top | 63 sq. in. | 404 sq. cm |
| F | Bottom | 63 sq. in. | 404 sq. cm |
Vent spacing (actual not minimum dimensions)
| G | 37 in. | 94 cm |
| H | 26 in. | 66 cm |
| J | 3 in. | 7.6 cm |
| K | 29 in. | 73 cm |
Stand alone (shown) or Side-by-Side
_or_side-by-side_bosch_compact_washer_machine_waw285h1uc.png)
Under counter (Preferred)
_bosch_compact_washer_machine_waw285h1uc.png)
Front of the appliance fully open.
No doors or coverings.
Minimum opening dimensions
| A | 28 in. | 71.1 cm |
| B | 23.8 in. | 60.5 cm |
| C | 34.5 in. | 87.6 cm |
Under counter (Less Desirable)
_bosch_compact_washer_machine_waw285h1uc.png)
If front of the appliance is covered ventilation openings must be installed.
E & F are minimum area sizes
| E | 63 sq.in. | 404 sq.cm |
|---|---|---|
| F | 63 sq.in. | 404 sq.cm |
G & H actual spacing dimensions for min. open area sizes
| G | 3 in. | 7.6 cm |
|---|---|---|
| H | 14 in. | 35.6 cm |
Description
The Bosch Compact Washer Machine WAW285H1UC boasts a contemporary design that blends seamlessly into any modern kitchen or laundry area. Its stainless steel tub ensures durability and prevents corrosion, while the multiple wash cycles cater to various fabric types. The machine's anti-vibration system minimizes noise and vibration during operation, making it an excellent choice for those who value a quiet and efficient laundry experience.
The user-friendly interface allows for easy selection of wash cycles and options, making it accessible even for first-time users. Additionally, the washer's compact size makes it perfect for under-counter installation or placement in tight spaces.
INSTALLATION INSTRUCTIONS
WARNING: RISK OF FIRE, ELECTRICAL SHOCK OR INJURY TO PERSONS
To reduce the risk of fire, electric shock or injury to persons, read the Important Safety Instructions at the front of this manual before installing or operating this appliance.
CAUTION: THE APPLIANCE IS HEAVY
- Use additional help and care when lifting and positioning.
- REMOVE ALL TRANSPORT BOLTS BEFORE OPERATING THE WASHER. The washer will vibrate and could cause damage if transport bolts are not removed before use.
Read these installation instructions completely and carefully before starting to install your new washing machine. The information contained can save time and effort and will help to ensure optimum performance of your new washer. Be sure to observe all warnings and cautions.
NOTICES
- Frozen hoses can tear or burst. Do not install the washing machine outdoors or in an area exposed to freezing conditions.
- If the washing machine is located in a room which will be exposed to temperatures below freezing, or if it is located in a cabin that is being shut down for the winter, any residual water in the pump or water inlet hose(s) must be drained.
- Take care not to damage the washing machine. Do not hold on to protruding parts (e.g. door) when lifting. Do not push against the appliance door glass due to risk of damage.
- In addition to the safety information listed here, the local water and electric authorities may have special requirements that must be followed.
- If in doubt, have the appliance installed by an authorized service provider.
- Hidden surfaces may have sharp edges. During service wear gloves and use caution when reaching inside the washer housing.
These installation instructions are intended for use by qualified installers. In addition to these instructions, the installation must comply with:
- for the United States - National Electrical Code, ANSI/NFPA70 - and latest editions of the state and municipal and/or local regulations.
- for Canada - Canadian Electrical Code C22.1 - and the latest editions of the provincial, municipal and/or local regulations.
Leveling the washer
Importance of leveling the washer
Your new washer uses high spin speeds to remove water at the end of the wash cycle. It is important that your washer is level and that all four washer feet press with equal pressure against the floor. This will help assure the quietest, most vibration-free use of your washer.
Follow these steps:
- Install the washer on a level and solid surface, preferably in a corner of a room.
- If the floor is uneven (or unlevel) adjust the washer feet as required to level the washer. Do not place anything under the washer feet to help level the washer.
- Extend the washer feet no more than is necessary. The more the feet are extended, the more vibration the washer will experience. Start with the washer feet turned all the way in and adjust each foot as necessary.
- Use a bubble level to check the top of the washer to make sure it is level side to side and front to rear.
- Press down on each corner of the washer top to make sure the washer doesn’t “wobble“. There should be no "give" or movement. All four washer feet should press equally against the floor. This is just as important as the washer being level to prevent vibration.
- When the washer is level and does not wobble, lock the washer feet in place by tightening the locknuts against the washer bottom. Be sure to do this without changing the height of the foot (hold the foot while tightening the locknut).
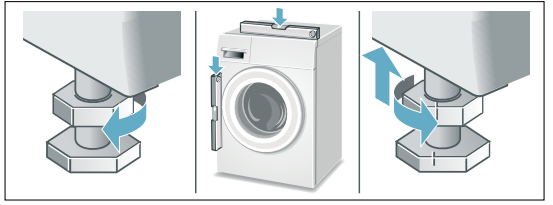
Procedure for adjusting the washer feet:
- After determining which washer feet need to be extended, have someone lift up on the washer slightly to take pressure off the foot to be adjusted.
- Turn the grey plastic foot to extend it downward as far as necessary to raise the corner of the washer the correct amount to level the washer.
When the height of the foot is correct, use a 17 mm open end wrench to tighten the locknut against the washer bottom. The locknut should be tight against the bottom of the washer to lock the foot in place.
Electrical connection
WARNING: ELECTRICAL SHOCK HAZARD
Improper connection of the equipment-grounding conductor can result in a risk of electric shock. Check with a qualified electrician or serviceman ifyou are in doubt as to whether the appliance has been properly grounded.
WARNING: ELECTRICAL SHOCK HAZARD
To reduce the risk of fire or electrical shock, DO NOT use an extension cord to connect the washing machine to the power supply.
WARNING: ELECTRICAL SHOCK HAZARD
To reduce the risk of electrical shock:
- Only pull out the power cord by the plug end and never by the cable, as this could damage it.
- Never touch or hold the plug end or power cord with wet hands.
- Never unplug the power cord during operation.
GROUNDING INSTRUCTIONS
WARNING: ELECTRICAL SHOCK HAZARD
This appliance must be grounded. In the event of malfunction or breakdown, grounding will reduce the risk of electric shock by providing a path of least resistance for the electric current. This appliance is equipped with a cord that has an equipment grounding conductor and a grounding plug. The plug must be plugged into an appropriate outlet that is properly installed and grounded in accordance with all local codes and ordinances.
- Do not modify the plug provided with the appliance. If the plug will not fit into the outlet have a properly grounded outlet installed by a qualified electrician. Do not cut, remove or bypass the grounding prong on the washer power cord plug.
- The washer power cord plug must be easily accessible when the washer is operating.
- When unplugging or plugging in the washer power cord, grasp the plug end. Do not pull on the cable to unplug the washer.
- The household electrical supply must be suitable for the voltage specification shown on the washer rating plate (located inside the washer door, immediately below the drum opening). See below for connection specifications and fuse/breaker requirements.
- The wiring for the electrical outlet circuit must be sufficient to meet the appliance requirements. Use of a Ground Fault Circuit Interrupter (GFCI) is recommended.
- Protect the power cord from physical damage, such as being twisted, kinked, pinched, caught in a door, or walked upon.
- If the power cord is damaged, it must be replaced by a qualified authorized service provider to avoid a fire/shock hazard. Replacement power cords can be purchased through Customer Service.
- The washing machine must only be connected to an individual branch circuit via a receptacle which has been properly installed and grounded.
- Make sure that:
- the power plug fits into the receptacle
- the wire size is sufficient
- the grounding system is properly installed
- The power cord may be replaced by an electrician only. Replacement power cords can be purchased from Customer Service. To reduce the risk of fire or electrical shock, DO NOT use an extension cord to connect the washing machine to the power supply. If a ground fault circuit breaker is to be used, only use the types marked with the following symbol: z. Only this symbol can assure compliance with all current regulations.
Transporting the washer
Before transporting the washer
- Disconnect the washer power cord from the wall outlet.
- Turn off the water supply to the washer.
- Disconnect water supply lines from the tap.
- Disconnect the drain hose from the drain location.
- Install the transport bolt assemblies as shown in the following images.
CAUTION: Carefully drain residual water from inlet and drain hoses. Secure all hoses and power cord to the back of the washer to prevent them from being damaged.
Remove the transport bolt hole covers
- Remove all four transport bolt hole covers.
- Pull the tip of the arrow on the cover out slightly to disengage the locking tab.
- Rotate the cover counterclockwise to remove. Repeat for all 4 transport bolt hole covers.

Insert the transport bolt assemblies
- Each assembly consists of a plastic bushing and a bolt that extends through the bushings. Unscrew the bolt until the threaded end is flush with the end of the plastic bushing.
- Insert the transport bolt and bushing assembly as shown. The metal housing slides around the bolt through the slot in the plastic bushing as the bushing is slid into place. The open part of the bushing slot should be facing the direction shown to allow the assembly to slide fully into place.
- When the bolt is in place screw it in until the bolt threads engage the drum. Double check and ensure bolts are screwed into threaded holes and not into cracks or crevices. Repeat the process for all 4 transport bolt assemblies before tightening any all the way. Complete tightening all 4 bolt assemblies until they are each snug in place.

CAUTION: RISK OF APPLIANCE OR MATERIAL DAMAGE
- Despite draining, there will always be some residual water in the appliance. This residual water may leak out and cause damage; therefore, the appliance should always be transported upright.
- Ensure transport bolts are removed after transporting washer and before first use.
Setup Guide
To set up the Bosch Compact Washer Machine WAW285H1UC,
- Start by ensuring the machine is properly positioned on a level surface.
- Connect the water supply hoses to the appropriate inlets at the back of the washer and secure them tightly.
- Plug in the machine and ensure it is properly grounded to prevent any electrical hazards.
- For under-counter installation, follow the manufacturer's instructions for securing the washer to the surrounding cabinet.
- Once installed, select your desired wash cycle and options using the intuitive control panel.
Bosch Compact Washer Machine WAW285H1UC Troubleshooting
Emergency door lock release Troubleshooting
In the event of a power interruption the program will continue running when the power supply has been restored. If the washer door must be opened and the normal door unlock procedures do not work, the emergency door lock release rod can be actuated to open the door.
WARNING: RISK OF SCALDING
To avoid risk of scalding, allow water to cool down prior to activating the emergency door lock release. The drum may be full of hot water which could cause burn injury.
WARNING: RISK OF INJURY
- You may injure your hands if you reach into the drum while it is turning.
- Do not reach into the drum when it is turning. Wait until the drum has stopped turning.
CAUTION: WATER DAMAGE AND BURN INJURY
Any escaping water may cause water damage and burns.
Do not open the washing machine door if water can be seen through the glass.
- Press the center of Program Selector to switch off the appliance. Any running program will then be cancelled. Disconnect the power plug.
- Allow the water in the drum to cool off.
- Allow the washer drum to come to a stand still (no longer spinning).
- Before opening the washer door, perform the drain procedure included in the pump maintenance section.
- Loosen screws and remove the protective foil.
The washing machine door can then be opened. Pull the emergency release downwards with a tool and release.
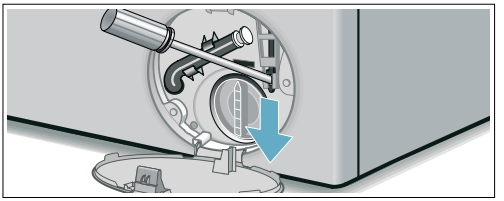
- The door can now be opened.
General Troubleshooting
If you encounter a problem, consider the suggestions and instructions below before you call Customer Service.
WARNING: ELECTRIC SHOCK HAZARD
To avoid the risk of electric shock, repairs should be carried out by an authorized service provider.
If repairs are necessary and you cannot eliminate the fault with the aid of the table below, follow these steps:
- Press the center of the Program Selector to switch off the appliance.
- Disconnect the appliance from the power outlet.
- Turn off the water taps.
- Call Customer Service
NOTICE: The troubleshooting items listed below can help resolve minor issues with your washer quickly and without the necessity of a service call.
Determining the Problem
| Problem | Possible cause(s) | Solution(s) |
|---|---|---|
| Washer door cannot be opened. | Child lock is activated. | Deactivate Child lock (press Finish in - and + for approximately 3 seconds). |
| A power failure occurred. | If a cycle is interrupted by a power failure, it will resume when the power is restored. If power is not restored, follow the cautions and instructions for Emergency door lock release: → Page 40 | |
| Cycle is running, or water level is too high and/or too hot, or the drum is still spinning. | Wait until the cycle ends. | |
| Electric power cord has become loose or unplugged. | Make sure the electric cord is securely plugged in. | |
| Appliance switched off before end of cycle. | Switch the appliance on. | |
| Door still cannot be opened, | Child lock is activated. | Deactivate Child lock (press Finish in - and + for approximately 3 seconds). |
| even after turning the washer | Door is locked for safety reasons (high water level, water temperature too high, drum is spinning). | Run a Spin/Drain program to reduce the water temperature and level. |
| off and back on again. | ||
| Wash cycle time is increased. | Your washer utilizes sensors to monitor certain characteristics of the wash load. Increases in wash cycle time could be due to: | Solutions are based on the specific reason the wash time has been extended. |
| The automatic unbalanced load correction function. | Redistribute laundry evenly to ensure balance. | |
| Excess suds. | Use less detergent. | |
| Washer does not start. | Power cord end not inserted correctly. | Insert power cord end correctly. |
| A fuse is blown or breaker is tripped. | Replace fuse or reset breaker. | |
| Door not closed properly. | Check if laundry is caught in the door. Close the door until you hear it click shut completely. | |
| Energy-saving mode is activated. | Press any button to activate the display. | |
| The display panel and indicator lights switch off, Start/Pause indicator flashes. | Automatic switch-off function is active. | Press the center of the Program Selector to switch on the appliance. |
| Start/Pause button not pressed. | Press the Start/Pause button to start the cycle. | |
| A delayed starting time has been selected and activated. | Wash cycle will begin at the selected Finish in-time. | |
| Child lock is activated. | Deactivate Child lock (press Finish in - and + for approximately 3 seconds). | |
| Detergent residue remains in the detergent dispenser. | Dry detergent may have been damp or lumpy. | Clean and dry the detergent dispenser. |
| Excess liquid detergent may have been added. | See the section on adding the correct amount of HE detergent. → Page 32 | |
| Water does not appear to be filling into the drum. | Start/Pause not pressed. | Press Start/Pause. |
| Water taps not turned on. | Turn on water taps. | |
| Kinked or pinched water hose. | Eliminate the cause. | |
| Water has not drained completely. | Suds may be excessive. | Use less detergent for future loads. Be sure to use only high efficiency HE-detergents. |
| Pump is blocked. | Check and clean the drain pump, water drain hose, and/or drain pipe. | |
| Water is coming out from underneath the washer. | Drain hose or drain pipe is blocked. | Clean drainage pipe and/or hose. |
| Water supply hose is leaking: not screwed on tight at both ends, or rubber washer missing. | Eliminate the cause: tighten the hose, check for rubber washer in place. | |
| Drain hose is leaking. | Check the drain hose, be sure that it is securely attached. Replace the hose if the leak continues. | |
| No spin took place (laundry is still wet). | Excessive suds. | Mix 1 tablespoon of fabric softener with 1/2 liter (1 pint) of water and pour this mixture into the detergent compartment. Do not use softener with waterproof textiles. |
| No Spin was selected. | Select a spin speed setting (Low, Medium, or High). | |
| Detergent residue on the laundry. | Some phosphate-free detergents contain water-insoluble ingredients. | Brush off when laundry is dry or execute the program Rinse. |
| System shakes or shudders when spin speed increases. | Washer drum suspension system shifts during spinning. | Mix small and large laundry items together in the load to minimize this effect. Check that the washer is level and all four feet press equally against the floor. → Leveling the washer; Page 17 |
| Home Connect™ is not working. | Wi-Fi is switched off. | To connect to your home network, switch on Wi-Fi. → Page 27 |
Customer Reviews
Customers generally praise the Bosch Compact Washer Machine WAW285H1UC for its compact size, quiet operation, and efficient performance. Many reviewers appreciate its ability to handle delicate items well and its user-friendly interface. However, some users note that the higher price point and limited capacity are drawbacks.
Common complaints
Include the need for more frequent washing due to the smaller capacity and occasional issues with balance during spin cycles.
STATEMENT OF LIMITED PRODUCT WARRANTY
Bosch warrants that the Product is free from defects in materials and workmanship for a period of three hundred sixty-five (365) days from the date of the original purchase. The foregoing timeline begins to run upon the date of the original purchase, and shall not be stalled, tolled, extended, or suspended, for any reason whatsoever.
This Product is also warranted to be free from cosmetic defects in material and workmanship (such as scratches of stainless steel, paint/porcelain blemishes, chip, dents, or other damage to the finish) of the Product, for a period of thirty (30) days from the date of purchase.
Faqs
What is the capacity of the Bosch Compact Washer Machine?
Is the Bosch Compact Washer Machine WAW285H1UC energy-efficient?
How do I install the Bosch Compact under a counter?
Why does my Washer Machine vibrate excessively during spin cycles?
How do I troubleshoot poor drainage issues with my Bosch WAW285H1UC?
Can I wash bulky items like comforters in the Bosch?
How often should I maintain my Bosch Compact?
Can I stack other appliances on top of my Washer Machine?
What is covered under warranty for my Bosch?
Leave a Comment
