Brio Water Disepenser CLBL520SC Instruction Manual
Content
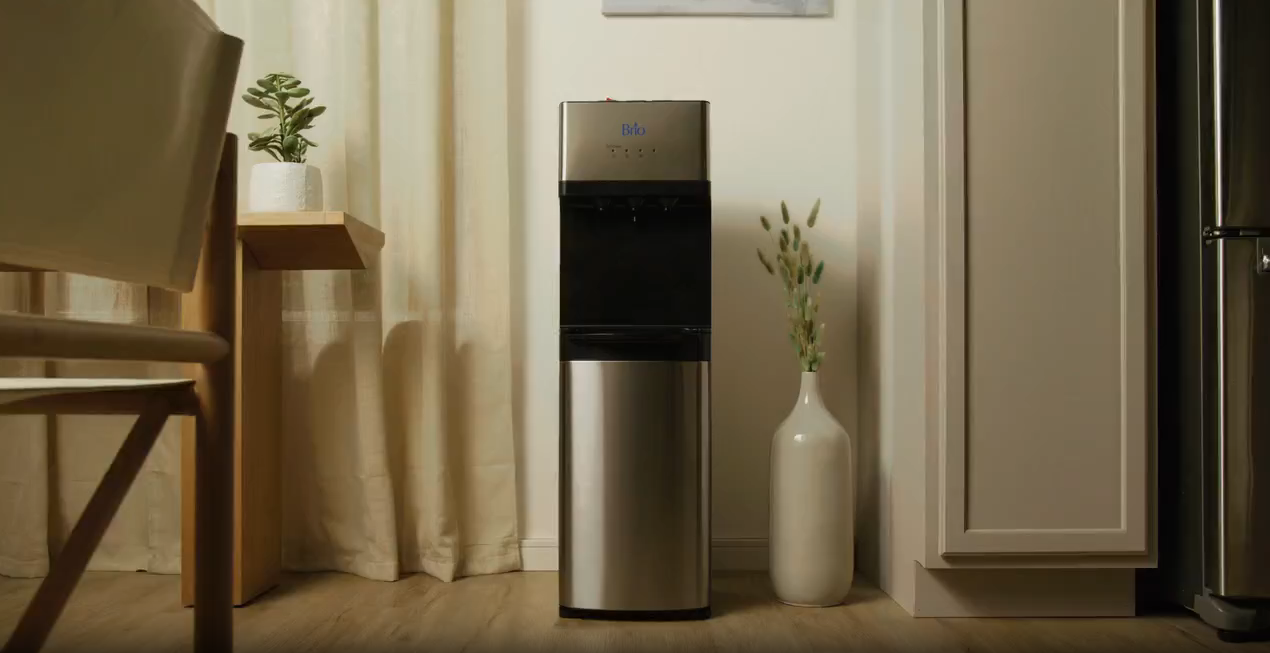
Brio Water Dispenser CLBL520SC Introduction
The Brio Water Dispenser CLBL520SC is a stylish and functional bottom-load water cooler designed for home or office use. It features a sleek stainless-steel design that complements any decor while providing easy access to hot, cold, and room-temperature water from three separate spouts. The unit includes a child safety lock for the hot water faucet and a removable drip tray for hassle-free cleaning. With its convenient bottom-loading system, replacing water bottles is effortless. The Brio Water Dispenser is priced at approximately $200.
Detailed Specifications
- Multiple Temperature Settings: Cold, Room Temperature, and Hot
- Compact Design: 10.4 x 12.2 x 10.4 inches
- High-Capacity Water Tank: 3-Gallon
- Easy-to-Clean Design
- Energy-Efficient Operation
- Child Safety Lock
- LED Indicator Lights
- Stainless Steel Water Reservoir
PRODUCT FEATURES
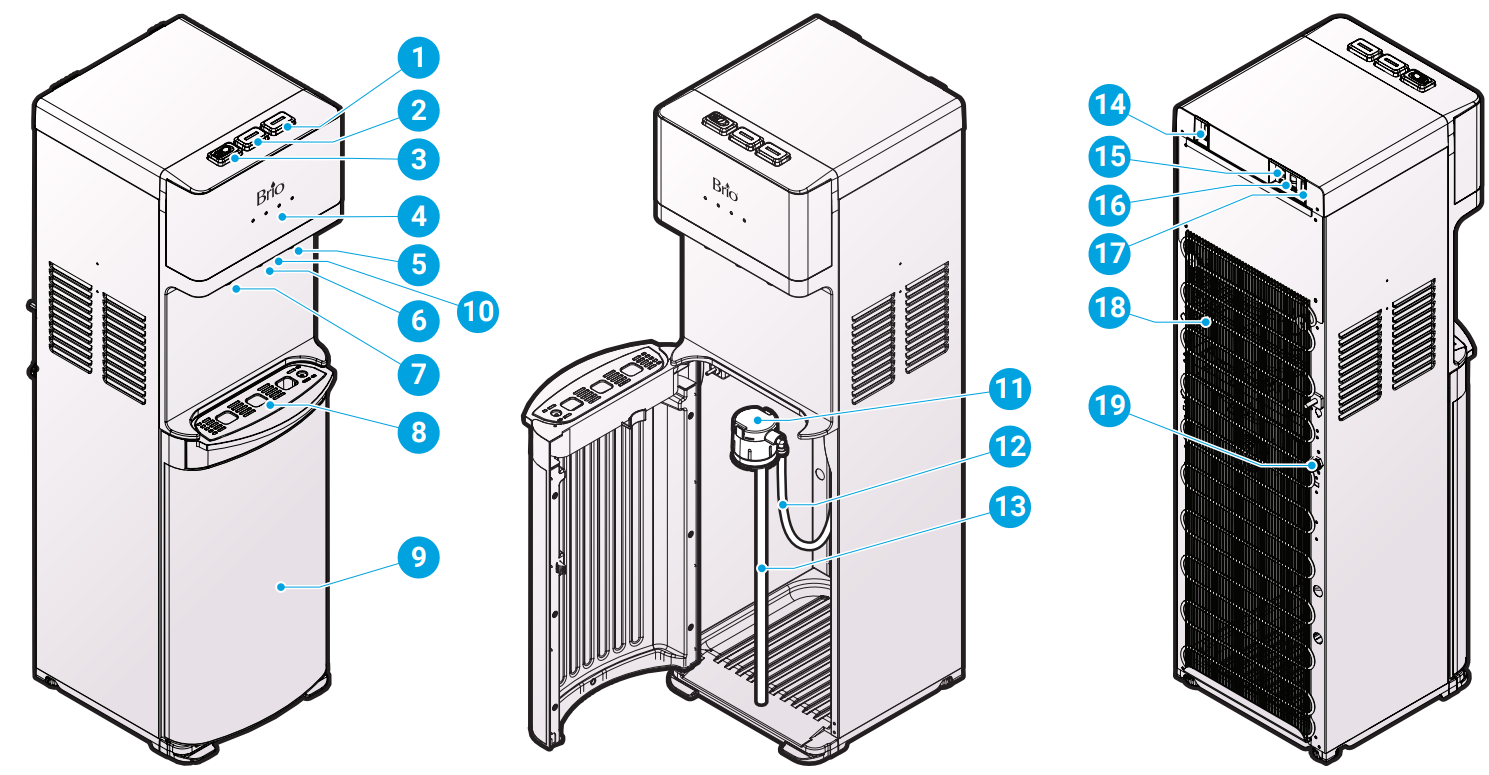
PART | DESCRIPTION |
1 | Cold water button |
2 | Room temperature water button |
3 | Hot water button |
4 | Indicator panel |
5 | Cold water tap |
6 | Room temperature water tap |
7 | Hot water tap |
8 | Drip tray |
9 | Water bottle cabinet |
10 | Nightlight |
11 | Bottle adapter |
12 | Water line |
13 | Bottle adapter tube |
14 | Self-cleaning switch |
15 | Nightlight switch |
16 | Cold water switch |
17 | Hot water switch |
18 | Condenser |
19 | Drain outlet |
Indicator Panel Description
- Power indicator/self-cleaning light – When illuminated, indicates that the dispenser is on. When blinking, indicates that the self-cleaning feature is operating.
- Hot water indicator light – When illuminated, indicates that the dispenser is heating water.
- Cold water indicator light – When illuminated, indicates that the dispenser is cooling water.
- Bottle indicator light – When flashing, indicates that your water bottle is empty and needs to be replaced with a new water bottle.
Product Dimensions
HEIGHT | WIDTH | DEPTH |
105 .1 cm (41 .4 in .) | 31 .1 cm (12 .2 in .) | 39 .6 cm (15 .6 in .) |
Operational Specifications
CAUTION: This unit dispenses water at temperatures that can cause severe burns. Avoid direct contact with hot water. Keep children and pets away from unit while dispensing. Never allow children to dispense hot water without proper and direct supervision. Unplug unit to prevent unsupervised use by children.
| Operational Specifications | TEMPERATURE | TANKCAPACITY | FLOW RATE |
DISPENSING COLD WATER | 37°-50°F / 3°-10°C | 3 .6 L | 35mL per second/ 1.5L per hour |
DISPENSING HOT WATER | 176°–198°F / 80°–92°C | 1L | 35 mL per second/ 4 .5 L per hour |
INSTALLATION
- Determine Installation Location
- Place the dispenser upright.
- Locate the dispenser on a hard and level surface in a cool shaded location near a grounded wall outlet.
NOTICE: Do NOT plug in the power cord until the entire installation section is completed. - Position the back of the dispenser no closer than 20 cm (8 in.) from a wall and permit free airflow between the wall and water dispenser.
- Install the Drip Tray and Grid
- Unwrap the drip tray (8) from the packaging material and slide it onto the dispenser until it is secure in place.
- Connect a Water Bottle
IMPORTANT: To prevent dry heating, do not turn on the heating and cooling switches until you complete the steps in this procedure.- Remove the plastic wrapping and cap from the water bottle. Then clean the new bottle with a cloth.
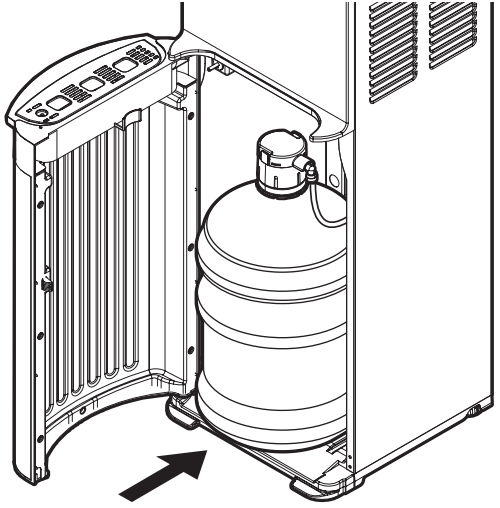
- Open the cabinet door and feed the bottle adapter tube (12) into the water bottle. Ensure the tube hits the bottom of the bottle.
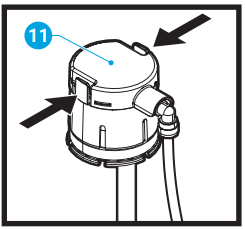
For a 5-gallon bottle, place the bottle adapter (11) over the neck of the water bottle and press securely into place.
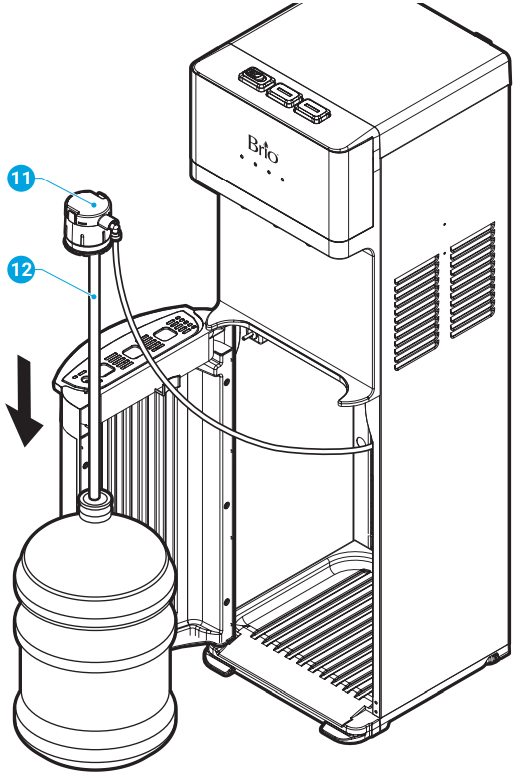
For a 3-gallon bottle, press down on the two tabs on top of the bottle adapter (11) and slide the cap down the probe tubing to adjust the bottle adapter to fit.
- Slide the water bottle into the dispenser cabinet and close the door.
- Wait 5 minutes for the water tanks to fill with water before attempting to use the dispenser.
Remove air from the tanks by placing a cup under each water tap and drain at least 4 cups (1 liter) of water before initial use.
NOTE: Water will not pump from the bottle until the door is completely closed.
Brio Water Dispenser CLBL520SC OPERATION
IMPORTANT: This unit has been tested and sanitized prior to packing and shipping. During transit, dust and odors can accumulate in the tank and lines. Dispense and dispose at least one quart of water prior to drinking any water.
Turn the Dispenser On/Off
IMPORTANT: Before you turn the dispenser on and activate the hot and cold switches, ensure a bottle is installed.
- Plug in the dispenser and turn the On/Off switch to On.
- Run water through the cold and hot water taps until water begins to dispense.
- To power on the cooling system, flip the cooling switch to the On position.
- To power on the heating system, flip the heating switch to the On position.
Dispense Cold Water
NOTE: Water will take approximately 1 hour after plugging in and turning on to become completely chilled. The cooling light will turn off once the water has been fully chilled.
- Press a drinking glass or container against the cold water faucet to dispense cold water.
- Release when your container is full.
Dispense Hot Water and Activate Child Safety Lock
CAUTION: This unit dispenses water at temperatures that can cause severe burns. Avoid direct contact with hot water. Keep children and pets away from the unit while dispensing. Never allow children to dispense hot water without proper and direct supervision. Disable the heating feature by switching the heating convenience switch to the Off position.
NOTE: Water will take approximately 15-20 minutes after plugging in and turning on to reach its hottest temperature. The heating light will turn off once the water has been fully heated.
- This water dispenser is equipped with a child safety feature in order to prevent inadvertent dispensing. To enable dispensing of hot water, press and hold the red lock button and then press your mug or container against the paddle directly beneath the red lock button.
- Release the paddle once your container is full.
Change the Water Bottle
CAUTION: Do not dispense hot, cool or cold water if the red light is flashing as you could empty the tanks and cause the dispenser to overheat. When the bottle indicator light on the front-right of the dispenser flashes red, it is time to replace your empty water bottle with a new water bottle:
- Open the dispenser cabinet door and slide the empty bottle out of the cabinet.
- Remove the bottle adapter from the empty bottle and let the probe drip into the bottle. Once dripping has stopped, place the bottle adapter on the hanger and set the empty bottle aside.
- Follow the steps in Connect a Water Bottle to install your new water bottle.
- Recycle the empty bottle at your local exchange center to receive your next bottle at a discount.
Setup Guide
- Unpacking: Carefully unpack the dispenser and all included accessories from the box.
- Assembly: Assemble the dispenser according to the provided instructions. Attach the water tank and ensure all connections are secure.
- Placement: Place the dispenser on a flat, stable surface. Ensure the power cord is accessible but out of the way.
- Water Installation: Fill the water tank with clean water and attach it to the dispenser. Plug in the unit and turn it on.
- Configuration: Adjust the temperature settings as desired. Test the dispenser to ensure it is functioning correctly.
CLEANING AND MAINTENANCE
Use the Self-Cleaning Ozone Feature
It is highly recommended that you use the self-cleaning feature on a weekly basis to sanitize tanks and water lines.
To activate the self-cleaning cycle, press in the self-cleaning switch (14), hold for 5 seconds, and release.
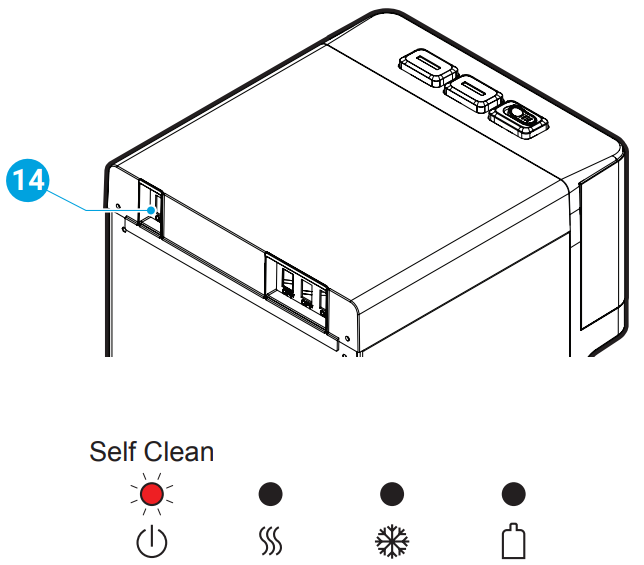
The power indicator light on the front of the dispenser will begin blinking, indicating the cleaning process is underway.
During the cleaning cycle, ozone is produced and injected into the water system. This ozone kills bacteria and biofilms typically found in water dispensers. By the time the cleaning cycle ends, the ozone is converted to harmless oxygen and emitted into the air.
IMPORTANT: The cycle takes 90 minutes to complete. During this time do not dispense and drink the water. Doing so may result in an odd taste. For your convenience, we recommend that you do this during a period when the dispenser is not in use, such as overnight hours or when staff is away from the office. During the cycle you may smell a faint trace of ozone.
- Keep this dispenser in a dry and cool place and avoid direct sunshine.
- Ensure the back of the dispenser is at least 20 cm (8 in.) away from the wall.
- Never put the dispenser on paper or foam, which may store water and then cause creepage. Never put anything flammable beside this machine.
- Do not use the dispenser outdoors or in a place that can be splashed by water.
- If the dispenser is not in use for longer than a 24-hour period, turn off the heating switch or the refrigerating switch to save power and drain any remaining water.
- Clean your cabinet, controls, bottle probe and spout each time you change your water bottle. Use a clean soft cloth and a food grade sanitizer or bleach.
- Empty and clean the drip tray, grid and float as needed.
SAFETY INFORMATION
WARNING: To reduce risk of injury and property damage, you must read this entire guide before assembling, installing and operating the dispenser.
WARNING: This product dispenses water at very high temperatures. Failure to use properly can cause personal injury. When operating this dispenser, always exercise basic safety precautions, including the following:
- Prior to use, this dispenser must be properly assembled and installed in accordance with this manual.
- For indoor use only. Keep the water dispenser in a dry place away from direct sunlight. Do NOT use outdoors.
- Install and use only on a hard, flat and level surface.
- Do NOT place the water dispenser in an enclosed space or cabinet.
- Do NOT operate the dispenser in the presence of explosive fumes.
- Use only properly grounded outlets.
- Do not use an extension cord.
- Always grasp the plug and pull straight out from the outlet. Never unplug by pulling on the power cord.
- Do NOT use the dispenser if the cord becomes frayed or otherwise damaged. If the supply cord is damaged, it must be replaced by the manufacturer, its service agent or similarly qualified persons in order to avoid a hazard.
- To protect against electric shock, do NOT immerse cord, plug, or any other part of the dispenser in water or other liquids.
- Do not use this dispenser with water that is microbiologically unsafe or of unknown quality.
- Water dispenser is compatible with 3- or 5-gallon (12- or 19- liter) water bottles.
- Clean up all water spills after loading or unloading water bottles from the dispenser.
- Ensure the water dispenser is unplugged prior to cleaning.
- Never allow children to dispense hot water without proper and direct supervision. Unplug the unit to prevent unsupervised use by children.
- Service should be performed only by a certified technician.
- The appliance must not be cleaned by a water jet and is not suitable for installation in an area where a water jet could be used.
WARNING: Keep ventilation openings, in the dispenser enclosure or in the built-in structure, clear of obstruction.
WARNING: Do not use mechanical devices or other means to accelerate the defrosting process, other than those recommended by the manufacturer.
- This dispenser should work under environment of temperatures from 4°C~40°C (39°F~104°F) and humidity ≤90%.
- Never turn the dispenser upside down or lean it more than 45°.
- After turning the dispenser off, allow the dispenser to sit idle for 3 minutes before turning on again.
INTENDED USE
This dispenser is intended to be used in household and similar applications such as:
- Staff kitchen areas in shops, offices and other working environments
- Farm houses
- Clients in hotels, motels and other residential type environments
- Bed and breakfast type environments
- Catering and similar non-retail applications
This dispenser is not intended for use by persons (including children) with reduced physical, sensory or mental capabilities, or lack of experience and knowledge, unless they have been given supervision or instruction concerning use of the appliance by a person responsible for their safety.
TROUBLESHOOTING
PROBLEM | SOLUTION |
The cold water is not cold . |
and there is free airflow on all 20 cm sides of the dispenser.
|
Thehot water is nothot . |
|
The nightlight is not working . |
|
Thedispenser is noisy. |
|
Thebottle is leaking . |
|
The dispenser is not dispensing water . |
remove air untilwater begins to flow. |
Brio Water Coolers Warranty
Brio (“Vendor”) warrants to the original purchaser of the Brio Water Coolers (the “Product”), and to no other person, that if the Product is assembled and operated in accordance with the printed instructions accompanying it, then for a period of one (1) year from the date of purchase, all parts in the Product shall be free from defects in material and workmanship. This Limited Warranty shall be limited to repair or replacement of parts, which prove defective under normal use and service and which Vendor shall determine in its reasonable discretion upon examination to be defective. T
Pros & Cons
Pros
- Compact and modern design fits well in most spaces.
- Multiple temperature settings cater to various hydration needs.
- High-capacity water tank reduces the need for frequent refills.
- Energy-efficient operation helps save on utility costs.
- Child safety lock and LED indicator lights enhance user safety.
Cons
- Some users may find the initial setup process somewhat complex.
- The dispenser can be noisy during operation, particularly when cooling or heating water.
- Occasional complaints about the dispenser's durability and longevity.
Customer Reviews
Customers generally praise the Brio Water Dispenser CLBL520SC for its ease of use and multiple temperature settings. However, some users have reported issues with the dispenser's noise level and occasional durability concerns.
A common complaint is the initial setup process being more complicated than expected, but once assembled, the dispenser operates smoothly. Overall, the product is well-regarded for its modern design and functional efficiency.
Faqs
How do I assemble the Brio Water?
What are the different temperature settings available on the Brio Water Dispenser?
Is the Brio Water Dispenser energy-efficient?
How often do I need to refill the water tank?
Can I use the CLBL520SC in an office setting?
How do I clean and maintain the Brio Water Dispenser?
Is the Brio noisy during operation?
What safety features does the Brio Water Dispenser have?
Can I purchase replacement parts for the Brio Water Dispenser?
What is the warranty offered with the CLBL520SC?
Leave a Comment