Features: Bristan Thermostatic Power Shower 1500 Instruction Manual
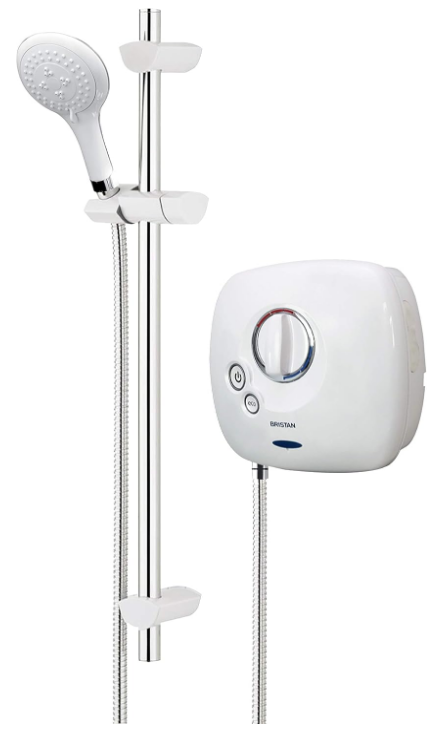
Content
Introduction
The Bristan Thermostatic Power Shower 1500 is a high-performance shower system designed to deliver a luxurious and consistent showering experience. With its thermostatic control, this power shower ensures that water temperature remains stable, providing safety and comfort for users. Its sleek design and powerful performance make it suitable for various bathroom styles, while the easy installation process adds to its appeal. Priced at approximately $299.99, this shower system combines functionality with modern aesthetics for an enjoyable bathing experience.
Specifications
- Thermostatic control for stable water temperature
- 1500mm showerhead with multiple spray patterns
- Adjustable thermostat for precise temperature control
- Anti-scald protection for safety
- Compatible with both high and low-pressure systems
- Durable construction with chrome or white finish options
Important Safety Information
- Please read these instructions thoroughly and retain for future use.
- All products manufactured and supplied by Bristan are safe provided they are installed, used correctly and receive regular maintenance in accordance with these instructions.
- If you are in any doubt what so ever about your ability to install this product safely you must employ the services of an experienced qualified plumber.
- Do not operate the shower unit if you suspect it is frozen. Do not site the shower unit where it might be subjected to freezing conditions.
- Do not operate the shower unit if the showerhead or spray hose has been damaged or is blocked.
- Do not block the flow of water from the showerhead, by placing it (smothering it) on your hand or any other part of your body or foreign object.
- Do not operate the shower if the water stops flowing during use or if the water is leaking from the shower unit
General Safety
- Always switch off the power at the consumer unit and remove the correct circuit fuse before making any electrical connections or if you have to remove the cover of an installed unit.
- The unit must be mounted on the finished wall surface (usually tiled). Under no circumstances must you tile up to the unit after fixing it directly to the bare wall as this may cause overheating.
- If the shower unit is fitted in a hard water area, a scale inhibitor may have to be fitted and the filter cleaned regularly. For more advise on obtaining a scale inhibitor, visit local merchant or DIY store.
- This appliance is not intended for use by persons (including children) with reduced physical, sensory or mental capabilities, or lack of experience and knowledge, unless they have been given supervision or instruction concerning use of the appliance by a person responsible for their safety.
- Children should be supervised to ensure that they do not play with the appliance.
Product Features
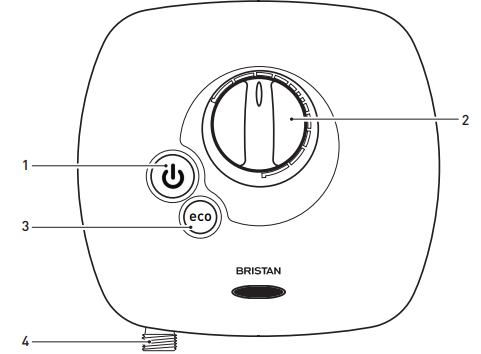
- Push Button STOP/START Switch Electronic switch
- Temperature Control Adjustable Temperature Control
- Eco Button
Non-powered shower - Hose outlet
Shower hose outlet
Removing cover
- Temperature Control handle
- Graphic Ring
- Logo
- Screws (x3)
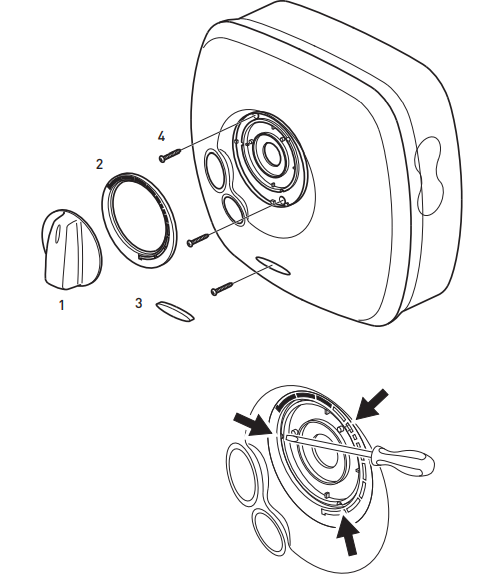
- Please note that this product comes packaged with the front cover and control knobs already in place. These have to be removed to install the shower. Please follow the procedure below.
- Pull off control knob (1).
- To remove the graphic ring (2) which surrounds the main control knob, insert a thin bladed screwdriver into the recess (arrowed) gently prise off the ring, revealing two fixing screws.
- Remove lower logo (3) by inserting a thin bladed screwdriver in the slot, to reveal the lower fixing screw.
- Remove all three fixing screws (4). The cover can now be slowly removed - care should be taken not to strain wiring which is attached to the front cover.
- This procedure can be reversed to replace the front cover and control knob after installation to the wall.
Electrical Requirements
Warning: This appliance MUST be earthed!
All electrical wiring for the shower must comply with the current I.E.E. Regulations which includes earth-cross bonding to all metal pipe work.
Typical Power Shower Installation

Important:
- All plumbing connections should be completed before any electrical connections are undertaken.
- The shower must be connected to a 230/240 volt. A.C. electrical supply from a 13-amp ring main, via a fused double pole switch with at least 3mm contact separation. The switch is to be clearly identifiable, a minimum distance of 2.5m from a fixed tap or shower, i.e. mounted in an adjacent room or via a ceiling-type pull cord.
- It should be fused at no more than 3 amps.
- This appliance must be earthed, and all associated metal pipe work earth crossbonded in line with current I.E.E. regulations.
As the colours of the wires in the cable (not supplied) used to connect to this appliance may not correspond with the coloured markings identifying the terminals in your switch, please follow the procedure below: Please use the cable entry point provided. Failure to comply will eliminate any BEAB approval.
Procedure
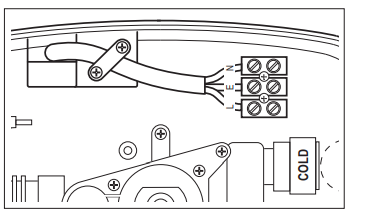
- The wire, which is coloured Blue or Black, must be connected to the terminal that is marked with the letter N.
- The wire, which is coloured Brown or Red, must be connected to the terminal that is marked with the letter L.
- The wire, which is coloured Green or Yellow, must be connected to the terminal that is marked with the earth symbol .
- The installation and wiring must comply with I.E.E regulations.
Description
Shower 1500 boasts a sleek and modern design that complements any bathroom aesthetic. The thermostatic valve ensures that the water temperature remains consistent, even when there are changes in the water supply. This feature is particularly useful in households where multiple people are using the shower simultaneously. The showerhead is designed with multiple spray patterns, allowing users to customize their shower experience according to their preferences.
Water Requirements
Water tank detail
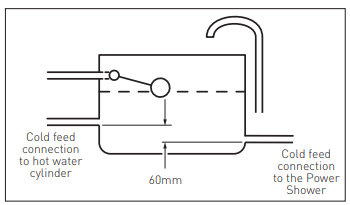
Typical Power Shower Installation

Cylinder Flange
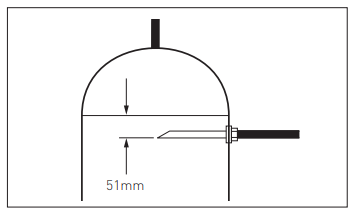
- Under no circumstances must the Power Shower be connected to the mains cold water supply, or to a combination boiler, or pressurised hot water system.
- For correct operation of the Bristan Thermostatic Power Shower both hot and cold supplies to the unit must be gravity fed, at nominally equal pressures, from a cold water storage tank and hot water storage cylinder.
- We recommend a minimum 112 litre (25 gallons) cold water storage tank. Please ensure compliance with all Water Regulations.
- Please ensure maximum supply head of 10 metres, minimum 1 metre.
- Please note, when using this unit in ‘gravity’ shower mode, without the boost button depressed, ensure you have a minimum of 1 metre head from your shower head to the bottom of your cold water tank.
- It is recommended that the hot water supply is at a temperature of 60°C, in line with British Standard 6700, British Water Regulations, and Plumbing Code of Practice.
- Do not use jointing compounds, or solder within 300mm of the unit.
- Before proceeding with the installation of this unit, check that your site requirements allow the shower unit and handset when positioned on the wall to be a minimum of 1 metre below the cold water storage tank.
- All plumbing should be completed before any electrical connections are undertaken.
- The unit can be connected to a cylinder system providing it has cold water storage capacity of 112 litres (25 gallons).
- Do not run shower dry as this will damage the internal seals and invalidate the warranty.
- All pipe work into the unit should be 15mm. Non-restrictive isolating valves must be fitted on hot and cold supply pipes. When connecting pipe work avoid using elbows: sweep or formed bends will ensure optimum performance.
- Do not position unit in areas subjected to freezing conditions.
- The temperature of your stored water must not exceed 65°C. A stored water temperature of 60°C is considered sufficient to meet all normal requirements in line with the British Standard 6700.
- Warning - All connecting pipe work should be earthed.
- Procedure - Plumbing Connections.
- Isolate mains water and electrical supplies. To empty the pipe work open the hot and cold water taps.
- Make your connection into the hot water supply pipe from the cylinder, ensuring that it is the first draw-off (below the expansion pipe tee) to minimise the effects of water draw offs elsewhere in the house, and a minimum of 1 metre from the base of the cold storage tank and the top of the hot water cylinder. If this is not possible, a direct connection must be made from the hot water cylinder with a cylinder flange.
- The cold water supply should be taken directly from the cold storage tank, and must be positioned 60mm below the cold feed connection to the hot water cylinder. This should not be directly beneath the ball valve as aeration of the water going to the shower could cause pump damage.
- Run hot and cold pipe work to the unit position.
Fitting your Shower
We recommend that the shower unit is fitted at chest height, and set to one side of the intended riser rail position, ensuring that the top of the shower unit is at least 1 metre below the base of the cold water storage tank.
Important: The unit must be fitted on the finished tiled surface
Warning: Do not seal the edge of the shower unit to the tiled surface with any form of sealant. The gap between the back of the shower unit and the tiles is needed for ventilation.
The outlet connection for the hose should be sited at the bottom of the unit.
Do not fit a fuse or switch on mains electrical supply until all plumbing work is completed. Connecting pipework can feed from above or below the unit, or straight through the wall at nominal centres of 40mm.
Side Feed = Hot on the bottom/cold on the top
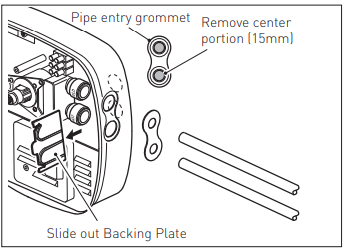
Back Feed = Hot on the bottom/cold on the top
Procedure:
The integral fittings on the valve are of the self-seal push-fit type. Ensure that all burrs are removed from the ends of the supply pipes. Where chromium plated pipe is used then the first 25mm of chrome must be roughened or removed to ensure that the push fit fittings in the supply retain the pipe in position.
The inlet elbows supplied are of a standard length, in some cases these will need to be shortened for correct installation.
Surface Mounting
If exposed pipe work is the chosen option, the pipes enter the unit on the right hand side with the cold on the top. The pipe centres are 40mm apart, and need to penetrate the mixer connections to a depth of 25mm.
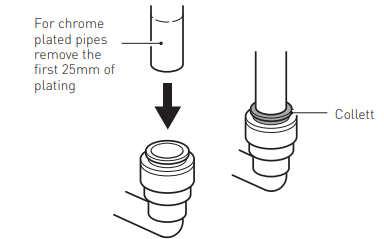
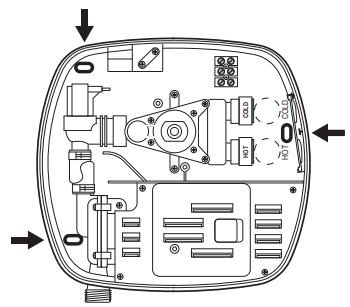
- Position the unit on the wall and mark the fixing hole positions. Drill the wall, insert the wall plugs supplied, and secure the unit to the wall. Make the necessary measurements, remove the unit from the wall, and bring the pipe work and wiring to finished positions.
- Make the hot water connection into the hot water supply pipe from the cylinder, ensuring that it is the first draw off (below the expansion tee), to minimise the effects of water drawn off elsewhere in the house, and a minimum of 1 metre below the base of the cold water storage tank. If connection to the hot water storage pipe is not possible, a cylinder flange type connection may be used.
- Make the cold water connection into the base of the cold water storage tank, 60mm below the level of the cold water take off to the hot water cylinder.
- Flush out the pipe work.
- Detach the pipe entry grommet and, using a sharp knife or similar, remove the centre (15mm dia.) portions, and refit the grommet.
- Fit the shower unit over the pipe work, and insert the mains wiring through the aperture at the top of the base moulding. Ensure that the supply pipes are fully inserted into the mixer valve ‘push fit’ connections, and fix to the wall.
- Connect the wiring in line with the polarity indications moulded into the base unit.
Recessed Fitting Pipework
Hole Fixing Positions
Wiring Connections
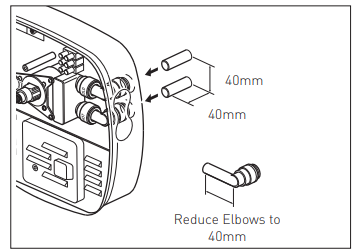
- If the pipe work is to be recessed, it should be let into the wall with the ends of the hot and cold pipes standing 40mm off the finished surface of the wall, and centres 40mm apart, with the cold above the hot. Connections to the hot and cold water supplies should be made as described above, knocking out inlet holes in rear of unit.
- Position the unit on the wall with the inlet pipes centred in the holes in the rear of the base moulding, mark the fixing screw positions on the wall and remove the unit.
- Drill the fixing screw holes and insert the wall plugs supplied.
- Cut the plastic inlet elbows supplied to 40mm long from the centre of the elbow, and remove any burrs from the cut end. Fit the cut inlet elbows into the push-fit connectors on the shower mixer valve.
- Flush out the pipe work.
- Fit the shower unit over the pipe work, and insert the mains wiring through the aperture at the top of the base moulding. Ensure that the supply pipes are fully inserted into the mixer valve ‘push fit’ connections, and fix to the wall using the fixing screws suppled.
- Connect the wiring in line with the polarity indications moulded into the base unit.
Fitting the Riser Rail
- Mark the position
- Position the assembled riser rail on the wall, bearing in mind the different heights of people likely to use the shower and the length of the hose when connected to the shower.
- With the riser rail vertical, mark the wall bracket positions onto the wall.
Release the slider handle and remove the slider and wall brackets from the rail.
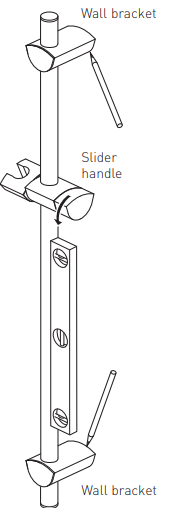
Attach wall brackets
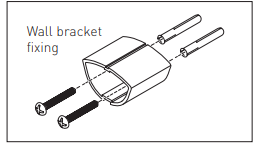
- Position the wall bracket fixings in the marked positions against the wall, ensure they are vertically in line with each other and mark the centres of the fixing holes onto the wall.
Warning: Please check for any hidden pipes and cables before drilling holes in the wall. - Drill suitable holes and insert the wall plugs. Securely attach the wall bracket fixings to the wall using the screws.
Tips: A piece of insulation or masking tape positioned where holes are to be drilled and before marking out the exact position for the fixing holes will help stop the drill bit from wandering, particularly on a tiled surface. When working near a basin, bath or shower insert plug or cover waste to prevent losing small parts. Take care not to drop tools/equipment into basin, bath or shower during shower installation.
Note: If replacing an existing riser rail, check to see if the existing holes can be reused or covered by the new wall brackets. Try to avoid drilling close to the edge of tiles, drill in the middle of the tiles or in the tile joints.
- Position the wall bracket fixings in the marked positions against the wall, ensure they are vertically in line with each other and mark the centres of the fixing holes onto the wall.
- Insert rail clamps
- Insert the rail clamps into both wall brackets, ensuring the screw is accessable .
- Insert riser rail
- Push the riser rail up through the bottom wall bracket.
- Push the soap dish and slider down onto the riser, ensuring they are the correct way up.
- Then push the top wall bracket down onto the riser rail.
- Tighten rail clamps
- Centre the riser rail within the wall brackets and tighten both clamps onto the rail.
- Fit wall bracket fixings
- Position the wall bracket fixings onto the wall surface and mark the position. Drill suitable holes and insert the wall plugs. Secure the wall bracket fixings to the wall using the screws provided.
- Fit riser rail to the wall
- Slide the wall brackets over the wall bracket fixings. Tighten the grub screw on the under side of each wall bracket using a 2.5mm hexagonal key.
- Connect shower hose to shower
- Screw the shower hose (ribbed nut end) onto the shower ensuring that the rubber washer is fitted and feed the hose through the hole in the soap dish.
- Connect shower hose to showerhead
- Screw the shower hose (conical end) onto the showerhead ensuring that the rubber washer is fitted.
Place the showerhead into the slider.

Setup Guide
To set up the Bristan Thermostatic, follow these steps:
- Shut off the water supply to the shower.
- Install the thermostatic valve according to the manufacturer's instructions.
- Connect the showerhead to the valve and ensure all connections are secure.
- Turn on the water supply and test the shower for leaks and proper function.
- Adjust the thermostat to your desired temperature.
Commissioning
Testing the System
- Connect the shower hose to the unit but do not fit the handset.
- Turn on the hot and cold isolating valves, and the electricity-isolating switch. Place the open end of the hose in the bath or shower tray.
- Set the temperature control knob to cold, fully clockwise, and press the ‘stop/start’ button.
Cold water will run from the hose, and you should allow this to continue for two minutes after which the control knob should be returned to the ‘12 o’clock’ position. Allow the water to run for a few minutes to stabilise the hot water flow, and then check that the water is at a comfortable showering temperature.
Temperature Adjustment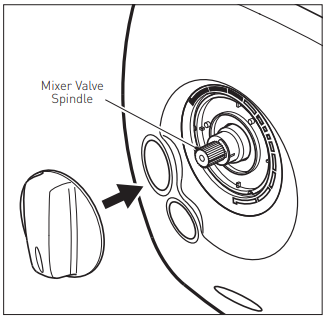
- If it is too hot or cold, turn off the electricity-isolating switch, pull off the control knob, and adjust the brass spindle anti-clockwise to increase the temperature - clockwise to decrease. Replace the knob in the ‘12 o’clock’ position, switch the electricity on, and check the water temperature. Readjust as necessary until a satisfactory temperature is achieved.
- Pass the shower hose through the hole in the soap dish and, using the rubber sealing washer supplied, fit the handset to the hose and place the handset in the handset holder.
- Press the Stop/Start button. Water flows from the shower head under the gravity pressure from the storage tank. The ‘Eco’ button allows you to switch from a power shower to a gravity (non-powered) shower.
Temperature Adjustment
The valve allows the maximum showering temperature to be set at a safe level, preventing accidental scalding. This setting should be made during commissioning and will require that the hot water cylinder is at its normal operating temperature.
IMPORTANT: The handset must be in the spray mode. We recommend the reading of User Instructions before proceeding further. This will familiarise you with the operation of the shower.
Turn the brass mixer valve spindle fully clockwise, and then anti- clockwise until the black line on the spindle is aligned with the groove on the mixer body, and fit the control knob in the fully cold position. Check that it is correctly fitted by turning fully clockwise to the stop, pull the knob off and check that the black line and groove are aligned. Adjust if necessary. This sets the shower temperature to 38-40°C, with the control knob pointing to ‘12 o’clock’, if the stored hot water is at the recommended 60°C.
Operating the Shower
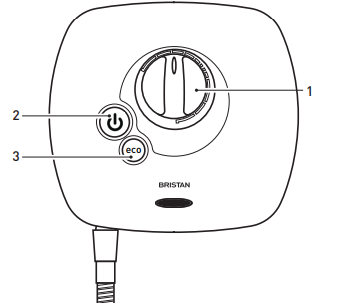
- To operate the shower ensure the temperature control knob (1) is set approximately to the 12 o’clock position and press the Stop /Start button (2).
- Adjust the shower temperature by turning the knob anti-clockwise - towards red, for warmer temperature, and clockwise - blue, for cooler.
- Setting the knob in the same position in future will give the same showering temperature.
- If a less powerful shower is required, press the Shower Eco button (3).
- The handset holder has a friction grip on the rail and simply slides up and down to adjust the height. The angle of the handset in the holder has 5, spring loaded positions.
To adjust, grip the handset handle next to the hose nut, and move it to it’s required position.
Cleaning
- Do not at anytime use bath cleaning liquids, powders or specified scratch cleaners on any surface finishes.
- In order to avoid surface wear or chemical attack on any of your shower fittings when cleaning, always use a damp cloth.
- For persistent stains or marks, you may use domestic liquid or soap.
Handset
The Handset has three spray modes.
- Spray
- Jet spray
Combination spray
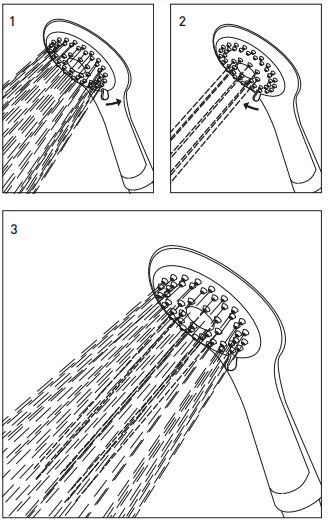
To select the desired showering mode, simply rotate the spray head one way or the other to the desired spray pattern.
Cleaning - Rub-clean feature
To remove any build-up of limescale from your handset, remove it from its holder and rub your fingers over the rubber spray jets. Turn the shower on and any build up of limescale will be flushed out of the handset.
Troubleshooting
Warning: Before carrying out general repairs or testing the shower, ensure that the electricity supply is turned off at the mains and the correct circuit fuse is removed.
| Symptom | Likely Cause | Action/Remedy |
| Shower not operating | Electric is not switched on | Check all fuses and electrical supply. |
| No water flow (Hotor Cold) | Isolating valves turned off | Check isolating valves are turned on Check cold-water storage tank has not run dry |
| Poor performance | Restrictions in water supply | Check both hot and cold isolating valves are fully open |
Pump may have overheated | Allow unit to cool and it will automatically re-set Check for adequate ventilation | |
Unit may be incorrectly installed | Check that the top of the shower unit is at least1 metre below the base of the cold water tank | |
Blockage in handset or shower hose | Check and clean as necessary |
Spare Parts
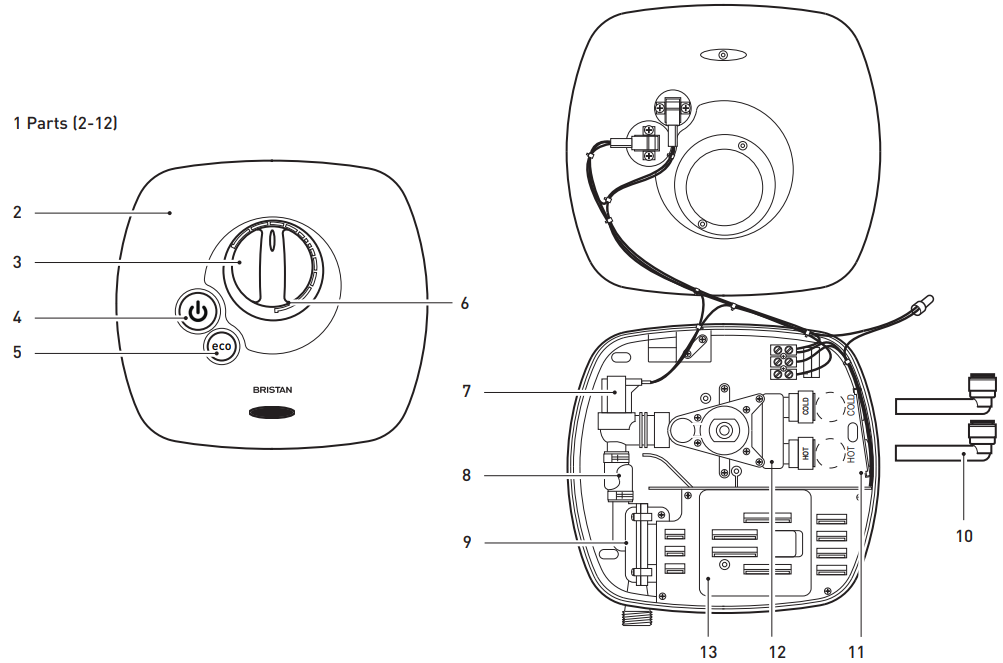
| No. | Part No. | Description | No. Off |
| 01 | SP-087-0105-WT | Base assembly | 1 |
| 02 | COV SP-087-0507 W | Front cover | 1 |
| 03 | SP-087-0505-WT | Temperature control knob | 1 |
| 04 | SP-087-0503-WT | Stop/start button | 1 |
| 05 | SP-087-0504-WT | Shower Eco button | 1 |
| 06 | SP-490-0014 | Front cover screws | 3 |
| 07 | SP-087-0230 | Solenoid | 1 |
| 08 | SP-087-0127 | Pipe connection | 1 |
| 09 | SP-087-0110 | Pump unit | 1 |
| 10 | SP-086-0060 | Long Inlet Elbow | 2 |
| 11 | SP-087-0091 | TPE Cover | 1 |
| 12 | SP-087-0154 | Mixer valve assembly | 1 |
| 13 | SP-087-0097 | Motor Cover | 1 |
| 14 | SP-087-0129 | Latching Switch# | 1 |
Guarantee
Guarantee: 2 Year parts.
1 Year labor (subject to registration).
Should a complaint arise, products are guaranteed against faulty workmanship and materials for a period of 12 months from the date of purchase, when in domestic use (second year guarantee is parts only). For your guarantee to be valid, your shower must be installed by a competent person, in accordance with the instruction manual.
Pros & Cons
Pros
- Consistent water temperature due to thermostatic control
- Anti-scald protection for enhanced safety
- Multiple spray patterns for a customizable shower experience
- Durable construction with attractive finishes
- Compatible with both high and low-pressure systems
Cons
- Higher initial cost compared to non-thermostatic models
- Requires professional installation for optimal performance
- Possible need for regular maintenance to prevent mineral buildup
Customer Reviews
Customers have praised the Bristan for its reliable performance and consistent water temperature. Many have noted the ease of installation, though some recommend professional help for a seamless setup. Some common complaints include the need for occasional cleaning of the showerhead to maintain water pressure and the higher upfront cost compared to other shower systems.
Faqs
What is the primary benefit of the Bristan Power Shower?
Is the Bristan Thermostatic suitable for low-pressure systems?
How do I adjust the temperature on the Thermostatic?
What safety features does the Power Shower offer?
Does the Bristan require regular maintenance?
Can I install the Bristan Power Shower myself?
What finishes are available for the Bristan?
How long does it take to set up the Thermostatic Power Shower?
Is the Bristan energy-efficient?
What is the warranty period for the Power Shower?
Leave a Comment
