
Setup: Canesthome Smart Bidet Toilet TC-100GE User Guide
Content
Canesthome Smart Bidet Toilet TC-100GE
Introduction
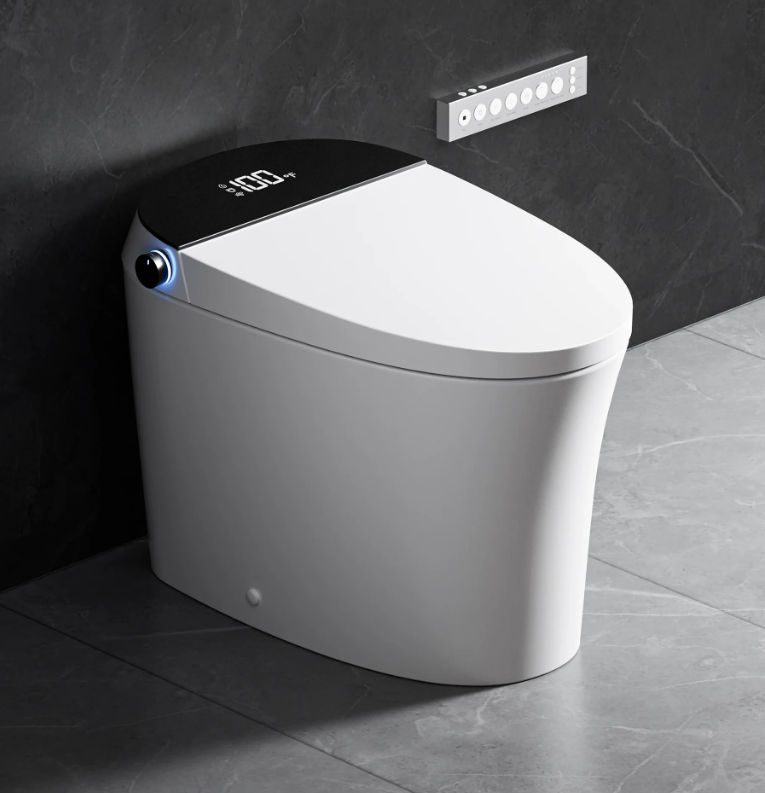
The Canesthome Smart Bidet Toilet TC-100GE is a cutting-edge bathroom fixture designed to enhance hygiene, comfort, and convenience. This advanced toilet integrates a bidet with a plethora of features that make it a superior choice for modern homes. The TC-100GE is expected to be launched in the summer of 2023, with an estimated price range of $1,500 to $2,000, making it a significant investment for those seeking a luxurious bathroom experience.
This smart toilet is engineered to provide a comprehensive cleaning experience with its advanced bidet functions, including heated seats, massaging jets, and self-cleaning nozzles. It also features advanced hygiene technologies such as UV light disinfection and antimicrobial coatings. The user-friendly interface and remote control make it easy to customize settings according to individual preferences.
The Canesthome Smart Bidet Toilet TC-100GE is not just a toilet; it's a holistic solution for bathroom hygiene and comfort. Whether you're looking to upgrade your existing bathroom or are in the process of building a new home, this smart bidet toilet is an excellent choice.
Safety Precautions
- Before installation, please read this manual carefully and install it in strict accordance with the instructions. After reading, please put this manual in a prominent position. Keep the place properly. To avoid injury and property damage to users and others, please strictly observe the safety warnings and precautions.
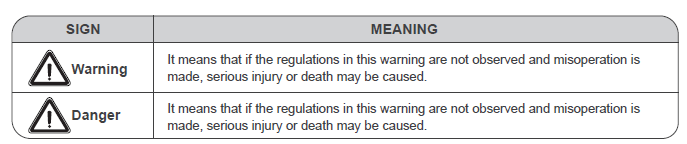
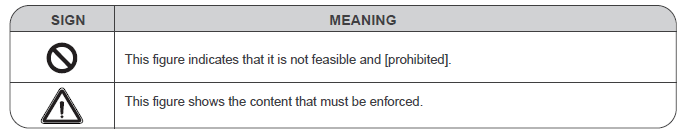
WARNING
- Do not install and use this product in damp places. This product must be reliably grounded, and the reliable connection of the
AC socket ground wire to the ground should be ensured. The grounding wire should use a tripod socket. If you are not sure whether it has been reliably grounded, please ask a qualified electrician or maintenance personnel to check and confirm. The wiring of the power socket conforms to the national standard (zero on the left and fire on the right) and cannot be reversed. - It is forbidden to use the power extension cord or a loose and unstable power socket; otherwise, it may cause fire or electric shock.
- The lit cigarettes and other combustibles cannot be put into the toilet cover; otherwise,, it may cause a fire. It is forbidden to disassemble, repair,, or modify the product by yourself, otherwise it may cause fire or electric shock.
- This product must be connected to a special standard socket and wiring with a 120V/60Hz load current of at least 10A, and the socket must be equipped with an Earth fault circuit breaker,, or earth leakage protection, or or highly sensitive and fast leakage switch (rated sensitive current below 10mA). 120V
- Do not touch the product that has fallen into water or soaked in water, and immediately unplug the power plug.
- If the power cord is damaged, to avoid danger, it must be replaced by professionals from the manufacturer, its maintenance department,, or similar departments.
- Please pull out the power plug when it thunders.
- If the product function is abnormal or fails, please stop using it immediately and cut off the power supply, and contact the service provider in time.
- When used by people (including children) with physical, cognitive, visual, v,e and intellectual disabilities or a lack of experience and common sense, it is necessary to use this product under supervision. Patients with heart disease should use it carefully. Do not let children play with this product.
- If it is not used for a long time, the power supply and water supply must be cut off.
- It is forbidden to disassemble, repair,, or modify the product by yourself, otherwise it may cause fire or electric shock.
- Banana water, gasoline, liquid medicine, detergent, insecticide, toilet cleaner,r, and a hard brush are prohibited to clean this product.
- Do not pour water or detergent on the machine body or power plug; otherwise,, it may cause fire or electric shock. This product is electrical.
- It is forbidden to put it in a place that is easy to be soaked by water. Do not pour urine or other liquids onto the body.
- Do not use water other than tap water; otherwise, it may cause skin inflammation and other problems.
- Do not stand on the ceramic toilet, and do not hit the ceramic with gravity to prevent damage and water leakage.
- Do not put fingers or other objects into or block the drying air outlet, otherwise it may cause scald, electric shock, or burn.
- It is forbidden to use other electrical appliances on the same socket.
- When the product is powered on, it is not allowed to put the product sideways or upside down, otherwise it may cause fire or burn.
- The socket shall be installed in a place that is not easy to be soaked by water. It is recommended to use a waterproof socket.
- The new hose assembly and other attached or designated parts attached to the appliance shall be used for installation. The old hose assembly cannot be reused, ; otherwise, it may cause water leakage, fire, or electric shock.
- When the product is moved indoors from a cold or wet place, it should be stored for 2 hours to fully volatilize the condensed water in the machine, and then it can be started for use,.To avoid short-circuiting of products.
- Do not place the product where it may fall or be pulled into the bathtub or sink.
- Do not put this product in water or other liquids.
- Do not touch the product that has fallen into water or soaked in water, and immediately unplug the power plug.
- It is forbidden to embed cementitious materials (cement mortar) into the base of the ceramic toilet; otherwise, the ceramic toilet may be cracked due to expansion.
- Do not exert strong force or impact, do not stand on the seat ring, toilet cover, or this product, and do not place heavy objects.
- Do not connect the water pipe with the outlet pipe of the water heater. The waterThe water inlet temperature is 37.4 ℉~95℉. If it exceeds the specified range, it may cause internal heating. The component does not work properly.
- When using this product, do not lean back on the toilet cover to avoid damaging the product.
- Please do not flush newsprint, paper urinal pads, women's sanitary napkins,s and other easily cloggable items into the toilet.
- Do not use the product in an environment below 32℉. If the room temperature is lower than 32℉, the water in the water supply line of the product must be drained, to prevent the waterway from freezing and cracking, causing water leakage or fire during later use.
- To prevent damage caused by freezing, please take measures to keep warm and increase the temperature of the toilet.
- When installing, disassembling, repairing,, and maintaining the product, you must unplug the power plug and close the water supply valve.
- The seat ring and toilet lid of this product would lower slowly. Do not press hard to avoid damaging it .
- Do not let the sun shine directly on theDo not let the sun shine directly on the product to avoid discoloration and afproduct to avoid discoloration and affectfect he reception ethereception effect of the remote control.fe ct of the remote control.
Technical Specifications
- Rated voltage 120V~
- Rated frequency 60Hz
- Rated power 1240W
- Pressure of Water supply 20.31psi( minimum necessary water pressure )
- 116.03psi(static pressure)F. low of water supply at least 7.93gpm
- Ambien t temperature 32℉- 104℉
- Temperature of water supply 41℉- 104℉
Toilet Flushing
- Flushin g type Jet Siphon
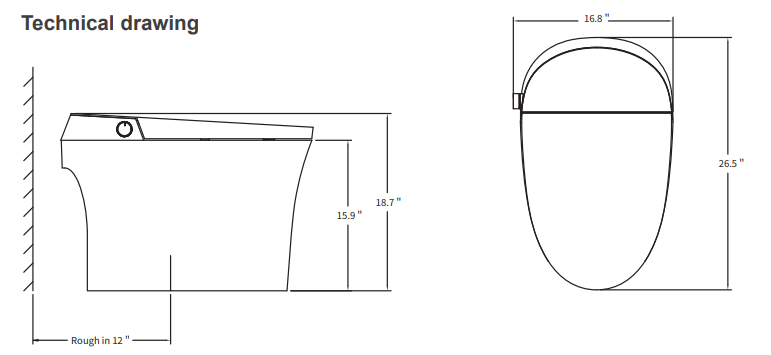
- Rough in 12''
Cleansing
- Water heating type: Instant heating
- Water heating power 1300W
- Warm water temperature off, 86℉- 100.4℉ (6 levels)
- Safety device temperature fuse, water temperature sensor, grounding protection, over-temp protection
Dryer
- Mi n air volume ≥ 0.2m³/ min
- Ai r heating power 250W
- Drye r temperature off, 86℉- 122℉ (6 levels)
- Safety device
- Temperature controller, temperature fuse, and leakage protection plug.
Heating seat
- Sea t heating power 40W
- Sea t temperatu re off, 86℉- 100.4℉ (6 levels)
- Safety device
- Temperature sensor, temperature fuse, temperature controller, grounding protection
- Produc t size 26.5 x 16.8 x 18.7 inch
- Waterproof rate IPX4
Remarks:
Rated power: the product starts to power on and start up under the conditions of ambient temperature of 73.4℉, static water inlet pressure of 116.03psi+/-2.9psi, and water inlet temperature of 41℉. After setting the water pressure, seat temperature , and water temperature to the highest level in turn, immediately start the rear wash and continue to work steadily for the average power of a cleaning cycle.
Installation
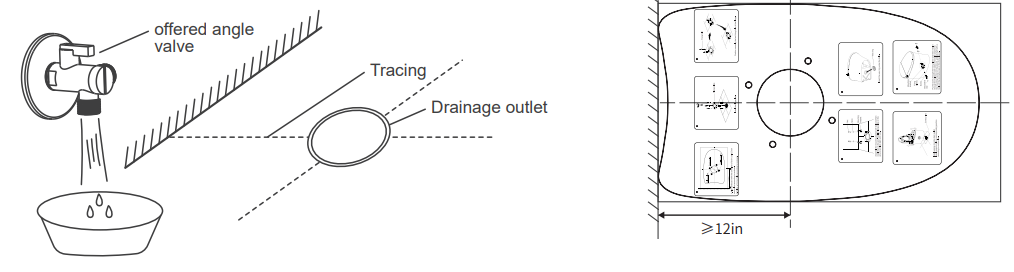
- Install the offered angle valve..
Mark the center line of the drain outlet on the ground, and install the water inlet angle valve at a suitable position on the wall according to the size of the toilet.
After installing the angle valve, open the valve to discharge the sewage. - Mark the drain with a cross line
Cardboard installation- Align the cardboard with the center line of the drawing.n;
Draw contour lines from cardboard.
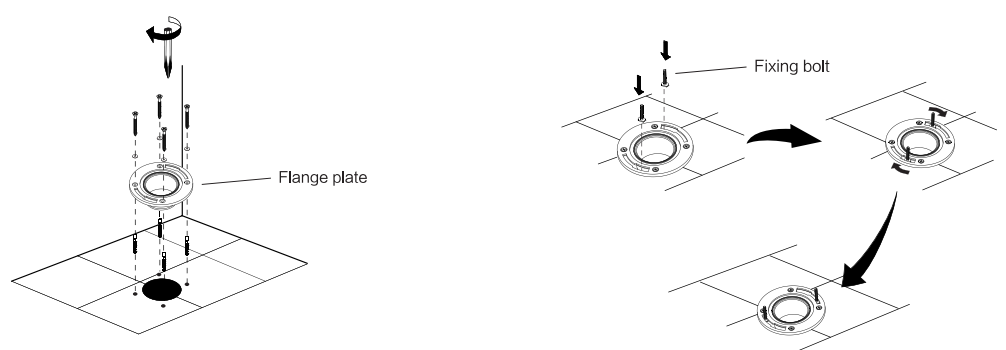
- Install the flange plate.
Position correctly the two fixing bolts of the flange
- Assemble the mounting bracket with bolts and then install it to the pre-installed flange plate on the ground and lock it tight with nuts.
Insert the wax ring under the toilet.
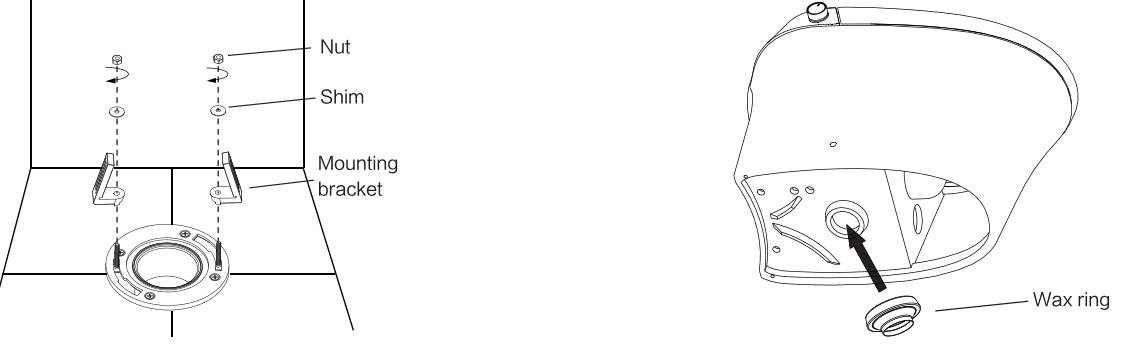
Install the waxing ring into the drain outlet; Install the ceramic toilet in the corresponding position according to the contour line.
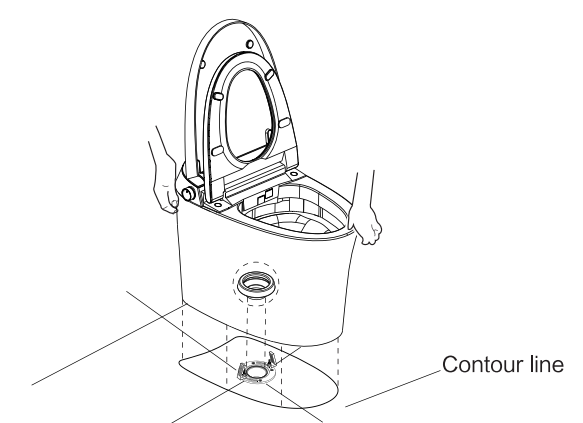
Put the screw through the fixing sleeve and then install it through the holes(on both sides of the toilet ceramic) to the mounting bracket on the ground , and lock it ight with a tool. Put the decorative cap on the fixing sleeve.
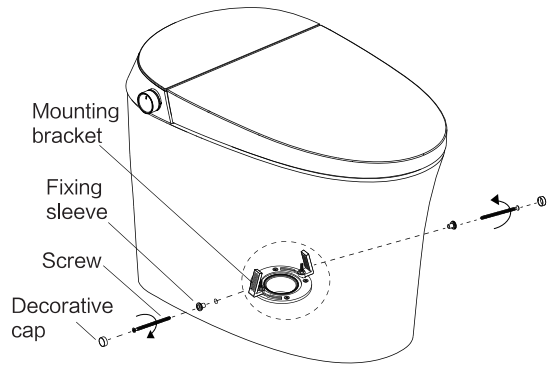
Connect the hose and the angle valve.
As shown in the figure below, connect and tighten the inlet hose, angle valve,e and filter.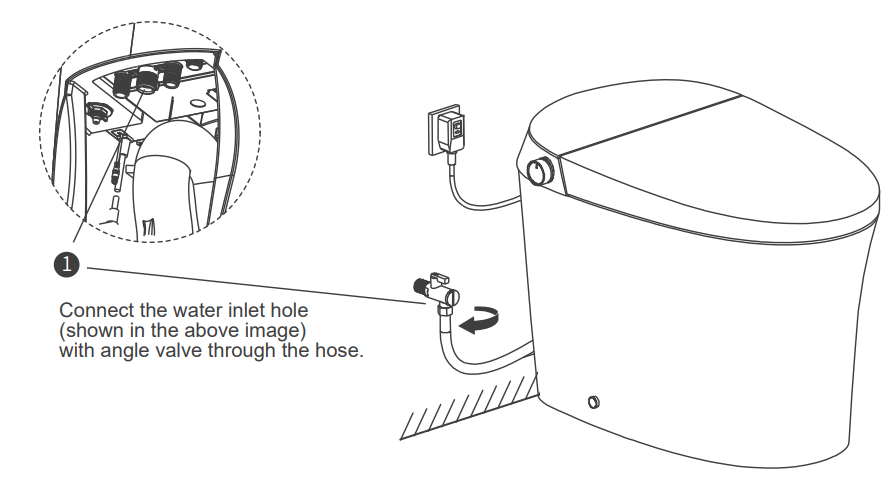
Install the battery box
Put the battery (9V, not included) in the battery box. 2. Connect the line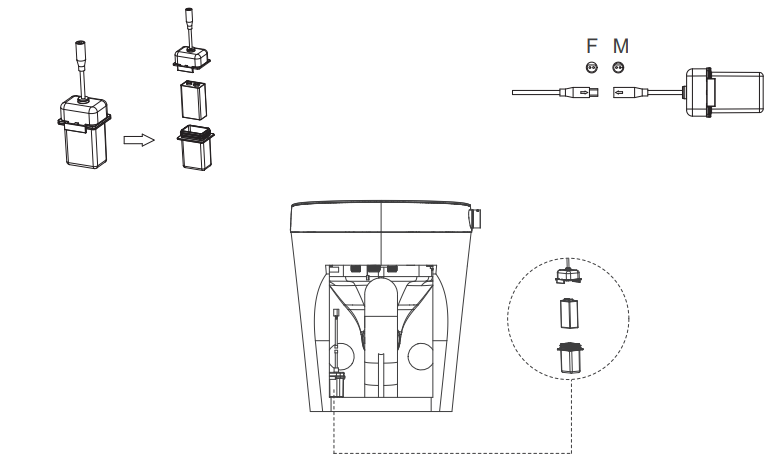
Battery replacement
- Remove the battery box from the back of the toilet and pull out the battery box connector.
- Open the battery box, remove the old battery, and replace it with a new one.
- Plug in the battery box connector and the toilet cable,e and put them back on the back of the toilet.
Open the angle valve.
Check the tightness of the threaded connection to make sure there is no water leakage. Turn the angle valve counterclockwise and adjust the opening to the maximum.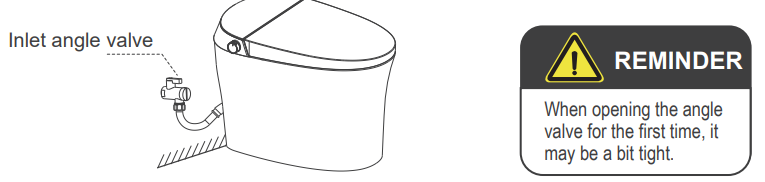
- Power on
Plug the leakage protection plug into the power socket, press the reset switch, and the plug indicator light will be on, indicating that it is powered on.
REMINDER- Press the leakage test key before us;, the reset switch pops up, indicating leakage protection. The protection function is normal.
Press the TEST button (then RESET button) every month to assure proper operation.
It applies to the model with a leakage protection plug. The leakage protection plug is subject to the actual object.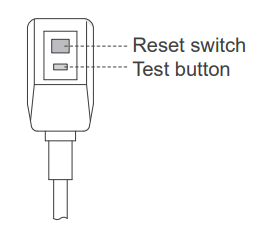
- Safety self-inspection
- The buzzer of the main engine beeps, the blue light of the knob flashes, and the self-test starts.
- The buzzer of the main engine rings another "tick", and the knob turns on the white light after self-inspection.
- The function mode is on and can be used normally.
Remote Control Installation and Battery Replacement
Install the remote control
- Install the remote control rack
- Stick the remote control rack horizontally to the pre-installation area on the wall, and mark the position of two installation holes on the wall with a marker. Use a drill bit with a diameter of 6mm to drill holes at the marked positions on the wall, with a depth of 35mm.
Install the expansion pipe into the wall hole, attach the hanger to the wall, align the hole on the hanger with the expansion pipe, and place the screw to lock it.
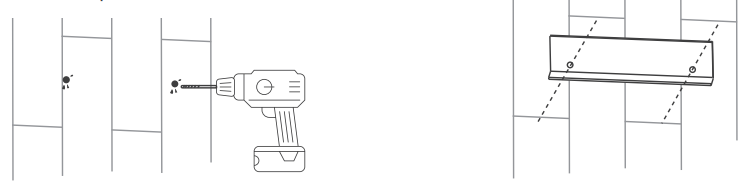
- Install the remote control hanger (only for the hanger with a fixed plate and foam rubber pad)
- Clean and dry the pre-installed area of the remote control rack on the wall.
Tear off the double-sided adhesive sticker on the back of the hanger and
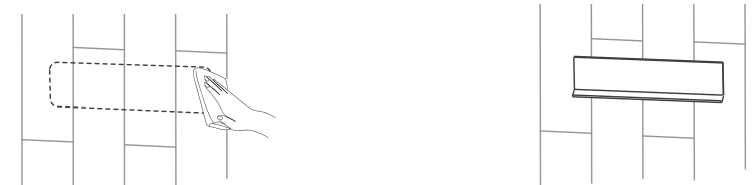
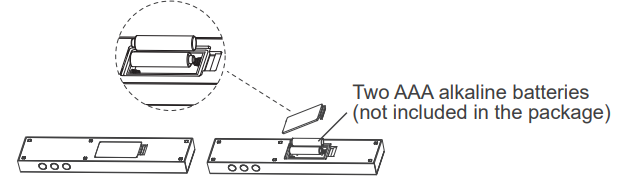
Install the battery into the remote control, and place it on the rack.
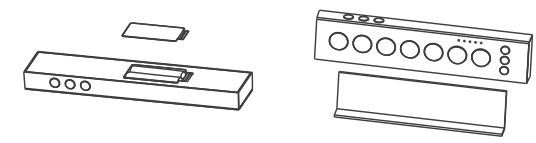
- Use and replacement of the remote control battery
- The remote control uses 2 AAA alkaline batteries.
When the battery is low, the red light on the remote control flashes or lights up, prompting the user to replace the battery.
Attention
- The positive and negative electrodes of the battery must match those on the remote control.
- New and old batteries cannot be mixed.
- Please use an alkaline battery.
Daily Maintenance
Maintenance of the body
- Cut off the power supply
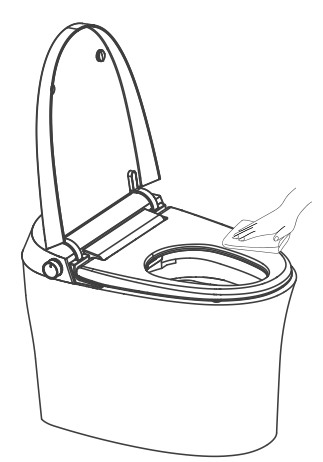
Please cut off the power supply before maintenance. - Wipe with a soft cloth
Please wipe the dirty parts with a soft, damp cloth and then let it dry. - Safety self-inspection
Please reconnect the power supply after cleaning.
Nozzle maintenance
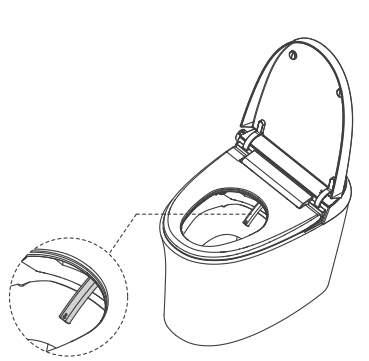
- Nozzle extends
Press and hold the "Stop" button and the "Rear wash" button on the remote control for 3 seconds at the same time to enter the manual cleaning procedure. - Nozzle cleaning
Please wipe with a soft cloth or soft brush. - Cleaning is completed. Press the "Stop" button to exit the manual cleaning mode, de and the nozzle wiretracts automatically.
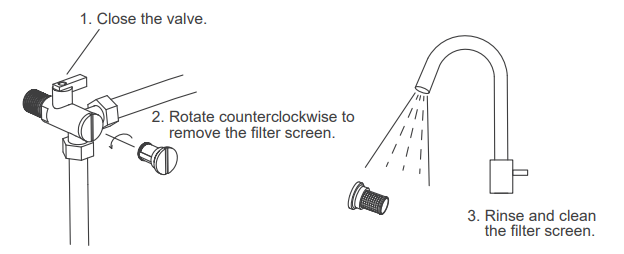
Filter screen cleaning
- Open two rubber plugs, loosen two screws, and pick up two screws and gaskets.
Remove the four water pipes, gently lift the base and put it upside down, loosen the screws of the activated carbon, and remove the cover.
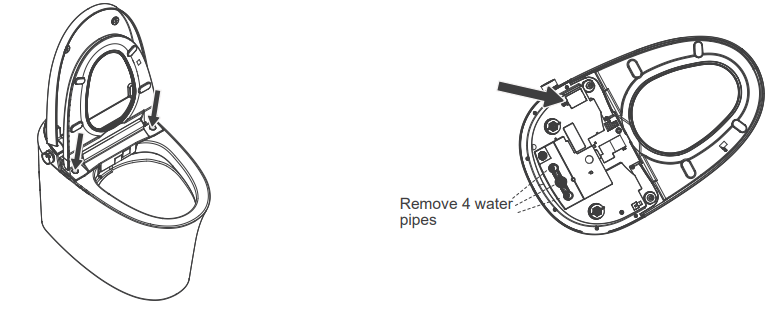
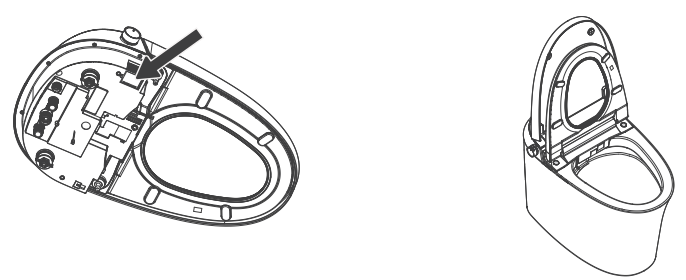
- After loosening the tape, pull out the activated carbon, replace it with a new one, and then install the cover and lock it.
Connect and tighten the four removed water pipes in turn. Put the cover back into the ceramic body, lock the,, screw and cover the rubber plug.
Drain the water in the pipeline when not in use for a long time
- Pull out the power plug to cut off the power.
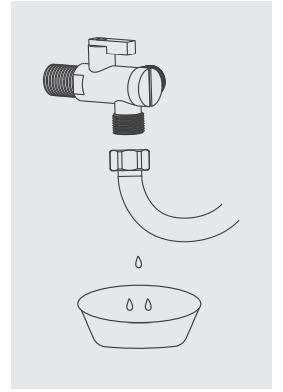
- Close the inlet angle valve, unscrew the hose from the angle valve, drain the water in the , pipeline, and reinstall it.
For safety, it is recommended to put antifreeze into the accumulated water in the toilet.
TIPS
Before opening the angle valve, the power must be cut off! When using the toilet again, be sure to connect to the water supply first, then plug in.
Troubleshooting
Pros & Cons
Pros:
- Enhanced Hygiene: Advanced bidet functions and UV light disinfection ensure superior cleanliness.
- Comfort Features: Heated seat, massaging jets, and adjustable water pressure for maximum comfort.
- User-Friendly Interface: Remote control and customizable settings make it easy to use.
- Sustainability: Water-saving technology and energy-efficient design reduce utility bills.
Cons:
- High Cost: The estimated price range of $1,500 to $2,000 may be prohibitive for some users.
- Complex Installation: Requires professional installation, which can add to the overall cost.
- Maintenance Requirements: Regular cleaning and maintenance are necessary to ensure optimal performance.
Customer Reviews
Initial reviews from early adopters have been overwhelmingly positive. Users praise the toilet's comfort features, advanced hygiene technologies, and user-friendly interface. Some users have noted that the installation process can be complex and requires professional help. However, overall satisfaction with the product's performance and features is high.
Common complaints include the high cost and the need for regular maintenance to keep the bidet and toilet in optimal condition.
Faqs
What are the key features of the Canesthome Smart Bidet Toilet TC-100GE?
How much does the Canesthome Smart Bidet Toilet TC-100GE cost?
Is professional installation required for the Canesthome Smart Bidet Toilet TC-100GE?
What maintenance is required for the Canesthome Smart Bidet Toilet TC-100GE?
Does the Canesthome Smart Bidet Toilet TC-100GE come with a warranty?
How does the UV light disinfection feature work?
Can I customize the settings on the Canesthome Smart Bidet Toilet TC-100GE?
Is the Canesthome Smart Bidet Toilet TC-100GE energy-efficient?
What if I encounter any issues with my Canesthome Smart Bidet Toilet TC-100GE?
Does the Canesthome Smart Bidet Toilet TC-100GE have any sustainability benefits?
Tags
Leave a Comment