Chamberlain Remote Control KLIK3U Instruction Manual
Content
Introduction of Chamberlain Remote Control KLIK3U
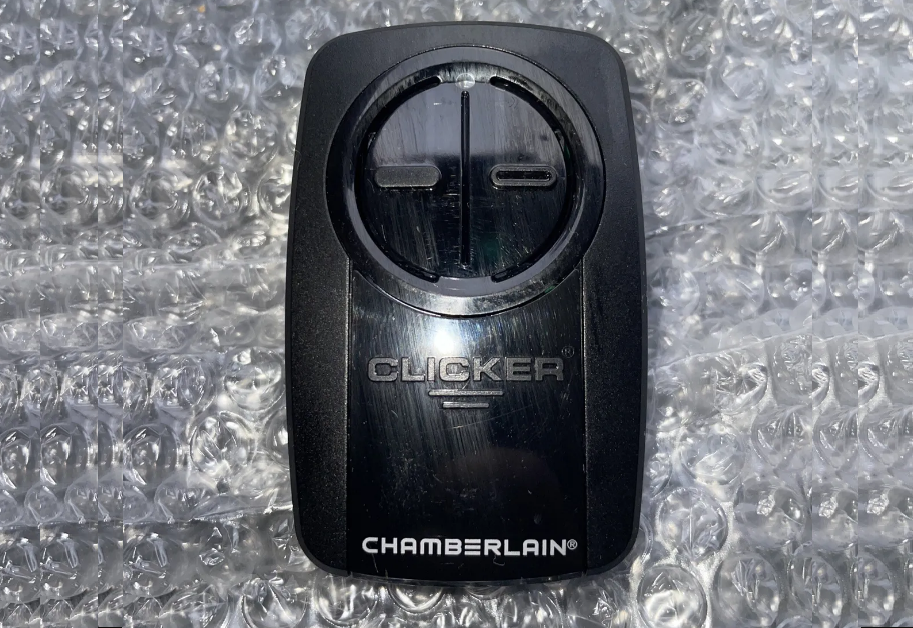
The Chamberlain Remote Control KLIK3U is the latest addition to the Chamberlain family of garage door openers. With its sleek design and advanced features, the KLIK3U is the perfect solution for anyone looking for a reliable and easy-to-use garage door opener. The estimated price for the is $40, and it is now available for purchase.
Detailed Specifications
The Remote Control KLIK3U comes with the following key features
- 3-button remote control for maximum convenience
- Encrypted technology for superior security
- Compatible with all Chamberlain garage door openers manufactured since 1993
- Range of up to 1,500 feet for added flexibility
- Compact and lightweight design for easy carrying
Description of Chamberlain Remote Control
The Chamberlain Remote Control is the perfect solution for anyone looking for a reliable and easy-to-use garage door opener. With its encrypted technology, you can be sure that your garage is secure at all times. The 3-button remote control makes it easy to open and close your garage door, and the compact and lightweight design means you can take it with you wherever you go. The Chamberlain Remote Control KLIK3U is compatible with all Chamberlain garage door openers manufactured since 1993, so you can be sure it will work with your existing setup.
Setup of Remote Control
Setting up the Chamberlain Remote Control is easy. Simply follow these steps
- Insert the batteries into the remote control.
- Press and hold the button you want to use until the LED light starts flashing.
- Press the learn button on your garage door opener.
- The LED light on the remote control will stop flashing, indicating that the remote is paired with the garage door opener.
- Test the remote control by pressing the button to open and close the garage door.
GETTING STARTED
The remote control can be programmed to activate up to two products, such as a garage door opener, gate operator, or commercial door operator. The images throughout this manual are for reference only and your product may look different.
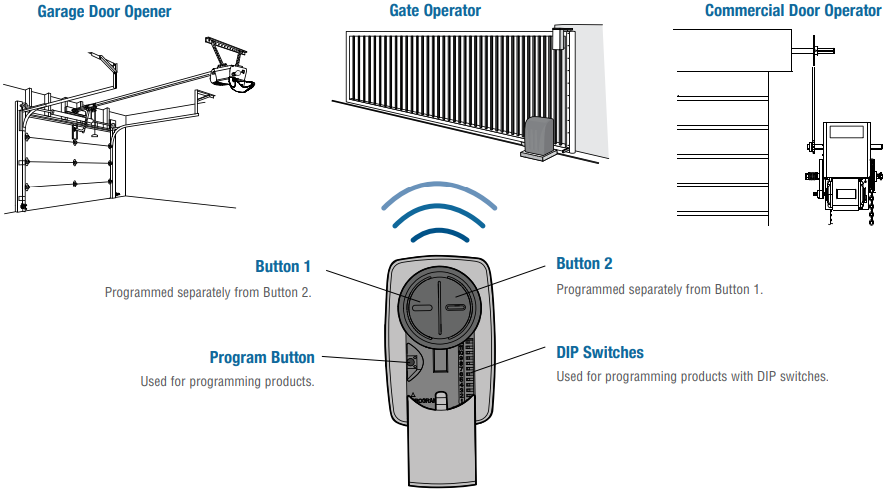
Depending on your product, there is a button (Program/LEARN button) or DIP switches used for programming. You will need to locate the Program/LEARN button or DIP switches on your product before you start programming.
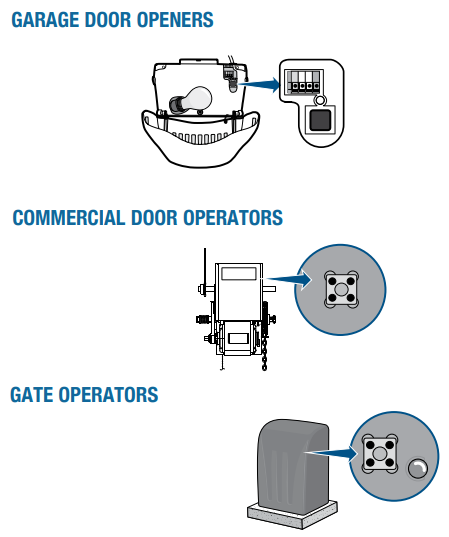
- GARAGE DOOR OPENERS
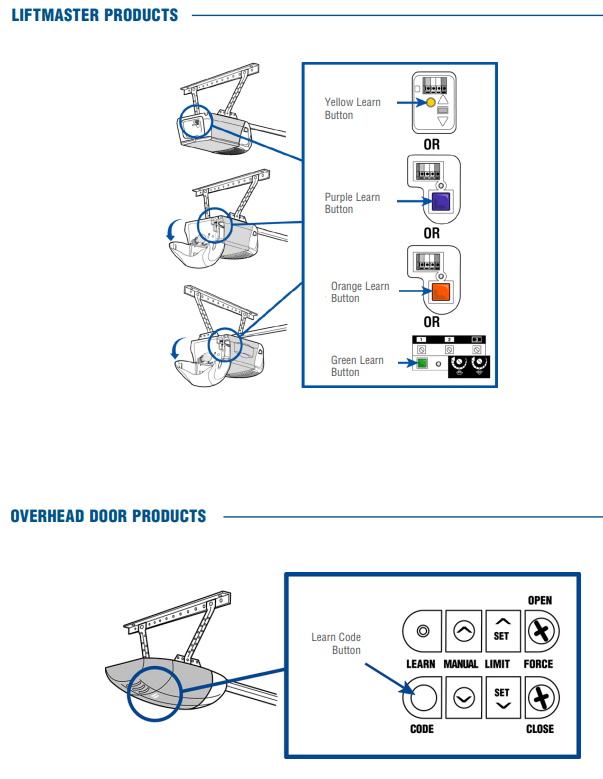
The Program/LEARN button or DIP switches are typically located on the back or side panel of your garage door opener. Your Program/LEARN button may have a different name (SMART button, SET button, etc.). For help locating your Program/LEARN button or DIP switches refer to the Table of Contents in this manual or contact your garage door opener manufacturer. - COMMERCIAL DOOR OPERATORS
The Program/LEARN button or DIP switches are typically located on the logic board of your operator. Your Program/LEARN button may have a different name (RADIO button, XMITTER button, etc.). For help locating your Program/LEARN button or DIP switches contact your door operator manufacturer. - GATE OPERATORS
The Program/LEARN button or DIP switches are typically located on the control board of your operator. Your Program/LEARN button may have a different name (RADIO button, XMITTER button, etc.). For help locating your Program/LEARN button or DIP switches contact your gate operator manufacturer.
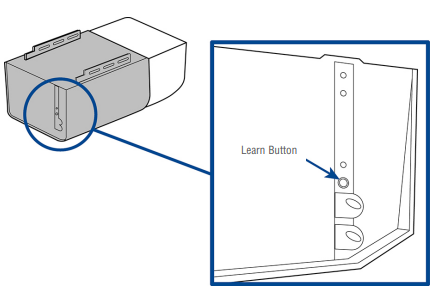
EXTERNAL RECEIVER
Some products do not have a Program/LEARN button or DIP switches. In this case, the Program/ LEARN button or DIP switches will be located in an external receiver. The receiver will be located on the product or mounted nearby. Follow the programming instructions for an external receiver.
LOCATE THE PROGRAM/LEARN BUTTON
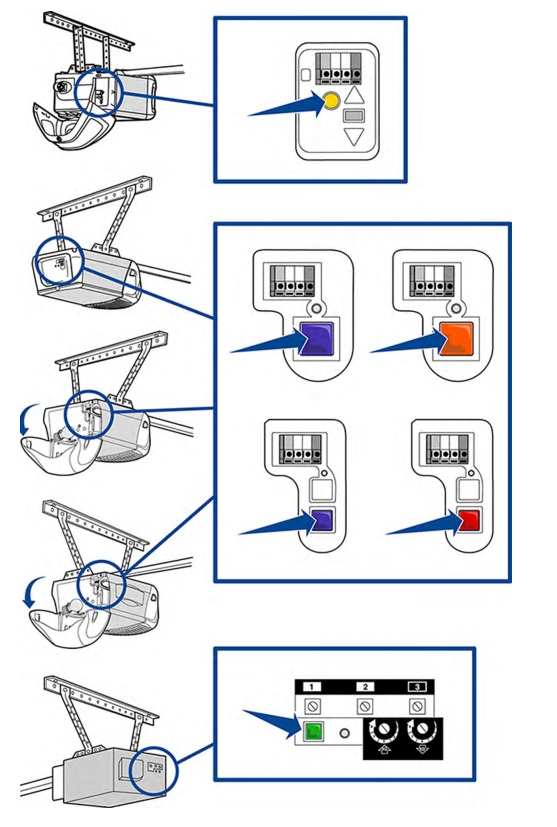
CHAMBERLAIN PRODUCTS
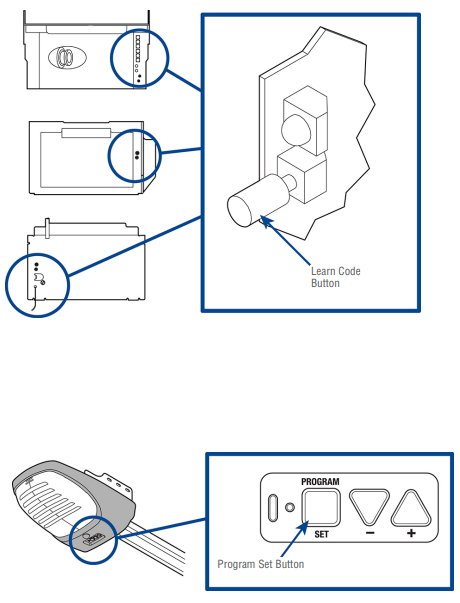
GENIE PRODUCTS
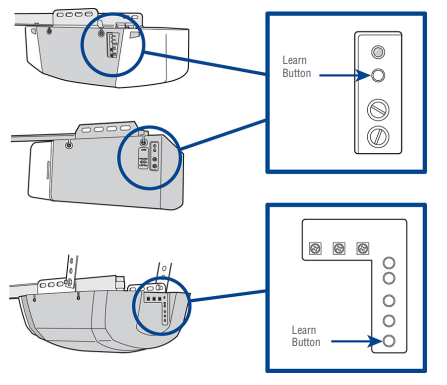
LINEAR PRODUCTS
WAYNE DALTON PRODUCTS
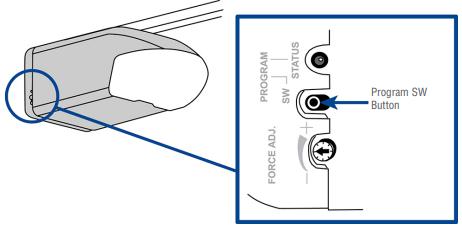
STANLEY PRODUCTS
GARAGE DOOR OPENERS
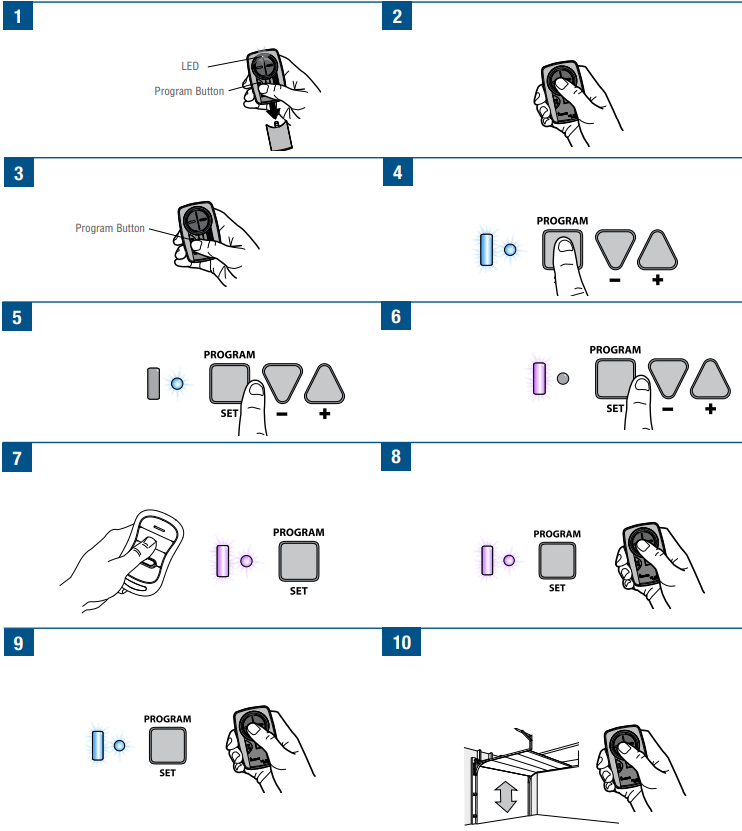
Programming to a Genie Intellicode 2 Garage Door Opener
Before starting, you MUST have a Genie Intellicode 2 remote control with at least one button already programmed to the garage door opener.
The images throughout this manual are for reference only and your product may look different.
- Press the program button on the Universal Remote Control until the LED turns on.
- Select a button to program and press that button 5 times, ensuring the LED stops flashing after each press.
- Press the program button on the Universal Remote Control.
- On the garage door opener, press and hold the Program/Set button until both the long and short LED light up BLUE.
- Release the Program/Set button and only the round LED will be lit in BLUE.
- Press and release the Program/Set button and the long LED will flash PURPLE.
- On the Genie® remote control, press and release the button that is already programmed to the garage door opener. Both LED’s will flash PURPLE.
- On the Universal Remote Control, press and release the same button you have already selected in step 2. Both LEDs on the garage door opener will light up PURPLE.
- On the Universal Remote Control, press and release the same button again. Both LED’s on the garage door opener will light up BLUE.
- On the Universal Remote Control, press and release the same button again. This will activate the garage door opener and programming is complete. If the door does not activate, repeat the steps.
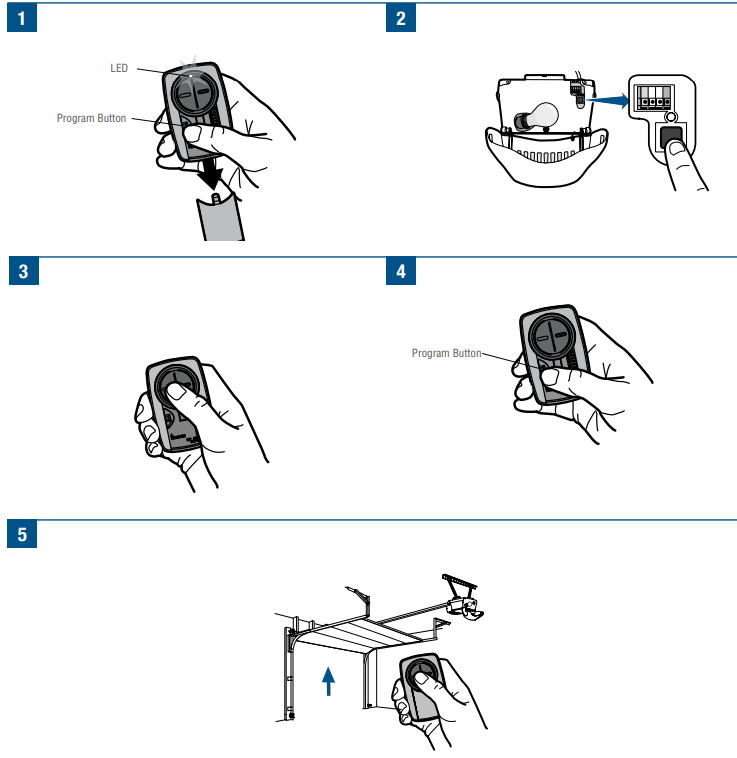
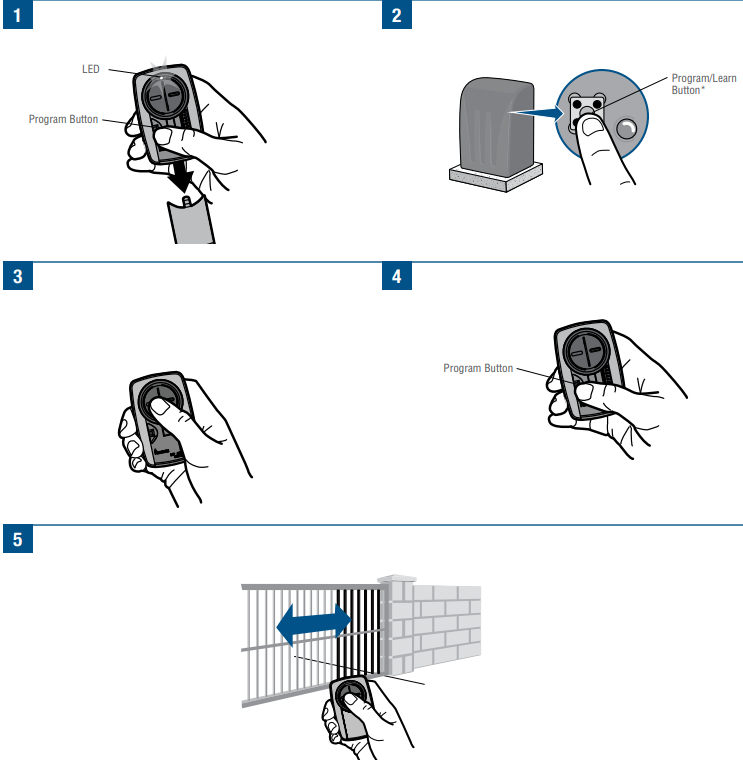
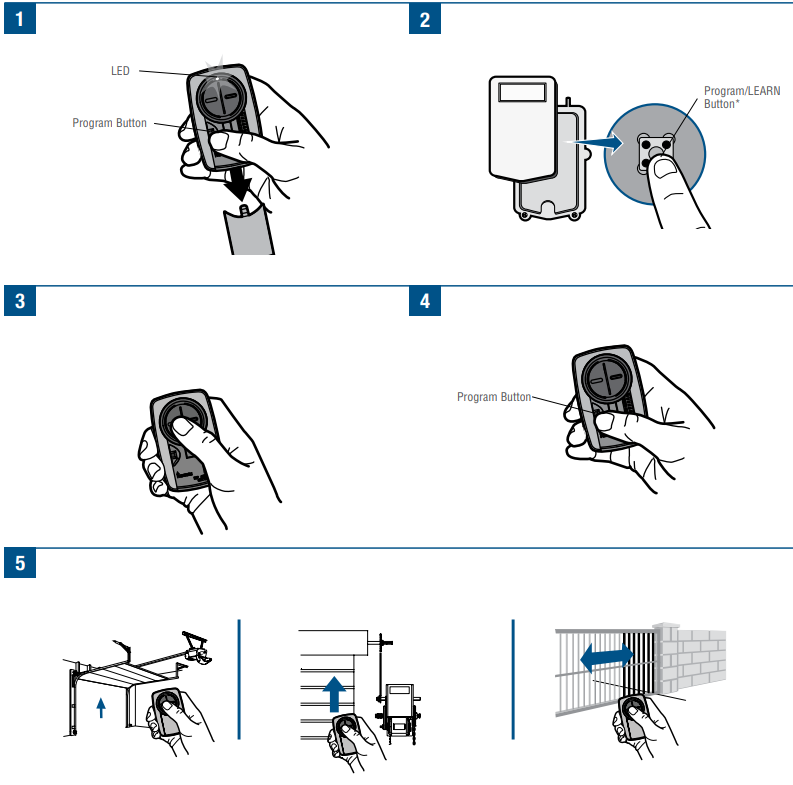
Programming to a Commercial Door Operator with a LEARN Button
- Press the program button on the remote control until the LED turns on.
- Press and release the Program/LEARN button* on your commercial door operator.
- Press and release the remote control button, the LED will flash. When the LED stops flashing, continue to press and release the button until your commercial door operator responds by clicking, blinking, or activating.
- Press the program button on the remote control to save.
- Test the remote control by pressing the button. If the commercial door operator does not activate, repeat the programming steps or follow the alternative programming option.
Commercial door operator
Programming to a Commercial Door Operator with a LEARN Button
- The Program/LEARN button is typically located on the logic board of the operator or an external receiver. For help locating your
- Program/LEARN button contact your commercial door operator manufacturer.
- The images throughout this manual are for reference only and your product may look different.
- Press the program button on the remote control until the LED turns on.
- Press and release the Program/LEARN button* on your commercial door operator.
- Press and release the remote control button, the LED will flash. When the LED stops flashing, continue to press and release the button until your commercial door operator responds by clicking, blinking, or activating.
- Press the program button on the remote control to save.
- Test the remote control by pressing the button. If the commercial door operator does not activate, repeat the programming steps or follow the alternative programming option.
Programming to a GTO/Mighty Mule Gate Operator without a Remote Control
- Set the remote control DIP switches 1-9 to any combination.
- Press the program button on the remote control until the LED turns on.
- Press and release the remote control button, the LED will flash. When the LED stops flashing, continue to press and release the button 20 times, ensuring the LED stops flashing after each press. The code is accepted when thegate operator is activated.
- Press the program button on the remote control to save.
- Program the remote control to the gate operator (refer to the gate operator instructions).
- Test the remote control by pressing the button. If the gate operator does not activate, repeat the programming steps.
Programming to a GTO/Mighty Mule Gate Operator with a Remote Control
If you don’t have an existing GTO remote control go to the previous page. Before beginning, check the DIP switches on the GTO remote control. If any of the DIP switches are in the "0" position, move them to either the "+" or "-" position and reprogram the GTO remote control to the gate operator (refer to the gate operator instructions). The images throughout this manual are for reference only and your product may look different.
Initial Setup
2-Button GTO Remote Control
If the right button on the GTO remote control is programmed to the gate operator, the GTO remote control will need to be reprogrammed using the left button.
3-Button GTO Remote Control
If the middle button on the GTO remote control is programmed to the gate operator, the GTO remote control will need to be reprogrammed using either the left or right button.
- Match the Universal Remote Control DIP switches to the
- GTO remote control DIP switches
- GTO “+” = Universal Remote Control “ON”
- GTO “-” = Universal Remote Control “OFF”
- 2-Button GTO remote controls ONLY: Set the 9th DIPswitch on the Universal Remote Control to the “ON” position.
3-Button GTO remote controls ONLY: Set the 9th DIP switch on the Universal Remote Control to the “ON” position if using the GTO left button or the “OFF” position if using the GTO right button. - Press the program button on the Universal Remote Control until the LED turns on.
- Press and release the Universal Remote Control button, the LED will flash. When the LED stops flashing, continue to press and release the button 20 times, ensuring the LED stops flashing after each press. The code is accepted when the gate operator is activated
- Press the program button on the Universal Remote Control to save.
- Test the Universal Remote Control by pressing the button. If the gate operator does not activate, repeat the programming steps
EXTERNAL RECEIVERS
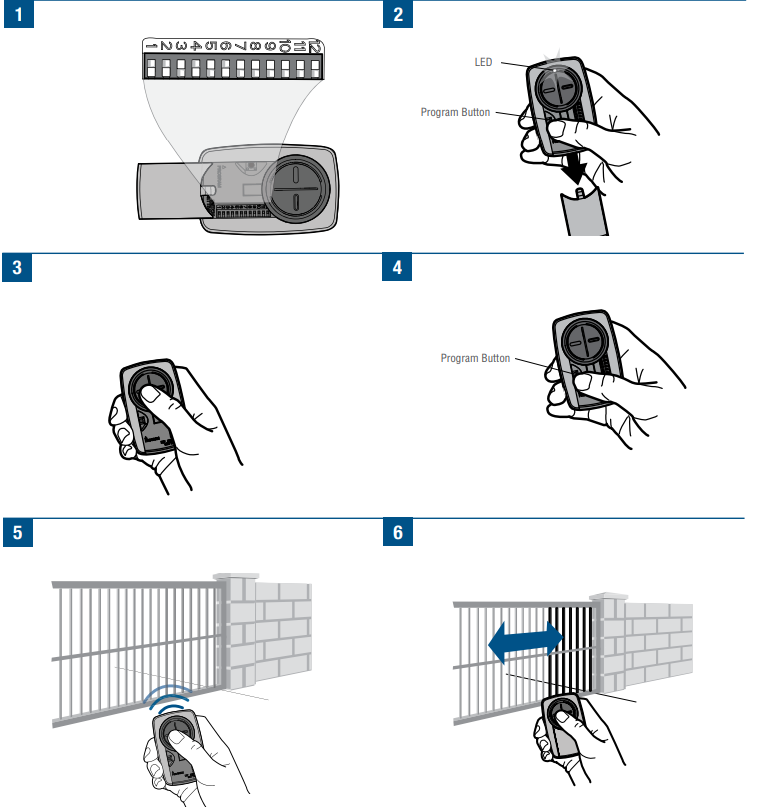
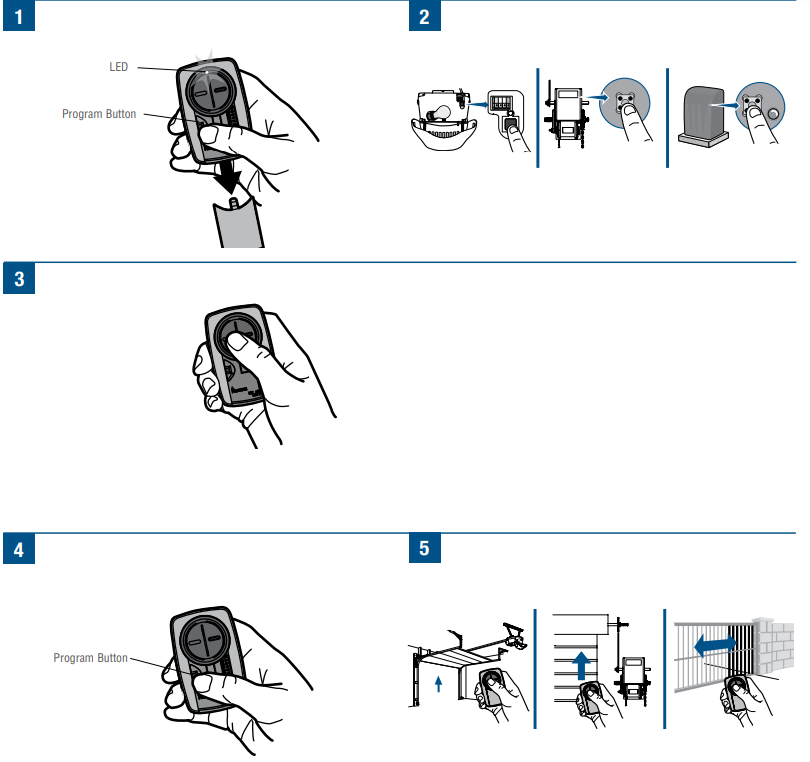
Programming to an External Receiver with DIP Switches
If using the Universal Remote Control with residential door openers, the remote control must be used only with door openers manufactured after 1993 that utilize photoelectric sensors. The photoelectric sensors are always located on or near the bottom of the door track. The external receiver is typically located on the product or mounted near the product.The images throughout this manual are for reference only and your product may look different.
TIPS
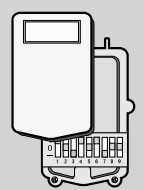
- 2 Position DIP Switch
If programming fails reverse DIP switches (OFF to ON and ON to OFF). - 3 Position DIP Switch
For Chamberlain remotes DO NOT use the “0” position, use “+” or “-”. If you already have a 3-button remote, DIP switch #1 must be set to “-” if the large button is to open the door. It may be necessary to reprogram original remote controls.
- Match the DIP switches between the existing remote 2 control or external receiver and the Universal Remote Control. Turn extra switches OFF.
- Press the program button on the Universal Remote Control until the LED turns on.
- Press and release the Universal Remote Control button, the LED will flash. When the LED stops flashing, continue to press and release the button until your product responds by clicking, blinking, or activating.
- Press the program button on the Universal Remote Control to save.
- Test the Universal Remote Control by pressing the button. If the product does not activate, repeat the programming steps or follow the alternative programming option.
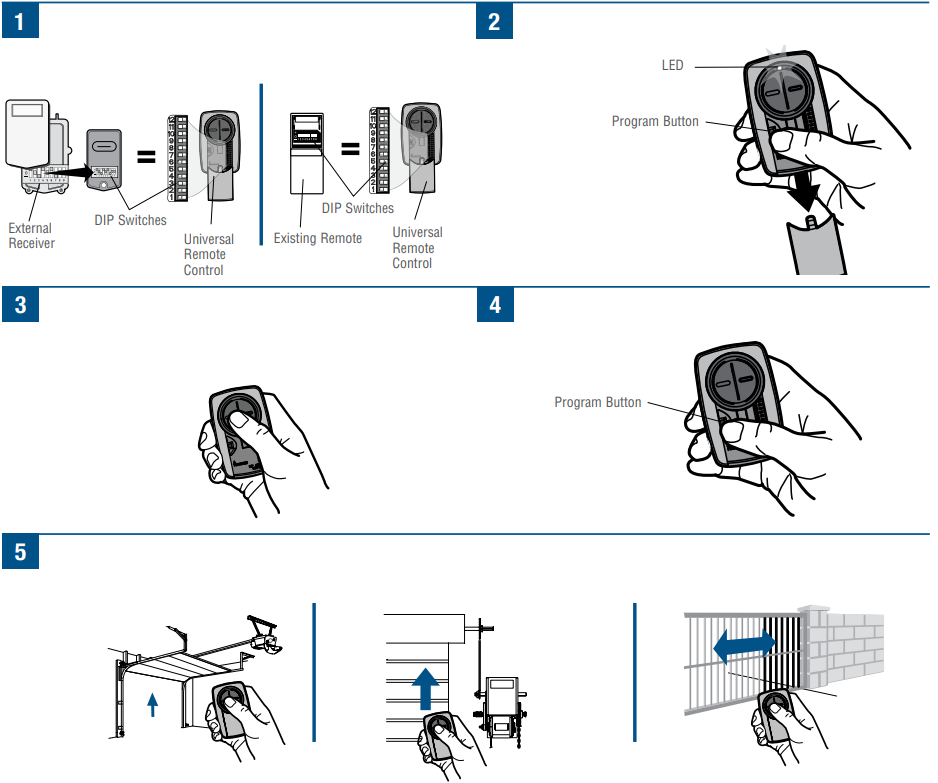
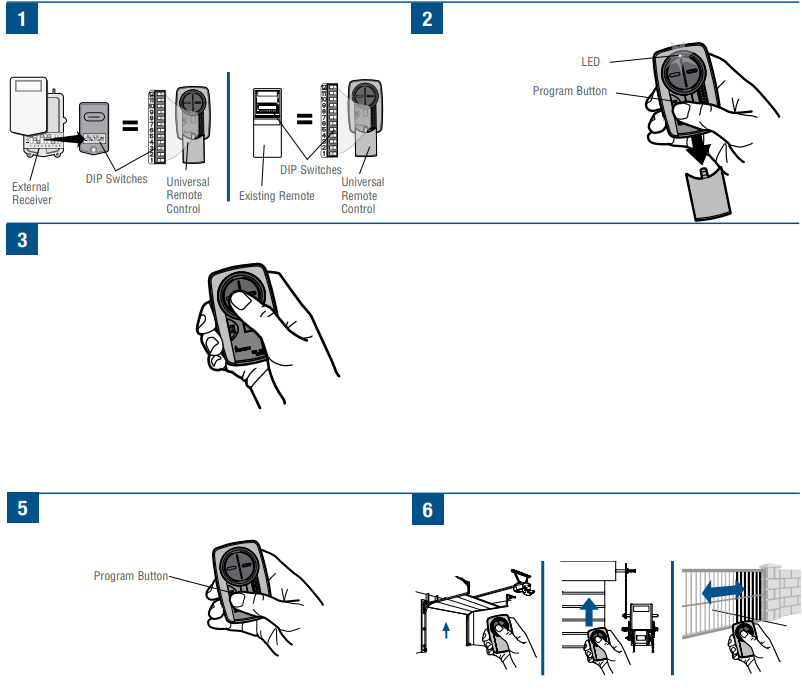
Programming to an External Receiver with a Program/LEARN Button
If using the Universal Remote Control with residential door openers, the remote control must be used only with door openers manufactured after 1993 that utilize photoelectric sensors. The photoelectric sensors are always located on or near the bottom of the door track. The external receiver is typically located on the product or mounted near the product. The images throughout this manual are for reference only and your product may look different.
- Press the program button on the remote control until the LED turns on.
- Press and release the Program/LEARN button* on the external receiver.
- Press and release the remote control button, the LED will flash. When the LED stops flashing, continue to press and release the button until your product responds by clicking, blinking, or activating.
- Press the program button on the remote control to save.
- Test the remote control by pressing the button. If the product does not activate, repeat the programming steps or follow the alternative programming option.
Alternative programming options
Alternative programming option for products with a Program/LEARN Button
The Program/LEARN button is typically located on the product or an external receiver. For help locating your Program/LEARN button refer to the Help section in this manual or contact your product manufacturer.
The images throughout this manual are for reference only and your product may look different.
LiftMaster, Do-It, Master Mechanic, Raynor, True Value and Sears Craftsman are compatible with Chamberlain technology.
- Press the program button on the remote control until
the LED turns on. - Press and release the Program/LEARN button* on your
product. - Press and release the remote control button
- 8 times (Chamberlain** product with yellow Program/LEARN button).
- 3 times (Chamberlain** product with purple Program/LEARN button).
- 2 times (Chamberlain** product with orange Program/LEARN button).
- 4 times (Chamberlain** product with green Program/LEARN button).
- 5 or 6 times (Overhead Door Genie Intellicode product).
- 1 time (Linear Mega-Code product).
- 7 times (Stanley Secure Code product).
- 9 times (Wayne Dalton Rolling Code product).
The LED on the remote control must stop blinking between each press of the button. The code is accepted when the product responds by clicking, blinking, or activating.
- Press the program button on the remote control to save.
- Test the remote control by pressing the button. If the product does not activate, repeat the programming steps.
Alternative programming option for products with DIP Switches
- If using the Universal Remote Control with residential door openers, the remote control must be used only with door openers manufactured after 1993 that utilize photoelectric sensors. The photoelectric sensors are always located on or near the bottom of the door track.
- The DIP switches are typically located on the product or an external receiver. For help locating your DIP switches contact your product manufacturer.
- The images throughout this manual are for reference only and your product may look different.
- LiftMaster, Do-It, Master Mechanic, Raynor, True Value and Sears Craftsman are compatible with Chamberlain technology.
- Match the DIP switches between the existing remote 2
control or external receiver and the Universal Remote
Control. Turn extra switches OFF. - Press the program button on the Universal Remote
Control until the LED turns on. - Press and release the Universal Remote Control button
- 1 times (Chamberlain** product with 9 DIP switches).
- 12 times (Chamberlain** Canada product with 9 DIP switches).
- 13 times (Genie® product with 12 DIP switches).
- 14 times (Linear Multicode with 10 DIP switches).
- 15 times (Chamberlain* product with 8 DIP switches).
- 16 times (Stanley/Multicode product with 10 DIP switches).
- 17 times (Genie product with 9 DIP switches).
- 18 times (Linear®, Moore-O-Matic product with 8 DIP switches).
- 19 times (Chamberlain** product with 7 DIP switches).
The LED on the Universal Remote Control must stop blinking between each press of the button. The code is accepted when the garage door opener responds by clicking, blinking, or activating
- Press the program button on the Universal Remote.
- Test the Universal Remote Control by pressing the button. If the product does not activate, repeat the programming steps. Control to save.
BATTERY
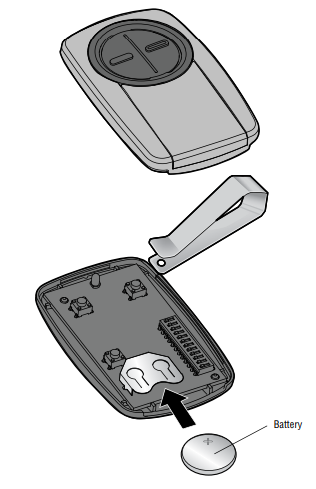
To prevent possible SERIOUS INJURY or DEATH
- NEVER allow small children near batteries.
- If battery is swallowed, immediately notify doctor.
To reduce risk of fire, explosion or chemical burn
- Replace ONLY with 3V2032 coin batteries.
- DO NOT recharge, disassemble, heat above 212°F (100°C) or incinerate.
NOTICE: To comply with FCC and or Industry Canada (IC) rules, adjustment or modifications of this receiver and/or transmitter are prohibited, except for changing the code setting or replacing the battery.
Troubleshooting
If you experience any issues with the Chamberlain Remote Control KLIK3U, try the following solutions
- Check the batteries and replace them if necessary.
- Make sure the remote control is within range of the garage door opener.
- Try re-pairing the remote control with the garage door opener.
- Make sure the learn button on the garage door opener is not already paired with another remote control.
Pros & Cons
Pros
- Encrypted technology for superior security
- 3-button remote control for maximum convenience
- Compatible with all Chamberlain garage door openers manufactured since 1993
- Range of up to 1,500 feet for added flexibility
- Compact and lightweight design for easy carrying
Cons
- May not be compatible with garage door openers from other manufacturers
- Some users may find the 3-button remote control to be unnecessary
Faqs
Is the Chamberlain KLIK3U Remote Control available, and what are the primary characteristics of this device?
To make my Chamberlain KLIK3U compatible with my garage door opener, what are the steps I need to take?
When it comes to garage door openers, is the Chamberlain KLIK3U compatible with all devices?
What should I do if the KLIK3U remote control that I have is unable to open my garage door?
Does the KLIK3U have the capability to be programmed to operate two distinct garage door openers?
I have a Chamberlain KLIK3U; what is the procedure for replacing the battery?
When using the Chamberlain KLIK3U, are there any potential safety issues that should be taken into consideration?
When I am installing the battery in the KLIK3U for the very first time, what factors should I take into consideration?
If I have a Chamberlain KLIK3U that is not functioning properly, how can I reset it?
Is there a warranty that comes with the Chamberlain KLIK3U Remote Control?
Leave a Comment