Chefmate C12 Globe Food Slicer Instruction Manual
Content

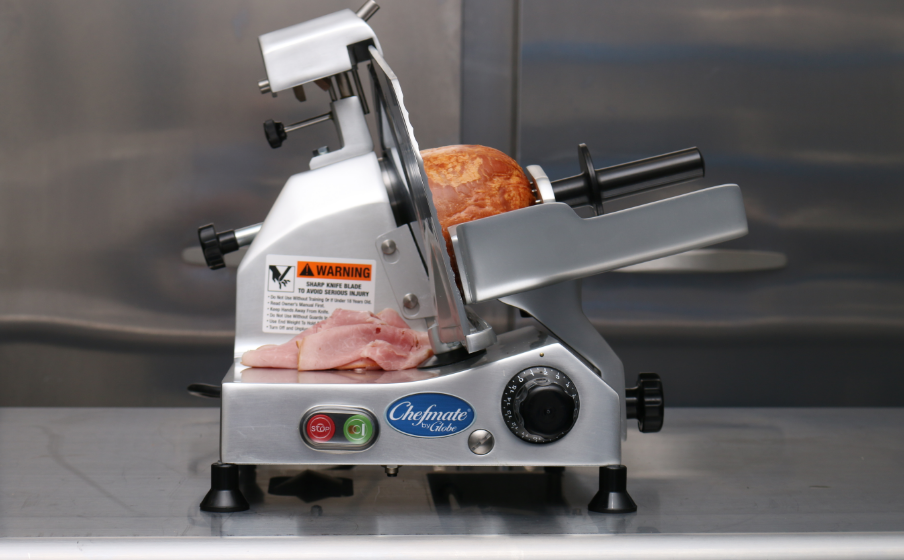
Introducing the Chefmate C12 Globe Food Slicer
The Chefmate Globe Food Slicer is a versatile and durable kitchen appliance designed to make food preparation easier and more efficient. This food slicer is perfect for both home and professional use, and is ideal for slicing a variety of foods including meats, cheeses, vegetables, and more. The estimated price of the Chefmate C12 Globe Food Slicer is $150, and it is now available for purchase.
Detailed Specifications
The C12 Globe Food Slicer boasts the following key features
- 12-inch stainless steel slicing blade for even and consistent slices
- Adjustable thickness control from paper-thin to ¾-inch thick slices
- Powerful 150-watt motor for efficient slicing
- Sturdy and stable base with non-slip feet for added safety
- Easy-to-clean design with removable parts
- Built-in food carriage and finger guard for added safety and convenience
- Compact and space-saving design for easy storage
Key Components of the Slicer
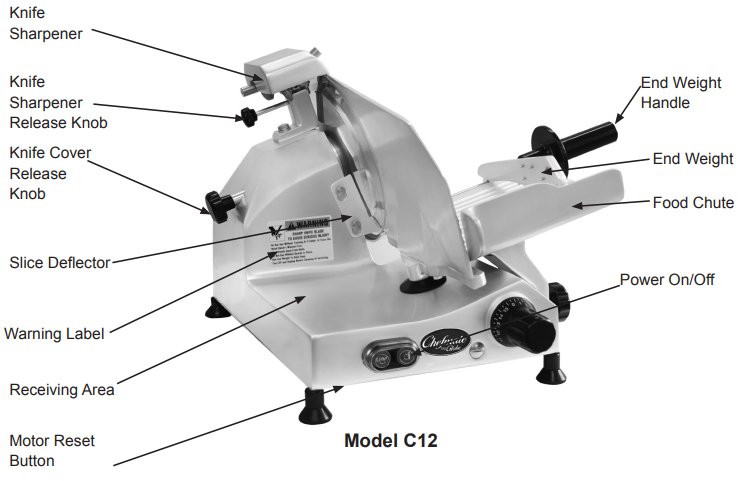
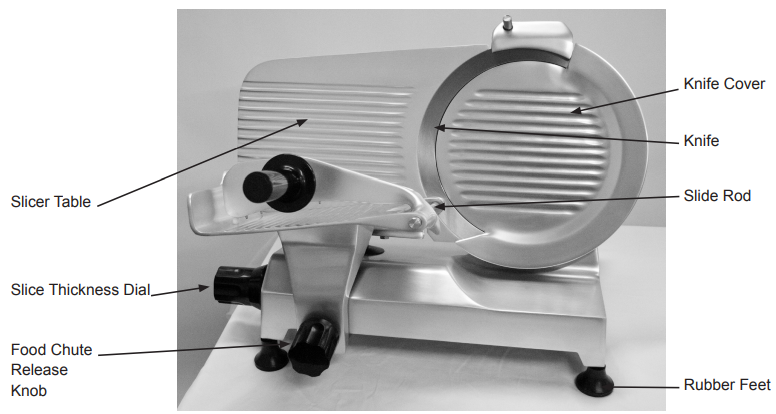
Description of Chefmate Globe Food Slicer
The Chefmate Globe Food Slicer is a high-quality and durable kitchen appliance that is designed to make food preparation faster and easier. The 12-inch stainless steel blade is perfect for slicing a variety of foods, from meats and cheeses to vegetables and fruits. The adjustable thickness control allows you to choose the perfect slice for your needs, and the powerful 150-watt motor ensures efficient and consistent slicing. The sturdy base with non-slip feet keeps the slicer stable and safe during use, and the easy-to-clean design makes cleanup a breeze. Whether you're a professional chef or a home cook, the C12 Globe Food Slicer is a must-have addition to your kitchen.
Installation
UNPACKING
- Unpack slicer immediately after receipt. If the machine is found to be damaged, save the packaging material and contact the carrier within fifteen (15) days of delivery and immediately contact your source of the equip-ment. You have no recourse for damage after fifteen (15) days of receipt.
- Four rubber feet, lubricating oil, and an instruction manual are included with slicer. Contact Globe or your local supplier if you did not receive all of these items.
TO AVOID SERIOUS PERSONAL INJURY PROPERLY INSTALL SLICER IN AN ADEQUATE WORK AREA
- ALWAYS install equipment in a work area with adequate light and space.
- ONLY operate on a solid, level, nonskid surface that is nonflammable.
- NEVER operate slicer with a damaged power cord or power plug.
- NEVER operate slicer with an extension cord.
- NEVER bypass, alter, or modify this equipment from its original condition. Doing so can create hazards and will void the warranty.
- NEVER operate slicer without the knife cover securely installed.
- NEVER operate slicer without warning label attached (Refer to page 4 for location).
- Read this manual thoroughly before installation and operation. DO NOT proceed with installation and operation if you have any questions or if you do not understand everything in the manual. Contact your local representative or Globe first. Make sure to clean and sanitize entire slicer before use. Refer to this manual for cleaning and sanitizing guidelines.
- Remove slicer from the corrugated box.
- Make sure the rubber feet are firmly tightened.
- Select a location for slicer that has a level, solid, nonskid surface that is nonflammable and is in a well-lit work area that is away from children and visitors.
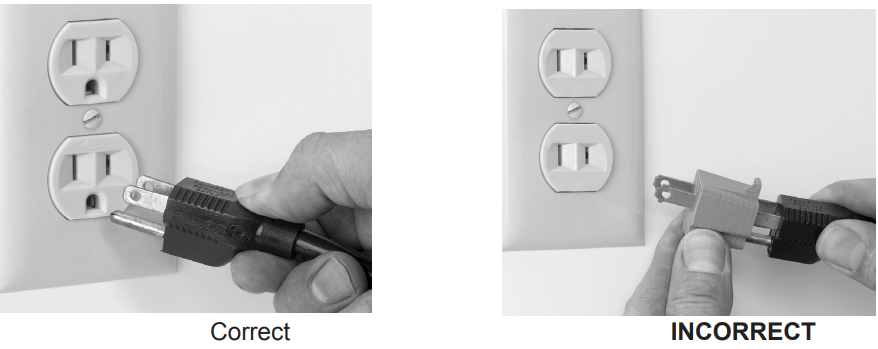
THIS MACHINE IS PROVIDED WITH A THREE-PRONG GROUNDING PLUG. THE OUTLET TO WHICH THIS PLUG IS CONNECTED MUST BE PROPERLY GROUNDED. IF THE RECEPTACLE IS NOT THE PROPER GROUNDING TYPE, CONTACT AN ELECTRICIAN. DO NOT, UNDER ANY CIRCUMSTANCES, CUT OR REMOVE THE THIRD GROUND PRONG FROM THE POWER CORD OR USE ANY ADAPTER PLUG - Inspect slicer to make sure all parts have been provided.
- Make sure knife cover, knife ring guard, and knife sharpener are in place.
- Make sure the warning label is properly positioned and legible. The instruction manual must be available near slicer.
- Post the provided wall chart in a visible area near the slicer to be referred to often for cleaning, sanitizing, and inspecting slicer. Refer to the wall chart and Owner’s Manual for proper cleaning, sanitizing and inspection of your slicer.
- Clean slicer using the procedures outlined in the cleaning section (pages 10 through 13) before using the slicer.
- Contact your local representative, or Globe directly, if you have any questions or problems with the installation or operation of this slicer.
Operating Instructions
TO AVOID SERIOUS PERSONAL INJURY
- NEVER touch slicer without training and authorization from your supervisor, or if you are under 18 years of age. Read this instruction manual before operating slicer.
- NEVER TOUCH KNIFE. Keep hands and arms away from all moving parts.
- NEVER OPERATE slicer without knife cover and knife sharpener securely installed.
- BE ALERT when slicer is on and in motion.
- NEVER HOLD THE FOOD PRODUCT WHILE SLICING. Hold only the end weight handle to slice.
- DO NOT CATCH SLICES WITH YOUR HAND. Let slices drop onto the receiving area.
- AFTER EACH USE, ALWAYS turn slicer OFF and turn the slice thickness dial clockwise until it stops.
- BEFORE CLEANING, SHARPENING, SERVICING OR REMOVING ANY PARTS, always turn slicer OFF, turn the slice thickness dial clockwise until it stops, unplug power cord, and remove food chute.
SLICER OPERATION
- Tighten all knobs before slicer is used.
- With the slicer turned OFF, pull the food chute completely towards you and place the food product onto food chute. Slice only boneless, unfrozen product with slicer. Use end weight to hold the food product in place.
- Rotate the slice thickness dial counterclockwise to the desired setting. After slicing is complete, always turn the slice thickness dial clockwise until it stops to close slicer table.
- Turn slicer on by pushing “Start” button. The power indicator light, located near the power on button, will illuminate.
- Use food chute handle to manually push the food chute back and forth. The food chute handle is the only part of the slicer you must touch while slicing. Do not catch slices with your hand. Let slices drop onto the receiving area.
- After the last slice stroke, pull the food chute all the way towards you. Turn the slicer off by pushing the stop button. The power indicator light will go out. Always turn slice thickness dial clockwise until it stops to close the slicer table.
- Now you can unload and load food product from the food chute.
Cleaning & Sanitizing
TO AVOID SERIOUS PERSONAL INJURY TO SLICER OPERATOR AND CUSTOMERS:
- BEFORE CLEANING, SHARPENING, SERVICING OR REMOVING ANY PARTS, always turn slicer off, turn the slice thickness dial clockwise until it stops, and unplug the power cord.
- NEVER attempt to clean slicer with the knife running.
- NEVER attempt to remove the knife from slicer. It must remain on the slicer for proper operation, sharpening and cleaning.
Warning
- To prevent illness or death caused by the spread of food-borne pathogens, it is important to properly clean and sanitize the entire slicer as surface of the slicer can become contaminated. It is the responsibility of the slicer owner/operator to follow all guidelines, instructions and laws as established by your local and state health departments and the manufacturers of chemical sanitizers.
- Once the slicer makes contact with food product, the entire slicer, including removable parts, must be thoroughly cleaned and sanitized. This process is to be repeated at least every 4 hours using these procedures and information; and must comply with additional laws from your state and local health departments.
- As with all food contact surfaces, it is extremely important to properly sanitize the entire slicer and to closely follow the instructions on your quaternary sanitizer container to make sure proper sanitation is achieved to kill potentially harmful bacteria.
NOTE: It can be desirable to wear non-cutting safety gloves during the cleaning operation.
IMPORTANT: If a chemical sanitizer other than chlorine, iodine or quaternary ammonium is used, it must be applied in accordance with the EPA-registered label use instructions. Excessive amounts of sanitizer and use of products not formulated for stainless steel or aluminum can VOID your warranty.
Caution
- DO NOT hose down, pressure wash, or pour water on slicer.
- NEVER use a scrubber pad, steel wool, or abrasive material to clean slicer.
- ALWAYS turn slicer OFF and unplug the power cord BEFORE cleaning.
- It is extremely important to follow the instructions on the sanitizer container to make sure proper sanitation is achieved. Allow the parts to air dry before placing them back on the slicer
DO NOT use bleach, products containing sodium hypochlorite or other caustic/strong detergents on the slicer base or removable parts. These products will discolor and destroy the parts. Slicer components are easily disassembled without the use of special tools. It can be desirable to wear non-cutting safety gloves during the cleaning operation.
DISASSEMBLY & CLEANING
- Turn slicer OFF.
- Turn slice thickness dial clockwise past zero (0) until it stops so the table covers the knife edge.
- Unplug the power cord.
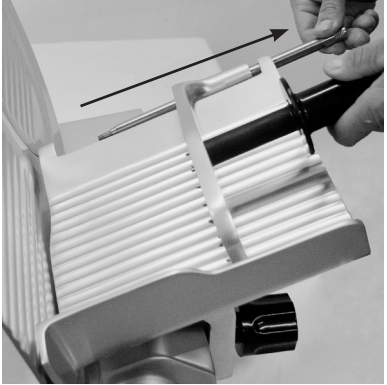
Remove food chute’s end weight. Hold end weight and unscrew slide rod. Pull slide rod out of the pivot of end weight.
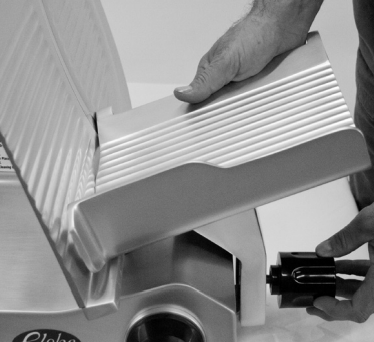
Remove the food chute. Loosen food chute release knob that fastens the food chute to chute arm. Remove food chute from slicer.
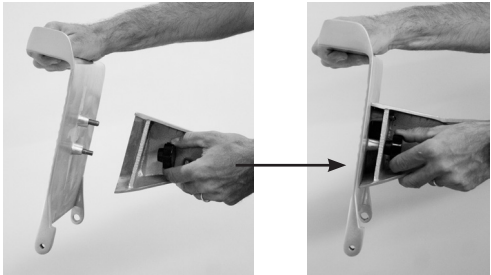
Disassemble food chute. Use the knob on the back of the chute to unscrew food chute into three separate pieces (see photos below).
Remove knife sharpener. Loosen screw on the neck of sharpener, then lift knife sharpener off and away from the slicer).
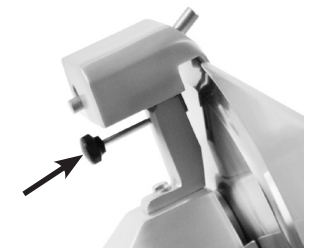
- Remove knife cover by rotating knife cover release knob counterclockwise until it releases , while carefully holding the edge of the knife cover and lifting the knife cover upward to remove.
Remove slice deflector. Slice deflector can be removed by loosening the screw knobs
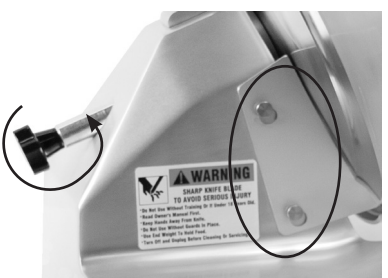
Place all removable parts in a three compartment sink with warm water and a mild detergent solution; soak, clean and thoroughly scrub all surfaces using a solution of mild detergent and warm water. Removable parts include: food chute and all of its parts, end weight, slide rod, knife cover, knife sharpener, and slice deflector. Rinse removable parts with fresh, clean water. Following the instructions on your quaternary sanitizer label, soak food chute and all of its parts, knife cover, knife sharpener and slice deflector in a proper solution of quaternary sanitizer for a minimum of two minutes. Allow these parts to air dry.
Knife must also be cleaned and sanitized. Carefully wash and rinse the top and bottom of knife by wiping from the center of knife outward. Spray both sides of knife, slicer table and the entire slicer base with a non-bleach, non-chlorine sanitizer following the instructions on your quaternary sanitizer container to make sure proper sanitation is achieved. Allow slicer parts to air dry.
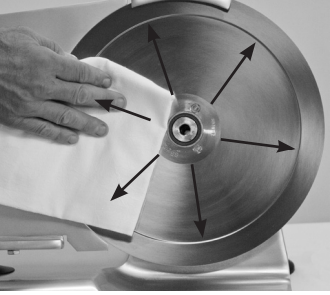
- Soak a clean cloth in a mild detergent and warm water solution. Ring out excess water from cloth. With slicer table completely closed, wipe slicer table off by starting at knife and pulling towards you. Never wipe slicer table towards the knife. Spray or wipe a sanitizer on slicer table and allow it to air dry.
- .With a clean cloth soaked in mild detergent, wipe down all remaining surfaces of slicer to remove food, debris and grease/oil. Use a nylon brush to scrub difficult areas. Use a clean, wet cloth to rinse the entire slicer. Finish by spraying sanitizer on all surfaces and then let air dry.
REINSTALL REMOVABLE PARTS
After cleaning, sanitizing, and allowing the parts to air dry, they must be reinstalled.
BE ALERT. The slicer knife is exposed. Always be aware of the placement of your hands/fingers in relationship to the knife.
- Carefully reinstall slice deflector.
Reinstall knife cover. Put knife cover over knife, centering it on knife hub.
Then, while holding knife cover in place with one hand, begin turning knife cover release knob clockwise with your other hand until knife cover is secured into place.
NOTE: NEVER operate the slicer with the knife cover removed.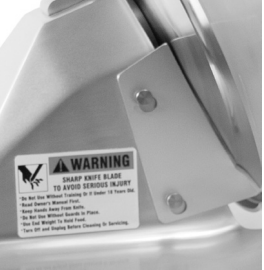
Reinstall knife sharpener. Attach it to the top of the slicer and secure it with the knife sharpener release knob.
IMPORTANT: Before operating slicer, knife sharpener must be in place and secure.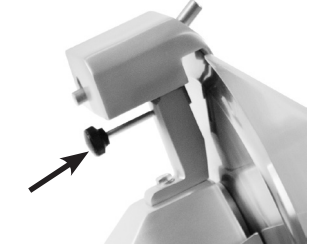
Reassemble the food chute.
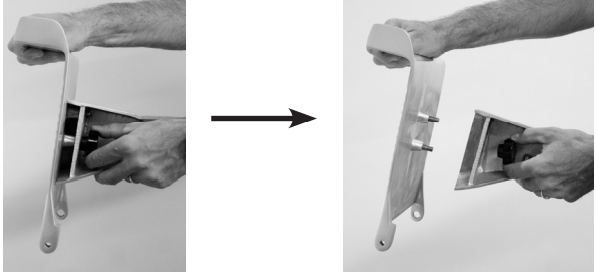
Put the cleaned and sanitized food chute back onto the slicer. Securely tighten food chute release knob to prevent “play” between food chute and chute arm.
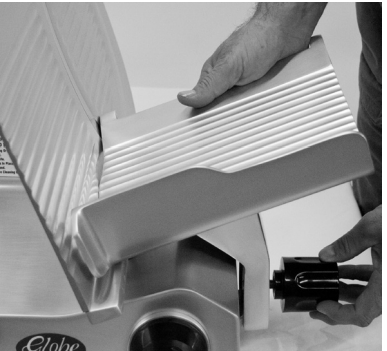
- Reinstall end weight. Align end weight with chute and insert slide rod through chute and end weight (Fig 13-3). Allow end weight to rest on chute and securely screw in slide rod to slicer chute.
- Plug in the power cord.
INSPECTION
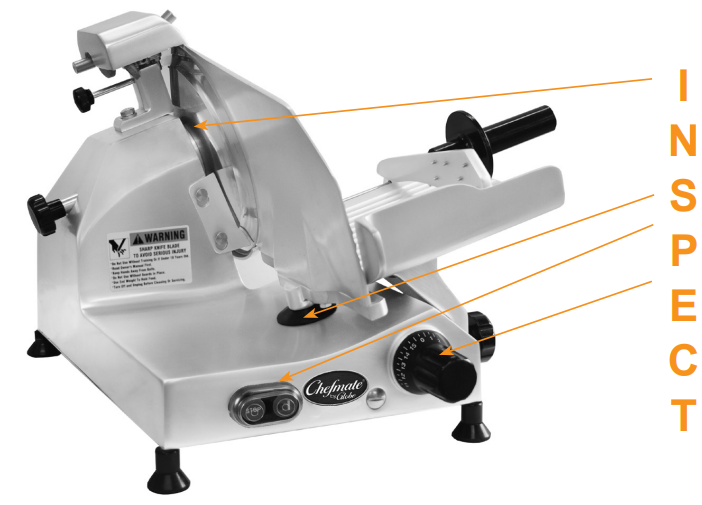
INSPECTING THE SLICER FOR DAMAGED OR BROKEN PARTS INCLUDING GASKETS & SEALS. A thorough visual inspection must be made of the entire slicer and its parts. Globe urges the owner/operator to inspect all components often and for an authorized service agent to inspect the entire slicer at least every 6 months, including all parts that are detachable for cleaning and sanitizing. This inspection must include: looking for damaged parts, broken seals or gaskets, and areas that can be more difficult to clean and sanitize.
Warning
IF A SEAL OR GASKET IS FOUND TO NOT PROPERLY SEAL, IS DAMAGED, OR IS MISSING, THE SLICER MUST BE REMOVED FROM SERVICE UNTIL IT IS REPAIRED BY AN AUTHORIZED SERVICER.
Knife Sharpening
TO AVOID SERIOUS PERSONAL INJURY
- NEVER touch rotating knife.
- ALWAYS keep hands clear of all moving parts.
- ALWAYS turn slicer OFF, turn slice thickness dial clockwise until it stops, and remove food chute before sharpening.
- NEVER sharpen slicer unless all guards are installed.
- NEVER operate slicer without knife sharpener.
WHEN AND HOW OFTEN TO SHARPEN THE KNIFE
- Symptoms of a dull knife are excess waste (or “tail”) on the unsliced portion remaining in the food chute.
- The knife should be sharpened periodically to provide consistent slices and maximum food product yield. Sharpening knife lightly every few days is more effective than heavy sharpening at less frequent intervals.
PREPARING TO SHARPEN
- Turn off and unplug slicer. Turn slice thickness dial clockwise until it stops so slicer table covers knife’s edge.
- Remove food chute from slicer.
- Clean and dry both sides of knife before sharpening, following instructions for knife cleaning on pages 11 through 13.
- Loosen the sharpener release knob by turning it counterclockwise several times
BE ALERT. The next step will expose the knife. Lift the sharpener cover up , rotate it clockwise and lower it into position with the knife fitting between the two stones.
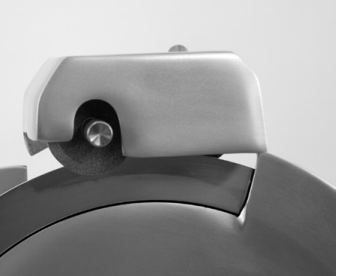
- Tighten the sharpener release knob to secure the sharpener.
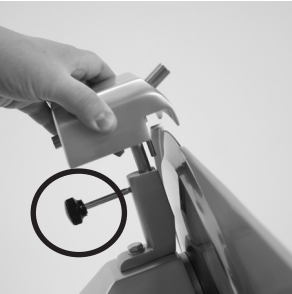
SHARPENING THE KNIFE - (Regular Procedure)
- Plug in and select the start button on the slicer.
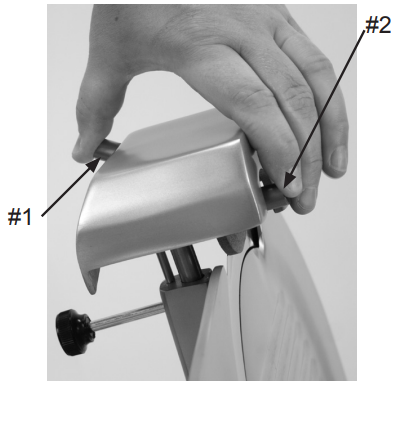
- Push grinding stone button #1 and honing stone button #2 at the same time so both stones make contact with knife. Maintain pressure on the buttons for 5-10 seconds.
TURN SLICER OFF before inspecting.
SHARPENING THE KNIFE - (Extended Procedure)
NOTE: Use the extended procedure if the regular sharpening procedure does not produce satisfactory results.
- Start slicer.
- Push grinding stone button #1 so the stone sharpens the back side of knife. Maintain pressure on the button for 30 seconds.
- Push grinding stone button #1 and honing stone button #2 at the same time so both stones make contact with knife. Maintain pressure on the buttons for 5 seconds.
AFTER SHARPENING
- Turn slicer OFF and unplug the power cord.
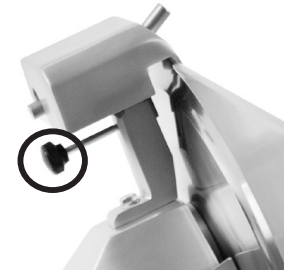
- Loosen sharpener release knob.
- Rotate sharpener and place it back in its stored position.
Tighten sharpener release knob
- Clean and sanitize the entire slicer as described on pages 10-1
- Reinstall food chute and plug the power cord in.
IMPORTANT: Before operating the slicer, the knife sharpener must be securly in place.
Inspections, Simple Maintenance, and Repair
- BEFORE CLEANING, SHARPENING, SERVICING, OR REMOVING ANY PARTS, always turn off and unplug slicer, turn the slice thickness dial clockwise past zero “0” until it stops, and remove the food chute.
- NEVER TOUCH KNIFE. Keep hands and arms away from all moving parts.
- DO NOT tamper with, bypass, or remove any safety devices, guards, START/STOP button, or touch pad controls.
- AFTER EACH USE, ALWAYS turn slicer OFF and turn the slice thickness dial clockwise past zero “0” until it stops.
- USE ONLY properly installed Globe parts and accessories
INSPECTING THE SLICER
INSPECTING THE SLICER FOR DAMAGED OR BROKEN PARTS INCLUDING GASKETS & SEALS. A thorough visual inspection should be made of the entire slicer and its parts. Globe urges the owner/operator to inspect
all components often and for an authorized service agent to inspect the entire slicer at least every 6 months, including all parts that are detachable for cleaning and sanitizing. This inspection must include looking for damaged parts, broken seals or gaskets, and areas that can be more difficult to clean and sanitize.
SLICER INSPECTION
Slicer Seals and Gaskets Identified
LUBRICATION
Various slicer parts need to be lubricated periodically using Globe oil. Globe oil is a light, tasteless, odorless mineral oil that will not contaminate or impart odors or taste to sliced food products.
Food Chute Slide Rod
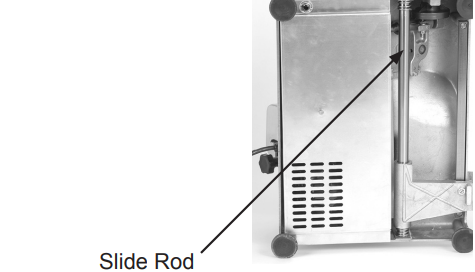
It is necessary to lubricate the food chute slide rod with Globe oil if the food chute becomes difficult to push.
- Make sure slicer is off and unplugged. Then remove food chute.
- Tilt slicer on its end.
Put several drops of Globe oil on slide rod towards the top of slide rod.
- Tilt slicer back to its normal position.
- Push food chute back and forth several times to distribute the oil onto slide rod.
- Reinstall food chute.
- Plug slicer in.
Sharpener Shafts
It is necessary to lubricate the sharpener shafts with Globe oil every week.
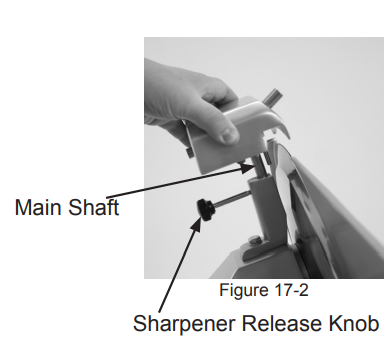
Loosen sharpener release knob and pull sharpener up to remove it
Put several drops of Globe oil on shaft behind each sharpening stone
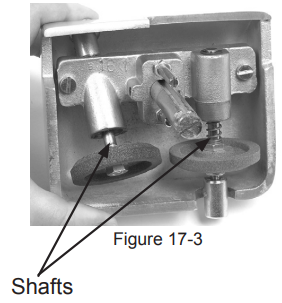
- Push both sharpener buttons a couple of times to distribute the oil onto the shafts.
- Put several drops of Globe oil on main shaft (Fig. 17-2), place sharpener back into position and tighten the sharpener release knob.
- Wipe off any excess oil that drips onto slicer.
NOTE: Sharpener and stones can be cleaned with warm water and a brush. Allow it to air dry. If sharpener or stones are cleaned, it is very important that all sharpener shafts are lubricated with Globe oil afterwards
End Weight Slide Rod
The end weight slide rod should be lubricated with a few drops of Globe oil, every week or when excessive drag is felt.
Apply a few drops of Globe oil to slide rod
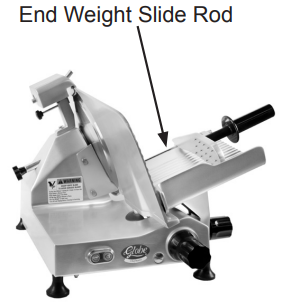
- Slide end weight up and down to distribute the oil.
Globe Slicer Safety Tips
TO AVOID SERIOUS PERSONAL INJURY
- NEVER touch slicer without training and authorization from your supervisors, or if you are under 18 years of age. Read this instruction manual before operating slicer.
- ONLY install slicer on a level nonskid surface that is nonflammable and is located in a clean, well-lit work area away from children and visitors.
- ALWAYS ground slicer utilizing proper power source.
- NEVER TOUCH KNIFE. Keep hands and arms away from all moving parts
- NEVER OPERATE slicer without knife cover and knife sharpener securely installed.
- BE ALERT when slicer is on and in motion.
- NEVER HOLD THE FOOD PRODUCT WHILE SLICING. Hold only the end weight handle to slice.
- DO NOT CATCH SLICES WITH YOUR HAND. Let slices drop onto receiving area.
- ALWAYS turn slicer OFF and turn the slice thickness dial clockwise until it stops after each use
- BEFORE CLEANING, SHARPENING, SERVICING, OR REMOVING ANY PARTS, always turn slicer OFF, turn the slice thickness dial clockwise until it stops, remove food chute and unplug the power cord.
- ALWAYS properly clean and sanitize slicer. To prevent illness or death caused by the spread of food-borne pathogens, it is important to properly clean and sanitize the entire slicer as the surface of the slicer can become contaminated. It is the responsibility of the slicer owner/operator to follow all guidelines, instructions and laws as established by your local and state health departments and the manufacturers of chemical sanitizers.
- USE ONLY GLOBE SLICER ACCESSORIES properly installed.
Troubleshooting of C12 Globe Food Slicer
| PROBLEM | CAUSE | SOLUTION |
|---|---|---|
| Slicer will not start | Slicer not plugged in | Plug in slicer |
| Motor reset button tripped | Press reset button located underneath slicer | |
| Ragged cuts-poor yield | Dull knife | Sharpen knife. Make sure knife and stones are clean. |
| Chipped knife | Sharpen or have new knife installed. | |
| Knife-slicer table gap too wide | Call for service to adjust slicer table. | |
| Knife too small | Have new knife installed. | |
| Metal rubbing knife | Knife cover | Tighten knife cover release knob. |
| Food chute | Tighten or adjust food chute knob. | |
| End weight | Have defective end weight replaced. | |
| Slicer table | Call for service to adjust slicer table. | |
| Hard to push food chute | No lubrication | Lubricate slide rods thoroughly with Globe oil. Do not use vegetable oil! |
| Hard to sharpen | Stones dirty, wet or clogged with grease | Clean stones with warm water and a brush. Allow stones to air dry. Lubricate shafts with Globe oil afterwards. |
| Knife dirty | Clean top and bottom of knife. | |
| Worn stones | Have stones replaced. | |
| Stones not properly aligned | Have sharpener adjusted. | |
| Slicer stops running | Motor overheated | Wait 10-15 minutes for slicer to cool down. Push reset button, then start slicer. |
Warranty of Chefmate Globe Food Slicer
Globe Food Equipment Company (“GFE”) warrants to the original purchaser of new equipment that said equipment, when installed in accordance with our instructions within North America and subjected to normal use, is free from defects in material or workmanship for a period of one year from installation or 18 months from actual shipment date, whichever date occurs first.
THIS WARRANTY IS IN LIEU OF ALL OTHER WARRANTIES, WHETHER EXPRESSED OR IMPLIED. GFE EXPRESSLY DISCLAIMS ANY IMPLIED WARRANTY OF MERCHANTABILITY OR EXPRESSED OR IMPLIED WARRANTY OF FITNESS FOR A PARTICULAR PURPOSE.
GFE’S OBLIGATION AND LIABILITY UNDER THIS WARRANTY IS EXPRESSLY LIMITED TO REPAIRING AND REPLACING EQUIPMENT THAT PROVES TO BE DEFECTIVE IN MATERIAL OR WORKMANSHIP WITHIN THE APPLICABLE WARRANTY PERIOD. All repairs pursuant to this Warranty will be performed by an Authorized Designated GFE Service Location during normal working hours. IN NO EVENT SHALL GFE BE LIABLE FOR INCIDENTAL OR CONSEQUENTIAL DAMAGES TO BUYER OR ANY THIRD PARTY, INCLUDING, WITHOUT LIMITATION, LOSS OF PROPERTY, PERSONAL INJURY, LOSS OF BUSINESS OR PROFITS OR OTHER ECONOMIC LOSSES, OR STATUTORY OR EXEMPLARY DAMAGES, WHETHER IN NEGLIGENCE, WARRANTY, STRICT LIABILITY OR OTHERWISE.
Pros & Cons
Pros
- Versatile and durable for all your food-slicing needs
- Adjustable thickness control for perfectly sliced food
- Powerful motor for efficient slicing
- Easy-to-clean design with removable parts
- Compact and space-saving design for easy storage
Cons
- May be too large for some kitchens or storage spaces
- May require occasional blade sharpening or replacement
- May not be suitable for very thick or dense foods
Customer Reviews of Chefmate C12 Globe Food Slicer
Customers love the Chefmate Globe Food Slicer for its versatility and durability. Many reviewers note that the slicer is easy to use and clean, and that the adjustable thickness control is a game-changer for food preparation. However, some reviewers mention that the slicer may require occasional blade sharpening or replacement, and that it may not be suitable for very thick or dense foods. Overall, the C12 Globe Food Slicer receives high praise from customers for its quality and performance.
Faqs
How does the Chefmate C12 Globe Food Slicer maintain precision and can it handle both meat and vegetables?
Which safety measures need to be followed while using the Chefmate C12 Globe Food Slicer?
In order to adhere to food safety regulations, how should I clean the Chefmate C12 Globe Food Slicer?
If my Chefmate C12 Globe Food Slicer won't start, what should I do?
How often should I sharpen my Chefmate C12 Globe Food Slicer's blade?
Where can I get replacement components for the food slicer Chefmate C12 Globe?
How can I change the Chefmate C12 Globe Food Slicer's slice thickness?
Can cheese be sliced with the Chefmate C12 Globe Food Slicer?
What is the Chefmate C12 Globe Food Slicer's electricity requirement?
What is covered by the Chefmate C12 Globe Food Slicer warranty, and how long is it valid for?
Leave a Comment
