
How to Use: Chefs Choice Sharpener For Asian Knives 316 User Manual
Content
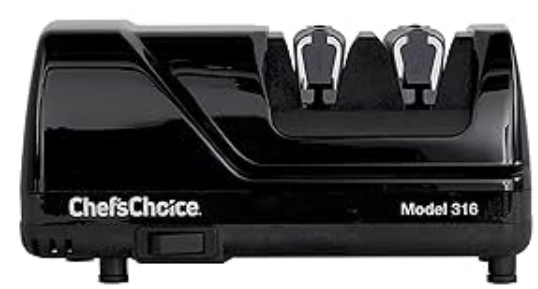
Chef's Choice Sharpener For Asian Knives 316
Introduction
The Chef's Choice Sharpener For Asian Knives 316 is a premium electric knife sharpener designed specifically to restore and maintain the razor-sharp edges characteristic of Asian-style knives. Engineered with precision angle control and advanced diamond honing technology, this sharpener effortlessly sharpens traditional Japanese single-bevel knives, Chinese cleavers, and contemporary double-bevel Asian blades at a precise 15-degree angle. Its dual-stage sharpening process uses 100% diamond abrasives for both honing and polishing, ensuring superior edge quality that matches factory-sharpened performance.
Ideal for professional chefs, culinary enthusiasts, and home cooks who value the precision and sharpness of Asian knives, the Model 316 makes food preparation smoother and safer. Whether slicing sushi, filleting fish, or chopping vegetables, this sharpener delivers consistent, factory-level sharpness with minimal effort. Its compact design and durable ABS housing make it a practical addition to any kitchen countertop.
Available for approximately $80 to $90 USD, the Chef's Choice 316 is widely accessible through authorized dealers and online retailers, usually shipping within 1-3 business days. This electric sharpener is assembled in the USA and carries UL and ETL safety certifications, ensuring quality and reliability for users seeking long-lasting performance in maintaining their Asian knife collections.
SHARPENING THE CONTEMPORARY ASIAN KNIFE
Before sharpening your contemporary style Asian blade, refer to Description of Asian and Euro/American blades, pages 9 and 10, to confirm that you do,, in fact,ct have a double faceted blade. All double-faceted Asian blades are defined as contemporary blades. Most of the popular Asian blades, such as the Usaba (nakiri) and Santo,,ku currently sold in the United States are the double-faceted contemporary design. If your double-faceted knife is very thin at the edge and it is relatively new,, it probably will not need to be pre-honed in Stage 1 before polishing. Instead, start in Stage 2, which will polish the edge with ultrafine diamonds. Turn on the power switch and sharpen in Stage 2 as follows:
START BY POLISHING THE EDGE IN STAGE 2
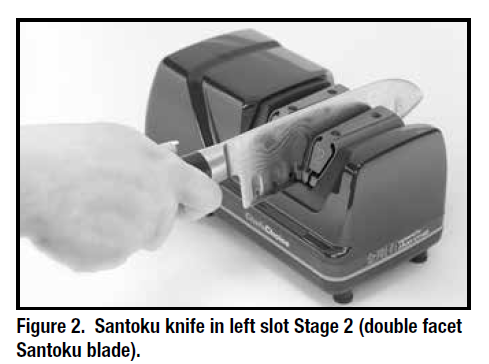
- Pull the blade through the left slot of Stage 2 (see Figure 2) and then through the right slot of Stage 2. Make 2 pairs of pulls, alternating each pull in the left and right slots of Stage 2. You should take about 3 seconds for each pull for a 5-inch (12 cm) long blade.
- Then make 3 pairs of alternating faster pulls (about 1 second per pull for a 5-inch 12 cm] blade) in Stage 2.
If the knife is not yet shaving sharp, repeat steps a and b above. Again t test the blade for sharpness. In the event the knife still is not sufficiently sharp, it will be faster to first pre-hone it in Stage 1 as follows:
USE HONING STAGE 1, WHEN NECESSARY
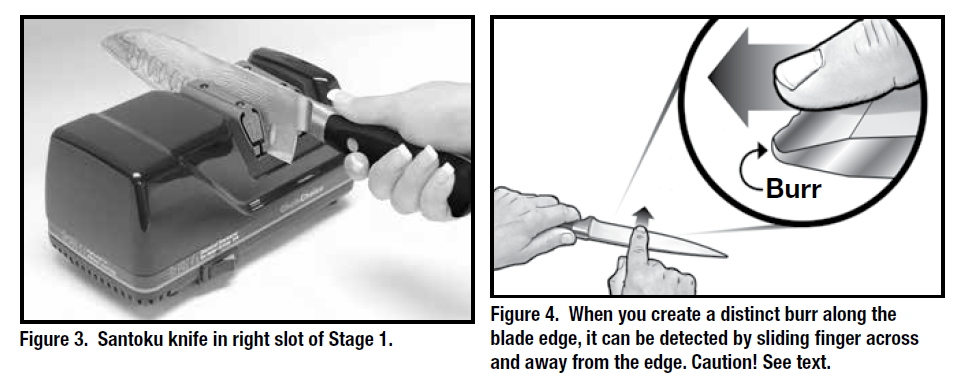
- Pull the blade alternately through the left and right slots (see Figure 3) of Stage 1, making about 3 pairs of pulls, taking about 3 seconds for each pull. Check the edge carefully to confirm the presence of a burr (see Figure 4), which will be small since the Stage 1 abrasive is quite fine. To check for the burr, move your forefinger carefully across the edge as shown in Figure 4. (Do not move your finger along the edge—to avoid cutting your finger). If the last pull was in the right slot, the burr would appear only on the right side of the blade (as you normally hold it) and vice versa. The burr, when present, feels like a rough and bent extension of the edge; the opposite side of the edge feels very smooth by comparison. When a burr exists along the entire edge, proceed to polish again in Stage 2.
- If there is no burr,, continue honing in Stage 1, alternating left and right slots until a light burr develops. When a burr is present along the entire blade length, proceed as below to polish again in Stage 2.
RETURN TO POLISHING STAGE 2
- Make 3 pairs of pulls, alternating pulls in the left and right slots, taking 3 seconds per pull for a 5” blade. Make 3 pairs of faster pulls, alternating left and right slots, taking 1 second per pull. Test the blade for sharpness.
- If the edge is not shaving sharp, make a few more pairs of fast pulls in Stage 2 until the edge is shaving sharp.
RE-SHARPENING THE CONTEMPORARY ASIAN BLADE
- Re-sharpen by following the procedure above,, starting with Polishing in Stage 2 as described. You should be able to resharpen to a razor edge 10 or more times using only Stage 2 before finding it necessary to again hone in Stage 1. Hone in Stage 1 only when you find it is taking too long or too many pulls in Stage 2 to bring the edge to razor sharpness. In that event, follow the sharpening sequence described above.
SHARPENING THE TRADITIONAL (SINGLE BEVEL) JAPANESE BLADE
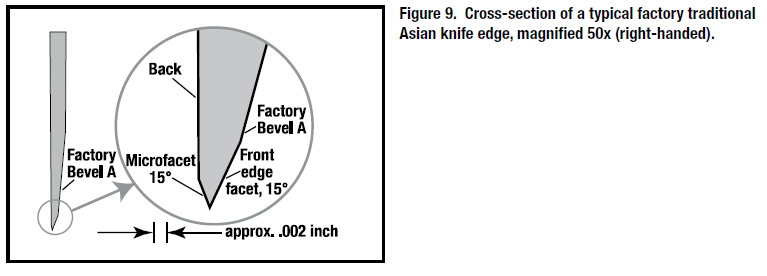
Traditional Japanese knives are single-sided and have a large factory bevel (Bevel A, page 9) on one side of the blade. There are a large number of manufacturers of knives of this type,, which are used widely to prepare sashimi. The factory bevel (Bevel A) is commonly ground at about 10 degrees, but there are exceptions, ns, and that angle is not standardized at the factories. Designs of the traditional Japanese knives and the detailed structure of the cutting edges likewise vary widely from one manufacturer to the next; however, there are some similarities. The cutting edge consists of a small primary facet on the front face of the blade and a much smaller secondary microfacet along the back face. Commonly,, the back side microfacet (Figure 10) can be easily seen only with a hand magnifier. The back face is ground flat at the factory,, or more commonly,, it is slightly hollow ground to ensure that an effective microfacet can be formed there as part of the cutting edge. Because of the lack of standardization, commonly the manual approach used to sharpen these knives has proven difficult, laborious, us, time-consuming. The Chef’sChoice® Model 316 Sharpener is designed to sharpen all but the heaviest contemporary and traditional Asian blades and to create a factory-like edge.
Before you start to sharpen a traditional blade, examine it carefully to confirm that you have the traditional single bevel blade and to determine whether you have a right or left-handed type as described on page 9. You must follow carefully the sharpening procedure and sequence as described below to achieve the optimum edge on your traditional blade.
Note: Do not attempt to sharpen any traditional blade thicker than 1/8 inch (3 mm) in the Model 316 sharpener. (Control of the sharpening angle becomes difficult for such thick blades.)
Again, confirm which side of the blade has the large factory Bevel A. Hold the blade in your hand (as if you are cutting), and if the large factory bevel is on the right side of the blade, the blade is right-handed. For the right-handed blades, start sharpening in the left slot of Polishing Stage 2 so that only the beveled side (right side) of the edge will contact the polishing wheel.
STEP 1 - START IN POLISHING STAGE 2 (RIGHT HANDED BLADES)
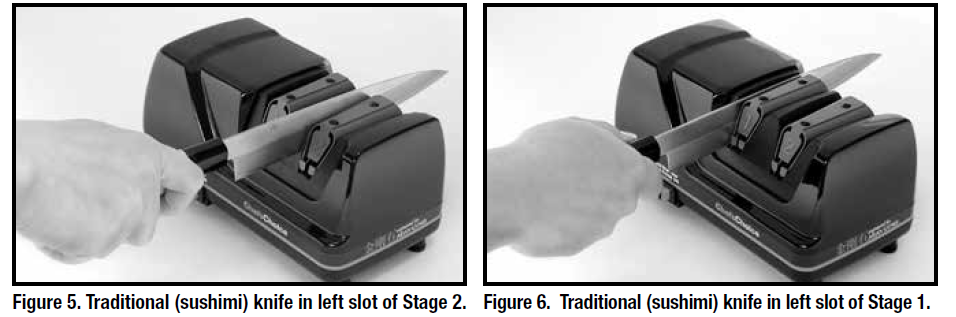
Pull the full length of the blade through the left slot of Stage 2 (Figure 5) about ten (10) times (take about 3 seconds for each pull of a 5-inch (12 cm) blade and proportionally longer for longer blades). Feel for a burr on the bathed ck side of the blade edge as shown in Figure 4. (The burr will be extremely small.) If there is no burr, make ten (10) additional slow pulls through the left slot. If no burr is formed after these pulls,, proceed to Step 2; otherwise, omit Step 2 and go to Step 3. STEP 2 – USING THE HONING
STAGE 1 (RIGHT HANDED BLADES)
If you were unable to develop a burr in Stage 2 as described in Step,, 1 you will need to hone the edge in Stage 1 as follows: Since your traditional blade is handed, you must hone only in the left slot of Stage 1 (see Figure 6). The number of pulls that you need to make depends on how dull your blade is. Duller blades will require more pulls.
Make ten (10) pulls in the left slot of Stage 1 and then check for a burr along the back of the blade. (The burr created in Stage 1 will be small but easily felt as shown in Figure 4). Make certain the burr is present along the entire length of the edge. If there is no burr or only a partial burr, continue to make additional pulls all in the left slot about five (5) at a time and check for a burr after each group of five (5) pulls. Probably 20-30 total pulls in the left slot will be adequate to raise a burr; it is unlikely to take more than 50 left slot pulls to create the burr. When a burr is confirmed, proceed to Step 3.
STEP 3 – FORMING THE FINAL EDGE (RIGHT HANDED BLADE)
- Make five (5) regular pulls in the left slot of Stage 2.
- Make one (1) regular pull in the right slot of Stage 2 to create a small microbevel along the back side of the edge.
- Make several pairs of fast pulls (one (1) second each) in Stage 2,, alternating in the left and right slots of Stage 2. The fast pulls with ultrafine diamonds polish the facet on the front side of the blade as well as the rear microfacet to create an extremely sharp edge.
- Check the blade carefully for sharpness using a thin sheet of paper. The blade should be razor sharp. If not razor sharp , repeat 3cAboveve and retest the blade for sharpness.
RESHARPENING THE TRADITIONAL JAPANESE BLADE (RIGHT HANDED)In
Generally, you will be able to resharpen quickly by making 3 or 4 pairs of fast pulls alternating in the left and right slots of Stage 2. Repeat this if necessary to obtain a razor-sharp edge.
When resharpening, nothing only in Stage 2 becomes too slow to develop a sharp ed,ge, or if the edge has been damaged,,d you will need to re-hone the edge in Stage 1. Use only the left slot of
Stage 1. Generally,y you will find that about five (5) re-honing pulls will be sufficient in Stage 1 to speed the resharpening in Stage 2. After re-honing, return to Stage 2 and make several pairs of fast pulls alternating in the left and right slots to develop the final edge.
SHARPENING LEFT-HANDED TRADITIONAL BLADES
The procedure you must use with left-handed blades is similar to that procedure for right-handed blades as detailed above, except that, in all cases, the slots you must use are reversed. Where the sharpening procedure for right-handed blades calls for the use of the left slot, you must use the right slot when sharpening a left-handed blade. Likewise,, use the left slot where right-handed instructions call for using the right slot.
HOW TO CREATE THE ASIAN EDGE ON EURO/AMERICAN BLADES
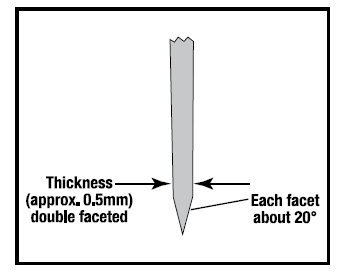
If you have a Euro/American brand knife, it is relatively simple to convert its edge to the low-angle Asian double-faceted edge. Remember that the advantage of the Asian edge is due to the thinner cross-section of the typical Asian blade, where the edge facets are formed, and the smaller angle (about 15°) of each edge facet. If the Euro/American style blade is thick and its thickness at the top of its edge facets is already large, much of the advantage of the Asian edge will not be realized. The blade must be very thin where the facets are honed to realize the advantage of the Asian edge. Consequently, consider this change for only your thinnest blades, such as a thin utility blade or perhaps a thin paring knife.
To convert from the Euro/American Edge to the Asian Edge, start with the Honing Stage 1 as follows:
START IN HONING STAGE 1
Pull the full length of the blade through the left (Figure 7) and right slots of Stage 1, using the left and right slots on alternate pulls. (Take about 3 seconds for each pull on a 5” long blade). It will take about 20 pairs of pulls to fully re-angle the edge of a thin blade. Check for a burr and continue to make more pulls as necessary to create a small burr along the full length of the blade. Then proceed to Stage 2 as follows.
POLISHING IN STAGE 2
- Make about 5 to 7 pairs of pulls through Stage 2 (Figure 8), alternating each pull in the left and right slots (about 3 seconds for each pull on a 5-inch [12 cm] long blade).
- Then make 4 pairs of fast pulls alternating through the left and right slots. (1 second for each pull for a 5-inch [12 cm] blade.)
- Check the blade for sharpness. For a sharper edge,, make a few more pairs of fast pulls as in step b and check for sharpness.
![a. Make about 5 to 7 pairs of pulls through Stage 2 (Figure 8), alternating each pull in the left and right slots (about 3 seconds for each pull on a 5 inch [12 cm] long blade.) b. Then make 4 pairs of fast pulls alternating through the left and right slots. (1 second for each pull for a 5 inch [12 cm] blade.) c. Check the blade for sharpness. For a sharper edge make a few more pairs of fast pulls as in step b and check for sharpness.](https://manualsfact.com/media/posts/68eee555f9bec76dcdc9b993/chef's_choice_sharpener_for_asian_knives_316-understanding-use-c.png)
RE-SHARPENING THE EURO/AMERICAN BLADE
Re-sharpen in Polishing Stage 2 as described above. You will be able to re-sharpen repetitively about 10 times using only Stage 2 as described above. After resharpening several times, you may want to hone in Stage 1 to speed the re-sharpening process. In Stage 1, make about 5 pairs of alternating slow pulls and check for a burr. When a burr exists, proceed to polish in Stage 2 as described above.
DESCRIPTION OF ASIAN AND EURO/AMERICAN BLADES
Euro/American blades, in general, have a sturdier cross-section than the more delicate and thinner contemporary Asian blades. The variation among commercially available knives of any type is great,, and in fact, some Euro/American blades are very thin ,, and certain Asian knives have a thicker cross-section designed for heavier work.
CONTEMPORARY ASIAN KNIVES
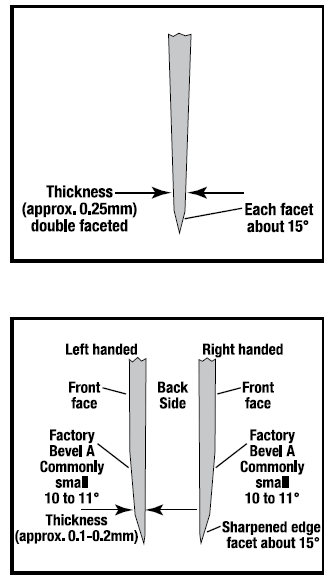
The more popular Asian blade,; the thin, lightweight Santokuu and Usaba or Nakiri are generally double-faceted (sharpened on both faces of the blade) as shown on the left. Occasionally, Santoku knives are sold with single facets (#2 below), but these are not readily available in the United States.
There are other but somewhat heavier double-faceted Asian knives, the Deba and Gyutou, popular in Asia, which are used for chopping hard vegetables, for tailing and filleting fi,, sh and for meats. These are basically Asian chefs' knives designed for heavier-duty work. The Chinese cleaver is included in his class.
TRADITIONAL JAPANESE KNIVES
The traditional Japanese knife is single beveled and has a wide factory bevel A along one face of the blade above the small edge facet. These are sold as either right-handed or left-handed versions, as shown on the left. The factory bevel A is ground, commonly at about 10 degrees. The most popular example of this type of blade is the sashimi knife, also called yanagi and sujihiki, designed as shown to the left. This lengthy, slicing blade is ideal for preparing very thin slices of raw tuna or salmon. The back of this blade is commonly slightly hollow ground. A small single cutting facet of about 15° to 20° is created along the front of the edge of the sashimi blade,, as shown in Figure 10, to establish the geometry of the cutting edge. An even smaller cutting micro-facet (barely visible) is customarily created on the back face of the blade to enhance the sharpness of the finished edge. Figure 10 shows a greatly enlarged cross-sectional view of a typical factory edge on the traditional single-bevel Japanese knife. The large factory bevel A serves to deflect the food slice away from the blade as it is cut.
EUROPEAN/AMERICAN BLADES
While most of the Euro/American knives (shown on the left) have a thicker cross-section designed for heavier work, the range of blade thickness in these familiar blades is great,, and certain of these knives, such as the conventional paring, fill, et, and utility blades, have a relatively thin cross-section well suited to their intended application. Euro/American blades are universally double beveled (sharpened on both sides of the blade).
NORMAL MAINTENANCE
NO lubrication is required for any moving parts, motor, bearings, or sharpening surfaces. There is no need for water on abrasives. The exterior of the sharpener may be cleaned by carefully wiping with a sof t damp cloth. Do not use detergents or abrasives.
Once a year o,r s, or as needed, you should remove metal dust that will accumulate inside the sharpener from repeated sharpenings. Remove the small rectangular clean-out cover (Figure 12) that covers an opening on the underside of the sharpener. You will find metal particles adhered to a magnet attached to the inside of that cover. Simply rub off or brush off accumulated filings from the magnet with a paper towel or toothbrush and reinsert the cover in the opening. If larger amounts of metal dust have been created, you can shake out any remaining dust through the bottom opening when the cover is removed. After cleaning, replace the cover securely with its magnet in place.
Specifications of Chef's Choice Sharpener For Asian Knives 316
- Sharpening Angle: Precisely set at 15 degrees for Asian-style blades
- Abrasive Material: 100% fine and ultra-fine diamond abrasives in both sharpening stages
- Sharpening Stages: Two-stage process — Stage 1 hones the edge, Stage 2 polishes for a razor-sharp finish
- Compatibility: Suitable for contemporary Asian-style double-bevel knives, traditional Japanese single-bevel knives, Chinese cleavers, and can also create a 15-degree edge on thinner Euro/American knives
- Dimensions: Approximately 8.5" width × 4" depth × 4" height
- Weight: Around 3.8 lbs (1.9 kg)
- Housing Material: Durable ABS plastic
- Safety & Certification: UL and ETL certified for electrical safety
- Performance: Creates factory-sharp edges comparable to professional sharpening services; efficiently removes nicks and dullness
- Comparison: Unlike general-purpose sharpeners operating at 20 degrees, the Model 316’s 15-degree angle is optimized for Asian blades,, offering thinner, sharper edges that enhance cutting precision and ease
Troubleshooting Guide for Chef's Choice Sharpener For Asian Knives 316
- Problem: The Knife edge remains dull after sharpening
- Solution: Ensure the knife is inserted fully and aligned with the elastomeric angle guides. Repeat the sharpening stages as per instructions, allowing 3 seconds per pull in Stage 1 and faster alternating pulls in Stage 2.
- Problem: The Sharpener won’t power on or is unresponsive
- Solution: Check the power cord connection and the outlet. Verify no obstruction in sharpening slots. Contact support if the electrical issue persists.
- Problem: Uneven sharpening or blade damage
- Solution: Confirm the knife type is compatible (15-degree edges only). Avoid sharpening serrated knives or scissors. Use gentle, consistent pressure guided by built-in angle controls.
- Preventive Measures:
- Regularly clean and sharpen the slots from metal debris.
- Use only for recommended knife types to avoid abrasive wear.
- Warranty & Support: Manufacturer provides a limited warranty covering defects in materials and workmanship. For assistance, contact Chef's Choice customer service at 1-866-467-6123.
Pros & Cons of Chef's Choice Sharpener For Asian Knives 316
Pros
- Precision Sharpening: Designed specifically for 15-degree Asian blades, delivering sharper edges than generic sharpeners.
- Diamond Abrasives: 100% diamond stones ensure durable, consistent, and fast sharpening.
- Dual-Stage System: Efficient honing and polishing stages produce a factory-new edge quality.
- Versatility: Suitable for traditional single-bevel and contemporary double-bevel Asian knives as well as thinner Euro/American knives.
- Build Quality: Sturdy ABS housing and UL/ETL certification ensure safety and long-lasting use.
- Easy to Use: Elastomeric angle guides eliminate guesswork, making it accessible for home users and professionals alike.
Cons
- Limited Knife Types: Not suitable for serrated knives, scissors, or thicker European knives with wider angles.
- Price Point: Slightly higher cost compared to basic manual sharpeners, though justified by technology and results.
- Size: While compact, it still requires countertop space that may be limited in small kitchens.
Customer Reviews of Chef's Choice Sharpener For Asian Knives 316
Users consistently praise the Chef's Choice Sharpener For Asian Knives 316 for its ability to restore knives to a factory-sharp edge, with many highlighting the ease and speed of the two-stage diamond sharpening process. Common praises include the sharpener’s precision angle guides and the smooth, effortless sharpening experience, especially on thin Asian blades.
Some customers mention that it does not accommodate serrated knives, which matches product specifications, and a few note the price as higher than manual models, but agree the quality justifies the investment. Star ratings generally range between 4.5 to 5 stars,,s with recommendations for anyone wanting professional-level results at home. Frequent users report improved cutting performance on sushi knives, cleavers, and delicate Japanese blades after using the Model 316.
Overall, the sharpener is highly recommended for cooks who use Asian style knives regularly and want a reliable, high-performance tool for maintaining perfect edges.
Faqs
How do I set up the chefs choice Sharpener For Asian Knives 316 for first-time use?
What should I do if the chefs choice Sharpener For Asian Knives 316 is not sharpening my knives effectively?
Can the chefs choice Sharpener For Asian Knives 316 be used on traditional single-bevel Japanese knives?
How often should I clean and maintain my chefs choice Sharpener For Asian Knives 316?
What are the key features of the chefs choice Sharpener For Asian Knives 316 that enhance sharpening performance?
Is the chefs choice Sharpener For Asian Knives 316 compatible with European-style knives or only Asian knives?
Why does the chefs choice Sharpener For Asian Knives 316 use diamond honing technology?
What safety precautions should I follow when using the chefs choice Sharpener For Asian Knives 316?
Tags
More chefs choice manuals
Leave a Comment