How to Install: Conico 1080p Cloud IP Camera User Manual
Content
Introduction
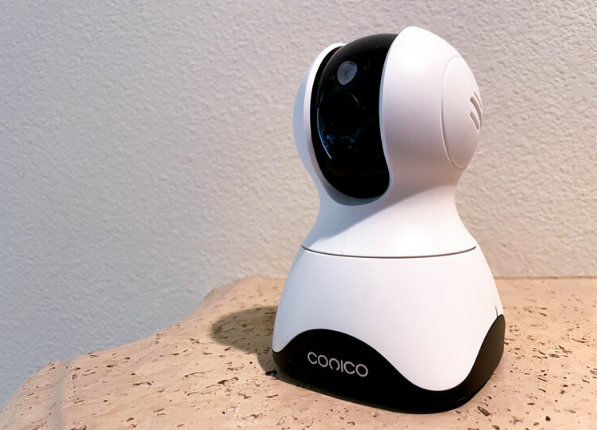
One effective and reasonably priced option for home surveillance is the Conico 1080p Cloud IP Camera. This camera from Conico has 2 way voice for better communication, night vision, pan and tilt, and 1080p HD video quality. It will be available for about $29.99 when it launches in 2021. The Conico camera is perfect for both novice and experienced users, thanks to its cloud storage choices and seamless Alexa connection.
Specifications
- Resolution: 1080p (1920x1080 pixels)
- Field of View: 130 degrees
- Night Vision: Up to 30 feet
- Weather Resistance: IP66 rating for outdoor use
- Connectivity: Wi-Fi (2.4GHz and 5GHz)
- Storage: Cloud storage and microSD card slot (up to 128GB)
- Motion Detection: Alerts sent via app
- Audio: Two-way audio with built-in microphone and speaker
- Power: DC 5V/1A
Description
The Conico 1080p Cloud IP Camera is a sleek and compact device that can be easily mounted on walls or ceilings. It has a sturdy build and is designed to withstand various environmental conditions. The camera’s advanced night vision capabilities ensure that you have clear visibility even in the dark. The two-way audio feature allows for real-time communication, making it ideal for interacting with visitors or family members remotely.
The camera’s wide-angle lens captures a broad field of view, reducing the need for multiple cameras. The Conico app provides a user-friendly interface for managing the camera, receiving alerts, and viewing recorded footage. With its cloud storage option, you can access your footage from anywhere, at any time.
Install "MIPC" APP
- Download the MIPC from Apple App Store (iOS) or Google Play Store (Android).
- Download the MIPC on the website: https://www.mipcm.com
- Scan the QR code by smartphone to download the MIPC.
Sign Up Account
For purposes of this user guide, we will use iPhone X as an example. The app interface may differ slightly from the screenshot below as the app keep updating.
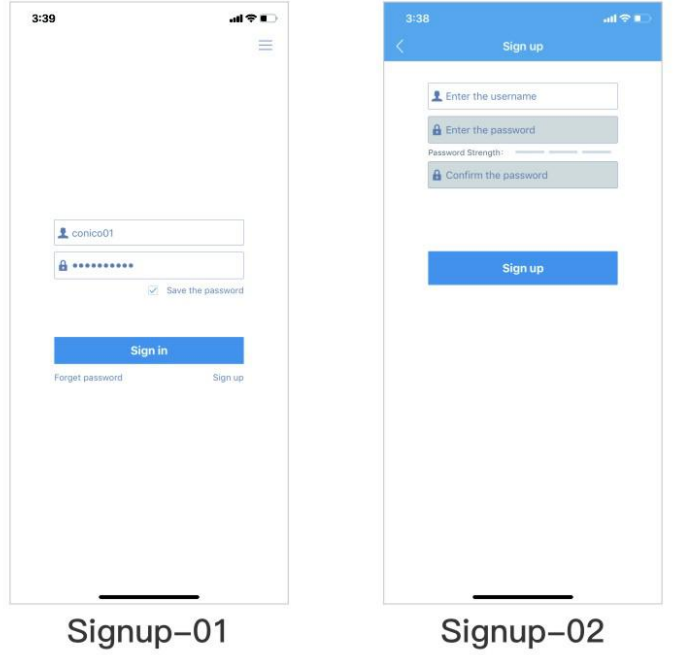
Launch the MIPC app, tap the "Sign Up" button at the lower right of the landing screen to register a new account by inputting your username and password in the sign up interface (Signup-01 & Signup-02). Please make sure your user name is at least 6 characters beginning with a letter.
Note: For your account security and password recovery request, we recommend you bind the email before logging in.
Wi-Fi Set Up on Phone
Before connecting to your camera, please confirm if your home Wi-Fi network is 2.4GHz. Meanwhile, please choose 2.4GHz Wi-Fi to connect your phone. Additionally, please put this camera close to your Wi-Fi router, it will help you connect the camera with Wi-Fi successfully.
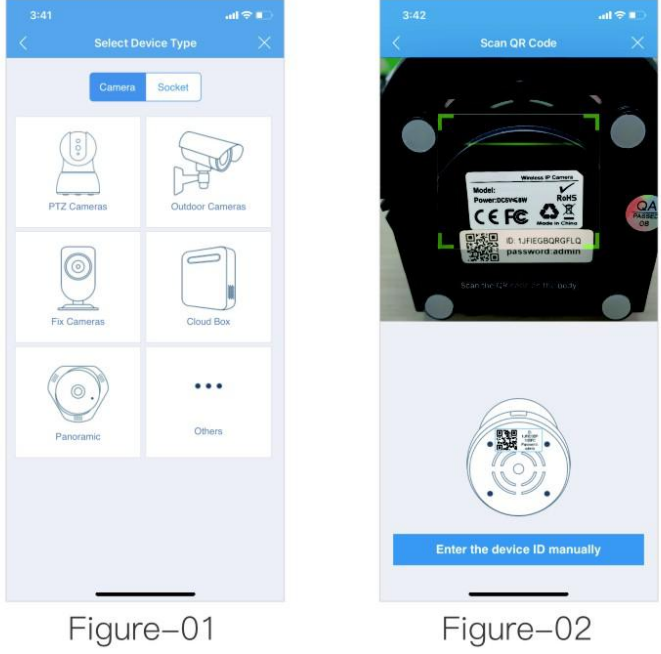
Tap "+" icon at the top left and select the right device type (Figure-01 ). Then, Scan the device QR code to add the camera (Figure-02).
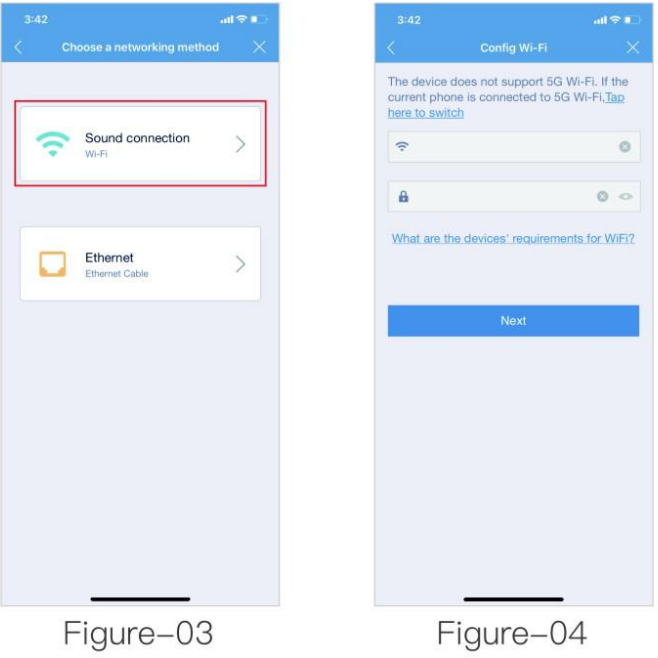
- Tap "Sound Connection" and enter the"Conflg Wi-Fi" interface (Figure-03).
Enter your home Wi-Fi network and tap the "Next" icon (Figure-04).
You will be asked to connect your power supply in this step (Figure-05). Plug in the power source to power on the camera , wait for about 60 seconds to allow the camera getting ready. The camera is ready once you hear a "tick" sound. Then, tap "Next".

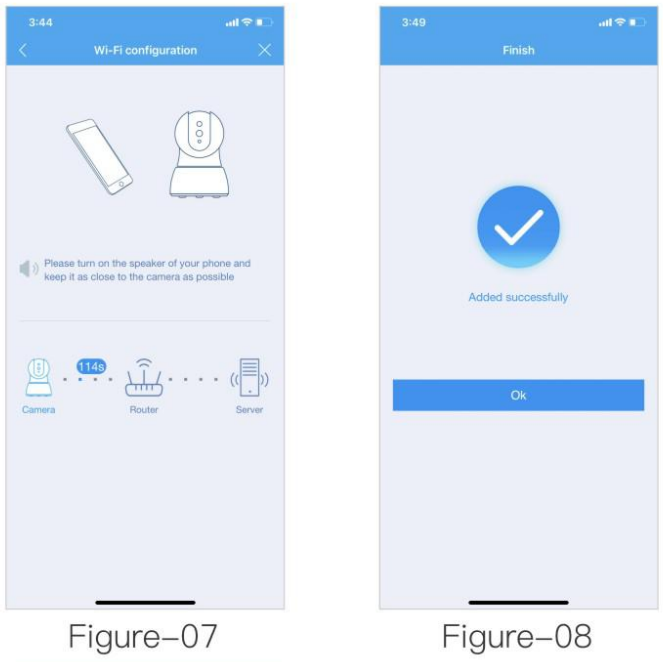
- At this step, please press the reset button about 1 second and you will hear the voice prompts "Waiting for receiving wireless configuration information". Then, turn up your phone speaker's volume, keep you phone closer to the camera's Mic, and waiting for the camera connecting your home Wi-Fi network (Figure-06 & Figure-07).
Once finish Wi-Fi configuration, it will direct you to "Finish" interface (Figure-OS). Please tap "OK" icon to enter next step.
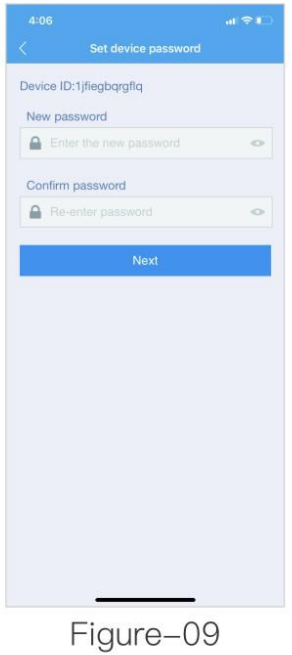
Please input your new camera password (Figure-09). If you did not modify password, it would keep popping tips to remind you to change your camera's password.
Ethernet Set Up on Phone
Conico Cloud IP Camera can be set up with Ethernet cable via smartphone.
- Connect the camera to a power supply using the included power adapter. Please wait for about 60 seconds to allow the camera getting ready. The camera is ready once you hear a "tick" sound.
- Connect the camera to the internet through Ethernet cable.
- Using a smartphone, download the MIPC and install it.
- Sign up an account, log in and follow the instruction on app to add the camera.
- Once add the camera successfully, please modify the camera password.
- If you would like to use Wi-Fi network, navigate to Camera Settings- Wi-Fi. Please choose the right Wi-Fi name on Wi-Fi list, enter your password and click the icon "Save".
Ethernet Set Up on PC
Conico Cloud IP Camera can be accessed via a web browser on a personal computer.
- Connect the camera to a power supply using the included power adapter. Please wait for about 60 seconds to allow the camera getting ready. The camera is ready once you hear a "tick" sound.
- Connect the camera with internet through Ethernet cable.
- Using a PC, download the browser MIPC and install it (www.mipcm.com).
- Sign up an account, log in and following tips to add the camera. After adding it successfully, please remove the Ethernet.
Conico 1080p Cloud IP Camera Troubleshooting
SD Card Issues
How to set up the camera to record videos?
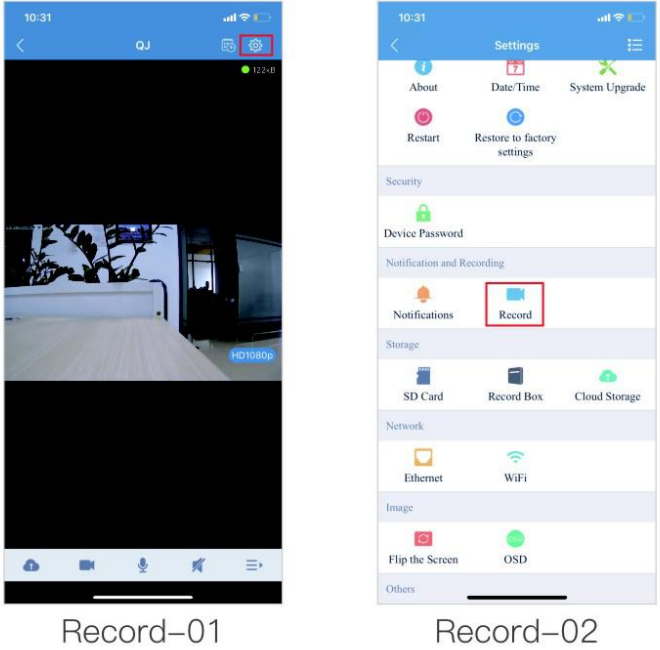
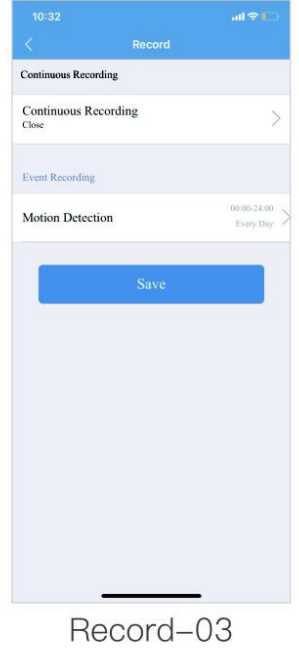
After inserting the micro SD card, please tap the camera you would like to record videos, Settings and Record (Record-01 & Record-02 & Record-03).
Note:
- Please save your file in other device before inserting the micro SD card in the camera. The micro SD card will be formatted automatically once you insert in the camera.
- Please remove the power adapter when you insert in / pull out the micro SD card, or it won't recognize the micro SD card.
- If you would like to download recorded videos, please install SDtool www.mipcm.com to help you download it.
Wi-Fi Connection Issues
- If you can't connect the camera with your home Wi-Fi successfully, please confirm the following things.
- Please confirm if your home Wi-Fi network is 2.4GHz.
- Please connect the phone with 2.4GHz Wi-Fi network before setting up the camera.
- If your home Wi-Fi is dual-band, please turn off 5GHz, and turn on 2.4GHz Wi-Fi network.
- If your camera is offiine, please follow these steps.
- Will the infrared light blink when you re-plug the power adapter?
- If yes, please go to 2).
- If not, the power adapter, cable or the camera may something wrong. Please change one of them to confirm the exact problem.
- Can you find your camera on Local Search (Account Settings-Local Search)?
- If not, please go to 3).
- If yes, the network between the app and server may something wrong. Please contact our customer support.
- Will the infrared light blink when you re-plug the power adapter?
- Does the camera go offline automatically or by other reasons, such as power outage, network outage?
- If not, please go to 4).
- If yes, the chip of the camera may be stuck. Please re-plug the power adapter, and wait for network stable, then check it again.
- Can the camera power on?
- If yes, please go to 5).
- If not, the camera may break, please contact our customer support.
- Can the camera work normally after connecting Ethernet cable?
- If not, the camera may break, please contact our customer support.
- If yes, the Wi-Fi network may be weak for this camera. Please cut off some of your smart device's network and retry it. If it still can't work normally, please contact our customer support.
App Issues
- There are spots on MIPC interface.
- Please wipe the camera lens.
- If it is still in it, please slap the lens from the side of the camera, then check if the spot moves.
- If it is still in it, please contact our customer support.
- If you receive tips like "Network Diagnostic", it means that your network is unstable. We recommend you to cut off some smart device's network or change other networks to test it again.
- If you receive a black screen, please check the sensor status (it will show "Malfunction"). If it shows "Malfunction", please contact our customer support with the screenshot of sensor status (Camera Settings-About).
- If you receive a screen showing "loading" and "OKB" on the top right corner, please check your Wi-Fi network if it is stable.
- If you the video is lagging, please cut off some smart device's Wi-Fi network, and move the camera closer to the router. Then, test it again.
- If you can't receive notifications, please confirm the following things.
- Please check if you accept the MIPC send notification to your phone.
- Please check if you turn on the "Sound" and "Vibration" on MIPC (Account Settings- Notification Center).
- If you choose the alarm type and enable the alarm on Notification (Camera Settings-Notification).
- If you can't receive notifications after logging out the MIPC, please contact our customer support.
Other Issues
- If there is noise when the camera is panning or tilting, there may be dust covering on it. Please clean it, then reset the camera to check again.
- If you can't hear the voice clearly from the app or camera side via two way audio, please turn up the phone and cameras' speaker, and keep your phone away from the camera more than 2 meters, then try it again.
- As for accessories broken issues, such as power adapter, power cable, wall mount, please contact our customer support directly.
Conico 1080p Cloud IP Camera Pros & Cons
Pros
- High-definition 1080p resolution for clear video
- Wide-angle lens for broader field of view
- Advanced night vision capabilities
- Two-way audio for real-time communication
- Cloud storage and microSD card slot for flexible storage options
- User-friendly Conico app for remote access and management
Cons
- Requires stable Wi-Fi connection for optimal performance
- No battery option; requires constant power source
- Some users may find the app interface slightly complex to navigate
Customer Reviews
The Conico 1080p Cloud IP Camera has received positive reviews from customers who appreciate its high-quality video, ease of setup, and robust features. Many users have praised the camera's night vision and two-way audio capabilities. However, some users have noted that the app can be a bit tricky to use at first.
Common complaints
Include occasional issues with Wi-Fi connectivity and the need for a constant power source.
Warranty
Products enjoys a warranty of 30-day free return and 90-day replace. Please return the item including all accessories that came with in the package if you are going to return this item.
Products within 90 days warranty with equipment performance problems, and no scratches in appearance, can be directly replaced new ones. After checking and testing by our company, faulty products which are under warranty will be replaced with the same type of products; Trouble-free products will return originally.
Faqs
How do I set up my IP Camera?
What is the resolution of the Conico?
Does the Camera support night vision?
Can I access my camera remotely?
What type of storage does the Conico offer?
Is the Cloud IP Camera weather-resistant?
Does the Cloud IP Camera support two-way audio?
How do I troubleshoot common issues with my Conico 1080p Cloud IP Camera?
What are some safety precautions I should take when using my Conico Camera?
How often should I update my IP software?
Leave a Comment
