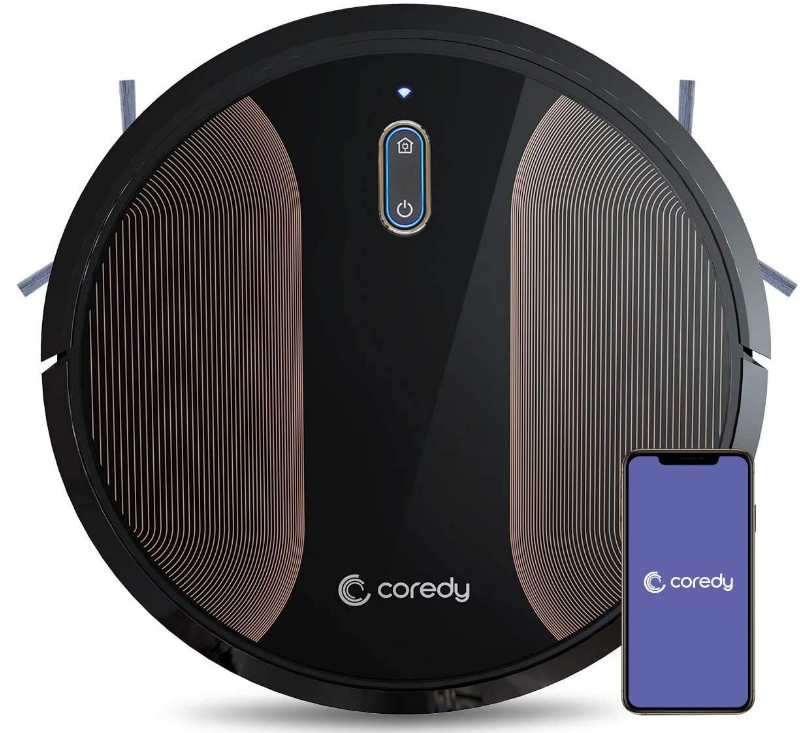
Coredy Robot Vacuum Cleaner R580 Owners Manual
Content
Introduction
To combat debris, dust, and pet hair on different types of floors, the R580 boasts powerful suction, sophisticated navigation technology, and many cleaning modes. It has Wi-Fi connectivity, so using the Coredy app or voice commands with Alexa or Google Assistant, it is simple to use. Its thin profile makes it possible to clean beneath furniture, and its long-lasting battery guarantees complete coverage. Regardless of your flooring type—carpets, hardwood, or tile—the Coredy R580 offers a practical and efficient solution to keep your house tidy.
Specifications
| Specification | Details |
|---|---|
Product Model 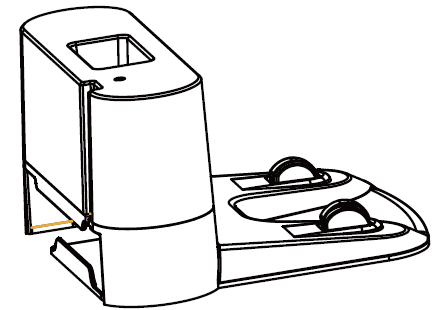 | R580 |
| Input | 19 V |
| Battery Voltage | DC 14.4 V |
| Power Consumption | 28 W |
| Battery Type | DC 14.4 V Li-ion 2600 mAh |
| Dust Collector Capacity | 0.5 L |
| Cleaning Time | Max. 120 mins |
| Charging Time | 300 - 360 mins |
Input 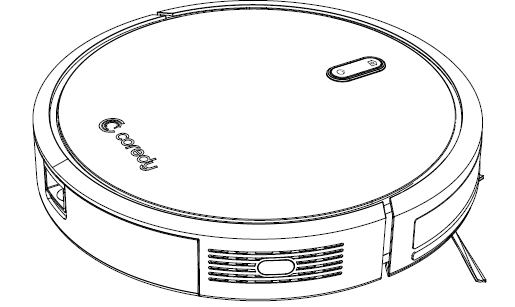 | 19 V |
| Output | 19 V |
Product Diagram
Robot
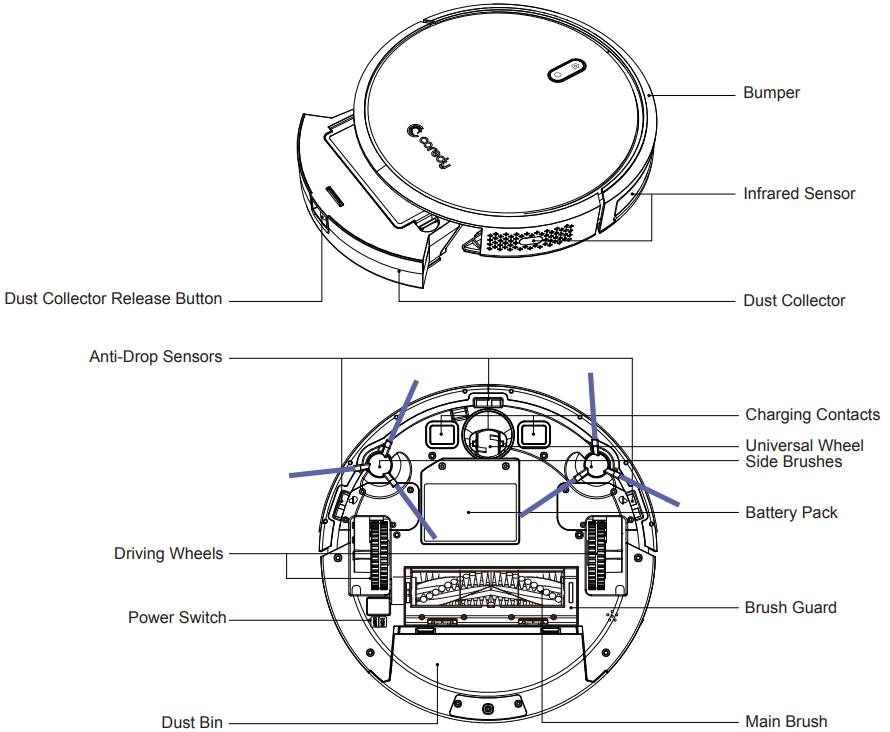
Accessories
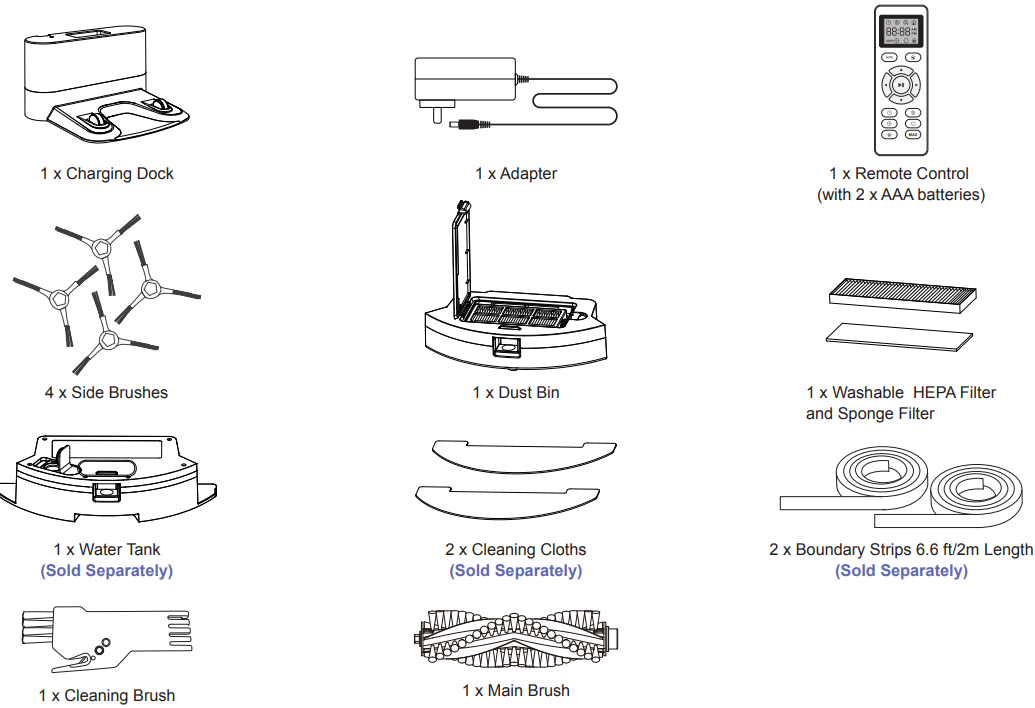
Charging Dock
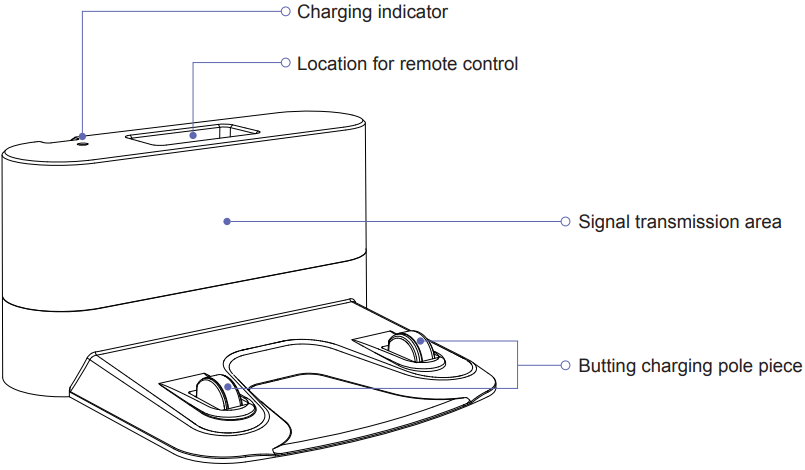
Remote Control
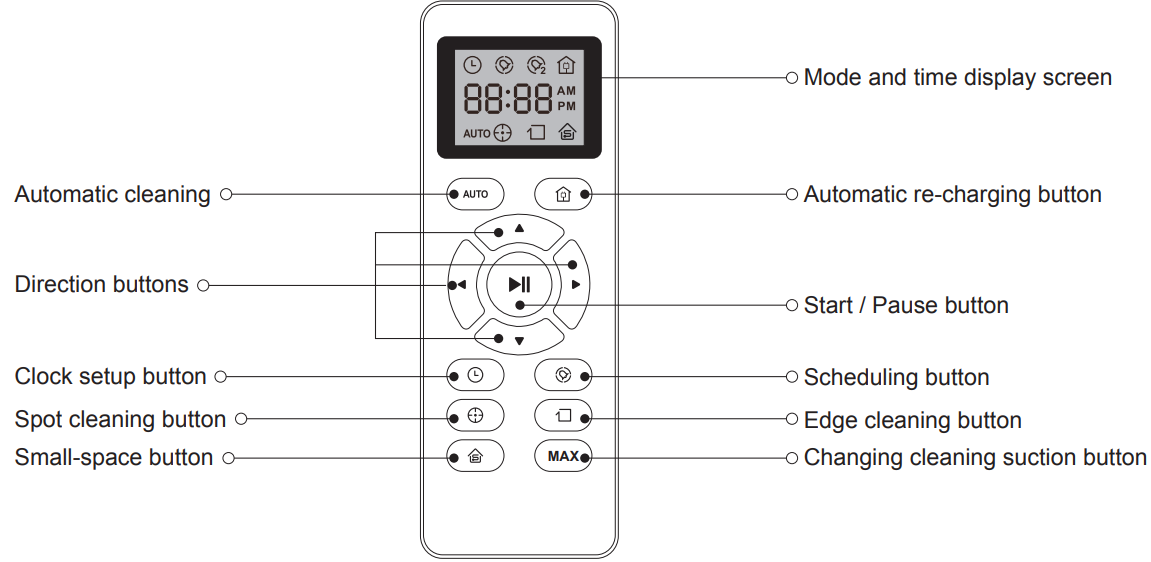
*Install 2 AAA batteries (included in the package) before using the remote control for the first time.
Description
A sleek and contemporary robot vacuum that is simple to operate and maintain is the Coredy R580. Its powerful suction allows it to effectively collect dust, debris, and pet hair, leaving your floors immaculate. With its sophisticated sensors, the vacuum can easily maneuver through your house, dodging stairwells and obstructions. With the Coredy app, which offers real-time monitoring and customization options, you can schedule and control the R580. You can also use voice commands to operate the vacuum by connecting it to Google Assistant and Amazon Alexa. The HEPA filter that comes with the R580 helps to clean the air in your house by capturing allergens. Its slender form makes it able to clean thoroughly in confined areas and nooks.
Operating and Programming
Notes Before Cleaning
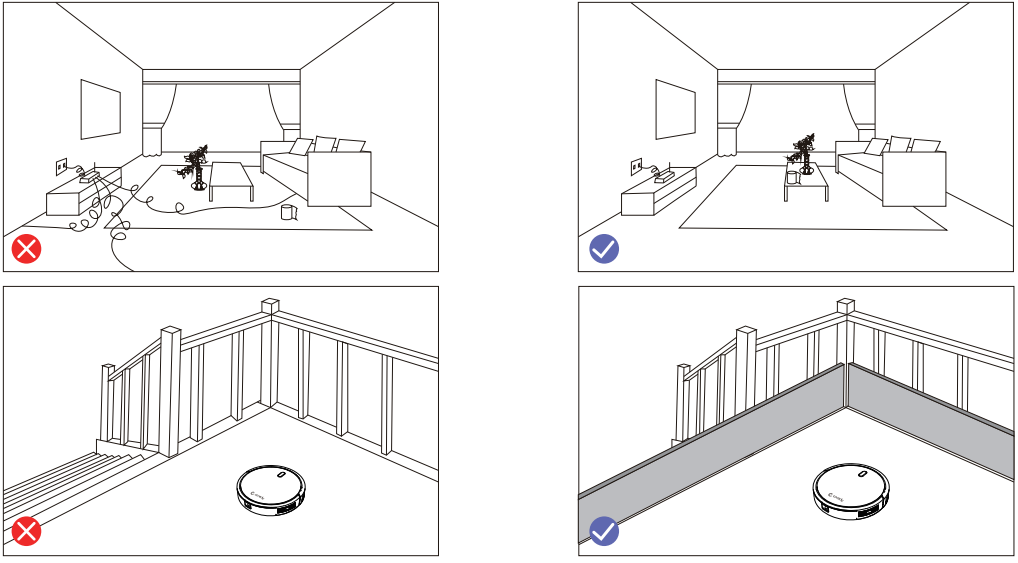
- Before using Robot, pick up objects like clothing, loose papers, pull cords for blinds or curtains, power cords, and any fragile objects. If the Robot passes over a power cord and drags it, there is a chance an object could be pulled off a table or shelf.
If the room to be cleaned contains a balcony, a physical barrier should be used to prevent access to the balcony and ensure safe operation.
Quick Start
Plug in the Charging
Dock and place the remaining wire into the trunking at the bottom of the Charging Dock.
Note: Failure to place the remaining wire into the trunking, may cause Robot to become stuck while charging or cleaning.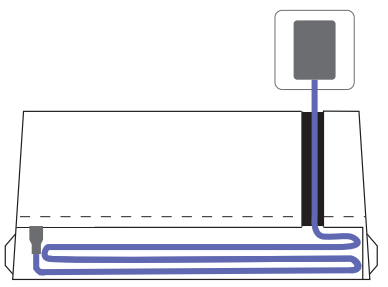
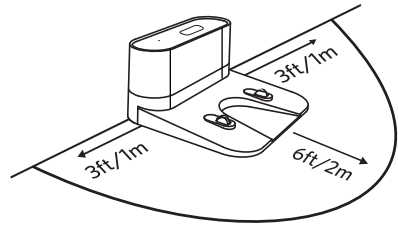
Place the Charging Dock on a hard level surface and against a wall.

- Charging Dock Position
- Place the Charging Dock against the wall and make sure it is in an open and uncluttered area leaving at least:
- 2 meters (6 feet) in the front of the Charging Dock.
1 meter (3 feet) on both sides of the Charging Dock.
- Place the Charging Dock against the wall and make sure it is in an open and uncluttered area leaving at least:
Install Side Brushes
Attach Side Brushes to the bottom of Coredy R580 by pressing a brush into each slot until it clicks.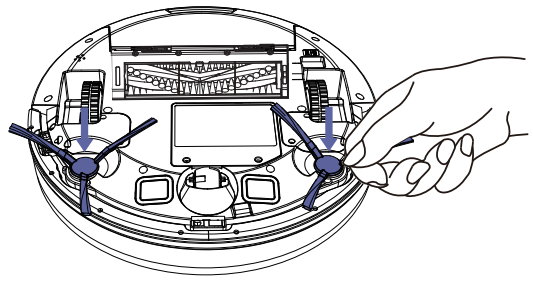
Activate the Robot
Place Coredy R580 onto the Charging Dock, making sure the metal charging contacts on the Charging Dock match up with those underneath the robot.
Note: For initial Use, Switch on the Power Button on the Bottom.
If successful, you will hear a series of tones. Once the Power button illuminates, Coredy R580 is ready for use.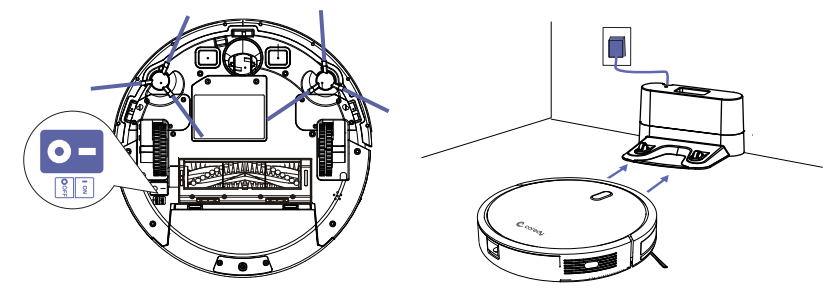
Start Cleaning Cycle
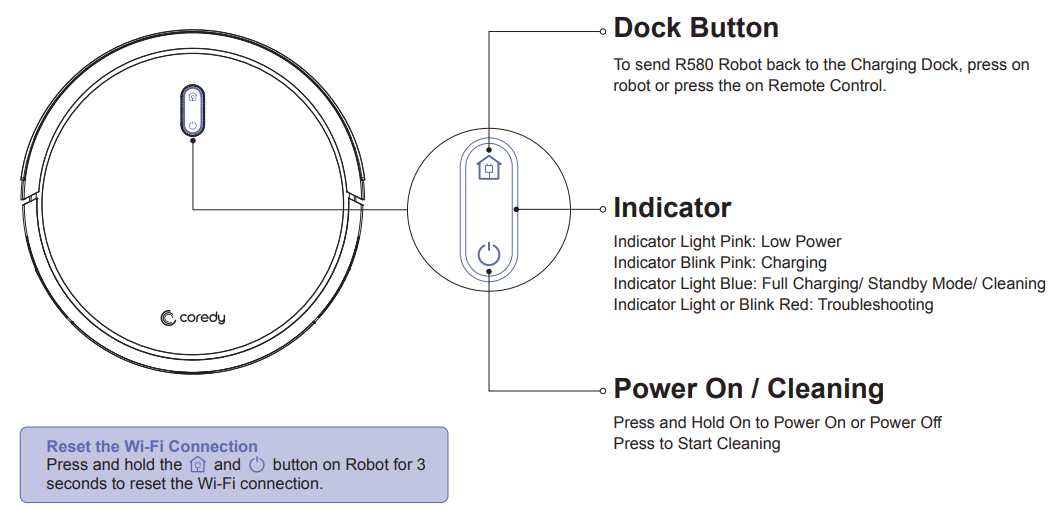
Press the button once to wake up the robot. Press the
  button again to start a cleaning cycle (
 or button on Remote Control). If its battery gets low before finishing a cleaning cycle, robot returns to the Charging Dock to recharge.
If the Charging Dock is inaccessible, Robot will not be able to recharge, please place the robot manually on Charging Dock for charging. (Refer Activate the Robot)
Note: Please refer to section 3.4 for more Cleaning Mode.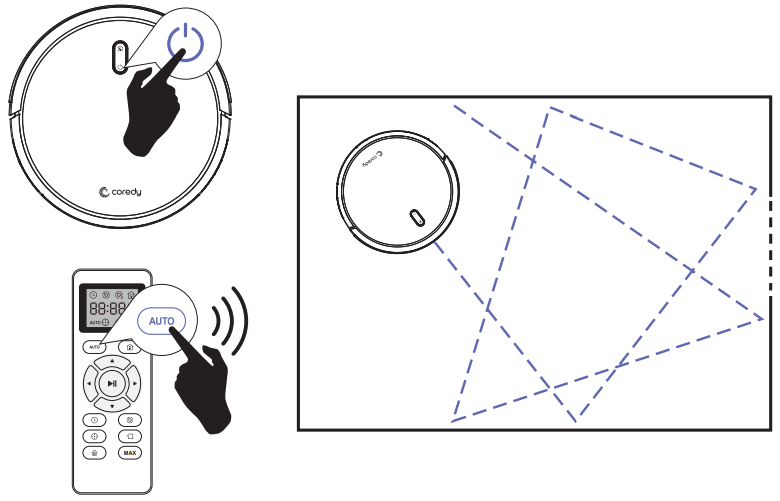
Pause
To pause the robot during a cleaning cycle press the button on robot or press the
 button on the Remote Control. To resume the cleaning cycle, press button
  again. To send robot back to the Charging Dock, press
 button.
Note: The actions listed above can also be managed from the Remote Control.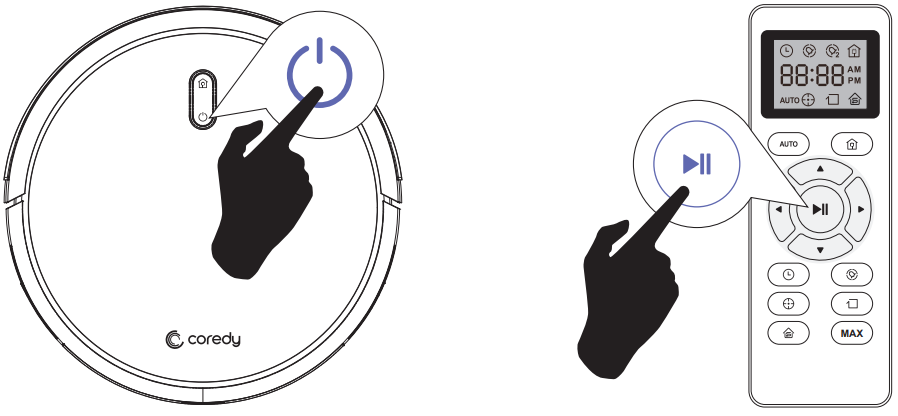
Reset
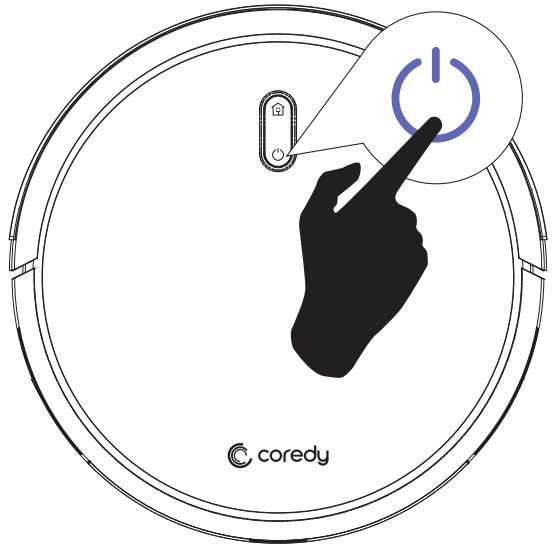
Press and hold the and
and button on Robot for 3 seconds to reset the Wi-Fi connection.
Control with the “Coredy Robot” APP
To enjoy all available features, it is recommended to control your Robot via the Coredy Robot app.
Scan the QR code as below to download the latest version of APP or download from the App Store (iOS devices) or Google Play (Android devices).

Before you start, make sure that
Your smartphone or tablet is connected to a Wi-Fi network ( Only support 2.4GHz network).
Your smartphone or tablet is running iOS 8.0 (or above) or Android 4.4 (or above).
The Wi-Fi status light on Robot is rapidly flashing green.
Robot is attached to the Charging Base to ensure it has enough power during setup.
Create a user account
Open the app and create a user account.
Agree the “privacy Policy”
Create your account with the mobile phone number or E-mail ID.
Enter verification code.

Set your password with 6-20 characters.

Add Device
Press “Add Device”
Add a Robot to your Coredy account.

Wifi Connection
Turn on the main power switch on the bottom of Robot, Make sure the Wi-Fi indicator light on Robot is flashing rapidly, then Press the “Next”.

Select the network you want Robot to use. You need to select an exact Wi-Fi as your usually using network. If no Wi-Fi network list for you choosing, check and set your phone Wi-Fi setting first, then press “Change Network” to connect and choose the exact network you need. Enter Wi-Fi password, press “Confirm” to connect.
- Waiting for the connecting until “100%”.
- Device added successfully, then press“Done”.
Wait 1-2 seconds, Coredy R580 is on standby.

Coredy APP Control
Follow the instructions in the app to set up the Wi-Fi connection.
After connecting successfully, you can control Robot via the app.
With the app, you can select a cleaning mode, set the time, schedule a cleaning, view the system status, receive notifications and access additional features.
Note: If you have any problems during the Wi-Fi setup process, refer to the “Troubleshooting > Wi-Fi connection” section in APP. If Robot gets stuck in any space, tap “Find me” in the app to find the machine.
Reset the Wi-Fi Connection
Press and hold the “AUTO”
 button + “
 HOME” button simultaneously on Robot for 5 seconds to reset the Wi-Fi connection.
If Wi-Fi connection reset successfully, 2 “beep” will sound and Wi-Fi status light will flash green rapidly. Then you can follow the Wi-Fi instructions in the Coredy Robot app to set up the Wi-Fi connection.

Using Amazon Alexa
Follow the instructions to control your Coredy devices with Amazon Alexa. If you run into any difficulties during the process, please scroll down to the bottom for
Troubleshooting
Before you start, make sure that
Your Coredy Devices are connected with the Coredy Robot app.
You have an Alexa-enabled device (i.e. Amazon Echo, Echo Dot and Amazon Tap).
The Amazon Alexa app is installed on your smart device and you have created an account.
To control Coredy devices with Amazon Alexa:
For Robot only, do the following steps:
Open the Alexa app and select “Skills & Game” from the
 menu.
menu.On the Skills screen, search for
 “SmartLife”.
Select your SmartLife skill, then press “Enable”.
Login with your Coredy Robot account so Alexa can control your Coredy devices.
Using “SmartLife” skill (for Robot only)
You do not need to discover your device as you can control the Robot with your voice.
Say simple commands to Alexa. Examples“Alexa, turn on Coredy R580"”
“Alexa, turn off Coredy R580"”
If you add two or more Robot devices to Coredy Robot App, you can edit name for each Coredy robot on Coredy App or Alexa, they’re Synchronous. After named, giving a command by using your robot name. Examples, named “Robot 1”
“Alexa, turn on Coredy R580"”
“Alexa, turn off Coredy R580"”
Using Google Assistant
These instructions will help enable you to control your Coredy devices with Google Assistant.
Before you start, please make sure that
Your Coredy Devices are connected with the Coredy Robot app.
You have a Google Assistant enabled device (i.e. Google Home).
The Google Home app is already installed on your smart device, and you have created an account.
To control Coredy devices with Google Assistant. For Robot only, do the following steps
Open the Google Home app.
Say “OK Google, talk to Robot” to the Google Assistant-enabled device (i.e. Google Home) to initiate the Google action for Robot.
Follow the instructions in the Google Home app to authorize Google Assistant with your Coredy Robot account.
To control Robot with your voice, say simple commands to Google Assistant:
“OK Google, turn on Coredy R580”
“OK Google, turn off Coredy R580”
“OK Google, find Coredy R580”
“OK Google, go home Coredy R580”
If you add two or more Robot devices to Coredy Robot App, you can edit name for each Coredy robot on Coredy App or Alexa, they’re Synchronous. After named, giving a command by using your robot name. Examples, named “Robot 2”:
“OK Google, turn on Robot 2”
“OK Google, turn off Robot 2”
“OK Google, find Robot 2”
“OK Google, go home Robot 2”
Setup Guide
Setting up the Coredy R580 is straightforward:
- Charge the vacuum for 4-5 hours before the first use.
- Download the Coredy app and create an account.
- Connect the vacuum to your home Wi-Fi network using the app.
- Place the vacuum in the area you want to clean and press the power button.
- Use the app to select the cleaning mode and schedule the vacuum as needed.
Regular Robot Care
To keep robot running at peak performance, perform the following care procedures. If you notice robot picks up less debris from your floor, then empty the bin, clean the filter and clean the rolling brush.
Robot Part | Care Frequency | Replacement Frequency |
Filter | Once per week (twice per week in homes with pets) |
Every 2-3 Months |
Side Brush | Once per week (twice per week in homes with pets) |
Every 2-3 months (or when visibly worn) |
Rolling Brush | Once per week (twice per week in homes with pets) |
Every 3-6 months |
Brush Guard |
Once per month |
Every 3-6 months |
Mopping Cloth (sold separately) |
After each use |
Every 3-6 months (or when visibly worn) |
Dust Bin |
After each use |
Every 12 months |
Water Tank (sold separately) |
After each use |
Every 12 months |
Cliff Sensors Charging Contacts Floor Tracking Sensor Front Driving Wheel Unversal Wheel |
Once per month |
|
Note: Coredy manufactures various replacement parts and assemblies. If you think you need a replacement part, please contact Coredy Customer Care for more information.
Emptying Robot’s Bin and Cleaning Robot’s Filter
- Press dust bin release button to remove it.
- Open dust bin door to empty it.
- Remove filter by grasping the white tab.
Shake off debris by tapping the filter against your trash container.

Battery and Charging Information
Lithium Ion Battery
Important: Lithium ion batteries and products that contain lithium ion batteries are subject to stringent transportation regulations.
If you need to ship this product (with the battery included) for service, travel or any other reason, you MUST comply with the following shipping instructions:
- Remove the lithium ion battery from the product
- Place a piece of tape over the battery’s metal charging contacts
- Reinstall the battery (with the tape on it) in the product and secure the battery door
- Package the product in its original packaging or in your own packaging that prevents any movement during transportation Ship via ground transportation only (no air shipping)
Battery Charging
To extend battery life, always keep robot charged on the Home Base when not in use.
Battery Storage
If storing robot off of the Charging Dock, remove the battery first. Then store robot and the battery in a cool, dry place.
Battery Disposal
Contact your local waste management authority for battery recycling and disposal regulations in your area.
Battery Replacement
You can visit Coredy’s website http://shop.coredy.com to purchase the battery or other accessories for the robot.
Battery Removal
Follow these instructions to remove and reinstall robot’s battery:
Unscrew the door and the two screws on the battery door, then remove.
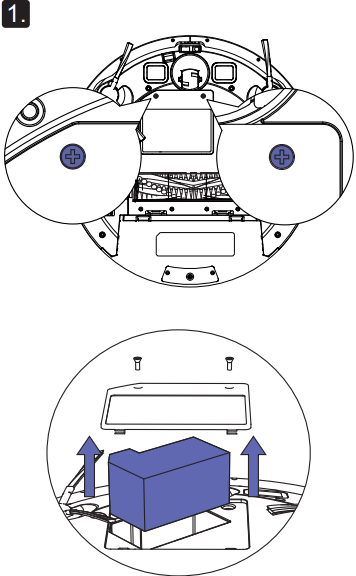
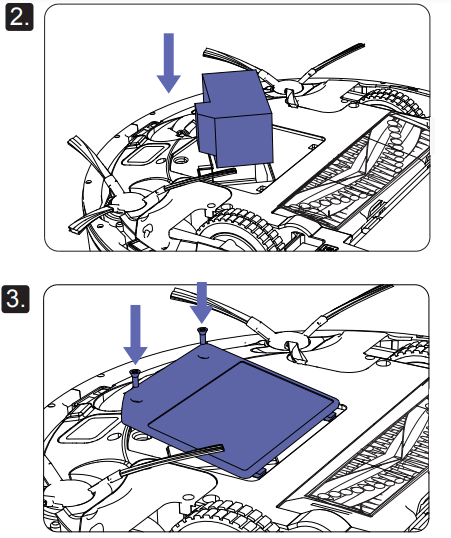
- Reinstall the battery with the battery label and tabs facing up.
Reinstall the battery door and the two screws. Take care not to pinch the side brush in the battery door when re-installing the battery.
Troubleshooting
Robot will tell you something is wrong with a two-tone distress sound followed by message. The indicator to the chart as below to resolve Robot’s problem. If the problem is not resolved, please contact our COST FREE customer service team for more assistance.
Rebooting Instructions
For some errors, rebooting Robot may resolve the problem. To reboot Robot, press the power button on the bottom on Robot, you will hear an audible tone signifying a successful reboot.
Indicator Lighting Red
| Robot Blinks and Says | Likely Cause | What to Do |
|---|---|---|
| Indicator Lighting Red | ||
| One beep | Robot's front driving wheel is stuck. | Clean the front driving wheel, then press the power button to restart the robot. |
| Two beeps | Robot's side brush is stuck. | Clean the side brush, then press the power button to restart the robot. |
| Three beeps | Robot's vacuum fan is stuck or its filter is clogged. | Remove and empty robot's dust bin. Clean robot's filter, then briskly tap the bin to loosen any remaining trapped debris. Make sure the vacuum inlet is not blocked by any hair or debris. |
| Four beeps | Robot's main rolling brush is stuck. | Remove and clean the main rolling brush and brush guard, then press the power button to restart the robot. |
Indicator Flashing Red
| Robot Blinks and Says | Likely Cause | What to Do |
|---|---|---|
| Indicator Flashing Red | ||
| Two beeps | Robot's bumper is stuck. | Tap robot's bumper several times to dislodge any debris that might be trapped underneath. Press robot's bumper 5-10 times to ensure bumper contracts freely. |
| Three beeps | Robot's cliff sensors are dirty. Robot is hanging over a drop, or it is stuck on a dark surface. | Clean robot's cliff sensors gently with a dry cloth. Start cleaning in a new location if robot is hanging over a drop, or on a dark surface. Use boundary strip or a physical barrier to block off the problem area. |
| Four beeps | Robot's battery power level is too low. Robot cannot return to its charging dock. | Manually take the robot on the charging dock to charge. Ensure there are no obstacles in front of the charging dock or starting position, wipe the charging contacts on both of the charging dock and robot with a clean, dry cloth. |
Pros & Cons
Pros
- High suction power
- Long battery life
- Smart app control and scheduling
- Compatible with Amazon Alexa and Google Assistant
- HEPA filter
- Slim design
Cons
- May have difficulty with high-pile carpets
- May not pick up larger debris
Customer Reviews
Customers have given the Coredy R580 positive reviews, praising its efficient cleaning, long battery life, and smart app control. Some have noted that it may have difficulty with high-pile carpets and may not pick up larger debris. However, overall, customers are satisfied with the vacuum's performance and value for money.
Faqs
What are the Coredy R580's primary features?
How do I set up my Coredy Robot Vacuum Cleaner R580 to connect to WiFi?
Is it possible to use my smartphone to manage the Coredy R580?
After a full charge, how long does the battery last?
How much time does the Coredy R580 take to charge completely?
If the R580 is not effectively gathering up dirt, what should I do?
How can I maintain the Coredy Robot Vacuum Cleaner R580 filters?
Could the Coredy clean more than one room?
How can I configure the R580's virtual boundaries?
What is the warranty on the Coredy?
Leave a Comment
