How to Assemble: Creality Ender 5 Pro Printer User Manual
Content
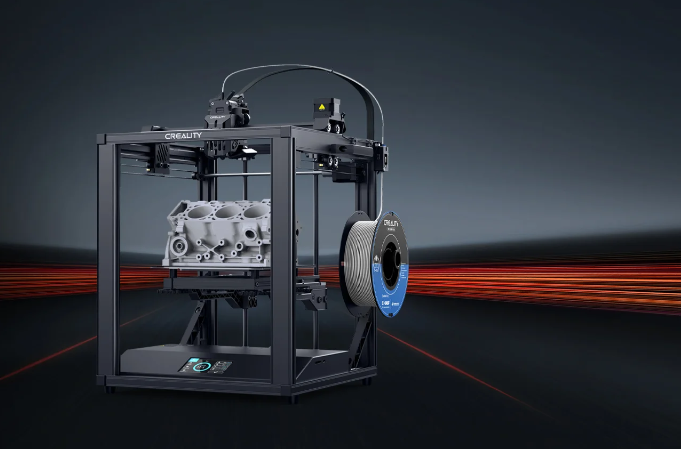
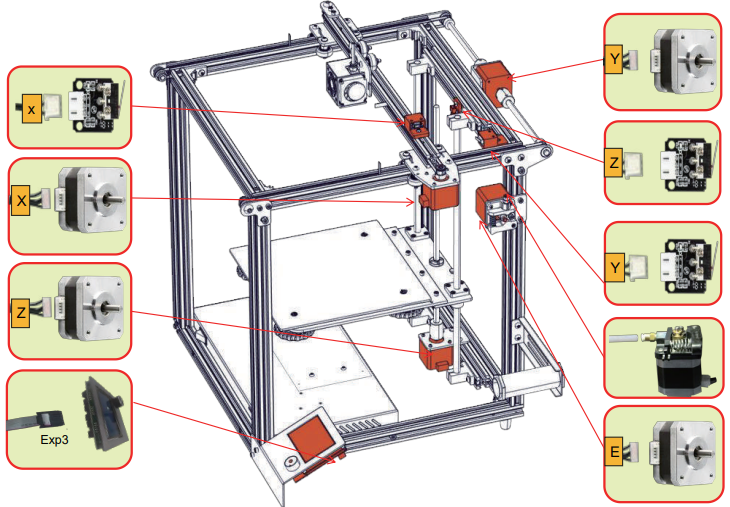
Introduction of Creality Ender 5 Pro Printer


Hot Bed
Levelling screw
Power supply
Switch
SD Slot and USB Port
Display
Z Stepper
Foot pad
Spool Holder
. Extrusion mechanism
X Stepper
Nozzle Assembly
Y Stepper
Z Limit Switch
Y Limit Switch
X Limit Switch
General List

Creality Ender 5 Pro Printer Tool List
| No. | Image | Name | Qty |
| 1 |  | Wrench & Screw driver | 1set |
| 2 |  | TF Card & Reader | 1set |
| 3 |  | Spatula | 1 |
| 4 |  | Pliers | 1 |
| 5 |  | 0.4mm Nozzle Cleaner | 1 |
| 6 |  | Power Cable | 1 |
| 7 |  | Filament(200)g | 1 |
| 8 |  | Spare Parts | 1set |

Specifications of Creality Ender 5 Pro Printer
The Creality Ender 5 Pro Printer is a high-performance 3D printer with a build volume of 220 x 220 x 300mm. It features a direct drive extruder, a heated print bed, and a Bowden tube system for efficient and reliable printing. The printer has a maximum nozzle temperature of 255°C and a maximum bed temperature of 110°C, making it suitable for printing with a wide range of materials. It also has a print speed of up to 180mm/s and a layer resolution of 0.1-0.4mm, allowing for detailed and accurate prints.
Assembly Step
.png)
Place the profile hole of the side upon, install the profile, but not mess with the direction.
.png)
.png)
.png)
.png)
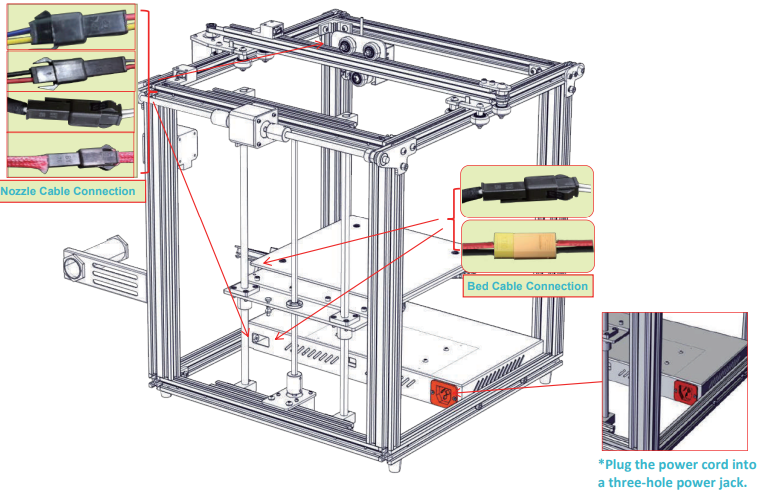
Cable Connection
Screen Information
Information Displayed

| Menu | Sub Menu | Explanation |
|---|---|---|
| Info Screen | ↑ main↑ | Return |
| Disable Steppers | Moving X Y Z axis by hand | |
| Auto Home | Return to the origin | |
| Preheat PLA | - | |
| Preheat ABS | - | |
| Prepare→ | Cooldown | Close and cool down the nozzle |
| Move Axis→ | Moving X Y Z axis or Extruder by given value | |
| Control→ | Temperature→ | Heat the nozzle and bed, or change fan speed by given value |
| Restore Failsafe | Restore factory setting | |
| No Card | - | Select the printing model |
| Print from SD | - | - |
| Init. SD-Card | - | - |
| Change SD-Card | - | - |
| Printing | - | - |
| Tune→ | Speed | Change printing speed by given value |
| Nozzle | Change the temperature by given value | |
| Bed | Change the temperature by given value | |
| Fan Speed | Change fan speed by given value | |
| Flow | Change filament flow by given value | |
| Pause Print | - | - |
| Stop Print | - | - |
Loading Filament
Preheat

Feeding
Press and hold the extruder lever then insert 1.75mm filament through the small hole of the extruder. Continue feeding until you see filament come out the nozzle.
Tip: How to Replace the Filament?
Cutting filament near the Extruder and slowly feed new filament until they are fed into the new filament.

Preheating the nozzle and withdraw the filament quickly and feed the new filament.

Bed Levelling

Prepare →Auto Home. Wait for the nozzle to move to the left/front of the platform.

Prepare →Disable Steppers(Close stepper drive, release motor)


Move the nozzle the front/left leveling screw and adjust the platform height by turning the knob underneath. Use a piece of A4 paper (standard printer paper) to assist with the adjustment, making sure that the nozzle lightly scratches the paper.
Complete the adjustment of the screw on all 4 corners.
Repeat above steps 1-2 times if necessary.

Software Installation
Double click to install the software.
Double click to open the software.
Select language →Next →Select your machine → Next → Finish.

Preparing to Print
.Slicing
Insert TF card into computer with Reader.
Open the software → Load → Select the file → Wait for slicing to finish ,and save the gcode file to TF card.
Printing

Insert the TF card → Select Print from TF →Select the file.
Troubleshooting

Service
The printer can be returned within seven days, 15 days replacement, one year warranty, lifetime maintenance.
Replacement requirement
The appearance of the product is intact, without damage, scratches, smudges, cracks, deformation, etc.;
Machine parts, tools and others are complete;
Provide a complete and valid purchase invoice and warranty, product number should be the same.
Warranty
This Warranty period is 3 months, if it is damage after the warranty expires, you need to purchase another one. Motherboard, LCD display, power supply, hot bed, warranty period is 12 months, if there are quality problems, you can get free maintenance; over the warranty period, can be sent back to the original factory maintenance, the users need to bear the return shipping and maintenance costs
Description
The Creality Ender 5 Pro Printer is a versatile and easy-to-use 3D printer that is perfect for both beginners and experienced users. Its direct drive extruder ensures consistent and accurate extrusion, while its heated print bed provides excellent adhesion and warp prevention. The printer's Bowden tube system allows for fast and efficient printing, and its open frame design makes it easy to access and monitor the print process. The Ender 5 Pro also features a touchscreen display and a resuming print function, allowing for easy operation and recovery in case of power outages.
Creality Ender 5 Pro Printer Setup Guide
- Remove the printer from its packaging and assemble the frame according to the instructions provided.
- Install the extruder and heated print bed, and run the calibration procedure to ensure that the printer is properly calibrated.
- Connect the printer to your computer via USB or Wi-Fi and install the necessary software.
- Load the filament into the extruder and level the print bed.
- Select a print file and send it to the printer.
Notes
Do not use the printer any way other than described herein in order to avoid personal injury or property damage.
Do not place the printer near any heat source or flammable or explosive objects. We suggest placing it in a well-ventilated, low-dust environment.
Do not expose the printer to violent vibration or any unstable environment, as this may cause poor print quality.
Before using experimental or exotic filaments, we suggest using standard filaments such as ABS or PLA to calibrate and test the machine.
Do not use any other power cable except the one supplied. Always use a grounded three-prong power outlet.
Do not touch the nozzle or printing surface during operation as they may be hot. Keep hands away from machine while in use to avoid burns or personal injury.
Do not wear gloves or loose clothing when operating the printer. Such cloths may become tangled in the printers moving parts leading to burns, possible bodily injury, or printer damage.
When cleaning debris from the printer hot end, always use the provided tools. Do not touch the nozzle directly when heated. This can cause personal injury.
Clean the printer frequently. Always turn the power off when cleaning, and wipe with a dry cloth to remove dust, adhered printing plastics or any other material off the frame, guide rails, or wheels . Use glass cleaner or isopropyl alcohol to clean the print surface before every print for consistent results.
Children under 10 years of age should not use the printer without supervision.
Pros & Cons
Pros
- High-performance 3D printer with a large build volume
- Direct drive extruder for consistent and accurate extrusion
- Heated print bed for excellent adhesion and warp prevention
- Bowden tube system for fast and efficient printing
- Touchscreen display and resuming print function
Cons
- Assembly is required, which may be challenging for some users
- The open frame design may not be as sturdy as some other 3D printers
Customer Reviews about Creality Ender 5 Pro Printer
"The Ender 5 Pro is a great 3D printer. It's easy to assemble and use, and the print quality is excellent. I've been able to print a wide variety of objects with no issues." "I was a little intimidated by the assembly process, but the instructions were clear and easy to follow. The printer has been working great ever since." "I've had some issues with warping on other 3D printers, but the heated print bed on the Ender 5 Pro has completely eliminated that problem. I'm very happy with this printer."
Faqs
What upgrades does the Ender 5 Pro have compared to the Ender 5?
Is the printer capable of resuming prints after a power outage?
How quiet is the Creality Ender 5 Pro during operation?
Is assembly required for the Creality Ender 5 Pro Printer?
Does the Creality Ender 5 Pro Printer require a heated bed for better adhesion?
How do I level the bed on the Creality Ender 5 Pro?
Can the Ender 5 Pro Printer print via SD card or USB?
Does the Creality Ender 5 Pro Printer have a touchscreen display?
Does the Creality Ender 5 Pro Printer have a resuming print function?
Is there a warranty on the Creality Ender 5 Pro?
Leave a Comment