Crownful Air Fryer TXG-KK-DT10L-D-W User Manual
Content
Introduction
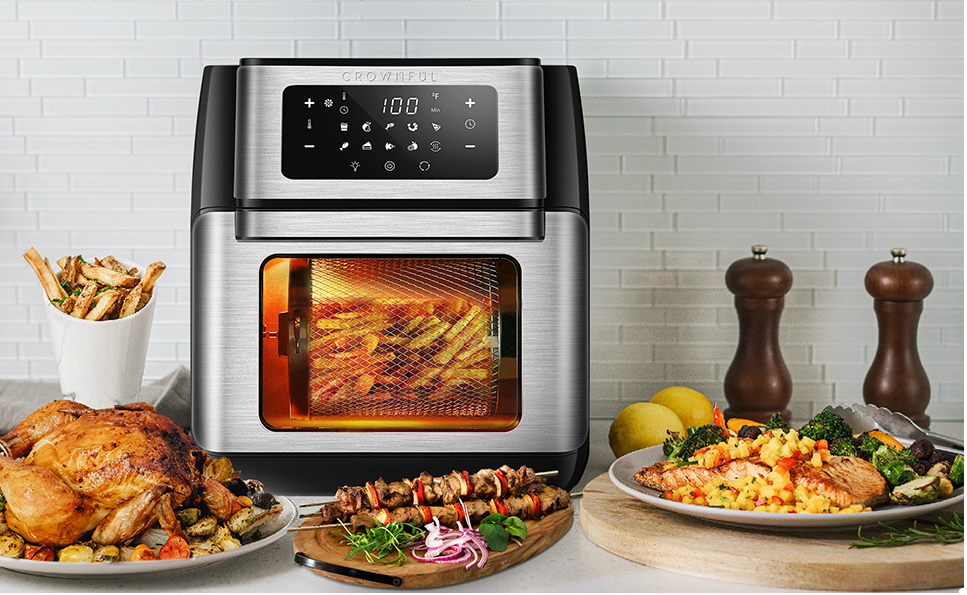
The Crownful Air Fryer TXG-KK-DT10L-D-W is a multifunctional kitchen appliance designed to simplify cooking while promoting healthier eating habits. With a generous 10.6-quart capacity, this air fryer can bake, fry, roast, dehydrate, and more, all while using little to no oil. Its user-friendly digital touch screen allows for easy temperature and time adjustments. Priced at approximately $129.99, it offers an efficient solution for preparing delicious meals with convenience and versatility.
IMPORTANT SAFETY INSTRUCTIONS
When using your electrical appliances, basic safety precautions should always be followed to reduce the risk of fire, electric hazard and injury to persons, including the following.
DANGER
- This appliance is not intended for use by persons (including children below 8 years old) with reduced physical, sensory or mental capabilities, or lack of experience and knowledge, unless they have been given supervision or instruction concerning the use of appliance by a person responsible for their safety.
- Check if the voltage indicated on the appliance corresponds to the local mains voltage before you connect the appliance.
- Do not use the appliance if the plug or the mains cord or the appliance itself is damaged.
- Never immerse the housing (which contains electrical components and the heating elements) in water nor rinse under tap water.
- Do not let any water or other liquid get into the appliance to prevent electric shock.
- Always use the pan or cooking accessories with the ingredients to avoid the food from getting in direct contact of the heater/heating elements
- Do not cover the air inlet and the air outlet while the appliance is operating.
- Do not fill the pan with oil as this may cause a fire hazard.
- While working, the internal temperature of the unit reaches several hundred degrees Fahrenheit. TO AVOID PERSONAL INJURY, never place your hands inside the unit unless it is thoroughly cooled down.
- Children should be supervised to ensure that they do not play with the appliance. Cleaning and user maintenance shall not be made by children unless they are older than 8 and if supervised.
- Keep the mains cord away from hot surfaces.
- Do not place the appliance on or near combustible materials such as a tablecloth or curtain.
- Do not place the appliance against a wall or against other appliances. Leave at least 10cm / 3.9in free space on the back and sides and 10cm / 3.9in free space above the appliance. Do not place anything on top of the appliance.
- Do not use the appliance for any other purpose than described in this manual.
The accessible surfaces may become hot during use.
- During hot air frying, hot steam is released through the air outlet openings. Keep your hands and face at a safe distance from the steam and from the air outlet openings. Also be careful of hot steam and air when you remove the pan from the appliance.
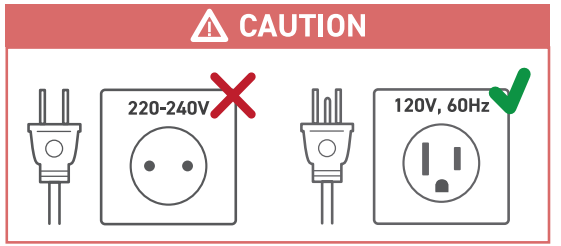
- Do not use with a 220-240V outlet.
- After using the appliance, the metal cover inside is very hot, avoid contact with it after cooking.
- Immediately unplug the appliance if you see dark smoke coming out of the appliance. Wait for the smoke emission to stop before you remove the pan from the appliance.
- When reaches the set timer, cooking will stop but the fan WILL CONTINUE RUNNING for 20 seconds to cool down the Unit.
NOTE: If the WiFi indicator turns red, Unplug the power plug and wait for 30 seconds, then plug in to power on again.
SAVE THESE INSTRUCTIONS
Package Contents
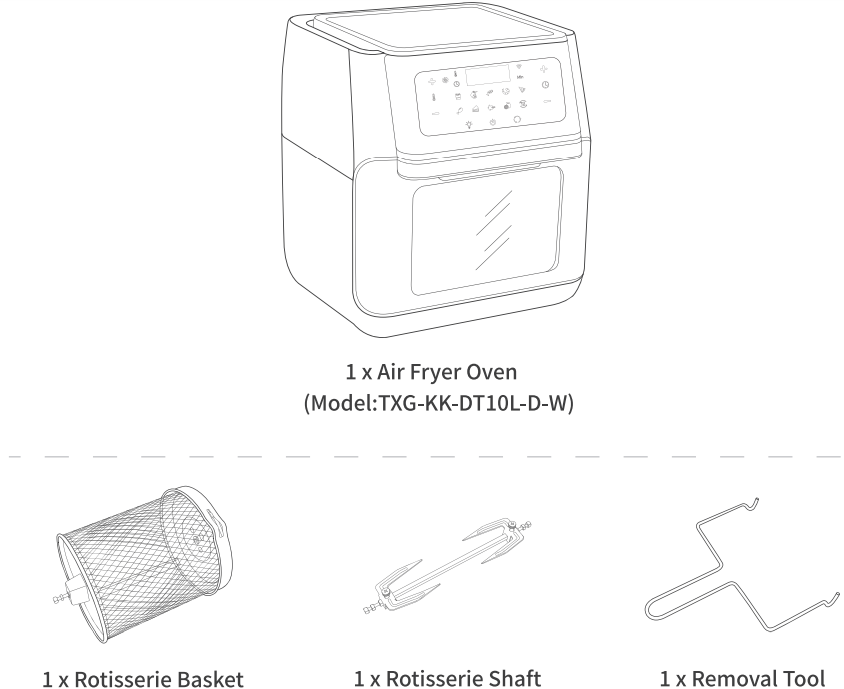
NOTE: You can use the removal tool to remove rotisserie basket and rotisserie shaft to avoid burns.

NOTE: You can use the clip to remove mesh racks and drip tray to avoid burns.
KNOW YOUR AIR FRYER OVEN
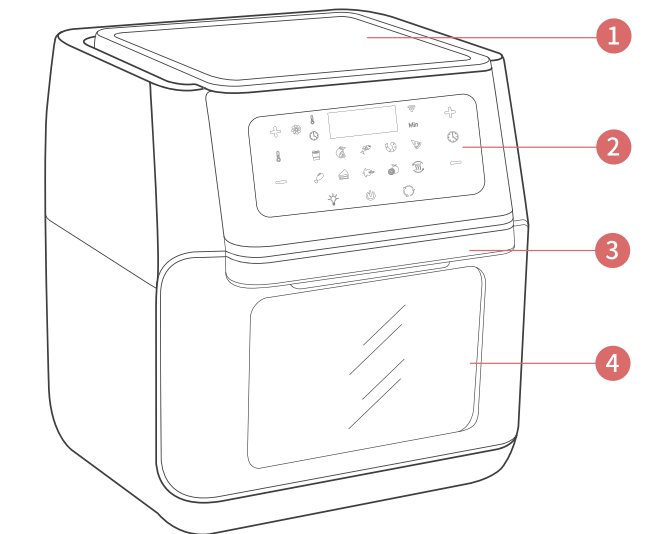
- Top Lid
- Control panel
- Handle
Window
- Switch
- Lock
- Rails
Sliding Chute
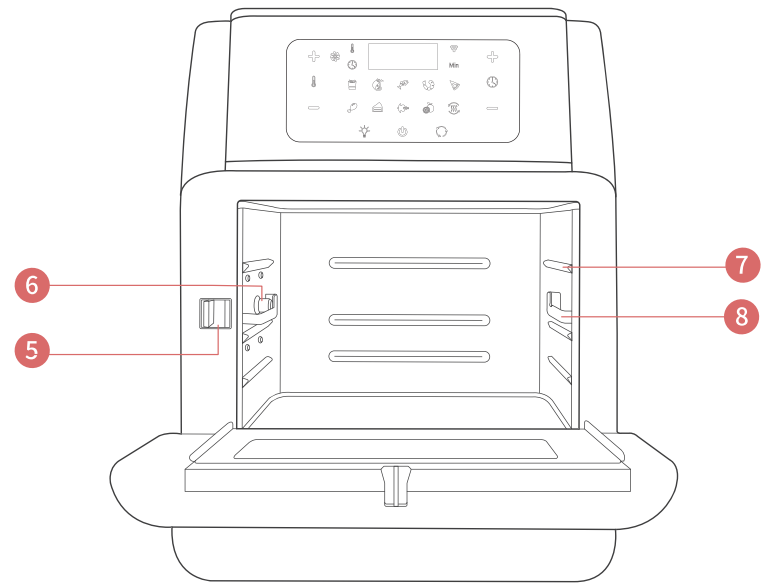
SPECIFICATIONS
Model NO.: | TXG-KK-DTl0L-D-W |
Supply Power: | 120V 60Hz |
Rated Power: | 1500W |
Capacity: | 10.6Quart/10L |
Temperature Range: | 180°F - 400°F (90°F - 180°F under Dehydration mode) |
Time Range: | 1- 90 mins (1 H - 24H under Dehydration mode) |
BEFORE FIRST USE
SETTING UP
- Take out the oven from the box and remove all the packaging.
- Place it on a stable, level, heat-resistant surface, away from anything that can be damaged by heat.
- Wash all the accessories and clean the oven's interior. Dry and put the accessories back in oven.
- Place the air fryer on a stable, level, heat-resistant surface. Keep away from areas that can be damaged by steam (such as walls or cupboards).
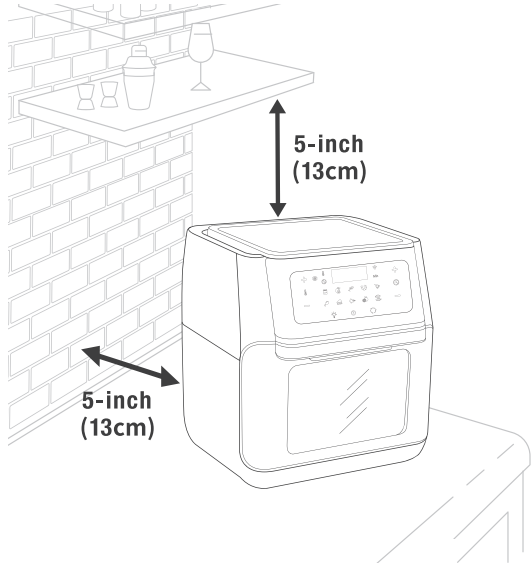
NOTE: Leave 5 inches / 13cm of space behind and above the air fryer. Leave enough room to remove the basket.
CROWNFUL APP SETUP
DOWNLOADING THE FREE MOBILE APP
To download the CROWNFUL App, please scan the QR code or search for "CROWNFUL" in Apple App Store (iOS) or Google Play Store(And roid) .
- For Android users, choose "Allow" to use CROWNFUL. It won't be used to record personal and private information.
- The CROWNFUL App is continually being improved and may change over time. If there are any differences, follow the in-a pp instructions.
- Follow the instructions to finish setting up your air fryer.
- All smart air fryer functions can be controlled remotely, except for starting cooking (to comply with UL safety regulations). It needs to be started cooking manually on the air fryer.
- CREATE/LOGIN YOUR OWN CROWNFUL ACCOUNT
Open the CROWNFUL a pp. If you already have an account tap login.
NOTE: You must create your own CROWNFUL account to use third-party services and products. These will not work with a guest account. With a CROWNFUL account, you can also allow your family and friends to control your smart air fryer. PAIRING WITH CROWNFUL APP
Turn on Bluetootht
 and WiFi '
 ' on your phone.
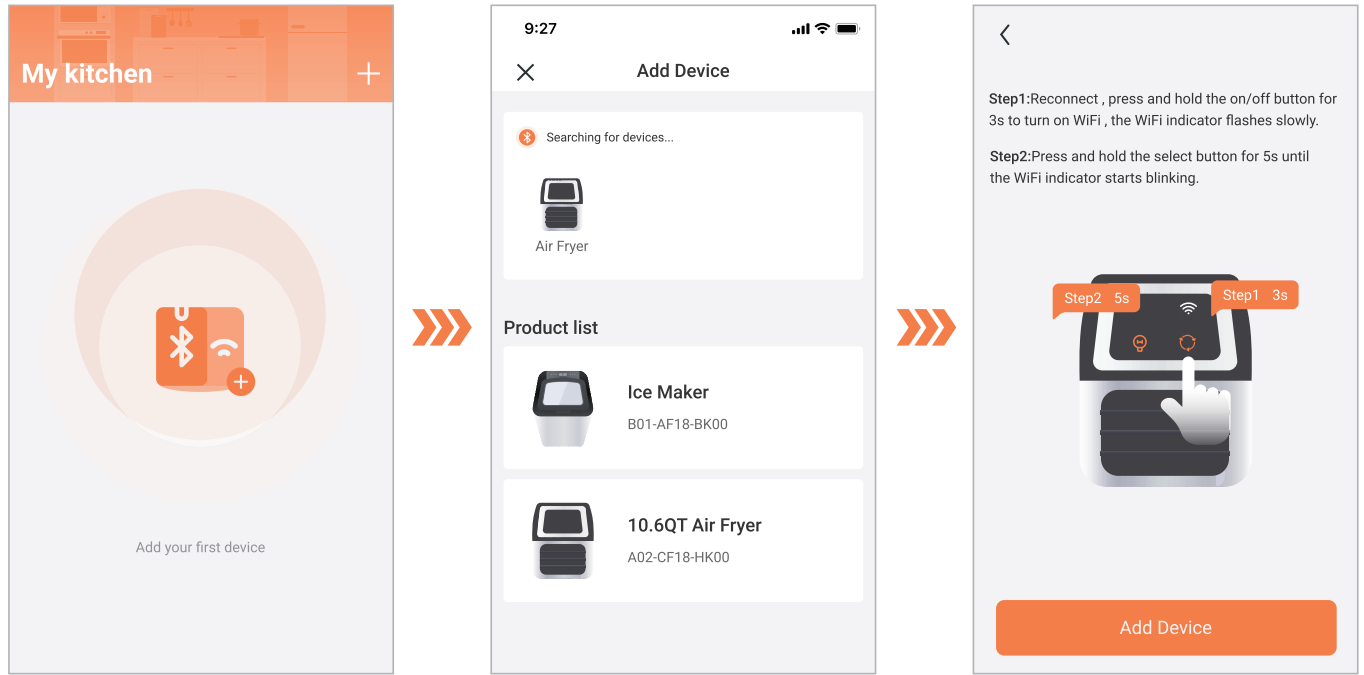
- Press and hold the rotating button
 for 3 seconds to turn on Wi-Fi, there will be a beep released, and the Wi-Fi indicator blinks slowly.
NOTE: If you want to turn off Wi-Fi, press and hold the rotating button again for 3 seconds and the Wi-Fi indicator with be off with a beep.
 - Press and hold the light button
 for 5 seconds to enter the network configuration state of the device. The Wi-Fi indicator blinks quickly with a beep.
- Press and hold the light button
- Tap+ in the CROWNFUL App and select your smart air fryer from the product list during the first setup.
Once paired successfully, it will remain in "Searching for Devices". You can tap it directly the next time you use it.
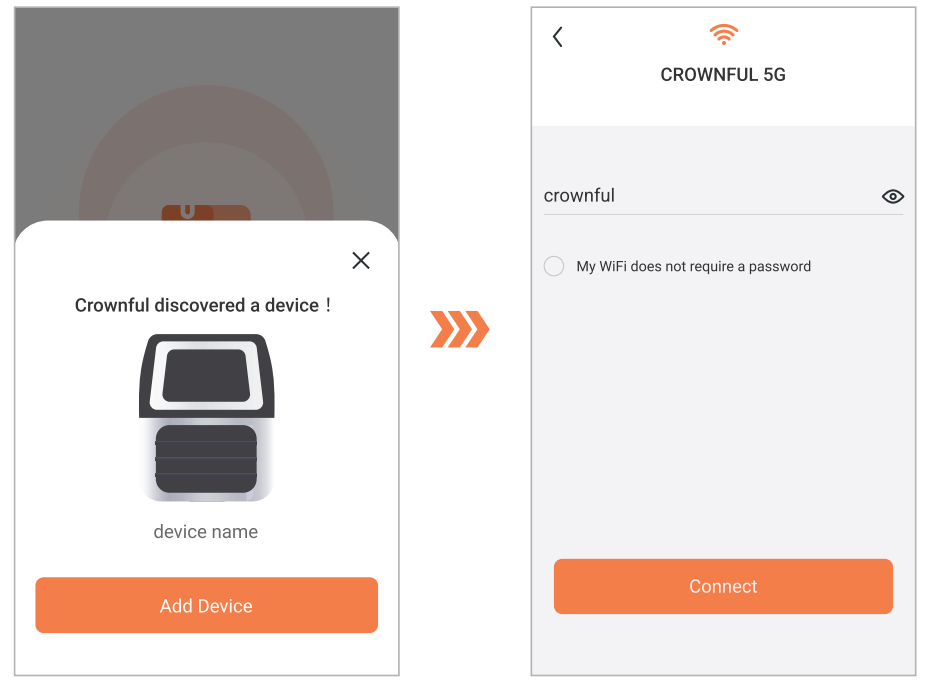
- Choose the product to start the WiFi network configuration of the device, then select WiFi and enter the password to connect.
NOTE: If it discovered the air fryer, please tap "Add Device" and set up WIFI.
NOTE
- Without the cooking process, the air fryer will be automatically turned off after 3 minutes if there is no operation on the air fryer. Please press the power button
 again to turn it on and follow the above step to reconnect.
 - Make sure your router is turned on and connectable.
- The Wi-Fi password is entered correctly.
- Make sure your WiFi signal can cover the device.
- Only use 2.4G network connection.
ATTENTION!
If you're having trouble setting it up or pairing it. please follow the steps, below to troubleshoot.
- Only use 2.4G network connection.
APP FEATURES
- Remote Control
All smart air fryer functions can be controlled remotely, except for starting cooking (to comply with UL safety regulations). Cooking progress can be monitored from a distance. - In-App Recipes & Cooking videos
50+ cooking videos with recipes are available on the app. These recipes automatically set the recommended time and temperature. Create and save custom recipes. - Setting a schedule for cooking
Choose the recipe you want, or customize. - Third-Party Voice Control
Compatible with Amazon Alexa and Google Assistant TM for voice commands.
NOTE: The Crownful app is continually updated and the app features will expand.
TROUBLESHOOTING
Can't find your device
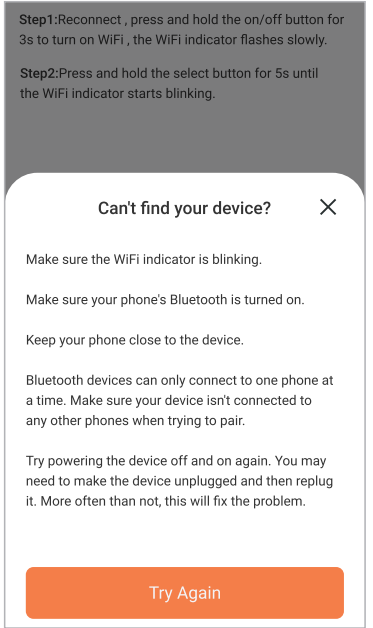
SOLUTIONS
- Make sure the Wi-Fi indicator is blinking.
- Make sure your phone's Bluetooth is turned on.
- Make sure your device isn't connected to any other phones when trying to pair. (Only one phone can be connected to the device at a time.)
- Turn the air fryer off and on again by unplugging and plugging it back in. Click "Try Again" and follow steps above.
WHY DOES IT SHOW THIS REMINDER?
You or Your family have used another Crownful account to connect this air fryer with Crownful App before. Repeat connecting the same device on this app.Reset My Device
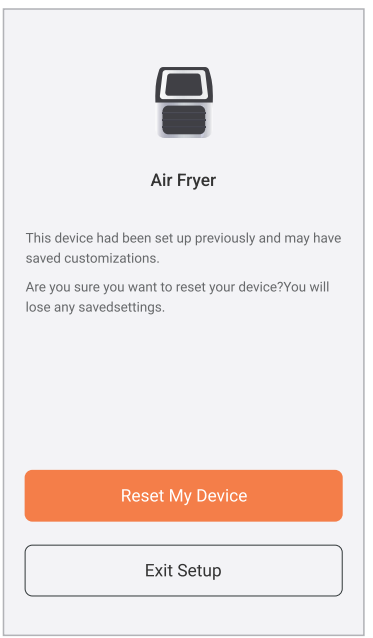
SOLUTION
Please click "Reset My Device" and then you can connect to other new devices. However, it will lose all your saving settings on this device. ( You can also use this method to reset your device upon demand)
If you don't want to reset your device, please click "Exit Set Up" and it will keep all your saved settings.
(Wi-Fi indicator turns red)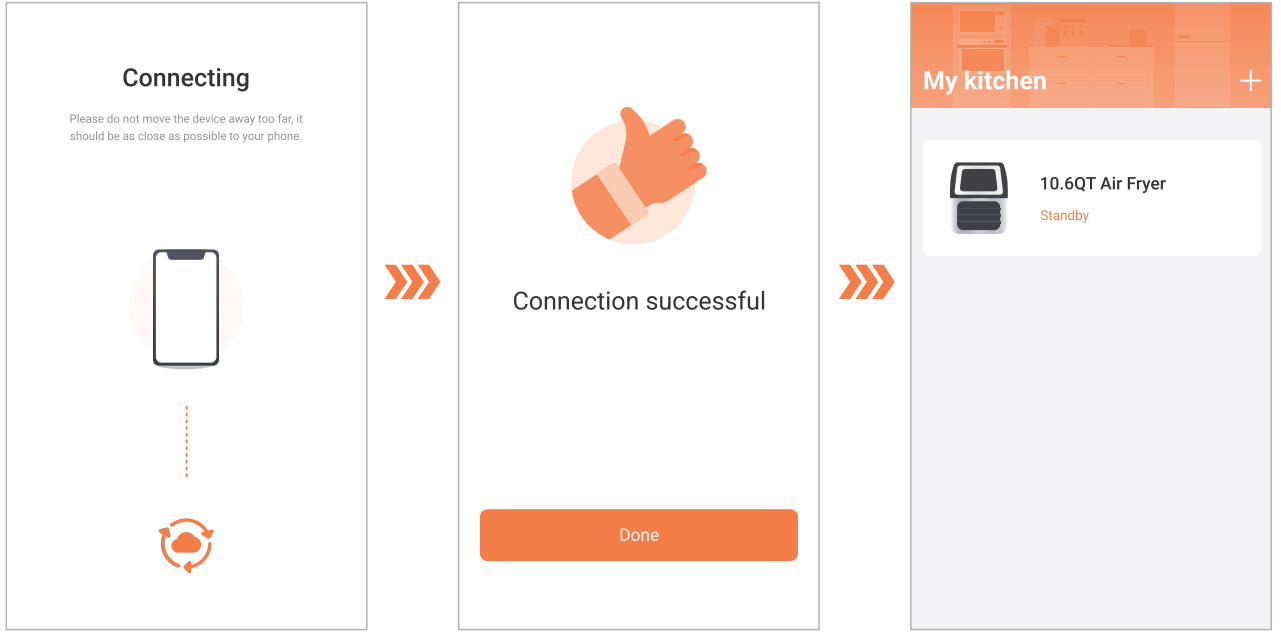
SOLUTIONS
- Unplug the air fryer and wait for 30 seconds and then plug in again.
- Follow the above instructions to connect again.
NOTE: If the Wi-Fi indicator is still in red light, there is a device malfunction.
- PAIRING WITH THE DEVICE
- It takes time for the first time to pair with the Crownful App. Please wait for the connection. Once the connection is completed, the Wi-Fi indicator will keep on with a beep. Then, You can visit the air fryer operation interface after the connection is successful.
NOTE: If the device connects well, please do not press and hold the light button again for 5 seconds to avoid re-entering the network configuration state of the device and resetting the device. It will lose all your saving settings on this device for the above situation.
 - Select the air fryer under "My Device" on the next usage and it will connect automatically.
- It takes time for the first time to pair with the Crownful App. Please wait for the connection. Once the connection is completed, the Wi-Fi indicator will keep on with a beep. Then, You can visit the air fryer operation interface after the connection is successful.
Bluetooth Connection Failed
If the Bluetooth connection failed, please keep your phone closer to the device and reconnect again.
Wi-Fi Connection Failed
If the device network configuration failed, please make sure the WiFi password is correct, or try to switch WiFi to connect.
Device Connection Failed
Press and hold the light button for 5 seconds until the Wi-Fi indicator blinks with a beep quickly and try to reconnect it again.
DISCONNECTING FROM WIFI
METHOD 1
- To disconnect Wi-Fi, press and hold the light button
 for 5 seconds until the Wi-Fi indicator blinks. This will restore the smart air fryer's default settings and disconnect it from the Crownful app.
 - To reconnect, please follow the above instructions for adding a device.
METHOD2
- Delete device from the Crownful app setting, the Wi-Fi indicator stays in slow flashing status.
- To reconnect, please follow the above instructions for adding a device.
In case of power failure or manual unplugging during use, please follow these operation steps:
- Press and hold the rotating button
 for 3 seconds to turn on WiFi and the Wi-Fi indication blinks slowly with a beep.
 - If the network has been connected before a power failure, the device will automatically reconnect. During reconnecting, the Wi-Fi indicator blinks slowly and then changes to steady after completed connection.
NOTE: If the device is disconnected or offline, the Wi-Fi indicator stays in slow flashing status. To reconnect, please follow the above instructions for adding a device.
CONTROL PANEL
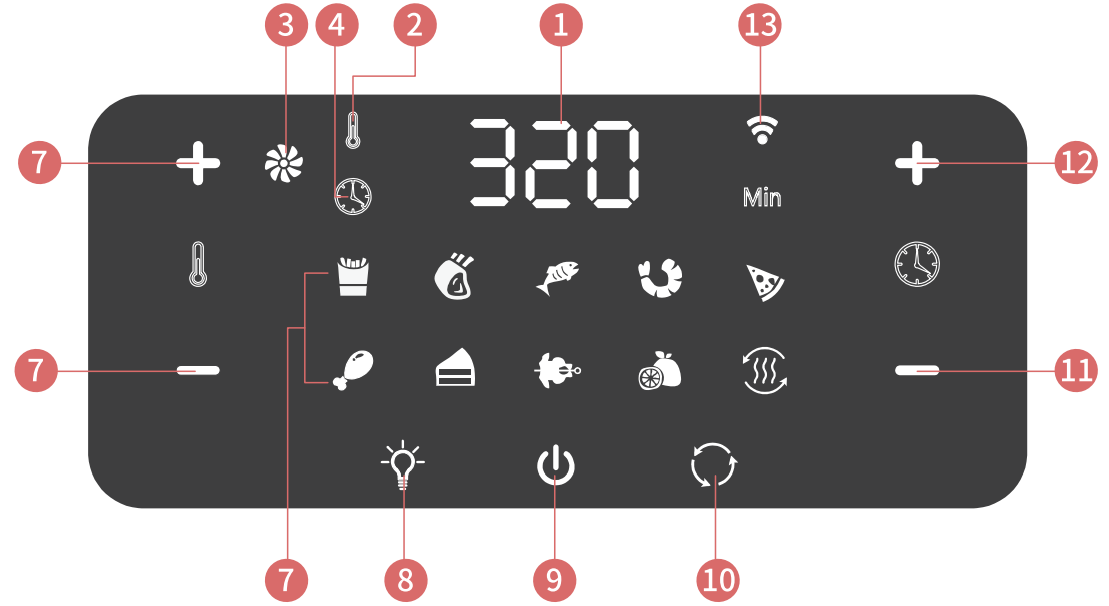
- LCD Display
- Temperature Indicator
- Working Indicator
- Time Indicator
- Temperature+
- Temperature-
- Mode Indicators: French Fry,roast, fish, shrimp,pizza,chicken,bake, rotisserie
- Light Button / Long press 5 seconds as WiFi Setting Button
- Power on/Pause Button(Long-press to turn off the machine)
- Rotating Button / Long press 3 seconds as WiFi Turn on/ off Button
- Time-
- Time+
- Wi-Fi Indicator
Description
The Crownful Air Fryer TXG-KK-DT10L-D-W features a spacious 10-liter capacity, allowing you to cook large portions in a single batch. It operates at a wide temperature range of 100°F to 400°F, giving you the flexibility to cook a variety of dishes. The air fryer comes with a non-stick basket and pan that are dishwasher safe, making cleanup a breeze. The digital touchscreen display is intuitive and easy to use, featuring preset buttons for common dishes and manual settings for more control.
The air fryer also includes a 60-minute timer and automatic shut-off for added convenience. Its compact design ensures it fits well on most kitchen countertops without taking up too much space. The Crownful Air Fryer TXG-KK-DT10L-D-W is also ETL certified, ensuring it meets safety standards for home use.
USING YOUR AIR FRYER
Connect the appliance to a power source, it enters standby mode with a beep. All the indicators on the control panel will flash once.
Note: Without the cooking process, the air fryer will automatically enter standby mode with a beep after 3 minutes if there is no operation on the air fryer. Please press the power button (![]() ) again to turn it on.
) again to turn it on.
Power On / Off
Tap the Power Button to turn on the appliance and it will beep. All the indicators on the control panel will light up.
Tap it again to turn off the appliance. When it is off, the fan will continue working for 20 seconds more until it stops.
Light Control
When the appliance is on, press the Light Button to turn on/ off the light.
Preheat the Oven
Preheat the Air Fryer Oven for 1-3 minutes. It is necessary for the Air Fryer to reach the desired temperature.
Choose the Cooking Mode
- When the unit is on, tap the Mode Button to choose the cooking mode as desired. The corresponding mode indicator will light up. The LCD display will show the cooking temperature and cooking time alternatively with the latter counting down by the minute.
- When the mode is selected, press the Power Button again to start the cooking process. The Working (Fan) Indicator will keep flashing, it means the blower starts running and cooking process has started.
NOTE: More flexible time & temperature setting can be adjusted.
- To adjust time of cooking mode, press the+ or- on the right side of the control panel to increase or decrease time in 1 minute increments, from 1 to 90 minutes. You also can long press the+ or - on the right side of the control panel to increase or decrease time in 5 minute increments. (Only under Dehydration mode, press the+ or- on the right side of the control panel to increase or decrease time in 30 minute increments, from 1 to 24 hours.)
- To adjust temperature of cooking mode, press the+ or - on the right side of the control panel to increase or decrease temperature in 5 degree increments, from 180°F to 400°F. You also can long press it to increase or decrease temperature quickly. (Only under Dehydration mode, press the+ or - on the left side of the control panel to increase or decrease temperature in 5 degree increments, from 90°F to 180°F.)
- Du ring the cooking process, you can press the+ or - on the right/ left side of the control panel to adjust Time/Temperature. But if you want to change to cooking mode, please press the power button to pause the cooking and then you can change the cooking mode.
- When you open the oven's door during a cooking process, the oven will pause working. This is the best time to check or turn the food over. Close it again, the appliance will resume working under the previous remaining time and temperature.
NOTE: Tap the Rotating Button to start rotating if the rotisserie shaft or basket is used for more even result.
DEFAULT COOKING TIME AND TEMPERATURE:
COOKING MODE | TEMPERATURE | COOKING TIME |
French Fries | 400°F | 15 min |
Roast | 360 °F | 25 min |
Fish | 340°F | 15 min |
Shrimp | 320 °F | 12 min |
Pizza | 360 °F | 15 min |
Chicken | 360 °F | 30 min |
Baking | 320 °F | 30 min |
Rotisserie | 370 °F | 30 min |
Dehydrate | 150 °F | 4 hours |
Reheat | 240°F | 6 min |
Set the Cooking Time
- Tap the Time+/ - Buttons to increase/ decrease the cooking time with a difference of 1 minute on each tap, from 1 to 90 minutes.
- You also can long press the Time+/ - Buttons to increase or decrease time in 5 minute increments. (Only under Dehydration mode, press the Time+/ - Buttons to increase or decrease time in 30 minute increments, from 1 to 24 hours.)
Set the Cooking Temperature
- Tap the Temperature+/- Buttons to increase or decrease temperature in 5 degree increments, from 180° F to 400° F.
- You also can long press it to increase or decrease temperature quickly. (Only under Dehydration mode, it is from 90° F to 180° F.)
RECOMMENDED COOKING TIME AND TEMPERATURE:
FOOD | AMOUNT | TIME | TEMPERATURE | RECOMMENDATIONS |
Thin Frozen Fries | 1.5-3 cups | 15 min | 400°F | |
Thick Frozen Fries | 1.5-3 cups | 25 min | 400°F | |
Homemade Fries | 1.5-3.5 cups | 15 min | 400°F | Add 1/2 tbsp. oil |
Homemade Potato Wedges | 1.5-3.5 cups | 12 min | 360 °F | Add 1/2 tbsp. oil |
Homemade Potato Cubes | 1.5-3 cups | 15 min | 360 °F | Add 1/2 tbsp. oil |
Hash Browns | l cup | 30 min | 360 °F | |
Potato Gratin | 2 cups | 30 min | 400°F | |
Steak | 1/4-1.l lb | 30 min | 360 °F | |
Pork Chops | 1/4-1.l lb | 4 hours | 360 °F | |
Hamburger | 1/4-1.l lb | 6 min | 360 °F | |
Sausage Roll | 1/4-1.l lb | 13-15 mins | 400°F | |
Chicken Drumsticks | 1/4-1.l lb | 18-22mins | 360 °F | |
Chicken Breast | 1/4-1.l lb | 10-15mins | 360 °F | |
Spring Rolls | 1/4-3/4 lb | 15-20mins | 400°F | Use oven-ready |
Frozen Chicken Nuggets | 1/4-1.l lb | 10-15 mins | 400°F | Use oven-ready |
Frozen Fish Sticks | 1/4-1.l lb | 6-10 mins | 400°F | Use oven-ready |
Mozzarella Sticks | 1/4-1.l lb | 8-l0mins | 360 °F | Use oven-ready |
Stuffed Vegetables | 1/4-1.l lb | 10 mins | 320 °F | |
Cake | 1.25 cups | 20-25 mins | 320 °F | Use baking tin |
Quiche | 1.5 cups | 20-22 mins | 360 °F | Use baking tin/oven dish |
Muffins | 1.25 cups | 15-18 mins | 400°F | Use baking tin |
Sweet Snacks | 1.5 cups | 20 mins | 320 °F | Use baking tin/oven dish |
Frozen Onion Rings | lib | 15 mins | 400°F |
Useful Tips:
- Toast: Add your sliced bread to the air fryer Oven.Set the temperature to 40'FI 24C,and air fry for 4 minutes. If you have very thin sliced bread,your toast will probably be done in 3minutes. You can adjust according to your preferred texture and taste.
- Air fryers are popular for making healthy fried foods.People would assume that no oil is needed and so ended up with dry food.Howeveryou still need to addlteaspoon to ltablespoon of oil each time you use your air fryer to help bring that flavor and moisture to your food.
- Turn your air fryer at 350-400 degrees F forjust 3-4 minutes to reheatThen your reheated leftovers will taste just as crispy as it was the night before. Just think- crispy,hotand fresh reheated pizza in an air fryer(or any other food you want!).
- You can roast up to 3-pound whole chicken inside the oven using the roasting fork.
- Initial start-up operation may produce a smell and smoke for about 15 minutes. It is due to the protective substance on heating elements that protect them while they are stored.Cook slices of lemon at400F for 5-10 minutes to minimize the smell.
Setup Guide
To set up your Crownful Air Fryer TXG-KK-DT10L-D-W,
- Start by unpacking all the components from the box. This includes the main unit, non-stick basket, pan, and user manual.
- Place the air fryer on a flat surface and ensure it is away from any flammable materials.
- Next, wash the basket and pan with warm soapy water before the first use to remove any manufacturing residue. Dry them thoroughly before assembling the parts back into the main unit.
- Plug in the air fryer and follow the on-screen instructions on the digital display to set the desired temperature and timer.
- You can choose from preset settings or manually adjust the temperature and cooking time as needed.
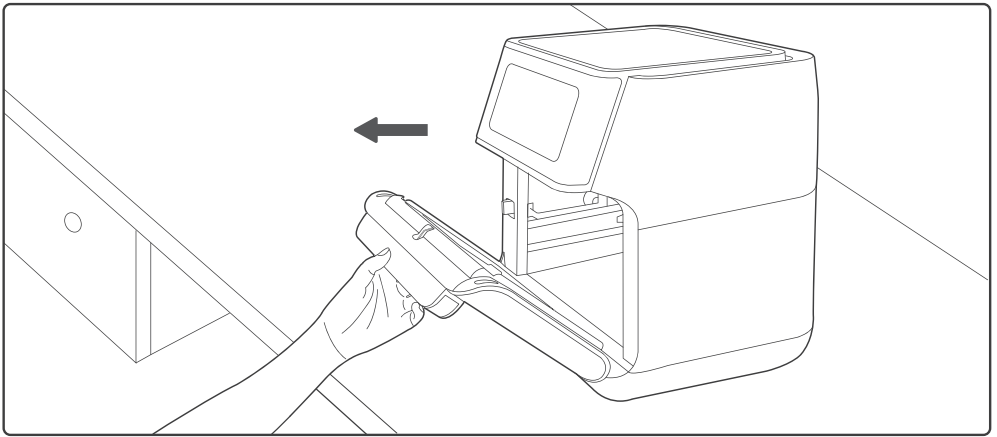
Use the Accessories: Please choose the proper accessories as per the ingredients to be cooked.Pull the Handle to open the window oil and residue for easier cleaning of the oven.
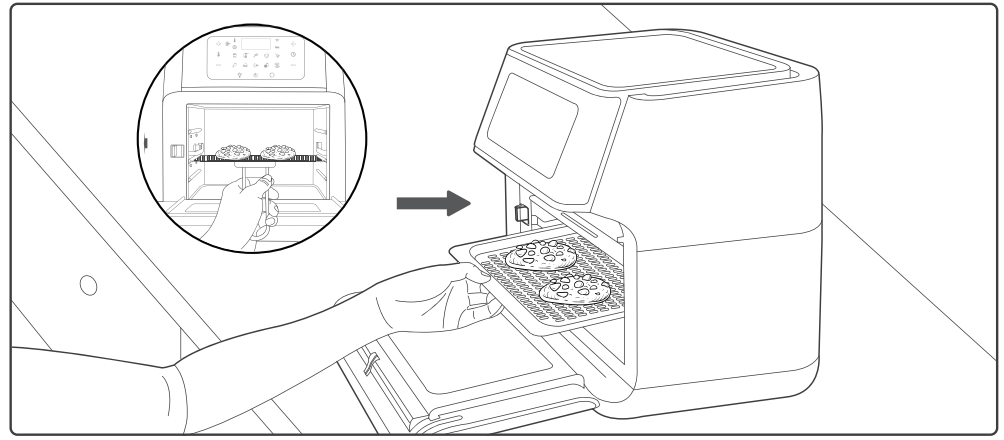
Mesh Racks: Slide the mesh racks into the upper two sliding chutes for dehydration or to cook crispy snacks/reheat items like pizza. Use this clip to remove food and prevent burns.
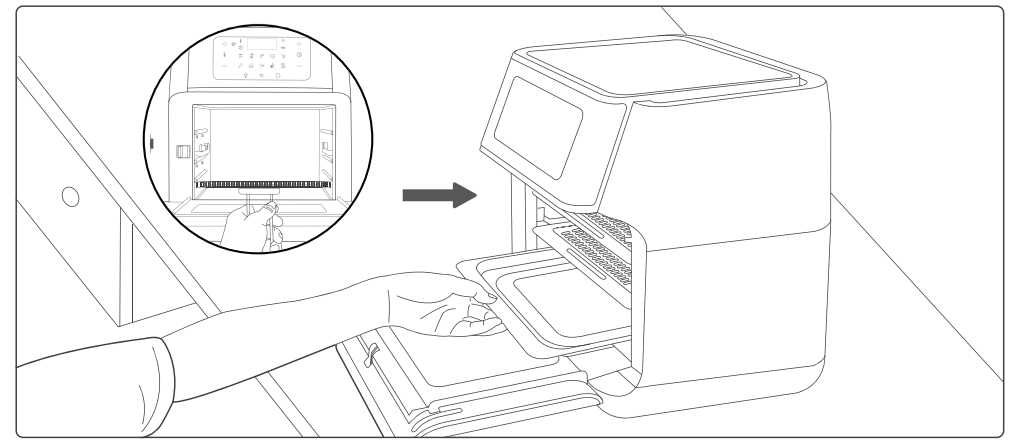
Drip Tray: Slide the drip tray into the lowest sliding chute to collect the dripping oil and residue for easier cleaning of the oven. Use this clip to remove food and prevent burns.
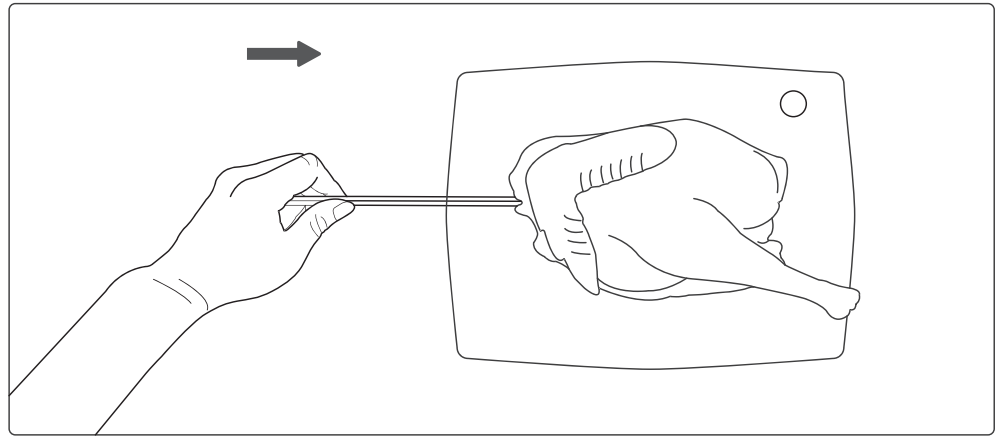
- Rotisserie Shaft: It is used to roast whole chicken and relatively large pieces of meat
Pass the shaft through the length of the whole chicken.
Mount the meat forks onto the shaft and insert it into the meat.Fix the forks with the screws.
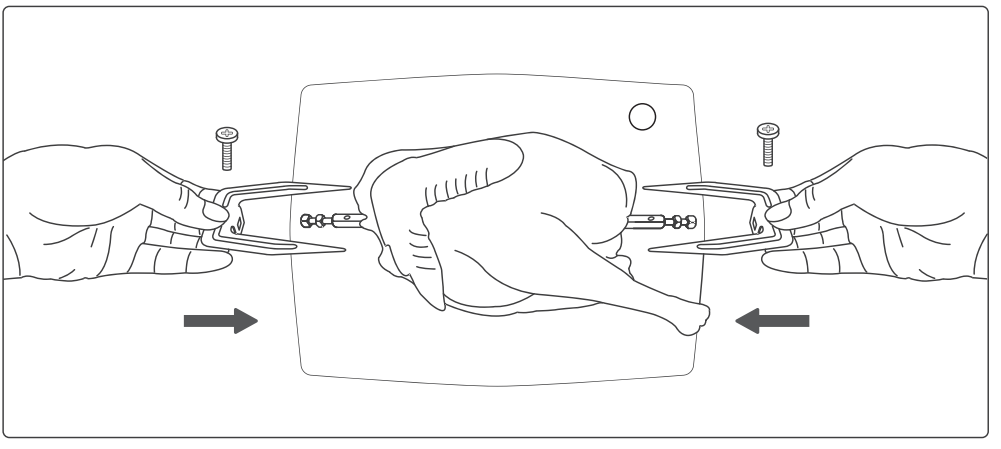
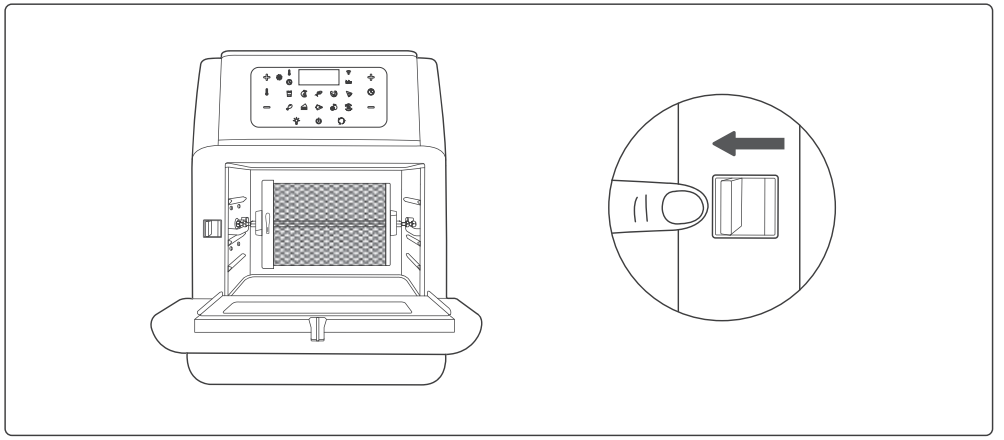
Toggle the Switch to the right, Place the rotisserie shaft onto the rails push it into the Lock position.
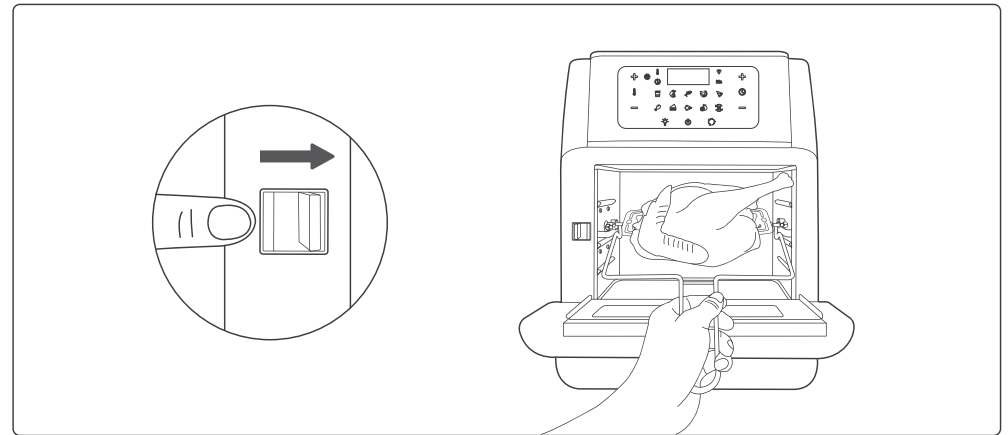
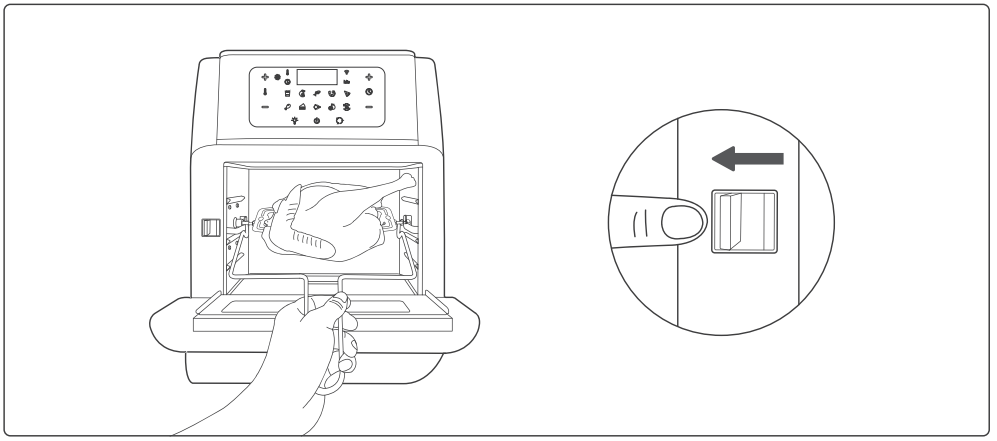
Release the Switch and lock the shaft into place.
- Rotisserie Basket:
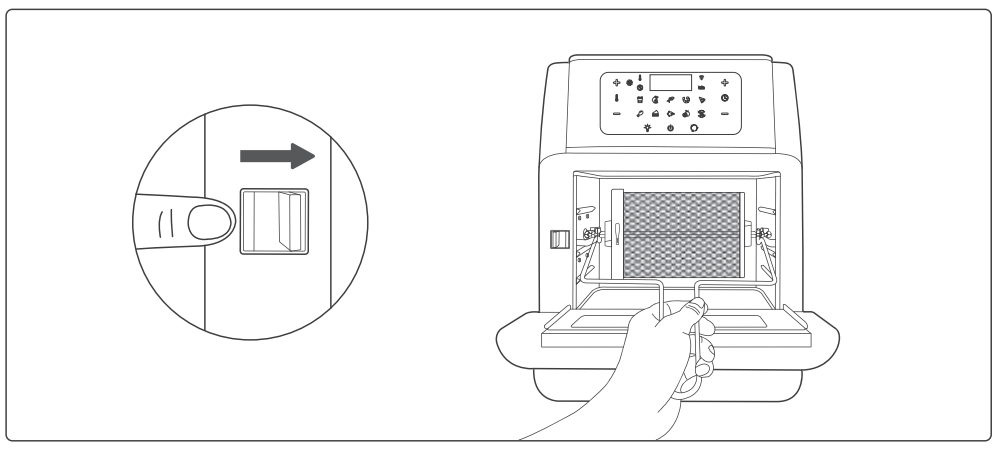
Toggle the Switch to the right.Place the rotisserie shaft onto the rails push it into the Lock position.
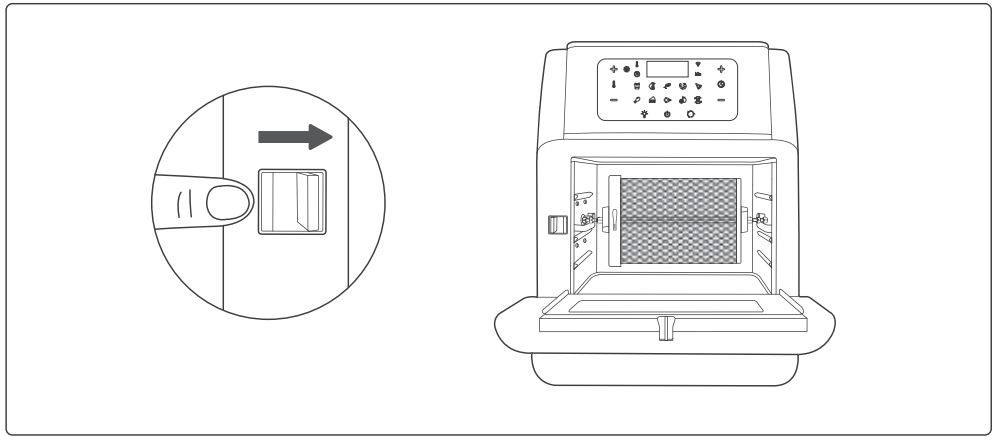
Release the Switch and lock the basket into place.
Use the removal tool to remove the basket to avoid scalding.
WARNING:
Accessories are relatively sharp due to functional requirements. Please pay specia attention during use,and take appropriate protection when necessary.When cooking is done, the temperature of the accessories is very high.Do not touch directly to prevent scalding. Please keep the accessories properly to prevent children from coming into contact with them.power on again.
NOTE:
You can use the removal tool to remove rotisserie basket and rotisserie shaft to avoid burns.
CLEANING AND MAINTENANCE
CLEANING
Clean the air fryer oven after each use.Unplug the power cord from the wall socket and be certain the appliance is thoroughly cooled before cleaning
- The accessories are dishwasher safe but never use abrasive cleaning materials or utensils on theirsurfaces to avoid scratches.
- Soak the caked-on food in warm, soapy water for easy removal
- Wipe the outside of the appliance with a warm cloth damped with mild detergent.
- Clean the inside of the appliance with a warm nonabrasive sponge damped with mild detergent.If necessaryremove unwanted food residue from the control panel with a cleaning brush.
STORAGE
- Unplug the appliance and let it cool thoroughly
- Make sure all components are clean and dry.
- Place the appliance in the clean, dry place.
TROUBLESHOOTING
PROBLEM | POSSIBLE CAUSE | SOLUTION |
The oven does not work. | The appliance is not plugged in. |
Plug power cord into wall socket. |
You have not turned on the Unit by setting the cooking time and temperature. |
Set the temperature and time as instructed. | |
The product window is not closed properly. |
Check that window is closed. | |
The ingredients fried with the air fryer oven are not done. |
Too much amount of food |
Reduce the amount of food for single cooking |
Setting temperature too low. | Set the temperature higher. | |
The ingredients are fried unevenly. | When tray is used to make food, the tray position is not adjusted. |
During cooking, adjust the tray positionappropriately. |
White smoke comes out of the appl iance. |
You are preparing greasy ingred ients. |
When you fry greasy ingredients in the air fryer, a large amount of oil will leak into the pan. The oil produces white smoke and the pan may heat up more than usual. This doesnot affect theappliance or the end resuIt. |
The pan still contains grease residues from previous use. | White smoke is caused by grease heating up in the pan. Make sure you clean the pan properly after each use. | |
Fresh fries are not crispy. |
The crsip i ness of the fries depends on the amount of oil and water in the fries. |
Make sure you dry the potato sticks properly before you add the oil, Cut the potato stickssmaller for a crispier result. Add slightly more oil for a crispier result. |
NOTE: 1 or E2: Malfuncation or short circuit on the internal wire, please take a picture and contact us.
Warranty
We grant 1-year warranty on the product commencing on the date of purchase. Within the guarantee period, we will eliminate any defects in the appliance resulting from faults in materials or workmanship.
Pros & Cons
Pros
- The 10-liter capacity allows for cooking large portions in a single batch.
- The digital touchscreen display is easy to navigate and includes preset buttons for common dishes.
- The non-stick basket and pan are dishwasher safe, making cleanup simple.
- From fries and chicken to baked goods and desserts, this air fryer can handle a wide range of recipes.
- It fits well on most kitchen countertops without taking up too much space.
Cons
- Some users have reported that the air fryer can be quite loud during operation.
- The non-stick coating on the basket and pan may wear off over time and cannot be replaced.
- There have been occasional reports of uneven heat distribution, though this is rare.
Customer Reviews
Users have generally praised the Crownful Air Fryer TXG-KK-DT10L-D-W for its performance, ease of use, and value for money. Many reviewers appreciate the large capacity and the variety of dishes they can cook with it. Some have noted that the air fryer is louder than expected, but overall satisfaction remains high.
A common complaint is the non-replaceable non-stick coating, which can wear off over time. However, this has not significantly impacted the overall user experience for most customers.
Faqs
What is the Crownful Air Fryer capacity?
How many different cooking presets does the Crownful Air Fryer offer?
How simple is it to clean the Crownful?
How can cooking with the Air Fryer TXG-KK-DT10L-D-W promote healthier eating?
What extras come with the Crownful air fryer?
Is the TXG-KK-DT10L-D-W Crownful Air Fryer appropriate for big families?
What is the Crownful Air Fryer's preheat time?
Which safety features are included with the Crownful Air Fryer?
Is it possible to bake in th Crownful Air Fryer?
Leave a Comment
