Cuisinart Automatic Grind & Brew Thermal Coffeemaker DGB-900 Instruction Manual
Content
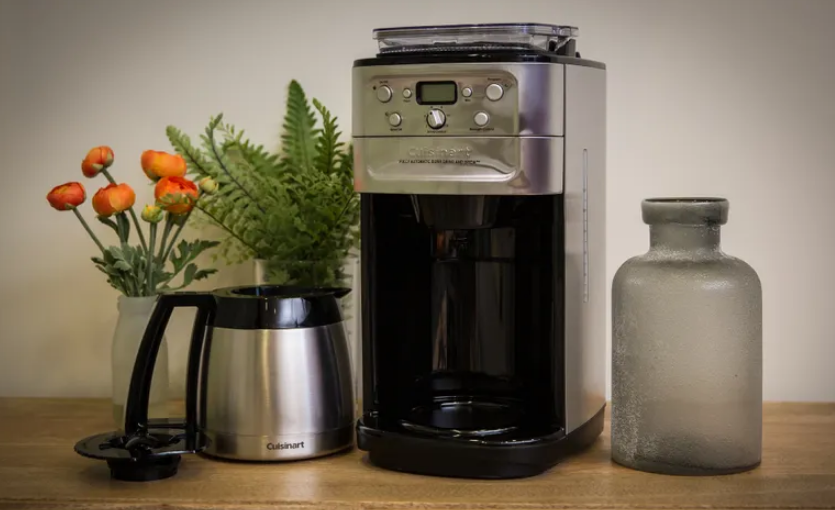
Cuisinart Automatic Grind & Brew Thermal Coffeemaker DGB-900
Imagine waking up to the aroma of freshly ground and brewed coffee, ready for you to enjoy. That's the experience the Cuisinart Automatic Grind & Brew Thermal Coffeemaker offers. Launched in 2020, this innovative appliance combines a grinder, a brewer, and a thermal carafe into one sleek package. With an estimated price range of $150 to $200, it's a investment that can elevate your morning routine.
Detailed Specifications
The Cuisinart DGB-900 is a feature-rich coffeemaker. It has a 24-hour programmability feature, allowing you to set it up the night before. The grinder has a capacity of 8 ounces of coffee beans, and the brew strength control lets you choose between bold and regular. The thermal carafe can hold up to 12 cups of coffee, keeping it warm for hours. The machine also has a charcoal water filter and a gold-tone coffee filter for added convenience.
FEATURES AND BENEFITS
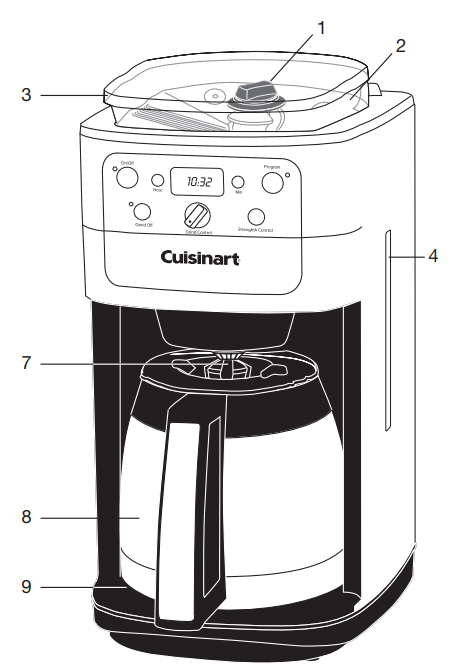
- Hopper Container Release Knob
Locks hopper container onto the unit. - Hopper Container
Can be taken out from the unit, for easy filling and/or cleaning. A safety interlock system prevents operation of the unit if the hopper container is removed. - Hopper Container Lid
Keeps beans fresh by sealing out harmful light, moisture and air. - Water Reservoir (not shown) with Water Level Window
- Showerhead (not shown) Distributes water evenly over coffee.
- Control Panel
(see detailed drawing on page 8) Contains: On/Off SwitchHour Set/Minute Set Clock Display Program Setting Grind Off Grind Control Strength Control - Brew Pause
Stops flow of coffee from basket when carafe is removed from resting plate, so a cup can be poured in mid-brew, if desired. Do not remove carafe for longer than 20 seconds. - Thermal Carafe with Hands-Free Lid An easy pour, no drip double-wall insulated 12- cup stainless steel thermal carafe with ergonomic handle. Coffee brews through and pours through a unique lid that seals air out to provide fresh flavor. No need to turn or adjust lid.
- Resting Plate
Scratch-resistant with nonstick coating. - Cord Storage (not shown)
- Water Reservoir Cover
Flips back for easy filling. - Charcoal Water Filter (not shown) and Holder (see page 9 for actual filter) Charcoal water filter eliminates chlorine, bad tastes and odors from tap water.
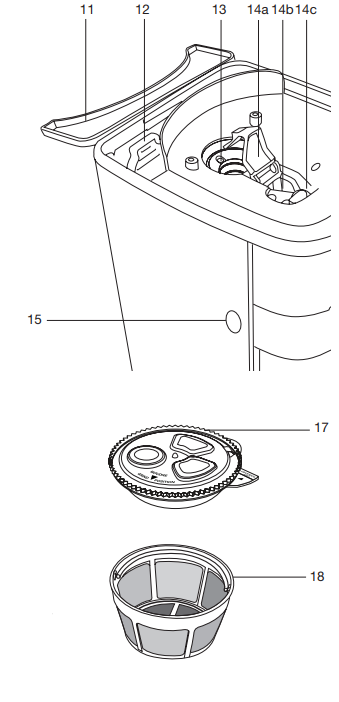
- Burr Grinder
- Coffee Channel Assembly
- Channel Cover
Flips back, for cleaning of coffee chute. NOTE: Cover must be in place before grinding. - Coffee Chute
- Grind Chute Lever
For easy cleaning.
- Channel Cover
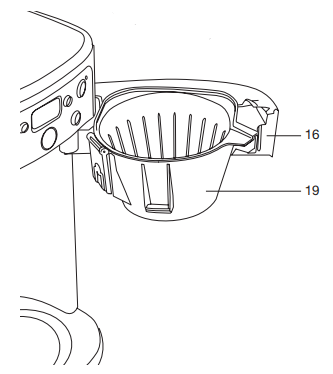
- Filter Basket Door Release Button
- Filter Basket Door
A safety interlock system prevents operation of the unit if the filter basket door is not closed prior to brewing. (You will hear a click when the door is properly shut.) - Filter Basket Cover
Before grinding match GRIND arrows.
To remove, lift where “LIFT” indicates. NOTE: Cover becomes hot after coffee is brewed. Use caution when removing cover. A safety interlock system prevents operation of the unit if the filter basket cover is not in place. - Gold Tone Cuisinart Commercial Style Filter
A note about filters: When using our permanent filter, be sure that the handle is positioned toward the front of the unit. If you do not, the handle may interfere with the flow of coffee into the filter basket. Also note: using our permanent gold-tone filter will allow some fine coffee grounds to fall into the coffee carafe. This will appear as sediment in the carafe. - Filter Basket
Holds our commercial style permanent filter or #4 paper filter. Removable for easy cleaning. A safety interlock system prevents operation of the unit if the filter basket door is not closed prior to brewing.
Product Description
The Cuisinart Automatic Grind & Brew Thermal Coffeemaker DGB-900 is a dream come true for coffee lovers. It automatically grinds your coffee beans, then brews the coffee right into the thermal carafe. The grind-off feature allows you to use pre-ground coffee if you prefer. The strength control feature ensures you get the perfect cup of coffee every time. The machine is also easy to clean, with a dishwasher-safe carafe and gold-tone filter.
CONTROL PANEL
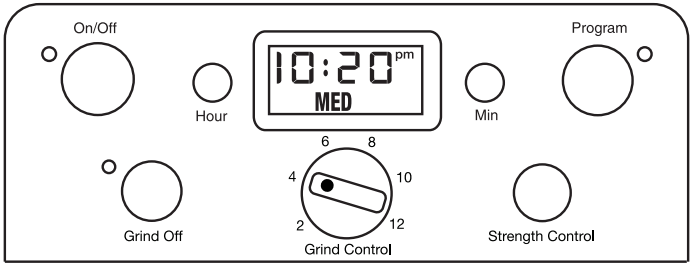
- On/Off button with LED Indicator Audible Tone (not shown): The Fully Automatic Burr Grind & Brew™ Thermal Coffeemaker is equipped with an audible tone which will sound 5 times when the coffee has completed brewing (coffee may continue to stream from the filter for several seconds afterward). Unit will automatically shut off.
- Hour and Minute Buttons
Press and hold either Hour or Min for approximately 2 seconds to enter Time Set Mode. - Clock/LCD Display
Displays time of day and program setting when Program button is pressed. Displays Strength Control setting (MILD, MED or STRONG) - Program Button with LED Indicator Press to display or set Auto On time.
- Grind Off Button with LED Indicator Use to turn off the grinder when using pre-ground coffee.
- Grind Control Knob
Turn the Grind Control to choose the desired amount of coffee beans to grind. - Strength Control Button
Press to choose coffee strength: mild, medium, or strong. Selected coffee strength will show on Clock Display.
PROGRAMMING YOUR COFFEEMAKER
- Setting the Clock
When the coffeemaker is plugged in, 12:00 will appear until you set the time. - Entering Time Set Mode
To set the time, hold down either the Hour or Minute button until the clock begins flashing (about 2 seconds). You are now in the Time Set mode and can operate either button to select the desired time. The buttons can be held down to scroll through the digits, or pressed and released to advance one digit at a time. When scrolling, the numbers will advance slowly at first and then speed up to the rate of about three per second. When the number displayed approaches the desired time, release the button and press repeatedly to advance one digit at a time. Be careful to make sure that the PM indicator is on if a PM time is desired. - Exiting Time Set Mode
The Time Set mode can be exited in one of two ways- Press any button besides the Hour or Minute button. This will exit the Time Set mode and activate the selected function.
- Do nothing. If neither the Hour or Minute button is pressed for a period of five seconds, the Time Set mode will be exited.
- Setting the Program Time
When you press the Program Set button, it displays the current auto on time (default time 12:00 pm). - Entering Set Program Time Mode
Press and hold the Program Set button (about 2 seconds) until the green light and LCD display begin to flash. This signals that you have entered the Set Program Time mode. The desired time can be set by pressing the Hour and Minute buttons to scroll forward through the digits. Pressing and holding either button will allow you to scroll continuously, slowly at first, and then to accelerate to the rate of about three digits per second. As the desired time setting approaches, release the button and press repeatedly to advance one digit at a time.
The coffeemaker will start to brew at the pro-grammed time. The Program mode cannot be entered if the coffeemaker is in its brew cycle.
Exiting Set Program Time Mode
Set Program Time may be exited in any of three ways
- Press the Program Set button again. This will cause the coffeemaker to revert to its previous state.
- Press any other button (except Hour or Minute). Set Program Time mode will be exited and the function of the button pressed will be executed.
- Do nothing. If neither the Hour nor Minute button is pressed for a period of five seconds, the Set Program Time mode will be exited and the programmed setting will be in effect.
Inserting the Filter
- Remove the filter from polybag and soak in cold tap water for 15 minutes.
- Remove the water filter holder from the coffeemaker by lifting it out of the reservoir area with your thumb and forefinger.
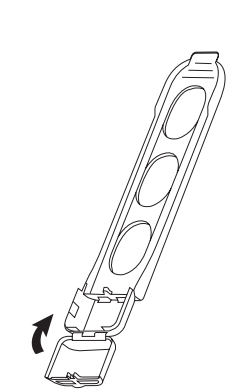
- Grasp the stem in one hand. Using the thumb of the other hand, gently press down and pull toward you. The compartment will flip open.
- Place the filter in the holder and close the water filter holder; you will hear a snap indicating filter is in place.
NOTE: Caution must be used when inserting the charcoal filter. Improper placement in the holder can cause tearing of the filter skin. - Hold the filter under cold running tap water for 10 seconds to flush. You should place the hole openings in the side of the unit directly under the water stream.
- Allow the filter to drain completely.
- Replace the water filter holder in the reservoir area of the coffeemaker, pushing it all the way down to the base of the unit, along the reservoir wall.
NOTE: We recommend changing the water filter every 60 days or 60 uses or more often if you have hard water.
Replacement water filters can be purchased in stores or by calling customer service or through the Cuisinart website.
MAKING COFFEE WITH WHOLE BEANS
Before you make the first pot of coffee in your new Cuisinart® Fully Automatic Burr Grind & Brew™ Thermal Coffeemaker, we recommend operating the coffeemaker once, using only water and a paper filter. This will remove any dust or residues which will remain in the system from the manufacturing process. Note: Allow the grinder to grind free of beans for this process.
- Fill the Water Reservoir
Open the reservoir lid. Pour the desired amount of water in the reservoir using the water level window indicator. Close the reservoir lid. Note: Do not exceed the
12-cup line. Doing so may cause the carafe to overflow. - Add Beans
Lift the hopper lid, using the recess on either side. Fill the hopper with beans. We recommend keeping the hopper at least halfway full. Be sure that you have a sufficient amount of beans in your hopper for the amount of coffee you intend to brew (maximum capacity is ½ lb. Do not over-pack the hopper. Over-packing may result in jamming the grinder.)
For easy filling, the hopper container can be taken out by turning the hopper container release knob to the unlock position.
Note: Do not put any water in the unit once the hopper container has been removed. If water gets into the grinder motor, the motor may become damaged and may malfunction.
Put hopper lid back in place. - Lock Hopper
- If you have removed the hopper from the unit, be sure that the hopper container release knob is in the unlocked position and place the hopper container back in the unit.
- Turn the knob to locked position.
- This unit is equipped with a safety interlock system. The unit will not grind if the hopper container is not in place. If you try to turn on the unit for grinding with the hopper out of place, the unit will beep continuously until the missing part is installed.
- The brewing process can be restarted by pressing the On button. Restarting the process will not affect coffee results.
- 4. Insert Coffee Filter
Open filter door by pressing filter basket door release button. Remove filter basket cover and place a #4 basket paper filter or Cuisinart’s commercial style permanent filter in the basket.
Note: When using our permanent filter, be sure that the handle is positioned toward the front of the unit. If you do not, the handle may interfere with the flow of coffee into the filter basket.
Also note: Using our permanent gold-tone filter will allow some fine coffee grounds to fall into the carafe.
When using a paper filter, be sure that the filter is completely open while touching the side walls and bottom of the basket.
Put filter basket cover in place. Close filter door. (You will hear a click if the door is properly shut.)
The unit is equipped with a safety interlock system. The unit will not operate if the filter basket cover or filter basket are not in place or if the filter door is not closed. If you try to turn the unit on while the filter compartment is out of place, the unit will beep continuously until the missing part(s) are installed.
Before Brewing Coffee
Remove thermal carafe lid by turning in the direction of the “unlock” arrow. Prewarm carafe by rinsing it out with hot water. PREWARMING THE CARAFE WILL HELP KEEP THE COFFEE HOTTER.
Return the carafe lid to the carafe. To lock the lid, turn in the direction of the lock arrow until it fits tightly on carafe and arrow lines up in the center of the pour spout. This ensures that the lid is closed and in the proper position for brewing and pouring.
Make sure you have replaced the thermal carafe in it’s position on the resting plate and closed the top cover. - Brewing
- Immediate Grinding and Brewing
- Turn the Grind Control Knob to set the number of cups you want to brew. The coffeemaker will grind the corresponding amount of beans. The unit will automatically adjust for low cup settings.
- Press the Strength Control button to set coffee strength. MILD, MED or STRONG will show on the LCD display.
- Press the On button. The indicator will light and the process will begin.
- Programmed Brewing
Press the Program button. The indicator will light and the display will show the programmed time for as long as the button is depressed. The display reverts back to time of day once the button is released.
(To set the programmed time, see Programming Your Coffeemaker on page 8.)- Turn the Grind Control knob to set the number of cups you want to brew. The coffeemaker will grind the corresponding amount of beans. The unit will automatically adjust for low cup settings.
- Press the Strength Control button to set coffee strength. MILD, MED or STRONG
will show on the LCD display. - The coffeemaker will begin brewing at the programmed time.
- Immediate Grinding and Brewing
- During and After Brewing
The Brew Pause feature allows you to remove the carafe from the resting plate during mid-brew. The brewing process does not stop during this period; only the flow of coffee from the basket stops. Do not remove the carafe for longer than 20 seconds or the coffee may overflow the basket. While we offer this feature, we do not recommend that you pour coffee before the cycle has reached completion, since the coffee brewed at the beginning of the cycle has a flavor profile which is very different from the coffee made at the end of the cycle. Removing a cup during the brewing cycle will alter the flavor of the finished pot.
When the brewing cycle is completed, five beeps will sound. Coffee will continue to stream from the filter for several seconds. After brewing, the unit will automatically shut itself off. The thermal carafe will keep the coffee hot for hours.
Bottom of thermal carafe is hot to touch for several minutes after brewing. Use caution.
MAKING COFFEE WITH PRE-GROUND BEANS
Before you make the first pot of coffee in your new Cuisinart Fully Automatic Burr Grind & Brew™ Thermal Coffeemaker, we recommend operating the coffeemaker once, using only water and a paper filter. This will remove any dust or residues that remain in the system from the manufacturing process.
- Fill the Water Reservoir
Open the reservoir lid. Pour the desired amount of water in the reservoir using the water level window indicator. Close the reservoir lid. Note: Do not exceed the 12-cup line. Doing so may cause the carafe to overflow. - Add Coffee Grounds
- Open filter door. Add ground coffee to our permanent or #4 paper filter. Our recipe suggestion: Use 1 level scoop of ground coffee per cup. Adjust the amount according to your individual taste.
- Place filter basket lid in place. Close filter door.
NOTE: The maximum capacity for ground coffee is 16 level scoops, using either a paper or permanent filter. Exceeding that amount may cause overflow if the coffee is too finely ground.
- Brewing
- Immediate Grinding and Brewing
- Press the Grind Off button. When this function is activated, an amber LED will be illuminated.
- Press the On button. The indicator will light and the process will begin.
- Programmed Brewing
- Immediate Grinding and Brewing
Press the Program button. The indicator will light and the display will show the programmed time for as long as the button is depressed. The display reverts back to time of day once the button is released. (To set the programmed time, see Programming Your Coffeemaker on page 8.)
- Press the Grind Off button. When this function is activated, an amber LED will be illuminated.
- The coffeemaker will begin brewing at the programmed time.
IMPORTANT UNPACKING INSTRUCTIONS
- Place the box on a large, sturdy, flat surface.
- Remove the instruction book and any other literature.
- Turn the box so that the back side of the coffeemaker is down and slide the coffeemaker from the box.
- After the coffeemaker has been removed, place the box out of the way and lift off the left and right polyfoam insert.
- Remove cardboard insert from carafe handle.
- Remove the cardboard insert between the carafe lid and Brew Pause™ mechanism by sliding it out of the unit.
- Grasp the carafe by its handle, remove it from the resting plate, and remove the polybag.
- Remove the polybag covering the coffeemaker.
We suggest you save all packing materials in the event that future shipping of the machine is needed. Keep all plastic bags away from children.
THE QUEST FOR THE PERFECT CUP OF COFFEE
It is generally agreed that there are four basic elements critical to the perfect cup of coffee
- Water
Coffee is 98% water. Often overlooked, the quality of the water is as important as the quality of the coffee. A good rule of thumb is that if your water doesn’t taste good from the tap, it won’t taste any better in your coffee. That’s why Cuisinart has added a water filter to the Fully Automatic Burr Grind & Brew™ Thermal Coffeemaker. The charcoal water filter removes chlorine, bad tastes and odors, for the purest cup of coffee every time. - Coffee
While the bulk of the liquid is water, all of the flavor should be from the coffee. To achieve the same great quality cup of coffee you receive at a coffee bar, you need to use the same quality beans. Buy the beans fresh and whole, only about two weeks’ supply at a time for maximum freshness. Once the coffee bean is broken, its flavor degrades very quickly. That’s why the Fully Automatic Burr Grind & Brew™ Thermal Coffeemaker grinds your coffee just prior to brewing. If it is not practical to buy small supplies, we recommend you separate larger amounts of beans into one to two week portions immediately after purchase, and freeze them in airtight containers. The best way to maximize freshness is to minimize exposure to air, light and moisture. So, once beans have been removed from the freezer, maintain them in a sealed container at room temperature, since damaging condensation occurs every time the beans are removed from the freezer or refrigerator. Note that some coffee experts advise against freezing dark-roast beans, because freezing can cause the oils to coagulate. Other experts disagree. We suggest you experiment and decide for yourself. - Grind
The grind is critical for proper flavor extraction. If the grind is too fine, over-extraction and bitterness will result. Too fine a grind may also clog the filter. If grind is too coarse, the water will pass through too quickly and the desired flavors will not be extracted. The Fully Automatic Burr Grind & Brew™ Thermal Coffeemaker is preset for a medium grind, the optimal grind for this type of coffeemaker. - Proportion
The Fully Automatic Burr Grind & Brew™ Thermal Coffeemaker makes up to twelve cups (54 oz.) of coffee.
- Using Whole Beans
We recommend refilling the hopper after two full pots of coffee have been brewed. Be sure that you have a sufficient amount of beans in your hopper for the amount of coffee you intend to brew.
NOTE: The maximum capacity for whole beans is ½ lb. — enough for over two 12-cup pots of coffee. - Using Pre-Ground Coffee
Although it is preferable to use fresh, whole beans, you can make coffee in the Fully Automatic Burr Grind & Brew™ Thermal Coffeemaker using pre-ground beans. To do so, turn off the grinder by pressing the Grind Off button before turning on the unit. - Our recipe
We suggest that you use 1 level scoop of ground coffee per cup. Adjust the amount to your taste.
NOTE: The maximum capacity for ground coffee is 16 level scoops, using either a paper or permanent filter. Exceeding this amount may cause overflow.
CLEANING AND MAINTENANCE
- COMPLETELY CLEAN AND DRY ALL PARTS AFTER EVERY USE.
- Always turn coffeemaker off and remove the plug from the electrical outlet before cleaning.
- After every use, open filter basket door by pressing filter basket door release button. Remove filter basket cover, filter basket and gold tone filter or paper filter. Discard ground coffee and paper filter.
- The filter, filter basket and filter basket cover can be washed in warm soapy water and rinsed thoroughly, or cleaned in the upper rack of the dishwasher. Dry all parts after every use.
- Remove the carafe from the heating plate. Discard any remaining coffee. The carafe and lid can be washed in warm soapy water and rinsed thoroughly.
- We suggest cleaning the hopper and coffee chute every 1-2 weeks depending on frequency of use.
- To clean the hopper, remove hopper container and lid by turning the hopper container release knob to the unlocked position. Discard any leftover coffee beans.
- The hopper container and hopper container lid can be washed in warm soapy water and rinsed thoroughly, or cleaned in the upper rack of the dishwasher. Dry all parts after every use.
- NOTE: Do not put any water in the unit once the hopper container has been removed. If water gets into the grinder motor, the motor may become damaged and may malfunction.
- Wipe the area under the hopper container with a damp cloth.
- The coffee channel cover can be flipped back for easy cleaning of the coffee chute. Push the coffee channel cover tab away from you and lift up. Use the brush to remove any ground coffee that remains. Brush grounds toward you (when facing the unit head-on) and pull the grind chute lever toward you to send grounds through the chute. Be sure the filter basket is in place to catch the grounds.
- NOTE: Failing to properly clean the coffee chute may lead to grind accumulations which can result in weak-tasting coffee.
- Do not use scouring agents or harsh cleansers on any part of the coffeemaker.
- Never immerse base unit in water or other liquid. To clean base, simply wipe with a clean, damp cloth and dry before storing. Wipe heating plate with a clean, damp cloth. Never use rough, abrasive materials or cleansers to clean the resting plate. Do not dry the inside of the water reservoir with a cloth, as lint may remain.
TROUBLESHOOTING
| PROBLEM | CAUSE | SOLUTION |
|---|---|---|
| Continuous beeping | Hopper not locked in place (when brewing with whole beans) | Check to see if the hopper container release knob is in the unlocked position. Turn the knob to the locked position. Place the hopper container on the unit. Turn the knob to the locked position. Press On/Off or Program again to resume. |
| Filter door not closed | Check to be sure that all components of the filter compartment are in place. Close filter door (you will hear a click if the door is properly shut). Press On/Off or Program again to resume. | |
| Filter basket not in place | Open filter door by pressing the filter door release button. Hook filter basket with cover onto door. Close filter door (you will hear a click if the door is properly shut). Press On/Off or Program again to resume. | |
| Filter basket cover not in place | Open filter door by pressing the filter door release button. Put on cover, matching “grind” arrows. Hook filter basket with cover onto door. Close filter door (you will hear a click if the door is properly shut). Press On/Off or Program again to resume. | |
| Filter Basket not emptied of used grinds | Open filter door by pressing the filter door release button. Remove filter basket with cover. Discard used grounds. Replace filter basket with cover and close door. Press On/Off or Program again to resume. | |
| Coffee chute is clogged | Remove the hopper from the unit. Lift coffee channel cover. Clean out coffee chute. Replace coffee cover and hopper. Your coffeemaker is now ready to brew again. | |
| Coffee is weaker than usual | Not enough beans in hopper | Be sure there are enough beans in your hopper for the amount of coffee you intend to brew. |
| Strength setting is incorrect | Check your strength setting — displayed on the LCD screen. To change your strength settings press the strength control button. |
WARRANTY
This warranty is available to consumers only. You are a consumer if you own a Cuisinart Fully Automatic Burr Grind & Brew Thermal Coffeemaker that was purchased at retail for personal, family or household use. Except as otherwise required under applicable law, this warranty is not available to retailers or other commercial purchasers or owners. We warrant that your Cuisinart® Fully Automatic Burr Grind & Brew™ Thermal Coffeemaker will be free of defects in materials and workmanship under normal home use for 3 years from the date of original purchase.
Customer Reviews of Cuisinart Automatic Grind & Brew Thermal Coffeemaker
Customers love the Cuisinart DGB-900 for its convenience and flavor. Many praise the thermal carafe for keeping their coffee hot for hours. However, some have complained about the grinder being noisy and the machine being a bit difficult to program.
Faqs
For the first time, how should I set up my Cuisinart DGB-900?
If the brew cycle on my coffeemaker isn't started, what should I do?
How should the Cuisinart DGB-900 grinder be maintained?
Why does the DGB-900 not heat my coffee enough?
Is the Cuisinart DGB-900 dishwasher safe to use with its thermal carafe?
What should I do if my Cuisinart coffeemaker's grinder looks to be stuck or is too loud?
How can my Cuisinart DGB-900 coffee maker be descaled?
Which kind of coffee grounds work best with the Cuisinart DGB-900 grinder?
Can I use the Cuisinart DGB-900 to change the strength of my coffee?
How long is the Cuisinart DGB-900 warranty valid for, and what is covered under it?
Leave a Comment