Cuisinart Frozen Yogurt & Ice Cream Maker ICE-70C User Guide
Content
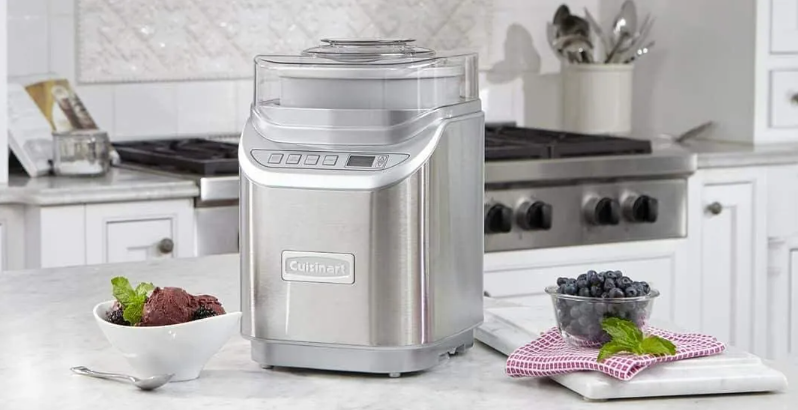
Cuisinart Gelateria Gelato & Sorbet Maker ICE-70C
The Cuisinart Gelateria Frozen Yogurt is a high-quality ice cream maker that allows you to create your favorite frozen yogurt, gelato, and sorbet at home. With a sleek and stylish design, this machine is not only functional but also a great addition to your kitchen appliances. The estimated price of the Cuisinart Gelateria Frozen Yogurt is around $200 to $250, and it is now available in the market.
Detailed Specifications
The Cuisinart Gelateria Frozen Yogurt has the following key features:
- 1.5-quart capacity
- Stainless steel housing
- Easy-lock lid with a large spout
- Includes double-insulated freezer bowl
- Instant-stop function
- 3 preset settings: frozen yogurt, gelato, and sorbet
- 60-minute countdown timer
- Removable mixing paddle
- Non-slip rubber feet
- cord storage
FEATURES AND BENEFITS
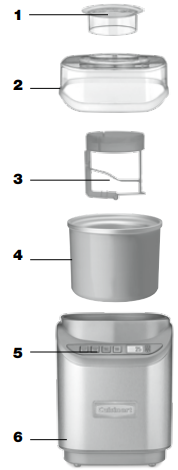
Cap With Measurement Cup
Pour recipe ingredients through the spout. Also use to add ingredients, like chips or nuts, without interrupting the freezing cycle.Easy-Lock Lid with Ingredient Spout
Transparent to let you watch the freezing process as it progresses. Lid is designed to easily lock to the base.Mixing Arm
Mixes and aerates ingredients in freezer bowl to create frozen desserts.Freezer Bowl
Contains cooling liquid within a double insulated wall to create fast and even freezing. Double wall keeps the bowl cool and at an even temperature.Control Panel with Timer
Select function and preset program time will appear.Base
Contains heavy-duty motor system strong enough to handle ice cream, gelato, frozen yogurt, and sorbet.Rubber Feet (not shown)
Nonslip feet keep base stationary during use.Cord Storage (not shown)
Unused cord is easily pushed into the bottom of base to keep counters neat and safe.
BEFORE USING FOR THE FIRST TIME
DO NOT immerse the motor base in water. Wipe it with a moist cloth. Wash the lid, freezer bowl and mixing arm in warm soapy water to remove any dust or residue from the manufacturing and shipping process. DO NOT clean any of the parts with abrasive cleaners or hard implements.
FREEZING TIME AND BOWL PREPARATION
The freezer bowl must be completely frozen before you begin your recipe. For the most convenient frozen desserts, leave your freezer bowl in the freezer at all times. You can take it out any time for immediate use. In general, freezing time is between 12 hours and 24 hours. To determine whether the bowl is completely frozen, shake it. If you do not hear liquid moving, the cooling liquid is frozen. Before freezing, wash and dry the bowl. We recommend that you place the freezer bowl in the back of your freezer where it is coldest. Reminder: Your freezer should be set to 0°F (-18°C) to ensure proper freezing of all foods.
MAKING FROZEN DESSERTS
Use Cuisinart recipes from the pages that follow, or use your own recipe, making sure it yields 2 quarts (1.89 L) or less. Do not fill the freezer bowl higher than 1/2 inch (1.25 cm) from the top. The ingredients will increase in volume during the freezing process. For best results, prepare ingredients in a container from which it is easy to pour.
Remove the freezer bowl from the freezer. Place freezer bowl on the center of the base.
NOTE: Bowl will begin to defrost quickly once it has been removed from the freezer. Use it immediately after removing from the freezer.
Place mixing arm in the freezer bowl. The arm does not fit tightly. It rests in the center of the bowl, with the circle side facing up.
Place lid on base, oriented to the right of center, and turn clockwise to lock. Easy-lock lid mechanism allows the lid to rest on the base.
Once the unit is plugged in, all function buttons should be lit. Using the control panel, select the desired function: ICE CREAM, GELATO or SORBET. You will hear a beep indicating ready mode.
Note: Use the ICE CREAM function when preparing frozen yogurt. The function cannot be changed after the preparation cycle begins. If necessary, press Start/Stop twice to reset the unit.
Adjust the preset time by using the arrows, if necessary. Max time is 60 minutes. (Time cannot be adjusted after the process begins.) Select Start/Stop. The freezer bowl will start turning, and the pre-programmed time will appear on the LCD screen.
Immediately pour ingredients through the ingredient spout. Place the measurement cup on the lid.
Frozen desserts will be done in 15 to 40 minutes. The time will depend on the recipe and volume of the dessert you are making. When the mixture has thickened to your liking, it is done. If you desire a firmer consistency, transfer the dessert to an airtight container and store in the freezer for two or more hours.
Once the time expires, the timer will begin counting negative to keep the unit cool for an additional maximum time of 30 minutes. The unit will beep for 5 seconds every 5 minutes during the keep-cool feature to remind you that your dessert is ready to serve or store.
NOTE: There are many variables to the final consistency — room temperature, bowl temperature, ingredient temperature, etc. If the recipe is done sooner, press Start/Stop.
NOTE: Do not store frozen desserts in the freezer bowl. Desserts will stick to the side of the freezer bowl and may damage the bowl. Store only in a plastic airtight container.
ADDING INGREDIENTS
In general, ingredients such as chips and nuts should be added about 5 minutes before the recipe is complete. Once the dessert has begun to thicken, add the ingredients through the ingredient spout. To add a chocolate swirl to ice cream, gelato or frozen yogurt, drizzle in hot fudge or melted chocolate. The melted chocolate will harden once it makes contact with the freezing ingredients so add it in a slow drizzle to ensure that it does not clump.
SAFETY FEATURE
Cuisinart Gelateria Frozen Yogurt, Ice Cream, Gelato & Sorbet Maker is equipped with a safety feature that automatically stops the unit if the system overheats. This may occur if the dessert is extremely thick, if the unit has been running for an excessively long period of time, or if added ingredients (nuts, etc.) are in extremely large pieces. Remove ingredients to serve or store, press the Start/Stop, begin the process again, if making another cycle.
Detailed Description
The Cuisinart Gelateria Frozen Yogurt is a versatile and easy-to-use ice cream maker that can help you create delicious and healthy treats at home. Its 1.5-quart capacity is perfect for making desserts for the whole family or a small group of friends. The stainless steel housing is not only durable but also adds a modern and stylish touch to your kitchen. The easy-lock lid with a large spout ensures that the mixture stays inside the bowl while mixing, and the removable mixing paddle makes cleaning a breeze.
One of the unique features of the Cuisinart Gelateria Frozen Yogurt is its double-insulated freezer bowl, which eliminates the need for ice and salt. The instant-stop function allows you to stop the machine at any time, giving you full control over the consistency of your frozen dessert. The 60-minute countdown timer is also a convenient feature, ensuring that your dessert is ready at the perfect time.
RECIPES
The recipes that follow offer you a variety of options for delicious frozen desserts. You may create or use recipes of your own, as long as bases yield 2 quarts (1.89 L) or less.
For optimum consistency, chill all mixtures for a minimum of 2 hours or up to 3 days. Always re-whisk the mixture after chilling to be sure all ingredients are well combined. While chilling the mixture is not required, resting it in a chilled environment helps bind the ingredients together, and prevents any ice or fat crystals from forming during the freezing process.
Some recipes use precooked ingredients. For best results, the precooked mixture should be chilled overnight or chilled over an ice bath before using. To make an ice bath, fill a large container with ice and water. Place saucepan or other container into the ice bath. Cool precooked ingredients completely.
You may substitute lower-fat creams (e.g., half and half) and/or milk (reduced fat or low fat) for heavy cream and whole milk used in many recipes. However, keep in mind that the higher the fat content, the richer and creamier the result. Using lower-fat substitutes may change the taste, consistency and texture of the dessert. When substituting, be sure to use the same volume of the substitute as you would have used of the original item. For example, if the recipe calls for 2 cups of cream, use a total of 2 cups of the substitute (such as 1 cup cream, plus 1 cup whole milk).
You may substitute artificial sweeteners for sugar. Stir the mixture thoroughly to dissolve the sweetener. See our recipe suggestions on page 14 for a guide.
Simple Vanilla Ice Cream
This ice cream can easily be dressed up by adding your favorite chopped candies or sprinkles at the end of churning.
Makes about 7 cups (1.75 L) [fourteen ½-cup (125 ml) servings]
1½ cups (375 ml) whole milk
1 cup (250 ml) plus 2 tablespoons (30 ml) granulated sugar
Pinch kosher salt
3 cups (750 ml) heavy cream
1½ tablespoons (25 ml) pure vanilla extract
In a medium bowl, use a hand mixer on low speed or whisk to combine the milk, sugar, and salt until the sugar is dissolved. Stir in the heavy cream and vanilla. Cover and refrigerate at least 2 hours, or overnight.
Press Ice Cream and then Start/Stop. Pour the mixture through the spout and then cover with the cap. Let mix until thickened. The ice cream will have a soft, creamy texture. If a firmer consistency is desired, transfer the ice cream to an airtight container and place in the freezer for about 2 hours. Remove from the freezer about 15 minutes before serving.
Nutritional information per serving [based on ½ cup (125 ml)]: Calories 260 (67% from fat) • carb. 19g • pro. 2g • fat 20g • sat. fat 12g • chol. 75mg • sod. 45mg • calc. 66mg • fiber 0g
Simple Chocolate Ice Cream
For a real treat, serve this with our Hot Fudge Sauce on page 26.
Makes about 7 cups (1.75 L) [fourteen ½-cup (125 ml) servings]
2⁄3 cup (150 ml) cocoa powder, sifted
½ cup (125 ml) granulated sugar
1⁄3 cup (75 ml) packed brown sugar
Pinch kosher salt
1½ cups (375 ml) whole milk
3½ cups (875 ml) heavy cream
2 teaspoons (10 ml) pure vanilla extract
Put the cocoa, sugars, and salt in a medium bowl; whisk to combine, breaking up any larger pieces with your fingers. Add the milk and, using a hand mixer on low speed or a whisk, beat to combine until the dry ingredients are dissolved. Stir in the heavy cream and vanilla. Cover and refrigerate at least 2 hours, or overnight.
Press Ice Cream and then START/STOP. Pour the mixture through the spout and then cover with the cap. Let mix until thickened. The ice cream will have a soft, creamy texture. If a firmer consistency is desired, transfer the ice cream to an airtight container and place in the freezer for about 2 hours. Remove from the freezer about 15 minutes before serving.
Nutritional information per serving [based on ½ cup (125 ml)]: Calories 283 (72% from fat) • carb. 17g • pro. 3g • fat 23g • sat. fat 14g • chol. 85mg • sod. 46mg • calc. 71mg • fiber 1g
Peanut Butter Cup Ice Cream
One of the easiest ice creams to make, the rich peanut butter flavor in this ice cream will have your friends and family in awe.
Makes about 6 cups (1.5 L) [twelve ½-cup (125 ml) servings]
1 cup (250 ml) good quality peanut butter
2⁄3 cup (150 ml) granulated sugar
1 cup (250 ml) whole milk
2 cups (500 ml) heavy cream
1 teaspoon (5 ml) pure vanilla extract
1 cup (250 ml) chopped chocolate peanut butter cup candies
(about 15 miniature peanut butter cups)
In a medium mixing bowl, use a hand mixer on low speed to combine the peanut butter and sugar until smooth. Add the milk and mix on low speed until the sugar is dissolved, about 1 to 2 minutes. Stir in the heavy cream and vanilla. Cover and refrigerate at least 2 hours, or overnight.
Press Ice Cream and then Start/Stop. Pour the mixture through the spout and then cover with the cap. Let mix until thickened. When the ice cream is almost fully churned, gradually add the chopped candy. The ice cream will have a soft, creamy texture. If a firmer consistency is desired, transfer the ice cream to an airtight container and place in the freezer for about 2 hours. Remove from the freezer about 15 minutes before serving.
Nutritional information per serving [based on ½ cup (125 ml)]: Calories 365 (68% from fat) • carb. 23g • pro. 8g • fat 29g • sat. fat 12g • chol. 58mg • sod. 157mg • calc. 58mg • fiber 2g
Banana Walnut Chip Ice Cream
Do not be intimidated by the multiple steps in this ice cream. The end result of frozen banana, toasted walnuts, and flecks of chocolate makes it worth every minute.
Makes about 6 cups (1.5 L) [twelve ½-cup (125 ml) servings]
¾ cup (175 ml) whole milk
2½ cups (625 ml) heavy cream
1 whole vanilla bean, halved and seeds scraped
½ teaspoon (2 ml) pure vanilla extract
½ teaspoon (2 ml) kosher salt
½ cup (125 ml) packed dark brown sugar
1 tablespoon (15 ml) water
3 tablespoons (45 ml) unsalted butter
3 large bananas, cut into 1-inch pieces
2 tablespoons (30 ml) rum
½ teaspoon (2 ml) fresh lemon juice
¾ cup (175 ml) toasted walnuts, roughly chopped 6 ounces (170 g) bittersweet chocolate, roughly chopped
In a medium saucepan set over medium-low heat, bring the milk, cream, scraped vanilla bean (including the pod), vanilla extract, and the salt just to a boil. Remove from heat; let mixture steep for 30 minutes.
While the milk/cream mixture is steeping, heat the sugar with water in a large skillet until it begins to sizzle. Stir in the butter and heat until melted. Add the bananas; cook for about 2 minutes, or until fragrant and softened. Carefully stir in the rum and cook for an additional 2 minutes, or until slightly thickened. Remove from heat. Stir the lemon juice into the bananas and then mix into the steeped milk/cream. Cover and refrigerate at least 2 hours, or overnight.
Right before churning ice cream, melt the bittersweet chocolate in a bowl set over a pot of simmering water. Keep chocolate at room temperature (it should remain fluid, but not hot).
Remove the vanilla pod from the steeped milk/cream mixture; discard the pod. Press Ice Cream and then Start/Stop. Pour the mixture through the spout and then cover with the cap. Let mix until thickened.
When the ice cream is almost fully churned, add the walnuts; let mix until combined. Right before the ice cream is done, drizzle the melted chocolate into the churning ice cream. The ice cream will have a soft, creamy texture. If a firmer consistency is desired, transfer the ice cream to an airtight container and place in the freezer for about 2 hours. Remove from the freezer about 15 minutes before serving.
Nutritional information per serving [based on ½ cup (125 ml)]: Calories 260 (62% from fat) • carb. 22g • pro. 3g • fat 19g • sat. fat 9g • chol. 35mg • sod. 90mg • calc. 38mg • fiber 2g
Butter Pecan Ice Cream
The butter used to toast the pecans can be saved and used over pancakes or waffles.
Makes about 6½ cups (1.625 L) [thirteen ½-cup (125 ml) servings]
4 tablespoons (60 ml) unsalted butter
1 cup (250 ml) pecan halves
1 teaspoon (5 ml) kosher salt, plus pinch
1¼ cups (300 ml) whole milk
1 cup (250 ml) granulated sugar
2½ cups (625 ml) heavy cream
2 teaspoons (10 ml) pure vanilla extract
Melt the butter in a medium skillet. Add the pecans and 1 teaspoon (5 ml) of salt. Cook over medium-low heat until pecans are toasted and golden, stirring frequently, about 6 to 8 minutes. Remove from the heat, strain and reserve the pecans, allowing them to chill.
In a medium bowl, use a hand mixer on low speed or whisk to combine the milk, sugar and pinch of salt until the sugar is dissolved. Stir in the heavy cream and vanilla. Cover and refrigerate at least 2 hours, or overnight. Whisk mixture together again before pouring into the ice cream maker.
Press Ice Cream and then Start/Stop. Pour the mixture through the spout and then cover with the cap. Let mix until thickened. When the ice cream is almost fully churned, gradually add the pecans. Allow to mix thoroughly. The ice cream will have a soft, creamy texture. If a firmer consistency is desired, transfer the ice cream to an airtight container and place in the freezer for about 2 hours. Remove from the freezer about 15 minutes before serving.
Nutritional information per serving [based on ½ cup (125 ml)]: Calories 349 (75% from fat) • carb. 19g • pro. 3g • fat 30g • sat. fat 15g • chol. 81mg • sod. 45mg • calc. 68mg • fiber 1g
Fresh Strawberry Ice Cream
Best made when strawberries are at their peak, this ice cream is light, sweet and fruity.
Makes about 5½ cups (1.375 ml) [eleven ½-cup (125 ml) servings]
1½ cups (375 ml) fresh strawberries, hulled*
¾ cup (175 ml) whole milk
2⁄3 cup (150 ml) granulated sugar
Pinch kosher salt
1½ cups (375 ml) heavy cream
1½ teaspoons (7 ml) pure vanilla extract
Put the strawberries into the bowl of a food processor fitted with the chopping blade. Pulse strawberries until rough/fine chopped (depending on preference).
In a medium bowl, use a hand mixer on low speed or whisk to combine the milk, sugar, and salt until the sugar is dissolved. Stir in the heavy cream and vanilla. Stir in reserved strawberries with all juices. Cover and refrigerate at least 2 hours, or overnight. Whisk mixture together again before pouring into the ice cream maker.
Press Ice Cream and then Start/Stop. Pour the mixture through the spout and then cover with the cap. Let mix until thickened. The ice cream will have a soft, creamy texture. If a firmer consistency is desired, transfer the ice cream to an airtight container and place in the freezer for about 2 hours. Remove from the freezer about 15 minutes before serving.
*Thawed frozen strawberries may be substituted if fresh strawberries are not available.
Nutritional information per serving [based on ½ cup (125 ml)]: Calories 175 (62% from fat) • carb. 15g • pro. 1g • fat 12g • sat. fat 8g • chol. 46mg • sod. 21mg • calc. 24mg • fiber 0g
Rich Vanilla Bean Ice Cream
For the true vanilla lover, be sure to use fresh vanilla beans to capture the intense flavor.
Makes about 6 cups (1.5 L) [twelve ½-cup (125 ml) servings]
21⁄3 cups (575 ml) whole milk
2½ cups (625 ml) heavy cream
1¼ cups (300 ml) granulated sugar, divided
Pinch kosher salt
1 whole vanilla bean, halved and seeds scraped
7 large egg yolks
In a medium saucepan set over medium-low heat, add the milk, cream, half of the sugar, salt, and the scraped vanilla bean (including the pod). Whisk to combine and bring the mixture just to a boil.
While the milk/cream mixture is heating, combine the yolks and remaining sugar in a medium bowl. Using a hand mixer on low speed or whisk, beat until mixture is pale and thick.
Once the milk/cream mixture has come to a slight boil, whisk about 1⁄3 of the hot mixture into the yolk/sugar mixture. Add another 1⁄3 of the mixture, then return the combined mixture to the saucepan. Using a wooden spoon, stir the mixture constantly over low heat until it thickens slightly and coats the back of the spoon. This mixture must NOT boil or the yolks will overcook – the process should only take a few minutes.
Let the ice cream base come to room temperature. Then cover and refrigerate at least 2 hours, or overnight. Before churning, pour the mixture through a fine mesh strainer and discard the vanilla pod.
Press Ice Cream and then Start/Stop. Pour the mixture through the spout and then cover with the cap. Let mix until thickened. The ice cream will have a soft, creamy texture. If a firmer consistency is desired, transfer the ice cream to an airtight container and place in the freezer for about 2 hours. Remove from the freezer about 15 minutes before serving.
Nutritional information per serving (based on ½ cup): Calories 260 (62% from fat) • carb. 21g • pro. 3g • fat 18g • sat. fat 11g • chol. 165mg • sod. 50mg • calc. 87mg • fiber 0g
Fresh Mint with Chocolate Cookies Ice Cream
Always a winning combination, fresh mint and chocolate take the forefront in this rich and creamy ice cream.
Makes about 7 cups (1.75 ml) [fourteen 1/2-cup (125 ml) servings]
2⅓ cups (575 ml) whole milk
2⅓ cups (575 ml) heavy cream
1¼ cups (300 ml) granulated sugar, divided
¼ teaspoon (1 ml) kosher salt
2 teaspoons (10 ml) pure vanilla extract
3 cups (750 ml) fresh mint leaves
7 large egg yolks
1½ cups (375 ml) crushed chocolate sandwich cookies (about 12 cookies)
In a medium saucepan set over medium-low heat, add the milk, cream, half of the granulated sugar, salt, vanilla, and mint leaves. Whisk to combine and bring the mixture just to a boil.
While the milk/cream mixture is heating, combine the yolks and remaining sugar in a medium bowl. Using a hand mixer on low speed or a whisk, beat until the mixture is pale and thick.
Once the milk/cream mixture has just come to a boil, slowly whisk about ⅓ of the hot mixture into the yolk/sugar mixture. Whisk in another ⅓ of the mixture and return the combined mixture to the saucepan. Using a wooden spoon, stir the mixture constantly over low heat until it thickens slightly and coats the back of the spoon. This mixture must NOT boil or the yolks will overcook – the process should only take a few minutes.
Bring the ice cream base to room temperature. Then cover and refrigerate at least 2 hours, or overnight. Before churning, pour the custard through a fine mesh strainer.
Press Ice Cream and then Start/Stop. Pour the mixture through the spout and then cover with the cap. Let mix until thickened. When the ice cream is almost fully churned, gradually add the crushed cookies. Allow to mix thoroughly. The ice cream will have a soft, creamy texture. If a firmer consistency is desired, transfer the ice cream to an airtight container and place in the freezer for about 2 hours. Remove from the freezer about 15 minutes before serving.
Nutritional information per serving [based on ½ cup (125 ml)]: Calories 330 (56% from fat) • carb. 32g • pro. 5g • fat 21g • sat. fat 12g • chol. 165mg • sod. 115mg • calc. 126mg • fiber 2g
Mexican-Style Chocolate Ice Cream
This ice cream can be spicy for some, so adjust the cayenne to your personal taste.
Makes about 6 cups (1.5 L) [about twelve 1/2-cup (125 ml) servings]
2½ cups (625 ml) whole milk
2½ cups (625 ml) heavy cream
2 teaspoons (10 ml) pure vanilla extract
1½ teaspoons (7 ml) ground cinnamon
¼ teaspoon (1 ml) cayenne
¾ teaspoon (3.75 ml) kosher salt
1 cup (250 ml) granulated sugar, divided
8 large egg yolks
8 ounces (230 g) bittersweet chocolate, roughly chopped
In a medium saucepan set over medium-low heat, add the milk, cream, vanilla, spices, salt, and half of the sugar. Whisk to combine and bring the mixture just to a boil.
While the milk/cream mixture is heating, combine the yolks and remaining sugar in a medium bowl. Using a hand mixer on low speed or a whisk, beat until the mixture is pale and thick.
Place the chopped chocolate in a separate mixing bowl; reserve.
Once the milk/cream mixture has come to a slight boil, whisk about ⅓ of the hot mixture into the yolk/sugar mixture. Add another ⅓ of the mixture and return the combined mixture to the saucepan. Using a wooden spoon, stir the mixture constantly over low heat until it thickens slightly and coats the back of the spoon. This mixture must NOT boil or the yolks will overcook – the process should only take a few minutes.
Pour the hot mixture through a fine mesh strainer into the bowl of the reserved chocolate; let stand for about 1 minute then whisk to combine, making sure the chocolate is melted and the custard is smooth. Let the base come to room temperature. Then cover and refrigerate at least 2 hours, or overnight.
Press Ice Cream and then Start/Stop. Pour the mixture through the spout and then cover with the cap. Let mix until thickened. The ice cream will have a soft, creamy texture. If a firmer consistency is desired, transfer the ice cream to an airtight container and place in the freezer for about 2 hours. Remove from the freezer about 15 minutes before serving.
Nutritional information per serving [based on ½ cup (125 ml)]: Calories 300 (65% from fat) • carb. 23g • pro. 4g • fat 23g • sat. fat 13g • chol. 160mg • sod. 140mg • calc. 85mg • fiber 1g
Pistachio Ice Cream
An old standby takes center stage in the Cuisinart Gelateria Frozen Yogurt, Ice Cream, Gelato & Sorbet Maker. We love this flavor in our Birthday Cake on page 25, or just scoop into your favorite cone.
Makes about 7 cups (1.75 L) [about fourteen 1/2-cup (125 ml) servings]
2 cups (500 ml) whole milk
2 cups (500 ml) heavy cream
1 cup (250 ml) granulated sugar, divided Pinch kosher salt
5 large egg yolks
1½ cups (375 ml) shelled, roasted, unsalted pistachios
¾ teaspoon (3.75 ml) almond extract
In a medium saucepan set over medium-low heat, combine the milk, cream, ⅓ cup (75 ml) of the sugar, and salt. Whisk to combine and bring the mixture just to a boil.
While the milk/cream mixture is heating, combine the yolks and ⅓ cup (75 ml) of the sugar in a medium bowl. Using a hand mixer on low speed or a whisk, beat until the mixture is pale and thick.
In the bowl of a food processor fitted with the chopping blade, combine the pistachios with the remaining sugar. Pulse to roughly chop the nuts and set aside.
Once the milk/cream mixture has just come to a boil, whisk about ⅓ of the hot mixture into the yolk/sugar mixture. Add another ⅓ of the mixture and return the combined mixture to the saucepan. Using a wooden spoon, stir the mixture constantly over low heat until it thickens slightly and coats the back of the spoon. This mixture must NOT boil or the yolks will overcook – the process should only take a few minutes.
Pour the mixture through a fine mesh strainer into a medium bowl. Stir in the chopped pistachios and the almond extract. Let the base come to room temperature. Then cover and refrigerate at least 2 hours, or overnight.
Press Ice Cream and then Start/Stop. Pour the mixture through the spout and then cover with the cap. Let mix until thickened. The ice cream will have a soft, creamy texture. If a firmer consistency is desired, transfer the ice cream to an airtight container and place in the freezer for about 2 hours. Remove from the freezer about 15 minutes before serving.
Nutritional analysis per serving [based on ½ cup (125 ml)]: Calories 289 (64% from fat) • carb. 21g • pro. 6g • fat 21g • sat. fat 10g • chol. 117mg • sod. 46mg • calc. 87mg • fiber 1g
Orange Liqueur Ice Cream
A luxurious treat intended for the adult crowd.
Makes about 5 cups (1.25 L) [about ten ½-cup (125 ml) servings]
2 cups (500 ml) whole milk
2 cups (500 ml) heavy cream Zest of one medium-large orange
1 cup (250 ml) granulated sugar, divided Pinch kosher salt
5 large egg yolks
1 teaspoon (5 ml) pure vanilla extract
3 tablespoons (45 ml) orange liqueur
In a medium saucepan set over medium-low heat, stir together the milk and heavy cream. Bring the mixture just to a boil. Turn heat off and add the orange zest; let mixture steep for 30 to 60 minutes. After steeping, add half of the sugar and salt and gradually return the mixture just to a boil over medium-low heat.
While the milk/cream mixture is reheating, combine the yolks and remaining sugar in a medium bowl. Using a hand mixer on low speed or a whisk, beat until the mixture is pale and thick.
Once the milk/cream mixture has come to a slight boil, whisk about ⅓ of the hot mixture into the yolk/sugar mixture. Add another ⅓ of the mixture, then return the combined mixture to the saucepan. Using a wooden spoon, stir the mixture constantly over low heat until it thickens slightly and coats the back of the spoon. This mixture must NOT boil or the yolks will overcook – the process should only take a few minutes.
Stir in the vanilla and orange liqueur and pour the mixture through a fine mesh strainer (discard the orange zest); bring to room temperature. Cover and refrigerate at least 2 hours, or overnight. Whisk mixture again before pouring into the ice cream maker.
Press Ice Cream and then START/STOP. Pour the mixture through the spout and then cover with the cap. Let mix until thickened. The ice cream will have a soft, creamy texture. If a firmer consistency is desired, transfer the ice cream to an airtight container and place in the freezer for about 2 hours. Remove from the freezer about 15 minutes before serving.
Nutritional information per serving [based on ½ cup (125 ml)]: Calories 313 (60% from fat) • carb. 24g • pro. 4g • fat 21g • sat. fat 13g • chol. 177mg • sod. 62mg • calc. 103mg • fiber 0g
Dairy-Free Vanilla Ice Cream
You will not miss anything in this alternative sweet treat.
Makes about 6 cups (1.5 L) [twelve ½-cup (125 ml) servings]
4 cups (1 L) unsweetened dairy-free milk (soy, hemp, almond, rice)
2½ tablespoons (40 ml) tapioca starch
1 cup (250 ml) granulated sugar Pinch kosher salt
1½ teaspoons (7 ml) pure vanilla extract
In a medium bowl, use a hand mixer on low speed or whisk to combine all of the ingredients. Cover, refrigerate at least 2 hours, or overnight. Whisk mixture again before pouring into the ice cream maker.
Press Ice Cream and then Start/Stop. Pour the mixture through the spout and then cover with the cap. Let mix until thickened. The ice cream will have a soft, creamy texture. If a firmer consistency is desired, transfer the ice cream to an airtight container and place in the freezer for about 2 hours. Remove from the freezer about 15 minutes before serving.
Nutritional information per serving [based on ½ cup (125 ml)]: Calories 105 (8% from fat) • carb. 21g • pro. 3g • fat 1g • sat. fat 0g • chol. 0mg • sod. 38mg • calc. 14mg • fiber 1g
Agave-Vanilla Ice Cream
The agave nectar gives this vanilla ice cream a honey-like taste.
Makes about 6 cups (1.5 L) [twelve ½-cup (125 ml) servings]
1½ cups (375 ml) whole milk
2⁄3 cup (150 ml) agave nectar Pinch kosher salt
3 cups (750 ml) heavy cream
1½ teaspoons pure vanilla extract
In a medium bowl, use a hand mixer on low speed or whisk to combine the milk, agave, and salt until homogenous. Stir in the heavy cream and vanilla. Cover and refrigerate at least 2 hours, or overnight.
Press Ice Cream and then Start/Stop. Pour the mixture through the spout and then cover with the measuring cup. Let mix until thickened. The ice cream will have a soft, creamy texture. If a firmer consistency is desired, transfer the ice cream to an airtight container and place in the freezer for about 2 hours. Remove from the freezer about 15 minutes before serving.
Nutritional information per serving [based on ½ cup (125 ml)]: Calories 228 (87% from fat) • carb. 5g • pro. 1g • fat 21g • sat. fat 17g • chol. 83mg • sod. 47mg • calc. 84mg • fiber 1g
Vanilla Ice Cream with Stevia
A little goes a long way when using stevia. We recommend using only 1 tablespoon (15ml) of the stevia powder, but if the ice cream is not sweet enough, try adding some blended frozen fruit as well.
Makes about 5 cups (1.25 L) [ten ½-cup (125 ml) servings]
1½ cups (375 ml) whole milk
4 teaspoons (20 ml) stevia powder Pinch kosher salt
3 cups (750 ml) heavy cream
2 teaspoons (10 ml) pure vanilla extract
In a medium bowl, use a hand mixer on low speed or whisk to combine the milk, stevia, and salt until the stevia is dissolved. Stir in the heavy cream and vanilla. Cover and refrigerate at least 2 hours, or overnight.
Press Ice Cream and then Start/Stop. Pour the mixture through the spout and then cover with the cap. Let mix until thickened, adding additional time as necessary. The ice cream will have a soft, creamy texture. If a firmer consistency is desired, transfer the ice cream to an airtight container and place in the freezer for about 2 hours. Remove from the freezer about 15 minutes before serving.
Nutritional information per serving [based on ½ cup (125 ml)]: Calories 268 (95% from fat) • carb. 3g • pro. 1g • fat 25g • sat. fat 17g • chol. 100mg • sod. 30mg • calc. 41mg • fiber 0g
Chocolate-Coconut Ice Cream
A delicious and creamy non-dairy frozen treat. Be sure to mix the batter very well before freezing to avoid any clumps in the final product.
Makes about 4 cups (1 L) [eight ½-cup (125 ml) servings]
¾ cup (175 ml) cocoa powder, sifted
2⁄3 cup (150 ml) granulated sugar
1⁄3 cup (75 ml) packed light brown sugar Pinch kosher salt
2 cans [13.5 ounces (400 ml) each] coconut milk (do not use “lite”)
1½ teaspoons pure vanilla extract
Using a blender or in a bowl with an immersion blender on low speed, mix all ingredients together until very smooth with no clumps.
Cover and refrigerate 2 hours, or overnight. Whisk mixture before pouring into the ice cream maker.
Press Ice Cream and then Start/Stop. Pour the mixture through the spout and then cover with the cap. Let mix until thickened. The ice cream will have a soft, creamy texture. If a firmer consistency is desired, transfer the ice cream to an airtight container and place in the freezer for about 2 hours. Remove from the freezer about 15 minutes before serving.
Nutritional information per serving [based on ½ cup (125 ml)]: Calories 305 (57% from fat) • carb. 31g • pro. 3g • fat 20g • sat. fat 18g • chol. 0mg • sod. 46mg • calc. 6mg • fiber 2g
Cherry-Chocolate Ice Cream
Chocolate-covered cherries in ice cream form. This dairy-free dessert is sure to please all.
Makes about 6 cups (1.5 L) [twelve ½-cup (125 ml) servings]
2 cans [13.5 ounces (400 ml) each] coconut milk (do not use “lite”)
¾ cup (175 ml) granulated sugar
½ teaspoon (2 ml) kosher salt
1 teaspoon (5 ml) pure vanilla extract
1 cup (250 ml) frozen cherries, thawed
4 ounces (115 g) semisweet chocolate [about ¾ cup (175 ml)], melted and kept warm (or use dairy-free or carob chips)
Using a blender or in a bowl with an immersion blender on low speed, mix the coconut milk, sugar, salt, and vanilla until very smooth with no clumps. Add the thawed cherries and pulse to combine (they can be fully puréed, or left in pieces, depending on personal preference).
Chill for at least 2 hours, or overnight. Whisk mixture before pouring into the ice cream maker.
Press Ice Cream and then Start/Stop. Pour the mixture through the spout and then cover with the cap. Let mix until thickened. When the ice cream is almost fully churned, drizzle in the melted chocolate. The ice cream will have a soft, creamy texture. If a firmer consistency is desired, transfer the ice cream to an airtight container and place in the freezer for about 2 hours. Remove from the freezer about 15 minutes before serving.
Nutritional information per serving [based on ½ cup (125 ml)]: Calories 165 (74% from fat) • carb. 10g • pro. 1g • fat 15g • sat. fat 13g • chol. 0mg • sod. 112mg • calc. 3mg • fiber 1g
Basic Vanilla Gelato
Drizzle in melted chocolate for a decadent stracciatela gelato.
Makes about 5 cups (1.25 L) [ten ½-cup (125 ml) servings]
1 cup (250 ml) heavy cream
3 cups (750 ml) whole milk, divided
1 cup (250 ml) granulated sugar
2 tablespoons (30 ml) cornstarch Pinch kosher salt
½ teaspoon (2 ml) pure vanilla extract
1 tablespoon (15 ml) liquid pectin
In a medium saucepan, combine cream and 2 cups (500 ml) of the milk. Set over medium/medium-low heat and bring to a simmer.
While the cream/milk mixture is heating, put the remaining milk, sugar, cornstarch, salt, and vanilla into a small-medium mixing bowl. Whisk to combine.
Once the cream/milk mixture comes to a simmer, add the milk/sugar mixture and stir until fully combined. While still set over medium/medium-low heat, continuously stir until the mixture comes to a strong simmer and thickens slightly, so it just coats the back of a spoon (this will take no more than 20 minutes, depending on the stove being used).
Remove the pan from heat, stir in pectin, strain, and cool to room temperature. Cover and refrigerate at least 2 hours, or overnight. Whisk the mixture together again before pouring into the ice cream maker.
Press Gelato and then Start/Stop. Pour the mixture through the spout and then cover with the cap. Let mix until thickened. The gelato will have a soft, creamy texture. If a firmer consistency is desired, transfer the gelato to an airtight container and place it in the freezer for about 2 hours. Remove from the freezer about 15 minutes before serving.
Nutritional information per serving [based on ½ cup (125 ml)]: Calories 211 (46% from fat) • carb. 26g • pro. 3g • fat 11g • sat. fat 7g • chol. 43mg • sod. 61mg • calc. 106mg • fiber 0g
Chocolate-Hazelnut Gelato
A standard in many gelaterias, bring the flavors of Italy to your kitchen with this recipe.
Makes about 5 cups (1.25 L) [ten ½-cup (125 ml) servings]
1¾ cups (425 ml) heavy cream
2¼ cups (550 ml) whole milk, divided
½ cup (125 ml) granulated sugar
2 tablespoons (30 ml) cornstarch Pinch kosher salt
1 cup (250 ml) chocolate-hazelnut spread
½ cup (125 ml) chopped hazelnuts
In a medium saucepan, combine the cream and 1½ cups (375 ml) of the milk. Set over medium/medium-low heat and bring to a simmer.
While the cream/milk mixture is heating, put the remaining milk, sugar, cornstarch, and salt into a small-medium mixing bowl. Whisk to combine.
Once the cream/milk mixture comes to a simmer, add the milk/sugar mixture and stir until fully combined. Slowly whisk in the chocolate-hazelnut spread. While still set over medium/medium-low heat, continuously stir until the mixture comes to a strong simmer and thickens slightly so it just coats the back of a spoon (this will take no more than 20 minutes, depending on the stove being used).
Remove the pan from heat, strain, and cool to room temperature. Cover and refrigerate at least 2 hours, or overnight. Whisk the mixture together again before pouring into the ice cream maker.
Press Gelato and then Start/Stop. Pour the mixture through the spout and then cover with the cap. Let mix until thickened. When the gelato is almost fully churned, gradually add the hazelnuts. Allow mixing thoroughly. The gelato will have a soft, creamy texture. If a firmer consistency is desired, transfer the gelato to an airtight container and place it in the freezer for about 2 hours. Remove from the freezer about 15 minutes before serving.
Nutritional information per serving [based on ½ cup (125 ml)]: Calories 403 (65% from fat) • carb. 30g • pro. 5g • fat 30g • sat. fat 13g • chol. 65mg • sod. 71mg • calc. 136mg • fiber 3g
Custard Gelato
This recipe uses egg yolks to create an extra creamy and custard-like flavor.
Makes about 4 cups (1 L) [eight ½-cup (125 ml) servings]
1 cup (250 ml) heavy cream
2 cups (500 ml) whole milk, divided
2 teaspoons (10 ml) pure vanilla extract
¼ teaspoon (1 ml) kosher salt
2 tablespoons (30 ml) cornstarch
6 large egg yolks
¾ cup (175 ml) granulated sugar
Put the cream and 1¾ cups (425 ml) milk together with the vanilla and salt into a saucepan over medium heat and bring just to a simmer. In a small bowl, mix together the remaining milk with the cornstarch and reserve.
While the cream/milk mixture is heating, combine the yolks and sugar in a medium bowl. Using a hand mixer on low speed or whisk, beat well until the mixture is pale and thick.
Once the cream/milk mixture has come to a simmer, stir in the milk/cornstarch mixture and continue to stir over heat for an additional 5 minutes, being sure the mixture does not come to a boil.
Whisking continuously at the same time, whisk about ⅓ of the hot mixture into the yolk/sugar mixture. Add another ⅓ of the mixture, then return the combined mixture to the saucepan. Using a wooden spoon, stir the mixture constantly over low heat until it thickens slightly and coats the back of the spoon. This mixture must NOT boil or the yolks will overcook. The process should only take a few minutes.
Let the gelato base come to room temperature. Then cover and refrigerate at least 2 hours, or overnight. Before churning, strain the base through a fine mesh sieve.
Press Gelato and then Start/Stop. Pour the mixture through the spout and then cover with the cap. Let mix until thickened. The gelato will have a soft, creamy texture. If a firmer consistency is desired, transfer the gelato to an airtight container and place it in the freezer for about 2 hours. Remove from the freezer about 15 minutes before serving.
Nutritional information per serving [based on ½ cup (125 ml)]: Calories 176 (55% from fat) • carb. 17g • pro. 3g • fat 11g • sat. fat 6g • chol. 138mg • sod. 82 mg • calc. 74mg • fiber 0g
Lemon Gelato
The perfect amount of sweet and tart for this classic gelato flavor.
Makes about 5 cups (1.25 L) [ten ½-cup (125 ml) servings]
1 cup (250 ml) heavy cream
2 cups (500 ml) whole milk, divided
½ cup (125 ml) lemon zest (from about 4–6 medium lemons)
1¼ cups (300 ml) granulated sugar
2 tablespoons (30 ml) cornstarch Pinch kosher salt
1 teaspoon (5 ml) pure vanilla extract
1 tablespoon (15 ml) liquid pectin
1 cup (250 ml) lemon juice (from about 4–6 medium lemons)
In a medium saucepan, combine the cream and 1 cup (250 ml) of the milk. Set over medium/medium-low heat and bring to a simmer.
While the cream/milk mixture is heating, put the remaining milk, lemon zest, sugar, cornstarch, salt, and vanilla into a small-medium mixing bowl. Whisk to combine.
Once the cream/milk mixture comes to a simmer, add the milk/sugar mixture and stir until fully combined. While still set over medium/medium-low heat, continuously stir until the mixture comes to a strong simmer and thickens slightly so it just coats the back of a spoon (this will take no more than 20 minutes, depending on the stove being used).
Remove the pan from heat, stir in pectin, strain, and cool to room temperature. Stir in the lemon juice, cover, and refrigerate at least 2 hours, or overnight. Whisk the mixture together again before pouring into the ice cream maker.
Press Gelato and then Start/Stop. Pour the mixture through the spout and then cover with the cap. Let mix until thickened. The gelato will have a soft, creamy texture. If a firmer consistency is desired, transfer the gelato to an airtight container and place it in the freezer for about 2 hours. Remove from the freezer about 15 minutes before serving.
Nutritional information per serving [based on ½ cup (125 ml)]: Calories 281 (40% from fat) • carb. 40g • pro. 3g • fat 13g • sat. fat 8g • chol. 50mg • sod. 43mg • calc. 105mg • fiber 1g
Mascarpone and Fig Gelato
Mascarpone and fig combine deliciously together in this grown-up gelato flavor.
Makes about 6½ cups (1.625 ml) [thirteen ½-cup (125 ml) servings]
Fig purée: [or, you can substitute 1 cup (250 ml) fig jam for the homemade purée)
1 cup (250 ml) dried, sulfate-free figs, about 10 to 12 figs
1½ cups (375 ml) water, plus more as needed
2 tablespoons (30 ml) honey
Mascarpone base
1½ cups (375 ml) heavy cream
3 cups (750 ml) whole milk, divided
1⅔ cups (400 ml) granulated sugar
3 tablespoons (45 ml) cornstarch Pinch kosher salt
2 teaspoons (10 ml) pure vanilla extract
1½ cups (375 ml) mascarpone
1½ tablespoons (25 ml) liquid pectin
1 recipe Fig Purée (entire yield from recipe above)
Make the purée
Put the figs, water, and honey in a small saucepan. Bring the mixture to a boil and then immediately reduce the heat to maintain a slight simmer.
Continue simmering for at least 3 hours, adding water as necessary to keep the figs covered while they are simmering.
When figs are really soft and there is only ½ cup of liquid remaining, purée the mixture with a hand blender until smooth. Refrigerate until ready to use.
While the figs are simmering, prepare the base
In a medium saucepan, combine the cream and 1½ cups (375 ml) of the milk. Set over medium/medium-low heat and bring to a simmer.
While the cream/milk mixture is heating, put the remaining milk, sugar, cornstarch, salt, and vanilla into a medium mixing bowl. Whisk to combine.
Once the cream/milk mixture comes to a simmer, add the milk/sugar mixture and stir until fully combined; reserve the mixing bowl for the mascarpone. Add the mascarpone to the reserved bowl and whisk to loosen slightly.
While still set over medium/medium-low heat, continuously stir until the mixture comes to a strong simmer and thickens slightly so it just coats the back of a spoon (this will take no more than 20 minutes, depending on the stove being used).
Remove the pan from heat. Slowly pour the hot liquid into the mascarpone, mixing with a hand mixer or whisk until the mixture is completely homogenous. Once the mixture is homogenous, stir in pectin, strain, and cool to room temperature. Cover and refrigerate at least 2 hours, or overnight. Whisk the mixture together again before pouring into the ice cream maker. The mixture will be very thick.
Press Gelato and then Start/Stop. Pour the mixture through the spout and then cover with the cap. Let mix until thickened. When the gelato is almost fully churned, gradually add the fig purée, a dollop at a time. Allow to mix thoroughly. The gelato will have a soft, creamy texture. If a firmer consistency is desired, transfer the gelato to an airtight container and place it in the freezer for about 2 hours. Remove from the freezer about 15 minutes before serving.
Nutritional information per serving [based on ½ cup (125 ml)]: Calories 364 (50% from fat) • carb. 41g • pro. 4g • fat 20g • sat. fat 13g • chol. 74mg • sod. 128mg • calc. 115mg • fiber 1g
Mixed Berry Gelato
The richness of the cream and the sweetness of the berries are reminiscent of pie à la mode.
Makes about 7 cups (1.75 ml) [fourteen ½-cup (125 ml) servings]
2 cups (500 ml) heavy cream
4 cups (1 L) whole milk, divided
1½ cups (375 ml) granulated sugar
3 tablespoons (45 ml) cornstarch
¼ teaspoon (1 ml) kosher salt
2 cups (500 ml) mixed fresh or frozen (thawed) berries
1 teaspoon (5 ml) pure vanilla extract
2 tablespoons (30 ml) mixed berry jam
In a medium saucepan, combine the cream and 3 cups (750 ml) of the milk. Set over medium/medium-low heat and bring to a simmer.
While the cream/milk mixture is heating, put the remaining milk, sugar, cornstarch, and salt into a small-medium mixing bowl. Whisk to combine. Using a blender, food processor, or hand blender, purée the berries until mostly smooth; reserve.
Once the cream/milk mixture comes to a simmer, add the milk/sugar mixture and stir until fully combined. While still set over medium/medium-low heat, continuously stir until the mixture comes to a strong simmer and thickens slightly, so it just coats the back of a spoon (this will take no more than 20 minutes, depending on the stove being used).
Remove the pan from heat, stir in the puréed berries, vanilla, and jam; strain and cool to room temperature. Cover and refrigerate a minimum of 2 hours, or overnight. Whisk the mixture together again before pouring into the ice cream maker.
Press Gelato and then Start/Stop. Pour the mixture through the spout and then cover with the cap. Let mix until thickened. The gelato will have a soft, creamy texture. If a firmer consistency is desired, transfer the gelato to an airtight container and place it in the freezer for about 2 hours. Remove from the freezer about 15 minutes before serving.
Nutritional information per serving [based on ½ cup (125 ml)]: Calories 207 (44% from fat) • carb. 27g • pro. 2g • fat 10g • sat. fat 6g • chol. 40mg • sod. 49mg • calc. 77mg • fiber 0g
Olive Oil-Thyme Gelato
A savory treat, this fragrant gelato is perfect with a simple cookie on the side.
Makes about 4½ cups (1.125 L) [nine ½-cup (125 ml) servings]
1 cup (250 ml) heavy cream
3 cups (750 ml) whole milk, divided
2 sprigs fresh thyme
1 cup (250 ml) granulated sugar
2 tablespoons (30 ml) cornstarch Pinch kosher salt
¾ cup (175 ml) extra virgin olive oil
1 tablespoon (15 ml) liquid pectin
In a medium saucepan, combine the cream, 2 cups (500 ml) of the milk, and the thyme. Set over medium/medium-low heat and bring to a simmer. Remove from heat and allow thyme to steep in the cream/milk mixture for about 30 minutes. After steeping, remove and discard thyme and then return to the heat and bring back to a simmer.
While the cream/milk mixture is re-heating, put the remaining milk, sugar, cornstarch, and salt into a small-medium mixing bowl. Whisk to combine. Slowly whisk in the olive oil.
Once the cream/milk mixture comes to its second simmer, add the milk/sugar mixture and stir until fully combined. While still set over medium/medium-low heat, continuously stir until the mixture comes to a strong simmer and thickens slightly, so it just coats the back of a spoon (this will take no more than 20 minutes, depending on the stove being used).
Remove the pan from heat, stir in pectin, strain, and cool to room temperature. Cover and refrigerate at least 2 hours, or overnight. Whisk the mixture together again before pouring into the ice cream maker.
Press Gelato and then Start/Stop. Pour the mixture through the spout and then cover with the cap. Let mix until thickened. The gelato will have a soft, creamy texture. If a firmer consistency is desired, transfer the gelato to an airtight container and place it in the freezer for about 2 hours. Remove from the freezer about 15 minutes before serving.
Nutritional information per serving [based on ½ cup (125 ml)]: Calories 394 (69% from fat) • carb. 29g • pro. 3g • fat 31g • sat. fat 10g • chol. 48mg • sod. 68mg • calc. 118mg • fiber 0g
Rich Vanilla Frozen Yogurt
While part-skim or fat-free yogurt can be substituted, to get the real flavor and richness of this frozen yogurt it is best to use the whole-milk variety.
Makes about 4 cups (1 L) [eight ½-cup (125 ml) servings]
2 tablespoons (30 ml) light corn syrup
2 tablespoons (30 ml) honey
¼ cup (60 ml) water
1 vanilla bean, split and seeds scraped
4 cups (1 L) whole milk, plain Greek yogurt
1½ teaspoons (7 ml) pure vanilla extract
1¼ cups (300 ml) granulated sugar Pinch kosher salt
Add the corn syrup, honey, water, and scraped vanilla pod to a medium saucepan. Bring the mixture to a boil and then simmer until reduced by half; cool and reserve.
In a large mixing bowl, whisk the yogurt, vanilla seeds, reserved honey-vanilla reduction, vanilla extract, sugar, and salt together. Whisk until the sugar has dissolved. Cover and refrigerate for 2 to 3 hours, or overnight.
Press Ice Cream and then Start/Stop. Pour the mixture through the spout and then cover with the cap. Let mix until thickened. The frozen yogurt will have a soft, creamy texture. If a firmer consistency is desired, transfer the frozen yogurt to an airtight container and place it in the freezer for about 2 hours. Remove from the freezer about 15 minutes before serving.
Nutritional information per serving [based on ½ cup (125 ml)]: Calories 387 (27% from fat) • carb. 48g • pro. 5g • fat 12g • sat. fat 8g • chol. 30mg • sod. 90mg • calc. 154mg • fiber 0g
Mango Frozen Yogurt
We use frozen mango to make this a quick, simple dessert, but for a more intense flavor, use ripe, fresh mango.
Makes about 6 cups (1.5 L) [twelve ½-cup (125 ml) servings]
2 cups (500 ml) whole milk, plain Greek yogurt
½ cup (125 ml) granulated sugar
4 cups (1 L) frozen mango pieces, thawed
1 teaspoon (5 ml) fresh lime juice Pinch kosher salt
Put all of the ingredients into a Cuisinart® food processor. Purée until completely smooth, stopping to scrape down the sides of the bowl as needed. Strain mixture into a medium mixing bowl, cover, and refrigerate at least 2 hours, or overnight.
Press Ice Cream and then Start/Stop. Pour the mixture through the spout and then cover with the cap. Let mix until thickened. The frozen yogurt will have a soft, creamy texture. If a firmer consistency is desired, transfer the frozen yogurt to an airtight container and place it in the freezer for about 2 hours. Remove from the freezer about 15 minutes before serving.
Nutritional information per serving [based on ½ cup (125 ml)]: Calories 130 (7% from fat) • carb. 27g • pro. 4g • fat 1g • sat. fat 1g • chol. 5mg • sod. 65mg • calc. 182mg • fiber 2g
Chocolate Pretzel Frozen Yogurt
The combination of the chocolate and the salt from the pretzel is a standout in this tangy and sweet dessert.
Makes about 6½ cups (1.625 L) [thirteen ½-cup (125 ml) servings]
4 cups (1 L) whole milk, plain Greek yogurt
¾ cup (175 ml) granulated sugar
⅓ cup (75 ml) cocoa powder, sifted Pinch kosher salt
1 cup (250 ml) whole milk
½ teaspoon (125 ml) pure vanilla extract
1 cup (250 ml) chopped chocolate or yogurt-covered pretzels
In a large mixing bowl, whisk together all ingredients except the pretzels, until the dry ingredients have dissolved. Cover and refrigerate at least 2 hours, or overnight.
Press Ice Cream and then Start/Stop. Pour the mixture through the spout and then cover with the cap. Let mix until thickened. When the frozen yogurt is almost fully churned, gradually add the chopped pretzels. Allow to mix thoroughly. The frozen yogurt will have a soft texture. If a firmer consistency is desired, transfer the frozen yogurt to an airtight container and place it in the freezer for about 2 hours. Remove from the freezer about 15 minutes before serving.
Nutritional information per serving [based on ½ cup (125 ml)]: Calories 254 (40% from fat) • carb. 32g • pro. 5g • fat 11g • sat. fat 7g • chol. 21mg • sod. 183mg • calc. 131mg • fiber 0g
Blueberry Frozen Yogurt
The tanginess of the yogurt comes through in this low-fat dessert.
Makes about 7 cups (1.75 L) [fourteen ½-cup (125 ml) servings]
2 cups (500 ml) whole milk, plain Greek yogurt
½ cup (125 ml) granulated sugar Pinch kosher salt
1 teaspoon (5 ml) pure vanilla extract
4 cups (1 L) blueberries fresh or frozen (thawed)
1 teaspoon (5 ml) fresh lemon juice
Put all ingredients into a Cuisinart® food processor. Purée until completely smooth, stopping to scrape down the sides of the bowl as needed. Strain into a large mixing bowl, cover, and refrigerate at least 2 hours, or overnight.
Press Ice Cream and then Start/Stop. Pour the mixture through the spout and then cover with the cap. Let mix until thickened. The frozen yogurt will have a soft, creamy texture. If a firmer consistency is desired, transfer the frozen yogurt to an airtight container and place it in the freezer for about 2 hours. Remove from the freezer about 15 minutes before serving.
Nutritional information per serving [based on ½ cup (125 ml)]: Calories 95 (32% from fat) • carb. 15g • pro. 2g • fat 3g • sat. fat 2g • chol. 9mg • sod. 29mg • calc. 45mg • fiber 1g
Honey-Almond Frozen Yogurt
The flavors of this are like eating a bowl of Greek yogurt topped with honey.
Makes about 5 cups (1.25 L) [ten ½-cup (125 ml) servings]
3 cups (750 ml) heavy cream
1⁄3 cup (75 ml) honey
1⁄3 cup (75 ml) granulated sugar Pinch kosher salt
2 cups (500 ml) whole milk, plain Greek yogurt
1½ teaspoons (7 ml) pure almond extract
¾ cup (175 ml) sliced almonds
In a small to medium saucepan, combine the cream, honey, sugar, and salt. Bring to a simmer, whisking occasionally to combine ingredients. Cool to room temperature.
In a medium mixing bowl, whisk the yogurt and almond extract together until combined. Slowly whisk in the cooled cream/honey mixture and continue to whisk until combined. Cover and refrigerate at least 2 hours, or overnight. Whisk mixture again before pouring into the ice cream maker.
Press Ice Cream and then Start/Stop. Pour the mixture through the spout and then cover with the cap. Let mix until thickened. The frozen yogurt will have a soft, creamy texture. If a firmer consistency is desired, transfer the frozen yogurt to an airtight container and place in the freezer for about 2 hours. Remove from the freezer about 15 minutes before serving.
Nutritional information per serving [based on ½ cup (125 ml)]: Calories 282 (65% from fat) • carb. 22g • pro. 3g • fat 20g • sat. fat 14g • chol. 71mg • sod. 56mg • calc. 78mg • fiber 1g
Dark Chocolate Sorbet
A step away from ordinary sorbets, our Dark Chocolate Sorbet is a decadent treat.
Makes about 8 cups (2 L) [sixteen ½-cup (125 ml) servings]
4 cups (1 L) water
2 cups (500 ml) granulated sugar
½ teaspoon (2 ml) kosher salt
4 ounces (115 g) semisweet chocolate, chopped [or about 3⁄4 cup (175 ml) chocolate chips]
2 cups (500 ml) cocoa powder, sifted
1½ teaspoons (7 ml) pure vanilla extract
Prepare simple syrup with the water, sugar, and salt by adding all three to a medium saucepan set over medium-low heat. Cook mixture until the sugar is fully dissolved.
While syrup is cooking, put the chocolate in a medium bowl; reserve.
In a medium bowl, gradually add the hot simple syrup to the cocoa powder by whisking constantly until smooth. Pour mixture over the chopped chocolate. Let sit for 5 minutes to melt the chocolate; add the vanilla and stir to combine. Cool to room temperature. Cover, and refrigerate at least 2 hours, or overnight.
Press Sorbet and then Start/Stop. Pour the mixture through the spout and then cover with the measuring cap. Let mix until thickened. The sorbet will have a soft texture. If a firmer consistency is desired, transfer the sorbet to an airtight container and place in the freezer for about 2 hours. Remove from the freezer about 15 minutes before serving.
Nutritional information per serving [based on ½ cup (125 ml)]: Calories 171 (15% from fat) • carb. 36g • pro. 2g • fat 3g • sat. fat 1g • chol. 0mg • sod. 69mg • calc. 4mg • fiber 2g
Lemon-Basil Sorbet
The basil adds a nice undertone to the sorbet, but any one of your favorite herbs could be substituted.
Makes about 7 cups (1.75 ml) [fourteen ½-cup (125 ml) servings]
31⁄4 cups (810 ml) water
21⁄4 cups (550 ml) granulated sugar
2 tablespoons (30 ml) lemon zest, divided
1½ cups (375 ml) packed fresh basil
Pinch kosher salt
31⁄4 cups (810 ml) fresh lemon juice
Prepare lemon simple syrup with the water, sugar, and 1 tablespoon (15 ml) of the lemon zest by adding all three to a medium saucepan set over medium-low heat. Cook mixture until the sugar is fully dissolved. Remove from heat.
Once the simple syrup is ready, add the basil and salt. Let the mixture steep for 30 minutes. Stir in the lemon juice. Cool to room temperature, cover, and refrigerate at least 2 hours, or overnight.
Strain the chilled mixture through a fine mesh strainer, discarding the zest and basil. Press Sorbet and then Start/Stop. Pour the mixture through the spout and then cover with the cap. Let mix until thickened. The sorbet will have a soft texture. If a firmer consistency is desired, transfer the sorbet to an airtight container and place in the freezer for about 2 hours. Remove from the freezer about 15 minutes before serving.
Nutritional information per serving [based on ½ cup (125 ml)]: Calories 140 (0% from fat) • carb. 37g • pro. 0g • fat 0g • sat. fat 0g • chol. 0mg • sod. 12mg • calc. 14mg • fiber 0g
Raspberry-Mint Sorbet
The perfect pairing of flavors for a light dessert.
Makes about 8 cups (2 L) [sixteen ½-cup (125 ml) servings]
3 cups (750 ml) water
2 cups (500 ml) granulated sugar
1 cup (250 ml) packed mint leaves
Pinch kosher salt
6 cups (1.5 L) frozen raspberries, thawed
Prepare simple syrup with the water and sugar by adding both to a medium saucepan set over medium-low heat. Cook mixture until the sugar is fully dissolved.
Once the simple syrup is ready, remove from heat and add the mint leaves and salt. Let the mixture steep for 15 to 20 minutes. If you desire a milder mint flavor, remove and discard the mint leaves after steeping, but for a more intense sorbet, blend the sugar/mint mixture using a Cuisinart Immersion Blender.
Add the raspberries and, using a Cuisinart Immersion Blender, blend the mixture until smooth. Strain through a fine mesh strainer, cool to room temperature, cover and refrigerate at least 2 hours, or overnight.
Press Sorbet and then Start/Stop. Pour the mixture through the spout and then cover with the cap. Let mix until thickened. The sorbet will have a soft texture. If a firmer consistency is desired, transfer the sorbet to an airtight container and place in the freezer for about 2 hours. Remove from the freezer about 15 minutes before serving.
Nutritional information per serving [based on ½ cup (125 ml)]: Calories 190 (1% from fat) • carb. 50g • pro. 1g • fat 0g • sat. fat 0g • chol. 0mg • sod. 10mg • calc. 19mg • fiber 4g
Prosecco-Grapefruit Sorbet
This refreshing dessert could also double as a frozen cocktail.
Makes about 4 cups (1 L) [eight ½-cup (125 ml) servings]
¾ cup (175 ml) water
¾ cup (175 ml) granulated sugar
1 tablespoon (15 ml) grapefruit zest
Pinch kosher salt
2 cups (500 ml) fresh grapefruit juice
¾ cup (175 ml) prosecco (Italian sparkling wine)
Combine the water, sugar, zest, and salt in a small to medium saucepan set over medium-low heat. Cook mixture until the sugar is fully dissolved.
Pour the grapefruit juice into the sugar/zest mixture and whisk together. Cool to room temperature, cover and refrigerate at least 2 hours, or overnight. Strain the mixture, and then whisk in prosecco prior to pouring into the ice cream maker.
Press Sorbet and then Start/Stop. Pour the mixture through the spout and then cover with the cap. Let mix until thickened. The sorbet will have a soft texture. If a firmer consistency is desired, transfer the sorbet to an airtight container and place in the freezer for about 2 hours. Remove from the freezer about 15 minutes before serving.
Nutritional information per serving [based on ½ cup (125 ml)]: Calories 114 (0% from fat) • carb. 25g • pro. 0g • fat 0g • sat. fat 0g • chol. 0mg • sod. 18mg • calc. 7mg • fiber 0g
Pineapple Sorbet
For a taste of the tropics, prepare this sorbet for your family and friends.
Makes about 7 cups (1.75 L) [fourteen ½-cup (125 ml) servings]
2 cups (500 ml) water
1 cup (250 ml) granulated sugar Pinch kosher salt
4½ cups (1.125 L) cubed pineapple (fresh or frozen, thawed, not canned)
Prepare simple syrup by adding the water, sugar, and salt (if using fresh pineapple, the core can be added to the pot as well) to a medium saucepan set over medium-low heat. Cook until the sugar is fully dissolved. Discard the core and remove from heat and bring to room temperature.
In a blender, combine the simple syrup and the cubed pineapple and blend until smooth. Strain through a fine mesh strainer. Cover and refrigerate at least 2 hours, or overnight.
Press Sorbet and then Start/Stop. Pour the mixture through the spout and then cover with the cap. Let mix until thickened. The sorbet will have a soft texture. If a firmer consistency is desired, transfer the sorbet to an airtight container and place in the freezer for about 2 hours. Remove from the freezer about 15 minutes before serving.
Nutritional information per serving [based on ½ cup (125 ml)]: Calories 82 (1% from fat) • carb. 21g • pro. 0g • fat 0g • sat. fat 0g • chol. 0mg • sod. 12mg • calc. 8mg • fiber 1g
Chocolate Cocoa Nib and Pecan Sandwich Cookies
A step above the traditional ice cream sandwich cookies. If you cannot find cocoa nibs, miniature chocolate chips can be substituted, or you can double the amount of pecans.
Makes 24 cookies (for 12 ice cream sandwiches)
1⁄3 cup (75 ml) cocoa powder, sifted
11⁄3 cups (325 ml) bread flour
¾ teaspoon (3.75 ml) baking powder
¼ teaspoon (1 ml) kosher salt
1 tablespoon (15 ml) instant espresso powder
½ cup [125 ml (1 stick)] unsalted butter, room temperature and cubed
1 cup (250 ml) granulated sugar
1 large egg
1 teaspoon (5 ml) pure vanilla extract
3 tablespoons (45 ml) cocoa nibs (can be found in most gourmet or specialty stores)
¼ cup (60 ml) chopped pecans, toasted
Preheat oven to 350°F (180°C).
Combine the cocoa powder, flour, baking powder, salt, and espresso powder in a small bowl. Whisk to blend; reserve.
Place the butter in the bowl of a Cuisinart® Stand Mixer, fitted with the mixing paddle. Using medium speed (4 to 5), cream until smooth. Gradually add the sugar and mix until creamy. Add the egg and vanilla and mix until combined. Add the reserved dry ingredients and using a low speed (2 to 3), mix until fully incorporated. Add the cocoa nibs and pecans and mix on low until just combined.
Using a small ice cream scoop [about 1½ inches (3.75 cm) in diameter], scoop the dough onto a parchment-lined cookie sheet [each round should be about 2 tablespoons (30 ml)]. Use a cup to flatten each cookie mound down.
Bake in the preheated oven for about 20 minutes, or until the cookie looks dry, but not firm. Let cookies fully cool before assembling.
To assemble: Using a small ice cream scoop, scoop about 2 tablespoons (15 ml) of your favorite ice cream onto the flat part of one cookie. Place another cookie on top of the ice cream and press down until the ice cream just reaches the edge of the cookies. Continue with each set of cookies. Wrap each ice cream sandwich in plastic wrap and chill in the freezer until firm (about 20 minutes).
Nutritional information per serving (2 cookies, not including ice cream): Calories 200 (36% from fat) • carb. 29g • pro. 2g • fat 8g • sat. fat 4g • chol. 30mg • sod. 90mg • calc. 15mg • fiber 1g
Pistachio Birthday Cake
We love the flavor combination of the pistachio ice cream with a chocolate crust, but any flavor can be substituted.
Makes 16 servings
½ cup [125 ml (1 stick)] unsalted butter, cubed
6 ounces semisweet chocolate, chopped
60 chocolate wafer cookies
1 recipe Pistachio Ice Cream (page 12), softened
½ cup (125 ml) chopped pistachios, toasted
In a heat-proof bowl set over a pot of simmering water, combine the butter and chocolate. Stirring occasionally, let sit until just melted. Reserve.
In the bowl of a Cuisinart® Food Processor fitted with the chopping blade, add the chocolate wafer cookies. Pulse until finely chopped. Add the melted butter/chocolate mixture through the feed tube of the processor and pulse until completely combined. Press 2⁄3 of the chocolate crumb mixture into the bottom of a 10-inch springform pan. Place in freezer; chill 10 to 15 minutes to let crust harden.
Remove from the freezer and spread half of the ice cream over the chilled chocolate crust. Cover with plastic and return to the freezer for about 30 minutes, or until just firm. Sprinkle the reserved chocolate crumb mixture over the chilled ice cream and return to the freezer again to chill, for about 30 minutes. Spread the remaining ice cream evenly over the top and smooth completely with an offset spatula. Cover and chill in the freezer for a minimum of 4 hours, or overnight to completely firm the cake.
Before serving, remove the ice cream cake from the pan and press the chopped pistachios around the sides of the cake. Serve on chilled plates.
Nutritional information per serving: Calories 490 (63% from fat) • carb. 39g • pro. 8g • fat 36g • sat. fat 19g • chol. 190mg • sod. 250mg • calc. 125mg • fiber 2g
Caramel Sauce
While we love this sauce on ice cream, it can also be used as a dipping sauce for fruit and cake.
Makes about ¾ cup (175 ml)
¾ cup (175 ml) granulated sugar
½ teaspoon (2 ml) kosher salt
¼ cup (60 ml) water (enough so that the consistency when mixed with the sugar and salt is similar to wet sand)
1 tablespoon (15 ml) light corn syrup
1⁄3 cup (75 ml) heavy cream
3 tablespoons (45 ml) unsalted butter, cut into ½-inch (1.25 cm) cubes
In a medium, heavy-bottomed saucepan, stir together the sugar, salt, water, and corn syrup. Be sure to clean the inside walls of the pan if there is any sugar on the sides (a clean, wet pastry brush works best). Set over medium-low heat, to keep the mixture at a low simmer, and cook until the sugar mixture turns a very light amber color (about 15 to 20 minutes). Keep a close eye on the caramel sauce as it can burn easily.
Once the sugar mixture has a light amber color, take it off the stove and slowly and carefully stir in the cream. After the cream has been incorporated, slowly whisk in the butter, one piece at a time, continually whisking to emulsify until all the butter has been added. Use immediately, or keep warm over a pot of warm water.
Nutritional information per serving [2 tablespoons (30 ml)]: Calories 198 (46% from fat) • carb. 27g • pro. 0g • fat 10g • sat. fat 7g • chol. 33mg • sod. 184mg • calc. 9mg • fiber 0g
Hot Fudge Sauce
No sundae bar is complete without homemade hot fudge.
Makes about 2 cups (500 ml)
2⁄3 cup (150 ml) heavy cream
1⁄3 cup (75 ml) light corn syrup
1⁄3 cup (75 ml) packed light brown sugar
¼ cup (60 ml) cocoa powder, sifted
¼ teaspoon (1 ml) kosher salt
2 tablespoons (30 ml) unsalted butter
1 teaspoon (5 ml) pure vanilla extract
6 ounces (170 g) semisweet chocolate, chopped
In a heavy-bottomed saucepan, combine all ingredients except for semisweet chocolate. Set over medium-low heat and bring to a slight boil. Add chocolate and whisk to combine.
Nutritional information per serving [2 tablespoons (30 ml)]: Calories 133 (53% from fat) • carb. 15g • pro. 1g • fat 8g • sat. fat 5g • chol. 18mg • sod. 15mg • calc. 11mg • fiber 1g
Raspberry Sauce
This works well with more than just frozen desserts. Serve over pancakes or crêpes for your loved ones.
Makes about 1 cup (250 ml)
1 12-ounce (340 g) bag frozen raspberries, thawed [about 21/2 cups (625 ml)]
1 to 2 tablespoons (15 to 30 ml) granulated sugar
Pinch kosher salt
Pinch orange zest
Put all of the ingredients into a Cuisinart Food Processor fitted with the chopping blade. Process until completely smooth. Strain through a fine mesh strainer and discard the seeds. Taste and adjust sugar amount to personal preference.
Nutritional analysis per serving [2 tablespoons (30 ml)]: Calories 30 (2% from fat) • carb. 6g • pro. 0g • fat 0g • sat. fat 0g • chol. 0mg • sod. 15mg • calc. 7mg • fiber 2g
Setup Guide
Setting up the Cuisinart Gelateria Frozen Yogurt is easy and straightforward:
- Place the freezer bowl in the freezer for at least 12 hours before use.
- Remove the freezer bowl from the freezer and place it in the machine.
- Add the mixture to the freezer bowl.
- Close the lid and select the desired setting (frozen yogurt, gelato, or sorbet).
- Press the start button and wait for the machine to finish mixing the dessert.
- Serve immediately or transfer the dessert to an airtight container and store it in the freezer for later use.
CLEANING, STORAGE AND MAINTENANCE
Cleaning: Clean the freezer bowl, mixing arm and lid in warm soapy water. DO NOT PUT FREEZER BOWL IN THE DISHWASHER. DO NOT CLEAN WITH ABRASIVE CLEANSERS OR IMPLEMENTS. Wipe motor base clean with a damp cloth. Dry all parts thoroughly.
Storage: DO NOT put freezer bowl in freezer if bowl is wet. DO NOT store lid, mixing arm, or base in freezer.
Maintenance: Any other servicing should be performed by an authorized service representative.
IMPORTANT SAFEGUARDS
When using an electrical appliance, basic safety precautions should always be followed to reduce the risk of fire, electric shock, and/or injury, including the following:
READ ALL INSTRUCTIONS BEFORE USING.
To protect against risk of electric shock, do not place cord, plug, or base of appliance in water or any other liquid.
Close supervision is necessary when any appliance is used by or near children.
Always unplug from outlet when not in use, before putting on or taking off parts, and before cleaning.
Avoid contact with moving parts. Keep hands, hair, clothing, as well as spatulas and other utensils away during operation to reduce the risk of injury and/or damage to the appliance.
Do not operate any appliance with a damaged cord or plug, or after the appliance malfunctions, or is dropped or damaged in any manner. Return the appliance to the nearest Cuisinart Repair Center for examination, repair, electrical or mechanical adjustment.
The use of attachments not recommended by Cuisinart may cause fire, electric shock or risk of injuries.
Do not use outdoors.
Do not let cord hang over edge of table or counter, or touch hot surfaces.
Keep hands and utensils out of freezer bowl while in use to reduce the risk of injury to persons or to the appliance itself. DO NOT USE SHARP OBJECTS OR UTENSILS INSIDE THE FREEZER BOWL! Sharp objects will scratch and damage the inside of the freezer bowl. A rubber spatula or wooden spoon may be used when the appliance is in the OFF position.
This appliance is for household use. Any servicing other than cleaning and user maintenance should be done only by authorized Cuisinart Repair Personnel.
Do not use the freezer bowl on flames, hot plates or stoves. Do not expose to heat source. Do not wash in dishwasher; doing so may cause risk of fire, electric shock or injury.
Do not operate your appliance in an appliance garage or under a wall cabinet. When storing in an appliance garage always unplug the unit from the electrical outlet. Not doing so could create a risk of fire, especially if the appliance touches the walls of the garage or the door touches the unit as it closes.
NOTICE This appliance has a polarized plug (one blade is wider than the other). To reduce the risk of electric shock, this plug will fit in a polarized outlet only one way. If the plug does not fit fully in the outlet, reverse the plug. If it still does not fit, contact a qualified electrician. Do not attempt to defeat this safety feature.
CAUTION This appliance is for household use. Any servicing other than cleaning and user maintenance should be performed by an authorized service representative.
Do not immerse base in water.
To reduce the risk of fire or electric shock, do not disassemble the base. Note: The base does not contain any user-serviceable parts.
Repairs should be made only by authorized personnel.
Check voltage to be sure that the voltage indicated on the nameplate agrees with your voltage.
Never clean with scouring powders or hard implements.
Gelateria Gelato & Sorbet Maker ICE-70C Troubleshooting
Problem: The incorrect function was selected.
Solution: Reset the unit by pressing the Start/Stop button twice.
Problem: The unit is beeping every few minutes.
Solution: Press the Start/Stop button, the process has completed.
Problem: The time will not adjust by pressing the arrows.
Solution: Once the Start/Stop button is selected and the processing begins, time cannot be adjusted. To reset the unit, press Start/Stop.
Problem: The unit stopped running.
Solution: Recipe is either complete, or load was too heavy. Press Start/Stop to reset the unit.
Problem: Finished recipe is too thin.
Solution: Place freezer bowl back in the freezer. (Re-evaluate ingredients and/or bowl temperature.)
WARRANTY
We warrant that this Cuisinart product will be free of defects in materials or workmanship under normal home use for 3 years from the date of original purchase. This warranty covers manufacturer’s defects including mechanical and electrical defects. It does not cover damage from consumer abuse, unauthorized repairs or modifications, theft, misuse, or damage due to transportation or environmental conditions. Products with removed or altered identification numbers will not be covered.
Pros & Cons
Pros
- Easy to use and clean
- Versatile and can make various frozen desserts
- No need for ice and salt
- Affordable compared to commercial ice cream makers
- Stylish and modern design
Cons
- Limited capacity compared to commercial ice cream makers
- Long freezing time for the freezer bowl
- May not be as durable as commercial ice cream makers
Customer Reviews about Cuisinart Gelateria Gelato & Sorbet Maker ICE-70C
Customers love the Cuisinart Gelateria Frozen Yogurt for its ease of use, versatility, and affordability. Many users have praised the machine for its ability to make delicious and creamy frozen yogurt, gelato, and sorbet at home. However, some users have complained about the long freezing time for the freezer bowl and the limited capacity compared to commercial ice cream makers.
Faqs
What are the main functions of the Cuisinart Gelateria Gelato & Sorbet Maker ICE-70C?
What is the purpose of the Cuisinart Gelateria Gelato & Sorbet Maker ICE-70C?
How do I install the Cuisinart Gelateria Gelato & Sorbet Maker ICE-70C?
How does the Cuisinart Gelateria Gelato & Sorbet Maker ICE-70C work?
How do I use the Cuisinart Gelateria Gelato & Sorbet Maker ICE-70C?
Is the Cuisinart Gelateria Gelato & Sorbet Maker ICE-70C compatible with different power sources?
How do I clean the Cuisinart Gelateria Gelato & Sorbet Maker ICE-70C?
What are the safety features of the Cuisinart Gelateria Gelato & Sorbet Maker ICE-70C?
Can the Cuisinart Gelateria Gelato & Sorbet Maker ICE-70C be used in other countries?
What is the warranty period for the Cuisinart Gelateria Gelato & Sorbet Maker ICE-70C?
Leave a Comment