Cuisinart Mini-Prep Processor DLC-1 User Guide | Assembling
Content
Cuisinart Mini-Prep Processor DLC-1: A Compact and Powerful Food Processor
INTRODUCTION
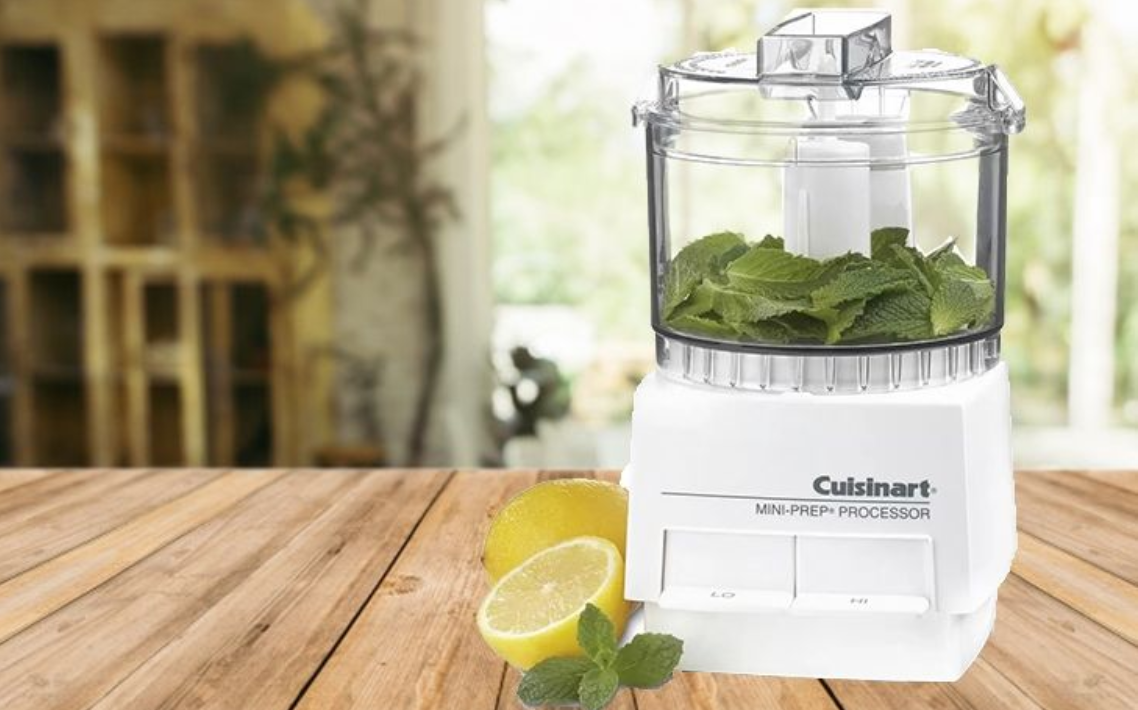
The Cuisinart® Mini-Prep® Processor handles a variety of food preparation tasks including chopping, grinding, puréeing, emulsifying and blending. The patented two-position blade provides a super-sharp edge for the delicate chopping of herbs, and for blending and puréeing other soft foods, while the blunt edge offers a powerful cutting surface to grind through coffee beans, spices and other hard foods. Two operating speeds with pulse activation give maximum control for precision processing. A powerful high-speed motor works hard and fast to accomplish any small job with ease. Chop herbs, onions, and garlic; grind coffee beans, spices, and hard cheese; purée baby foods; blend mayonnaise and flavored butter all with the same compact appliance. The Mini- Prep® takes up a minimum of counter space and stores neatly on the countertop or in a cabinet.
Detailed Specifications
The Cuisinart Mini-Prep Processor DLC-1 is a compact food processor with a 250-watt motor that can handle small batches of ingredients with ease. It features a 3-cup work bowl made of durable, scratch-resistant plastic, and a reversible stainless steel blade that can chop, grind, and mix. The processor also has a simple touchpad control with a pulse feature, making it easy to use and control. The DLC-1 measures 8.3 x 5.9 x 10.1 inches and weighs 2.9 pounds, making it a convenient and portable option for small kitchens or for taking on the go.
Description
The Cuisinart Mini-Prep Processor is a versatile and powerful food processor that is perfect for small batches of ingredients. It's compact size and lightweight design make it easy to store and use in any kitchen, while its 250-watt motor and reversible blade make it capable of handling a variety of tasks, such as chopping vegetables, grinding herbs and spices, and mixing sauces and dips. The DLC-1 also features a simple touchpad control with a pulse feature, making it easy to use and control. With its durable construction and attractive design, the Cuisinart Mini-Prep Processor is a great choice for anyone looking for a high-quality and convenient food processor.
THE PARTS OF Cuisinart Mini-Prep Processor DLC-1
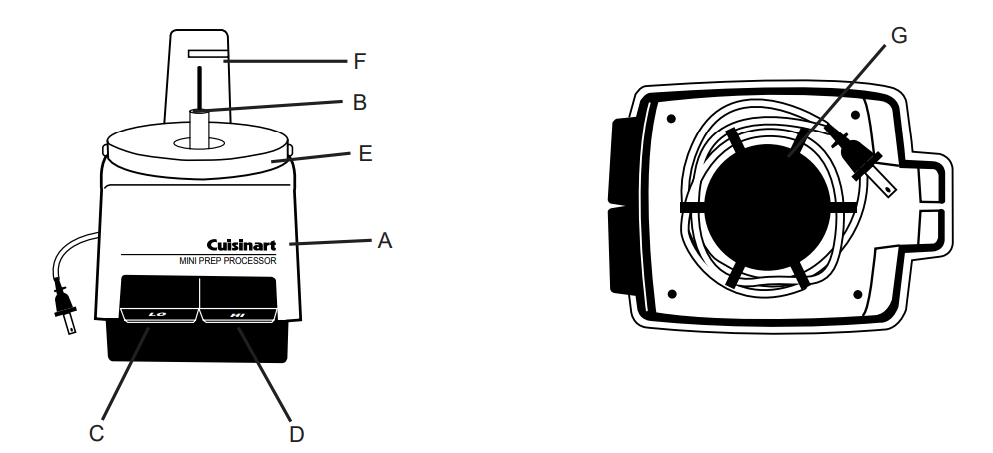
- A. Compact Motor Base, with
- B. Shaft from motor
- C. LO Speed-Control lever
- D. HI Speed-Control lever
- E. Round bowl-support platform with two locking tabs
- F. Column at back with interlock slot
- G. Power cord with concealed storage underneath
- H. Prep Bowl, with
- I. Prep Bowl part number
- J. Central Opening
- K. Two openings for locking tabs on lower surface of motor base
- L. Two tabs on opposite sides of top surface
- M. Prep Bowl Cover, with
- N. Tabs on opposite sides
- P. Long descending tab at back
- Q. Handle on top with two openings for adding liquids
- R. Plastic Sheath, with
- T. Handle on top
- U. Ridges along opposite sides
- V. Blade Assembly, with:
- W. Central hub holding ribs (grips)
- X. Curved sharp edge
- Y. Flat blunt edge BLADE IS VERY SHARP. ALWAYS HANDLE IT BY CENTRAL HUB. NEVER TOUCH THE BLADE ITSELF.
- Z. Spatula
ASSEMBLING THE PARTS
Before you process any food, assemble the parts and try the HI and LO processing speeds to get a feel for how your Mini-Prep® Processor works.
- Place the Motor Base on a flat, dry, stable surface. It should be close to an electrical outlet of the same voltage as that stated on the bottom of the unit.
- Locate part number on bottom of Prep Bowl. Place the Prep Bowl on the motor base with the Prep Bowl part number slightly to the left of center, then rotate it counterclockwise until it locks and clicks into position. Rotate Prep Bowl following direction of Bowl Lock arrows printed on motor base.
Connect the Blade Assembly to the Blade Sheath. HOLD THE BLADE ASSEMBLY BY THE CENTRAL HUB HOLDING RIBS (grips) ONLY. DO NOT TOUCH THE RAZOR-SHARP BLADES.
Note: these are important features of the Blade Assembly.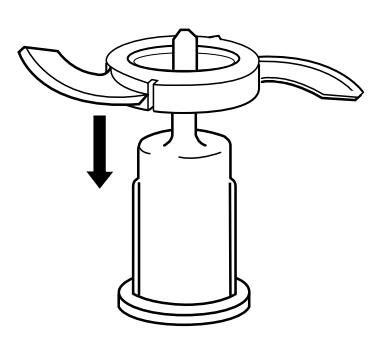
The Assembly can be placed over the Sheath in two different ways. If you hold it this way (A), you will see the word "Sharp" on the blade. Assemble the blade this side up to use the sharp edge.
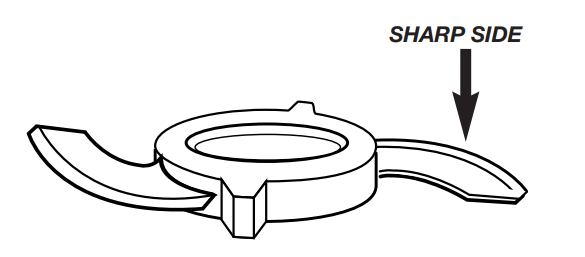
(See the section on processing food for information about when to use the sharp edge.)If you hold it this way (B), you will see no writing on the blade. Assemble the blade this side up to use the blunt edge.(See the section on processing food for information about when to use the blunt edge.)

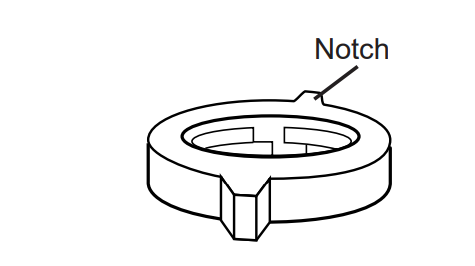
There are notches (C) on opposite sides of the interior of the hub. These fit over ridges on the sides of the Sheath. Place the Sheath, handle side up, on a flat surface. Pick up the Blade Assembly by its hub holding ribs (grips) and line up the notches in the interior of the hub with the ridges on the sides of the Sheath. Let the Blade Assembly slide down to the bottom of the Sheath.
Lift the Sheath by its handle. Hold the Blade Assembly by its hub holding ribs (grips) and turn it very slightly clockwise. This locks it in place on the Sheath and prevents it from sliding up during processing.
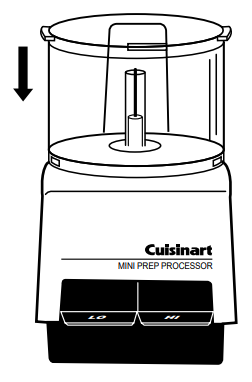
Hold the Sheath by its top handle, place it over the central opening of the Bowl, and slide the Sheath down over the motor shaft. The lower blade on the Blade Assembly should almost touch the bottom of the Prep Bowl.
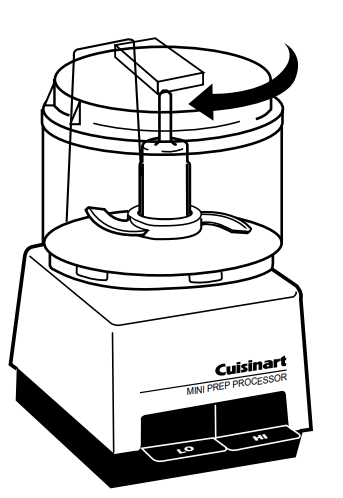
Hold the cover by its handle on the top, with the descending tab in about the 2 o'clock position (D).
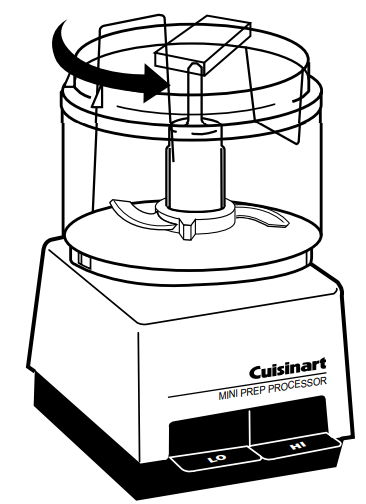
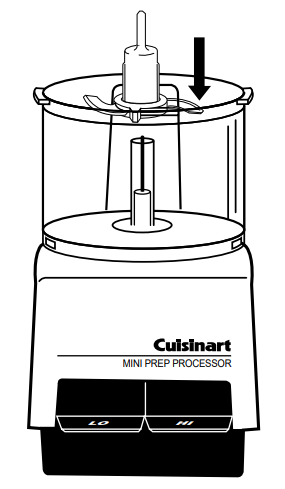
While holding D. the Motor Base, press the cover onto the Prep Bowl. Use the handle to turn it counterclockwise until the descending tab on the back locks into the slot on the column of the Motor Base. IF THE TAB DOES NOT FULLY OR COMPLETELY ENGAGE IN THE SLOT, THE MOTOR WILL NOT START.- Plug the cord into an electrical outlet.
- Place one hand on the cover of the unit, and press the LO Speed-Control Lever with the thumb or forefinger of your other hand. Remove your thumb or finger from the control.
- Now press and release the HI Speed-Control Lever.
WHEN THE BLADE STOPS MOVING, remove the cover by turning it gently clockwise and lifting it straight up.
- Now you are ready to process food.
- Disassembling the Blade Assembly
Lift the Sheath. Holding the Blade Assembly stationary, carefully turn the Sheath Cylinder clockwise, then guide the Blade Assembly up over the Sheath.
TIPS FOR PROCESSING FOOD
Preparing the Food
Size
Always cut large pieces of food into smaller pieces of even size – about 1/2 inch (12mm) to a side. If you don't start with pieces that are small and uniform, you will not get an even chop.
Quantity
Do not overload the Prep Bowl. Overloading causes inconsistent results and it strains the motor. Use the quantities given in the recipe section as a guide. As a rule of thumb, remember that after being processed, food should not reach more than 2/3 of the way up the Sheath of the Blade Assembly.
Selecting the Right Blade Edge
Use the sharp edge for chopping, puréeing and mixing. It is the right choice, for example, for chopping soft, fragile food such as herbs, celery, onions, garlic and most cheese. It is also the right choice for puréeing cooked vegetables, making mayonnaise and mixing salad dressing.Use the blunt edge for grinding coffee beans and spices, and for chopping hard food such as peppercorns, seeds, chocolate and nuts.
Selecting the Right Operating Speed Use low speed
(LO Lever) for chopping, puréeing, and mixing food with the sharp edge of the blade.
Use high-speed (HI Lever) for grinding and for chopping hard food with the blunt edge of the blade.
Note: Due to the powerful motor provided with this unit, Cuisinart recommends using one hand to support the Mini-Prep® during operation. This is especially true of the High-speed.
Selecting the Right Lever Action Pulse action is best when you are using the sharp edge of the blade. Two or three pulses are often enough. Be sure to check the food frequently to prevent overprocessing. If you overprocess, you are likely to get a watery paste instead of a fine chop.
Continuous-hold action is best when you are using the blunt edge of the blade. You may have to operate the Mini-Prep® Processor for several seconds to achieve the desired results with some food - as long as 20 seconds for some seeds, or 40 seconds for coffee beans.
When you operate the unit for more than 10 seconds, use a pulse action every 10 seconds or so to allow food to drop to the bottom of the Prep Bowl. This provides more consistent results.
Never operate the Mini-Prep® continuously for longer than 1 minute at a time.
Note: The Prep Bowl and Cover may become scratched when you use them for grinding coffee, grain and spices. This does not affect the performance of the Mini-Prep® Processor. However, you may want to reserve that bowl for grinding, and purchase an additional bowl and cover set for other uses. These are available from the Cuisinart® Customer Service Department, which you can reach by dialing our toll-free number: 800-726-0190. Ask for Model DLC-195A when ordering.
Summary: Selecting Blade, Speed, and Lever Action
| Operation | Blade Edge | Speed | Lever Action |
|---|---|---|---|
| Chopping | Sharp | LO | Pulse |
| Grinding | Blunt | HI | Continuous |
Adding Liquid
You can add liquids such as water, oil or flavoring while the machine is running. You might want to add oil when making mayonnaise or salad dressing, for example. Or you could add vanilla or alcohol when making frozen yogurt.
Pour the liquid through one of the two openings in the cover.
IMPORTANT: Add liquid through only one opening at a time. The other opening must be left free for air to escape. If both openings are blocked, liquid cannot flow smoothly into the bowl.
Removing Food from the Sides of the Bowl
Occasionally food will stick to the sides of the bowl as you process. Stop the machine to clear it away. AFTER THE BLADE HAS STOPPED MOVING, remove the cover, and use the spatula to scrape the food from the sides of the bowl back into the center.
Reversing the Blade in the Middle of a Processing Task
While preparing some recipes, you may want to switch the blad from sharp to blunt or vice versa.
- Be sure neither of the Control Levers is pressed down.
- Unplug the unit.
- Remove the cover from the Prep Bowl.
- Lift the Sheath by its top handle and remove the Blade Assembly. NEVER TOUCH THE BLADE ITSELF.
- Remove the contents of the bowl to another container.
- Carefully remove the Blade Assembly, holding it by its Hub Holding Ribs. Turn blade upside-down and reinsert it on the Sheath.
- Insert the Sheath over the central opening of the empty bowl.
- Insert the food to be processed.
- Replace the cover, locking it into place.
- Plug the unit into the electrical outlet and continue processing.
PROCESSING FOOD
- Place the Prep Bowl firmly on the motor base and insert the Blade Assembly. Be sure the blade is assembled to use the blade edge that is appropriate for the food to be processed.
- Place food in the Prep Bowl. Be sure the food is cut in small pieces, and the bowl is not overloaded.
- Lock the Cover into position. Note: Due to the powerful motor provided with this unit, Cuisinart recommends using one hand
to support the Mini-Prep®
during operation. - Press the appropriate Speed-Control Lever – LO or HI, depending on the food you are processing.
- When you have finished processing the food, stop the machine by releasing the Speed-Control Lever.
- WHEN THE BLADE STOPS MOVING, remove the Cover.6a. Unplug the unit.
- Carefully remove the Blade Assembly, holding it by the handle on the top of the Sheath. NEVER TOUCH THE BLADE ITSELF.
- Remove food with the spatula.
Note: Do not operate Mini-Prep® without food contents in Prep Bowl.
OPERATING TECHNIQUES
| Ingredient | Blade Position/Speed Sharp/LO | Blade Position/Speed Blunt/HI | Comments |
|---|---|---|---|
| anchovies | X | must be cooked crisp | |
| bacon | X | ||
| butter | X | must be chilled | |
| celery | X | chop no more than 2 ounces (56g) at a time | |
| cheese | X | hard | |
| chocolate | X | semi-hard | |
| mini chocolate | X | chip cookies | |
| coffee beans | X | ||
| ... | ... | ... | ... |
Chop, grind, and purée small amounts of food with the Mini-Prep® Processor. This table lists a number of ingredients in alphabetical order, and shows the recommended method of processing for each cheese is fresh and slightly crumbly, use the SHARP edge. ( Use the BLUNT edge for extremely hard, imported or older cheeses only. Many cheeses available are actually only semi-hard. )
TROUBLESHOOTING
- The motor doesn't start or blade doesn't rotate. Motor doesn't start or blade doesn't rotate.
- Check that plug is securely inserted into outlet.
- Check that Prep Bowl and cover are securely locked into place.
- Be sure to press only one speedcontrol lever at a time.
- Food is unevenly chopped.
- Either you are chopping too much food at one time, or the pieces are not small enough. Try cutting food into smaller pieces of even size and processing a smaller amount per batch.
- Food is chopped too fine or is watery.
- The food is overprocessed. Use brief pulses, or process for less time.
- Food collects on Prep Bowl cover or sides of Prep Bowl.
- You may be processing too much food. Turn machine off. When blade stops rotating, remove cover, and clean bowl and lid with spatula.
- Food hangs up on blade.
- You may be processing too much food. Carefully remove blade. Remove food from blade with spatula, and start over again.
CLEANING AND STORAGE
To simplify cleaning, rinse the Prep Bowl, cover and blade immediately after use, so that food won't dry onto them. Wash Blade Assembly, Sheath, Prep Bowl, cover and spatula in warm soapy water. Rinse and dry. Wash the blade carefully.Avoid leaving it in soapy water where it may disappear from sight.
If you have a dishwasher, you can wash the Prep Bowl, cover, Blade Assembly and spatula on the upper shelf. Insert the Prep Bowl upside-down and the cover right-side up. Put the blade and spatula in the cutlery basket. Unload the dishwasher carefully to avoid contact with the sharp blade. Wipe
the motor base clean with a damp sponge or cloth. Dry it immediately. Never submerge the motor base or
the plug in water or other liquid.
The Mini-Prep® stores neatly on the countertop in a minimum of space. When it is not in use, be sure to leave it unplugged. The hidden cord storage underneath the motor base will help to keep excess cord off the countertop. Store the unit assembled to prevent loss of parts. Store the blades as you would sharp knives–-out of the reach of children.
The Mini-Prep® is intended for HOUSE-HOLD USE ONLY. Any service other than cleaning and normal user maintenance, should be performed
by an authorized Cuisinart® Service Representative.
RECIPES
BABY FOOD
Puréed Vegetables, Fruit, Meat or Poultry may be prepared by using the following model recipe for Tiny Tender Peas.
Foods may be cooked in a microwave oven, saucepan or steamed in a steamer basket. Some additional water is added for each of the various cooking methods.
Model Recipe
1/2 cup (5 ounces, 140g) frozen peas 3 tablespoons hot water (to purée)
- Microwave Oven
Place frozen peas in a microwave-safe container, and cover with plastic wrap. Cook at 100% power for 5 minutes, stirring once. Let stand covered for 60 seconds. - Saucepan
Place peas and 1/4 cup water in a saucepan. Bring to full boil over medium heat, separating with fork. Reduce heat; cover and simmer until tender, about 3 minutes. Drain. - Steamer
Fill saucepan with 1 inch of water. Place steamer basket in saucepan and add peas. Bring to full boil. Separate peas with fork. Let steam for 5 minutes.
Insert blade using SHARP edge. Add peas with the 3 tablespoons hot water. Run at HI speed to purée, about 60 seconds. Stop and scrape bowl. Run at HI speed again until peas are completely puréed, about 30 seconds.
Makes about 1/2 cup (5 oz., 140g) puréed peas.
Note: For very stringy vegetables such as asparagus, press cooked puréed vegetables through a sieve before using.
*Always consult with your physician to know which foods are best for your baby.
TUNA FISH SALAD
Make this popular tasty sandwich filler with a few quick pulses!
- 1/2 ounce (15g) onion, peeled
- 1 small celery stalk, about
- 5 inches (13cm), cut into 1-inch (2.5cm) pieces
- 1 3-ounce (85g) can tuna fish
- Freshly ground black pepper to taste
- 2 tablespoons (30ml) mayonnaise, light or homemade
Insert blade using BLUNT edge. Add onion and celery to Prep Bowl and pulse at HI speed until coarsely chopped, about 5 pulses. Drain tuna fish and add with pepper and mayonnaise. Pulse twice at HI speed. Serve immediately or refrigerate. Makes about 3/4 cup (6 ounces, 170g).
CHOCOLATE FROSTING
- 1-1/2 cups (6 ounces, 170g) confectioner’s sugar
- 1 ounce (28g) unsweetened chocolate, in 1/2" pieces
- 2 tablespoons margarine
- 2 tablespoons milk*
- 1/2 teaspoon vanilla extract
- 1/8 teaspoon salt
Insert blade using BLUNT edge. Add sugar and chocolate to Prep Bowl. Pulse on Hi speed to coarsely chop chocolate, about 8 pulses. Then process at HI speed until chocolate is finely chopped, about 30 seconds. In a small saucepan over medium heat, bring margarine and milk to a boil. Add to Prep Bowl and process at HI speed until creamy, about 15 seconds. Add vanilla and salt; process at LO speed to incorporate, about 5 seconds. Makes 3/4 cup (180 ml) frosting, enough to frost one 8-inch (20cm) round layer cake. *You may use whole, 2%, 1% or skim milk.
Pros & Cons of Cuisinart Mini-Prep Processor DLC-1
Pros
- Compact and lightweight design
- Powerful 250-watt motor
- Reversible stainless steel blade
- Simple touchpad control with pulse feature
- Durable and scratch-resistant plastic work bowl
Cons
- Small work bowl capacity (3 cups)
- Not suitable for large batches of ingredients
- May overheat with prolonged use
- Noisy operation
Customer Reviews
The Cuisinart DLC-1 has received mostly positive reviews from customers. Many users have praised its compact size, powerful motor, and easy-to-use controls. However, some users have noted that the workbowl capacity is small, and that the processor may overheat with prolonged use. The most common complaint is the noisy operation of the DLC-1.
Faqs
What is the Cuisinart Mini-Prep Processor DLC-1's work bowl capacity?
Which jobs can be completed with the Cuisinart Mini-Prep Processor DLC-1?
What is the Cuisinart Mini-Prep Processor DLC-1's motor power?
Is there a pulse feature on the Cuisinart Mini-Prep Processor DLC-1?
How much does the Cuisinart Mini-Prep Processor DLC-1 weigh?
What kind of material is the Cuisinart Mini-Prep Processor DLC-1's work bowl made of?
What is the Cuisinart Mini-Prep Processor DLC-1's dimensions?
Can big amounts of ingredients be processed by the Cuisinart Mini-Prep Processor DLC-1?
Does the Cuisinart DLC-1 Mini-Prep Processor make a lot of noise?
Can extended use cause the Cuisinart Mini-Prep Processor DLC-1 to overheat?
Leave a Comment