D-Link AC1900 Gigabit Wi-Fi Router DIR-1950 User Guide
Content
Introduction
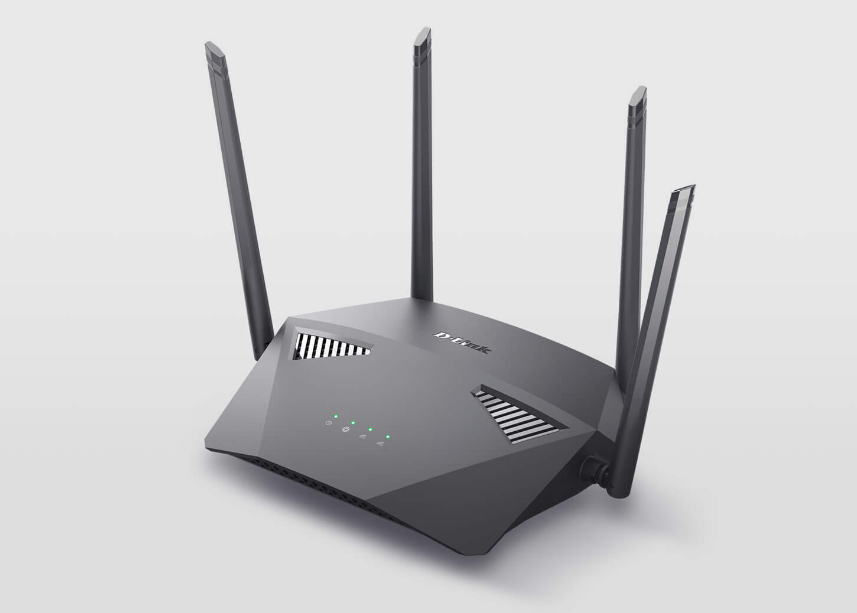
The D-Link AC1900 Gigabit Wi-Fi Router DIR-1950 is a high-performance networking solution designed to meet the demands of modern households. With dual-band technology, it delivers combined speeds of up to 1900 Mbps, ensuring seamless streaming, gaming, and browsing across multiple devices. The DIR-1950 is priced at approximately $99.99. The router features MU-MIMO technology for efficient data distribution and enhanced WPA3 security for safe connectivity. Easy setup and management through the D-Link app make it user-friendly.
Technical Specifications
Power
- Input: 100 to 240 V AC, 50 / 60 Hz
- Output: 12 V, 1.5 A
Temperature
- Operating: 0 to 40 °C (32 to 104 °F)
- Storage: -20 to 65 °C (-4 to 149 °F)
Humidity
- Operating: 10% to 90% maximum, non-condensing
- Storage: 5% to 95% maximum, non-condensing
Certifications
- IC
- FCC
- CE
Dimensions
- L x W x H: 226 x 173 x 52 mm (8.9 x 6.8 x 2.0 in)
Weight
- 411 g (0.91 lbs)
Product Overview
Package Contents
DIR-1950 | V |
Quick Installation Guide | V |
Quick Installation Card | V |
Ethernet Cable (RJ45) | V |
Power Adapter | V |
If any of the above items are missing or damaged, please contact your local reseller.
Note: Using a power supply with a different voltage rating than the one included with the router will cause damage and void the warranty for this product.
System Requirements
Network Requirements |
|
Web-based Configuration Utility Requirements | Computer with the following:
Browser Requirements:
Windows® Users: Make sure you have the latest version of Java installed. Visit www.java.com to download the latest version. |
D-Link Wi-FiApp Requirements |
|
Features
Need super-fast Wi-Fi for your wire-free, all-streaming house? With a powerful dual-core processor, the AC1900 Gigabit Wi-Fi Router packs in enough processing power to handle every networking task you throw at it. It’s a powerful, intelligent home router with integrated voice assistant compatibility for Amazon Alexa and Google Assistant so you can control your network with voice commands.
- Handle More with a High-Power Processor
With the DIR-1950, you’re not only enjoying buffer-free gaming and lightning fast surfing, you’re also enjoying features such as an optimizing QoS, an automatic firmware update system that ensures the latest features, and compatibility with voice assistants. All this is possible with the router’s 1.25 GHz dual-core high-power processor, 128 MB of flash memory and 128 MB of RAM. - Enhanced Quality of Service Features
The built-in Quality of Service (QoS) engine allows you to prioritize important traffic to ensure that your favorite applications are receiving optimal bandwidth. - Always Up-to-Date with the Latest Features
The DIR-1950 will automatically check daily for updates to make sure that the device always has the latest features, and will install the update silently in the background. For an extra peace of mind, in the event of failure during the firmware update, the router will store a backup system image in the memory before proceeding with the update. - Easy to Set Up and Manage
Sharing your Internet connection doesn’t have to be a complicated process; just download the free D-Link Wi-Fi app for your mobile device and follow the on-screen step-by-step instructions to set up your DIR-1950. You also have the option to use a web browser to access the setup wizard and to manage your router. Support for industry-standard Wi-Fi Protected Setup (WPS) lets you create encrypted connections to new devices by pressing a button.
Hardware Overview
LED Indicators
1 |
Power | Solid White | The device is on and the system is healthy. |
Solid Orange | The device is booting upor performingthe factory resetprocess. | ||
Blinking Orange | The device is under recovery mode. | ||
2 |
Internet | Solid White | The Internet port connectionis established. |
Solid Orange | The device cannot connect to the Internet. | ||
Blinking Orange | The device is undergoing the firmware upgrade process. | ||
3 | Wireless (2.4 GHz) | Solid White | The2.4 GHz wireless band is enabled. |
Blinking White | The device is processingWPS. | ||
4 | Wireless (5 GHz) | Solid White | The 5 GHz wireless band is enabled. |
Blinking White | The device is processingWPS. |

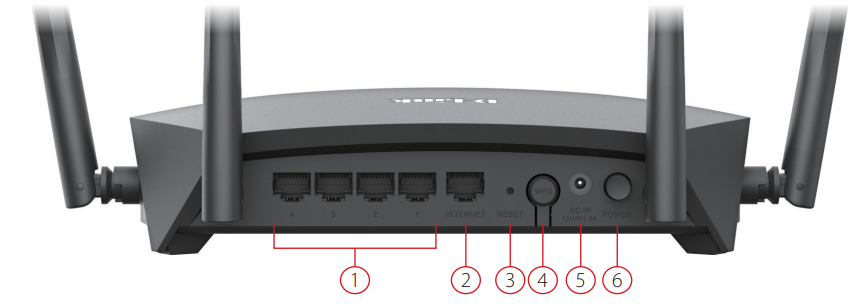
Back Panel
1 | Gigabit LAN Ports (1- 4) | Connect Ethernet devices such as computers, switches, storage (NAS) devices, and game consoles. |
2 | Gigabit WAN Port | Using an Ethernet cable, connect your broadband modem to this port. |
3 | Reset Button | Insert a paperclip in the hole,wait for 10 seconds, andrelease to resetthe router to default settings. |
4 | WPS Button | Press to start the WPS process and automatically create an encrypted connection to a WPS client. |
5 | Power Connector | Connector for the supplied power adapter. |
6 | Power Button | Press the power button to power the device onoroff. |
Networking Basics
Check your IP address
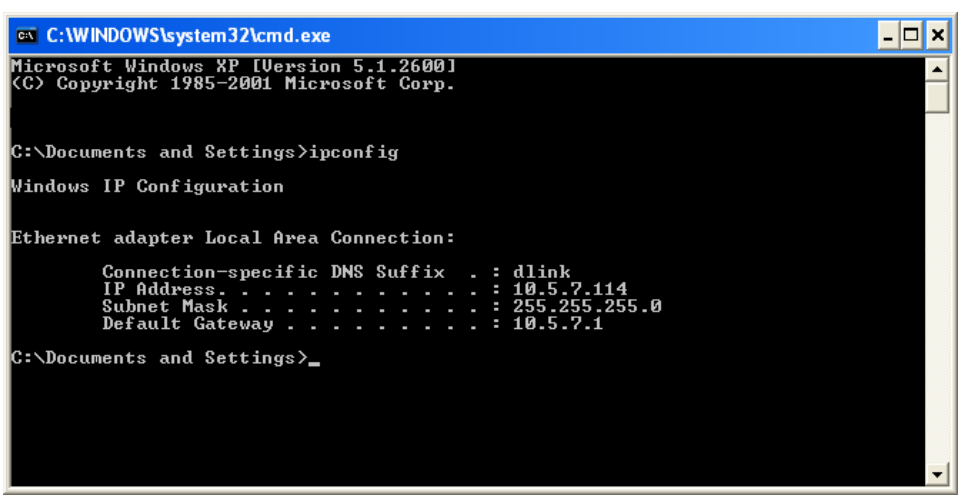
After you install your new D-Link adapter, by default, the TCP/IP settings should be set to obtain an IP address from a DHCP server (i.e. wireless router) automatically. To verify your IP address, please follow the steps below.
- Click on Start > Run. In the run box type cmd and click OK. (Windows 7/Vista users type cmd in the Start Search box.)
- At the prompt, type ipconfig and press Enter.
- This will display the IP address, subnet mask, and the default gateway of your adapter.
If the address is 0.0.0.0, check your adapter installation, security settings, and the settings on your router. Some firewall software programs may block a DHCP request on newly installed adapters.
Statically Assign an IP address
- If you are not using a DHCP capable gateway/router, or you need to assign a static IP address, please follow the steps below:
- Windows 7 Start > Control Panel > Network and Internet > Network and Sharing Center
- Windows Vista Start > Control Panel > Network and Internet > Network and Sharing Center > Manage Network Connections
- Windows XP Start > Control Panel > Network Connections
- Windows 2000 From the desktop, right-click My Network Places > Properties
- Right-click on the Local Area Connection which represents your network adapter and select Properties.
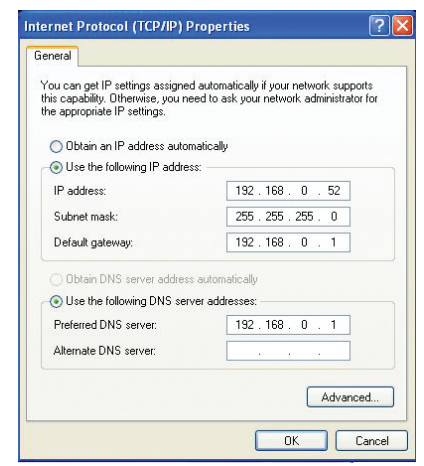
- Highlight Internet Protocol (TCP/IP) and click Properties.
- Click Use the following IP address and enter an IP address that is on the same subnet as your network or the LAN IP address on your router.
Example: If the router´s LAN IP address is 192.168.0.1, make your IP address 192.168.0.X where X is a number between 2 and 99. Make sure that the number you choose is not in use on the network. Set the Default Gateway the same as the LAN IP address of your router (I.E. 192.168.0.1).
Set Primary DNS the same as the LAN IP address of your router (192.168.0.1). The Secondary DNS is not needed or you may enter a DNS server from your ISP. Click OK twice to save your settings.
Description
The D-Link AC1900 Gigabit Wi-Fi Router DIR-1950 is a sleek and powerful device that enhances your home or office network. Its compact design makes it easy to place in any setting without taking up too much space. The router features a user-friendly interface through the D-Link Wi-Fi app, allowing you to manage your network settings, set up parental controls, and monitor usage from your smartphone or tablet.
The device supports Quality of Service (QoS) settings, enabling you to prioritize traffic for critical applications such as video streaming and online gaming. This ensures that your most important tasks get the necessary bandwidth to run smoothly.
Wireless Security
This section will show you the different levels of encryption you can use to better protect your data from intruders. The router offers the following types:
- WPA2 (Wi-Fi Protected Access 2)
- WPA (Wi-Fi Protected Access)
- WPA2-PSK (Pre-Shared Key)
- WPA-PSK (Pre-Shared Key)
What is WPA?
WPA (Wi-Fi Protected Access), is a Wi-Fi standard that was designed to improve the security features of WEP (Wired Equivalent Privacy).
The 2 major improvements over WEP:
- Improved data encryption through the Temporal Key Integrity Protocol (TKIP). TKIP scrambles the keys using a hashing algorithm and by adding an integrity-checking feature, ensures that the keys haven’t been tampered with. WPA2 is based on 802.11i and uses Advanced Encryption Standard (AES) instead of TKIP.
- User authentication, which is generally missing in WEP, through the extensible authentication protocol (EAP). WEP regulates access to a wireless network based on a computer’s hardware-specific MAC address, which is relatively simple to be sniffed out and stolen. EAP is built on a more secure public-key encryption system to ensure that only authorized network users can access the network.
WPA-PSK/WPA2-PSK uses a passphrase or key to authenticate your wireless connection. The key is an alpha-numeric password between 8 and 63 characters long. The password can include symbols (!?*&_) and spaces. This key must be the exact same key entered on your wireless router or access point.
WPA/WPA2 incorporates user authentication through the Extensible Authentication Protocol (EAP). EAP is built on a more secure public key encryption system to ensure that only authorized network users can access the network.
Setup Guide
To set up the D-Link AC1900 Gigabit Wi-Fi Router DIR-1950,
- Start by unplugging your modem and connecting it to the router's WAN port.
- Next, plug in the power cord and turn on the router.
- Using a computer or mobile device, connect to the default Wi-Fi network name (SSID) printed on the underside of the router.
- Open a web browser and go to the default IP address (usually 192.168.0.1) to access the setup wizard.
- Follow the on-screen instructions to change the admin password, set up your Wi-Fi network names and passwords, and configure any additional settings such as parental controls or QoS.
Connect a Wireless Client to your Router
WPS Button
The easiest way to connect your wireless devices to the router is with WPS (Wi-Fi Protected Setup). Most wireless devices such as wireless adapters, media players, Blu-ray DVD players, wireless printers and cameras will have a WPS button (or a software utility with WPS) that you can press to connect to the router. Please refer to your user manual for the wireless device you want to connect to make sure you understand how to enable WPS.
Once you know, follow the steps below:
Step 1 - Press the WPS button on the router for about 1 second. The wireless LEDs will start to blink.

- Step 2 - Within 2 minutes, press the WPS button on your wireless device (or launch the software utility and start the WPS process).
- Step 3 - Allow up to 1 minute for your connection to be configured. Once the Internet light stops blinking, you will be connected and your wireless connection will use WPA2.
Windows 10
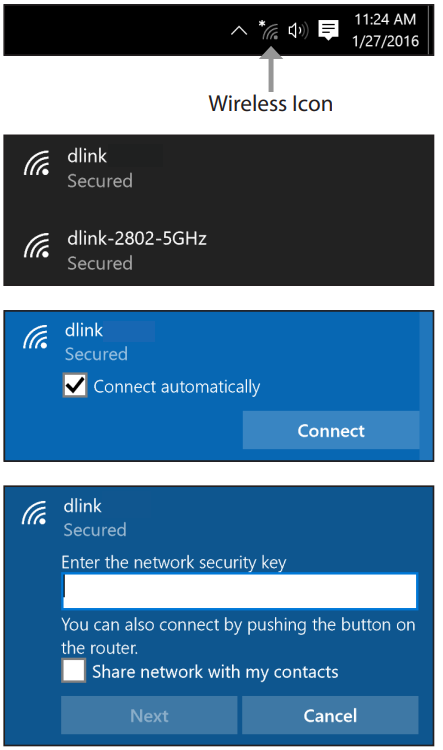
To join an existing network, locate the wireless network icon in the taskbar, next to the time display and click on it.
- Clicking on this icon will display a list of wireless networks which are within range of your computer. Select the desired network by clicking on the SSID.
- To connect to the SSID, click Connect.
- To automatically connect with the router when your device next detects the SSID, check the Connect Automatically check box.
You will then be prompted to enter the Wi-Fi password (network security key) for the wireless network. Enter the password into the box and click Next to connect to the network. Your computer will now automatically connect to this wireless network when it is detected.
Windows 8 - WPA/WPA2
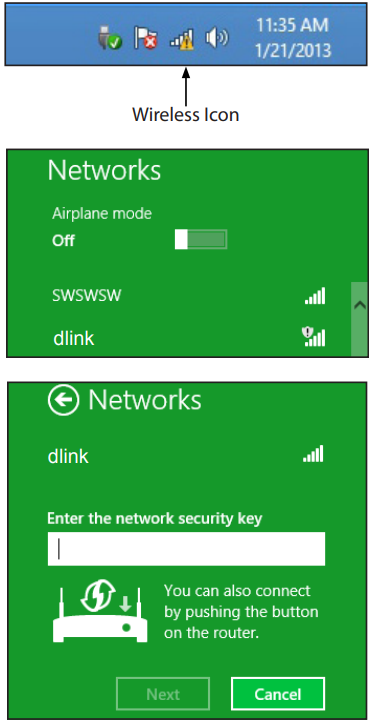
To join an existing network, locate the wireless network icon in the taskbar, next to the time display.
- Clicking on this icon will display a list of wireless networks which are within connecting proximity of your computer. Select the extender’s network by clicking on the network name.
- You will then be prompted to enter the network security key (Wi-Fi password) for the wireless network. Enter the password into the box and click Next.
If you wish to use Wi-Fi Protected Setup (WPS) to connect to the router, you can also press the WPS button on your router at this point to enable the WPS function.
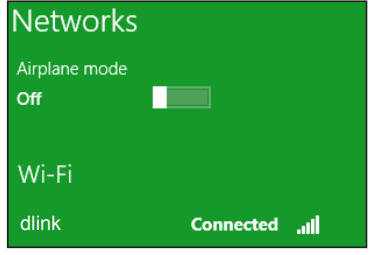
When you have established a successful connection with a wireless network, the word Connected will appear next to the name of the network to which you are connected.
Windows 7 WPA/WPA2
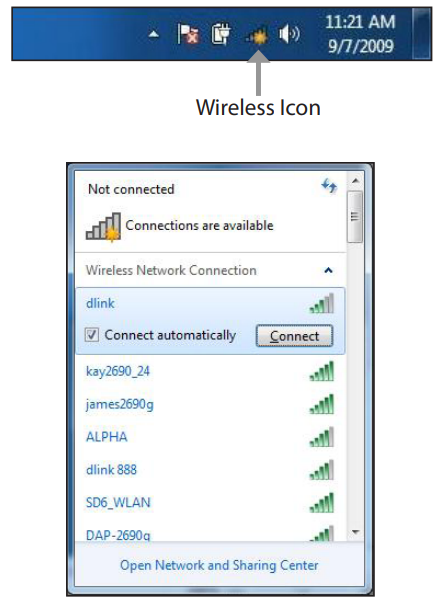
It is recommended that you enable wireless security (WPA/WPA2) on your wireless router or access point before configuring your wireless adapter. If you are joining an existing network, you will need to know the WiFi password or passphrase being used.
- Click on the wireless icon in your system tray (lower-right corner).
- The utility will display any available wireless networks in your area.
- Highlight the wireless connection with Wi-Fi name (SSID) you would like to connect to and click the Connect button.
If you get a good signal but cannot access the Internet, check your TCP/IP settings for your wireless adapter.
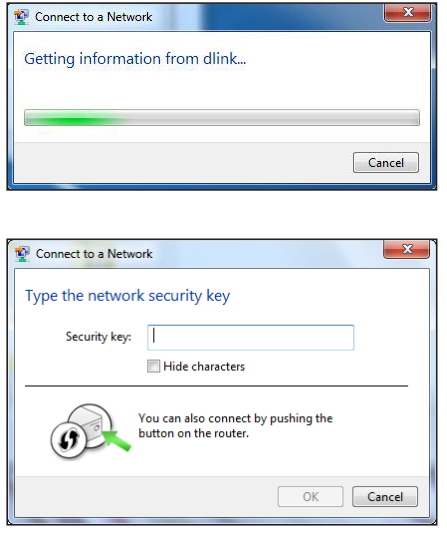
- The following window appears while your computer tries to connect to the router.
- Enter the same security key or passphrase (Wi-Fi password) that is on your router and click OK. You can also connect by pushing the WPS button on the router.
It may take 20-30 seconds to connect to the wireless network. If the connection fails, please verify that the security settings are correct. The key or passphrase must be exactly the same as the one on the wireless router.
Troubleshooting
This chapter provides solutions to problems that can occur during the installation and operation of the router. Read the following descriptions if you are having problems.
1. Why can’t I access the web-based configuration utility?
When entering the IP address of the D-Link router (192.168.0.1 for example), you are not connecting to a website, nor do you have to be connected to the Internet. The device has the utility built-in to a ROM chip in the device itself. Your computer must be on the same IP subnet to connect to the web-based utility.
- Make sure you have an updated Java-enabled web browser. We recommend the following:
- Microsoft Internet Explorer 10 or higher
- Mozilla Firefox 28 or higher
- Google Chrome 28 or higher
- Apple Safari 6 or higher
- Verify physical connectivity by checking for solid link lights on the device. If you do not get a solid link light, try using a different cable, or connect to a different port on the device if possible. If the computer is turned off, the link light may not be on.
- Disable any Internet security software running on the computer. Software firewalls such as ZoneAlarm, BlackICE, Sygate and Norton Personal Firewall may block access to the configuration pages. Check the help files included with your firewall software for more information on disabling or configuring it.
- Configure your Internet settings:
- Go to Start > Settings > Control Panel. Double-click the Internet Options Icon. From the Security tab, click the button to restore the settings to their defaults.
- Click the Connection tab and set the dial-up option to Never Dial a Connection. Click the LAN Settings button. Make sure nothing is checked. Click OK.
- Go to the Advanced tab and click the button to restore these settings to their defaults. Click OK three times.
- Close your web browser (if open) and open it.
- Access the web management. Open your web browser and enter the IP address of your D-Link router in the address bar. This should open the login page for your web management.
- If you still cannot access the configuration, unplug the power to the router for 10 seconds and plug back in. Wait about 30 seconds and try accessing the configuration. If you have multiple computers, try connecting using a different computer.
- What can I do if I forgot my password?
If you forgot your password, you must reset your router. This process will change all your settings back to the factory defaults.
To reset the router, locate the reset button (hole) on the rear panel of the unit. With the router powered on, use a paperclip to hold the recessed button down for 10 seconds. Release the button and the router will go through its reboot process. Wait about 30 seconds to access the router. The default IP address is 192.168.0.1. When logging in, leave the password box empty.
D-Link AC1900 Gigabit Wi-Fi Router DIR-1950 Pros & Cons
Pros:
- High-speed Wi-Fi performance with AC1900 technology
- Supports MU-MIMO for simultaneous device connections
- Advanced security features including WPA3 encryption
- User-friendly setup and management via D-Link Wi-Fi app
- Affordable pricing compared to similar models
Cons:
- Limited range compared to more expensive models
- No built-in mesh network capability
- Slightly bulky design with external antennas
- Some users report occasional firmware update issues
Customer Reviews
Customers generally praise the D-Link AC1900 Gigabit Wi-Fi Router DIR-1950 for its reliable performance and ease of setup. Many appreciate its ability to handle multiple devices without significant speed drops. However, some users have noted that the range could be better and that occasional firmware updates can be problematic.
A common complaint is about the limited range, but this can often be mitigated by using a range extender or ensuring optimal placement of the router.
Faqs
What is the maximum combined speed of the AC1900 Gigabit?
Does the D-Link Router support MU-MIMO technology?
How do I set up parental controls on my Gigabit Wi-Fi Router?
How often should I update the firmware of my D-Link AC1900?
What type of security protocols does the Gigabit Wi-Fi Router support?
How many Gigabit Ethernet ports does the D-Link AC1900 have?
Can I manage my network settings remotely with the Wi-Fi Router DIR-1950?
Is the D-Link AC1900 Gigabit compatible with all types of modems?
What is the typical range of the D-Link Router DIR-1950?
Leave a Comment
