
Setup: Ddpai N1 Dual DashCam User Manual
Content
ddpai N1 Dual DashCam
Introduction
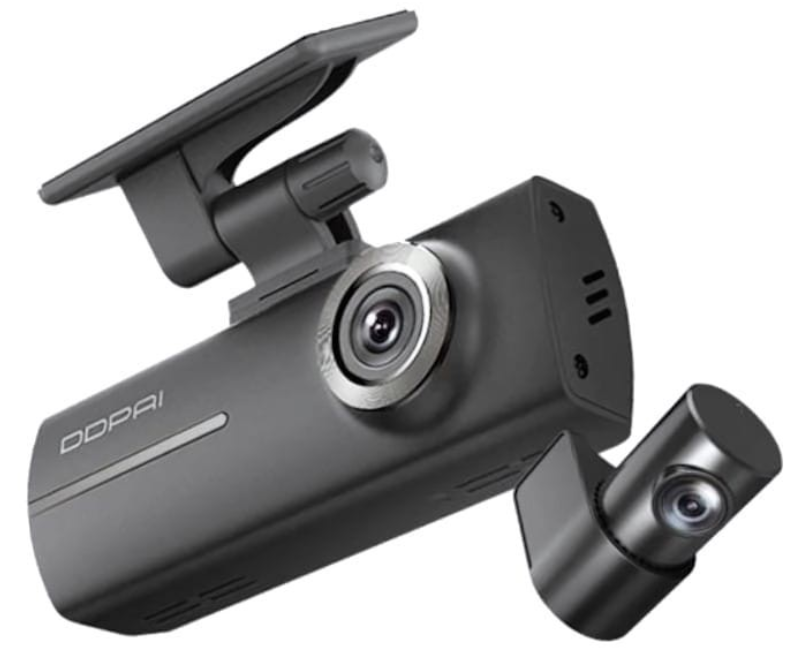
The ddpai N1 Dual DashCam is a premium dual-lens dash camera designed to provide comprehensive video coverage of both the front and rear of your vehicle, ensuring maximum road safety and security. Equipped with high-definition cameras, it captures crystal-clear footage in 1080p Full HD, providing sharp and vivid recordings day or night. Its dual-camera setup offers wide-angle views from both front and rear, minimizing blind spots and enhancing evidence collection in the event of an accident or traffic incident.
Key benefits include continuous loop recording, built-in Wi-Fi connectivity for seamless smartphone integration, and advanced G-sensor technology that automatically saves critical footage upon impact detection. The dashcam supports expandable microSD storage up to 128GB, allowing for extended recording periods. Its compact, sleek design ensures discreet mounting without obstructing the driver’s view, suitable for both private car owners and professional drivers such as rideshare operators or fleet managers.
Ideal for anyone seeking reliable video evidence for insurance claims, traffic disputes, or personal security, the ddpai N1 Dual DashCam excels in urban and highway environments alike. The device is typically priced in the range of $120 to $170 USD and is widely available through online retailers and select electronics stores, making it accessible for a broad audience focused on vehicle safety and driver accountability.
Package Contents
Appearance
Dash Cam Installation
Installing the TF Card
- The N1 Dual supports a maximum of 256GB TF memory card and requires a Class 10 high-speed card. Different brands of TF memory cards may affect the storage of performance; some TF memory cards have the risk of missing records. It is recommended to use the following brands of TF memory cards: DDPAI, Kingston, Samsung, Toshiba, and Lexar.
- Insert or remove the TF card ONLY when the Dash Cam is not connected to the power supply. Inserting or removing the TF card when the Dash Cam is running may damage the files within.
- Please confirm the orientation of the TF card before installation. If the memory card is forcibly inserted in the wrong direction, the memory card, the card slot,, or the card data may be damaged.
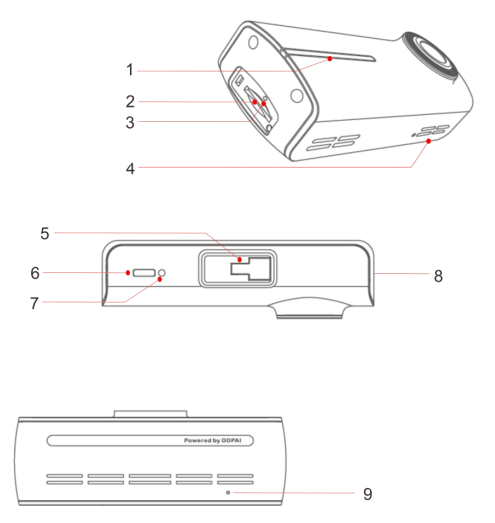
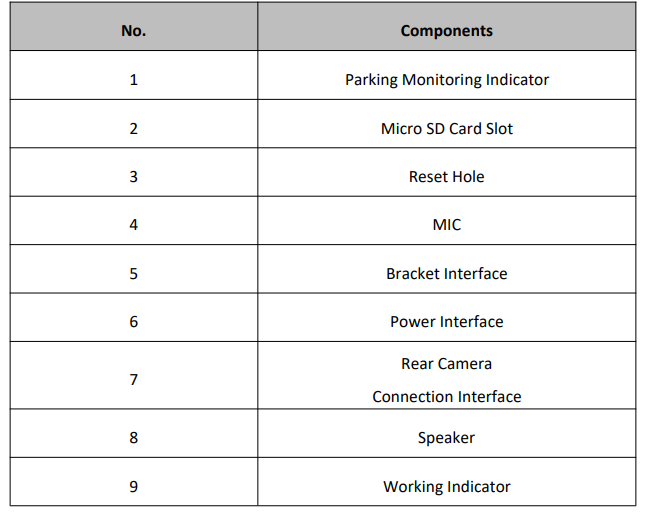
- Open the TF card slot cover on the left side of the Dash Cam.
- Please make sure the lens of the Dash Cam is facing up, and the chip of the TF card is facing up, then insert the TF card into the slot. Please refer to the silkscreen printed pattern beside the TF card slot to install the TF card.
- Close the card slot cover.
- The Dash Cam will automatically format the TF card at the first time using the TF card.
Power-On Checking
- Do not perform any operation to set up this product while driving.
- Downloading the app will incur your mobile data usage; if you don’t wish to, connect your phone to the Internet. Before installing the Dash Cam, perform a power-on check to confirm the Dash Cam is connected to the DDPAI App normally.
Scan to install the DDPAI App on your smartphone.

Please grant the DDPAI App the necessary application permissions to install; otherwise,, the connection may fail.
Connect the Dash Cam to the vehicle charger:
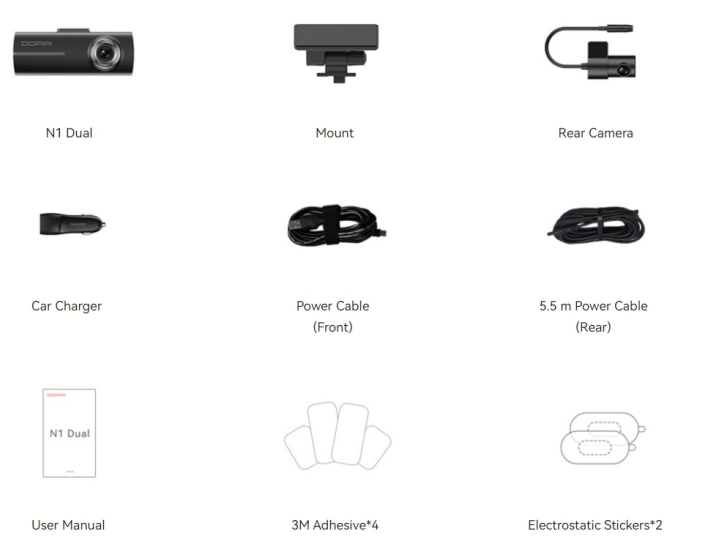
- Take out the N1 Dual host, mount, vehicle charger, and Type-C power cable.
- Connect the USB connector of the power cable to the vehicle charger and insert the other end into the Type-C interface of the Dash Cam. Please refer to the figure below.
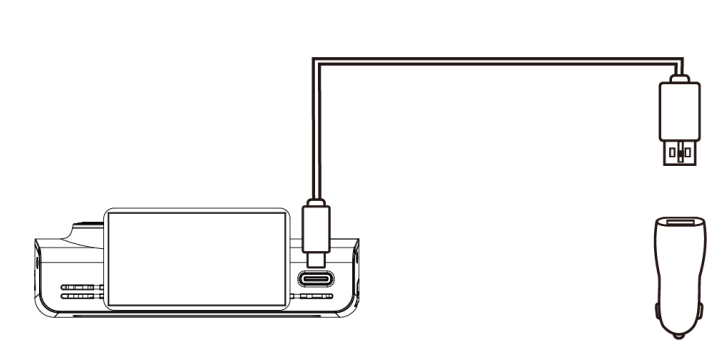
Insert the vehicle charger into the cigarette lighter socket and start the vehicle. Then the Dash Cam will automatically power on with the welcome greeting "Hello, DDPAI". When the indicator is breathing blue, it indicates that the Dash Cam is turned on normally; otherwise, please check the fault according to the status of the indicator. For a detailed description of the status of the indicator, please see 5. Indicator Guide.
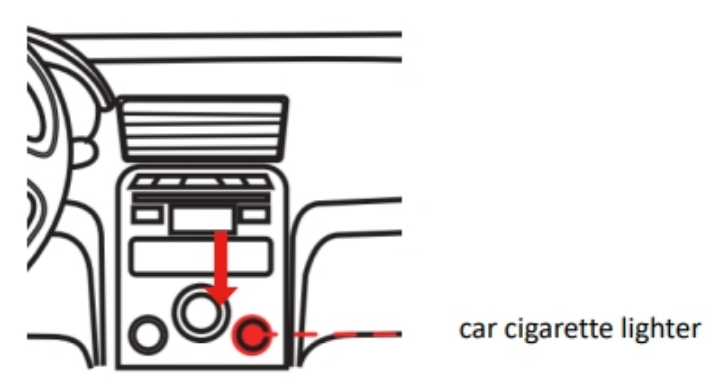
Installing the N1 Dual onto Your Windshield
- After performing the power-on check, please confirm that the N1 Dual is connected to the DDPAI app normally.
- Do NOT install this product or perform any other operation to set up this product while driving.
Select an appropriate place to locate the N1 Dual and clean this area:
You are recommended in most cases to install the N1 Dual on your front windshield (Next to the rearview mirror on the driver’s side), as shown in the figure below.
- Clean the location area on the windshield with a clean and soft cloth from dust, plastic, and other stuff, to ensure that the N1 Dual can be firmly attached to the front windshield.
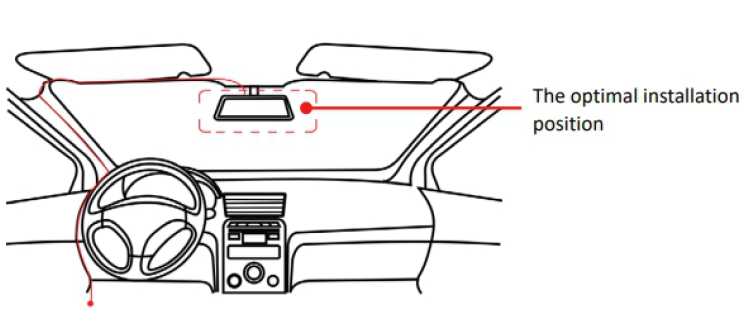
- Use the vehicle wire trim tool to run the power cable along the front windshield and the roof, and hide the cable on the A-pillar, so as not to block the driver’s sight and cause danger..
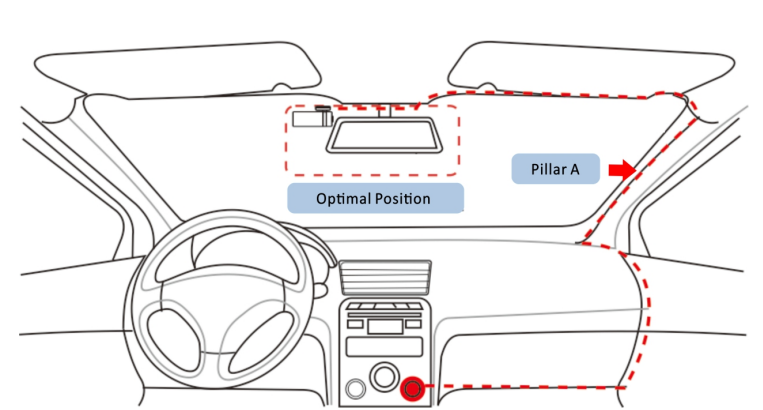
Locate the installation position based on the guidelines:
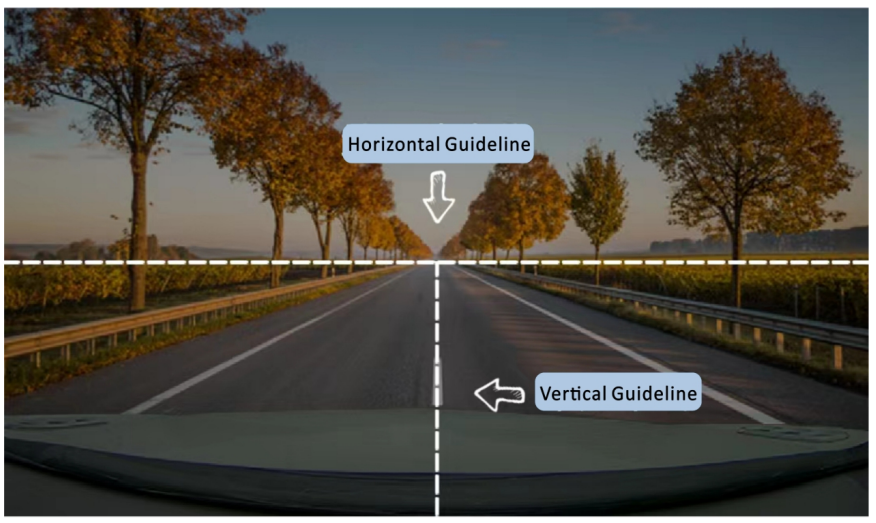
- Vertically: Moving the N1 Dual side to side with the help of the vertical guideline in the middle of the screen, keep adjusting until to the middle of the vehicle’s front end aligns with this vertical guideline.
- Horizontally: Rotating the camera up and down with the help of the horizontal guideline in the middle of the screen, keep adjusting until the ground-level horizon outside vanishes from the scope of this horizontal guideline.
Fix the N1 Dual in place:
- After locating the installation position, attach the electrostatic sticker and remove the red backing film from the 3M adhesive sticker on the bracket of the N1 Dual. Then attach the N1 Dual to the predetermined location, ensuring that the 3M adhesive sticker on the bracket is firmly attached to the windshield. The camera is facing towards the front of the vehicle.
Installing the Rear Camera
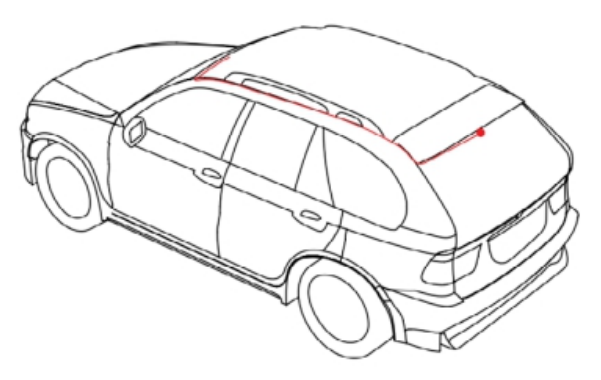
- Clean the rear windshield (the approximate installation position of the rear camera is shown in the figure below).
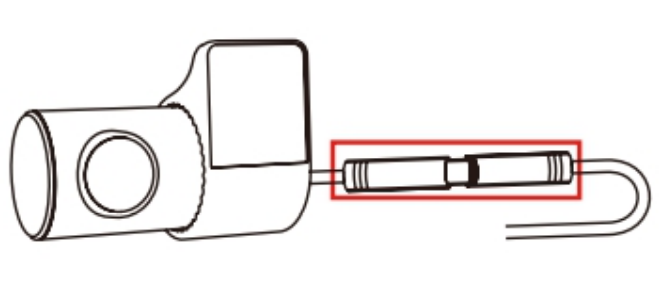
- Connect the rear camera to the power cable (rear).
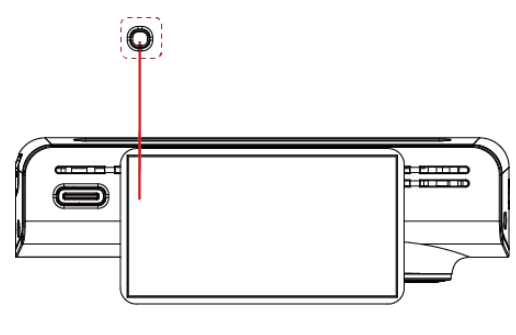
- Insert the rear power cable fully into the N1 Dual headphone jack.
Please make sure that the power cable is fully plugged into the jack; if not, the rear camera indicator will not turn on, and the rear camera will not work. - Route the rear power cable from the Dash Cam to the rear camera; cable routing is shown in the figure above.
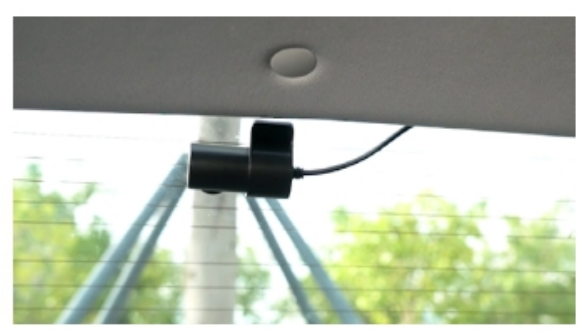
- Remove the red backing film of the adhesive sticker, and adjust the field of view of the rear camera, then fix the rear camera to the inner wall of the rear windshield.
Setting Up the N1 Dual on DDPAI App
The Dash Cam can be connected to the DDPAI App on a smartphone via its built-in Wi-Fi without incurring the user's data usage, forming a small Dash Cam-smartphone WLAN. Through this Wi-Fi network, you can preview, playback, download, and share driving recordings and photos in real time on the DDPAI App on your smartphone.
Downloading DDPAI App
Please scan the QR code below or search for“DDPAI” in Google Play Store (Android) or App Store (iOS) to download the DDPAI App.
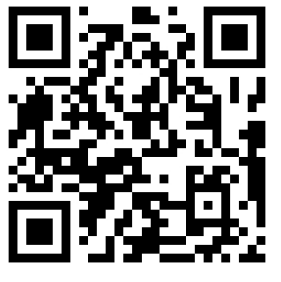
If the authorization prompts appear during installation, please grant full permissions; otherwise,, the connection between the DPAIApp and N1 Dual may be affected.
Connecting N1 Dual with Smart Phone
Troubleshooting Common Issues with the ddpai N1 Dual DashCam
Users of the ddpai N1 Dual DashCam may encounter several common issues, which can often be resolved with straightforward solutions:
- Dashcam not powering on: Check the power cable connection and ensure the vehicle ignition is on. Verify the fuse associated with the dashcam circuit is intact.
- Video files not saving: Format the microSD card using the dashcam’s menu or via a computer to avoid file system corruption. Use a high-quality microSD card rated for dashcam use (Class 10 or higher).
- Error code E01 or E02: These typically indicate memory card errors. Reinsert or replace the microSD card and format it properly.
- Wi-Fi connection issues: Ensure the dashcam’s Wi-Fi is enabled in settings and the smartphone’s Wi-Fi is connected to the dashcam network. Restart both devices if necessary.
Preventive tips include regularly formatting the memory card every 1-2 months and keeping the firmware updated to the latest version to maintain stability and functionality. The ddpai N1 Dual DashCam usually comes with a 1-year manufacturer's warranty covering defects and operational faults.
For support, customers can contact DDPai’s official service via their website or customer support email, which is typically listed in the product packaging and online resources.
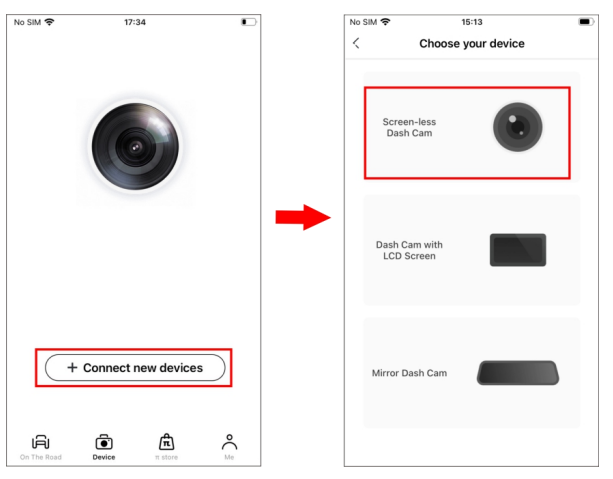
- Open the DDPAI App, enter the "Device" page, tap "+ Connect New Device", enter the "Choose your device" interface, and then tap "Screen-less Dash Cam"
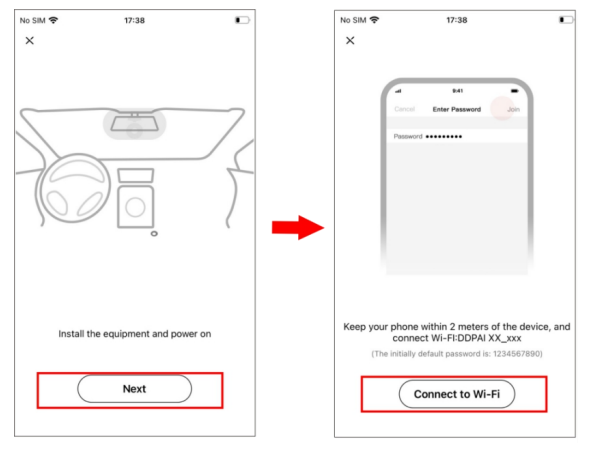
- Tap "Next" > "Connect to Wi-Fi" in turn, and the detected Wi-Fi of the Dash Cam (such as DDPAI_N1 Dual_XXXX) will be displayed.
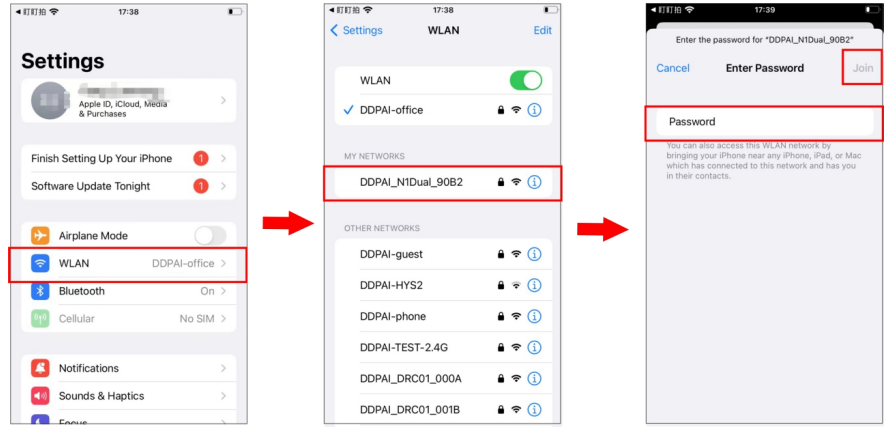
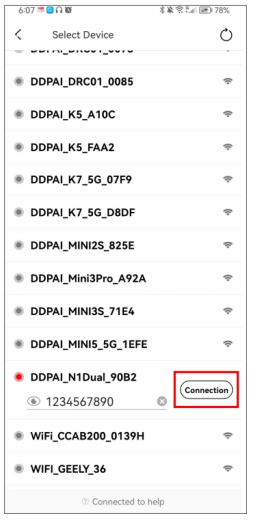
- Connect your phone to the built-in Wi-Fi "DDPAI_N1 Dual_XXXX" of the Dash Cam, and the default password is 1234567890.
- For iPhone: When you enter the“Settings” interface, select "WLAN" > "DDPAI_N1 Dual_XXXX", enter the initial password (1234567890), and tap Join.
- For Android phones: In the Wi-Fi list, select "DDPAI_N1Dual_XXXX", enter the initial password(1234567890), and tap Connection.
- After a successful connection, you can directly enter the "Now&back" interface of the DDPAI App.
- When you connect the Dash Cam for the first time, you will be prompted:
- To modify the Wi-Fi password: Please modify it according to your needs, and save the password properly after modification (if you forget the password, please hold the reset button on the Dash Cam with a pin for 6 to 8 seconds to restore the factory settings, and then reconnect the Dash Cam with the initial password).
- Whether to enable high compression video encoding: It is recommended to enable. After enabling, the recorded video quality will be improved, which is clearer than the default configuration.
- When you connect the Dash Cam for the first time, you will be prompted:
Specifications
- Model
- N1 Dual
- Rated Input
- 5V/1A
- Storage Capacity
- Support TF card (Max. 256GB)
- G-Sensor
- 3-axis G-sensor supports collision detection, triggers taking pictures in case of collision and rapid acceleration, and the sensitivity can be adjusted by the app
- Resolution
- Optional:
- 1. 1296P
- 2. Full HD (1080P)
- Video Encoding
- H.264/Al 265 (DDPAl encoding technology)
- Power Supply
- 12V intelligent step-down line
- Transmission
- Type-C interface
Appendix: Installing the Hardwire Kit
The installation of the hardwire kit requires connection to the vehicle's battery fuse box. To avoid damage to the vehicle due to incorrect operation, please have the hardwire kit installed at a professional auto service center. Install the voltage reduction cable with a hidden deployment method, ensuring a tidy space.
The method of power supply installation through the hardwire kit can achieve the parking monitoring function. The detailed steps for installing the hardwire kit (connecting to the fuse box for power supply) are as follows:
- Please ensure personal safety and turn off the vehicle engine before proceeding with the installation.
- Please ensure the Dash Cam can be successfully connected to the DDPAI App after startup. For details, please refer to 4.2 Power-on Checking.
- Please ensure the Dash Cam has been adjusted for shooting view and has been attached to the front windshield. For details, please refer to 4.3 Installing the N1 Dual onto Your Windshield.
Step 1: Take out the three types of wire terminals and the power connection wire as shown in the figure below.
The power connector includes the following terminals:
- Red ACC wire terminal
- Yellow VCC wire terminal
- Black GND wire terminal
- The end of the power wire is a Type-C connector
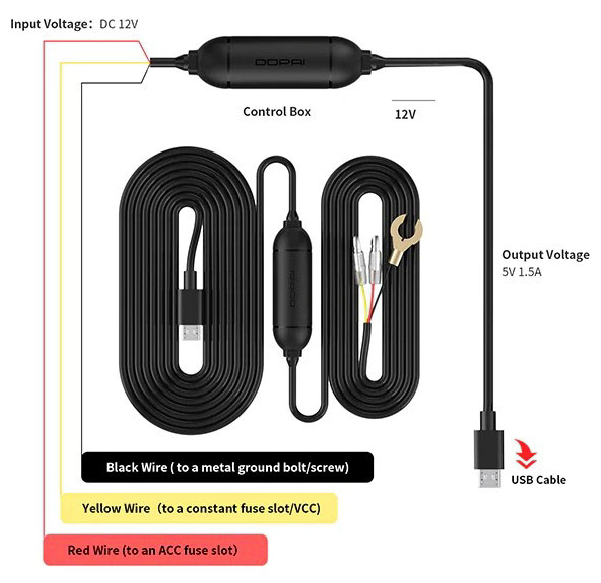
Step 2: Insert the end of the power wire Type-C interface into the Dash Cam power interface, and route the power wire along the front windshield, A-pillar, and driver's seat storage compartment to the fuse box. The power wire routing method is shown in the figure below.
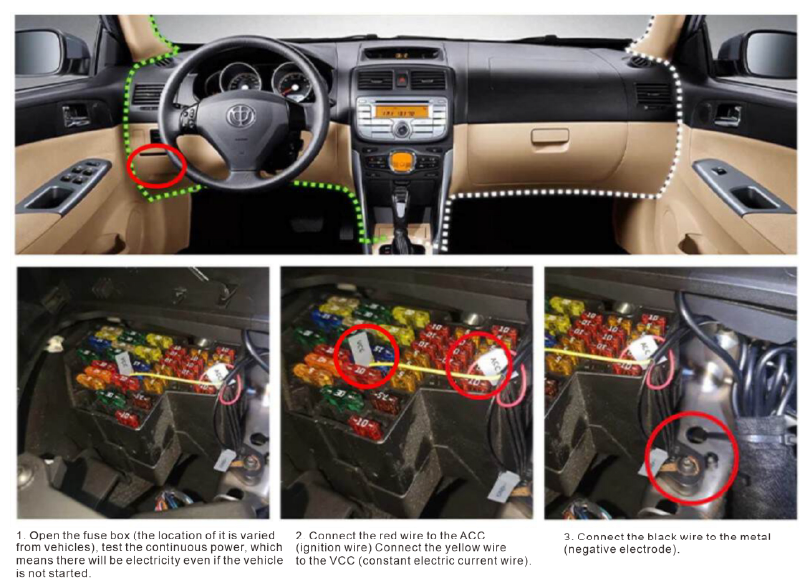
Automotive fuse box: It is usually located on the left side of the driver's seat or near the steering wheel.
Step 3: Connect the terminal cables:
- Connect the black wire (GND) to the ground wire inside the vehicle fuse box,
- Connect the red wire (ACC) to the +12VDC power supply control of the fuse box.
- Connect the yellow wire (VCC) to the 12VDC power supply of the fuse box (this power supply is always on and not controlled by the ignition).
Step 5: Start the vehicle. After the Dash Cam is powered on, it will automatically start up and emit a start-up prompt tone.
Check if the Dash Cam is working properly. The installation of the hardwire kit requires professional personnel from an auto service center. Alternatively, scan the QR code below to watch the hardwire kit installation video.
Pros & Cons of the ddpai N1 Dual DashCam
Pros
- High-Quality Dual Recording: Captures both front and rear views in 1080p Full HD with wide-angle lenses, ensuring comprehensive road coverage.
- Easy Smartphone Integration: Built-in Wi-Fi allows quick video playback, downloading, and firmware updates through the dedicated app.
- Automatic Incident Detection: G-sensor technology automatically locks critical footage in case of sudden impacts or collisions.
- Compact Design: Small form factor allows discreet installation without blocking the driver’s line of sight.
Cons
- Limited 1080p Resolution: While Full HD is clear, some competitors offer 2K or 4K recording for even sharper detail.
- App Usability: Some users report occasional connectivity drops or a less intuitive interface compared to premium brands.
- Rear Camera Wiring: Installation of the rear camera can be challenging for non-professionals due to cable routing requirements.
- Value for Money: Although competitively priced, similar dashcams with advanced features like GPS tracking or cloud storage come at a slightly higher cost.
Customer Reviews and User Feedback on the ddpai N1 Dual DashCam
Customers generally praise the ddpai N1 Dual DashCam for its solid video quality and ease of installation. Many users highlight the reliability of both front and rear recording as a major benefit, especially for urban drivers concerned about rear-end collisions. The built-in Wi-Fi feature receives positive remarks for convenient file management without removing the memory card.
Common complaints focus on the occasional disconnection between the dashcam and the mobile app,, and some users are experiencing difficulty setting up the rear camera cables. Star ratings typically average around 4 out of 5, reflecting good value and performance for the price range. Many reviewers recommend this dashcam for everyday drivers seeking dependable dual-view recording with straightforward operation.
Faqs
How do I set up the ddpai N1 Dual DashCam for first-time use?
What should I do if the ddpai N1 Dual DashCam is not recording or saving footage?
Can the ddpai N1 Dual DashCam record continuously while my car is parked?
How does the ddpai N1 Dual DashCam's NightVIS technology improve night recording?
Is the ddpai N1 Dual DashCam compatible with all smartphones for app control and video playback?
What are common performance tips to optimize video quality on the ddpai N1 Dual DashCam?
How do I maintain and care for the ddpai N1 Dual DashCam to ensure longevity?
What should I do if the G-Sensor on my ddpai N1 Dual DashCam is too sensitive or not triggering event recordings?
Tags
Leave a Comment