Dell Screen Monitor D3218HN User Guide
Content

Introduction of Dell Screen Monitor D3218HN
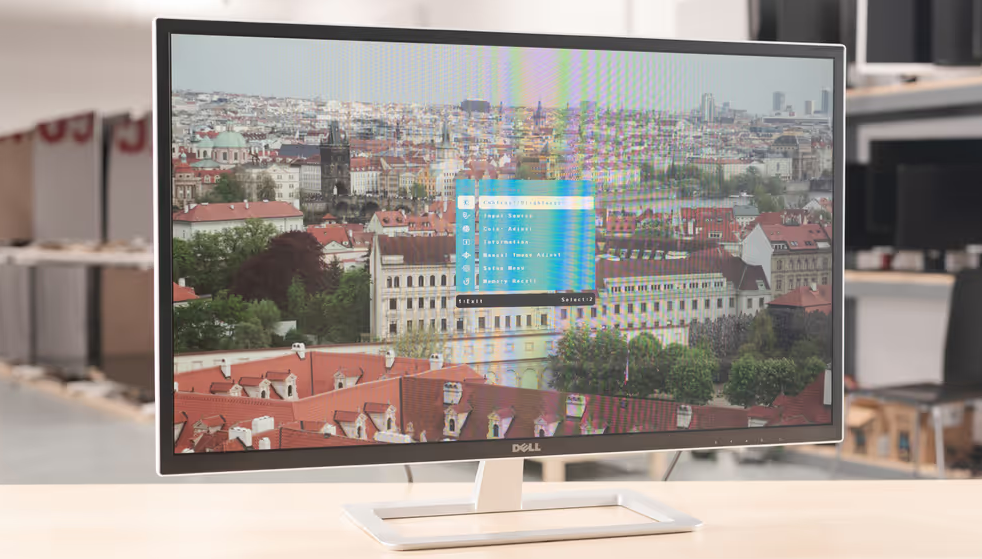
The Dell Screen Monitor is a 31.5-inch monitor with a Full HD (1920 x 1080) resolution and a 60Hz refresh rate. This monitor is perfect for productivity tasks, entertainment, and even light gaming. With its sleek design and adjustable stand, it's sure to fit in any workspace. The estimated price of the Dell Screen Monitor D3218HN is around $250 to $300, and it was launched in 2018.
Detailed Specifications
The Screen Monitor D3218HN has the following key features
- 31.5-inch Full HD (1920 x 1080) display
- 60Hz refresh rate
- 16:9 aspect ratio
- 5ms response time
- 1000:1 contrast ratio
- 178/178-degree viewing angle
- 250 cd/m² brightness
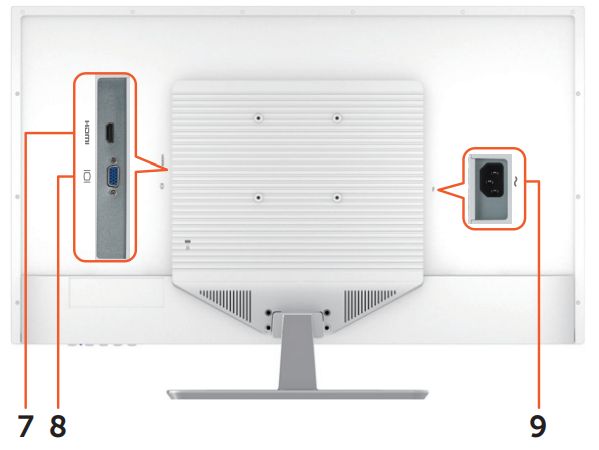
- HDMI, VGA, and audio line-out ports
- Adjustable stand (tilt, swivel, and height)
Monitor specifications
LCD Panel | 80.0 cm (31.5”) TFT (with LED back light) |
Power Management | VESA DPMS compatible Off Mode, < 0.4 W Power Saving Mode,< 0.4 W |
Displayable Resolution | Full HD, 1920 x 1080 max. Vertical Frequency, 60Hz max. |
Pixel Dimension | 0.36375 x 0.36375 mm |
Color gamut | 84% of NTSC (CIE1976) |
Color Depth | 16.7 Million |
Brightness | 300 cd/m²(typical) |
Contrast Ratio | 1200:1 (typical) |
Viewing Angle | 178° (Horizontal) typical 178° (Vertical) typical |
Response Time | 8 ms typical (whiteto black, blackto white) |
Connectivity | 1 x VGA 1 x HDMI 1.4 |
Active Display Area | 698.4 x 392.85mm |
Tilt | -5°~10°(±2°) |
VESA mount support | 100 x 100mm |
Dimension (with stand) | |
Height | 48.4 cm (18.94 inches) |
Width | 73.0 cm (28.73 inches) |
Depth | 21.0 cm (8.27 inches) |
Weight | |
without packaging | 7.3 kg (16.09 lb) |
with packaging | 9.5 kg (20.94 lb) |
Temperature | Operating: 0°C ~ + 40°C Storage: -20°C ~ + 60°C |
Compliance | FCC, cTUVus, Energy Star, KC, E-Standby, VCCI, PSE |
Power | Input Voltage AC100-240 V |
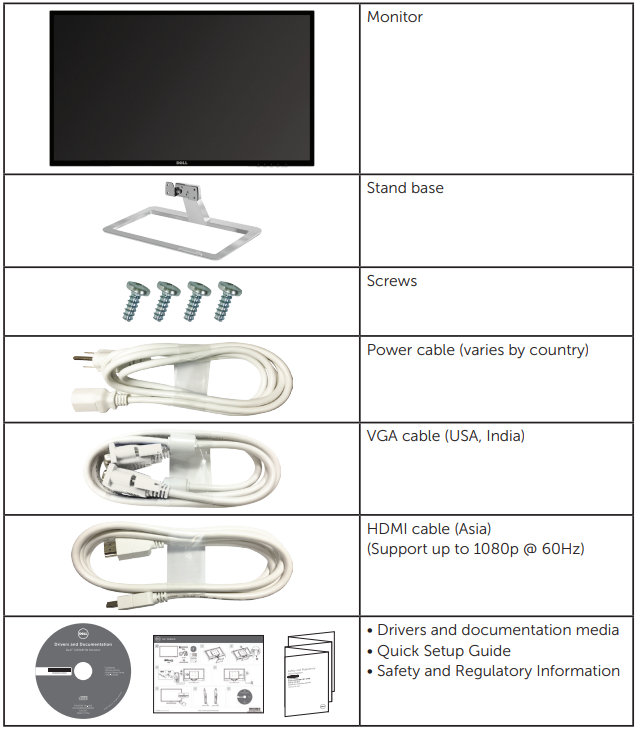
Package contents
Parts and controls
Front view
Back view
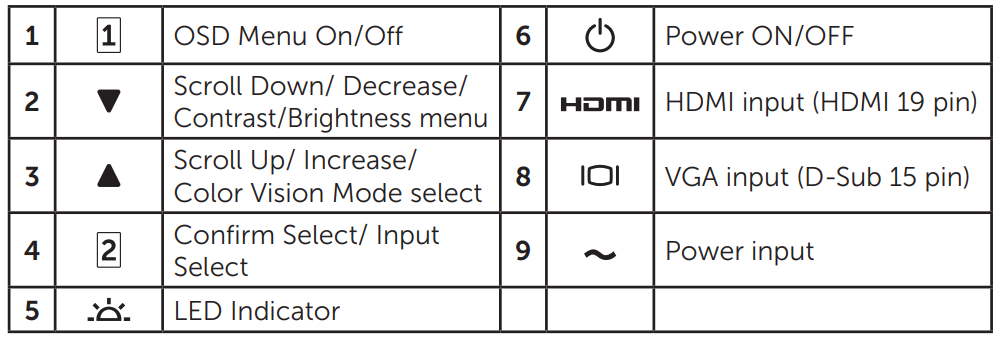
Description
The Dell Screen Monitor D3218HN is a versatile monitor that's perfect for any use case. Its Full HD resolution and 60Hz refresh rate make it great for productivity tasks, watching movies, and browsing the web. The monitor also has a 5ms response time and a 1000:1 contrast ratio, making it suitable for light gaming. The monitor's adjustable stand allows for tilt, swivel, and height adjustments, ensuring that the user can find the perfect viewing angle.
Setup of Dell Screen Monitor
Setting up the Dell D3218HN is a straightforward process
- Unbox the monitor and all its components.
- Attach the monitor to the stand by aligning the screw holes and tightening the screws.
- Connect the monitor to a power source using the included power cable.
- Connect the monitor to a computer or other device using the HDMI or VGA cable.
- Adjust the monitor's settings using the on-screen display (OSD) controls.
Power Management Modes
If you have VESA’s DPM-compliant video card or software installed in your PC, the monitor can automatically reduce its power consumption when not in use. This is referred to as power save mode*. If the computer detects input from the keyboard, mouse, or other input devices, the monitor automatically resumes functioning. The following table shows the power consumption and signaling of this automatic power saving feature.
VESA Modes | Horizontal Sync | Vertical Sync | Video | Power Indicator | Power Consumption |
| Normal operation | Active | Active | Active | White | 50W (maximum)** 45W (typical) |
| Active-off mode | Inactive | Inactive | Off | Orange | Less than 0.4 W |
| Switch off | - | - | - | Off | Less than 0.4 W |
Energy Star | Power Consumption |
| PON | 22.4 W*** |
ETEC | 70.0 kWh**** |
- *Zero power consumption in OFF mode can only be achieved by disconnecting the AC mains cable from the monitor.
- **Maximum power consumption with maximum luminance.
- ***Power consumption of on mode as defined in Energy Star 7.0 version.
- ****Total energy consumption in kWh as defined in Energy Star 7.0 version.
- This document is informational only and reflects laboratory performance. Your product may perform differently, depending on the software, components and peripherals you ordered and shall have no obligation to update such information.
- Accordingly, the customer should not rely upon this information in making decisions about electrical tolerances or otherwise. No warranty as to accuracy or completeness is expressed or implied.
- Activate the computer and the monitor to gain access to the OSD.
Supported resolutions and refresh rates
WARNING: Do not set the graphics card on your computer to exceed these maximum refresh rates. Doing so may result in permanent damage to your monitor.
VGA | 720 x 400 @ 70Hz |
VGA | 640 x 480 @ 60Hz |
VESA | 640 x 480 @ 75Hz |
VESA | 800 x 600 @ 60Hz |
VESA | 800 x 600 @ 75Hz |
VESA | 1024 x 768 @ 60Hz |
VESA | 1024 x 768 @ 75Hz |
VESA | 1152 x 864 @ 75Hz |
VESA | 1280 x 1024 @ 60Hz |
VESA | 1280 x 1024 @ 75Hz |
VESA | 1600 x 900 @ 60Hz |
VESA | 1920 x 1080 @ 60Hz |
The following resolutions are supported only with a HDMI source
480i @ 60Hz |
480p @ 60Hz |
576i @ 50Hz |
576p @ 50Hz |
720p @ 50Hz/ 720p @ 60Hz |
1080p @ 60Hz |
Setting up the monitor
Attaching the stand
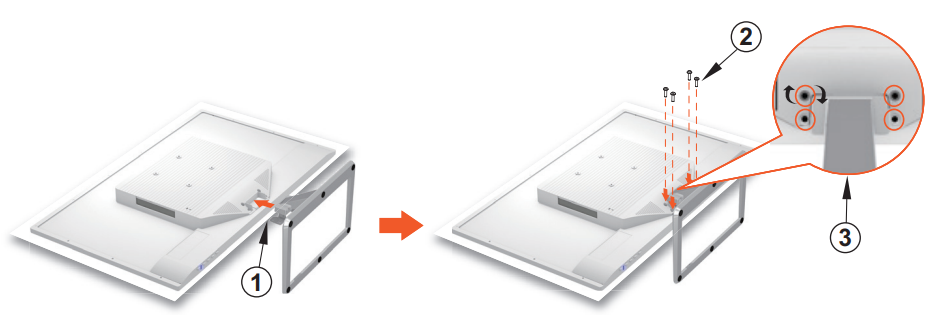
- Place the monitor face down on a flat and clean surface.
- Align the screw holes on the monitor with the screw holes on the stand.
- Replace the four screws that secure the monitor to the base. Tighten the screws firmly.
Removing the stand

- Place the monitor face down on a flat and clean surface.
- Remove the four screws that secure the monitor to the stand.
- Remove the stand.
Connecting Your Monitor
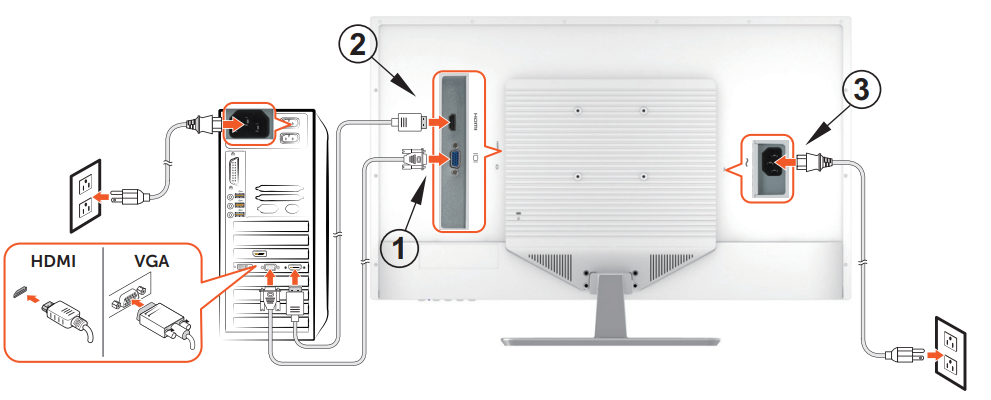
- Connect the video cable
Ensure both monitor and computer are turned off. Connect one end of the VGA or HDMI cable (optional) to the computer, and then connect the other end to the respective port on the monitor. - Connect the power cord
Connect the power cord to a properly-grounded AC outlet, and then to the monitor. - Turn on the monitor
Press the power button to turn on the monitor. - Set the resolution and refresh rate in Microsoft Windows
- Windows 7
- Right-click on the desktop, and then click Screen Resolution> Resolution.
- Set the appropriate resolution.
- Windows 8 or Windows 8.1
- Select the desktop tile to switch to classic desktop mode.
- Right-click on the desktop, and then click Screen Resolution> Resolution.
- Set the appropriate resolution.
- Windows 10
- Right-click on the desktop, and then click Display settings > Advanced display settings > Resolution.
- Set the appropriate resolution.
- Windows 7
Using On-Screen Display (OSD) Functions
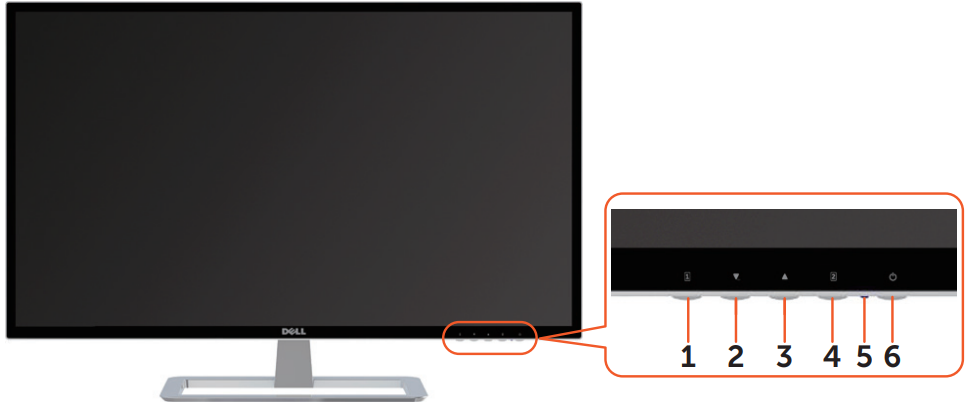
Your monitor’s settings are adjusted with the following buttons
Button | Function |
| Display main menu |
Exit from main menu | |
| Manual adjustmode select for VGA, HDMI mode |
| Select the desired item when in OSD menu |
When not in OSD menu, directly enters Color VisionMode | |
| Select the desired item when in OSD menu |
When not in OSD menu,directly enters Contrast/Brightness menu | |
| Recall bothContrast and Brightness (when not in OSD menu) |
| Power Lock, press 10 seconds to lock, repeat press 10 seconds to unlock(when not in OSDmenu) |
| OSD Lock, press10 seconds to lock, repeatpress 10 seconds to unlock(when not in OSD menu) |
The main menu
Use the monitor’s menu to make adjustments
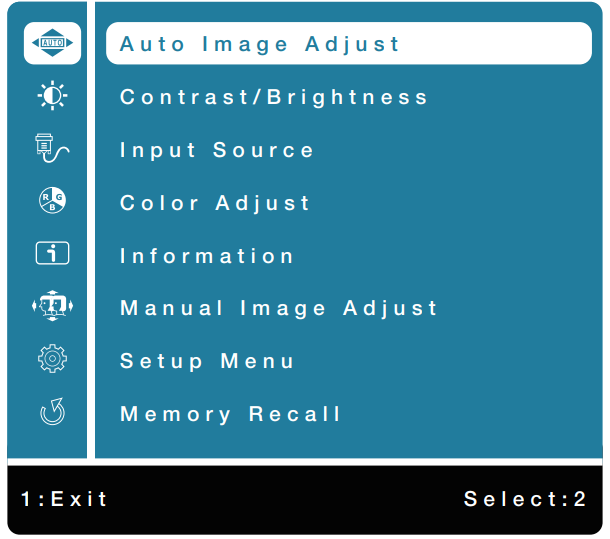
Menu item | Description | |
| Auto Image Adjust | Adjust the Horizontal Position, Vertical Position, Phase(Fine Tune) and Clock (H. Size) of the screen. NOTE: Only available for VGA input. |
| Contrast/Brightness | Adjust theContrast, Brightness, DCRand ECO of screen image. |
| Adjust the foreground white level ofscreen image. | |
| Adjust the luminance of the video. | |
| Detects the distribution of the visual signal input, and create san optimized contrast. NOTE: Brightness and ECO adjustment are disabled when DCR is active. | |
| Allows the user to change the energy-saving settings. NOTE: Brightness and DCRadjustment are disabled when ECO is active. | |
| Input Source | Press InputSource to change the input signal preset color screen image VGA or HDMI. |
| Color Adjust | Toggle between preset color settings such as Cool, Normal, Warm and User Color. |
| Adds blue to screen image for cooler widescreen image. | |
| Adds red to screen imagethe for warmer white and richer red. | |
| Adds green to screen image for a darker color. | |
| Manually adjust settings for Red (R), Green (G), Blue (B).
| |
| Information | Displays information about the input signal coming from the graphics card in your computer. |
| Manual Image Adjust | Manually adjust H. / V. Position, Horizontal Size, Fine Tune, Sharpness, Aspect Ratio and Color Vision Mode. |
| Adjust the horizontal and vertical position of the video.
move screen to the left.
NOTE: Only available for VGA input. | |
|
| Adjust the width of the screen image. ▲: increase the width of screen image, ▼: decrease the width of screen image. NOTE: Only available forVGA input. |
| Adjust the delaytime of dataand clock. Press ▲ or ▼ to adjust to your preference. | |
| Adjust theclarity of a non-Full HD resolution screen betweensignal with ▲ or ▼ button. | |
| Toggles thevideo mode between Full Screen or 4:3. | |
| Provides an optimum displaydelay timethe videothe clarity environment depending on the contents displayed. It contains 6 user-selectable presets.
Notes on DELL low blue light model
WARNING: The possible long-term effects of blue light emission from the monitor may cause personal injury such as digital eye strain,eye fatigue and damage to the eyes. Using monitor for extended periods of time may also cause pain in partsof body such as neck, arm, back and shoulder. |
|
| To reduce the risk of eye strain and neck/arm/ back/shoulder pain from using the monitor for long periods of time, we suggest you to:
|
| Setup Menu | Setup Language Select, OSD Position, OSD Time- out and OSD Background. |
| Allow users to choose from available languages below: English, Français, Español, 日本語, 한국어, 简体中文, 繁體中文. | |
| Press ▲ or ▼ button to selectbetween horizontal and vertical OSD position adjustment.
▲: move OSD to the right,▼: move OSD to the left.
▲: move OSD up, ▼: move OSD down. | |
| To automatically turn off On ScreenDisplay (OSD) after a preset period of time. | |
| Allows the userto turn the OSD background On or Off. | |
| Memory Recall | To recall factory settings for Video controls. Press button option. |
Maintenance guidelines
Care
- Avoid exposing your monitor directly to sunlight or other heat source. Place your monitor away from the sun to reduce glare.
- Place your monitor in a well-ventilated area.
- Do not place any heavy objects on top of your monitor
- Ensure your monitor is installed in a clean and moisture-free area.
- Keep your monitor away from magnets, motors, transformers, speakers, and TV sets.
Troubleshooting
Here are some common issues and solutions for the Screen Monitor D3218HN
- If the monitor is not turning on: Check the power cable and outlet to make sure they are properly connected. Try using a different power outlet or power cable.
- If there is no display: Check the HDMI or VGA cable to make sure it is properly connected. Try using a different cable or port on the computer or device.
- If the colors on the monitor are incorrect: Adjust the color settings using the OSD controls.
- If the monitor is flickering: Try adjusting the refresh rate or using a different cable or port.
- Always follow the manufacturer's instructions for use and maintenance to avoid any damage to the product or any risk to your safety.
No power
- Ensure that the power cable connecting the monitor and the wall outlet is properly connected and secure.
- Plug another electrical device into the power outlet to verify that the outlet is supplying proper voltage.
- Ensure that the video cable connecting the monitor and the computer is properly connected and secure.
No video/power light turned on
- Make sure the video cable supplied with the monitor is tightly secured to the video output port on back of the computer. If not, tightly secure it.
- Adjust brightness.
Wrong or abnormal colors
- If any colors (red, green, blue) are missing, check the video cable to make sure it is securely connected. Check for bent or broken pins in the video cable connector.
- Connect the monitor to another computer.
Pros & Cons of Dell D3218HN
Pros
- Large Full HD display
- Adjustable stand
- HDMI and VGA ports
- Affordable price
Cons
- Only 60Hz refresh rate
- 5ms response time may not be suitable for fast-paced gaming
- No built-in speakers
Customer Reviews of Dell Screen Monitor D3218HN
Customers have praised the Screen Monitor D3218HN for its large Full HD display, adjustable stand, and affordable price. However, some have criticized it for its lack of built-in speakers and low refresh rate. Overall, the monitor has received positive reviews and is a great choice for productivity and entertainment.
Most Common Complaints
The most common complaints about the Dell Screen Monitor are the lack of built-in speakers and the low refresh rate. Some customers have also reported issues with the monitor's durability and the quality of the display.
Faqs
How do I configure the Dell D3218HN Screen Monitor?
How can I fix my Dell Screen Monitor D3218HN not turning on?
Is it possible to wall-mount the Dell Screen Monitor D3218HN?
On the Dell Screen Monitor D3218HN, how should I clean it?
How should I proceed if my Dell Screen Monitor D3218HN is flickering or distorting the image?
Is it possible to play games on the Dell Screen Monitor D3218HN?
What are the steps to modify the Dell Screen Monitor D3218HN's settings?
In the event that my Dell Screen Monitor D3218HN is silent, what should I do?
Which cables come with the Dell D3218HN screen monitor?
For the Dell Screen Monitor D3218HN, how long is the warranty valid?
Leave a Comment


