Dell Ultra HD 4K Monitor P2415Q Instruction Manual

Content
Introducing the Dell Ultra HD 4K Monitor P2415Q
Dell 4K Monitor is a high-performance display designed to meet the needs of professionals and enthusiasts alike. Featuring a stunning 23.8-inch screen with a resolution of 3840 x 2160 pixels, this monitor delivers exceptional clarity and vibrant colors, making it ideal for graphic design, video editing, and gaming. The P2415Q is priced at approximately $379.99. Its IPS technology ensures wide viewing angles and accurate color reproduction.
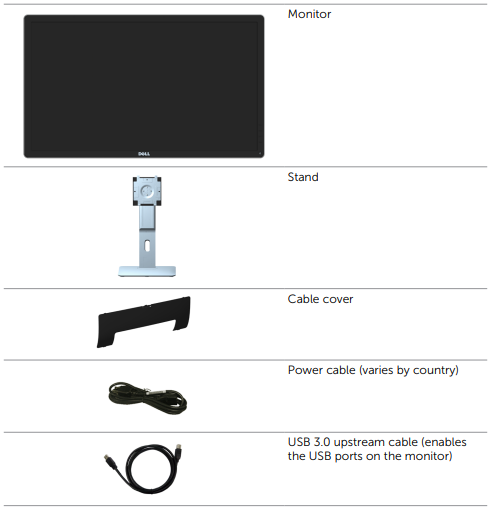
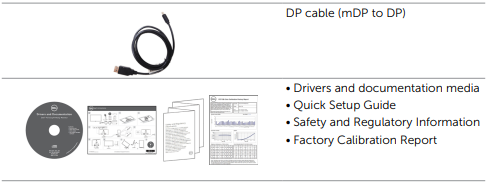
Package Contents
Your monitor ships with the components shown below. Make sure that you have received all the components and contact Dell if something is missing.
NOTE: Some items may be optional and may not ship with your monitor. Some features or media may not be available in certain countries.
Product Features
The Dell P2415Q flat panel monitor has an active matrix, thin-film transistor (TFT), liquid crystal display (LCD), and light emitting diode (LED) backlight. The monitor features include:
- P2415Q: 60.47 cm (23.80-inch) viewable area display (measured diagonally). 3840 x 2160 resolution with full-screen support for lower resolutions.
- Wide viewing angle to allow viewing from a sitting or standing position, or while moving from side-to-side.
- Tilt, swivel, vertical extension, and rotate adjustment capabilities.
- Extensive digital connectivity with DP, HDMI (MHL), and USB 3.0.
- Removable stand and video electronics standards association (VESA) 100 mm mounting holes for flexible mounting solutions.
- Plug and play capable.
- On-screen display (OSD) adjustments for easy setup and screen optimization.
- Software and documentation media includes an information file (INF), Image-color matching file (ICM), and product documentation.
- Dell display manager software (available on the disc shipped with the monitor).
- Energy saver feature for energy star compliance.
- Security-lock slot.
- Stand lock.
- Capability of switching from wide aspect to standard aspect ratio while maintaining image quality.
- EPEAT Gold rating.
- BFR/PVC- reduced.
- TCO-certified displays.
- Arsenic-free glass and mercury-free for the panel only.
- 0.5 W standby power when in the sleep mode.
- Energy gauge shows the energy level being consumed by the monitor in real time.
Identifying Parts and Controls
Dell Ultra HD 4K Monitor P2415Q Front view
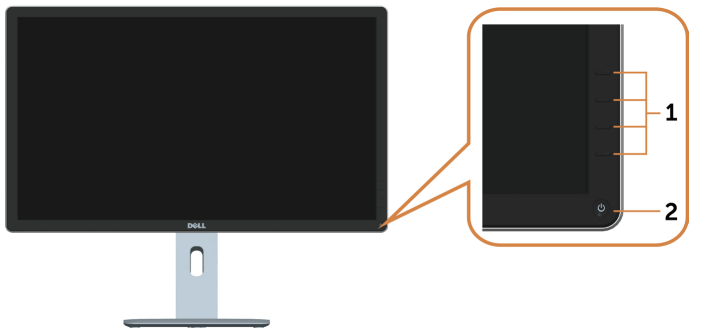
Label | Description |
1 | Function buttons |
2 | Power on/off button(with LED indicator) |
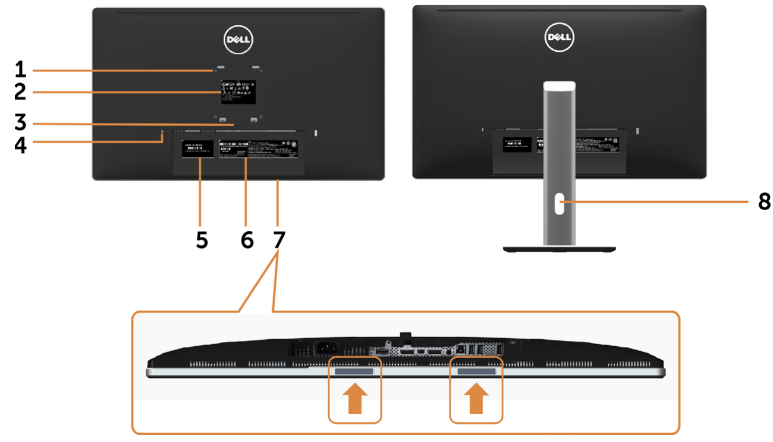
Back View
Label | Description | Use |
1 | VESA mounting holes (100 mm x 100 mm - behind attached VESA cover) | Wall mount monitor using VESA-compatible wall mountkit (100 mm x 100 mm). |
2 | Regulatory label | Lists the regulatory approvals. |
3 | Stand-release button | Release stand from monitor. |
4 | Security-lock slot | Secures monitor withsecurity lock (sold separately). |
5 | Service Tag label (P2715Q only) | Refer to this label if you need to contact Dell for technical support. |
6 | Barcode, serialnumber label | Refer to this label if you need to contact Dell for technical support. NOTE: P2415Q have service tag printing for EMEA only. |
7 | Dell soundbar mounting slots | Attaches the optional Dell soundbar. NOTE: Please removethe plastic strip covering themounting slots before affixing the Dell Soundbar. |
8 | Cable-management slot | Use to organize cables by placing them through the slot. |
Bottom View
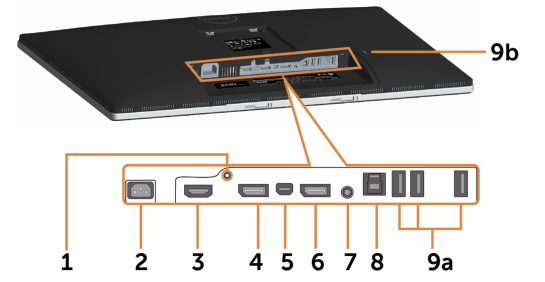
Label | Description | Use |
1 | Stand lock | Lock the standto the monitor using a M3 x 6 mm screw (screw not included). |
2 | AC power connector | To connect the monitor power cable. |
3 | HDMI (MHL) port | Connect your computer with HDMI cable or MHL devices with MHL cable(optional). |
4 | DP connector (in) | Connect your computer with DP cable. |
5 | mDP connector (in) | Connect your computer with mDP to DP cable. |
6 | DP connector (out) | DP outputfor MST (multi-stream transport) capable monitor. DP 1.1 monitorcan only be connected as the last monitor in the MST chain. To enable MST, refer to instruction on section |
7 | Audio line-out port | Connect speakers to playback audiocoming through HDMI or DP audiochannels. Only supports 2-channel audio. NOTE: The audio line-out port does not support headphones. |
8 | USB upstream port | Connect the USB cable to your computer and the monitor to enable the USB ports on the monitor. |
9a, 9b | USB downstream ports (4) | Connect USB devices. NOTE: You must connect the USB upstream cable to the monitor and your computer to be able to use these ports. |
Monitor Specifications
Flat Panel Specifications
Model | P2715Q | P2415Q |
Screen type | Active matrix - TFT LCD | Active matrix - TFT LCD |
Panel type | In-plane switching (IPS) | In-plane switching (IPS) |
Viewable image: | ||
Diagonal | 68.47 cm (27 inches) | 60.47 cm (23.80 inches) |
Active Area: | ||
Horizontal | 596.74 mm (23.49inches) | 527.04 mm (20.75 inches) |
Vertical | 335.66 mm (13.21 inches) | 296.46 mm (11.67 inches) |
Area | 200301.75 mm2 (310.47 inch2) | 156246.27 mm2 (242.18inch2) |
Pixel pitch | 0.1554 mm x 0.1554 mm | 0.13725 mm x 0.13725 mm |
Viewing angle: | ||
Horizontal | 178° (typical) | 178° (typical) |
Vertical | 178° (typical) | 178° (typical) |
Luminance output | 350 cd/m² (typical) | 300 cd/m² (typical) |
Contrast ratio | 1000 to 1 (typical) 2,000,000 to 1 (mega dynamic contrast on) | 1000 to 1 (typical) 2,000,000 to 1 (mega dynamic contrast on) |
Faceplate coating | Anti-glare treatment of the front polarizer(3H) | Anti-glare treatment of the front polarizer(3H) |
Backlight | LED edgelight system | LED edgelight system |
Response time | 8.6 ms (typical), 6ms (fast mode) | 8 ms (typical), 6 ms (fast mode) |
Color depth | 1.07 Billion colors | 1.07 Billion colors |
Color gamut* | 99% sRGB | 99% sRGB |
P2415Q: Color gamut (typical) is based on CIE1976 (102.28%) and CIE1931 (82.09%) test standards.
Resolution Specifications
Horizontal scan range | 31 kHz to 140 kHz(automatic) |
Vertical scan range | 29 Hz to 76 Hz (automatic) |
Maximum preset resolution | 3840 x 2160 at 60 Hz |
Video display capabilities (DP &HDMI & MHL playback) | 480i, 480p, 576i,576p, 720p, 1080i,1080p , QHD, UHD |
Preset Display Modes
Display Mode | Horizontal Frequency (kHz) | Vertical Frequency (Hz) | Pixel Clock (MHz) | Sync Polarity (Horizontal/ Vertical) |
VESA, 720 x 400 | 31.5 | 70.0 | 28.3 | -/+ |
VESA, 640 x 480 | 31.5 | 60.0 | 25.2 | -/- |
VESA, 640 x 480 | 37.5 | 75.0 | 31.5 | -/- |
VESA, 800 x 600 | 37.9 | 60.0 | 40.0 | +/+ |
VESA, 800 x 600 | 46.9 | 75.0 | 49.5 | +/+ |
VESA, 1024 x 768 | 48.4 | 60.0 | 65.0 | -/- |
VESA, 1024 x 768 | 60.0 | 75.0 | 78.8 | +/+ |
VESA, 1280 x 1024 | 64.0 | 60.0 | 108.0 | +/+ |
VESA, 1280 x 1024 | 80.0 | 75.0 | 135.0 | +/+ |
VESA, 1152 x 864 | 67.5 | 75.0 | 108.0 | +/+ |
VESA, 1600 x 900 | 60.0 | 60.0 | 108.0 | +/+ |
VESA, 1920 x 1080 | 67.5 | 60.0 | 148.5 | +/+ |
VESA, 2560 x 1440 | 88.8 | 60.0 | 241.5 | +/- |
VESA, 3840 x 2160 | 65.7 | 30.0 | 262.75 | +/- |
VESA, 3840 x 2160 | 133.3 | 60.0 | 533.25 | +/- |
MHL Source Display Modes
Display Mode | Frequency (Hz) |
640 x 480p | 60 |
720 x 480p | 60 |
720 x 576p | 50 |
1280 x 720p | 60 |
1280 x 720p | 50 |
1920 x 1080i | 60 |
1920 x 1080i | 50 |
1920 x 1080p | 30 |
720 (1440) x 480i | 60 |
720 (1440) x 576i | 50 |
Electrical Specifications
Video input signals |
|
Input voltage/ frequency/ current | 100-240 VAC/ 50 or 60 Hz ± 3 Hz / 1.8 A (maximum) |
Inrush current | 120 V: 30 A (Max.) 240 V: 60 A (Max.) |
Physical Characteristics
Model | P2415Q |
Connector type |
|
Signal cable type |
|
Dimensions (with stand): | |
Height (extended) | 499.53 mm (19.67 inches) |
Height (compressed) | 369.53 mm (14.55 inches) |
Width | 566.64 mm (22.31inches) |
Depth | 205 mm (8.07 inches) |
Dimensions (without stand): | |
Height | 336.06mm (13.23 inches) |
Width | 566.64 mm (22.31inches) |
Depth | 46.93 mm (1.85inches) |
Stand dimensions: | |
Height (extended) | 400.50 mm (15.77inches) |
Height (compressed) | 270.50 mm (10.65inches) |
Width | 245 mm (9.65 inches) |
Depth | 205 mm (8.07 inches) |
Weight: | |
With packaging | 8.68 kg (19.14 lb) |
With stand assembly and cables | 5.68 kg (12.52 lb) |
Without stand assembly (for wall mountor VESA mount considerations - no cables) | 3.34 kg (7.36 lb) |
Stand assembly | 2.06 kg (4.54lb) |
Front frame gloss | 5% (maximum) |
Environmental Characteristics
Model | P2415Q |
Temperature: | |
Operating | 0°C to 35°C (32°Fto 95°F) |
Non-operating | –20°C to 60°C(–4°F to 140°F) |
Humidity: | |
Operating | 10% to 80% (non-condensing) |
Non-operating | 5% to 90% (non-condensing) |
Altitude: | |
Operating | 5,000 m (16,404 ft) (maximum) |
Non-operating | 12,192 m (40,000ft) (maximum) |
Thermal dissipation | 307.09 BTU/hour (maximum) 153.55 BTU/hour (typical) |
Power Management Modes
If you have VESA’s DPM-compliant video card or software installed in your PC, the monitor can automatically reduce its power consumption when not in use. This is referred to as power save mode*. If the computer detects input from the keyboard, mouse, or other input devices, the monitor automatically resumes functioning. The following table shows the power consumption and signaling of this automatic power saving feature.
P2415Q
VESA Modes | Horizontal Sync | Vertical Sync | Video | Power Indicator | Power Consumption |
Normal operation | Active | Active | Active | White | 90 W (maximum)** 45 W (typical) |
Active-off mode | Inactive | Inactive | Off | White (blinking slowly) | Less than 0.5 W |
Switch off | - | - | - | Off | Less than 0.5 W |
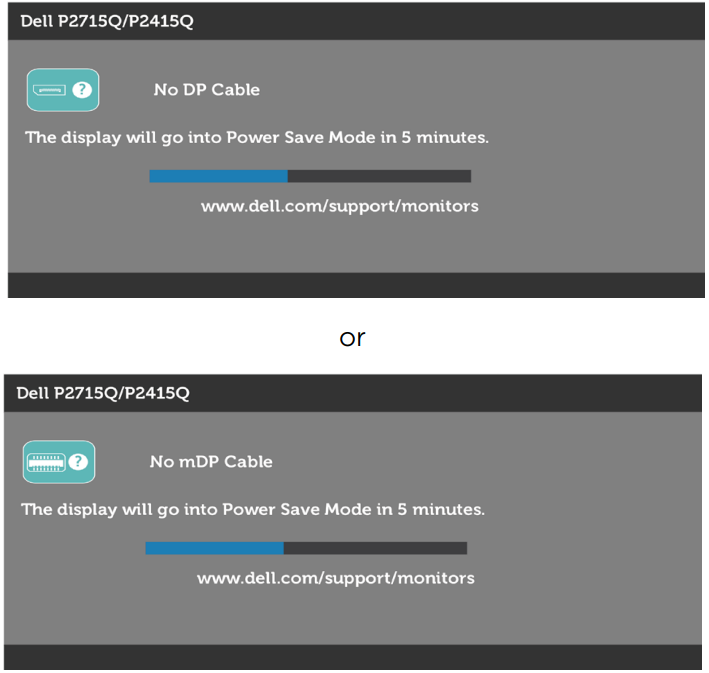
The OSD operates only in the normal operation mode. If you press any button in the active-off mode, one of the following message is displayed:
- Zero power consumption in OFF mode can only be achieved by disconnecting the AC mains cable from the monitor.
- Maximum power consumption with maximum luminance. Activate the computer and the monitor to gain access to the OSD.
NOTE: This monitor is ENERGY STAR -compliant.
Description
The Dell Ultra HD 4K Monitor P2415Q is a powerhouse of visual excellence. The IPS panel ensures wide viewing angles and consistent color accuracy, making it perfect for collaborative work environments or multi-monitor setups. The monitor’s design is both sleek and functional, with a slim bezel that minimizes distractions and maximizes screen real estate.
The monitor also includes features like Picture-in-Picture (PiP) and Picture-by-Picture (PbP), allowing users to multitask efficiently by displaying multiple sources on the same screen. Furthermore, the monitor is certified by various industry standards such as EPEAT Gold and ENERGY STAR, indicating its environmental sustainability and energy efficiency.
Setting Up the Dell Ultra HD 4K Monitor P2415Q
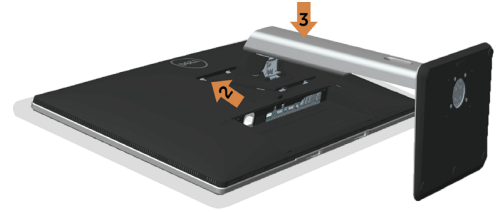
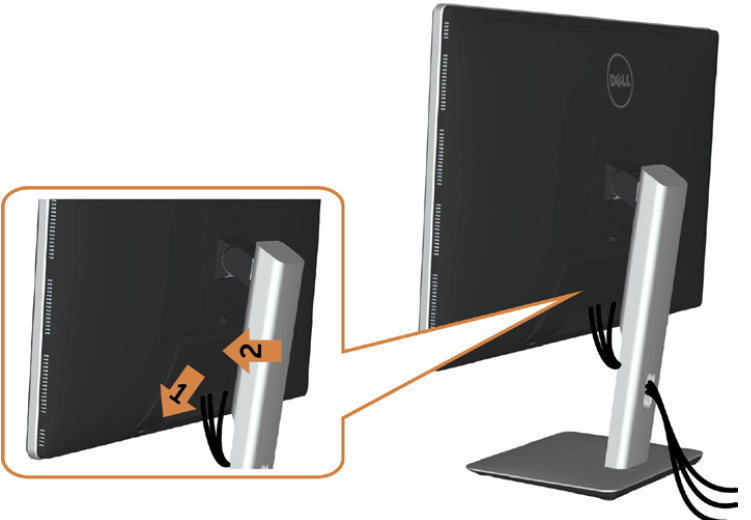
Attaching the Stand
NOTE: The stand is detached from monitor when it is shipped from the factory.
NOTE: The procedure below is applicable for the default stand. If you purchased any other stand, see the documentation shipped with the stand to set it up.
CAUTION: Place monitor of a flat, clean, and soft surface to avoid scratching the display panel.
To attach the monitor stand:
- Place the monitor on a flat surface.
- Insert the two tabs on the upper part of the stand in the slots on the back of the monitor.
Press the stand down till it snaps into place.
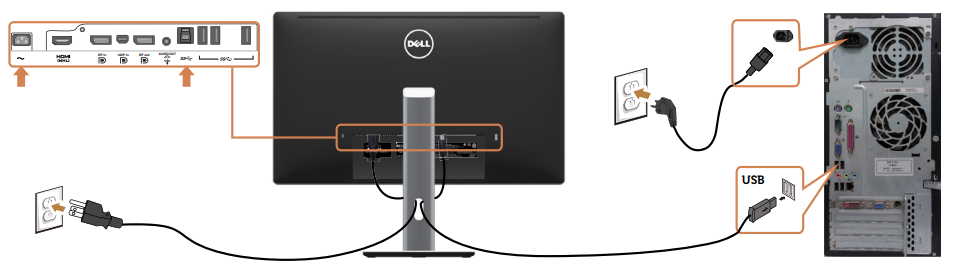
Connecting Your Monitor
WARNING: Before you begin any of the procedures in this section, follow the Safety Instructions.
To connect your monitor to the computer:
- Turn off your computer.
- Connect the mDP-DP/HDMI/USB cable from your monitor to the computer.
- Switch on your monitor.
- Select the correct input source at Monitor OSD Menu and turn on your computer.
NOTE: To enable 3840x2160@60, ensure the graphics card of the DP source is DP 1.2 certified.
NOTE: P2x15Q default setting is DP 1.2. DP 1.1 Graphic card may not display normally. Please refer to “product specific problems – No image when using DP connection to the PC” to change default setting.
Connecting the DP (or mDP) cable
_cable_dell_ultra_hd_4k_monitor_p2415q.png)
NOTE: Default is DP port. Select input source on monitor to switch to mDP.
Connecting the HDMI cable(Optional)
_dell_ultra_hd_4k_monitor_p2415q.png)
Connecting the USB cable
Connecting the Monitor for DP Multi-Stream Transport (MST) function

NOTE: Supports the DP MST feature. To make use of this feature, your PC Graphics Card must be certified to DP1.2 with MST option.
Using the Mobile-High Definition Link (MHL)
NOTE: This monitor is MHL ready.
NOTE: To use the MHL function, use only MHL certified cable and source devices that support MHL output.
NOTE: Some MHL source devices may take more than a few seconds or longer to output an image, depending on MHL source devices.
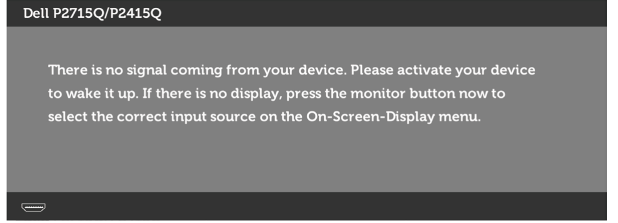
NOTE: When the connected MHL source device enters standby mode, the monitor displays a black screen or the message below, depending on MHL source device’s output.
_dell_ultra_hd_4k_monitor_p2415q.png)
To enable MHL connection, please perform the below steps:
- Plug the power cable on your monitor into a AC outlet.
- Connect the (micro) USB port on your MHL source device to HDMI (MHL) port on the monitor with a MHL certified cable (see Bottom View for details).
Turn on the monitor and the MHL source device.
_of_dell_ultra_hd_4k_monitor_p2415q.png)
- Select input source on monitor to HDMI (MHL) by using OSD menu (see Using the On-Screen Display (OSD) Menu for details).
- If the monitor does not display an image, see Mobile High-Definition Link (MHL) Specific Problems.
Organizing Your Cables
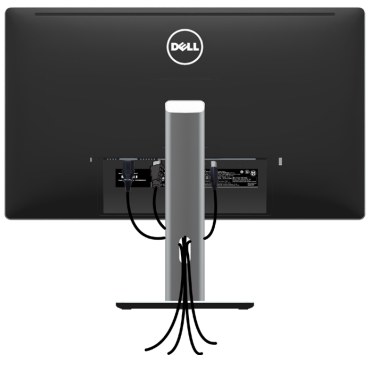
After attaching all necessary cables to your monitor and computer, (see Connecting Your Monitor for cable attachment) organize all cables as shown above.
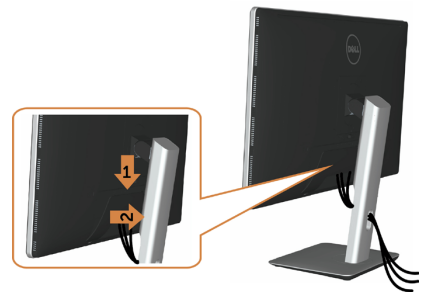
Attaching the Cable Cover
NOTE: The cable cover is detached when the monitor is shipped from the factory.
- Insert the two tabs on the bottom part of the cable cover in the slots on the back of the monitor.
Press the cable cover till it snaps into place.
Removing the Monitor Stand
CAUTION: To prevent scratches on the LCD screen while removing the stand, make sure that the monitor is placed on a soft, clean surface.
NOTE: The procedure below is applicable for the default stand. If you purchased any other stand, see the documentation shipped with the stand to set it up.
To remove the stand:
- Place the monitor on a soft cloth or cushion.
- Press and hold the stand-release button.
Lift the stand up and away from the monitor.

Removing the Cable Cover
- Press the tab on the cable cover.
Remove the two tabs on the bottom part of the cable cover from the slots on the back of the monitor.
Wall Mounting (Optional)
_dell_ultra_hd_4k_monitor_p2415q.png)
NOTE: Use M4 x 10 mm screws to connect the monitor to the wall-mounting kit.
Refer to the instructions that come with the VESA-compatible wall mounting kit.
- Place the monitor on a soft cloth or cushion on a stable, flat table.
- Remove the stand.
- Use a Phillips crosshead screwdriver to remove the four screws securing the plastic cover.
- Attach the mounting bracket from the wall mounting kit to the monitor.
- Mount the monitor on the wall by following the instructions that comes with the wall mounting kit.
NOTE: For use only with UL-listed wall mount bracket with minimum weight/load bearing capacity of 5.03 kg (P2715Q)/3.34 Kg (P2415Q).
Maintenance Guidelines
Cleaning Your Monitor
WARNING: Before cleaning the monitor, unplug the monitor power cable from the electrical outlet.
CAUTION: Read and follow the Safety Instructions before cleaning the monitor.
For best practices, follow these instructions in the list below while unpacking, cleaning, or handling your monitor:
- To clean your anti-static screen, lightly dampen a soft, clean cloth with water. If possible, use a special screen-cleaning tissue or solution suitable for the anti-static coating. Do not use benzene, thinner, ammonia, abrasive cleaners, or compressed air.
- Use a lightly-dampened, soft cloth to clean the monitor. Avoid using detergent of any kind as some detergents leave a milky film on the monitor.
- If you notice white powder when you unpack your monitor, wipe it off with a cloth.
- Handle your monitor with care as a darker-colored monitor may get scratched and show white scuff marks more than a lighter- colored monitor.
- To help maintain the best image quality on your monitor, use a dynamically changing screen saver and turn off your monitor when not in use.
Troubleshooting
WARNING: Before you begin any of the procedures in this section, follow the Safety Instructions.
Self-Test
Your monitor provides a self-test feature that allows you to check whether your monitor is functioning properly. If your monitor and computer are properly connected but the monitor screen remains dark, run the monitor self-test by performing the following steps:
- Turn off both your computer and the monitor.
- Unplug the video cable from the back of the computer. To ensure proper Self-Test operation, remove all digital and the analog cables from the back of computer.
- Turn on the monitor.
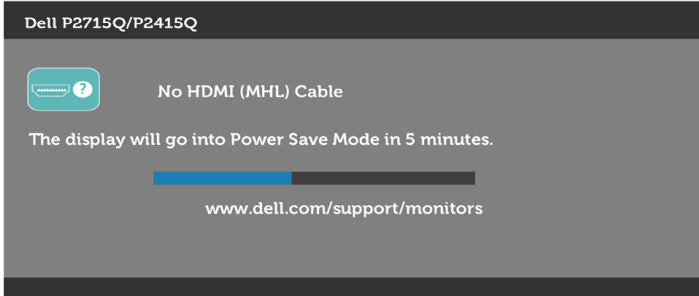
The floating dialog box should appear on-screen (against a black background), if the monitor cannot sense a video signal and is working correctly. While in self-test mode, the power LED remains white. Also, depending upon the selected input, one of the dialogs shown below will continuously scroll through the screen. - This box also appears during normal system operation, if the video cable becomes disconnected or damaged.
- Turn off your monitor and reconnect the video cable; then turn on both your computer and the monitor.
If your monitor screen remains blank after you use the previous procedure, check your video controller and computer, because your monitor is functioning properly.
Built-in Diagnostics
Your monitor has a built-in diagnostic tool that helps you determine if the screen abnormality you are experiencing is an inherent problem with your monitor, or with your computer and video card.
NOTE: You can run the built-in diagnostics only when the video cable is unplugged and the monitor is in self-test mode.
To run the built-in diagnostics:
- Make sure that the screen is clean (no dust particles on the surface of the screen).
- Unplug the video cable(s) from the back of the computer or monitor. The monitor then goes into the self-test mode.
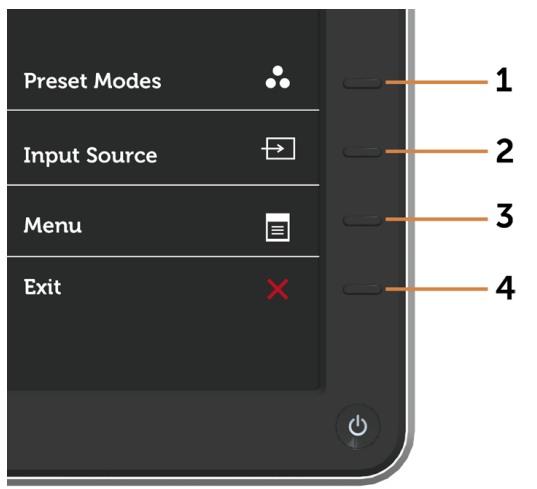
- Press and hold Button 1 and Button 4 on the front panel simultaneously for 2 seconds. A gray screen appears.
- Carefully inspect the screen for abnormalities.
- Press Button 4 on the front panel again. The color of the screen changes to red.
- Inspect the display for any abnormalities.
- Repeat steps 5 and 6 to inspect the display in green, blue, black, white, and text screens.
The test is complete when the text screen appears. To exit, press Button 4 again.
If you do not detect any screen abnormalities upon using the built-in diagnostic tool, the monitor is functioning properly. Check the video card and computer.
Common Problems
The following table contains general information about common monitor problems you might encounter and the possible solutions:
Common Symptoms | What You Experience | Possible Solutions |
No Video/Power LED off | No picture |
|
No Video/Power LED on | No picture or no brightness |
|
Missing Pixels | LCD screen has spots |
that canoccur in LCD technology.
|
Stuck-on Pixels | LCD screen has bright spots |
that canoccur in LCD technology.
|
Brightness Problems | Picture too dim or too bright |
|
Safety Related Issues | Visible signsof smoke or sparks |
|
Intermittent Problems | Monitor malfunctions on & off |
|
Missing Color | Picture missing color |
|
Wrong Color | Picture color not good |
Color menu OSDdepending on the application.
menu OSD.
|
Image retention from a static image left on the monitor for a long periodof time | Faint shadow from the static image displayed appears on the screen |
|
Product Specific Problems
Specific Symptoms | What You Experience | Possible Solutions |
Screen image is too small | Image is centered on screen, but does not fill entire viewing area |
menu OSD.
|
Cannot adjust the monitor with the buttons on the front panel | OSD does not appear on the screen |
|
No Input Signal when user controls are pressed | No picture, the LED light is white |
|
The picture does not fill the entire screen | The picture cannot fill the height or width of the screen |
|
No image when using DP connection to thePC | Black screen |
|
No image when usingDP connection to the Secondary monitor | Black screen | 1 Press OSDbutton to invokethe Input Source OSD menu 
|

CAUTION: The Graphics are used for the purpose of illustration only. Appearance of the computer may vary. |

Mobile High-Definition Link (MHL) Specific Problems
Specific Symptoms | What You Experience | Possible Solutions |
MHL interface is not working | Cannot see MHLdevice image shown on the monitor |
|
Dell Ultra HD 4K Monitor P2415Q Pros & Cons
Pros:
- High-resolution 4K display for detailed visuals
- Wide viewing angles due to IPS panel
- Ergonomic design with tilt, swivel, and height adjustments
- Multiple connectivity options including DisplayPort and HDMI
- Energy-efficient and environmentally friendly certifications
Cons:
- Higher price point compared to lower resolution monitors
- Requires powerful hardware to run at full 4K resolution smoothly
- Limited refresh rate of 60 Hz may not be ideal for fast-paced gaming
Customer Reviews
Customers have praised the Dell Ultra HD 4K Monitor P2415Q for its exceptional image quality and robust build. Many users appreciate the ergonomic features that enhance comfort during extended use. However, some users have noted that the monitor's high price and the necessity for powerful hardware to fully utilize its capabilities are significant drawbacks.
Common complaints include the limited refresh rate which might not be suitable for gaming enthusiasts and the occasional need for software updates to maintain optimal performance.
Faqs
What is the resolution of the HD 4K Monitor?
What types of connectivity options does the Dell P2415Q offer?
Is the Dell Ultra HD 4K Monitor suitable for gaming?
Can I mount the Dell Ultra HD 4K Monitor P2415Q on a wall?
Does the Dell Ultra have built-in speakers?
How do I adjust the ergonomic settings of the Dell P2415Q?
Is the Dell Ultra HD 4K Monitor P2415Q energy-efficient?
What are some common issues with the Dell and how can they be resolved?
Can I use multiple sources on the same screen with the Dell P2415Q?
Leave a Comment