Deluxe ANTI SKIP CD PLAYER DP-PCD-001 | Instruction Manual

Content
Introducing the Deluxe Anti-Skip CD Player DP-PCD-001
Experience uninterrupted music with the Deluxe Anti-Skip CD Player . This premium CD player is perfect for audiophiles who demand high-quality sound and reliable performance. The Deluxe Anti-Skip CD Player DP-PCD-001 boasts an impressive 8-second anti-skip protection, ensuring smooth playback of your favorite CDs. With a sleek and modern design, this CD player will look great in any home or office setting. The estimated price for the Deluxe Anti-Skip CD Player DP-PCD-001 is $120, and it is now available for purchase.
SPECIFICATIONS
Power Requirement : 2 x “AA” (UM-3) batteries (not included) or Micro USB Adaptor 5V
Product Details
- CD player with 8-second anti-skip protection
- Sleek and modern design
- LCD display for track information
- Repeat and shuffle functions
- Headphone jack for private listening
- Aux-in jack for connecting external devices
- Remote control included
PREPARATION FOR USE
Unpack the unit carefully to remove all the accessories from the packing. Verify that the following accessories are present before setting up the unit.
Accessories
- Main Unit X 1
- Earbuds X 1
- User Manual X 1
- A ux / Line In Cable X 1
LOCATION OF CONTROLS
- CD Door
- LCD Display
- Power On/Off; Play/Pause
 Button
  Stop Button
- Skip/Search Backward Button
- Skip/Search Forward
 Button
 - Program Button
- Mode Button
- CD Door Open Switch
- Volume Knob
- Headphone Jack
- Micro USB IN Jack
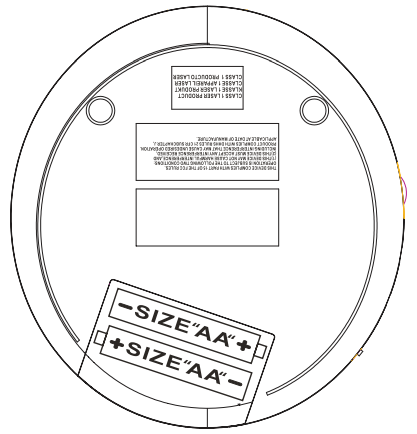
- Battery Compartment
POWER SOURCE
This CD player operates on two 1.5V DC “AA” size (UM-3) alkaline batteries (Not Included) or Micro USB adaptor with an output of 5V DC (Not Included).
Install batteries into the player
- Open the battery compartment cover located on bottom of cabinet.
- Insert two 1.5V DC “AA” size (UM-3) alkaline batteries (Not included) into the Battery compartment following the polarity markings as indicated in the compartment.
- Close the battery door.
IMPORTANT: Be sure that the batteries are installed correctly. Wrong polarity may damage the unit and void the warranty.
BATTERY NOTE AND CARE
- The danger of explosion if the battery is replaced incorrectly. Replace only with the same or equivalent type
- Do not mix old and new batteries.
- Do not mix alkaline, standard (carbon-zinc) or rechargeable (nickel-cadmium) batteries.
- If the unit is not to be used for an extended period of time, remove the batteries. Old or leaking batteries can cause damage to the unit and may void the warranty.
- Do not try to recharge batteries not intended to be recharged; they can overheat and rupture. (Follow battery manufacturer’s directions).
- Do not dispose of batteries in fire, batteries may leak or explode.
Using an adaptor (not included) to power the unit
- Before connecting the adaptor to the player, make sure that the AC voltage of the adaptor corresponds to you local AC outlet voltage. The polarity of the adaptor must match to the polarity markings next to the DC jack on the player.
- Plug the Micro USB 5V DC adaptor into an AC outlet.
- Insert the Micro USB plug into the Micro USB IN jack on the player.
NOTE: When Micro USB adaptor is connected, the batteries will be automatically disconnected and the player will now operate on the adaptors power. Once the adaptor is unplugged the player will automatically switch to back to battery power.
EARBUDS CONNECTION
Connect the plug of the stereo earbuds (included) into the phone socket.
CAUTION
- AVOID EXCESSIVE VOLUME LEVELS FOR LONG PERIODS OF TIME WHEN USING THE HEADPHONES. PROLONGED USE AT HIGH LEVELS MAY IMPAIR YOUR HEARING.
- Do not use earbuds while operating a motorized vehicle, as it may create a traffic hazard and is illegal in many areas
CD OPERATION
PLEASE READ THIS IMPORTANT INFORMATION
CD mechanisms used in devices like this are designed to fully read all commercial CDs. They will also read self-compiled CD-R/CD-RW discs but it may take up to 10 seconds for playback to start. If playback does not start, it is likely due to the quality of the CD-R/RW disc and/or the compatibility of the CD compilation software. Manufacturer is not responsible for the playback quality of CD-R/RW discs. Do not attach a label or seal to either side of the CD-R/RW disc. It may cause a malfunction. This player does not read MP3 file CDs
Turning Unit Power On and Off
- To Turn ON the unit, press the PLAY/PAUSE button, LCD display will be on and then read the inserted disc after display “60 SEC” anti-skip message. If no disc is inserted or the inserted disc has an error, the display will show “disc”.
- To Turn OFF, in CD stop mode, press STOP button once, display will go off. In CD playing mode, press STOP button twice will also turn off the power.
NOTE: When the unit is stopped for approximately 30 seconds, the power will be automatically turned off.
Play Mode
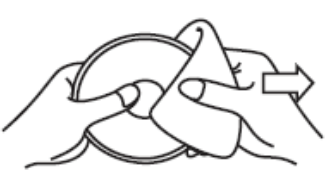
- In power off mode, press the CD door OPEN switch to open the CD door.
- Insert a CD with the label side facing upward and then close the CD door.
- Press the PLAY/PAUSE button to turn on the unit. The display will show “60 SEC”, total number of tracks and playing time in sequence and then start to play first track automatically.
- While playing, press the PLAY/PAUSE BUTTON to pause, the elapsed time will flash. Press PLAY/PAUSE BUTTON again to resume playing
- Rotate the VOLUME CONTROL KNOB to adjust volume level.
- Press the STOP BUTTON to stop playing.
- Press the STOP BUTTON again to turn the unit off.
NOTE: Do not open the CD DOOR when a CD is playing.
LCD DISPLAY INFORMATION
- At the initial start-up
- The display will show “60 SEC” then “- -“ and then the total number of tracks and total playing time. The disc will start playing and the display will show the first track number & instant playing time.
- To review the total number of tracks and total playing time of the disc, press the STOP button once.
- During PLAY mode
- The track number and the elapsed time are displayed.
- During PAUSE mode
- When the track playback is paused, the elapsed time flashes.
- Battery Low Indicator
- The Battery Low Indicator
 will appear in the display when the batteries need to be changed.
- The Battery Low Indicator
PLAY MODE
NORMAL PLAYBACK
The whole disc is played and the player will stop after the last track is finished.
SKIP AND SEARCH MODE
- During Play or Pause mode, tap the SKIP Forward " " or SKIP BACKWARD "
 " BUTTON to go to the next track or go back to the beginning of the current track.
 - During play mode or Pause mode, press and hold the SEARCH Forward “ ” or SEARCH BACKWARD " " BUTTON to search within the current track with audible high-speed playback.
Every time the MODE button is pressed, the corresponding mode appears in the display window, in the following sequence
- REPEAT 1:
When shown on the LCD display, the current track on the disc will be repeated. REPEAT ALL:
When shown on the LCD display, all tracks on the disc will be repeated. To cancel the Repeat function, press the MODE button repeatedly until the icon disappears.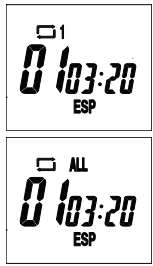
- INTRO:
To play the first 10 seconds of each track on the disc. - RANDOM:
Enables all the tracks on the disc to be played in a random sequence.
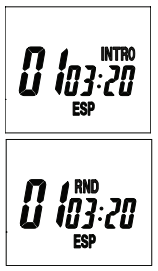
To cancel the INTRO & RANDOM function, press the MODE button repeatedly until the icon disappears.
PROGRAMMED PLAY
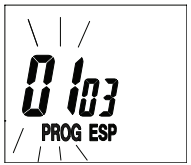
- In CD stop mode, press the PROG button once, PROG bumber appears. PROG icon and Track number “00” start flashing in the display.
- Press SEARCH/SKIP/button
 to select the desired track.
 - When the desired track is displayed, press the PROG button to register. The PROG number changes to 02. Track number returns to 00 and flashes together with PROG.
- Repeat above steps 2 and 3 to program more tracks. Up to 20 tracks can be programmed into the memory.
- Press PLAY/PAUSE button to start the programmed play.
- To erase the program, in STOP mo de simply press the STOP button.
ANTI-SKIP PROTECTION
This player incorporates an electronic anti-skip circuit to prevent interruption of the sound output when the unit is subjected to shock, vibration or rolling during disc playback. The anti-shock system will automatically activate when a disc is playing, the ESP indicator will appear in the display and flashing. Once the anti-skip buffer is full, it will give you approximately 60 seconds of protection against interruption of sound output. If the player is subjected to shock or rolling for longer than the buffer memory, some interruption of sound output will occur. This is normal and to be expected and the sound will resume once the player has stabilized from the shock or rolling disturbance.
Note: The anti-skip function provides for continuous sound output when the unit is subjected to shock or vibration. It will not compensate for errors arising from the use of defective, scratched or dirty discs
CARE AND MAINTENANCE
- Never wrap the earbuds cord around any animal or person. Special care should be taken with long wires.
- Clean the unit with a soft, damp (never wet) cloth. Solvent or detergent should never be used
- Avoid operating your unit under direct sunlight or in hot, humid or dusty places to reduce the risk of fire or electric shock.
- Keep your unit away from heating appliances and sources of electrical noise such as fluorescent lamps or motors.
- For better Display clarity, avoid operating the unit under direct sunlight or in strong room illumination
- Unplug the unit from the electrical power outlet immediately in case of malfunction.
- If drop-outs or interruptions occur in the music during CD play, or if the CD fails to play at all, its bottom surface may require cleaning. Before playing, wipe the disc from the center outwards with a lint-free soft cleaning cloth.
CAUTION: Never allow any water or other liquids to get inside the unit while cleaning.
CONNECTING TO EXTERNAL SPEAKER OR CAR
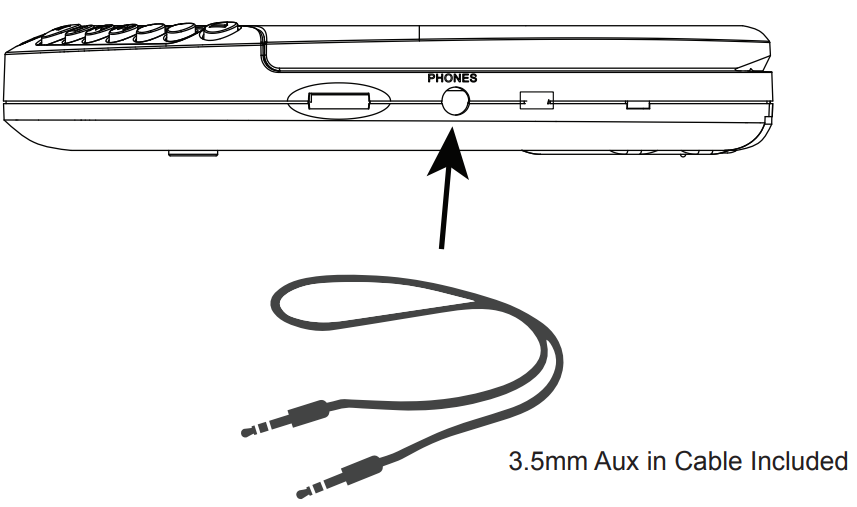
Connect one end of the 3.5 Aux in Cable (Included) to the “Phones” Jack. Ensure to insert it completely into the “Phones” Jack.
Connect the other end of the 3.5mm Aux in Cable to the Aux in or Line in Jack of your External Speaker or Car.
Helpful Tips:
- Ensure to adjust the VOLUME on BOTH the Portable CD Player and External Speaker/Car
- On the External Speaker or Car ensure to set the SOURCE to AUX in or LINE in
- Refer to the instruction manual of your External Speaker or Car
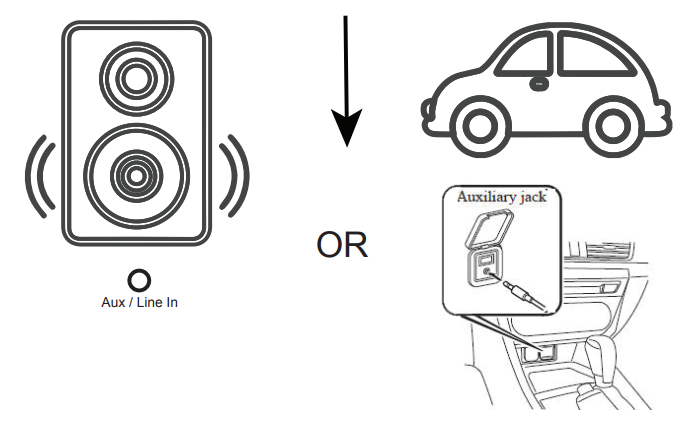
NOTE: EXTERNAL SPEAKER / CAR MUST HAVE AUX IN / LINE IN JACK
SAFETY PRECAUTIONS
- As the laser beam used in this compact disc player is harmful to the eyes, do not attempt to disassemble the casing.
- Stop operation immediately if any liquid or solid object should fall into the cabinet. Unplug the unit and have it checked by qualified personnel.
- Do not touch the lens or poke at it. If you do, you may damage the lens and the player may not operate properly.
- Do not put anything in the safety slot. If you do, the laser diode will be ON when the lid is still opened.
- If the unit is not to be used for a long period of time, make sure that all power sources are disconnected from the unit. Remove all batteries from the battery compartment, and unplug the adaptor from the wall outlet Make It a practice to remove the adaptor by grasping the main body and not by pulling the cord . (Not Included)
- This unit employs a laser. The use of controls or adjustment or performance of procedures other than those specified herein may result in exposure to hazardous radiation
IMPORTANT NOTES
- This product does not contain a separate Power On/O switch. After inserting a disc and installing batteries/micro USB adaptor, simply press the Play button to switch on and play a disc. (Micro USB adaptor not included)
- In order to maximize battery life and provide optimum playing time this product incorporates an Auto Power O function. The power to the player will automatically switch on approximately 30 seconds after a disc has nished playing or when the CD lid is opened.
TROUBLESHOOTING
If you experience problems with the use of this player, please check the following
| PROBLEM | POINTS TO CHECK |
|---|---|
| Player fails to function | Disc may be inserted upside down |
| Disc not mounted correctly on chuck | |
| Dirty or defective disc | |
| Dirty pick up lens | |
| Player lid not closed | |
| Moisture/Condensation, allow player to warm up to room temperature for 60 minutes | |
| AC power to adaptor switched off | |
| Weak batteries | |
| Auto switch off has occurred | |
| No sound from earbuds | Earbuds plug is not firmly inserted into the Phones socket. |
| Intermittent sound | Dirty or defective disc |
| Dirty pick up lens | |
| Player is subject to excessive vibration or shock | |
| Low battery power | |
| Poor headphone connection |
Pros & Cons of Anti-Skip CD Player
Pros
- Reliable anti-skip protection for smooth playback
- Modern and stylish design
- LCD display for easy track navigation
- Multiple playback options, including repeat and shuffle
- Headphone jack and aux-in jack for versatile connectivity
Cons
- May be priced higher than some competing models
- Does not support Bluetooth connectivity
Customer Reviews of Deluxe Anti-Skip CD Player DP-PCD-001
Customers love the Anti-Skip CD Player DP-PCD-001 for its reliable performance and sleek design. Many users have praised the CD player's anti-skip protection, noting that it provides smooth playback even during intense physical activity. Some users have noted that the CD player may have difficulty reading scratched or damaged discs, but this issue is relatively rare.
Faqs
In what kinds of materials may I use the 3M Cylinder Spray Adhesive to create a bond?
In order to ensure my safety when using 3M Cylinder Spray Adhesive, what precautions should I take?
What steps should I take in the event that the nozzle of the 3M Cylinder Spray Adhesive becomes clogged?
How much time does it take for the 3M Cylinder Spray Adhesive to dry completely?
In the event that the 3M Cylinder Spray Adhesive does not attach correctly, what should I do?
How can I get rid of any extra 3M Cylinder Spray Adhesive that has been applied to a surface?
When applied to vertical surfaces, is it possible to utilise the 3M Cylinder Spray Adhesive?
When exposed to high temperatures, does the 3M Cylinder Spray Adhesive withstand the effects?
When it is not being used, what is the proper way to store the 3M Cylinder Spray Adhesive?
When it comes to the 3M Cylinder Spray Adhesive, what kind of warranty is it?
Leave a Comment