Diymore Thermostat Controller STC-3008 User Guide | Operating Instructions
Content
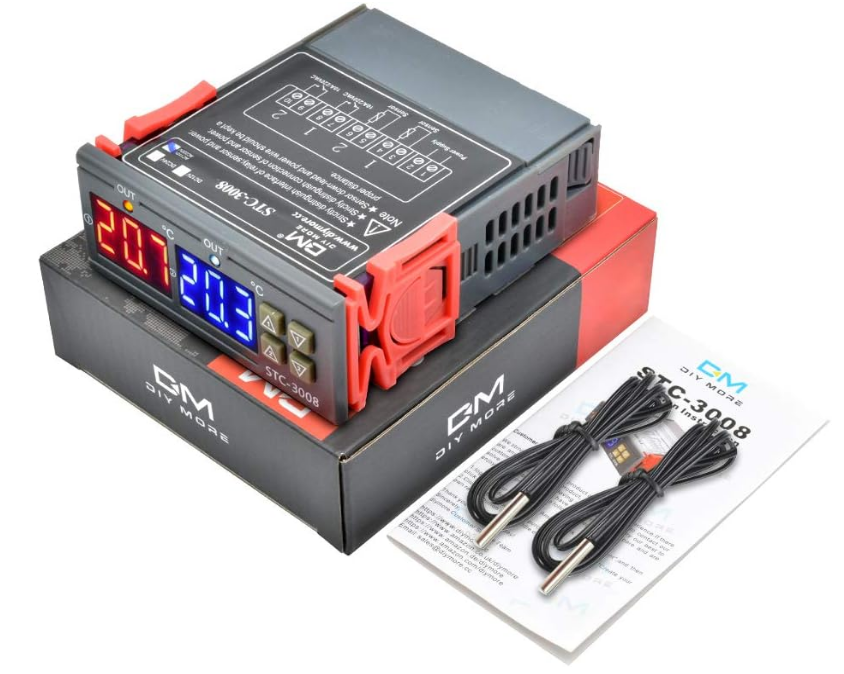
Introduction of DIYmore Thermostat Controller STC-3008
A multipurpose, dual-display, two-way thermostat for accurate temperature control in heating and cooling applications is the DIYmore Thermostat Controller STC-3008. Users may set temperature values and differences, calibrate temperatures, and switch between heating and cooling modes using its easy-to-read LED display. Refrigerating control output delay protection and temperature limit or sensor error alerts are features of the STC-3008.
Specification and Size
- Front panel size: 75(L) x 34.5(W) mm
- Mounting size: 71(L) x 29(W) mm
- Product size: 75(L) x 34.5(W) x 85(D) mm
- Sensor length: 1m (include the probe)
Technical Parameters
- Product Name: Dual display two-way thermostat
- Housing material: ABS gray flame retardant molded case
- Temperature measuring range: -55°C ~ 120°C
- Power supply: 110-220VAC ±10%, 50/60Hz (or DC12V/DC24V)
- Accuracy: ±1°C
- Temperature measurement accuracy: 0.1°C
- Humidity measurement accuracy: 3%
- Output control: relay output
- Output power: MAX 10A
- Sensor: NTC*2
Thermostat Controller Main Function
- Dual display two-way thermostat
- Switch the modes between cool and heat
- Control temperature by setting the temperature set value and the difference value
- Temperature calibration
- Refrigerating control output delay protection
- Alarm when temperature exceeds temperature limit or when sensor error
Description
An affordable, user-friendly programmed thermostat that makes it simple to control your heating and cooling systems is the DIYmore Thermostat Controller STC-3008. It is easy to program and operate thanks to its huge LCD display and straightforward user interface. The thermostat is a flexible choice for both home and business use because it works with the majority of HVAC systems. Additionally, it satisfies the stringent energy efficiency standards established by the US Environmental Protection Agency thanks to its Energy Star certification.
Panel Instruction
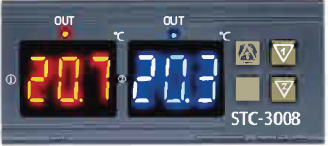
Display instruction:
Six-digit LED + Minus digit + Status indicator light (Status indicator light (1,2) + Set indicator light (Set))
Key Operation Instruction
- Long press "
 " 3 seconds, the first group start temperature flash (default 25°C), press "" or "
 " to adjust. Long press "" 3 seconds, stop the temperature value flash (default 40°C), press "" or "" to adjust.
 - Long press "
 " 3 seconds, the second group start temperature flash (default 25°C), press "" or "
 " to adjust. Long press "" 3 seconds, stop the temperature value flash (default 40°C), press "" to adjust.
 - Press button for 3 seconds at the same time to enter the setting mode, display PO, the first group temperature delay, press to adjust, 0~60 minutes, default 0, after adjustment, press & since , thesecond group temperature Delay, press to adjust, 0~60 minutes, default 0, after adjustment, press 8 since P2, high temperature alarm function, Default 120°C ,press to adjust, adjust, press & to enter P3, low temperature Alarm, default -55"C, press to adjust, wait for the second to automatically exitpress 3seconds to reset to factory settings.
Heating / Cooling Setting
CASE 1: Heating
- Control the water heater, heat to 65°C to stop, the temperature drops back to 50°C and start heating again
- Step 1: heating mode, starting temperature < stop temperature
- Step 2: Press and hold the "" button to start the temperature flashing. Use "" or "" to set the starting temperature to 50°C.
- Step 3: Long press "" button 3 seconds to stop the temperature flashing. Use "" or "" to set the stop temperature to 65°C. The setting is completed!
CASE 2: Cooling
- The fan is ventilated to 26°C to stop, the temperature is raised to 30°C and the ventilation is started again.
- Step 1: cooling mode, starting temperature > stop temperature
- Step 2: Press and hold the "" button to start the temperature flashing. Use "" or "" to set the starting temperature to 30°C.
- Step 3: Long press "" button 3 seconds to stop the temperature flashing. Use "" or "" to set the stop temperature to 26°C. The setting is completed!
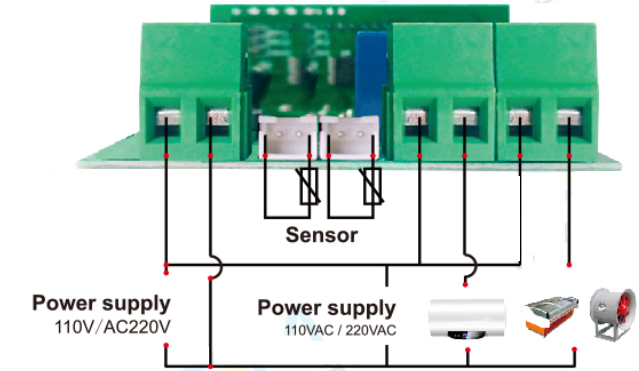
STC-3008 Wiring Diagram
Note: There is no voltage output from the output terminal of the thermostat, so the device needs to be connected to a power supply
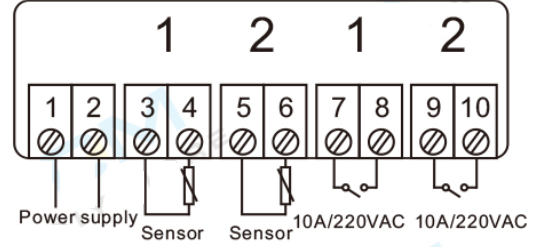
Connection 1: Independent power supply for load
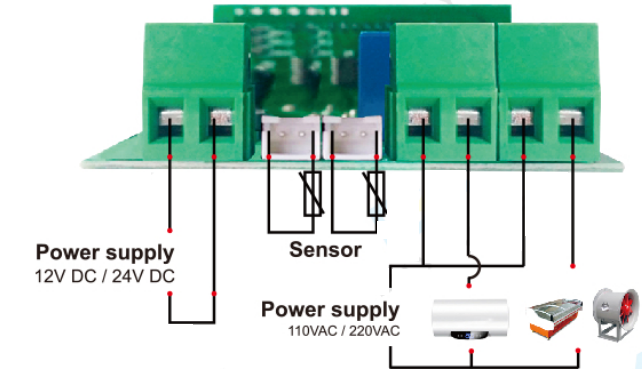
Connection 2: Same power supply for load
Indicator Light Status Instruction
- Indicator light:
- Red light: First group display
- Blue light: Second group display
- Set indicator light: On: parameter setting status
- Note: Cool, Heat indicator light cannot be "on" status simultaneously
Setup Guide
Configuring the STC-3008 is a simple procedure. Prior to installing the thermostat, check sure you have turned off the power to your HVAC system. After that, unplug the outdated thermostat from the HVAC system and take it down from the wall. As you connect the new thermostat to the HVAC system's wiring, make sure the wire colors match the matching terminals on the thermostat. After reconnecting, reactivate the HVAC system's electricity and set the thermostat to your preferred settings.
Safety Regulations
Danger
- Strictly distinguish the sensor down-lead, power wire, and output relay interface from one another, and prohibit wrong connections or overloading the relay.
- Prohibit connecting the wire terminals without electricity cut-off.
Warning
Prohibit using the machine under the environment of over damp, high temperature, strong electromagnetism interference, or strong corrosion.
Notice
- The power supply should conform to the voltage value indicated in the instruction.
- To avoid interference, the sensor down-lead and power wire should be kept a proper distance.
Error Description
- Alarm when sensor error: Controller activates the sensor error alarm mode when sensor open circuit or short circuit, all the running status is closed off with the buzzer alarms, and the nixie tube displays "EE", press any key can cancel alarm sound, system back to display the normal temperature when the error and the fault is cleared.
- Alarm when the measuring temperature exceeds temperature measuring range: Controller activates the error alarm function when the measuring temperature exceeds the temperature measuring range, all the running status is closed off with the buzzer alarms, and the nixie tube displays "HH", press any key can cancel alarm sound, system back to display the normal working mode when the temperature restores to normal measuring range.
Pros & Cons
- Pros
- Cost-effective
- Easy to use
- Compatible with most HVAC systems
- Energy Star certified
- Cons
- May require professional installation
- Limited to 24-hour and 7-day programming
Faqs
What is the DIYmore Thermostat Controller STC-3008?
What are the DIYmore Thermostat Controller primary uses?
How is the DIYmore Thermostat Controllerinstalled?
What kind of power source does the STC-3008 require?
How do I install the DIYmore Thermostat Controller?
What should I do if my DIYmore Thermostat Controller is not working?
Can I install the STC-3008 myself?
Is it possible to use the DIYmore Thermostat Controller for both cooling and heating?
What occurs in the event that the sensor fails?
Is the STC-3008 appropriate for conditions that are corrosive or humid?
Leave a Comment