Dji Digital FPV Remote Controller system User Manual
Content

Introduction
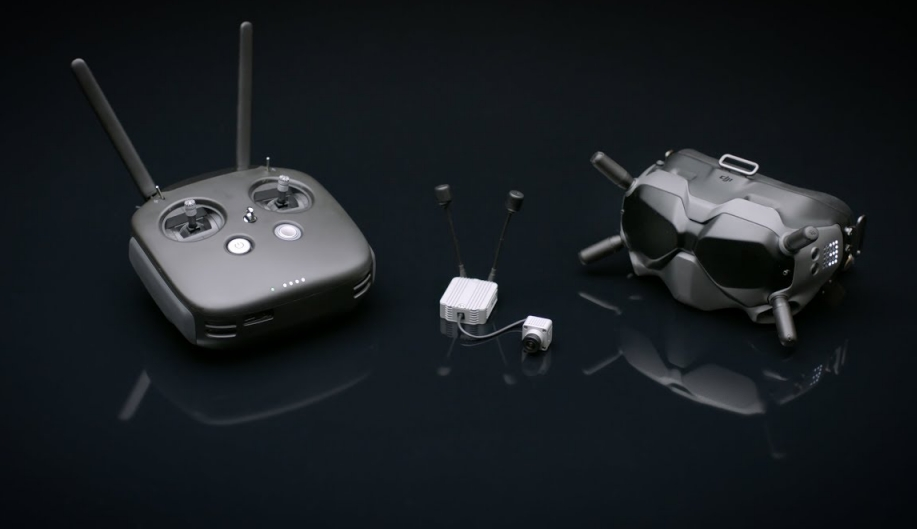
The DJI FPV Goggles are equipped with a high-performance display and DJI HDL FPV transmission technology, with a transmission range of up to 4 km and a minimum end-to-end latency within 28 ms. When used with a racing drone equipped with the DJI FPV Air Unit, users can enjoy a first-person view of their aerial experience in real time. The goggles support an 810p 120fps HD display and up to eight selectable transmission channels, providing users with a smooth and stable high-definition racing experience.
The DJI FPV Goggles can also be used to play video to bring you an immersive high-definition viewing experience.
Detailed Specifications
DJI FPV Air Unit
| Weight | Air Unit (camera included): 45.8 g Antenna: 3.74g (MMCX straight); 3.9 g (MMCX elbow); 6 g (reverse polarity female SMA) |
| Dimensions | Air Unit: 44×37.8×14.4 mm Camera: 27.4×21.1×20.1 mm Coaxial Cable: 100 mm Antenna: 12.7×12.7×80 mm (MMCX straight); 12.7×12.7×80 mm (MMCX elbow); 12.7×12.7×55 mm (reverse polarity female SMA) |
| Operating Frequency | 5.725-5.850 GHz |
| Transmitter Power (EIRP) | FCC/SRRC: <30 dBm; CE: < 14 dBm |
| Min. Latency (end-to-end) | Low Latency Mode(720p 120fps): <28ms; High Quality Mode (720p 60fps): <40 ms |
| Max. Transmission Distance | FCC/SRRC: 4 km; CE: 0.7 km |
| VideoFormat | MP4(Video format: H.264;Audio format: AAC-LC) |
| Video Resolution | 1080p 60fps, 720p 120fps |
| I/O Interface | USB-C, MMCX,3-in-1 port, microSDcard slot |
| SupportedFlight Controller System | BetaFlight |
| Operating Temperature Range | 0° to 40° C (32° to 104° F) |
| Input Power | 7.4-17.6V |
| Camera | Sensor: 1/3.2” CMOS;Effective Pixels: 4 M Lens: 2.1 mm, f/2.1 Shutter: Rolling shutterISO: 100-25600 FOV: 150°(D); 122° (H);93° (V) |
DJI FPV Goggles
| Weight | Approx. 415 g (headband and antennas included) |
| Dimensions | 184×122×110 mm (antennas excluded); 202×126×110 mm (antennas included) |
| ScreenSize | 2-inch × 2 |
| Screen Resolution (Single Screen) | 1440×810 |
| Refresh Rate | 120 Hz |
| FOV | 85° (Single Screen) |
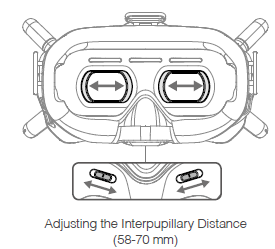
| Interpupillary Distance Range | 58-70mm |
| Communication Frequency | 5.725-5.850GHz |
| Transmitter Power (EIRP) | FCC: <30 dBm; CE: <14 dBm; SRRC: <19 dBm |
| Live View Mode | Low Latency Mode (720p120fps); High Quality Mode (720p 60fps) |
| Video Format | MP4 (Videoformat: H.264) |
| Resolution | 720p 60fps |
| Weight | Approx. 415 g (headband and antennas included) |
| Dimensions | 184×122×110 mm (antennas excluded); 202×126×110 mm (antennas included) |
| ScreenSize | 2-inch × 2 |
| Screen Resolution (Single Screen) | 1440×810 |
| Refresh Rate | 120 Hz |
| FOV | 85° (Single Screen) |
| Interpupillary Distance Range | 58-70mm |
| Communication Frequency | 5.725-5.850GHz |
| Transmitter Power (EIRP) | FCC: <30 dBm; CE: <14 dBm; SRRC: <19 dBm |
| Live View Mode | Low Latency Mode (720p120fps); High Quality Mode (720p 60fps) |
| Video Format | MP4 (Videoformat: H.264) |
| Resolution | 720p 60fps |
DJI FPV Remote Controller
| Remote Controller | |
| Weight | 765 g |
| Operating Frequency | 5.725-5.850 GHz |
| Max. Transmission Distance (unobstructed, free of interference) | FCC/SRRC: 4 km; CE: 0.7 km |
| Transmitter Power (EIRP) | FCC:<30 dBm; CE: <14 dBm; SRRC: <19 dBm |
| Operating Current/Voltage | 0.6 A @ 7.6V |
| Operating Temperature | 0° to 40° C (32°to 104° F) |
| Charging Temperature | 5° to 40° C (41°to 104° F) |
| Remote Controller Intelligent Battery (WB37-4920mAh-7.6V) | |
| Battery Type | LiPo 2S |
| Capacity 4920 mAh | 4920 mAh |
| Voltage | 7.6 V |
| Energy | 37.39 Wh |
Description
The DJI Digital FPV Remote Controller System offers a new level of convenience and comfortable usability. The remote controller features an ergonomic design, making it easy to use for longer periods. The adjustable control settings allow users to tailor the experience to their preferences, and the HD video transmission ensures crystal-clear visuals during flights. The remote controller's compatibility with the DJI Pilot App enables smartphone connectivity, further enhancing the user experience. The long battery life and built-in display round out a remote controller system that fulfills the needs of FPV enthusiasts
Installation and Wearing
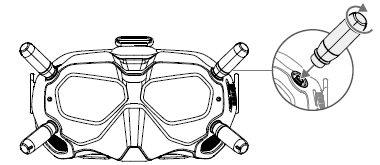
Install the four antennas to the mounting holes on the front of the goggles. Make sure that the antennas are installed securely.
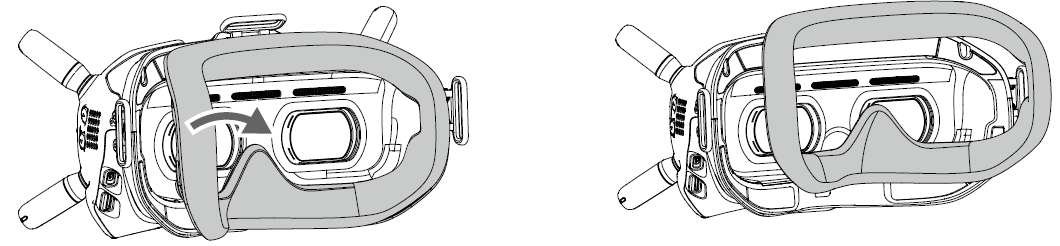
Attach the strap to the headband attachment on the top and sides of the goggles.
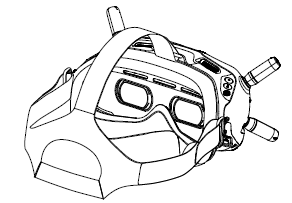
Align the lenses over your eyes and pull the headband down. Adjust the headband size until the goggles fit securely and comfortably on your face and head.

Turn the IPD knob to adjust the distance between the lenses until the images are properly aligned.
TIP: The goggles can be worn over glasses.
Power Supply
Use the included power cable to connect the power port of the goggles to an external power supply.
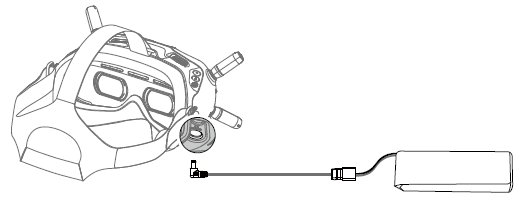
TIP: The external power supply is not included in the package. Prepare an external power supply with an input voltage of 7.4-17.6 V.
Operation
 5D Button
Toggle the button to scroll through the menu. Press the button to confirm.
On the main screen, press the button to enter the menu bar. Toggle left or right to quickly adjust the screen brightness. Toggle up or down to quickly adjust camera settings. The default adjustable setting is scene, which can be changed to FOV, exposure, or other settings. Record Button
Press to start or stop video recording. Back Button
Press to return to the previous menu or exit the current mode..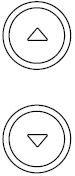 Channel Adjustment Buttons
Press the up or down button to switch channels 1 to 7. Channel Display
Displays the current channel of the goggles.
Video Play
Review your flight videos or other HD videos through the goggles for an immersive viewing experience. Insert the microSD card on the air unit or another microSD card containing video into the microSD card slot, select playback, and choose a video in the menu bar to play the video.
TIPS
- During video playback, toggle the 5D button up or down to adjust the volume. Toggle the 5D button left or right to adjust the progress bar.
- Make sure the video files are stored in the DCIM\100MEDIA in the root or the root directory of the microSD card. Only MP4, MOV, and MKV formats are supported. Refer to Specifications for more information. The video supports up to 4K 30fps.
Maintenance
Cleaning
- Make sure to disconnect the goggles from the power outlet before cleaning and make sure that there are no cables connected.
- Clean the surface of the goggles with a soft, dry clean cloth. To clean the foam padding, moisten the cloth with clean water, and wipe the foam padding.
Replacing the Foam Padding
The foam padding is attached to the goggles with Velcro. When replacing the foam padding, peel it gradually from the left or right side. Align the new foam padding with the goggles and then press the foam padding down so it is securely attached.
Maintenance of Lenses
Use a cleaning cloth to wipe the lenses gently.
- Moisten the cleaning cloth with alcohol or a lens cleaner.
- Wipe in a circular motion from the center to the outer edges of the lenses.
WARNING
- DO NOT clean the foam padding with alcohol.
- The lenses are delicate. Clean them gently. DO NOT scratch them as this will damage the overall viewing experience.
- Store the goggles in a dry room at room temperature to avoid damage to the lenses from high temperature and humid environments.
Warning
Always stay alert when using the DJI Digital FPV System v1.2 to control an unmanned aerial vehicle (UAV). Carelessness may result in serious harm to yourself and others.
DJI FPV Air Unit
- The DJI FPV Air Unit may become hot during or after operation. DO NOT touch the air unit before it cools down.
- DO NOT use the air unit for an extended period when the temperature is high or there is poor ventilation. Otherwise, the air unit may overheat and enter low-power mode, which will affect its performance. Restart the air unit or wait for it to cool down and exit low-power mode.
- Make sure that the external power source for the air unit is a lithium battery and within 7.4 - 17.6 V. Otherwise, the air unit may be damaged and may not work properly.
- DO NOT connect the power cable with the power GND cable directly or plug or unplug the cables when the air unit is powered on. Otherwise, the equipment may be damaged and may not work properly.
- DO NOT obstruct or twist the antennas of the air unit. Otherwise, the transmission may be affected or blocked.
- Follow the instructions in the quick start guide or user manual when installing the air unit. Incorrect installation may cause the air unit to not work properly.
- Keep all the electronic devices as far away from each other as possible during installation to minimize electromagnetic interference.
- Make sure that all connections are secure and all parts are working properly.
- Make sure that there are no other transmitting devices in the surrounding area that may cause interference. DO NOT use the same frequency band as other devices. Otherwise, the transmission of the DJI Digital FPV System will be affected.
DJI Digital FPV Remote Controller System DJI FPV Goggles
- DO NOT throw or drop the product. Otherwise, it may be damaged. If the product is damaged, take it to a DJI Service Center for inspection and repair.
- Keep the lenses away from direct sunlight to avoid screen burns.
- Only use official DJI power cables and an external power supply that meets the specification requirements (7.4-17.6 V). Use of improper accessories may lead to product damage, void the warranty, and even property damage and personal injury.
- The DJI FPV Goggles may become hotter than normal if used for an extended period. If the product overheats, turn off the device as instructed to avoid injury or product damage.
- DO NOT use or store the DJI FPV Goggles in adverse weather conditions or environments with high levels of humidity or dust.
- DO NOT attempt to disassemble or modify this product. Unauthorized disassembling or modification will void the product warranty.
- To avoid damaging the power cable, do not jerk, knot, sharply bend, or abuse the cable in any way. DO NOT expose the cable to sources of heat or liquid. Keep children and animals away from the cable.
- When not using the DJI FPV Goggles, keep the product away from heat, liquid, fire, and direct sunlight.
- DO NOT use the DJI FPV Goggles if any part or component is broken or damaged. DO NOT attempt to repair any part of the device yourself. If the product is damaged, take it to a DJI Service Center for inspection and repair.
- Detach and store the antennas from the DJI FPV Goggles when the goggles are not in use. Make sure to store the antennas carefully to avoid damage.
DJI FPV Remote Controller
- Fully charge the remote controller before each flight.
- If the remote controller is powered on and has not been used for five minutes, it will vibrate. Move the control sticks or perform an action to cancel the alert.
- Make sure the antennas are unfolded and adjusted to the proper position for optimal transmission.
- Contact DJI Support to repair or replace the antennas if they are damaged. Damaged antennas will greatly decrease performance.
- If you change the connected device, link the remote controller and the device again.
- Make sure to power off the aircraft before the remote controller.
- Fully charge the remote controller every three months.
- The remote controller will beep and vibrate when the battery level decreases to 10%. Immediately charge the remote controller to prevent it from being damaged due to over discharge for an extended period. Discharge the remote controller to a battery level between 40% and 60% if storing for an extended period.
- DO NOT cover the air vent or the air intake on the remote controller. Otherwise, the remote controller may overheat, which could affect its performance.
- DO NOT disassemble the remote controller without the assistance of an authorized DJI dealer. Contact DJI or an authorized DJI dealer to replace components of the remote controller.
Troubleshooting
- Problem: Video transmission is unstable or pixelated.
Solution: Ensure the remote controller has a clear line of sight to the drone and the environment is free of interference. If the issue persists, adjust the transmission power or check for firmware updates. - Problem: The remote controller is unresponsive.
Solution: Check the battery level, ensure the remote controller is properly charged, and verify the connection with the drone. Consult the user manual for resetting or re-pairing procedures if necessary. - Problem: The remote controller's screen is flickering or displaying incorrect color settings.
Solution: Adjust the screen brightness and contrast via the remote controller's settings menu. If issues continue, check for firmware updates or contact DJI support.
Pros & Cons
- Pros:
- HD video transmission
- Ergonomic design
- Adjustable control settings
- Long battery life
- Smartphone compatibility
- Cons:
- Limited compatibility (only with DJI Digital FPV System)
- No external antenna options for increased range
- No IP rating for water or dust resistance
Customer Reviews
Customers have praised the DJI Digital FPV Remote Controller System v1.2 for its impressive video transmission capabilities, ergonomic design, and long battery life. While they appreciate the compatibility with DJI's FPV Ecosystem, some wish for greater compatibility with other drones and a higher IP rating for increased durability. Nevertheless, the majority of users find this remote controller system to be an indispensable addition to their FPV drone experience.
Faqs
What are the recommended firmware updates for the DJI Digital FPV Remote Controller System v1.2?
What type of display technology is used in the built-in screen of the DJI Digital FPV Remote Controller System v1.2?
How can I adjust the control settings on the DJI Digital FPV Remote Controller System v1.2?
What are the recommended steps to troubleshoot connectivity issues between the DJI Digital FPV Remote Controller System v1.2 and the drone?
What is the maximum transmission range of the DJI Digital FPV Remote Controller System v1.2?
Does the DJI Digital FPV Remote Controller System v1.2 have a built-in cooling system to prevent overheating?
What is the expected battery life of the DJI Digital FPV Remote Controller System v1.2?
Leave a Comment