Dji Drone Mavic 2 Enterprise Quadcopter User Manual
Content
Introduction
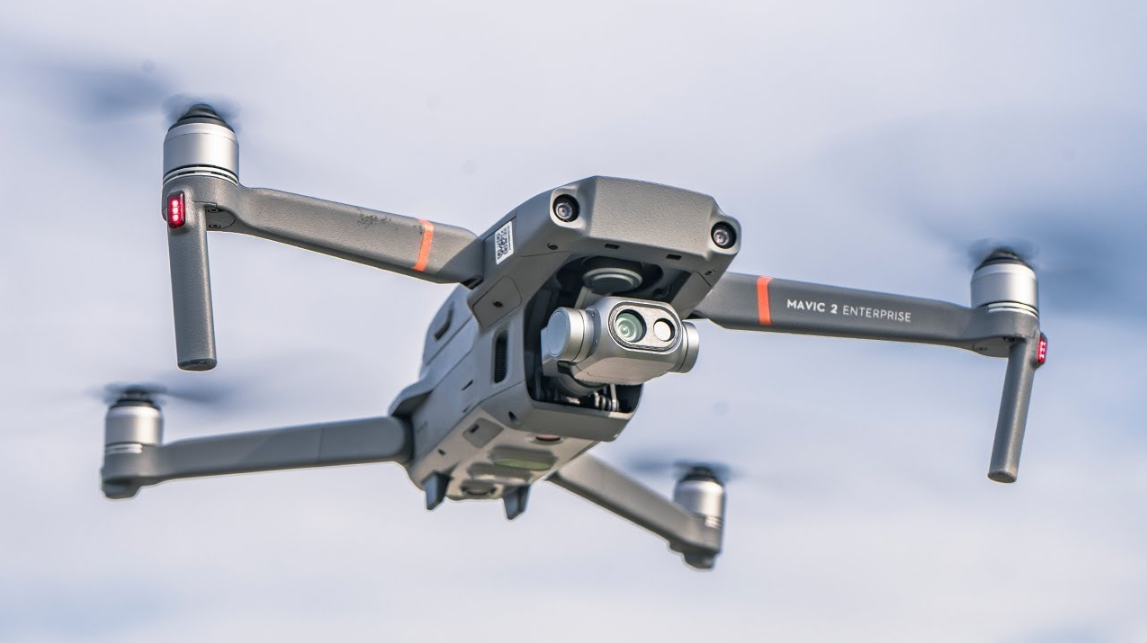
The DJI Mavic 2 Enterprise series features omnidirectional Vision Systems and Infrared Sensing Systems. DJI signature technologies such as Obstacle Sensing and the Advanced Pilot Assistance System*, help you capture complex shots effortlessly. Additional features like the built-in AirSense makes you aware of your surrounding airspace, and password protection helps you maintain secure access to your aircraft and protect your data. The Mavic 2 Enterprise series also has attachable modular accessories like the M2E Spotlight, M2E Beacon and M2E speaker that are purpose-built for various industrial applications.
The Mavic 2 Enterprise features a fully stabilized 3-axis gimbal camera that shoots 4K video, 12-megapixel photos, supports 2x optical zoom, 24-48 mm lens, and supports filters. The Mavic 2 Enterprise Dual features a fully stabilized 3-axis gimbal camera with a FLIR longwave infrared thermal camera and a visual camera, providing both infrared and visible light imaging simultaneously. The infrared thermal camera records 640×480 video, and the visual camera captures 4K videos and 12MP photos. The Mavic 2 Enterprise series uses the latest technology to increase stability and footage quality, reducing the Mavic 2 Enterprise angle vibration range to within ±0.005° and Mavic 2 Enterprise Dual angle vibration range to within ±0.01°.
Built into the remote controller is DJI’s long-range transmission technology OCUSYNCTM 2.0, offering a maximum transmission range of 6.2 mi (10 km) and displaying video from the aircraft to DJI Pilot on your mobile device at up to 1080p. The remote controller works at both 2.4 GHz and 5.8 GHz, and it can select the best transmission channel automatically without any latency. The aircraft and camera can easily be controlled using the onboard buttons. An onboard LCD screen gives real-time aircraft data information, and the detachable control sticks make the remote controller easier to store. The maximum run time is 2 hours and 15 minutes. The Mavic 2 Enterprise series boasts a maximum flight speed of 44.7 mph (72 kph) and a maximum flight time of 31 minutes.
The price for the DJI Mavic 2 Enterprise starts around $1,799.00, depending on the specific package and accessories included.
Specifications
Aircraft |
|
Takeoff Weight(Without Accessories) | 905 g (Mavic 2 Enterprise); 899 g (Mavic 2 Enterprise Dual) |
Max Takeoff Weight | 1100 g |
Dimensions | Folded: 214×91×84 mm (length×width×height) Unfolded: 322×242×84 mm (length×width×height) |
Diagonal Distance | 354 mm |
MaxAscent Speed | 5 m/s (S-mode), 4 m/s(P-mode) |
Max Descent Speed | 3 m/s (S-mode),3 m/s (P-mode) |
MaxSpeed | 72 km/h (S-mode) (nearsea level, no wind) |
Max Service Ceiling Above Sea Level | 6000 m |
Max Flight Time | 31 minutes (at a consistent 25 kph, no wind) |
Max Hovering Time | 29 min (no wind) 27 min (withbeacon turned on)28 min (withbeacon turned off) 22 min (with spotlight turned on) 26 min (withspotlight turned off) 25 min (with speaker turned on) 26 min (with speaker turned off) |
OverallFlight Time | 25 minutes ( in normal flight,15% remaining battery level ) |
Max Flight Distance | 18 km (at a consistent 50 kph, no wind) |
MaxWind SpeedResistance | 29–38 kph |
Max Tilt Angle | 35° (S-mode, with remote controller), 25° (P-mode) |
MaxAngular Velocity | 200°/s |
Operating Temperature Range | -10°C - 40°C |
GNSS | GPS+GLONASS |
Hovering Accuracy Range | Vertical: ±0.1 m (when vision positioning is active) ±0.5 m (with GPS positioning) Horizontal: ±0.3 m (when visionpositioning is active) ±1.5 m (withGPSpositioning) |
Operating Frequency | 2.400 - 2.4835GHz; 5.725 - 5.850GHz |
Transmission Power (EIRP) | 2.4 GHz FCC: ≤26dBm; CE: ≤20 dBm; SRRC:≤20 dBm; MIC:≤20 dBm 5.8 GHz FCC: ≤26 dBm; CE: ≤14 dBm; SRRC: ≤26 dBm |
Internal Storage | 24 GB |
Gimbal |
|
MechanicalRange | Tilt: -135 to 45°, Pan: -100 to100°, Roll: -45 to 45° |
| Controllable Range | Tilt: -90 to 30°, Pan: -75 to 75° |
| Stabilization | 3-axis (tilt, roll, pan) |
| Max Control Speed (tilt) | 120°/s |
| Angular VibrationRange | ±0.005° (Mavic 2 Enterprise); ±0.01° (Mavic 2 Enterprise Dual) |
| Sensing System |
|
| Sensing System | OmnidirectionalObstacle Sensing |
| FOV | Forward: Horizontal: 40°, Vertical: 70° Backward:Horizontal: 60°, Vertical: 77° Downward: Front and Back: 100°, Left and Right: 83° Lateral: Horizontal: 80°,Vertical: 65° |
| Obstacle SensingRange | Forward: Precision Measurement Range: 0.5 - 20 m Detectable Range: 20 - 40 m Effective Sensing Speed: ≤ 14 m/s Backward: Precision Measurement Range: 0.5- 16 m Detectable Range: 16 - 32 m Effective Sensing Speed: ≤ 12 m/s Upward: Precision Measurement Range: 0.1 - 8 m Downward: Precision Measurement Range: 0.5 - 11 m Detectable Range: 11 - 22 m Sides: Precision Measurement Range: 0.5- 10 m Effective Sensing Speed: ≤ 8 m/s |
| Operating Environment | Surface with clear pattern and adequate lighting (lux >15) Detects diffuse reflective surfaces (>20%) (walls, trees,people, etc.) |
| VelocityRange | ≤31mph (50 kph) at 6.6 ft (2 m) above ground |
| Altitude Range | 0.1 - 11 m |
| Operating Range | 0.3 - 50 m |
| Camera (Mavic 2 Enterprise) | |
| Sensor | 1/2.3" CMOS Effective Pixels: 12 million |
| Lens | FOV: approx. 83° (24 mm) approx. 48° (48 mm) 35 mm Format Equivalent: 24-48 mm Aperture: f/2.8 (24 mm)–f/3.8 (48 mm) Shooting Range: 0.5 m to ∞ |
| ISO Range | Video: 100-3200 Photo: 100-1600 (auto) 100-12800 (manual) |
| Shutter Speed | Electronic Shutter: 8–1/8000 s |
| Still Image Size | 4000×3000 |
| Still Photography Modes | Single shot Burst shooting: 3/5/7 frames Auto Exposure Bracketing (AEB): 3/5 bracketed frames at 0.7EV Bias Interval (JPEG: 2/3/5/7/10/15/20/30/60s RAW: 5/7/10/15/20/30/60s) |
| Video Resolution | 4K: 3840×2160 24/25/30p 2.7K: 2688×1512 24/25/30/48/50/60p FHD: 1920×1080 24/25/30/48/50/60/120p |
| Max Video Bitrate | 100 Mbps |
| SupportedFile System | FAT32: ≤ 32 GB exFAT: > 32 GB |
| Photo Format | JPEG / DNG (RAW) |
| Video Format | MP4 / MOV (MPEG-4 AVC/H.264, HEVC/H.265) |
| Supported SD Cards | Supports a microSD withcapacity of up to 128 GB. A UHS-I SpeedGrade 3 rating microSD card is required. |
Operating Temperature Range | -10°C to 40°C |
| HDR | HDR, 13 EV |
| Camera (Mavic 2 Enterprise Dual) | |
| Thermal Camera |
|
| Sensor | UncooledVOx Microbolometer |
| Lens | HFOV: 57° Aperture: f/1.1 |
| Pixel Pitch | 12 μm |
| Spectral Band | 8-14 μm |
| Image Size* | 640×480 (4:3); 640×360 (16:9) |
| Still Photography Modes | Single shot Burst shooting: 3/5/7 frames Interval (2/3/5/7/10/15/20/30/60 s) |
| Video RecordingModes | 640×360 @8.7fps |
| Accuracy | High Gain: Max ±5% (typical) Low Gain: Max ±10% (typical) |
| Scene Range | High Gain: -10° to +140°C Low Gain: -10°to +400°C |
| Supported File System | FAT32/exFAT |
| Photo | JPEG |
| Video | MP4, MOV (MPEG-4 AVC/H.264) |
| Visual Camera |
|
| Sensor | 1/2.3" CMOS; Effective pixels: 12M |
| pixel pitch | 1.55 μm |
| Lens | FOV: approx. 85° 35 mm format equivalent:24 mm Aperture: f/2.8 Focus: 0.5 m to ∞ |
| ISO Range | Video: 100-12800 (auto) Photo: 100-1600 (auto) |
| Shutter Mode | Electronic shutter: auto |
| Max ImageSize | 4056×3040 (4:3); 4056×2280 (16:9) |
| Still Photography Modes | Single shot Burst shooting: 3/5/7 frames Interval (2/3/5/7/10/15/20/30/60 s) |
| VideoRecording Modes | 4K Ultra HD: 3840×2160 30p 2.7K: 2688×1512 30p FHD: 1920×1080 30p |
| Max Video Bitrate | 100 Mbps |
| Supported FileSystem | FAT32/exFAT |
| Photo | JPEG |
| Video | MP4, MOV (MPEG-4AVC/H.264) |
| Remote Controller |
|
| Operating Frequency | 2.400 - 2.4835GHz; 5.725 - 5.850 GHz |
| Max Transmission Distance | FCC: 10 km; CE: 6 km; SRRC:6 km; MIC:6 km (unobstructed, free of interference) |
Operating TemperatureRange | 0°C - 40°C |
| Battery | 3950 mAh |
| Transmission Power (EIRP) | 2.400 - 2.4835 GHz FCC: ≤26 dBm; CE: ≤20 dBm; SRRC: ≤20 dBm; MIC: ≤20 dBm 5.725 - 5.850 GHz FCC: ≤26dBm; CE: ≤14 dBm; SRRC:≤26 dBm |
| Operating Current/Voltage | 1800 mA @ 3.83 V |
Supported Mobile Device Size | Max length: 160 mm; max thickness: 6.5 – 8.5 mm |
| Supported USB Port Types | Lightning, Micro USB (Type-B), USB-C |
| Charger |
|
| Input | 100-240 V, 50/60Hz, 1.8 A |
| Output | Main: 17.6V 3.41A or 17.0 V 3.53 A USB: 5 V 2 A |
| Voltage | 17.6±0.1 V or 17.0 V±0.1V |
| Rated Power | 60 W |
| Intelligent Flight Battery |
|
| Capacity | 3850 mAh |
| Voltage | 15.4 V |
| Max Charging Voltage | 17.6 V |
| Battery Type | LiPo 4S |
| Energy | 59.29 Wh |
| Net Weight | 297 g |
Charging Temperature Range | 5℃ - 40℃ |
| Max Charging Power | 80 W |
| Heating Temperature Rang | -4° to 43° F (-20°to 6° C) |
| Heating Time | 600 s (max) |
| Heating Power | 35 W (max) |
| App |
|
| Video Transmission System | OcuSync 2.0 |
| Name | DJI Pilot |
| Live ViewQuality | 720p@30fps / 1080p@30fps |
| Latency (depending on environmental conditions and mobile device) |
120 - 130 ms |
Required Operating System | iOS 10.0 or later Android 5.0 or later |
| M2E Beacon |
|
| Dimensions | 68×40×27.8 mm |
| Interface Type | USB Micro-B |
| Power | Avg. 1.6W |
| Luminous Intensity | Min. Angle: 55 cd; lightintensity: 157 cd |
| Max. Visible Distance | 5000 m (with goodair quality and high visibility) |
| M2E Spotlight |
|
| Dimensions | 68×60×41 mm |
| Interface Type | USB Micro-B |
| Power | Max. 26 W |
| Illuminance | FOV 17°, Max.11 lux @ 30 m straight |
| Illumination area | 30 m |
| M2E Speaker |
|
| Dimensions | 68×55×65 mm |
| Interface Type | USB Micro-B |
| Power | Max. 10 W |
| Decibel | 100 dB at 1 m-distance (International Standard) |
| Code Stream | 16 kbps |
Aircraft Diagram
Mavic 2 Enterprise (Model: L1ZE)
_dji_mavic_2_enterprise_quadcopter.png)
- Forward Vision System
- Propellers
- Motors
- Front LEDs
- Antennas
- Gimbal and Camera
- Backward Vision System
- Aircraft Status Indicator
- Battery Buckles
- Lateral Vision System
- USB-C Port
- Link Button/Linking Status Indicator
- Extended Port (to connect accessories)
- Extended Port Cover
- Battery Level LEDs
- Power Button
- Intelligent Flight Battery
- Upward Infrared Sensing System
- Downward Vision System
- microSD Card Slot
- Downward Infrared Sensing System
- Auxiliary Bottom Light (can be used as a beacon in low light conditions)
Mavic 2 Enterprise Dual (Model: L1DE)
_dji_mavic_2_enterprise_quadcopter.png)
- Forward Vision System
- Propellers
- Motors
- Front LEDs
- Gimbal and Camera
- Visual Camera
- Thermal Camera
- Antennas
- Backward Vision System
- Aircraft Status Indicator
- Battery Buckles
- Lateral Vision System
- USB-C Port
- Link Button/Linking Status Indicator
- Extended Port (to connect accessories)
- Extended Port Cover
- Battery Level LEDs
- Power Button
- Intelligent Flight Battery
- Upward Infrared Sensing System
- Downward Vision System
- microSD Card Slot
- Downward Infrared Sensing System
- Auxiliary Bottom Light (can be used as a beacon in low light conditions)
Controller Guide
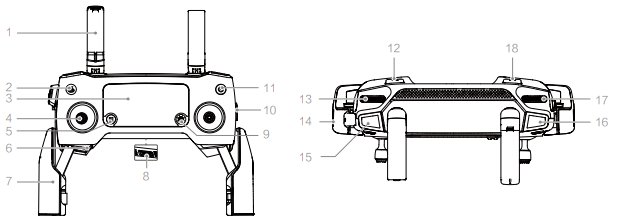
- Antennas
Relay aircraft control and video wireless signals. - Return to Home (RTH) Button
Press and hold the button to initiate RTH. The aircraft returns to the last recorded Home Point. Press again to cancel RTH. - LCD Screen
Displays the aircraft and remote controller system status. - Removable Control Sticks
The removable control sticks are easy to store. The default flight control is set to Mode 2. Set the flight control mode in DJI Pilot. - Flight Pause Button
Press to make the aircraft brake and hover in place (only when GPS or Vision System are available). - Control Sticks Storage Slot
For storing the control sticks. - Mobile Device Clamps
Securely mount your mobile device onto the remote controller. - Reserve Video-Downlink Port (USB)
Connect to a mobile device for video downlink via a standard USB cable. - 5D Button
The default configuration is listed below. The configuration can be adjusted based on your preferences in DJI Pilot.
Left: Decrease EV value.
Right: Increase EV value.
Up: Recenter gimbal/gimbal downward.
Down: Recenter gimbal/gimbal downward. - Flight Mode Switch
Switch between S-mode, P-mode, and T- mode. - Power Button
Press once to check the current battery level. Press once, then again, and hold to turn on/off the remote controller. - C1 Button (Customizable)
The default configuration is center focus. Adjust the configuration in DJI Pilot based on your preferences. - Gimbal Dial
Controls the camera's tilt. - Video-Downlink/Power Port (micro USB)
Connect to a mobile device for video linking via the RC cable. Connect to the AC Power Adapter to charge the remote controller battery. - Record Button
Press to start recording video. Press again to stop recording. - Focus/Shutter Button
Press halfway to autofocus. Press once to take photos according to the mode selected in the DJI Pilot. - Zoom Adjustment Dial (Mavic 2 Enterprise)
Turn to adjust the zoom of the camera.
EV Adjustment Dial (Mavic 2 Enterprise Dual) Turn to adjust the exposure value of the camera. - C2 Button (Customizable)
The default configuration is playback. Adjust the configuration in DJI Pilot based on your preferences.
Activation
The Mavic 2 Enterprise series requires activation before first time use. Follow the onscreen guide to activate the Mavic 2 Enterprise series using DJI Pilot.
Description
The DJI Mavic 2 Enterprise is built with durability and ease of use in mind. Its foldable design makes it highly portable, while its robust build ensures it can withstand various environmental conditions. The drone features a three-axis gimbal that stabilizes the camera, providing smooth footage even during turbulent flights. Additionally, the Mavic 2 Enterprise supports a range of intelligent flight modes, including ActiveTrack and Hyperlapse, which enhance its operational capabilities.
The drone also includes DJI's AirSense system, which integrates ADS-B technology to provide real-time alerts about nearby aircraft. This feature significantly enhances safety during critical missions.
Preparing the Aircraft
All aircraft arms are folded before the aircraft is packaged at the factory. Follow the steps below to unfold the aircraft.
- Remove the gimbal cover from the camera.
- Unfold the front arms, and then unfold the rear arms.

Attach the gimbal cover when not in use.
- Hold the gimbal in place and insert gimbal clamp between the aircraft and the gimbal.
Make sure the hooks on the Gimbal Protector are locked in the grooves of the aircraft, then lower the Gimbal Protector over the gimbal and secure with the buckle. The buckle will click when it is securely attached.

Attaching the propellers.
Attach the propellers marked white to the motors with white marks. Press the propeller down onto the motors and turn until it is secure. Attach the other propellers to the unmarked motors. Unfold all the propeller blades.
All Intelligent Flight Batteries are in Hibernation mode before shipment to ensure safety. Use the provided AC power adapter to charge and activate Intelligent Flight Batteries for the first time. To charge an Intelligent Flight Battery after flight, remove it from the aircraft and attach it to the AC power adapter.

WARNING
- Unfold the front arms and propellers before unfolding the rear arms.
- It is normal if there is friction on the arms and aircraft due to the firmly folding design of the Mavic 2 Enterprise series aircraft.
- Be sure the gimbal cover is removed and all arms and propellers are unfolded before powering on the aircraft. Otherwise, it may affect the aircraft self-diagnostics.
Preparing the Remote Controller
- Unfold the mobile device clamps and the antennas.
Remove the control sticks from their storage slots on the remote controller and screw them into place.
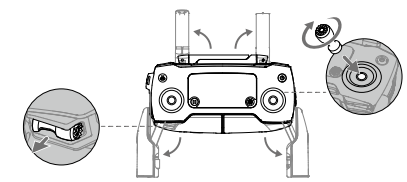
- Choose an appropriate RC cable based on the type of mobile device. A cable with a Lightning connector is connected by default to the cable slider. Micro USB and USB-C cables are also included in the packaging. Connect the end of the RC cable to your mobile device. Secure your mobile device by pushing both clamps inward.
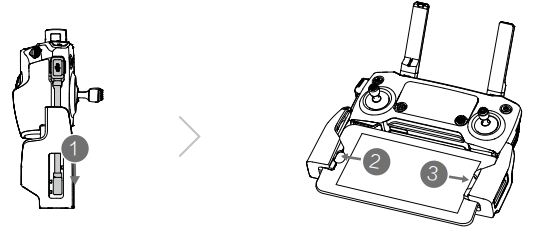
Refer to the figure below for how to replace the RC cable. The RC cable slider must be replaced if using a USB-C RC cable.

WARNING
- You can also connect your mobile device to the remote controller using a USB cable if the mobile device is too big to place into the clamps. Plug one end of the cable into your mobile device and the other end into the USB port on the bottom of the remote controller.
- Do not use the Micro USB and USB ports simultaneously for video linking. Remove the cable from one port before connecting a device to the other port for video linking.
Calibrating the Compass
- Flying at a location farther than 31 miles (50 km) away from the location the drone was last flown.
- The aircraft has not been flown for more than 30 days.
- A compass interference warning appears in DJI Pilot and/or the Aircraft Status Indicators blink alternating red and yellow.
WARNING
- DO NOT calibrate the compass in locations where magnetic interference may occur, such as close to magnetite deposits or large metallic structures such as parking structures, steel reinforced basements, bridges, cars, or scaffolding.
- DO NOT carry objects (such as cell phones) that contain ferromagnetic materials near the aircraft during calibration. It is not necessary to calibrate the compass when flying indoors.
Calibration Procedure
Choose an open area to carry out the following procedure.
- Tap the System Status Bar in DJI Pilot, select “Calibrate”, and follow the on-screen instructions.
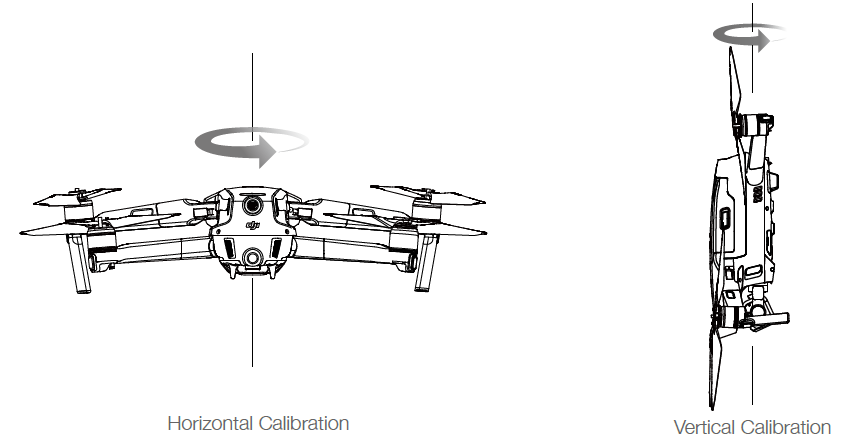
- Hold the aircraft horizontally and rotate it 360 degrees. The Aircraft Status Indicator will turn solid green.
- Hold the aircraft vertically, with its nose pointing downward, and rotate it 360 degrees around a vertical axis.
- If the Aircraft Status Indicator blinks red, the calibration has failed. Change your location and try the calibration procedure again.
NOTE: The aircraft can take off immediately once calibration is complete. If you wait more than three minutes to take off after calibration, you may need to calibrate again. It is possible that another compass interference warning will appear while the aircraft is on the ground. This indicates that the current location is not suitable for flying the aircraft, due to the level of magnetic interference.
Setup Guide
To set up the DJI Mavic 2 Enterprise, follow these steps:
- Unboxing and Assembly: Carefully remove the drone from the box and unfold the arms. Ensure all parts are securely locked into place.
- Charging the Battery: Charge the battery using the provided charger. It typically takes about 90 minutes to fully charge.
- Turn on both the drone and the controller. The drone will automatically search for the controller and pair with it.
- Open the DJI GO app on your smartphone or tablet and connect it to the controller. Configure settings such as flight mode, home point, and other preferences as needed.
Firmware Updates
Use DJI Pilot or DJI Assistant 2 for Mavic to update the aircraft firmware.
Using DJI Pilot
When you connect the aircraft or remote controller to DJI Pilot, you will be notified if a new firmware update is available. To start updating, connect your mobile device to the internet and follow the on-screen instructions. Note that you cannot update the firmware if the remote controller is not linked to the aircraft.
Using DJI Assistant 2 for Mavic
The USB-C port is used when connecting the aircraft to a computer to update firmware. Follow the instructions below to update the firmware through DJI Assistant 2 for Mavic:
- With the aircraft powered off, connect the aircraft to a computer via the Micro USB port using a Micro USB cable.
- Power on the aircraft.
- Launch DJI Assistant 2 for Mavic and log in with your DJI account.
- Select “Mavic 2” and click on Firmware Updates on the left panel.
- Select the firmware version that you wish to update to.
- Wait for the firmware to download. The firmware update will start automatically.
- Reboot the aircraft after the firmware update is complete.
WARNINGS
- Ensure the aircraft is connected to the computer before powering on.
- The firmware update will take around 15 minutes. It is normal that the gimbal goes limp, aircraft status indicators blink, and the aircraft reboots. Please wait patiently until the update is complete.
- Ensure the computer has access to the Internet.
- Before performing an update ensure the Intelligent Flight Battery has at least 50% power and the remote controller has at least 30% power.
- Do not disconnect the aircraft from the computer during an update.
- For safety, always update the firmware to the latest version when an update notification is shown in DJI Pilot.
- Firmware update notifications will prompt you to proceed with an update immediately or to update the firmware within three days. If you choose to ignore the current firmware update, you are required to accept the prompted disclaimer. You further understand and agree that the data includes but is not limited to user selection records and may be uploaded to and maintained on a DJI designated server.
- The remote control device may become unlinked from the aircraft after updating. Re-link the remote control device and aircraft. Be sure to check all connections and remove the propellers from the motors before performing the firmware update. DO NOT disconnect the aircraft or remote controller from the computer or internet while updating the firmware.
Remote Controller LCD Screen Menu Information
Remote Controller Status | |
BAT xx PCT | Remote controllerbattery level. |
SHUTDOWN_ | Remote controller is powering off. |
CHARGING_ | Remote controlleris charging. |
USB PLUGGED | Mavic2 has beenconnected to a computer. |
FC U-DISK | Flight Controlleris readingdata. |
UPGRADING | Upgrading. |
BINDING | Aircraft isbinding withthe remotecontroller. |
Before Flight | |
CONNECTING_ | The remotecontroller isconnecting tothe aircraft. |
SYS INITING | System is initiating. |
READY TO GO | Ready to take off. |
Flight Mode | |
GPS MODE | In P-GPS Mode. |
OPTI MODE | In P-OPTI Mode. |
ATTI MODE | In P-ATTI Mode. |
SPORT MODE | In Sport Mode. |
TRIPOD | In Tripod Mode. |
Flight Status | |
TAKING OFF | Taking off. |
LANDING | Landing. |
GOING HOME | Returning toHome. |
MAX ALT. | Aircraft has reached maximum altitude. |
MAX RADIUS | Aircraft hasreached maximumradius. |
OBSTACLE | Obstacle detected. |
NO FLY ZONE | Aircraft is in a No Fly zone. |
Intelligent Flight Mode Status | |
APAS MODE | Using APAS. |
System Waning and Error Information | |
SYS WARNING+CHECK APP | System Warning. See DJI Pilot for more information. |
UNACTIVATED+CHECK APP | Aircraft not Activated.SeeDJI Pilot for moreinformation. |
MAG INTERF+CHECK APP | Compass Error. See DJI Pilot for more information. |
BATTERY ERR+CHECK APP | Battery Error. See DJIPilot for moreinformation. |
SD ERR+CHECK APP | microSD card Error. See DJIPilot for more information. |
CALIBRATING | IMU Calibrating/Did not restart aircraft after calibration is complete. |
STICK ERR+RE-CTR STCK | Control stickis notcentered. Re-centerit. |
WHEEL ERR+RE-CTR WHEL | Left Dial on the remote controller is not centered. Re-center it. |
STICK ERR | Control stick error. Calibrate thecontrol sticks in the DJIPilot. |
MECH ERR | RemoteController Error. Calibrate the remote controller in the DJI Pilot. If this problem persists, contact DJI support. |
SD FULL | microSD cardis full. |
NO PROP | No propellers attached. |
BAT TEMP HI | Intelligent FlightBattery istoo hot. |
BATTERY ERR | Intelligent Flight Battery error. |
BAT TEMP LO | Intelligent FlightBattery istoo cold. |
LOW BATTERY | Intelligent Flight Batterylowbattery. |
RC LOWBAT | Remote controllerlow battery. |
NO RC SIGNL | Remote controller signal lost. |
RC TEMP HI | Remote controllertoo hot. |
NO RTH | Aircraft cannot Return to Home. |
Troubleshooting
Common issues with the DJI Mavic 2 Enterprise include:
- Ensure that both the drone and controller are turned on and properly paired. Restart both devices if connection is lost.
- Regularly update the firmware to ensure you have the latest features and fixes. Use the DJI GO app for this purpose.
- Check battery health and charge levels regularly. Avoid overcharging or deep discharging batteries.
- Always follow safety guidelines provided by DJI, such as maintaining line of sight and avoiding restricted areas.
After-Sales Information
Visit https://www.dji.com/support to learn more about after-sales service policies, repair services and support.
Pros & Cons
Pros
- Excellent image quality with 24MP resolution and 2x optical zoom.
- Up to 31 minutes of flight time allows for extended missions.
- Foldable design makes it easy to carry around.
- Includes intelligent flight modes, AirSense system, and modular accessories.
Cons
- The drone is expensive compared to consumer-grade models.
- Requires some technical knowledge for optimal use.
- Additional accessories like the M2E Beacon or Spotlight add extra cost.
Customer Reviews
Customers praise the DJI Drone Mavic 2 Enterprise Quadcopter for its robust build quality, excellent camera performance, and reliable operation. However, some users find it expensive and complex to operate. Common complaints include occasional connectivity issues and the need for frequent firmware updates.
Faqs
What is the maximum flight time of the DJI Mavic 2 Enterprise?
Can I use the DJI in harsh weather conditions?
How do I update the firmware on my DJI Mavic 2 Enterprise?
What is the transmission range of the DJI Mavic 2 Enterprise?
Is there an active track feature on this drone?
Can I use third-party batteries with my DJI Mavic 2 Enterprise?
How long does it take to fully charge the battery?
What are some common accessories for this drone?
Is this drone suitable for beginners?
Leave a Comment
