Dji Inspire 1 Raw Drone User Manual | Features & Settings
Content
Introduction
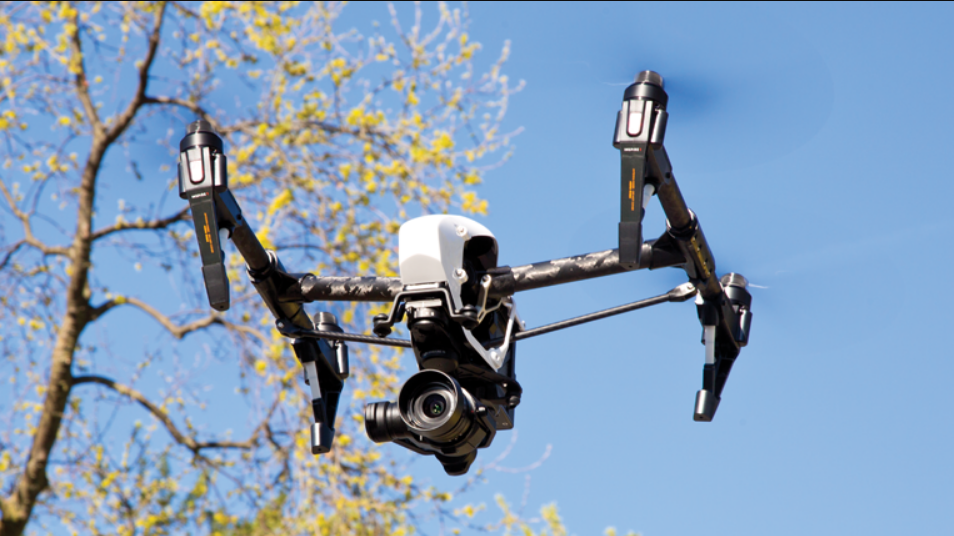
The DJI Inspire 1 Raw Drone is a sophisticated aerial filmmaking platform that combines advanced technology with professional-grade performance. Equipped with a Micro Four Thirds camera, it captures stunning 4K video and 16MP still images, delivering exceptional image quality. The Inspire 1 Raw features a retractable landing gear system and a 3-axis gimbal for stable footage, making it ideal for filmmakers and content creators. Priced at $2,999.00, it represents a significant investment in high-quality aerial cinematography.
Matrice 200 V2 / Matrice 210 V2 / Matrice 210 RTK V2 (M200 V2 / M210 V2 / M210 RTK V2) is a powerful aerial imaging system with class-leading agility and speed, redundant components for maximum reliability, and smart features that make performing complex tasks easy. The aircraft's visual sensors* enable enhanced hovering precision even when flying indoors or in environments where GNSS is unavailable. Gimbal cameras can be easily exchanged to suit your application's needs. Dual frequency transmission system makes HD video downlink more stable and efficient.
DJI Inspire 1 Raw Drone Specifications
Aircraft
- Model
T600 - Weight
2870 g (Battery and propellers included, Zenmuse X5R excluded)
3453 g (Battery, propellers and Zenmuse X5R included) - Max Takeoff Weight
3500 g - Hovering Accuracy (P Mode)
Vertical: 0.5 m
Horizontal: 2.5 m - Max Angular Velocity
Pitch: 300%/s
Yaw: 150% - Max Tilt Angle
35° - Max Ascent Speed
5 m/s - Max Descent Speed
4 m/s - Max Speed
18 m/s (ATTi mode, no wind) - Max Service Ceiling Above Sea Level
4,500 m (Software altitude limit: 120 m above takeoff point) - Max Wind Speed Resistance
10 m/s - Max Flight Time
Approx. 15 minutes - Motor Model
DJI 3510H - Propeller Model
DJI 1345T - Indoor Hovering
Enabled by default - Operating Temperature
14° to 104° F (-10° to 40° C) - Diagonal Distance
559 mm
Gimbal and Camera
- General Name
Zenmuse X5R - Operating Temperature
32° to 104° F (0° to 40° C)
Camera
- Lens
Supported Lenses:- Replaceable lens
- M43 mount supporting auto-focus
- DJI MFT 15mm f/1.7 ASPH
- Panasonic Lumix G Leica DG Summilux 15mm f/1.7 ASPH
- Olympus M.Zuiko Digital ED 12mm f/2.0
- Olympus M.Zuiko 17mm f/1.8 (Balancing ring will be available on the DJI Store soon)
- Sensor
Type 4/3 CMOS sensor - Effective Pixels
16 M - ISO Range
Photo: 100-25600; Video: 100-6400 - Electronic Shutter Speed
Photo: 85-1/800s; Video: 1/25s- 1/8000s - Field of View
DJI MFT 15mm f/1.7 ASPH 72° - Still Photography Modes
Single shot- Burst shooting: 3/5/7 frames
- Auto Exposure Bracketing (AEB): 3/5 bracketed frames at 0.7EV bias
- Timelapse (3/5/7/10/20/30/60 sec)
- HDR
- Video Resolution
- UHD: 4K (4096×2160) 24/25p, 4K (3840×2160) 24/25/30p, 2.7K (2704×1520) 24/25/30p
- FHD: 1920x1080 24/25/30/48/50/60p
- Max Video Bitrate
- Micro SD: 60 Mbps
- X5R SSD: 2.4 Gbps (Avg: 1.7 Gbps)
- Micro SD File Systems
FAT32 (≤ 32 GB), exFAT (> 32 GB) - Photo Formats
JPEG, DNG (RAW)
- Video Formats
- Micro SD: MP4/MOV (codec: H.264)
- X5R SSD: CinemaDNG (codec: Lossless JPEG)
- Supported Micro SD Devices
Class 10 or UHS-1 or above Micro SD cards; Max capacity of 64GB - Supported Storage Devices
Class 10 or UHS-1 or above Micro SD cards; Max capacity of 64 GB
Default Lens
- Name
DJI MFT 15mm f/1.7 ASPH - Focal Length
f= 15 mm (35 mm format equivalent 30 mm) - Aperture Type
7 diaphragm blades/circular aperture diaphragm - Maximum Aperture
F1.7 - Minimum Aperture
F16 - Lens Construction
9 elements in 7 groups (3 aspherical lenses) - In Focus Distance
0.2 m to ∞ (from the focus distance reference line) - Mount
Micro Four Thirds Mount - Angle of View
72° - Max Diameter
Approx. 2.26 inches (57.5 mm) - Overall Length
Approx. 1.42 inches (36 mm) - Weight
Approx. 115 g
Gimbal
- Angular Vibration Range
±0.02° - Mount
Detachable - Controllable Range
Pitch: -90° to +30°
Pan: ±320° - Max Controllable Speed
Pitch: 120%
Pan: 180°/s
Remote Controller
- Name
C1 - Operating Frequency
922.7MHz~927.7 MHz (Japan Only)
5.7255.825 GHz; 2.4002.483 GHz - Max Transmitting Distance
FCC Compliant: 3.1 miles (5 km)
CE Compliant: 2.1 miles (3.5 km) (unobstructed, free of interference) - EIRP
10 dBm@900 MHz, 13 [email protected] GHz, 20 [email protected] GHz - Video Output Ports
USB, Mini HDMI - Power Supply
Built-in battery - Charging
DJI charger - Dual User Capability
Primary-and-Secondary connection - Max Mobile Device Width
170 mm - Output Power
9 W - Operating Temperature
14° to 104° F (-10° to 40° C) - Storage Temperature
Less than 3 months: -4° to 113° F (-20° to 45° C)
More than 3 months: 72° to 82° F (22° to 28° C) - Charging Temperature
32° to 104° F (0° to 40° C) - Battery
6000 mAh 2S LiPo - Charger Model
A14-100P1A - Voltage
26.3 V - Rated Power
100 W
Intelligent Flight Battery
Battery (Standard)
- Name: TB47
- Capacity: 4500 mAh
- Voltage: 22.2 V
- Battery Type: 6S LiPo High voltage battery
- Energy: 99.9 Wh
- Net Weight: 570 g
- Operating Temperature: 14° to 104° F (-10° to 40° C)
- Storage Temperature:
- Less than 3 months: -4° to 113° F (-20° to 45° C)
- More than 3 months: 72° to 82° F (22° to 28° C)
- Charging Temperature: 32° to 104° F (0° to 40° C)
- Max Charging Power: 180 W
Battery (Optional)
- Name: TB48
- Capacity: 5700 mAh
- Voltage: 22.8 V
- Battery Type: 6S LiPo High voltage battery
- Energy: 129.96 Wh
- Net Weight: 670 g
- Operating Temperature: 14° to 104° F (-10° to 40° C)
- Storage Temperature:
- Less than 3 months: -4° to 113° F (-20° to 45° C)
- More than 3 months: 72° to 82° F (22° to 28° C)
- Charging Temperature: 32° to 104° F (0° to 40° C)
- Max Charging Power: 180 W
- Max Flight Time
Approx. 18 minutes
Vision Positioning
- Velocity Range
< 8 m/s @ altitude 6.56 feet (2 m) - Altitude Range
0.16 - 16.4 feet (5-500 cm) - Operating Environment
Surfaces with clear patterns and adequate lighting (> 15 lux) - Operating Range
< 9.84 feet (300 cm)
Feature Highlights
The Inspire 1 RAW is a professional aerial filmmaking and photography platform that is ready to fly right out of the box. Featuring an onboard camera equipped with a 15mm f/1.7 (35mm format equivalent 30mm) lens and 3-axis stabilized gimbal, it captures sharp 16MP stills and stable video at up to 4K resolution. Its retractable landing gear pulls up out of view, allowing the camera a full 360-degree view of the world below. Through the DJI GO app, the camera focus, shutter speed, aperture, and ISO can all be manually adjusted. The DJI Focus, a wireless follow-focus system, can also be linked to the remote controller of the Inspire 1 RAW for seamless and tactile camera control throughout the entire flight range.
HD Video Downlink
- Low latency HD downlink powered by an enhanced version of the DJI Lightbridge system.
- Supports dual-controller mode.
Landing Gear
- Retractable landing gear provides an unobstructed panoramic view from the camera.
DJI Intelligent Flight Battery
- 4500 mAh battery that employs new battery cells and a battery management system.
Flight Controller
- Next-generation flight controller system ensures a more reliable flight experience.
- New flight recorder stores data from each flight.
- Vision Positioning enhances hovering precision when no GPS is available.
Assemble the Aircraft
Unlocking Travel Mode
The aircraft is delivered in Travel Mode. Follow these steps to switch it to Landing Mode before your first flight:
- Insert the Intelligent Flight Battery into the battery compartment.
- Power on the Remote Controller and the Intelligent Flight Battery.
- Toggle the Transformation Switch up and down at least four times.
Power off the aircraft.

Warning
- The battery must be fully charged before first use. Refer to 'Charging the Intelligent Flight Battery' for more details.
- For dual remote controller versions, the primary remote controller must deactivate Travel Mode. Refer to the 'Setting Up Dual Remote Controllers Mode' section for details.
- Remove the gimbal from the aircraft before switching from Landing Mode to Travel Mode.
- Ensure the aircraft is placed on a smooth and reflective surface (e.g., table or tile) before switching between modes.
Installing the Gimbal and Camera
Follow these steps using the DJI MFT 15mm f/1.7 ASPH as an example:
- Remove the camera body cap.
- Hold down the Lens Release Button and rotate the Lens Lock clockwise to unlock it.
Remove the lens cap and rear cap.

- Align the two Lens Mount Indexes and insert the camera lens into the body.
- Rotate the camera lens clockwise until it clicks.
- Rotate the Lens Lock counterclockwise to lock it.
Mount the Balancing Ring or filter and the Lens Hood.

Insert the Micro SD card and the X5R SSD.

To remove the camera lens:
- Power on the battery.
- Hold down the Lens Release Button, rotate the Lens Lock clockwise to unlock it, and rotate the camera lens counterclockwise to detach it.
Warnings
- Wrap a dust cover around the lens to prevent contamination.
- Tighten the Lens Lock after attaching the camera lens to reduce vibrations during flight.
- Use filters weighing 7–11g, with 10–11g being ideal for optimal gimbal performance.
- Set the lens to AF mode before use.
Tip: The DJI MFT 15mm f/1.7 ASPH supports 46mm filters. When no filter is used, the Balancing Ring must be installed on the camera lens.
Attach the Zenmuse X5R
Power off the aircraft.
- Rotate the Gimbal Lock to the unlocked position.
- Align the white lines on the Gimbal Connector and Gimbal Lock, insert the Gimbal Connector.
- Rotate the Gimbal Lock to the locked position.
Turn the two keys on the other end of the mounting plate 90 degrees into the slots.

Attaching 1345T Quick-Release Propellers
Pair the propellers and motors with arrows of the same color (red or white).

Preparing Remote Controller
- Tilt the Mobile Device Holder to the desired position.
- Press the button on the side of the Mobile Device Holder to release the clamp, then adjust it to fit your mobile device.
- Connect your mobile device to the remote controller with a USB cable.
- Plug one end of the cable into your mobile device and the other into the USB port on the back of the remote controller.

Aircraft Diagram
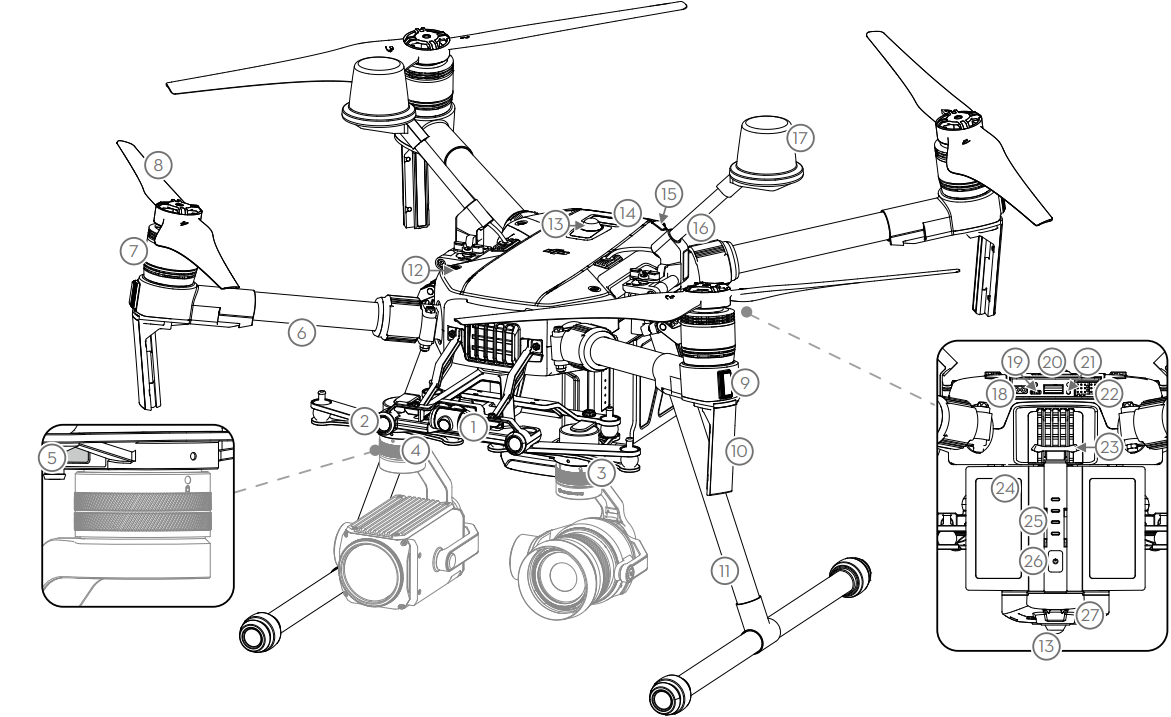
- GPS
- Propeller
- Motor
- Front LED
- Landing Gear
- Gimbal and Camera
- Intelligent Flight Battery
- Aircraft Micro-USB Port
- Rear LED
- X5R SSD
- Vision Positioning Sensors
- Aircraft Status Indicator
Remote Controller Diagram
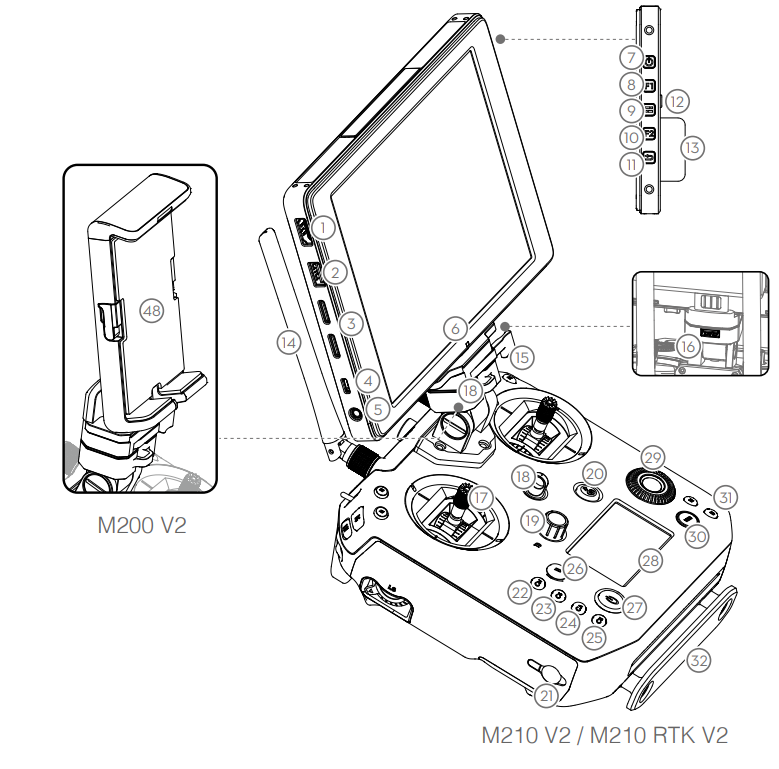
- Antennas (P32)
Relays aircraft control and video signal. - Mobile Device Holder
Mounting place for your mobile device. - Control Stick
Controls aircraft orientation. - Return Home (RTH) Button (P31)
Press and hold the button to initiate Return to Home (RTH). - Transformation Switch (P30)
Toggle the switch up or down to raise or lower the landing gear. - Battery Level LEDs
Displays the current battery level. - Status LED
Displays the connection status. - Power Button
Used to power on or power off the remote controller. - RTH LED
Circular LED around the RTH button displays RTH status. - Camera Settings Dial
Turn the dial to adjust camera settings. Only functions when the remote controller is connected to a mobile device running the DJI GO app. - Playback Button
Playback the captured images or videos. - Shutter Button
Press to take a photo. If in burst mode, the set number of photos will be taken with one press. - Flight Mode Switch
Used to switch between P, A, and F mode. - Video Recording Button
Press to start recording video. Press again to stop recording. - Gimbal Dial
Use this dial to control the orientation of the gimbal. - Mini-HDMI Port
Connect an HD compatible monitor to this port to get a live HD video preview of what the camera sees. - Micro USB Port
For connecting the remote controller to your computer. - CAN Bus Port
Reserved for future use. USB Port
Connect to mobile device to access all of the DJI GO app controls and features.
- GPS Module
Used to pinpoint the location of the remote controller. - C1 Button
Customizable button in DJI GO app. - Power Port
Connect to a power source to charge the remote controller's internal battery. C2 Button
Customizable button in DJI GO app.
Description
The DJI Inspire 1 Raw Drone is built with a carbon fiber body and features four arms that rise above the drone during flight, providing an unobstructed view for the camera. The Zenmuse X5R camera offers superior image quality with its Micro Four Thirds sensor, capturing detailed RAW images and smooth 4K video. The drone is controlled using the DJI GO app, which provides real-time video transmission, flight planning, and camera control.
The Inspire 1 Raw also includes advanced features such as dual transmitter support, allowing one pilot to control the drone while another operates the camera, enhancing teamwork and precision in aerial operations.
Remote Controller

Remote Controller Profile
The Inspire 1 RAW Remote Controller is a multi-function wireless communication device that integrates the video downlink ground system and aircraft Remote Controller system. The video downlink and aircraft Remote Controller system operate at 2.4 GHz with a maximum transmission distance of 5 km. The remote controller features a number of camera functions, such as taking and previewing photos and video, and controlling gimbal motions. The remote controller is powered by a 2S rechargeable battery, and the current battery level is displayed by LEDs on the front panel.
- Compliance Version: The Remote Controller is compliant with local compliance and regulations.
- Operating Mode: Control can be set to Mode 1 or Mode 2.
- Mode 1: The right stick serves as the throttle.
- Mode 2: The left stick serves as the throttle.
- Warning: Do not operate more than 3 aircrafts in the same area (size equivalent to a soccer field) to prevent transmission interference.
To ensure a stable connection between the aircraft and remote controller, the secondary remote controller should be used in environments with less interference.
Remote Controller Operations
Powering On And Off The Remote Controller
The Inspire 1 RAW remote controller is powered by a 2S rechargeable battery with a capacity of 6000mAh. The battery level is indicated by the Battery Level LEDs on the front panel. Follow these steps to power on your remote controller:
- When powered off, press the Power Button once and the Battery Level LEDs will display the current battery level.
- Then, press and hold the Power Button to power on the remote controller.
- The Remote Controller will beep when it powers on. The Status LED will blink green (secondary remote controller blinks solid purple) rapidly, indicating that the remote controller is linking to the aircraft. The Status LED will show a solid green light when linking is completed.
Repeat step 2 to power off the remote controller after finishing using it.

Charging Remote Controller
Charge the remote controller via supplied charger.

Controlling Camera
Shoot videos or images and adjust camera settings via the Shutter Button, Camera Settings Dial, Playback Button, and Video Recording Button on the remote controller.

- Camera Settings Dial
Turn the dial to quickly adjust camera settings such as ISO and shutter speed without letting go of the remote controller. Move the dial button to the left or right to view the pictures or videos in playback mode. - Playback Button
Press to view images or videos that have already been captured. - Shutter Button
Press to take a photo. If burst mode is activated, multiple photos will be taken with a single press. - Recording Button
Press once to start recording video, then press again to stop recording.
Controlling Aircraft
The Remote Controller is set to Mode 2 by default.
- Stick Neutral / Mid Point: Control sticks of the Remote Controller are placed at the central position.
- Move the Stick: The control stick is pushed away from the central position.

Flight Mode Switch
Toggle the switch to select the desired flight mode. You may choose between P mode, F mode, and A mode.


- P mode (Positioning): P mode works best when the GPS signal is strong. There are three different states of P mode, which will be automatically selected by the Inspire 1 RAW depending on GPS signal strength and Vision Positioning sensors:
- P-GPS: GPS and Vision Positioning are both available, and the aircraft uses GPS for positioning.
- P-OPTI: Vision Positioning is available but the GPS signal is not. The aircraft uses only Vision Positioning for hovering.
- P-ATTI: Neither GPS nor Vision Positioning is available, and the aircraft uses only its barometer for positioning, controlling only altitude.
- A mode (Attitude): The GPS and Vision Positioning System is not used for holding position. The aircraft only uses its barometer to maintain altitude. If it is still receiving a GPS signal, the aircraft can automatically return home if the Remote Controller signal is lost and if the Home Point has been recorded successfully.
- F mode (Function): Intelligent Orientation Control (IOC) is activated in this mode.
The Flight Mode Switch is locked in P mode by default. To unlock the switch, launch the DJI GO app, enter the "Camera" page, tap "MODE," and then activate 'Multiple Flight Mode'.
Transformation Switch / RTH Button
The Transformation Switch / RTH Button combination serves two functions. Toggle the switch up or down to raise or lower the landing gear, or press the button to activate the Return to Home (RTH) procedure.
Transformation Switch:
This switch has two positions.
Raise: Raises the landing gear to its uppermost position.

Lower: Lowers the landing gear to its lowest position for landing.

Warning: Do not raise the landing gear when the aircraft is on the ground. Ensure the landing gear is lowered before landing.
RTH Button:
Press and hold this button to start the Return to Home (RTH) procedure. The LED around the RTH Button will blink white to indicate the aircraft is entering RTH mode. The aircraft will then return to the last recorded Home Point. Press this button again to cancel the RTH procedure and regain control of the aircraft.
Connecting Mobile Device

- Tilt the Mobile Device Holder to the desired position.
- Press the button on the side of the Mobile Device Holder to release the clamp, then place your mobile device into the clamp.
- Adjust the clamp to secure your mobile device.
- Connect your mobile device to the remote controller with a USB cable. Plug one end of the cable into your mobile device, and the other into the USB port on the back of the remote controller.
Optimal Transmission Range
The signal transmission between aircraft and remote controller perform best within the range that displayed in the picture shown below:

Ensure the aircraft is flying within the optimal transmission range. Adjust the distance and position between the operator and the aircraft to achieve optimal transmission performance.
Dual Remote Controller Mode
More than one remote controller can connect to the same aircraft in Dual Remote Controller mode. In Dual Controller mode, the "Primary" remote controller operator controls the orientation of the aircraft, while the "Secondary" remote controller controls the movement of the gimbal and camera operation. When multiple "Secondary" remote controllers (maximum of 6) are connected to the aircraft, only the first connected "Secondary" remote controller is able to control the gimbal, while the remaining "Secondary" remote controllers can view the live video feed from the aircraft and set camera parameters, but they cannot control the gimbal.

In single remote controller mode, the gimbal dial on the remote controller controls the pitch movement of the camera. However, pan movement of the camera cannot be controlled in this mode.
Setting Up Dual Remote Controllers Mode
Dual Remote Controllers mode is disabled by default. Users must enable this feature on the "Primary" remote controller through the DJI GO app. Follow these steps for setup:
- Primary Remote Controller:
- Connect the remote controller to your mobile device and launch the DJI GO app.
- Go to the Camera page, and tap "Settings" to enter the remote controller settings window.
- Tap "Set RC Status" to enable Primary-and-Secondary mode.
Select "Primary" in the "Set RC Status" section to set the remote controller as "Primary" remote controller.

- Enter the connection password for the "Secondary" remote controller.
- Secondary Remote Controller:
Tap "Search for Primary Controller" to search for the "Primary" remote controller.

WARNING: Remote controller cannot link to the aircraft if the remote controller is set as “Secondary”. Meanwhile, the “Secondary” remote controller cannot control the orientation of the aircraft. Reset the remote controller to “Primary” in DJI GO app if you wish to link the remote controller to the aircraft.
Search the “Primary” remote controller in the surrounding area in the “Request Control” section.

Select the "Primary" remote controller from the "Primary RC List" and input the connection password to connect to the desired "Primary" remote controller.

Warning: The remote controller cannot link to the aircraft if set as "Secondary." The "Secondary" remote controller cannot control the orientation of the aircraft. Reset the remote controller to "Primary" in the DJI GO app if you wish to link the remote controller to the aircraft.
Remote Controller Status LED
The Status LED reflects the connection status between the Remote Controller and the aircraft. The RTH LED shows the Return to Home status of the aircraft. The table below contains details on these indicators.


WARNING: The Remote Status Indicator will blink red and sound an alert when the battery level is critically low.
Linking the Remote Controller
The remote controller is linked to your aircraft before delivery. Linking is only required when using a new remote controller for the first time. Follow these steps to link a new remote controller:
- Power on the remote controller and connect it to the mobile device. Launch the DJI GO app.
- Power on the Intelligent Flight Battery.
Enter "Camera" view and tap on, then tap the "Linking Remote Controller" button as shown below.

The remote controller is ready to link. The Remote Controller Status Indicator will blink blue and emit a "beep" sound.

Locate the Linking button on the front of the aircraft, as shown in the figure below. Press the Linking button to start linking. The Remote Controller Status Indicator will display solid green if the link is successful.

Note
- The remote controller cannot link to the aircraft if the remote controller is set as "Secondary". Meanwhile, the "Secondary" remote controller cannot control the orientation of the aircraft.
- Reset the remote controller to "Primary" in the DJI GO app if you wish to link the remote controller to the aircraft.
- The remote controller will disconnect from the linked aircraft if a new remote controller is linked to the same aircraft.
Used with the DJI Focus
DJI Focus is fully compatible with the Zenmuse X5R series gimbal and camera. No calibration is required when using the Focus with the Zenmuse X5R camera.
Connection
To allow communication between the two devices, connect the communication port on the Focus remote controller to the CAN Bus port on the Inspire 1 remote controller using the dedicated CAN Bus cable.

Notes: Ensure that the Zenmuse X5R camera is set in AF mode.
Aircraft Status Indicator Description

Intelligent Flight
Intelligent Flight mode includes Course Lock, Home Lock, Point of Interest (POI), Follow Me, and Waypoints features to assist users in creating professional shoots during the flight. Course Lock and Home Point Lock help to lock the orientation of the aircraft, allowing the user to focus more on other operations. Point of Interest, Follow Me, and Waypoints mode enable the aircraft to fly automatically according to the pre-set flight maneuvers.
| Mode | Description |
|---|---|
| Course Lock | Lock the current nose direction as the aircraft’s forward direction. The aircraft will move in the locked directions regardless of its orientation (yaw angle). |
| Home Lock | Pull the pitch stick backward to move the aircraft toward its recorded Home Point. |
| Point of Interest | The aircraft will orbit around the subject automatically to allow the operator to be more focused on framing their shot on the subject in Point of Interest. |
| Waypoints | Record a flight path, then the aircraft will fly along the same path repeatedly while you control the camera and orientation. The flight path can be saved and re-applied in the future. |
Enable Multiple Flight Mode by launching the DJI GO app > Camera View > ![]() > Advanced Settings > Multiple Flight Mode before using the Intelligent Flight Mode for the first time.
> Advanced Settings > Multiple Flight Mode before using the Intelligent Flight Mode for the first time.
Setup Guide
- To set up your DJI Inspire 1 Raw Drone, start by fully charging the batteries and ensuring all components are securely attached.
- Begin with assembling the drone's arms and propellers, then attach the Zenmuse X5R camera to the gimbal mount.
- Download and install the DJI GO app on your mobile device or tablet, then pair it with the remote controller.
- Configure the drone settings within the app, including calibrating the compass and setting up the camera preferences.
- Perform a quick systems check before your first flight to ensure everything is functioning properly.
How to Update Firmware DJI Inspire 1 Raw Drone
Follow the process described below to upgrade the aircraft, remote controller, and battery.
Updating the Aircraft Firmware
Step 1: Check Battery and SD Card Capacity
Ensure the Intelligent Flight Battery has at least 50% power and there is at least 100 MB of free space on the SD card.
Step 2: Prepare the Firmware Update Package
- Download the firmware update package from the official DJI website (http://www.dji.com/product/inspire-1-pro-and-raw).
- Insert the SD card into your PC. Extract all downloaded files into the root directory of the SD card. Remove the SD card from your PC. Ensure the aircraft is powered off, then insert the SD card into the SD card slot on the camera.
Step 3: Update the Aircraft
- Ensure the remote controller is powered off and then power on the aircraft. The upgrade will begin automatically after the aircraft is powered on.
- It will take approximately 25 minutes to complete the firmware update. The camera status indicator will blink green and red to indicate the upgrade is in progress and will stop blinking when the update is complete with success.
- Check the upgrade status by opening the "xt" file that is automatically generated after the update. The update is successful if the text "result: successful" is in the document. Try upgrading the firmware again if the text "result: failed" is found, or the camera status indicator shows solid red.
Note: Firmware update may reset various Main Controller Settings, such as the RTH Altitude and Maximum Flight Distance, to factory defaults. Before the update, take note of your preferred DJI GO 4 settings and readjust them after the update to suit your preference.
Updating the Remote Controller Firmware
Ensure the DJI GO app has been updated to v1.2.0 before updating the remote controller. The System Status bar in Camera View of the DJI GO App will flash several times if a firmware update is available. Follow these steps to update the firmware via the DJI GO App.
Step 1: Check Battery and SD Card Capacity
- The remote controller has at least 50% battery level.
- Your mobile device is able to access the internet.
- There is at least 30 MB of free space on your mobile device.
Step 2: Download and Update the Firmware
- Go to the DJI GO App > Camera View > System Status bar > Overall Status. Tap Download the firmware update package to download and update the firmware. Track the update progress from the progress bar in the DJI GO App. The status LED on the remote controller will blink blue during the update and blink green when the update is complete with success.
Note:
Firmware update through the DJI GO app will not work with older versions of the remote controller firmware. If the firmware update fails, follow the instructions below to update the firmware using the traditional method:
- Update the latest firmware package files from the DJI official website.
- Extract all downloaded files into the root directory of an SD card or USB flash drive.
- Turn off the remote controller, insert the SD card into an SD card reader or the USB disk into the remote controller USB port while the remote controller is turned off.
- Power on the remote controller and wait 60 seconds until the upgrade begins. Do not power off the remote controller during the update.
- It will take approximately 10 minutes to complete the firmware update. The camera will emit a beeping sound and the Status LED on the remote controller will show solid blue to indicate the update is in progress. The Status LED on the remote controller will show solid green and the beeping sound will stop if the upgrade is completed with success.
- If you do not have an SD card reader, you may insert the SD card into the gimbal and connect the gimbal with the remote controller to upgrade the remote controller.
Note
- You will only be able to update the remote controller firmware through the DJI GO app from this point onwards.
- Make sure to update your aircraft and gimbal before updating the Remote Controller. Otherwise, the Remote Controller will be disconnected from the aircraft due to firmware version mismatch.
Updating Intelligent Flight Battery Firmware
The Intelligent Flight Battery is upgraded during the aircraft firmware upgrade process. It is recommended to keep the upgrade package files in your SD card. The upgrade will start automatically after power cycling the aircraft.
Notes
- Ensure there is only one firmware package file stored on your SD card.
- Only storage devices that are formatted for FAT32 and exFAT file systems are supported for aircraft and remote controller firmware updates.
- Ensure the internet connection of your mobile device is stable when downloading the firmware update package.
- Turn on Airplane Mode on your mobile device before updating the firmware, as any incoming calls may disrupt the update process.
- Do not perform firmware updates while the aircraft is still flying in the air. Only carry out firmware updates when the aircraft is landed.
- Be sure to update the remote controller's firmware to the latest version after you upgrade the aircraft's firmware.
- The remote controller may become unlinked from the aircraft after updating. Re-link the remote controller and aircraft.
- Confirm the update results based on the blinking pattern of the camera status indicator or gimbal sound. It is normal for the aircraft to emit sounds or for the LED to blink during the update process.
Troubleshooting
- Cause: Battery not inserted properly, battery drained, or power button malfunction.
- Solution:
- Ensure the battery is inserted correctly.
- Hold the power button for a few seconds until the lights turn on.
- Cause: Signal interference or not paired correctly.
- Solution:
- Ensure that both the controller and drone are powered on.
- Rebind the controller to the drone through the DJI GO app.
- Cause: Calibration issues or hardware malfunction.
- Solution:
- Recalibrate the gimbal through the DJI GO app.
- Check for obstructions that may prevent the gimbal from moving freely.
- Cause: Obstructed view of the sky, GPS settings turned off.
- Solution:
- Move to an open area where the sky is visible with fewer obstructions.
- Ensure the GPS mode is turned on in the DJI GO app.
DJI Inspire 1 Raw Drone Pros & Cons
Pros
- High-quality RAW image capture and 4K video recording.
- 360-degree rotating gimbal for versatile shooting angles.
- Long flight times up to 18 minutes.
- Advanced stabilization systems for smooth footage.
- Dual transmitter support for enhanced teamwork.
Cons
- High cost, making it less accessible for hobbyists.
- Complex setup and operation require some learning curve.
- Large size and weight make it less portable than smaller drones.
- Battery life could be longer given its professional grade status.
Customer Reviews
Customers praise the DJI Inspire 1 Raw for its exceptional image quality and robust build. Many professional photographers and videographers find it indispensable for their work due to its ability to capture high-resolution RAW images and smooth 4K video. However, some users have noted that it requires significant investment both in terms of money and time to learn how to use it effectively.
Faqs
What is the maximum flight time of the DJI Inspire 1 Raw Drone?
Can I use different cameras with the DJI Inspire 1 Raw?
How far can I transmit video with the Lightbridge system?
Is the DJI Inspire 1 Raw suitable for beginners?
Can multiple people control the drone simultaneously?
How do I update the firmware on my DJI Inspire 1 Raw?
What is the maximum speed of the DJI Inspire 1 Raw Drone?
How do I calibrate the gimbal on my DJI Inspire 1 Raw?
Can I use the DJI Inspire 1 Raw in harsh weather conditions?
What kind of batteries does the DJI Inspire 1 Raw use?
Leave a Comment