Dji Wireless Ronin Thumb Controller V1.0 User Manual | Specs & Settings
Content
Introduction
DJI Wireless Ronin Thumb Controller V1.0 is designed specifically for DJI Roninseries hand held gimbals. It provides a simple, intuitive interface for controlling the gimbal’s pan, tilt, and roll motions. The pressure-sensative thumb stick and the easy-to-read OLED display give Ronin users more control than ever before. The Thumb Controller communicates with the Ronin-M via a preinstalled internal receiver. An external receiver is needed when the Thumb Controller is used with the Ronin.
In the Box
Check to ensure that all of the following items are included in the package. If any items are missing, contact DJI or your local dealer.
The following items are included with the Thumb Controller for the Ronin-M:
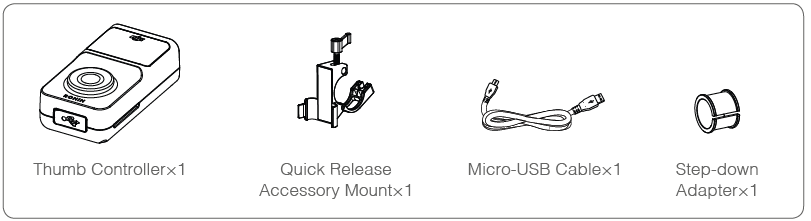
The following items are included with the Thumb Controller for the Ronin:

Specifications
| Specification | Value |
|---|---|
| Type | RONIN TC |
| Supported Devices | Ronin, Ronin-M |
| Operating Frequency | 2.415 GHz ~ 2.454 GHz |
| Working Current | <100 mA @ 3.3 V |
| Communication Distance | 200 ft. (60 m) |
| Battery Life | 18 h |
| Standby Life | 20 h |
| Operating Temperature | -4°F to 122°F (-20°C ~ 50°C) |
| Battery Type | LiPo |
| Battery Voltage | 3.7 V |
| Battery Capacity | 1150 mAh |
| Charge Time | 2 h |
| Weight | 1.75 oz. (50 g) |
| Size | 2.7 x 1.4 x 0.9 in. (68 x 36 x 23 mm) |
| Mounting Bracket Diameter | 1.0 in. or 1.2 in. (25 mm or 30 mm) |
| Display | White OLED, 0.96 inch, Dots: 128 x 64 |
Thumb Controller of DJI Wireless Ronin Thumb Controller V1.0
- Power Button
Press and hold the power button to turn on/off the Thumb Controller. - Status Indicator
Indicates the status of the Thumb Controller. - OLED Display
Displays the menu of the Thumb Controller. Pressure-Sensative
Thumb Stick Transmits the user’s input to the pressure sensor.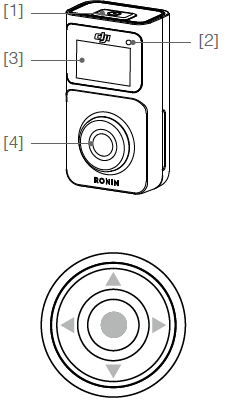
- Micro-USB Port
For charging the Thumb Controller and upgrading its firmware. Override Button
Allows a reset of the Thumb Controller following a failed update process.
External Receiver (For Ronin Only)
- CAN Ports
Connects the receiver to the Ronin. - Bind Button
Connects the Thumb Controller to the Ronin. - LED Indicator
Indicates the status of the receiver. Micro-USB Port
For upgrading the firmware._dji_wireless_ronin_thumb_controller_v1.0.png)
Description
The DJI Wireless Ronin Thumb Controller V1.0 is designed with the user in mind, offering a robust yet lightweight build that fits comfortably in the hand. The controller features dual control sticks that allow for precise control over the gimbal's movements, while the customizable buttons enable users to tailor the control layout to their specific needs. The ergonomic design ensures that the controller remains comfortable even during extended use, making it ideal for long shooting sessions.
The wireless connectivity feature allows for greater flexibility and reduced clutter, freeing up the user to move around freely without being tethered to the gimbal. This makes it particularly useful for complex camera movements and dynamic shooting scenarios.
Installation
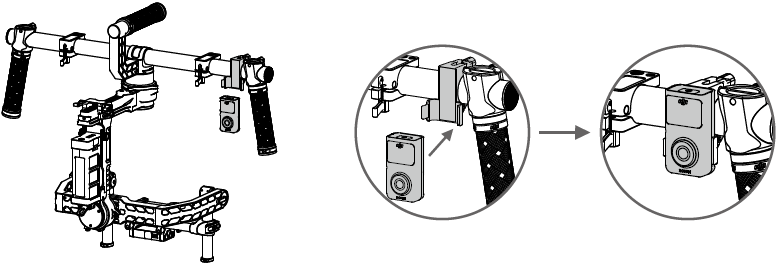
Installing the Thumb Controller
Install the quick-release accessory mount by clamping it around the handlebar of the Ronin and tightening the screw. Only use the step-down adapter when installing onto a Ronin-M.
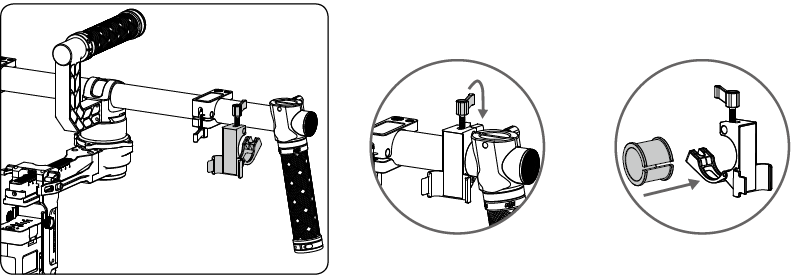
Clip the Thumb Controller into the quick-release accessory mount and ensure that it is secure.
Installing the External Receiver (For Ronin Only)
- Use the 4-pin cable to connect the CAN port on the Ronin to the CAN 1 or CAN 2 port on the receiver.
Use the provided adhesive tape to secure the receiver on the Ronin.
_dji_wireless_ronin_thumb_controller_v1.0.png)
Binding the Thumb Controller to the Gimbal
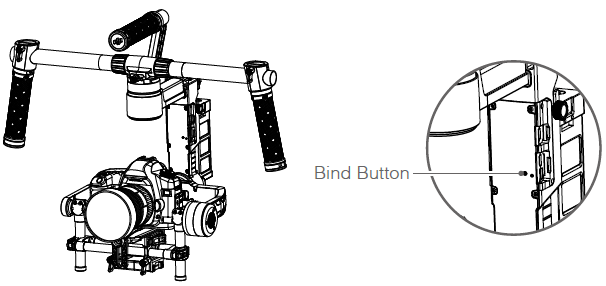
Binding to the Ronin-M
- Turn on the Ronin-M.
- Press the Ronin-M’s Bind Button (shown below) one time. The LED indicator on the Ronin-M will rapidly blink green.
- Turn on the Thumb Controller. If the LED indicator on the Ronin-M and the LED indicator on the Thumb Controller both glow solid green, they have been successfully connected.
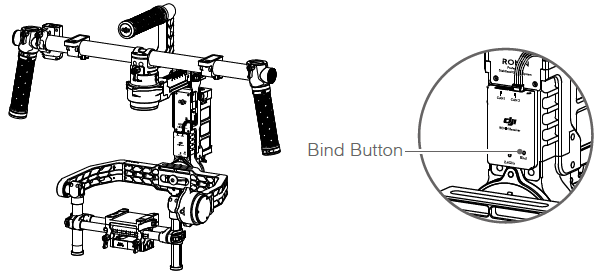
Binding to the Ronin
- Turn on the Ronin.
- Press the Bind Button on the receiver one time. The LED indicator on the receiver will rapidly blink green.
- Turn on the Thumb Controller. If the LED indicator on the receiver and the LED indicator on the Thumb Controller both glow solid green, they have been successfully connected.
Warning: The binding process only needs to be performed one time, unless the bind button is pressed or the Ronin/Ronin-M needs to be connected to another Thumb Controller.
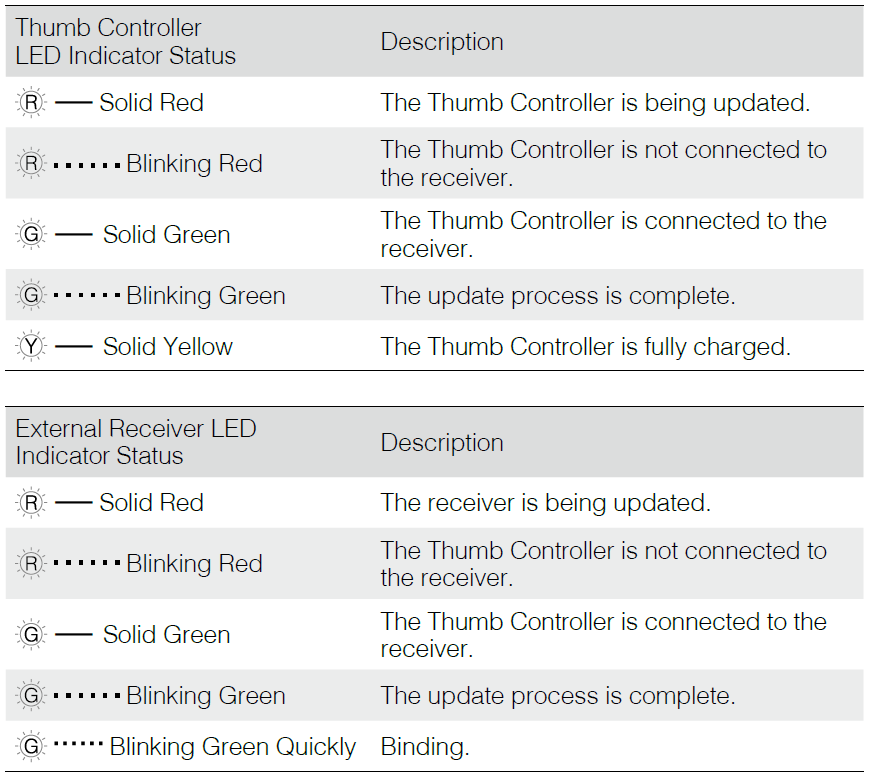
Indicator Status
Using the Thumb Controller
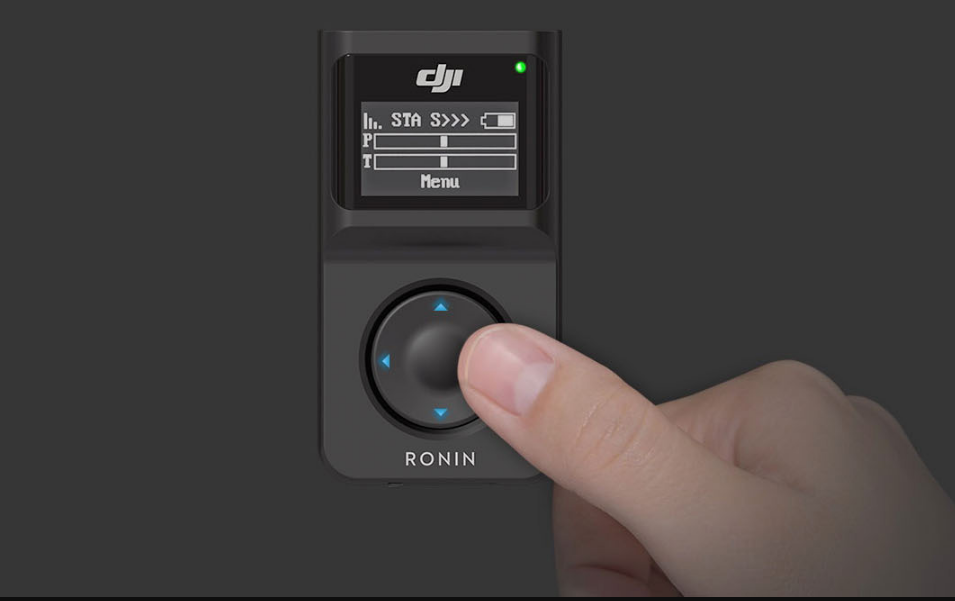
The OLED screen displays information about the Thumb Controller and gimbal when it is turned on. The main user interface of the device is shown below:
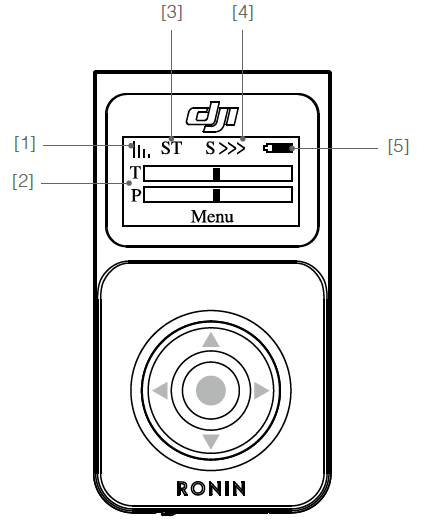
- Signal Strength
- Pan/Tilt/Roll Axis Position
- SmoothTrack Mode
- SmoothTrack Follow Speed
- Battery Level
To enter the Main Menu, press and hold the center of the thumb stick. The default settings are underlined on the diagram below.
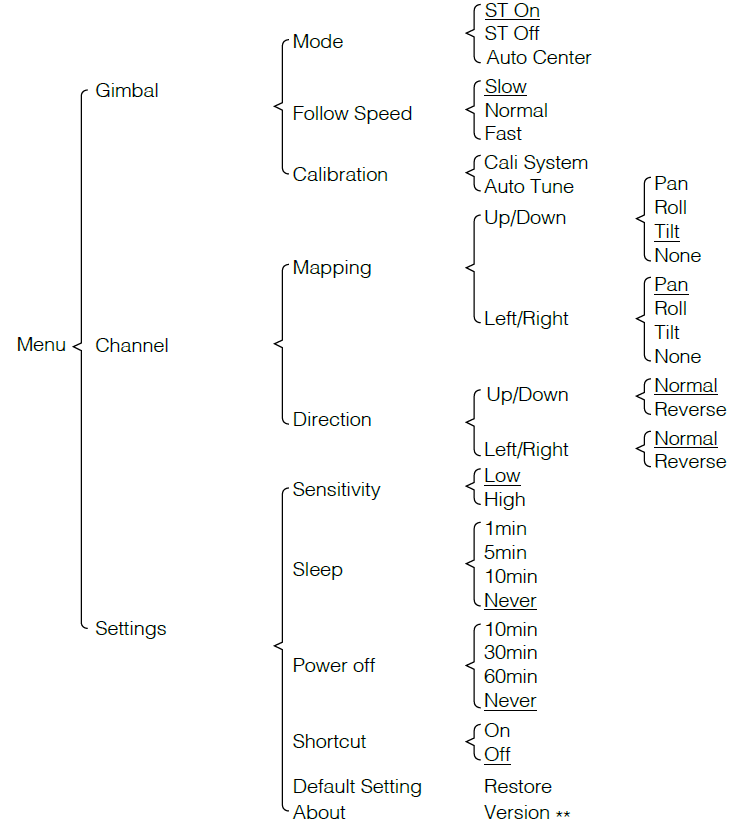
The Main Menu contains three tabs: Gimbal, Channel and Settings.
Press up/down on the thumb stick to select an item. Press right to view and select options, and press left to return to the Main Menu.
DJI Wireless Ronin Thumb Controller V1.0 Gimbal
- Mode
- ST Off: SmoothTrack is off. The Thumb Controller is free to control the pan axis. The gimbal will stop and hold the last position determined by the pan axis control stick, without applying SmoothTrack.
- ST On: SmoothTrack is on. The Thumb Controller is free to control the pan axis. The gimbal will stop and hold the last position determined by the pan axis control stick, while applying SmoothTrack.
- Auto Center: SmoothTrack is on. The gimbal will apply SmoothTrack when reorienting and resetting the pan angle to the forward-facing direction after the pan axis control stick is released.
- Follow Speed
The Follow Speed tab allows you to select the SmoothTrack speed.
There are 3 possible speeds: Fast, Normal, and Slow. The value of each speed can be adjusted in the DJI Assistant app or the PC/MAC Assistant. - Calibration
“Cali System” should be used if there is perceptible drift on any axis. The calibration procedure should take approximately 90 seconds to complete. Selecting “Auto Tune” will automatically adjust each motor’s stiffness settings to achieve an optimal balance. This process should take approximately 20 seconds to complete.
The gimbal cannot be controlled by the Thumb Controller or the remote controller during calibration. Do not touch or move the gimbal during either process.
Channel
- Mapping
Allows you to assign control of the pan, tilt, or roll motion of the gimbal to the up/down or left/right input of the thumb stick.
WARNING
By default, the up/down input on the thumb stick controls the tilt axis movement of the gimbal and the left/right input on the thumb stick controls the pan axis movement of the gimbal.
If you reassign the control input of either axis, only the most recent assignment will be valid. - Direction
Under the ‘Normal’ setting, the gimbal moves in the same direction of the input of the thumb stick. (Default settings: up/down tilt, left/right pan) Selecting ‘Reverse’ for the up/down or left/right input will reverse the controls respectively.
Settings
- Sensitivity
There are two sensitivity settings for the Thumb Controller: High/Low. - Sleep
If the Thumb Controller has been idle for longer than the specified amount of time, the OLED display will be turned off. - Power Off
If the Thumb Controller has been idle for longer than the specified amount of time, it will be turned off. - Shortcut
Enabling this allows you to switch SmoothTrack modes and change the SmoothTrack speed quickly by double tapping the thumb stick. - On the Home Screen:
Double tap right to select ST (SmoothTrack) Off. Double tap left to select ST (SmoothTrack) On. The “ST” icon will appear. Double tap down to select Auto Center. The “STA” icon will appear. Double tap up to change the Follow Speed. The icons “S>>>”, “S>>” and “S>” represent Fast, Normal, and Slow respectively. - Default Settings
Restores all settings to the factory defaults. - About
Displays the firmware version that is currently installed on the Thumb Controller.
DJI Assistant App Tuning
You can adjust various parameters in the DJI Assistant app.
Turn on the Thumb Controller and the gimbal, then launch the DJI Assistant app. To meet your specific requirements, you can also access advanced functions through the Assistant app. In the Control Menu, you can adjust the Deadband, Maximum Speed, Smoothing, and Controller Priority.
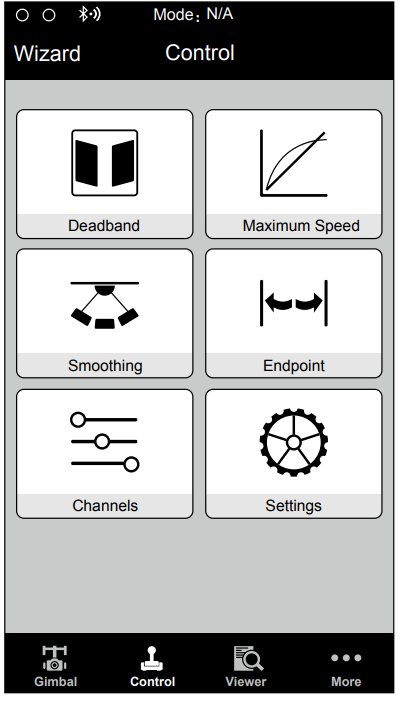
WARNING: Controller Priority: If both the Thumb Controller and a remote controller simultaneously send control signals to the gimbal, the input from the selected controller will take priority.
Setup Guide
To set up the DJI Wireless Ronin Thumb Controller V1.0, follow these steps:
- Ensure that the gimbal and controller are fully charged before use.
- Turn on both the gimbal and the controller.
- Pair the controller with the gimbal by following the on-screen instructions or using the DJI app.
- Configure the customizable buttons to your preferred settings through the DJI app or on-gimbal menu.
- Test the controller to ensure all buttons and sticks are functioning correctly.
Refer to the user manual for detailed instructions and troubleshooting tips.
DJI PC/MAC Assistant Tuning
- The DJI PC/MAC Assistant allows you to tune the Thumb Controller and update its firmware.
- The tuning procedures offered through the DJI Assistant app are the same as those offered through the DJI PC/MAC Assistant. There is no need to adjust the settings in both applications.
- The DJI Assistant app and the PC/MAC Assistant program cannot be connected to the Thumb Controller at the same time. If you are running the Assistant app on your mobile device, do not connect the Micro-USB cable to your computer.
Settings
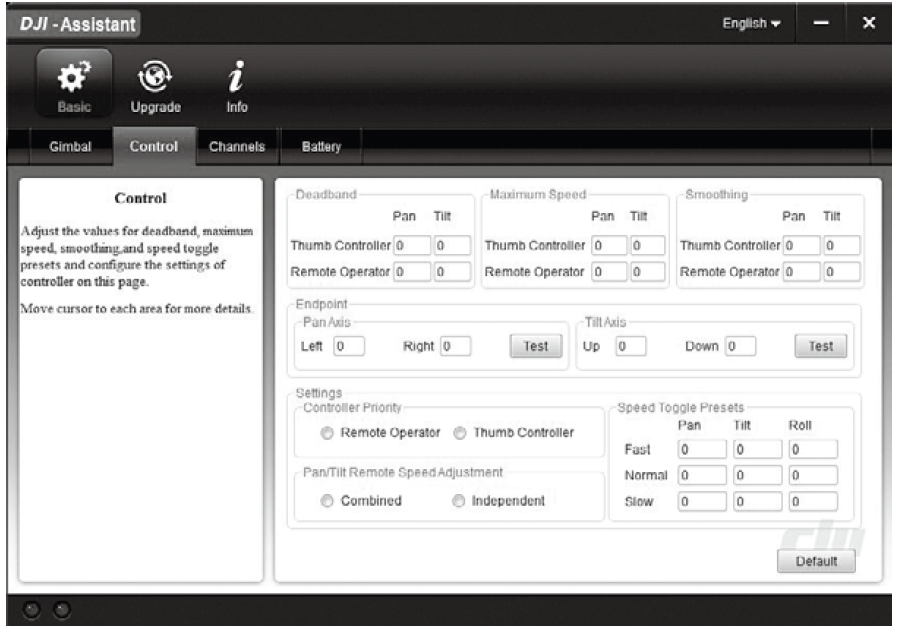
In the Control Menu, you can adjust the Deadband, Maximum Speed, Smoothing, and Controller Priority.
Updating the Thumb Controller and the Receiver

You can find the latest firmware version information on this page and update the firmware by following the steps below:
- Use the Micro-USB cable to connect the Thumb Controller to your computer, then wait until the indicator in the Assistant blinks blue.
- Click “Update.”
- Wait for the download to finish.
- Click “Update” again and then click “Confirm.”
- After the update is complete, turn the Thumb Controller off and then on again.
- Repeat this process with the Ronin-M or the Ronin External Receiver.
WARNING
- Ensure your computer is connected to the internet.
- Close all antivirus programs and network firewalls.
- Ensure the device is turned on before beginning the update process.
- Do not disconnect the USB cable until the update is complete.
If the Thumb Controller fails to update, follow the steps below:
- Press and hold the override button.
- Use the USB cable to connect the Thumb Controller to the computer.
- Now, release the override button and wait for the connection to be established.
- Click the “Update” button after the Thumb Controller has been successfully connected to the DJI PC/MAC Assistant. The Thumb Controller will be operate normally after the update is complete.
Disclaimers and Warnings
By using this product, you hereby agree to this disclaimer and signify that you have read it in its entirety. You agree that you are responsible for your own conduct, for all content that is created using this product, and for any consequences that may arise from either. You agree to use this product only for purposes that are proper and in accordance with local regulations, stated terms, and all applicable polices and guidelines.
By reading this disclaimer, you also agree that:
- Any part of this disclaimer is subject to change without prior notice. Refer to www.dij.com for the latest version.
- DJI reserves the right of final interpretation of this disclaimer.
As DJI has no control over use, setup, final assembly, modification, or misuse of its products, no liability shall be assumed or accepted for any resulting damage or injury. By using, setting up, or assembling the product, the user accepts all resulting liability. DJI assumes no liability for damages or injuries incurred directly or indirectly from the use of this product.
DJI and Ronin are registered trademarks. All names of products, brands, etc. appearing in this manual are trademarks or registered trademarks of their respective owner companies. This product and manual are copyrighted by DJI, with all rights reserved. No part of this product or manual shall be reproduced in any form without the prior written consent or authorization of DJI. No patent liability is assumed with respect to the use of the product or information contained herein.
Troubleshooting
If you encounter any issues with your DJI Wireless Ronin Thumb Controller V1.0, here are some common problems and solutions:
- Connection Issues: Ensure that both devices are turned on and within range. Restart both devices if necessary.
- Button Malfunction: Check if the buttons are customized correctly through the DJI app. Reset button configurations if needed.
- Battery Life: Make sure the controller is fully charged before use. Avoid leaving it on for extended periods when not in use.
Always refer to the user manual or contact DJI support for further assistance.
Pros & Cons
Pros
- Ergonomic design for comfortable use.
- Wireless connectivity for greater flexibility.
- Long-lasting battery life.
- Customizable buttons for tailored control.
- Precise control over gimbal movements.
Cons
- Potential connection issues if not paired correctly.
- May require frequent battery charging with heavy use.
- Additional cost compared to wired controllers.
Customer Reviews
Customers have praised the DJI Wireless Ronin Thumb Controller V1.0 for its ease of use and enhanced control over their gimbals. Many have noted that the ergonomic design reduces fatigue during long shoots, while others appreciate the customizable buttons that allow them to streamline their workflow. However, some users have reported occasional connection issues, which can be resolved by following the troubleshooting steps provided.
Faqs
What is the estimated price of the DJI Wireless Ronin Thumb Controller V1.0?
How do I pair the DJI Wireless Ronin Thumb Controller V1.0 with my gimbal?
What is the battery life of the DJI Wireless Ronin Thumb Controller V1.0?
Can I customize the buttons on the DJI Wireless Ronin Thumb Controller V1.0?
How far can I move away from my gimbal while using the DJI Wireless Ronin Thumb Controller V1.0?
Is there any maintenance required for the DJI Wireless Ronin Thumb Controller V1.0?
What should I do if my DJI Wireless Ronin Thumb Controller V1.0 is not connecting to my gimbal?
Is there a warranty available for the DJI Wireless Ronin Thumb Controller V1.0?
Leave a Comment