Elenco Electronics Snap Circuit Projects1-101 Instruction Manual

Content
Introduction
The Elenco Electronics Snap Circuit Projects 1-101 is an engaging educational kit designed to introduce users to the fundamentals of electronics through hands-on learning. This kit includes a variety of colorful snap-together components that allow users to build over 100 exciting projects, such as alarms and flying saucers, without the need for tools. Ideal for ages 8 and up, it fosters creativity and problem-solving skills. The cost of the Snap Circuit Projects 1-101 kit is approximately $49.99.
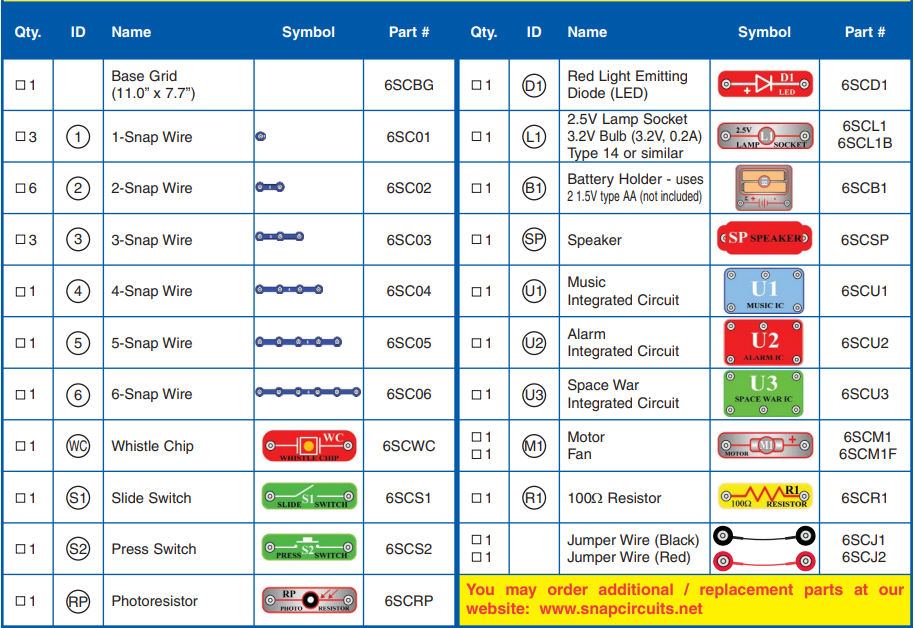
Elenco Electronics Snap Circuit Projects 1-101 Parts List
(Colors and styles may vary)
Symbols and Numbers
Note: If you have the more advanced Models SC-300, SC-500, or SC-750, there are additional part lists in the other project manuals.
Important: If any parts are missing or damaged, DO NOT RETURN TO RETAILER.
Specifications
The Elenco Electronics Snap Circuit Projects 1-101 kit includes:
- Over 60 pieces including resistors, capacitors, LEDs, and ICs
- More than 100 project ideas
- No soldering or tools required
- Easy-to-follow instructions and manual
- Durable and reusable components
- Perfect for educational purposes and hobbyists
WARNING TO ALL PARTS !
WITH A SYMBOL - Moving parts. Do not touch the motor or fan during operation. Do not lean over the motor. Do not launch the fan at people, animals, or objects. Eye protection is recommended.
WARNING: SHOCK HAZARD - Never connect Snap Circuits to the electrical outlets in your home in any way!
WARNING: CHOKING HAZARD - Small parts. Not for children under 3 years.
How To Use Elenco Electronics Snap Circuit Projects 1-101
The Electronic Snap Circuits kit has 101 projects. They are simple to build and understand. The Snap Circuits kit uses building blocks with snaps to build the different electrical and electronic circuits in the projects. Each block has a function: there are switch blocks, lamp blocks, battery blocks, different length wire blocks, etc. These blocks are in different colors and have numbers on them so that you can easily identify them. The circuit you will build is shown in color and with numbers, identifying the blocks that you will use and snap together to form a circuit.
For Example
This is the switch block which is green and has the marking on it as shown in the drawings. Please note that the drawing doesn’t reflect the real switch block exactly (it is missing the ON and OFF markings), but gives you the general idea of which part is being used in the circuit.

This is a wire block which is blue and comes in different wire lengths.
This one has the numbers 2, 3, 4, 5, or 6 on it depending on the length of the wire connection required.

There is also a 1-snap wire that is used as a spacer or for interconnection between different layers.

To build each circuit, you have a power source block number that needs two (2) “AA” batteries (not included with the Snap Circuits kit).
A large clear plastic base grid is included with this kit to help keep the circuit blocks properly spaced. You will see evenly spaced posts that the different blocks snap into. You do not need this base to build your circuits, but it does help in keeping your circuit together neatly. The base has rows labeled A-G and columns labeled 1-10.
Next to each part in every circuit drawing is a small number in black. This tells you which level the component is placed at. Place all parts on level 1 first, then all of the parts on level 2, then all of the parts on level 3, etc. The 2.5V bulb comes packaged separate from its socket. Install the bulb in the lamp socketwhenever that part is used.
Place the fan on the motor M1 whenever that part is used, unless the project you are building says not to use it. Some circuits use the jumper wires to make unusual connections. Just clip them to the metal snaps or as indicated.

Note: While building the projects, be careful not to accidentally make a direct connection across the battery holder (a “short circuit”), as this may damage and/or quickly drain the batteries.
Description
The Elenco Electronics Snap Circuit Projects 1-101 is a versatile electronics kit that allows users to explore various electrical circuits and principles. The kit includes a comprehensive manual with step-by-step instructions for each project, making it accessible even for beginners. The components are designed to snap together easily, eliminating the need for soldering or special tools.
This kit covers a wide range of topics including simple circuits, LED lights, capacitors, resistors, and more complex projects like radios and alarms. It is an excellent resource for homeschooling, classroom education, or personal learning.
About Your Snap Circuits Parts
(Part designs are subject to change without notice).
Note: If you have the more advanced Models SC-300, SC-500, or SC-750, there is additional information in your other project manual(s).
- The base grid functions like the printed circuit boards found in most electronic products. It is a platform for mounting parts and wires (though the wires are usually “printed” on the board.
- The blue snap wires are just wires used to connect other components, they are used to transport electricity and do not affect circuit performance. They come in different lengths to allow orderly arrangement of connections on the base grid.
- The red and black jumper wires make flexible connections for times when using the snap wires would be difficult. They also are used to make connections off the base grid (like the projects using water).
- The batteries (B1) produce an electrical voltage using a chemical reaction. This “voltage” can be thought of as electrical pressure, pushing electrical “current” through a circuit. This voltage is much lower and much safer than that used in your house wiring. Using more batteries increases the “pressure” and so more electricity flows.
- The slide switch (S1) connects (ON) or disconnects (OFF) the wires in a circuit. When ON it has no effect on circuit performance.
- The press switch (S2) connects (pressed) or disconnects (not pressed) the wires in a circuit, just like the slide switch does.
- Resistors, such as the 100Ω resistor (R1), “resist” the flow of electricity and are used to control or limit the electricity in a circuit. Increasing circuit resistance reduces the flow of electricity.
- The photoresistor (RP) is a light-sensitive resistor, its value changes from nearly infinite in total darkness to about 1000Ω when a bright light shines on it.
- A light bulb, such as in the 2.5V lamp (L1), contains a special wire that glows bright when a large electric current passes through it. Voltages above the bulb’s rating can burn out the wire.
- The motor (M1) converts elecricity into mechanical motion. Electricity is closely related to magnetism, and an electric current flowing in a wire has a magnetic field similar to that of a very, very tiny magnet. Inside the motor is three coils of wire with many loops. If a large electric current flows through the loops, the magnetic effects become concentrated enough to move the coils. The motor has a magnet inside so, as the electricity moves the coils to align them with the permanent magnet, the shaft spins.
- The speaker (SP) converts electricity into sound. It does this by using the energy of a changing electrical signal to create mechanical vibrations (using a coil and magnet similar to that in the motor), these vibrations create variations in air pressure which travel across the room. You “hear” sound when your ears feel these air pressure variations.
- The whistle chip (WC) contains two thin plates. When an electrical signal is applied across them they will stretch slightly in an effort to separate (like two magnets opposing each other), when the signal is removed they come back together. If the electrical signal applied across them is changing quickly, then the plates will vibrate. These vibrations create variations in air pressure that your ears feel just like sound from a speaker.
- The LED (D1) is a light emitting diode, and may be thought of as a special one-way light bulb. In the “forward” direction (indicated by the “arrow” in the symbol) electricity flows if the voltage exceeds a turn-on threshold (about 1.5V); brightness then increases. A high current will burn out the LED, so the current must be limited by other components in the circuit. LEDs block electricity in the “reverse” direction.
- Some types of electronic components can be super-miniaturized, allowing many thousands of parts to fit into an area smaller that your fingernail. These “integrated circuits” (ICs) are used in everything from simple electronic toys to the most advanced computers. The music, alarm, and space war ICs (U1, U2, and U3) in Snap Circuits® are actually modules containing specialized sound-generation ICs and other supporting components (resistors, capacitors, and transistors) that are always needed with them. This was done to simplify the connections you need to make to use them. The descriptions for these modules are given here for those interested, see the projects for connection examples:
Music IC:
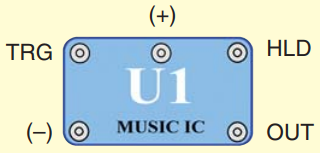
- (+) - power from batteries
- (–) - power return to batteries
- OUT - output connection
- HLD - hold control input
- TRG - trigger control input
Music for ~20 sec on power-up, then hold HLD to (+) power or touch TRG to (+) power to resume music.
Alarm IC:
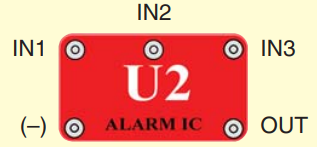
- IN1, IN2, IN3 - control inputs
- (–) - power return to batteries
- OUT - output connection
Connect control inputs to (+) power to make five alarm sounds, see project 22 for configurations.
Space War IC:
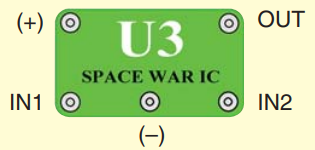
- (+) - power from batteries
- (–) - power return to batteries
- OUT - output connection
- IN1, IN2 - control inputs
Connect each control input to (–) power to sequence through 8 sounds.
Setup Guide
To operate the Elenco Electronics Snap Circuit Projects 1-101 kit:
- Unbox the kit and organize all components according to the manual.
- Choose a project from the manual and follow the step-by-step instructions.
- Connect the components by snapping them together as indicated in the instructions.
- Test your circuit to ensure it works as expected.
- Disassemble the circuit when finished and store components for future use.
Basic Troubleshooting
- Most circuit problems are due to incorrect assembly, always double-check that your circuit exactly matches the drawing for it.
- Be sure that parts with positive/negative markings are positioned as per the drawing.
- Sometimes the light bulbs come loose, tighten them as needed. Use care since glass bulbs can shatter.
- Be sure that all connections are securely snapped.
- Try replacing the batteries.
- If the motor spins but does not balance the fan, check the black plastic piece with three prongs on the motor shaft. Be sure that it is at the top of the shaft.
Elenco Electronics is not responsible for parts damaged due to incorrect wiring.
Note: If you suspect you have damaged parts, you can follow the Advanced Troubleshooting procedure on page 6 to determine which ones need replacing.
WARNING: Always check your wiring before turning on a circuit. Never leave a circuit unattended while the batteries are installed. Never connect additional batteries or any other power sources to your circuits. Discard any cracked or broken parts.
Batteries
- Use only 1.5V AA type, alkaline batteries (not incl.).
- Insert batteries with correct polarity.
- Non-rechargeable batteries should not be recharged. Rechargeable batteries should only be charged under adult supervision, and should not be recharged while in the product.
- Do not mix alkaline, standard (carbon-zinc), or rechargeable (nickel-cadmium) batteries.
- Do not mix old and new batteries.
- Remove batteries when they are used up.
- Do not short circuit the battery terminals.
- Never throw batteries in a fire or attempt to open its outer casing.
- Batteries are harmful if swallowed, so keep away from small children.
Advanced Troubleshooting
(Adult supervision recommended)
Elenco Electronics is not responsible for parts damaged due to incorrect wiring.
If you suspect you have damaged parts, you can follow this procedure to systematically determine which ones need replacing:
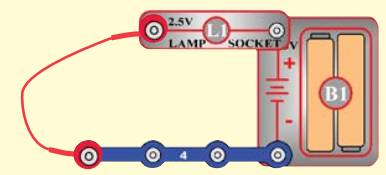
- 2.5V lamp (L1), motor (M1), speaker (SP), and battery holder (B1): Place batteries in holder and install bulb in lamp socket. Place the 2.5V lamp directly across the battery holder, it should light. Do the same with the motor (motor + to battery +), it should spin to the right at high speed. “Tap” the speaker across the battery holder contacts, you should hear static as it touches. If none work then replace your batteries and repeat, if still bad then the battery holder is damaged.
Jumper wires: Use this mini- circuit to test each jumper wire, the lamp should light.

Snap wires: Use this mini- circuit to test each of the snap wires, one at a time. The lamp should light.
- Slide switch (S1) and Press switch (S2): Build project #1, if the lamp (L1) doesn’t light then the slide switch is bad. Replace the slide switch with the press switch to test it.
- 100Ω resistor (R1) and LED (D1): Build project #7 except initially use the speaker (SP) in place of the LED, you will hear static if the resistor is good. Then replace the speaker with the LED and see that it lights.
- Alarm IC (U2): Build project #17, you should hear a siren. Then place a 3-snap wire between grid locations A1 and C1, the sound is different. Then move the 3-snap from A1-C1 to A3-C3 to hear a 3rd sound.
- Music IC (U1): Build project #74 but use the press switch (S2) in place of the photoresistor (RP). Turn it on and the LED (D1) flickers for a while and stops, it resumes if you press and hold down the press switch. Then touch a 3-snap wire across base grid points A1 and C1 and the flickering resumes for a while.
- Space war IC (U3) and photoresistor (RP): Build project #19, both switches (S1 and S2) should change the sound. Then replace either switch with the photoresistor, waving your hand over it should change the sound.
- Whistle chip (WC): Build project #61 and if there is light on the photoresistor (RP) then you will hear sound from the whistle chip.
Note: If you have the more advanced models SC-300, SC-500, or SC-750, there are additional tests in your other project manual(s).
Pros & Cons
Pros:
- Easy to use and assemble without soldering or tools.
- Comprehensive manual with step-by-step instructions.
- Durable and reusable components.
- Covers a wide range of electrical principles and projects.
- Affordable price point compared to other electronics kits.
Cons:
- Limited to basic projects; may not be suitable for advanced learners.
- Some users may find the components fragile if not handled carefully.
- The manual can be dense; some projects may require patience and multiple attempts to complete correctly.
Customer Reviews
Customer reviews for the Elenco Electronics Snap Circuit Projects 1-101 are generally positive, with many praising its ease of use and educational value. Some common compliments include:
- Excellent introduction to electronics for beginners.
- High-quality components that are durable and reusable.
- Clear instructions make it easy for kids and adults alike to learn.
Common complaints include:
- Some users find certain projects too simple or repetitive.
- A few instances of components arriving damaged or missing.
Faqs
What is the age range for the Elenco Electronics Snap Circuit Projects 1-101?
How many projects can I build with this kit?
Are the components reusable?
What type of projects can I expect to build with this kit?
Is this kit suitable for homeschooling or classroom education?
How long does it typically take to complete a project?
Can I purchase additional components or expansion kits?
Is there customer support available if I encounter any issues?
Leave a Comment