Emeril Lagasse Power AirFryer 360 XL User Manual | Specs & Features
Content
Introduction of Emeril Lagasse Power AirFryer 360 XL
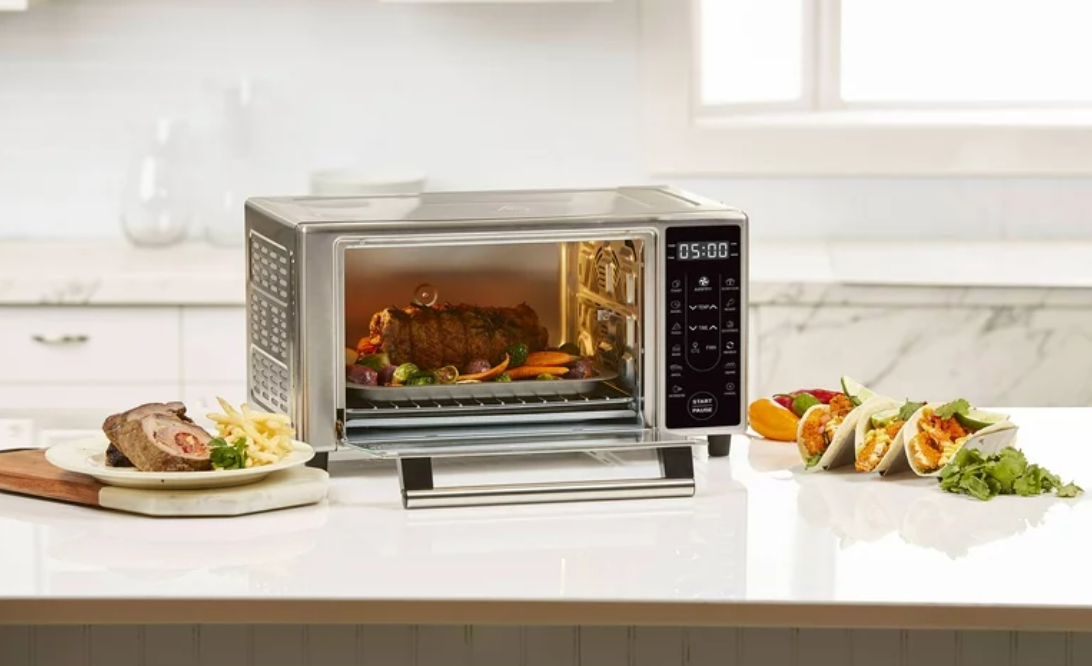
The Lagasse Power AirFryer 360 XL is the ultimate kitchen appliance for those who love fried food but want a healthier alternative. This powerful Emeril Lagasse Power AirFryer 360 XL has a large capacity of 932 cubic inches, making it perfect for cooking meals for the whole family. With its sleek design and modern technology, this air fryer is a must-have for any kitchen. It is expected to be launched in the market with an estimated price range of $300 to $350.
Unit Specifications of AirFryer 360 XL
- Model Number: S-AFO-004
- Supply Power: 120V 60HZ
- Rated Power: 1800W
- Capacity: Up to 1830 Internal Cubic Inches
- Temperature Range: 85° F – 450° F
- Display Type: LCD
Description of Lagasse Power AirFryer
The Emeril AirFryer 360 XL is a versatile kitchen appliance that can air fry, bake, roast, and broil your favorite foods. It has a temperature range of 120°F to 450°F, giving you the flexibility to cook a variety of dishes. The air fryer also comes with a cooking timer that can be set up to 60 minutes, ensuring that your food is cooked to perfection. The Emeril Lagasse Power AirFryer 360 XLsize of the air fryer allows you to cook a 12-inch pizza or a whole chicken with ease. The removable crisper tray and non-stick baking pan make cleaning a breeze.
Parts & Accessories of Power AirFryer 360 XL
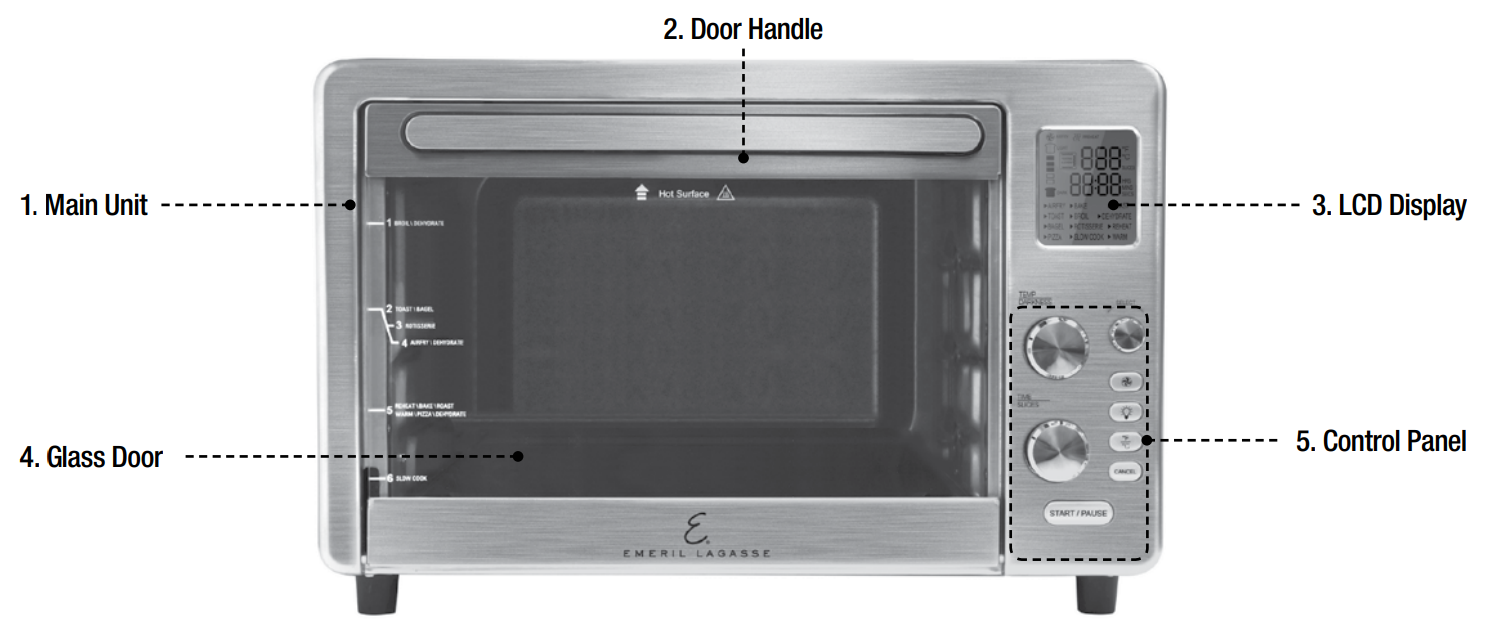
- MAIN UNIT: Features sturdy stainless steel construction throughout. Cleans easily with a damp sponge or cloth and a mild detergent. Avoid harsh, abrasive cleaners. NEVER submerge this Unit in water or liquids of any kind.
- DOOR HANDLE: Remains cool during cooking. Always use the handle and avoid touching the Glass Door. The Door may become very hot during the cooking process and can cause injury.
- LCD DISPLAY: Used for selecting, adjusting programming, or monitoring cooking programs.
- Illuminated BLUE when in selection or standby mode.
- Illuminated ORANGE indicates when program is actively operating.
- GLASS DOOR: Sturdy, durable tempered glass keeps heat in and helps assure even heat distribution to food. NEVER cook with this door in the open position.
- CONTROL PANEL: Contains the Control Buttons and Knobs (see The Control Panel, p. 10).
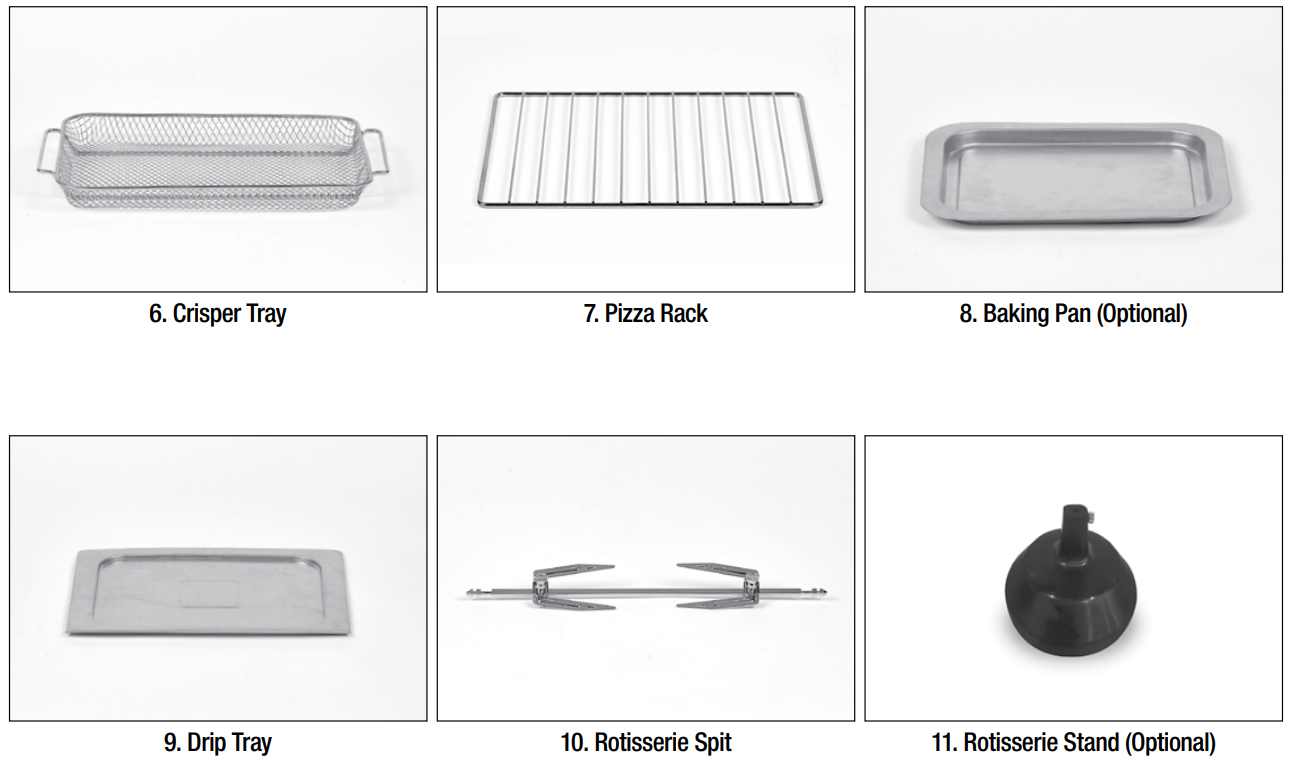
- CRISPR TRAY: Use for cooking oil-free fried foods and broiling. Quantity may vary.
- PIZZA RACK: Use for toasting breads, bagels, and pizzas; baking; grilling; and roasting. Quantity may vary.
- BAKING PAN (OPTIONAL): Use for baking and reheating various foods. Deeper oven-safe pans and dishes may be used in the Emeril Lagasse Power AirFryer 360 XL.
CAUTION: When baking or cooking with baking pans and dishes, always place them on a rack. Never cook anything directly on the heating elements. - DRIP TRAY: Place in the bottom of the Unit just below the heating elements. Never use this Unit without the Drip Tray. The Drip Tray may become full when cooking large or juicy foods. When the Drip Tray becomes more than half full, empty it. To empty the Drip Tray while cooking: While wearing oven mitts, open the door and slowly slide the Drip Tray out of the Unit. Empty the Drip Tray and return it to the Unit. Close the door to finish the cooking cycle.
- ROTISSERIE SPIT: Used for cooking whole chickens and roasts of all types.
- ROTISSERIE STAND (OPTIONAL): Used for placing the Rotisserie Spit upright when removing hot food from the Unit. Using hand protection to avoid burns from hot food, carefully seat the Spit into the Stand, allowing the food to stand upright.
Warning
The rotisserie parts and other metal components of this Unit are sharp and will get extremely hot during use. Great care should be taken to avoid personal injury. Wear protective oven mitts or gloves.
Using the Accessories of Lagasse Power AirFryer 360 XL
WEIGHT CAPACITY OF ACCESSORIES
| Accessory | Function | Weight Limit |
|---|---|---|
| Pizza Rack | Varies | 11 lb (5000 g) |
| Crisper Tray | Air Fryer | 0.7 lb (350 g) |
| Rotisserie Spit | Rotisserie | 4 lb (1814 g) |
USING THE PIZZA RACK OF Lagasse Power AirFryer 360 XL
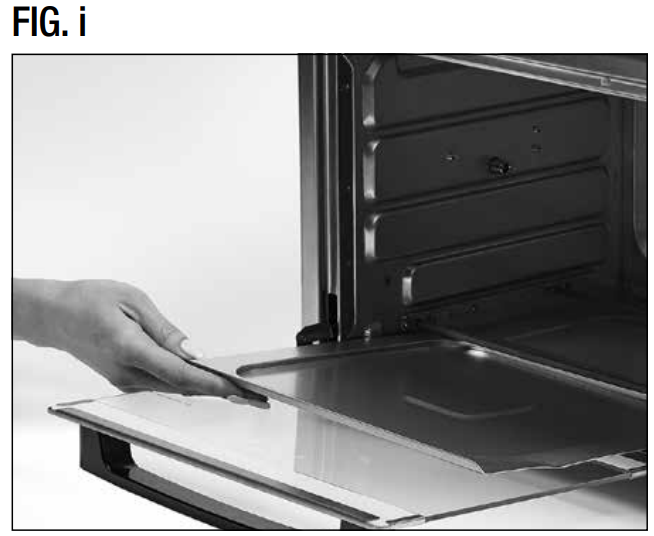
Insert the Drip Tray below the bottom heating elements (at the very bottom of the Unit [see Fig. i]).
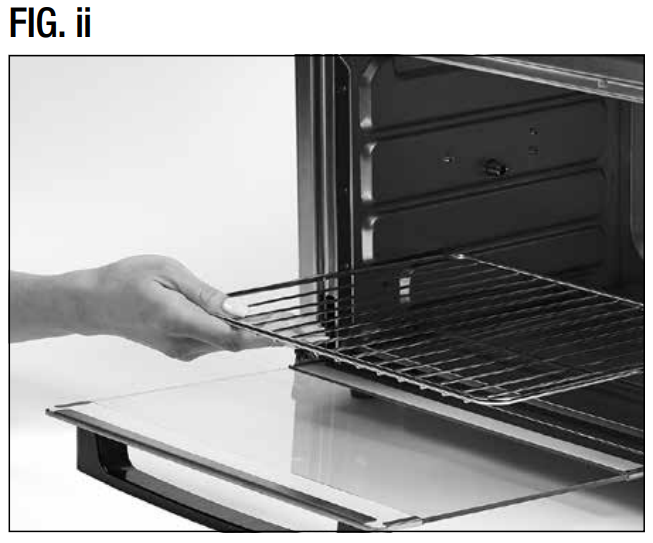
Use the markings on the door to choose the shelf position recommended for your recipe. Insert the Pizza Rack into the desired slot (see Fig. ii) and then place your food on the Pizza Rack.
USING THE BAKING PAN
- Insert the Drip Tray below the bottom heating elements (at the very bottom of the Unit [see Fig. i]).
- Use the markings on the door to choose the shelf position recommended for your recipe. Insert the Pizza Rack into the desired slot (see Fig. ii).
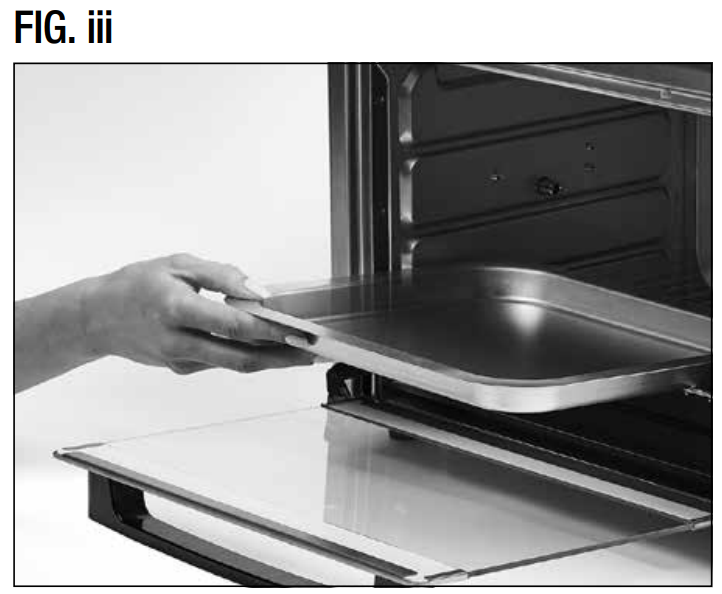
Place your food on the Baking Pan and then place the Baking Pan on the Pizza Rack (see Fig. iii).
USING THE CRISPER TRAY
- Insert the Drip Tray below the bottom heating elements (at the very bottom of the Unit [see Fig. i]).
Use the markings on the door to choose the shelf position recommended for your recipe. Place food on the Crisper Tray and insert the Tray into the desired slot (see Fig. iv).
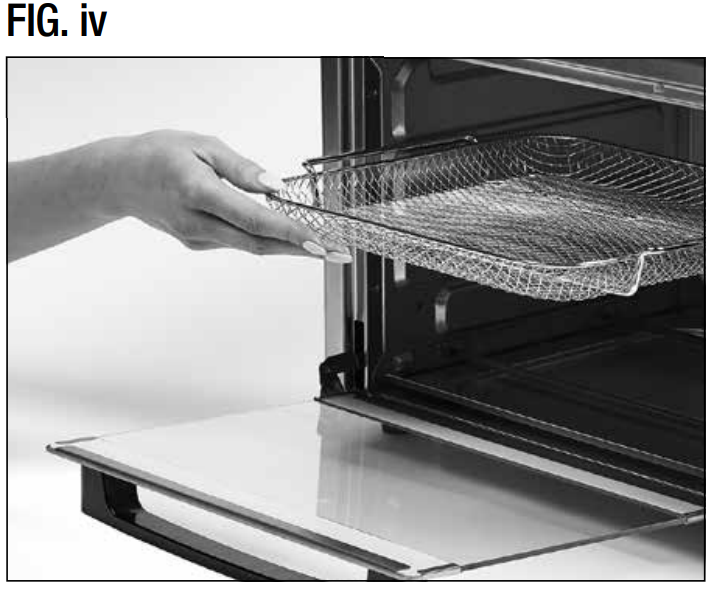
NOTE: When using the Crisper Tray to cook food with a higher moisture content, use the Baking Pan below the Tray or Rack to catch any dripping juices.
USING THE ROTISSERIE SPIT
- Insert the Drip Tray below the bottom heating elements (at the very bottom of the Unit [see Fig. i]).
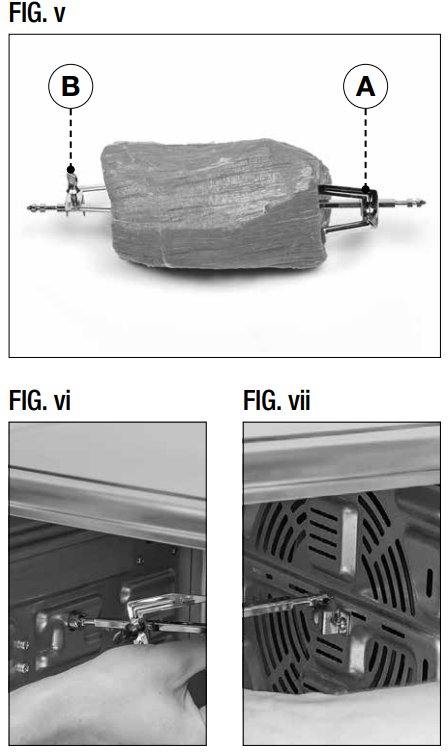
- With the Forks removed, force the Rotisserie Spit through the center of the food lengthwise.
- Slide the Forks (A) onto each side of the Spit and secure them in place by tightening the two Set Screws (B).
NOTE: To support the food on the Rotisserie Spit better, insert the Rotisserie Forks into the food at different angles (see Fig. v). - Hold the assembled Rotisserie Spit at a slight angle with the right side higher than the left side and insert the left side of the Spit into the Rotisserie connection inside the Unit (see Fig. vi).
- With the left side securely in place, lower the right side of the Spit into the Rotisserie connection on the right side of the Unit (see Fig. vii).
To remove cooked food, insert a large fork into the food, twist left, and raise to remove the Spit from the left slot and then remove the food from Unit with slight lifting motion. Transfer the food to a carving board or serving plate.
The Control Panel Of Lagasse Power AirFryer

LCD Panel
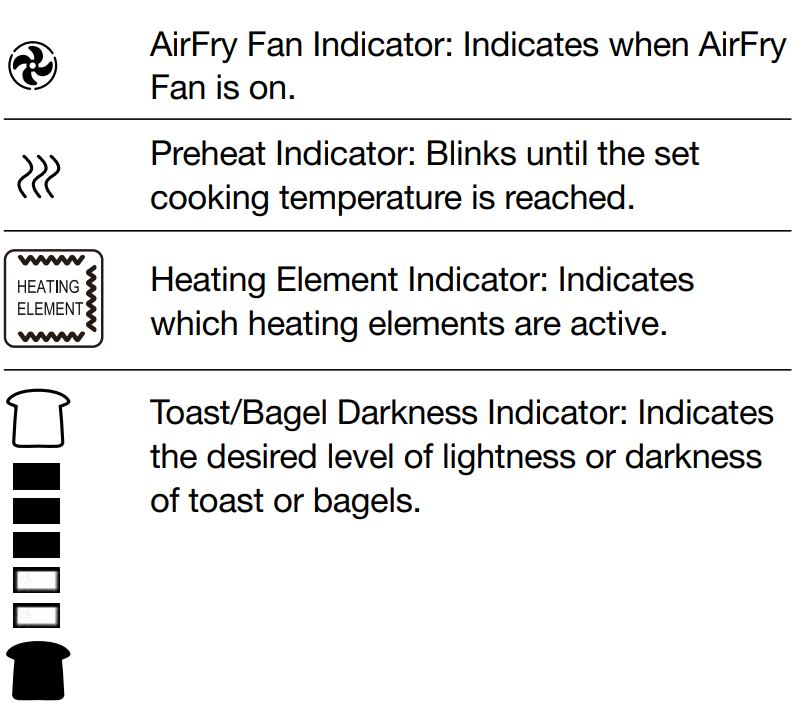
- TEMPERATURE/DARKNESS CONTROL KNOB: Allows you to override preset temperatures. Also controls the desired darkness during Toast or Bagel Mode. Temperature can be adjusted at any time during the cooking cycle.
- TIME/SLICES CONTROL KNOB: Allows you to override preset times. Also controls the setting to select the number of slices being toasted during Toast or Bagel Mode. Time can be adjusted at any time during the cooking cycle.
- PROGRAM SELECTION KNOB: Use to scroll through choices when selecting a preset mode.
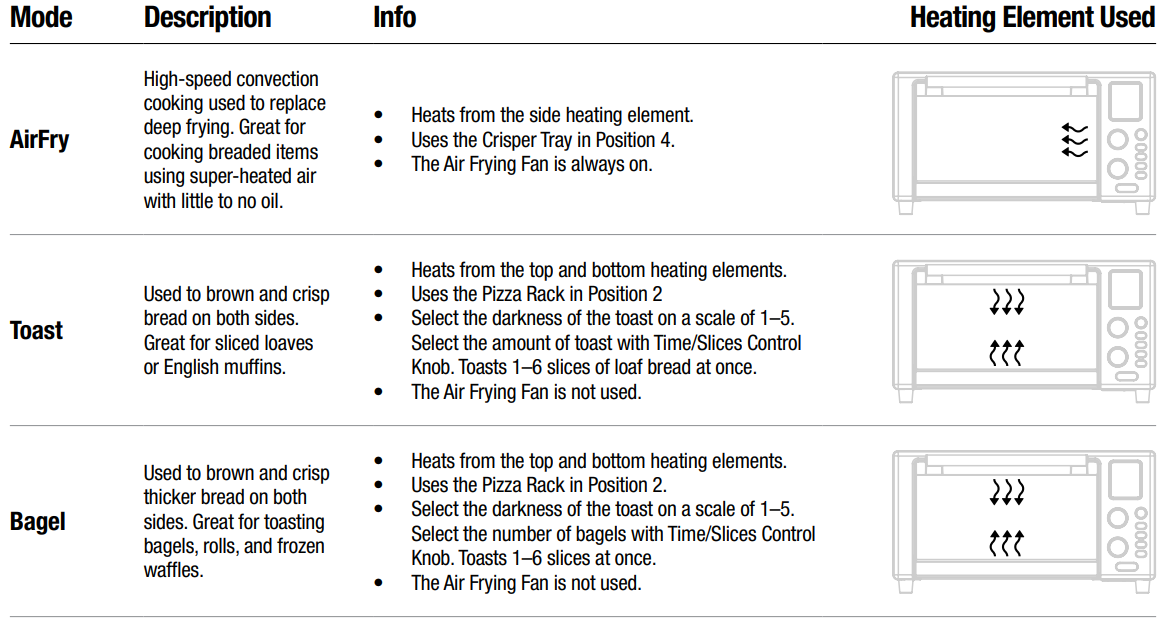
- AIR FRY BUTTON: Air fry-style cooking with the push of a button for all your oil-free fried snacks and main dishes. The Fan can be activated by pressing this button for the following presets: AirFry, Pizza, Bake, Rotisserie, Slow Cook, Roast, Dehydrate, and Reheat.
- LIGHT BUTTON: May be selected at any time during the cooking process to light the Unit's interior.
- FAHRENHEIT/CELSIUS BUTTON: You may choose your preferred method to measure cooking temperature.
- CANCEL BUTTON: You may select this button at any time to cancel the cooking process. Hold the Cancel Button for 3 secs. to power off the Unit (the LCD Panel will read "OFF").
- START/PAUSE BUTTON: Press to begin or pause the cooking process at any time.
Cooking Charts of Emeril Lagasse Power AirFryer 360 XL
Internal Temperature Meat Chart
Use this chart and a food thermometer to ensure that meat, poultry, seafood, and other cooked foods reach a safe minimum internal temperature.
*For maximum food safety, the U.S. Department of Agriculture recommends 165° F for all poultry; 160° F for ground beef, lamb, and pork; and 145° F, with a 3-minute resting period, for all other types of beef, lamb, and pork. Also review the USDA Food Safety Standards.
| Food | Type | Internal Temp. |
|---|---|---|
| Beef & Veal | Ground | 140°F (70°C) |
| Steaks, roasts: medium | 145°F (70°C) | |
| Steaks, roasts: rare | 125°F (52°C) | |
| Chicken & Turkey | Breasts | 165°F (75°C) |
| Ground, stuffed | 165°F (75°C) | |
| Whole bird, legs, thighs, wings | 165°F (75°C) | |
| Fish & Shellfish | Any type | 145°F (63°C) |
| Lamb | Ground | 160°F (70°C) |
| Steaks, roasts: medium | 140°F (70°C) | |
| Steaks, roasts: rare | 130°F (55°C) | |
| Pork | Chops, ground, ribs, roasts | 160°F (70°C) |
| Fully cooked ham | 140°F (60°C) |
Preset Chart
The Time and Temperature on the chart below refer the basic default settings. As you become familiar with the Unit, you will be able to make minor adjustments to suit your taste.
MEMORY: The Unit has a memory feature that will keep your last program setting used. To reset this feature, Hold the Cancel Button until the LCD Screen reads "OFF" and then power the Unit back on.
| Mode | Preheat | Temperature/ # of Slices | Temperature Range | Default Time | Time Range |
|---|---|---|---|---|---|
| Airfry | Yes | 400°F (205°C) | 120–450°F (49–232°C) | 18 mins. | 1–45 mins. |
| Toast | N/A | 4 Slices (up to 6) | Light–Dark | 5 mins. 55 secs. | N/A |
| Bagel | N/A | 4 Slices (up to 6) | Light–Dark | 6 mins. | N/A |
| Pizza | Yes | 375°F (190°C) | 120–450°F (49–232°C) | 20 mins. | 1–60 mins. |
| Bake | Yes | 325°F (165°C) | 120–450°F (49–232°C) | 30 mins. | 1 min.–4 hrs. |
| Broil | Yes | 400°F (205°C) | Low: 300°F (149°C). High: 400°F (204°C) | 10 mins. | 1–20 mins. |
| Rotisserie | Yes | 375°F (190°C) | 120–450°F (49–232°C) | 30 mins. | 1 min.–2 hrs. |
| Slow Cook | Yes | 225°F (107°C) | 225/250/275°F (107/121/135°C) | 4 hrs. | 2–10 hrs. |
| Roast | Yes | 350°F (175°C) | 120–450°F (49–232°C) | 1 hr. | 1 min.–4 hrs. |
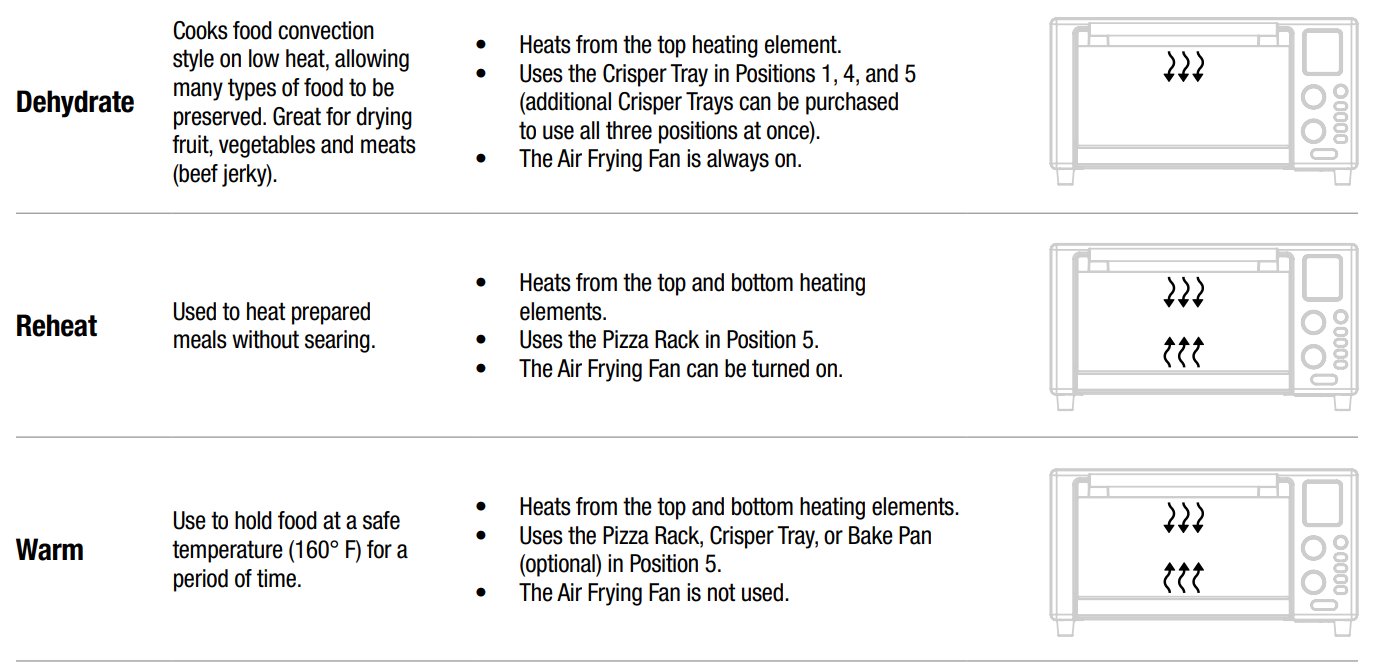
| Dehydrate | No | 120°F (49°C) | 85–175°F (29–79°C) | 6 hrs. | 30 min.–72 hrs. |
| Reheat | No | 320°F (160°C) | 120–450°F (49–232°C) | 15 mins. | 1 min.–2 hrs. |
| Warm | No | 160°F (70°C) | 160°F (71°C) | 1 hr. | 1 min.–4 hrs. |
Preset Information of Emeril Lagasse Power 360 XL
Instructions for Use
Before First Use of Emeril Lagasse Power AirFryer
- Read all material, warning stickers, and labels.
- Remove all packing materials, labels, and stickers.
- Hand-washing is recommended. Wash all parts and accessories used in the cooking process with warm soapy water.
- Never wash or submerge the cooking Unit in water. Wipe the inside and outside of the cooking Unit with a clean, moist cloth. Rinse with a warm, moist cloth.
- Before cooking food, preheat the Unit for a few minutes to allow the manufacturer's protective coating of oil to burn off. Wipe the Unit with warm, soapy water and a washcloth after this burn-in cycle.
Instructions of Emeril Lagasse Power AirFryer
- Place the appliance on a stable, level, horizontal, and heat-resistant surface. Ensure that the Unit is used in an area with good air circulation and away from hot surfaces, other objects or appliances and any combustible materials.
- Ensure that the Unit is plugged into a dedicated power outlet.
- Select the cooking accessory for your recipe.
- Place food to be cooked in Unit and close the door.
- Select a preset mode by pressing one of the preset buttons.
- After choosing the function you need, you can adjust the temperature by pressing the Temperature/Darkness Knob (marked "TEMP") and the time by pressing the Time/Slices Control Knob (marked "TIME").
NOTE: When toasting bread or a bagel, you control the lightness or darkness by adjusting the same knobs. - Press the Start/Stop Button to begin cooking cycle.
NOTE: When the cooking process is complete and the cooking time has elapsed, the Unit will beep several times.
CAUTION: All surfaces inside and outside of the Unit will be extremely hot. To avoid injury, wear oven mitts. Allow at least 30 mins. for the Unit to cool before attempting cleaning or storing.
Instructions for Use of Lagasse Power AirFryer
Tips
- Foods that are smaller in size usually require a slightly shorter cooking time than larger ones.
- Large sizes or quantities of food may require a longer cooking time than smaller sizes or quantities.
- Flipping or turning food halfway through the cooking process ensures that the food is evenly cooked.
- Misting a bit of vegetable oil on fresh potatoes is suggested for a crispier result. When adding a little oil, do so just before cooking.
- Snacks normally cooked in an oven can also be cooked in the Emeril Lagasse Power AirFryer 360 XL.
- Use premade dough to prepare filled snacks quickly and easily. Premade dough also requires a shorter cooking time than homemade dough.
- A baking tin or oven dish can be placed on a rack inside the Emeril Lagasse Power AirFryer 360 XL when cooking foods such as cakes or quiches. Using a tin or dish is also recommended when cooking fragile or filled foods.
Adjustable Tray Positions of Power AirFryer 360 XL
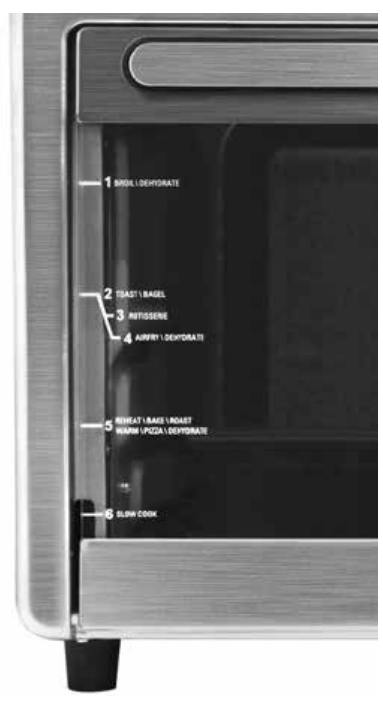
The Crisper Tray and Pizza Rack can be inserted into any of the four positions between the heat elements in the Unit.
IMPORTANT: The Drip Tray must be kept below the heat elements in the Unit at all times when cooking food.
- Broil \ Dehydrate
- Toast \ Bagel \ Broil
- Rotisserie
- AirFry \ Dehydrate
- Reheat \ Bake \ Roast Warm \ Pizza \ Dehydrate
- Slow Cook
Cleaning & Storage of Emeril Lagasse Power
Cleaning
Clean the Emeril Lagasse Power AirFryer 360 XL after each use. Remove the power cord from the wall socket and be certain the appliance is thoroughly cooled before cleaning.
- Clean the outside of the unit with warm water, mild detergent, and a soft cloth.
- To clean the door, gently scrub both sides with warm, soapy water and a damp cloth.
DO NOT soak or submerge the Unit in water or wash in the dishwasher. - Clean the inside of the Unit with hot water, a mild detergent, and a nonabrasive sponge. Do not scrub the heating coils because they are fragile and may break. Then, rinse the Unit thoroughly with a clean, damp cloth. Do not leave standing water inside the Unit.
- If necessary, remove unwanted food residue with a nonabrasive cleaning brush.
- Caked-on food on accessories should be soaked in warm, soapy water to remove the food easily. Hand-washing is recommended.
Storage
- Unplug the appliance and let it cool thoroughly.
- Make sure all components are clean and dry.
- Place the appliance in a clean, dry place.
IMPORTANT SAFEGUARDS OF Lagasse Power AirFryer
WARNING
PREVENT INJURIES! CAREFULLY READ ALL INSTRUCTIONS BEFORE USE! When using electrical appliances, always follow these basic safety precautions.
- Read all instructions carefully to prevent injuries.
- This appliance is NOT INTENDED for use by persons with reduced physical, sensory, or mental capabilities or a lack of experience and knowledge unless they are under the supervision of a responsible person or have been given proper instruction in using the appliance. DO NOT leave unattended with children or pets. KEEP this appliance and cord away from children. Anyone who has not fully read and understood all operating and safety instructions contained in this manual is not qualified to operate or clean this appliance.
- ALWAYS place the Unit on a flat, heat-resistant surface. Intended for countertop use only. DO NOT operate on unstable surface. DO NOT place on or near a hot gas or electric burner or in a heated oven. DO NOT operate the Unit in an enclosed space or under hanging cabinets. Proper space and ventilation is needed to prevent property damage that may be caused by steam released during operation. Never operate the Unit near any flammable materials, such as dish towels, paper towels, curtains, or paper plates. DO NOT let the cord hang over the edge of the table or counter or touch hot surfaces.
- CAUTION HOT SURFACES: This appliance generates extreme heat and steam during use. Proper precautions must be taken to prevent the risk of personal injury, fires, and damage to property.
- DO NOT use this appliance for anything other than its intended use.
- WARNING: To reduce risk of electric shock, cook only using the removable containers trays, racks, etc. provided.
- The use of accessory attachments NOT RECOMMENDED by the appliance manufacturer may cause injuries.
- NEVER use outlet below counter.
- NEVER use with an extension cord. A short power-supply cord (or detachable power-supply cord) is provided to reduce the risk of becoming entangled in or tripping over a longer cord.
- DO NOT use Unit outdoors.
- DO NOT operate if the cord or plug are damaged. If the appliance begins to malfunction during use, immediately unplug the cord from the power source. DO NOT USE OR ATTEMPT TO REPAIR A MALFUNCTIONING APPLIANCE. Contact Customer Service for assistance (see the back of the manual for contact information).
- UNPLUG the Unit from the outlet when not in use and before cleaning. Allow the Unit to cool before attaching or removing parts.
- NEVER immerse housing in water. If the Unit falls or accidentally becomes immersed in water, unplug from wall outlet immediately. Do not reach into liquid if the Unit is plugged in and immersed. Do not immerse or rinse cords or plugs in water or other liquids.
- The Unit's outer surfaces may become hot during use. Wear oven mitts when handling hot surfaces and components.
- Before using your new Emeril Lagasse Power AirFryer 360 XL on any countertop surface, CHECK with your countertop manufacturer or installer for recommendations about using appliances on your surfaces. Some manufacturers and installers may recommend protecting your surface by placing a hot pad or trivet under the Emeril Lagasse Power AirFryer 360 XL for heat protection. Your manufacturer or installer may recommend that hot pans, pots, or electrical appliances should not be used directly on top of the countertop. If you are unsure, place a trivet or hot pad under the Emeril Lagasse Power AirFryer 360 XL before using it.
- Please DO NOT place your Emeril Lagasse Power AirFryer 360 XL on a hot cooktop because it could cause a fire or damage the Emeril Lagasse Power AirFryer 360 XL, your cooktop, and your home.
- When cooking, DO NOT place the appliance against a wall or against other appliances. Leave at least 5 in. free space on the top, back, and sides and above the appliance. DO NOT place anything on top of the appliance.
- DO NOT place the Unit on stove top surfaces.
- This appliance is intended for normal household use only. It is NOT INTENDED for use in commercial or retail environments. If the Emeril Lagasse Power AirFryer 360 XL is used improperly or for professional or semiprofessional purposes or if it is not used according to the instructions in the user manual, the guarantee becomes invalid and the manufacturer will not be held liable for damages.
- ALWAYS unplug the appliance after use.
- EXTREME CAUTION must be used when moving an appliance containing hot oil or other hot liquids.
- USE EXTREME CAUTION when removing trays or disposing of hot grease.
- DO NOT clean with metal scouring pads. Pieces can break off the pad and touch electrical parts, creating a risk of electric shock. Use non-metallic scrub pads.
- Oversize foods or metal utensils MUST NOT be inserted in the Unit as they may create a fire or risk of electric shock.
- EXTREME CAUTION should be exercised when using containers constructed of material other than metal or glass.
- DO NOT store any materials, other than manufacturer-recommended accessories, in this Unit when not in use.
- 27. DO NOT place any of the following materials in the Unit: paper, cardboard, plastic.
- DO NOT cover the Drip Tray or any part of the Unit with metal foil. This will cause overheating of the Unit.
- A fire may occur if the toaster oven is covered or touching flammable material, including curtains, draperies, walls, and the like, when in operation. DO NOT store any item on top of the appliance when in operation
Warning
- NEVER put anything on top of the appliance.
- NEVER cover the air vents on the top, back, and side of the cooking Unit.
- ALWAYS use oven mitts when removing anything hot from the Unit.
- NEVER rest anything on the door while it is open.
- DO NOT leave the door open for an extended period.
- ALWAYS ensure that nothing is protruding from the unit before closing the door.
- ALWAYS close the door gently; NEVER slam the door closed. ALWAYS hold the handle of the door when opening and closing the door.
CAUTION: RISK OF FIRE - USE 15 WATTS, 120 VOLT, TYPE T LAMP(S)
To Replace the Lightbulb
- Ensure that the Unit is completely cool. Remove any accessories from the Unit.
- Unscrew the lightbulb cover, located at the top right corner inside the back of the Unit, by turning the cover counterclockwise. Remove the lightbulb by turning it counterclockwise.
- Insert a new lightbulb and turn it clockwise to secure. Insert the lightbulb cover and turn it clockwise to secure.
CAUTION: Attaching the Power Cord
- Do not use an extension cord with this product.
- This model is designed for use with a 2-prong grounded 120V dedicated electrical outlet only. Do not use with any other electrical outlet or modify the plug. Plugging other appliances into the outlet will cause the circuit to overload.
- To disconnect, turn any control to off and then remove the plug from the wall.
Electric Power
If the electrical circuit is overloaded with other appliances, your new Unit may not operate properly. It should be operated on a dedicated electrical circuit.
Important
- Before initial use, hand wash the cooking accessories. Then, wipe the outside and inside of the Unit with a warm, moist cloth and mild detergent. Next, preheat the Emeril Lagasse Power AirFryer 360 XL for a few minutes to burn off any residue. Finally, wipe the Unit out with a wet cloth. CAUTION: Upon first use, the Unit may smoke or emit a burning odor due to oils used to coat and preserve the heating elements.
- The Emeril Lagasse Power AirFryer 360 XL must be operated with the Drip Tray in place, and any food or grease must be cleaned off of the Drip Tray when the Drip Tray becomes more than half full.
- Never operate your Emeril Lagasse Power AirFryer 360 XL with the door open.
- Never put the Drip Tray, Baking Pan, or any other accessory directly on top of the lower heating elements.
Troubleshooting of AirFryer 360 XL
| Problem | Possible Cause | Solution |
|---|---|---|
| The Unit does not work | 1. The Unit is not plugged in. | 1. Plug power cord into wall socket. |
| 2. You have not turned the Unit on. | 2. Check that both the preparation time and temperature | |
| 3. The Unit is not in a dedicated outlet. | have been set before starting the cooking process. | |
| 3. Plug the Unit into a dedicated power outlet. | ||
| Food not cooked | 1. The Unit is overloaded. | 1. Use smaller batches for more even cooking. |
| 2. The temperature is set too low. | 2. Raise temperature and continue cooking. | |
| Food is not fried evenly | 1. Foods need to be turned. | 1. Check halfway and turn food if needed. |
| 2. Different sizes are being cooked together. | 2. Cook similar-sized foods together. | |
| White smoke from Unit | 1. Oil is being used. | 1. Wipe down to remove excess oil. |
| 2. Accessories have grease residue. | 2. Clean components and Unit interior after each use. | |
| French fries not even | 1. Wrong potato type. | 1. Use fresh, firm potatoes. |
| 2. Potatoes not blanched properly. | 2. Pat dry to remove excess starch. | |
| 3. Too many fries cooked at once. | 3. Cook less than 2 ½ cups of fries at a time. | |
| Fries not crispy | 1. Raw fries have too much water. | 1. Dry potato sticks properly before oiling. |
| 2. Cut sticks smaller. Add more oil. |
Warranty Of Emeril Lagasse Power AirFryer
Emeril AirFryer 360 XL comes with a 1-year limited warranty covering defects in materials and workmanship under normal home use.
90-Day Money-Back Guarantee
If you decide that you don’t love this product, your order is covered by our 90-Day Money-Back Guarantee. You have 90 days from the day you receive your product to request
a replacement product or a refund of the purchase price minus processing and handling fees. To receive a refund or replacement, you must return the product to us at your expense.
Pros & Cons of Emeril Lagasse Power AirFryer 360 XL
Pros
- Large capacity of 932 cubic inches
- Versatile cooking options - air fry, bake, roast, and broil
- Adjustable temperature range of 120°F to 450°F
- Cooking timer up to 60 minutes
- Easy to clean with a removable crisper tray and non-stick baking pan
Cons
- May take up a lot of counter space
- Can be expensive compared to other air fryers
- May take longer to cook some foods compared to traditional frying methods
Customer Reviews about AirFryer 360 XL
Customers love the Emeril Lagasse Power AirFryer for its large capacity and versatile cooking options. They appreciate the adjustable temperature range and cooking timer, which makes it easy to cook a variety of dishes. However, some customers have complained that the air fryer takes up a lot of counter space and can be expensive compared to other air fryers. Some have also mentioned that it may take longer to cook some foods compared to traditional frying methods.
Faqs
When using my Emeril Lagasse Power AirFryer 360 XL for the first time, how do I set it up?
Which recipes can I make with my 360 XL Emeril Air Fryer?
How can I stop food from adhering to my Emeril AirFryer 360 XL's tray?
How can I fix an Emeril AirFryer 360 XL that isn't heating up correctly?
Is it possible to use parchment paper or aluminum foil in the Emeril Lagasse Power AirFryer 360 XL?
How should my Emeril AirFryer 360 XL be cleaned and maintained?
While in use, my Emeril AirFryer 360 XL is emitting smoke. How should I proceed?
How can I use the Emeril AirFryer 360 XL to get extra crispy food?
Does the Emeril AirFryer 360 XL have replacement components available?
What is covered by the Emeril Lagasse Power AirFryer 360 XL warranty, and how long is it valid for?
Leave a Comment