Epson EcoTank Inject Printer ET-2760 Instruction Manual
Content

Introduction
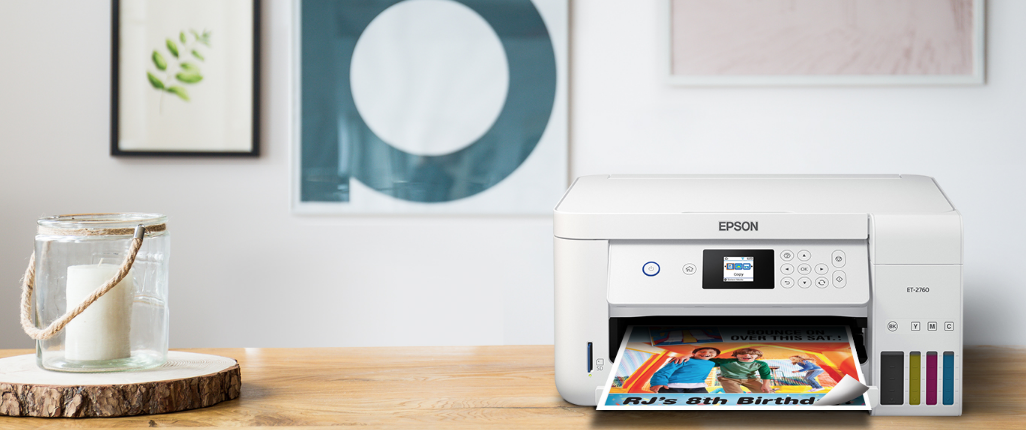
The Epson EcoTank ET-2760 is an innovative all-in-one printer designed to provide a cost-effective and efficient printing solution. Featuring a cartridge-free system, it utilizes high-capacity refillable ink tanks that significantly reduce ink costs, allowing users to save up to 90% on replacement ink. With capabilities for printing, scanning, and copying, along with automatic duplex printing, the ET-2760 is perfect for home or small office use. It is priced at approximately $299.99.
Product Basics
Using the Control Panel
Control Panel Buttons and Lights
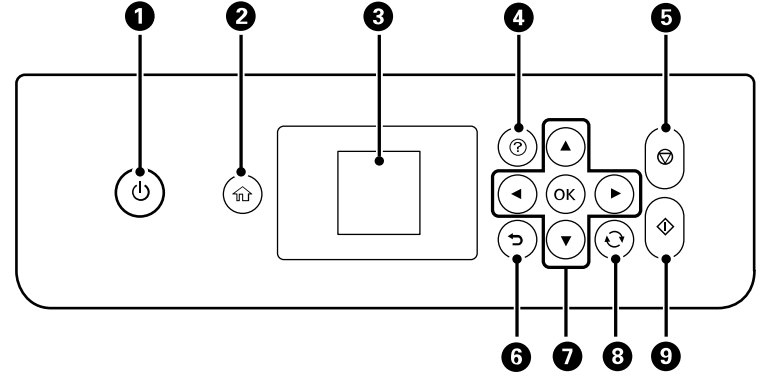
 power button and light
 home button
- LCD screen
 help button
 stop button
 back button
- Arrow buttons and OK button
 reset button
 start button
Status Icon Information
Your product displays status icons on the LCD screen for certain product status conditions.
- No Wi-Fi connection.
 A Wi-Fi network error has occurred or the product is searching for a connection.
 A Wi-Fi connection is established. The number of bars indicates the connection's signal strength.
 No Wi-Fi Direct connection.
 A Wi-Fi Direct connection is established.
Entering Characters on the LCD Screen
Follow these guidelines to enter characters for passwords and other settings.
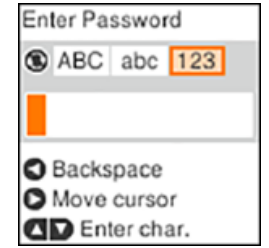
- To scroll through the characters, press the up or down arrow button.
- To change the character case or type, press the reset
 button.
 - To move the cursor to the right, press the right arrow button.
- To delete the previous character, press the left arrow button.
Changing LCD Screen Language
You can change the language used on the LCD screen.
- Press the
 home button, if necessary.
 - Press the arrow buttons to select Settings and press the OK button.
Select Printer Setup and press the OK button.
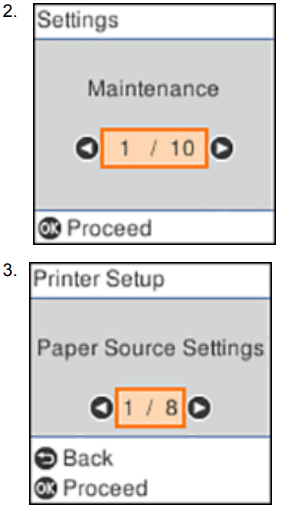
- Select Language and press the OK button.
- Select a language and press the OK button.
- Press the home button to exit.
Product Parts Locations
Product Parts
Front
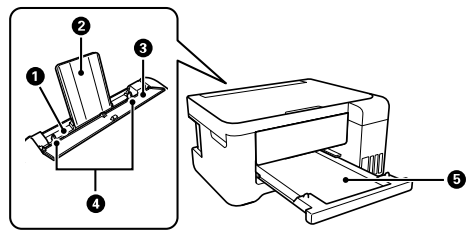
- Rear paper feed
- Paper support
- Feeder guard
- Edge guides
- Output tray
Inside
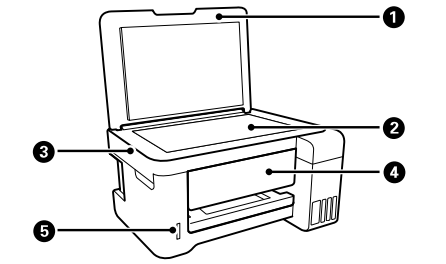
- Document cover
- Scanner glass
- Scanner unit
- Control panel
- Memory card slot
Side

- Ink tank cover
- Ink tanks
- Ink tank unit
- Print head
Back
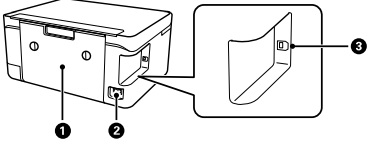
- Rear cover (duplexer)
- AC inlet
- USB port
Technical Specifications
Windows System Requirements
To use your product and its software, your computer should use one of these Microsoft operating systems:
- Windows 10
- Windows 8.x
- Windows 7
- Windows Vista
- Windows Server 2016
- Windows Server 2008 R2
- Windows Server 2008
- Windows Server 2003 R2
- Windows Server 2003 SP2 or later
Mac System Requirements
To use your product and its software, your Mac should use one of these operating systems:
- macOS 10.14.x
- macOS 10.13.x
- macOS 10.12.x
- OS X 10.11.x
- OS X 10.10.x
- OS X 10.9.x
- OS X 10.8.x
- OS X 10.7.x
- OS X 10.6.8
Paper Specifications
Note: Since the quality of any particular brand or type of paper may be changed by the manufacturer at any time, Epson cannot guarantee the quality of any non-Epson brand or type of paper. Always test a sample of paper stock before purchasing large quantities or printing large jobs.
Single Sheets
- Size:
- A4 (8.3 × 11.7 inches [210 × 297 mm])
- A6 (4.1 × 5.8 inches [105 × 148 mm])
- Letter (8.5 × 11 inches [216 × 279 mm])
- Legal (8.5 × 14 inches [216 × 356 mm])
- 8.5 × 13 inches (216 × 330 mm)
- 4 × 6 inches (102 × 152 mm)
- 5 × 7 inches (127 × 178 mm)
- 8 × 10 inches (203 × 254 mm)
- 3.5 × 5 inches (89 × 127 mm)
- Executive (7.25 × 10.5 inches [184 × 267 mm])
- 16:9 wide (4 × 7.1 inches [102 × 181 mm])
- Half Letter (5.5 × 8.5 inches [140 × 216 mm])
- Paper types: Plain paper
- Note: Your product also supports compatible papers distributed by Epson. Select the link at the end of this topic to view a list of compatible Epson papers.
- Weight:
- Plain paper: 17 lb (64 g/m²) to 24 lb (90 g/m²)
Envelopes
- Size:
- No. 10 (4.1 × 9.5 inches [105 × 241 mm])
- Paper types: Plain bond paper
- Weight: 20 lb (75 g/m²) to 24 lb (90 g/m²)
Printable Area Specifications
Note: When printing borderless, quality may decline in the expanded printable area.
Single Sheets
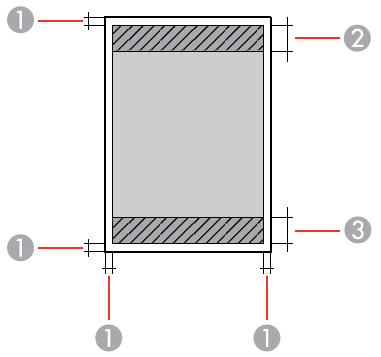
- Top/bottom margins: 0.12 inch (3 mm)
- Reduced print quality area/top: 1.61 inches (41 mm)
- Reduced print quality area/bottom: 1.46 inches (37 mm)
Borderless
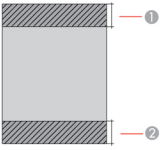
- Reduced print quality area/top: 1.73 inches (44 mm)
- Reduced print quality area/bottom: 1.57 inches (40 mm)
Envelopes
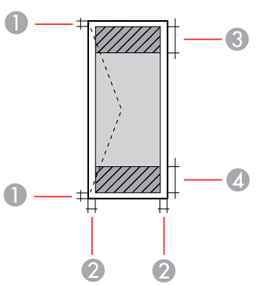
- Left/right margins: 0.12 inch (3 mm)
- Top/bottom: 0.20 inch (5 mm)
- Reduced print quality area/left: 0.70 inch (18 mm)
- Reduced print quality area/right: 1.61 inches (41 mm)
Scanning Specifications
Scanner Type
Flatbed, color
Photoelectric Device
CIS
Effective Pixels
10200 × 14040 pixels (1200 dpi)
Document Size
- Maximum: 8.5 × 11.7 inches (216 × 297 mm)
- Scanner Glass: US letter or A4
Scanning Resolution
- 1200 dpi (main scan)
- 2400 dpi (sub scan)
Output Resolution
50 to 9600 dpi in 1 dpi increments
Image Data
- Color:
- 48 bits per pixel (16 bits per pixel per color) internal
- 24 bits per pixel (8 bits per pixel per color) external
- Grayscale:
- 16 bits per pixel internal
- 8 bits per pixel external
- Black and White:
- 16 bits per pixel internal
- 1 bit per pixel external
Light Source
LED
Ink Specifications
Note: Epson's warranties do not extend to any damage caused by the use of third-party ink or ink not designed for your printer.
The included initial ink bottles must be used for printer setup and are not for resale. The printer ships with full ink bottles, and part of the ink from the first bottles is used to charge the print head. Yields vary considerably based on images printed, print settings, paper type, frequency of use, and temperature.
Color
- Black, Cyan, Magenta, Yellow
Ink Life
- Do not use if the date on the package has expired.
Temperature
- Storage: –4 to 104 °F (–20 to 40 °C)
- 1 month at 104 °F (40 °C)
- Ink freezes at 5 °F (–15 °C)
- Ink thaws and is usable after approximately 2 hours at 77 °F (25 °C)
Memory Card Specifications
Note: Cards marked with an asterisk (*) require an adapter; consult your adapter documentation for details on using it.
Compatible Types and Maximum Capacities
- SD: 2GB
- SDHC: 32GB
- SDXC: 64GB
- miniSD*: 2GB
- miniSDHC*: 32GB
- microSD*: 2GB
- microSDHC*: 32GB
- microSDXC*: 64GB
Media Format
DCF JPEG taken by digital cameras that are DCF (Design rule for Camera File system) version 1.0 or 2.0 compliant. Photos stored in built-in digital camera memory are not supported.
Dimension Specifications
Height
- Stored: 7.4 inches (187 mm)
- Printing: 10.2 inches (259 mm)
Width
- Stored: 14.8 inches (375 mm)
- Printing: 14.8 inches (375 mm)
Depth
- Stored: 13.7 inches (347 mm)
- Printing: 22 inches (558 mm)
Weight
- Without ink or power cord: 12.1 lb (5.5 kg)
Electrical Specifications
- Power Supply Rating
100 to 240 V - Rated Frequency Range
50/60 Hz - Rated Current
0.4 to 0.2 A - Power Consumption (with USB connection)
- Standalone copying: Approximately 12 W (ISO/IEC 24712)
- Ready mode: Approximately 4.3 W
- Sleep mode: Approximately 0.7 W
- Power off mode: Approximately 0.2 W
Environmental Specifications
- Temperature
- Operating: 50 to 95 °F (10 to 35 °C)
- Storage: –4 to 104 °F (–20 to 40 °C)
- 1 month at 104 °F (40 °C)
- Humidity (without condensation)
- Operating: 20 to 80% RH
- Storage: 5 to 85% RH
Interface Specifications
- Interface type
Hi-Speed USB (Device Class for computers)
Network Interface Specifications
- Standard
IEEE 802.11 b/g/n; complies with either IEEE 802.11 b/g or IEEE 802.11 b/g/n, depending on purchase location. - Security
- WEP (64/128 bit)
- WPA2-PSK (AES); complies with WPA2 with support for WPA/WPA2 Personal
- Frequency Band
2.4 GHz - Communication Mode
- Infrastructure mode
- Wi-Fi Direct (Simple AP); not supported for IEEE 802.11b
- Security Protocol
- SSL/TLS
- HTTPS Server/Client, IPPS
- Maximum Radio Frequency Power Transmitted
19.8 dBm (EIRP)
Description
The Epson EcoTank Inject Printer ET-2760 boasts a sleek and compact design, making it perfect for small spaces. Its key feature is the EcoTank ink system, which allows users to refill the ink tanks with affordable bottles, significantly reducing printing costs. The printer supports wireless connectivity, enabling users to print from smartphones, tablets, and computers using the Epson Connect app or voice commands through Amazon Alexa and Google Assistant.
The ET-2760 also features a built-in scanner and copier, allowing for versatile document handling. The printer is energy-efficient and comes with a set of initial ink bottles that can yield up to 6,000 black and white pages and 7,700 color pages.
Using Memory Cards with Your Product
Follow the instructions here to work with a memory card inserted into your product.
Note: Make sure your memory card and the files on it meet the specifications for your product.
Inserting a Memory Card
Insert only one memory card at a time into the memory card slot on your product.
- Make sure the memory card and the files on it are compatible with your product before inserting the card.
Insert your memory card into the slot, making sure the card is oriented correctly.
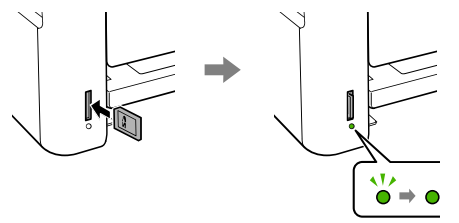
Note: Do not force the card all the way into the slot. Insert it only until it meets resistance.
The memory card access light flashes and then stays lit.
Caution: Do not remove the memory card or turn off your product while the memory card access light is flashing, or you may lose data from the memory card.
Memory Card Types
You can insert these types of memory cards in your product.
Note: Cards marked with an asterisk (*) require an adapter; consult your adapter documentation for details on using it.
You can insert the following cards in the memory card slot:
- SD: 2GB
- SDHC: 32GB
- SDXC: 64GB
- miniSD*: 2GB
- miniSDHC*: 32GB
- microSD*: 2GB
- microSDHC*: 32GB
- microSDXC*: 64GB
Memory Card File Specifications
You can insert memory cards in your product containing files that meet these specifications:
- File Format: JPEG with the Exif version 2.3 standard (taken with a digital camera using DCF (Design rule for Camera File system) version 1.0 or 2.0 compliant)
- Image Size: 80 × 80 pixels to 10200 × 10200 pixels
- File Size: Up to 2GB
- Number of Files: Up to 2000
Note: DCF 2.0 files stored in a camera's built-in memory are not supported.
Removing a Memory Card
After you finish working with a memory card, make sure it is safe to remove it from your product.
Caution: Do not remove a memory card or turn off your product while the memory card access light is flashing or you may lose data from the memory card.
Make sure the memory card access light is not flashing.
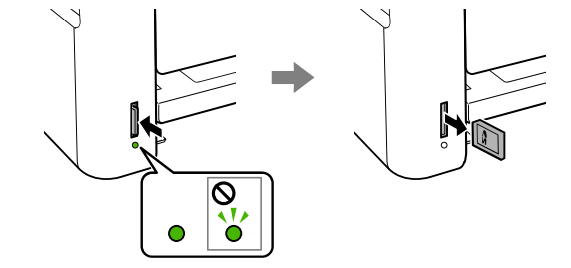
- If your product is connected to your computer using a USB cable, do one of the following:
- Windows: Open the My Computer, Computer, Windows Explorer, or File Explorer utility. Then right-click the name of your memory card (listed as a removable disk) and select Eject.
- Mac: Drag the removable disk icon for your memory card from the desktop or computer window into the trash.
- Push in the memory card, then pull it straight out of its slot.
Printing from a Memory Card
See these sections to print photos from a memory card inserted into your product:
Viewing and Printing Photos From the LCD Screen
You can select photos for printing as you view them on the LCD screen.
- Press the
 Home button, if necessary.
 - Press the arrow buttons to select Print Photos and press the OK button.
A photo on your memory card is displayed. - Press the right or left arrow button to scroll through your photos and display one that you want to view or print.
- Press the up or down arrow buttons to select one or more copies of the photo (up to 99).
- To view and select additional photos for printing, repeat the steps above.
To view print settings, press the OK button.
You see this screen: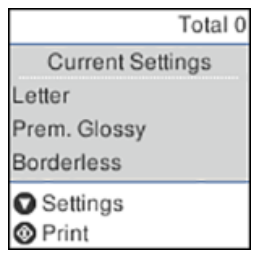
- Do one of the following:
- To change the print settings, press the down arrow button.
- To print the selected photo(s), press the
 Start button.
Print Setting Options Memory Card
Select the Print Settings options you want to use when printing photos displayed on the LCD screen.
Note: To return to the default print settings, press the stop button, select No and press the OK button.
Transferring Photos on a Memory Card
You can transfer photos to and from a memory card inserted into a memory card slot on your product.
Setting Up File Sharing for Photo Transfers from Your Computer
Before you transfer photos from a computer to a memory card inserted into a memory card slot on your product, you may need to set up your product's file sharing settings. Your product can only allow access from a single connection type at a time (USB or network). If you cannot save files to a memory card from a connected computer, check the file sharing setting.
Caution: Remove the memory card before you change this setting or you may lose data from the memory card. Do not remove a memory card or turn off your product while the memory card access light is flashing or you may lose data from the memory card.
- Remove any memory cards from the product.
- Press the home button, if necessary.
- Press the arrow buttons to select Settings and press the OK button.
- Select File Sharing and press the OK button.
- Select your connection type and press the OK button.
Transferring Photos from a Memory Card to Your Computer
You can transfer photos to and from a memory card inserted into a memory card slot on your product and a computer connected to your product.
Note: Do not transfer photos to and from a memory card while you are printing from the memory card.
- Make sure your product is connected to a computer.
- Insert a memory card into a memory card slot on your product.
- Do one of the following to access your memory card files from your computer:
- Windows: Open the Computer, My Computer, Windows Explorer, or File Explorer utility, then select the removable disk icon.
- Mac with a USB connection: Look for the removable disk icon on your desktop or computer window, then select it.
- Mac with a network connection: Select the hard drive icon on your desktop or computer window, select your product in the SHARED section of the sidebar (you may need to widen the sidebar to see the name), then select the MEMORYCARD icon.
- Select the folder that contains your photos.
- Drag the photos you want to transfer to the desired folder on your computer or on your memory card.
Note: Your product's LCD screen does not update to display new photos transferred to the memory card. Wait until the memory card access light stops flashing, then remove and insert the memory card to update the photos displayed.
Printing Personalized Projects
You can print calendars, lined paper, graph paper, or stationery with a photo background.
Printing Personalized Note Paper
- Load plain paper in one of these sizes: Letter (8.5 × 11 inches [216 × 279 mm]) or A4 (8.3 × 11.7 inches [210 × 297 mm]).
- Insert a memory card into your product's memory card slot.
- Press the
 home button, if necessary.
 - Select Personal Stationery and press the OK button.
- Select Writing Papers and press the OK button.
Select one of the layout options and press the OK button.
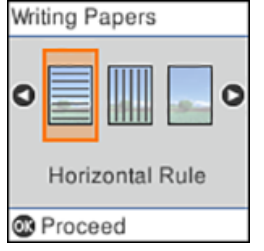
Note: View the images for each option to preview the design layout.
- Select the size of paper you loaded and press the OK button.
- Select the photo you want to use for your note paper and press the OK button.
Note: To rotate the layout for your note paper, press the down arrow button. - To print more than one sheet, press the up or down arrow button to select the number (up to 99).
- When you are ready to print, press the
 start button.
Note: To cancel printing, press the stop button.
Printing Lined Paper, Graph Paper, and Music Sheets
You can print music sheets, wide-rule or narrow-rule notebook paper, and graph paper.
- Load plain paper in one of these sizes: Letter (8.5 × 11 inches [216 × 279 mm]) or A4 (8.3 × 11.7 inches [210 × 297 mm]).
- Press the home button, if necessary.
- Select Personal Stationery and press the OK button.
Select Lined Papers and press the OK button.
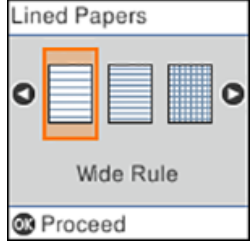
- Select one of the layout options and press the OK button.
Note: View the images for each option to preview the design layout. - Select the size of paper you loaded and press the OK button.
- To print more than one sheet, press the up or down arrow button to select the number (up to 99).
- When you are ready to print, press the
 start button.
Note: To cancel printing, press the stop button.
Printing Calendar Pages
You can create and print a weekly or monthly calendar page from your product.
- Load plain paper in one of these sizes: Letter (8.5 × 11 inches [216 × 279 mm]) or A4 (8.3 × 11.7 inches [210 × 297 mm]).
- Press the home button, if necessary.
- Select Personal Stationery and press the OK button.
Select Calendar and press the OK button.
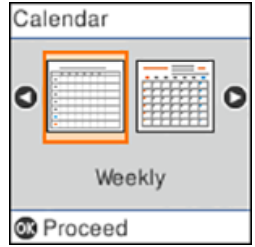
- Select one of the format options and press the OK button.
Note: View the images for each option to preview the design layout. - If you chose Monthly, select the year and month and press the OK button.
- Select the type of paper you want to print on and press the OK button.
- To print more than one sheet, press the up or down arrow button to select the number (up to 99).
- When you are ready to print, press the
 start button.
Note: To cancel printing, press the stop button.
Setup Guide
To set up the Epson EcoTank Inject Printer ET-2760,
- Start by unboxing and placing the printer on a flat surface.
- Remove any protective materials from the printer and ink tanks.
- Fill the ink tanks with the provided ink bottles by following the on-screen instructions.
- Connect the printer to your network via Wi-Fi or USB.
- Download and install the Epson Connect software from the Epson website to enable wireless printing and other features.
- Align the print head and calibrate the scanner according to the on-screen instructions.
Troubleshooting
If you encounter issues with the printer, check the following common problems and solutions:
- No Print Output: Ensure the ink tanks are filled and properly seated. Check for any blockages in the print head.
- Wireless Connectivity Issues: Restart your router and printer. Ensure your device is connected to the same network as the printer.
- Paper Jam: Carefully remove any jammed paper from the paper tray or rear feed slot.
Always refer to the user manual for detailed troubleshooting steps and follow safety instructions to avoid damage to the printer.
Pros & Cons
Pros:
- Cost-effective with refillable ink tanks
- Compact and space-saving design
- Wireless and voice-activated printing capabilities
- High print quality and speed
- Includes a built-in scanner and copier
Cons:
- Initial cost may be higher compared to traditional inkjet printers
- Refilling ink tanks can be messy if not done carefully
- Limited paper capacity
Inject Printer ET-2760 Customer Reviews
Many customers appreciate the low cost per page and the savings on ink. The EcoTank system, with its refillable ink tanks, eliminates the need for expensive ink cartridges.
Faqs
What is the estimated yield of the initial ink bottles provided with the Epson EcoTank?
How do I connect the Epson Inject Printer ET-2760 to my Wi-Fi network?
Can I use theET-2760 with my smartphone or tablet?
How often do I need to refill the ink tanks on the Epson EcoTank Inject Printer ET-2760?
Is the EcoTank Inject Printer compatible with voice assistants like Amazon Alexa and Google Assistant?
What is the maximum print resolution of the Epson?
Does the Epson EcoTank Inject Printer ET-2760 come with a built-in scanner and copier?
How do I troubleshoot common issues like paper jams on the ET-2760?
What are the dimensions of the ET-2760?
Leave a Comment
