Specification & Features: Epson L363 Exceed Your Vision Printer User Guide
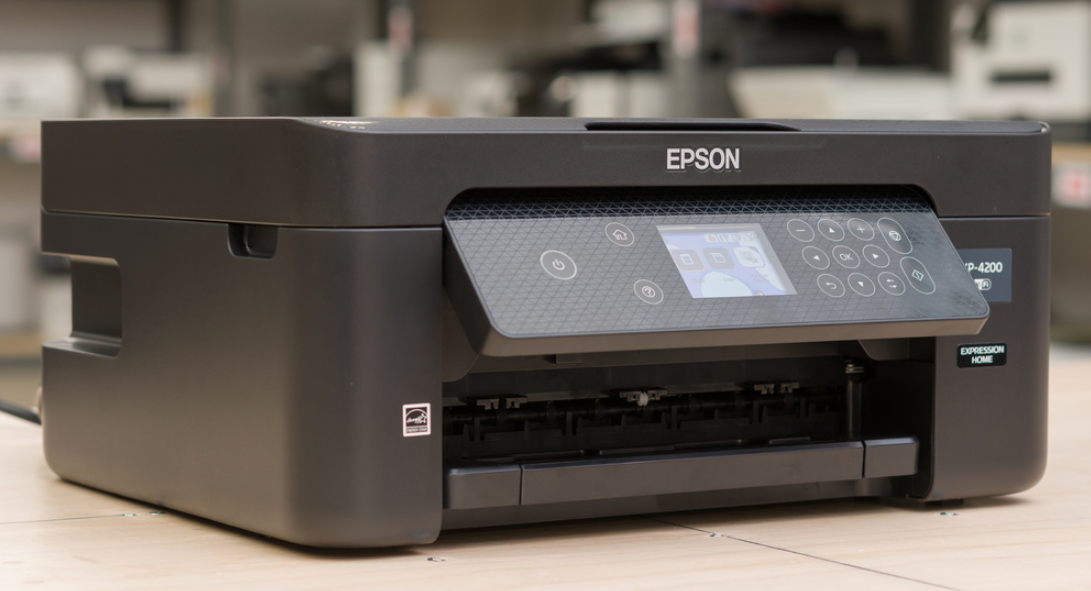
Content
Introduction
The Epson L363 Exceed Your Vision Printer is a powerful and innovative projector designed for both personal and professional use. This device offers stunning image quality, flexible connectivity options, and a user-friendly design. With an estimated price range of $800 to $1,000 and a launch date set for Q2 2023, this projector is perfect for those seeking an immersive visual experience.
Technical Specifications
Printer Specifications
| Print Head Nozzle Placement | Black ink nozzles: 180 Color ink nozzles: 59 for each color | |
| Weight of Paper | Plain Paper | 64 to 90 g/m2(17 to 24lb) |
Envelopes | Envelope #10, DL, C6: 75 to 90 g/m2 (20 to 24 lb) | |
Printable Area
Print quality may decline in the shaded areas due to the printer's mechanism.
Single sheets (normal printing)
_epson_exceed_your_vision.png) | A | 3.0 mm (0.12 in.) |
| B | 3.0 mm (0.12 in.) | |
| C | 40.0 mm (1.57 in.) | |
| D | 32.0 mm (1.26 in.) |
Envelopes
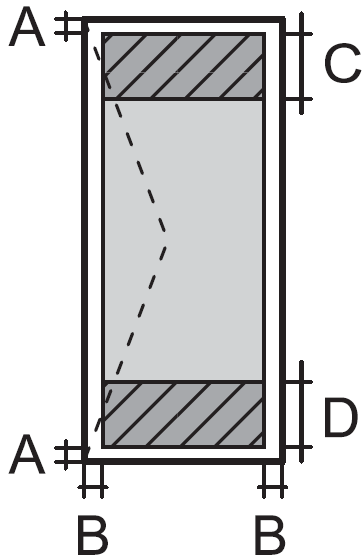 | A | 3.0 mm (0.12 in.) |
| B | 5.0 mm (0.20 in.) | |
| C | 18.0 mm (0.71 in.) | |
| D | 40.0 mm (1.57 in.) |
Scanner Specifications
| Scanner Type | Flatbed |
| Photoelectric Device | CIS |
| Maximum Document Size | 216 × 297 mm (8.5 × 11.7 in.) A4, Letter |
| Resolution | 600 dpi (main scan) 1200 dpi (sub scan) |
| Color Depth | Color
|
| Light Source | LED |
Interface Specifications
| For Computer | USB |
Dimensions
| Dimensions | Storage
|
| Weight* | Approx. 4.4 kg (9.7 lb) |
Without the ink and the power cord.
Electrical Specifications
| Model | 100 to 240 V Model | 220 to 240 V Model |
| Rated Frequency Range | 50 to 60 Hz | 50 to 60 Hz |
| Rated Current | 0.5 to 0.3 A | 0.3 A |
| Power Consumption (with USB Con- nection) | Standalone copying: Approx. 13 W (ISO/IEC24712) Ready mode: Approx. 3.8 W Sleep mode: Approx. 0.8 W Power off: Approx. 0.3 W | Standalone copying: Approx. 13 W (ISO/IEC24712) Ready mode: Approx. 3.8 W Sleep mode: Approx. 0.8 W Power off: Approx. 0.3 W |
Note: Check the label on the printer for its voltage.
Environmental Specifications
| Operation | Use the printer within the range shown in the following graph. 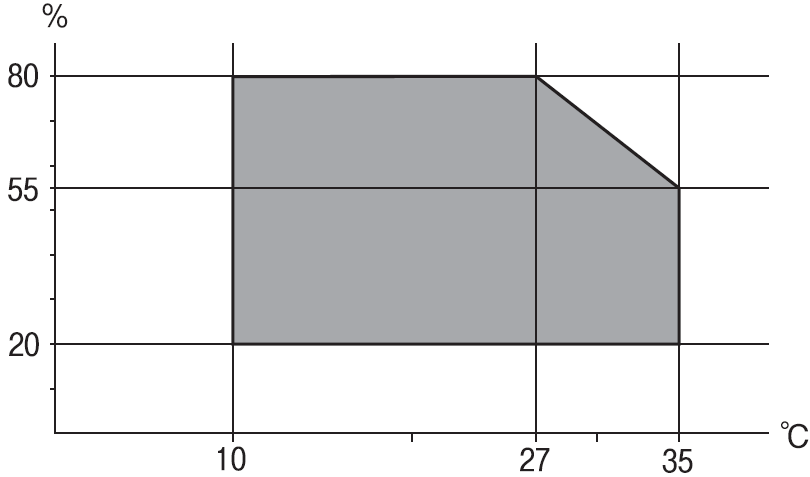 Temperature: 10 to 35°C (50 to 95°F) Humidity: 20 to 80% RH (without condensation) |
| Storage | Temperature: -20 to 40°C (-4 to 104°F)* Humidity: 5 to 85% RH (without condensation) |
You can store for one month at 40°C (104°F).
Environmental Specifications for Ink Bottles
| Storage Temperature | -20 to 40 °C (-4 to 104 °F)* |
| Freezing Temperature | -15 °C (5 °F) Ink thaws and is usable after approximately 2 hours at 25 °C (77 °F). |
You can store for one month at 40°C (104°F).
System Requirements
- Windows 8.1 (32-bit, 64-bit)/Windows 8 (32-bit, 64-bit)/Windows 7 (32-bit, 64-bit)/Windows Vista (32-bit, 64-bit)/Windows XP Professional x64 Edition/Windows XP (32-bit)
- Mac OS X v10.9.x/Mac OS X v10.8.x/Mac OS X v10.7.x/Mac OS X v10.6.8
Note:
- Mac OS X may not support some applications and features.
- The UNIX File System (UFS) for Mac OS X is not supported.
Printer Basics
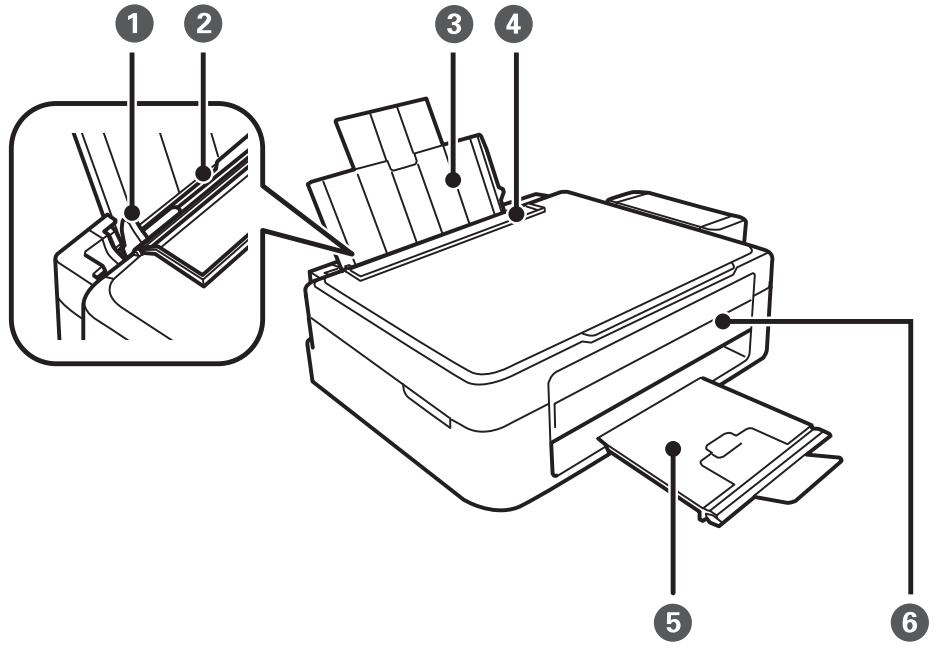
Part Names and Functions
- Edge guide - Feeds the paper straight into the printer. Slide to the edges of the paper.
- Rear paper feed - Loads paper.
- Paper support - Supports loaded paper.
- Feeder guard - Prevents foreign substances from entering the printer. Usually keep this guard closed
- Output tray - Holds the ejected paper. Before printing, raise the stopper to prevent the ejected paper from falling off the tray.
- Control panel - Operates the printer.
Printer Basics
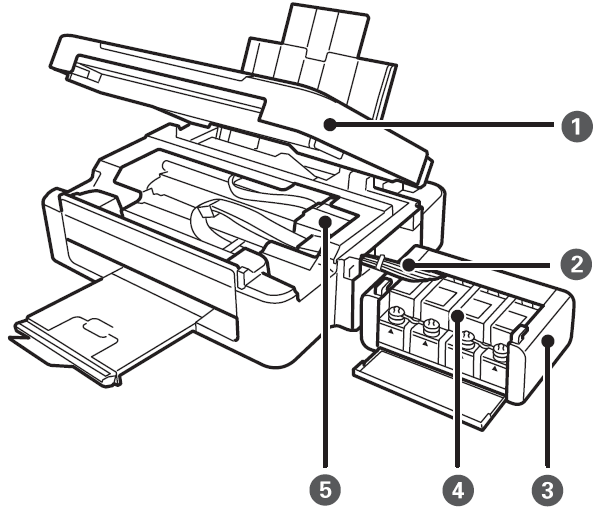
- Scanner unit - Scans placed originals. Open when removing jammed paper inside the printer.
- Ink tube - Supplies ink to the print head.
- Ink tank unit - Contains the ink tanks.
- Ink reservoir tanks (Ink tanks) - Supplies ink to the ink tubes.
- Print head - Fires ink.
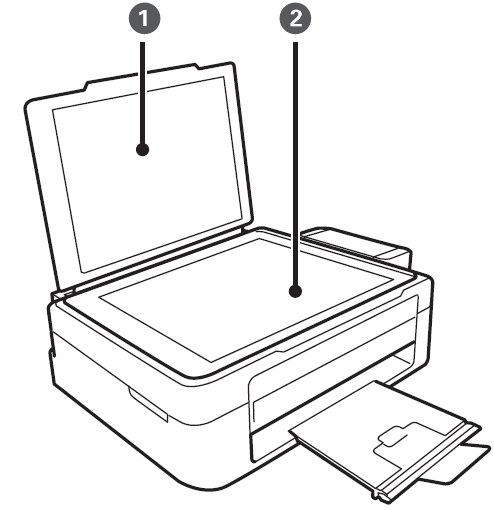
- Document cover - Blocks external light while scanning.
- Scanner glass - Place the originals.
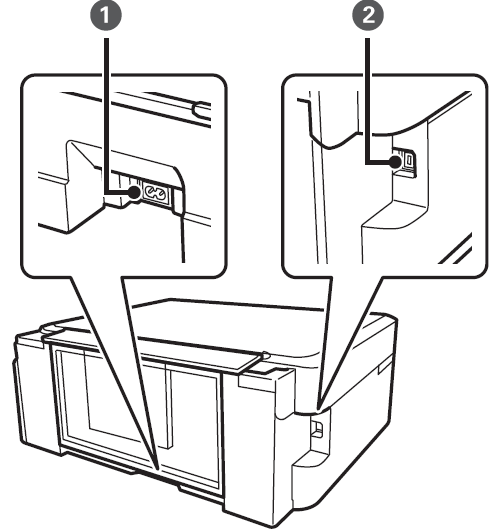
- AC inlet - Connects the power cord.
- USB port - Connects a USB cable.
Buttons
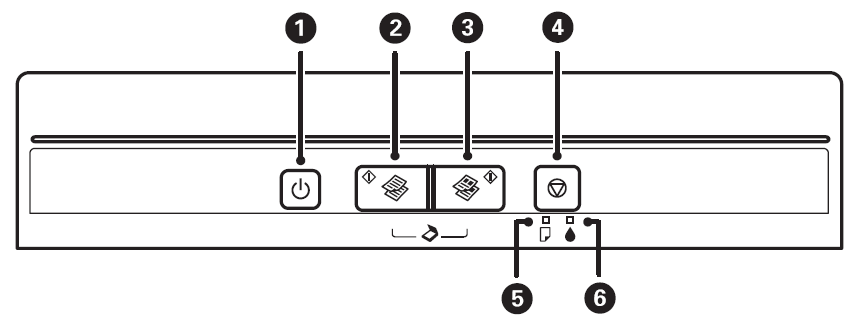
.png) Turns the printer on or off.
Turns the printer on or off.
Do not turn off while the power light is flashing (while the printer is operating or processing data).
Unplug the power cord when the power light is off. Starts monochrome copying on A4 size plain paper.
 Starts color copying on A4 size plain paper.
 Stops the current operation.
Hold this button down for three seconds until the P button flashes to run print head cleaning. Turns on or flashes when paper is out or a paper jam occurs.
 Indicates the status of the initial ink charging.
Additional functions are available with different combinations of buttons.
 +
+  Press the
  and
and  buttons simultaneously to start monochrome copying in draft mode.
 +
+  Press the
  and
and  buttons simultaneously to start color copying in draft mode.
 +
+  Press the
  and
and  buttons simultaneously to run software on a USB-connected computer and scan as a PDF file.
 +
+ .png) Turn the printer on while holding down the
Turn the printer on while holding down the  button to print the nozzle check pattern.
Description
With its adaptable design and excellent performance, the Epson L363 Exceed Your Vision Printer projector produces breathtaking images in every environment. The 4K resolution and HDR compatibility of this gadget provide a realistic and captivating visual experience. Its long-lasting laser light source avoids the need for regular bulb replacements, and its 3LCD technology provides accurate color reproduction and brightness. The projector is ideal for both personal and business use because of its wireless and Bluetooth connectivity options, which facilitate connecting to a variety of devices.
Placing Originals on the Scanner Glass
Important:
When placing bulky originals such as books, prevent exterior light from shining directly onto the scanner glass.
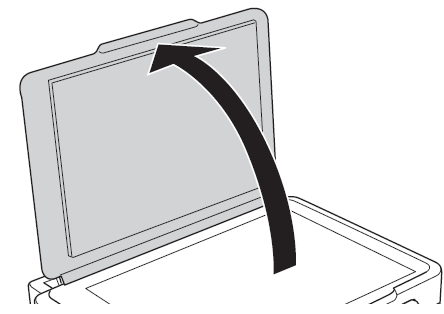
- Open the document cover.
Remove any dust or stains on the scanner glass.
Place the original face-down and slide it to the corner mark.
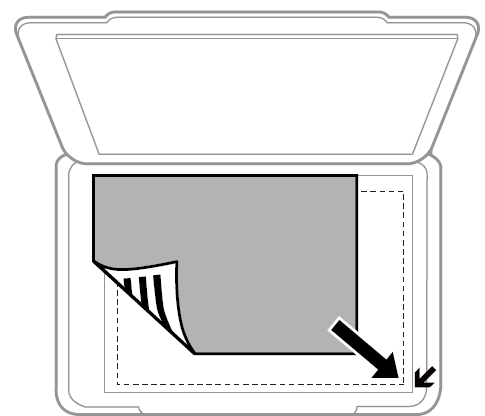
Note: The area 1.5 mm from the edges of the scanner glass is not scanned.
Placing Originals on the Scanner Glass
If you are scanning using Full Auto Mode or a thumbnail preview of EPSON Scan, place the original 4.5 mm away from the horizontal and vertical edges of the scanner glass.
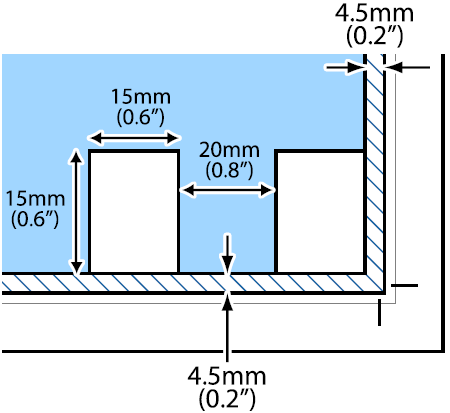
Note: Place multiple photos at least 20 mm apart from each other. The photos should be larger than 15 x 15 mm. 4. Close the cover gently.
Note: Remove the originals after scanning or copying. If you leave the originals on the scanner glass for a long time, they may stick to the surface of the glass.
Printing
Printing from a Computer
Printing Basics - Windows
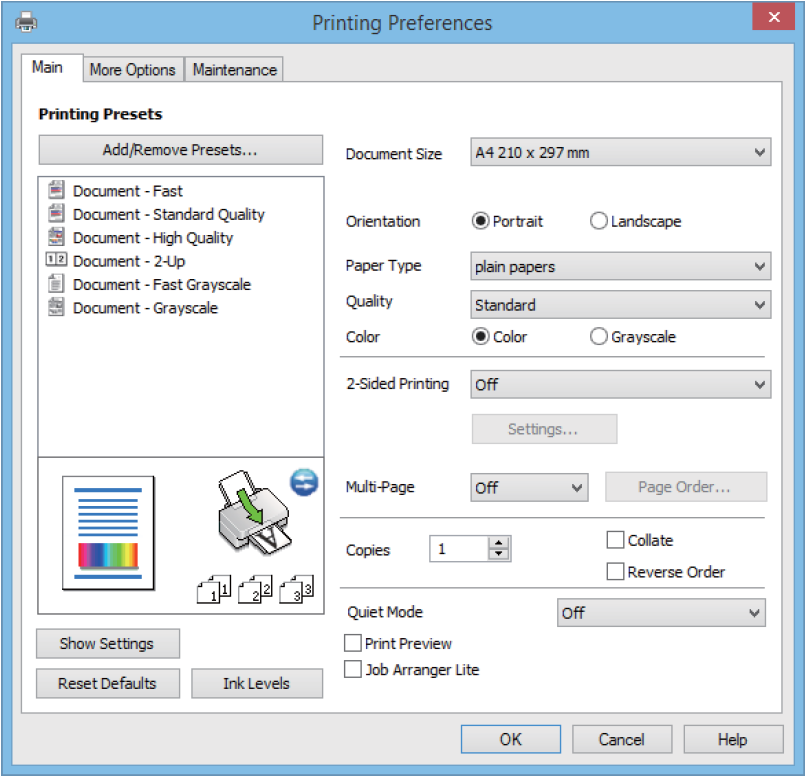
Note:
See the online help for explanations of the setting items. Right-click an item, and then click Help.
Operations differ depending on the application. See the application's help for details.
- Load paper in the printer.
- Open the file you want to print.
- Select Print or Print Setup from the File menu.
- Select your printer.
- Select Preferences or Properties to access the printer driver window.
Orientation: Select the orientation you set in the application.
Paper Type: Select the type of paper you loaded.
Color: Select Grayscale when you want to print in black or shades of gray.
Note: When printing on envelopes, select Landscape as the Orientation setting. 7. Click OK to close the printer driver window. 8. Click Print.
Printing Basics - Mac OS X
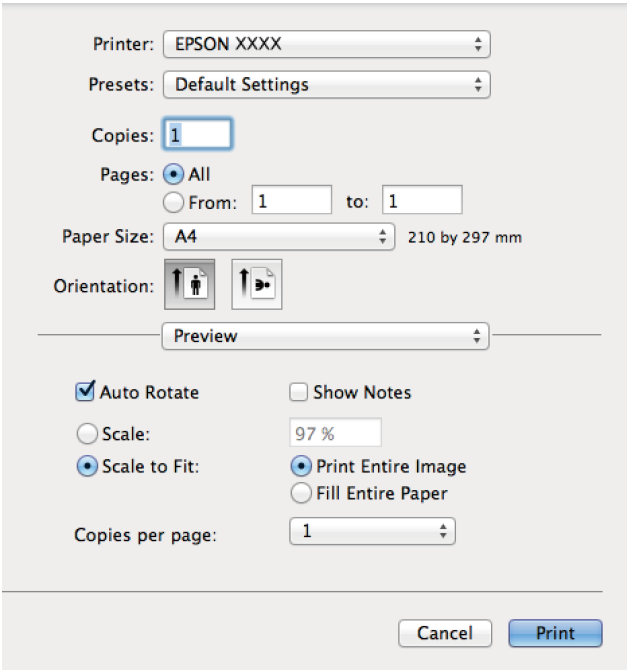
Note:
Operations differ depending on the application. See the application's help for details.
- Load paper in the printer.
- Open the file you want to print.
- Select Print from the File menu or another command to access the print dialog.
If necessary, click Show Details or d to expand the print window. - Make the following settings. ❏ Printer: Select your printer.
- Preset: Select when you want to use the registered settings.
- Paper Size: Select the paper size you loaded in the printer.
- Orientation: Select the orientation you set in the application.
Note: When printing on envelopes, select landscape orientation.
- Select Print Settings from the pop-up menu.
Note:
On Mac OS X v10.8.x or later, if the Print Settings menu is not displayed, the Epson printer driver has not been installed correctly. Select System Preferences from the menu > Printers & Scanners (or Print & Scan, Print & Fax), remove the printer, and then add the printer again. See the following to add a printer. http://epson.sn 6. Make the following settings.
Media Type: Select the type of paper you loaded.
Grayscale: Select to print in black or shades of gray. 7. Click Print.
Printing on 2-Sides (for Windows Only)
The printer driver prints automatically separating even pages and odd pages. When the printer has finished printing the odd pages, flip the paper over following the instructions to print the even pages. You can also print a booklet that can be created by folding the printout.
_epson_exceed_your_vision.png)
Note:
- If you do not use paper that is suitable for 2-sided printing, the print quality may decline and paper jams may occur.
- Depending on the paper and the data, ink may bleed through to the other side of the paper.
- If EPSON Status Monitor 3 is disabled, access the printer driver, click Extended Settings on the Maintenance tab, and then select Enable EPSON Status Monitor 3.
- 2-sided printing may not be available when the printer is accessed over a network or is used as a shared printer.
- Load paper in the printer.
- Open the file you want to print.
- Access the printer driver window.
- Select Manual (Long-edge binding) or Manual (Short-edge binding) from 2-Sided Printing on the Main tab.
- Click Settings, make the appropriate settings, and then click OK.
Note: To print as a booklet, select Booklet. - Set the other items on the Main and More Options tabs as necessary, and then click OK.
- Click Print.
When the first side has finished printing, a pop-up window is displayed on the computer. Follow the on-screen instructions.
Printing Several Pages on One Sheet
You can print two or four pages of data on a single sheet of paper.
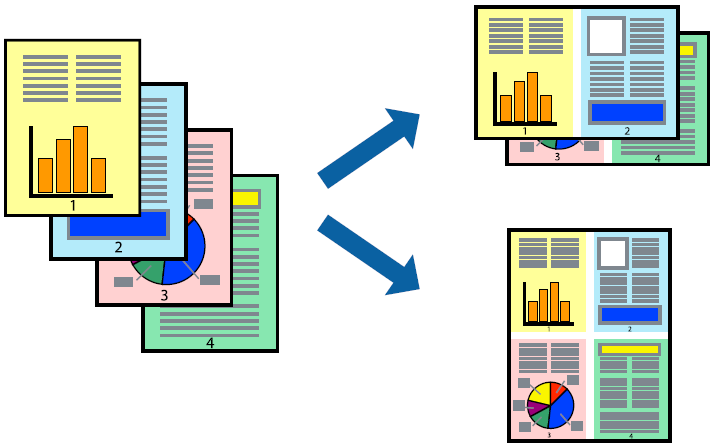
Printing Several Pages on One Sheet - Windows
- Load paper in the printer.
- Open the file you want to print.
- Access the printer driver window.
- Select 2-Up or 4-Up as the Multi-Page setting on the Main tab.
- Click Page Order, make the appropriate settings, and then click OK to close the window.
- Set the other items on the Main and More Options tabs as necessary, and then click OK.
- Click Print.
Printing Several Pages on One Sheet - Mac OS X
- Load paper in the printer.
- Open the file you want to print.
- Access the print dialog.
- Select Layout from the pop-up menu.
- Set the number of pages in Pages per Sheet, the Layout Direction (page order), and Border.
- Set the other items as necessary.
- Click Print.
Printing to Fit the Paper Size
You can print to fit the paper size you loaded in the printer.

Printing to Fit the Paper Size - Windows
- Load paper in the printer.
- Open the file you want to print.
- Access the printer driver window.
- Make the following settings on the More Options tab.
❏ Document Size: Select the paper size you set in the application.
❏ Output Paper: Select the paper size you loaded in the printer.
Fit to Page is selected automatically.
Note: If you want to print a reduced image at the center of the page, select Center. - Set the other items on the Main and More Options tabs as necessary, and then click OK.
- Click Print.
Printing to Fit the Paper Size - Mac OS X
- Load paper in the printer.
- Open the file you want to print.
- Access the print dialog.
- Select the size of the paper you set in the application as the Paper Size setting.
- Select Paper Handling from the pop-up menu.
- Select Scale to fit paper size.
- Select the paper size you loaded in the printer as the Destination Paper Size setting.
- Set the other items as necessary.
- Click Print.
Printing Multiple Files Together (for Windows Only)
Job Arranger Lite allows you to combine several files created by different applications and print them as a single print job. You can specify the print settings for combined files, such as layout, print order, and orientation.
_epson_exceed_your_vision.png)
Note:
To open a Print Project saved in Job Arranger Lite, click Job Arranger Lite on the printer driver's Maintenance tab. Next, select Open from the File menu to select the file. The extension of the saved files is "ecl".
- Load paper in the printer.
- Open the file you want to print.
- Access the printer driver window.
- Select Job Arranger Lite on the Main tab.
- Click OK to close the printer driver window.
- Click Print.
The Job Arranger Lite window is displayed and the print job is added to the Print Project. - With the Job Arranger Lite window opened, open the file that you want to combine with the current file, and then repeat steps 3 to 6.
Note: If you close the Job Arranger Lite window, the unsaved Print Project is deleted. To print later, select Save from the File menu. - Select the Layout and Edit menus in Job Arranger Lite to edit the Print Project as necessary.
- Select Print from the File menu.
Enlarged Printing and Making Posters (for Windows Only)
You can print one image on multiple sheets of paper to create a larger poster. You can print alignment marks that help you stick the sheets together.
_epson_exceed_your_vision.png)
- Load paper in the printer.
- Open the file you want to print.
- Access the printer driver window.
- Select 2x1 Poster, 2x2 Poster, 3x3 Poster, or 4x4 Poster from Multi-Page on the Main tab.
- Click Settings, make the appropriate settings, and then click OK.
- Set the other items on the Main and More Options tabs as necessary, and then click OK.
- Click Print.
Making Posters Using Overlapping Alignment Marks
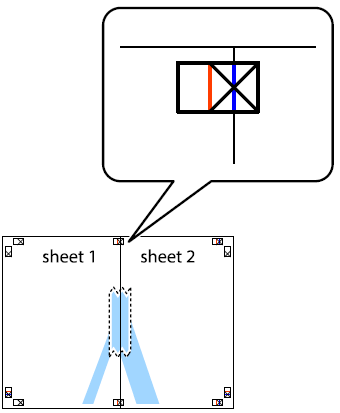
Here is an example of how to make a poster when 2x2 Poster is selected, and Overlapping Alignment Marks is selected in Print Cutting Guides.
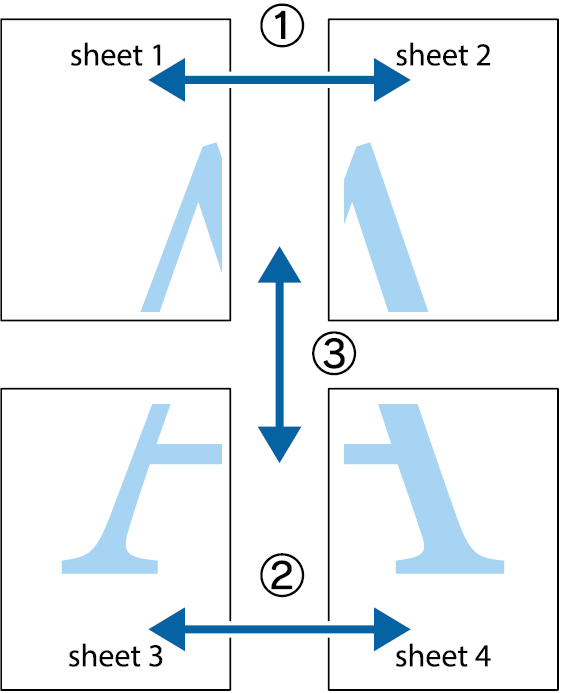
Prepare Sheet 1 and Sheet 2. Cut off the margins of Sheet 1 along the vertical blue line through the center of the top and bottom cross marks.
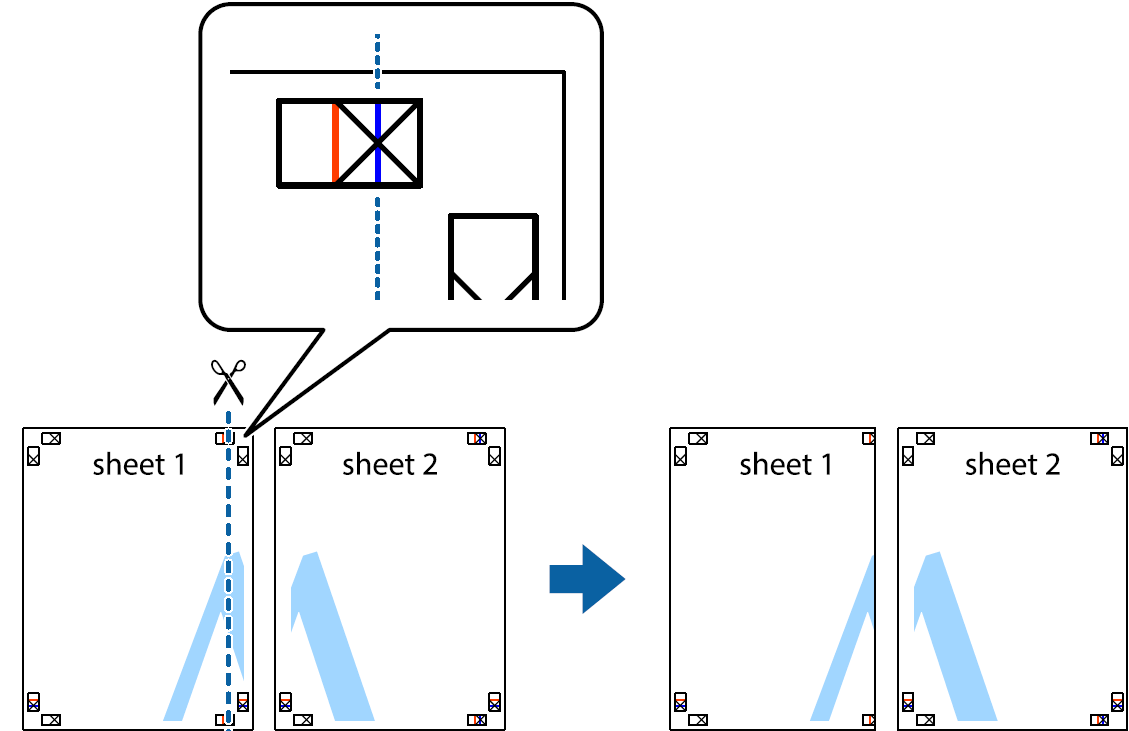
Place the edge of Sheet 1 on top of Sheet 2 and align the cross marks, then temporarily tape the two sheets together from the back.
Cut the taped sheets in two along the vertical red line through the alignment markers (this time, the line to the left of the cross marks).
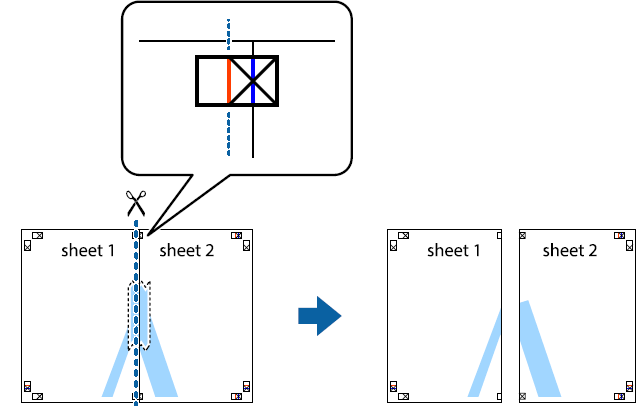
Tape the sheets together from the back.
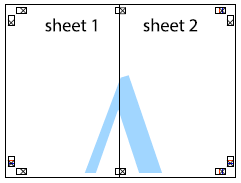
- Repeat steps 1 to 4 to tape Sheet 3 and Sheet 4 together.
Cut off the margins of Sheet 1 and Sheet 2 along the horizontal blue line through the center of the left and right side cross marks.
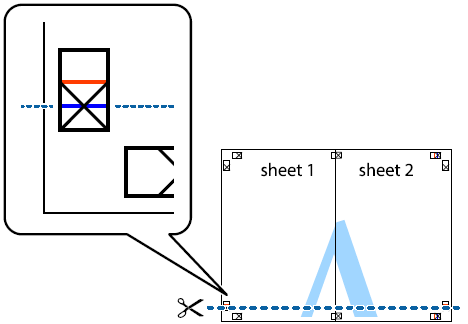
Place the edge of Sheet 1 and Sheet 2 on top of Sheet 3 and Sheet 4 and align the cross marks, and then temporarily tape them together from the back.
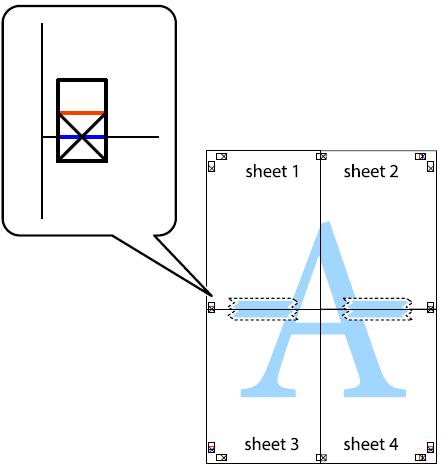
Cut the taped sheets in two along the horizontal red line through the alignment markers (this time, the line above the cross marks).
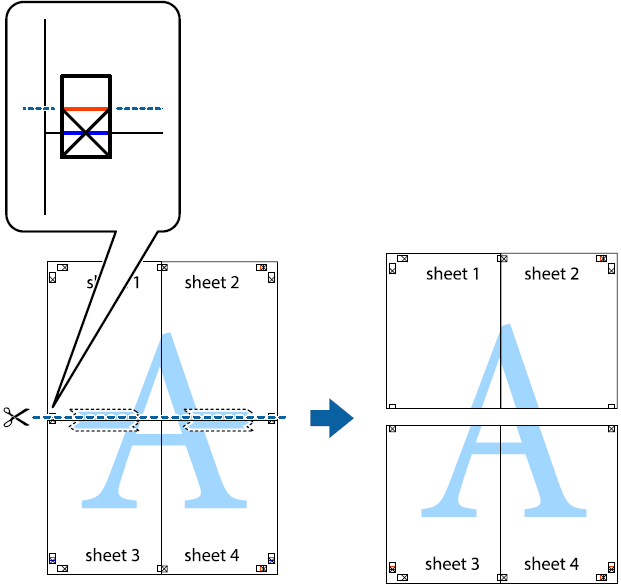
Tape the sheets together from the back.
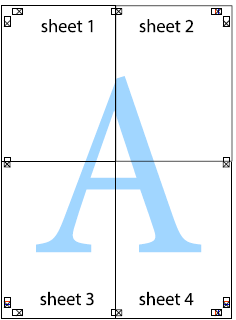
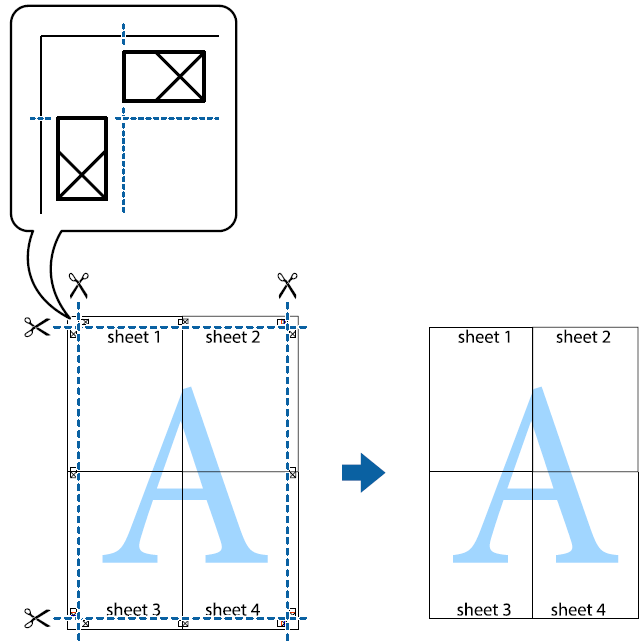
Cut off the remaining margins along the outer guide.
Printing Using Advanced Features
This section introduces a variety of additional layout and printing features available on the printer driver.
Adding a Printing Preset to Print Easily
If you create your own preset of frequently used print settings on the printer driver, you can print easily by selecting the preset from the list.
Printing - Windows
To add your own preset, set items such as the Document Size and Paper Type on the Main or More Options tab, and then click Add/Remove Presets in Printing Presets.
Note: To delete an added preset, click Add/Remove Presets, select the preset name you want to delete from the list, and then delete it.
Printing - Mac OS X
Access the print dialog. To add your own preset, set items such as the Paper Size and Media Type, and then save the current settings as the preset in the Presets setting.
Note: To delete an added preset, click presets > Show Presets, select the preset name you want to delete from the list, and then delete it.
Printing a Reduced or Enlarged Document
You can reduce or enlarge the size of a document by a specific percentage.
- Printing - Windows
- Set the Document Size on the More Options tab. Select Reduce/Enlarge Document, Zoom to, and then enter a percentage.
- Printing - Mac OS X
- Select Page Setup from the File menu. Select the settings for Format For and Paper Size, and then enter a percentage in Scale. Close the window, and then print following the basic printing instructions.
Adjusting the Print Color
You can adjust the colors used in the print job.
PhotoEnhance produces sharper images and more vivid colors by automatically adjusting the contrast, saturation, and brightness of the original image data.
Note: These adjustments are not applied to the original data. PhotoEnhance adjusts the color by analyzing the location of the subject. Therefore, if you have changed the location of the subject by reducing, enlarging, cropping, or rotating the image, the color may change unexpectedly. If the image is out of focus, the tone may be unnatural. If the color is changed or becomes unnatural, print in a mode other than PhotoEnhance.
Adjusting the Print Color - Windows
Select the method of color correction from Color Correction on the More Options tab.
If you select Automatic, the colors are automatically adjusted to match the paper type and print quality settings. If you select Custom and click Advanced, you can make your own settings.
Adjusting the Print Color - Mac OS X
Access the print dialog. Select Color Matching from the pop-up menu, and then select EPSON Color Controls. Select Color Options from the pop-up menu, and then select one of the available options. Click the arrow next to Advanced Settings and make the appropriate settings.
Printing a Watermark (for Windows Only)
You can print a watermark such as "Confidential" on your printouts. You can also add your own watermark.
Click Watermark Features on the More Options tab, and then select a watermark. Click Settings to change details such as the color and position of the watermark.
Printing a Header and Footer (for Windows Only)
You can print information such as a user name and printing date as headers or footers.
Click Watermark Features in the More Options tab, and then select Header/Footer. Click Settings and select necessary items from the drop-down list.
Printing Photos Using Epson Easy Photo Print
Epson Easy Photo Print lets you lay out and print photos easily on various types of paper.
Note: By printing on genuine Epson photo paper, the ink quality is maximized and the printouts are vivid and clear.
Canceling Printing
Note: In Windows, you cannot cancel a print job from the computer once it has been completely sent to the printer. In this case, cancel the print job by using the printer's control panel. When printing several pages from Mac OS X, you cannot cancel all of the jobs by using the control panel. In this case, cancel the print job from the computer.
Canceling Printing - Printer Button
Press the y button to cancel the print job in progress.
Canceling Printing - Windows
- Access the printer driver window.
- Select the Maintenance tab.
- Click Print Queue.
- Right-click on the job you want to cancel and then select Cancel.
Canceling Printing - Mac OS X
- Click the printer icon in the Dock.
- Select the job you want to cancel.
- Cancel the job.
Mac OS X v10.8.x to Mac OS X v10.9.x
Click.png) next to the progress meter.
next to the progress meter.
Mac OS X v10.6.8 to v10.7.x
Click Delete.
Setup Guide
To operate, assemble, and configure the Epson Exceed your Vision, follow these steps:
- Unbox the projector and connect the power cord.
- Turn on the projector and use the remote control to navigate the on-screen menu.
- Connect your device to the projector using the HDMI or wireless connection.
- Adjust the projector's position and focus using the manual controls.
- Configure the projector's settings to your preference.
Improving Print and Scan Quality
Checking and Cleaning the Print Head
If the nozzles are clogged, the printouts become faint, there is visible banding, or unexpected colors appear. When print quality has declined, use the nozzle check feature and check if the nozzles are clogged. If the nozzles are clogged, clean the print head.
Important: Do not open the scanner unit or turn off the printer during head cleaning. If the head cleaning is incomplete, you may not be able to print.
Note:
- Because print head cleaning uses some ink, clean the print head only if quality declines.
- When ink is low, you may not be able to clean the print head. Prepare a new ink bottle.
- If print quality has not improved after repeating nozzle check and head cleaning three times, wait for at least 12 hours without printing, and then run the nozzle check again and repeat the head cleaning if necessary. We recommend to turn off the printer. If print quality has still not improved, contact Epson support.
- To prevent the print head from drying out, do not unplug the printer while the power is on.
- To keep the print head operating at its best, we recommend printing a few pages on a regular basis.
Checking and Cleaning the Print Head - Printer Buttons
- Load A4-size plain paper in the printer.
- Press the
.png) button to turn off the printer.
button to turn off the printer. - Turn the printer on while holding the y button down, and then release the buttons when the power light flashes.
The nozzle check pattern is printed. Compare the printed check pattern with the sample shown below.
All lines are printed: The print head nozzles are not clogged. You do not need to clean the print head.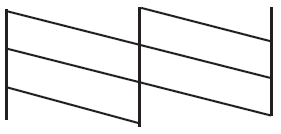
There are broken lines or missing segments: The print head nozzles may be clogged. Go to the next step.
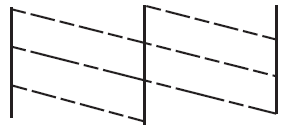
Note: The test pattern may vary by model.
- Hold the y button down for three seconds until the power light starts flashing.
Print head cleaning starts. - When the power light stops flashing, print a nozzle check pattern again. Repeat cleaning and printing the pattern until all lines are printed completely.
Checking and Cleaning the Print Head - Windows
- Load A4-size plain paper in the printer.
- Access the printer driver window.
- Click Nozzle Check on the Maintenance tab.
- Follow the on-screen instructions.
Checking and Cleaning the Print Head - Mac OS X
- Load A4-size plain paper in the printer.
- Select System Preferences from the menu
 > Printers & Scanners (or Print & Scan, Print & Fax), and then select the printer.
 - Click Options & Supplies > Utility > Open Printer Utility.
- Click Nozzle Check.
- Follow the on-screen instructions.
Replacing Ink inside the Ink Tubes
If you have not used the printer for a long time and notice banding or missing colors in the printouts, you may need to replace the ink inside the ink tubes to solve the problem. The Power Ink Flushing utility allows you to replace all of the ink inside the ink tubes.
Important: This feature consumes a lot of ink. Before using this feature, make sure there is enough ink in the printer’s ink tanks. If there is not enough ink, refill the ink tanks.
Caution:
- This feature affects the service life of the ink pad. The ink pad reaches its capacity earlier by running this feature. Contact Epson or an authorized Epson service provider to request replacement before the end of its service life. It is not a user-serviceable part.
- After using the Power Ink Flushing utility, turn the printer off and wait for at least 12 hours. Using this feature improves the print quality after 12 hours, however it cannot be used again within 12 hours of the last use. If you still cannot solve the problem after trying all of the methods above, contact Epson support.
Replacing Ink inside the Ink Tubes - Windows
- Access the printer driver window.
- Click Power Ink Flushing on the Maintenance tab.
- Follow the on-screen instructions.
Replacing Ink inside the Ink Tubes - Mac OS X
- Select System Preferences from the menu
 > Printers & Scanners (or Print & Scan, Print & Fax), and then select the printer.
 - Click Options & Supplies > Utility > Open Printer Utility.
- Click Power Ink Flushing.
- Follow the on-screen instructions.
Aligning the Print Head
If you notice a misalignment of vertical lines or blurred images, align the print head.
Aligning the Print Head - Windows
- Load A4-size plain paper in the printer.
- Access the printer driver window.
- Click Print Head Alignment on the Maintenance tab.
- Follow the on-screen instructions.
Aligning the Print Head - Mac OS X
- Load A4-size plain paper in the printer.
- Select System Preferences from the menu
 > Printers & Scanners (or Print & Scan, Print & Fax), and then select the printer.
 - Click Options & Supplies > Utility > Open Printer Utility.
- Click Print Head Alignment.
- Follow the on-screen instructions.
Cleaning the Paper Path
When the printouts are smeared or scuffed, clean the roller inside.
Important:
Do not use tissue paper to clean the inside of the printer. The print head nozzles may be clogged with lint.
- Make sure there is no dust or stains on the scanner glass.
- Load A4-size plain paper in the printer.
Start copying without placing the original.
Note: Repeat this procedure until the paper is not smeared with ink.
Cleaning the Scanner Glass
When the copies or scanned images are smeared or scuffed, clean the scanner glass.
Important: Never use alcohol or thinner to clean the printer. These chemicals can damage the printer.

- Open the document cover.
- Use a soft, dry, clean cloth to clean the surface of the scanner glass.
Note:- If the glass surface is stained with grease or some other hard-to-remove material, use a small amount of glass cleaner and a soft cloth to remove it. Wipe off all remaining liquid.
- Do not press the glass surface too hard.
- Be careful not to scratch or damage the surface of the glass. A damaged glass surface can decrease the scan quality.
Important Instructions
Safety Instructions
Read and follow these instructions to ensure safe use of this printer. Make sure you keep this manual for future reference. Also, be sure to follow all warnings and instructions marked on the printer.
- Use only the power cord supplied with the printer and do not use the cord with any other equipment. Use of other cords with this printer or the use of the supplied power cord with other equipment may result in fire or electric shock.
- Be sure your AC power cord meets the relevant local safety standard.
- Never disassemble, modify, or attempt to repair the power cord, plug, printer unit, scanner unit, or options by yourself, except as specifically explained in the printer's manuals.
- Unplug the printer and refer servicing to qualified service personnel under the following conditions:
- The power cord or plug is damaged; liquid has entered the printer; the printer has been dropped or the casing damaged; the printer does not operate normally or exhibits a distinct change in performance. Do not adjust controls that are not covered by the operating instructions.
- Place the printer near a wall outlet where the plug can be easily unplugged.
- Do not place or store the printer outdoors, near excessive dirt or dust, water, heat sources, or in locations subject to shocks, vibrations, high temperature or humidity.
- Take care not to spill liquid on the printer and not to handle the printer with wet hands.
- Be careful not to touch any ink when you handle the ink tanks, ink tank caps, and opened ink bottles or ink bottle caps
- If ink gets on your skin, wash the area thoroughly with soap and water.
- If ink gets into your eyes, flush them immediately with water. If discomfort or vision problems continue after a thorough flushing, see a doctor immediately.
- If ink gets into your mouth, see a doctor right away.
- Do not tilt or shake an ink bottle after removing its seal; this can cause leakage.
- Keep ink bottles and the ink tank unit out of the reach of children. Do not allow children to drink from or handle the ink bottles and ink bottle cap.
Printer Advisories and Warnings
Read and follow these instructions to avoid damaging the printer or your property. Make sure you keep this manual for future reference.
Advisories and Warnings for Setting Up/Using the Printer
- Do not block or cover the vents and openings in the printer.
- Use only the type of power source indicated on the printer's label
- Avoid using outlets on the same circuit as photocopiers or air control systems that regularly switch on and off.
- Avoid electrical outlets controlled by wall switches or automatic timers.
Solving Problems
Checking the Printer Status
Checking the Error Indicators on the Printer
When an error occurs, the light turns on or flashes. Details of the error are displayed on the computer screen.
 :On
:On : Flashing slowly
 : Flashing fast

Note: In some print cycles a very small amount of surplus ink may be collected in the ink pad. To prevent ink leakage from the pad, the printer is designed to stop printing when the pad has reached its limit. Whether and how often this is required will vary according to the number of pages you print, the type of material that you print and the number of cleaning cycles that the printer performs. The need for replacement of the pad does not mean that your printer has ceased to operate in accordance with its specifications. The printer will advise you when the pad requires replacing and this can only be performed by an authorized Epson Service provider. The Epson warranty does not cover the cost of this replacement.
Checking the Printer Status - Windows
- Access the printer driver window.
- Click EPSON Status Monitor 3 on the Maintenance tab.
Note:- You can also check the printer status by double-clicking the printer icon on the taskbar. If the printer icon is not added to the taskbar, click Monitoring Preferences on the Maintenance tab, and then select Register the shortcut icon to the taskbar.
- If EPSON Status Monitor 3 is disabled, click Extended Settings on the Maintenance tab, and then select Enable EPSON Status Monitor 3.
Checking Printer Status - Mac OS X
- Select System Preferences from the menu
 > Printers & Scanners (or Print & Scan, Print & Fax), and then select the printer.
 - Click Options & Supplies > Utility > Open Printer Utility.
- Click EPSON Status Monitor.
Removing Jammed Paper
Check the error displayed on the control panel and follow the instructions to remove the jammed paper including any torn pieces. Next, clear the error.
Important: Remove the jammed paper carefully. Removing the paper vigorously may cause damage to the printer.
Removing Jammed Paper from the Rear Paper Feed
Remove the jammed paper.

Removing Jammed Paper from Inside the Printer
Caution: Be careful not to trap your hand or fingers when opening or closing the scanner unit. Otherwise you may be injured. Never touch the buttons on the control panel while your hand is inside the printer. If the printer starts operating, it could cause an injury. Be careful not to touch the protruding parts to avoid injury.
Open the scanner unit with the document cover closed.
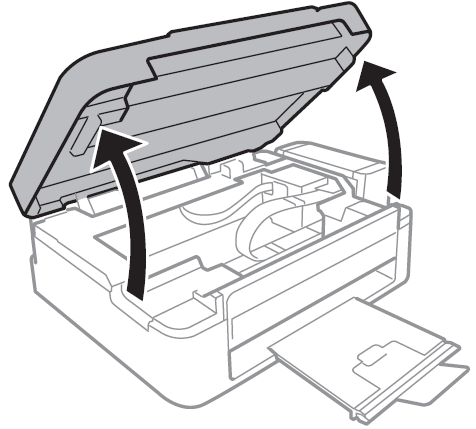
Remove the jammed paper.

Important: Do not touch the white flat cable, translucent part, and ink tubes inside the printer. Doing so may cause a malfunction.

Close the scanner unit.

The paper Does Not Feed Correctly
Check the following if the paper jams, paper is fed at a slant, several sheets of paper are fed at a time, no paper is fed, or paper is ejected.
- Place the printer on a flat surface and operate in the recommended environmental conditions.
- Use paper supported by this printer.
- Follow the paper handling precautions.
- Load paper in the correct direction, and slide the edge guide against the edge of the paper.
- Do not load more than the maximum number of sheets specified for the paper. For plain paper, do not load above the line indicated by the triangle symbol on the edge guide.
- When a paper out error occurs although paper is loaded in the printer, reload paper against the right edge of the rear paper feed.
- Load one sheet of paper at a time when loading multiple sheets of paper.
- When several sheets of paper are fed at a time during manual 2-sided printing, remove any paper which is loaded in the paper source before you reload the paper.
- Printing may have been paused for a certain length of time which causes the printer to eject the paper.
Power and Control Panel Problems
Power Does Not Turn On
- Hold down the
.png) button for a little longer.
button for a little longer. - Make sure the power cord is securely plugged in.
Power Does Not Turn Off
Hold down the ![]() button for a little longer. If you still cannot turn off the printer, unplug the power cord. To prevent the print head from drying out, turn the printer back on and turn it off by pressing the P button.
button for a little longer. If you still cannot turn off the printer, unplug the power cord. To prevent the print head from drying out, turn the printer back on and turn it off by pressing the P button.
Printer Does Not Print
Check the following if the printer does not operate or prints nothing.
- Install the printer driver.
- To print photos easily, install Epson Easy Photo Print.
- Connect the USB cord securely to the printer and the computer.
- If you are using a USB hub, try to connect the printer directly to the computer
- If you are printing a large data size image, the computer may run out of memory. Print the image at a lower resolution or a smaller size.
- In Windows, click Print Queue on the printer driver's Maintenance tab, and then check the following.
- Check if there are any paused print jobs.
- Cancel printing if necessary.
- Make sure the printer is not offline or pending.
- If the printer is offline or pending, clear the offline or pending setting from the Printer menu.
- Make sure the printer is selected as the default printer from the Printer menu (there should be a check mark on the menu item).
- If the printer is not selected as the default printer, set it as the default printer.
In Mac OS X, make sure the printer status is not Pause. - Select System Preferences from the menu
 > Printers & Scanners (or Print & Scan, Print & Fax), and then double-click the printer. If the printer is paused, click Resume (or Resume Printer).
Run the nozzle check, and then clean the print head if any of the print head nozzles are clogged.
Printout Problems
Print Quality Is Poor
Check the following if the print quality is poor due to blurry prints, banding, missing colors, faded colors, misalignment, and mosaic-like patterns in the prints.
- Make sure the initial ink charging is complete.
- Check the ink tank. If the tank is empty, refill the ink immediately and clean the print head.
- Run the nozzle check and then clean the print head if any of the print head nozzles are clogged.
- If you have not used the printer for a long time, use the Power Ink Flushing utility of the printer driver
- Align the print head.
- If misalignment appears at intervals of 2.5 cm, align the print head.
- Use paper supported by this printer.
- Do not print on paper that is damp, damaged, or too old.
- If the paper is curled or the envelope is puffed up, flatten it.
- When printing images or photos, print using high-resolution data. Images on websites are often low resolution although they look good enough on the display, and so print quality may decline.
- Select the appropriate paper type setting in the printer driver for the type of paper loaded in the printer.
- Print using a high quality setting in the printer driver.
- When images or photos are printed in unexpected colors, adjust the color and then print again. The automatic color correction feature uses the standard correction mode in PhotoEnhance. Try another correction mode in PhotoEnhance by selecting an option other than Auto Correct as the Scene Correction setting. If the problem continues, use any other color correction feature other than PhotoEnhance.
- Disable the bidirectional (or high speed) setting. When this setting is enabled, the print head prints while moving in both directions, and vertical lines may be misaligned. If you disable this feature, printing may slow down.
- Windows: Clear High Speed on the printer driver's More Options tab.
- Mac OS X: Select System Preferences from the menu
 > Printers & Scanners (or Print & Scan, Print & Fax), and then select the printer. Click Options & Supplies > Options (or Driver). Select Off as the High Speed Printing setting.
- Do not stack the paper immediately after printing.
- Dry the printouts completely before filing or displaying them. When drying the printouts, avoid direct sunlight, do not use a dryer, and do not touch the printed side of paper.
- Try to use genuine Epson ink bottles. This product is designed to adjust colors based on the use of genuine Epson ink bottles. The use of non-genuine ink bottles may cause print quality to decline.
- Use ink bottles with the correct part code for this printer.
- Epson recommends using the ink bottle before the date printed on the package
- When printing images or photos, Epson recommends using genuine Epson paper rather than plain paper. Print on the printable side of the genuine Epson paper.
Copy Quality Is Poor
Check the following if uneven colors, smears, dots, or straight lines appear in the copied image.
- Load and eject paper without printing to clean the paper path.
- Clean the scanner glass and the document cover.
- Do not press too hard on the original or the document cover when you are placing the originals on the scanner glass. Uneven colors, smears, or dots may appear when the original or the document cover are pressed too hard.
An Image of the Reverse Side of the Original Appears in the Copied Image
- For a thin original, place the original on the scanner glass and then place a piece of black paper over it.
The Position, Size, or Margins of the Printout Are Incorrect
- Load paper in the correct direction, and slide the edge guide against the edges of the paper.
- When placing the originals on the scanner glass, align the corner of the original with the corner indicated by a symbol on the frame of the scanner glass. If the edges of the copy are cropped off, move the original slightly away from the corner.
- Clean the scanner glass and the document cover. If there is dust or stains on the glass, the copy area may extend to include the dust or stains, resulting in the wrong printing position or small images.
- Select the appropriate paper size setting in the printer driver
- Adjust the margin setting in the application so that it falls within the printable area.
Paper Is Smeared or Scuffed
Check the following if the paper is smeared or scuffed when printing.
- Clean the paper path.
- Clean the scanner glass and the document cover.
- Load paper in the correct direction.
- When performing manual 2-sided printing, make sure that the ink is completely dry before reloading the paper.
Printed Characters Are Incorrect or Garbled
- Connect the USB cord securely to the printer and the computer.
- Cancel any paused print jobs.
- Do not put the computer manually into the Hibernate mode or the Sleep mode while printing. Pages of garbled text may be printed next time you start the computer.
The Printed Image Is Inverted
Clear any mirror image settings in the printer driver or the application.
- Windows: Clear Mirror Image on the printer driver's More Options tab.
- Mac OS X: Clear Mirror Image from the print dialog's Print Settings menu.
The Printout Problem Could Not be Cleared
If you have tried all of the solutions and have not solved the problem, try uninstalling and then reinstalling the printer driver.
Other Printing Problems
Printing Is Too Slow
- Close any unnecessary applications.
- Lower the quality setting on the printer driver. High quality printing slows down the printing speed.
- Enable the bidirectional (or high speed) setting. When this setting is enabled, the print head prints while moving in both directions, and the printing speed increases.
- Windows: Select High Speed on the printer driver's More Options tab.
- Mac OS X: Select System Preferences from the menu > Printers & Scanners (or Print & Scan, Print & Fax), and then select the printer. Click Options & Supplies > Options (or Driver). Select On as the High Speed Printing setting.
Disable quiet mode. This feature slows down the printing speed. - Windows: Disable the Quiet Mode setting on the printer driver's Main tab.
- Mac OS X: Select System Preferences from the menu
 > Printers & Scanners (or Print & Scan, Print & Fax), and then select the printer. Click Options & Supplies > Options (or Driver). Select Off as the Quiet Mode setting.
Printing Slows Down Dramatically During Continuous Printing
Printing slows down to prevent the printer mechanism from overheating and being damaged. However, you can continue printing. To return to normal printing speed, leave the printer idle for at least 30 minutes. Printing speed does not return to normal if the power is off.
Cannot Start Scanning
- Connect the interface cable securely to the printer and the computer.
- If you are using a USB hub, try to connect the printer directly to the computer.
- Make sure you select the correct printer (scanner) if a scanner list is displayed when you start EPSON Scan.
- If you are using any TWAIN-compliant applications, select the printer (scanner) you are using.
- In Windows, make sure the printer (scanner) is displayed in Scanner and Camera. The printer (scanner) should be displayed as "EPSON XXXXX (printer name)". If the printer (scanner) is not displayed, uninstall and then re-install EPSON Scan. See the following to access Scanner and Camera.
- Windows 8.1/Windows 8: Select Desktop > Settings > Control Panel, enter "Scanner and Camera" in the search charm, click Show Scanner and Camera, and then check if the printer is displayed.
- Windows 7: Click the start button and select Control Panel, enter "Scanner and Camera" in the search charm, click View scanners and cameras, and then check if the printer is displayed.
- Windows Vista: Click the start button, select Control Panel > Hardware and Sound > Scanners and Cameras, and then check if the printer is displayed.
- Windows XP: Click the start button, select Control Panel > Printers and Other Hardware > Scanner and Cameras, and then check if the printer is displayed.
- If you cannot scan using any TWAIN-compliant applications, uninstall and then reinstall the TWAIN compliant application.
- For Mac OS X with an Intel processor, if other Epson scanner drivers except for EPSON Scan, such as Rosetta or PPC are installed, uninstall them and EPSON Scan, and then reinstall EPSON Scan.
Canot Start Scanning when Using the Control Panel
- Make sure EPSON Scan and Epson Event Manager are installed correctly.
- Check the scanning setting assigned in Epson Event Manager.
Scanned Image Problems
Scan Quality Is Poor
- Clean the scanner glass and the document cover.
- Do not press too hard on the original or the document cover when you are placing the originals on the scanner glass. Uneven colors, smears, or dots may appear when the original or the document cover are pressed too hard.
- Remove dust from the original.
- Scan at a higher resolution.
- Adjust the image in EPSON Scan, and then scan. See the EPSON Scan help for details.
Characters Are Blurred
In Home Mode or Office Mode in EPSON Scan, select Image Option as the Image Adjustments setting, and then select Text Enhancement.
In Professional Mode in EPSON Scan, select Document as the Auto Exposure Type in the Original settings.
Adjust the threshold settings in EPSON Scan.
- Home Mode: Select Black & White as the Image Type setting, click Brightness, and then adjust the threshold.
- Office Mode: Select Black & White as the Image Type setting, and then adjust the threshold.
- Professional Mode: Select Black & White as the Image Type setting, and then adjust the threshold setting.
- Scan at a higher resolution.
An Image of the Reverse Side of the Original Appears in the Scanned Image
- For a thin original, place the original on the scanner glass and then place a piece of black paper over it.
- Make the appropriate document type settings in EPSON Scan
- In-Home Mode or Office Mode in EPSON Scan, select Image Option as the Image Adjustments setting, and then select Text Enhancement.
Moire (Cross-Hatch) Patterns Appear in the Scanned Image
- Place the original at a slightly different angle.
- Select Descreening in any mode other than Full Auto Mode in EPSON Scan.
- Change the resolution setting in EPSON Scan.
Scanning Area or Direction Is Not Correct
- When placing the originals on the scanner glass, align the corner of the original with the corner indicated by a symbol on the frame of the scanner glass. If the edges of the scanned image are cropped off, move the original slightly away from the corner.
- Clean the scanner glass and the document cover. If there is dust or stains on the glass, the scanning area may extend to include the dust or stains, resulting in the wrong scanning position or small images.
- When you place multiple originals on the scanner glass to scan them separately, but they are scanned onto a single file, place the originals at least 20 mm (0.8 inch) apart. If the problem continues, place one original at a time.
- When scanning using Full Auto Mode or the thumbnail preview in EPSON Scan, move the original 4.5 mm (0.18 inch) away from the edges of the scanner glass.
- When using the thumbnail preview for a large original in Home Mode or Professional Mode in EPSON Scan, the scanning area may not be correct. When previewing in EPSON Scan, create marquees of the area you want to scan on the Preview tab in the Preview window.
- If Auto Photo Orientation in EPSON Scan does not work as intended, see the EPSON Scan help.
- Clear Auto Photo Orientation in EPSON Scan.
- When scanning with EPSON Scan the available scanning area may be restricted if the resolution setting is too high. Lower the resolution or adjust the scanning area in the Preview window.
The Scanned Image Problem Could Not be Cleared
If you have tried all of the solutions and could not solve the problem, click Configuration in a mode other than Full Auto Mode in the EPSON Scan window, and then click Reset All on the Other tab to initialize the EPSON Scan settings. If initialization does not solve the problem uninstall and re-install EPSON Scan.
Other Scanning Problems
Cannot Scan in Full Auto Mode in EPSON Scan
- You cannot scan to PDF/Multi-TIFF format continuously in Full Auto Mode. Scan in a mode other than Full Auto Mode.
- See the EPSON Scan help for other ways of solving problems.
The thumbnail Preview Does Not Work Properly
Scanning Is Too Slow
Lower the resolution.
Scanning Stops when Scanning to PDF/Multi-TIFF
- When scanning large volumes, we recommend scanning in grayscale.
- Increase the free space on the computer's hard disk. Scanning may stop if there is not enough free space.
- Try scanning at a lower resolution. Scanning stops if the total data size reaches the limit.
Other Problems
Slight Electric Shock when Touching the Printer
If many peripherals are connected to the computer, you may feel a slight electric shock when touching the printer. Install a ground wire to the computer that is connected to the printer.
Operation Sounds Are Loud
If operations sounds are too loud, enable quiet mode. However, this may slow down printer operations.
- Windows printer driver: Select On as the Quiet Mode setting on the Main tab.
- Mac OS X printer driver: Select System Preferences from the menu
 > Printers & Scanners (or Print & Scan, Print & Fax), and then select the printer. Click Options & Supplies > Options (or Driver). Select On as the Quiet Mode setting.
Application Is Blocked by a Firewall (for Windows Only)
Add the application to the Windows Firewall allowed program in security settings on the Control Panel.
Epson L363 Exceed Your Vision Printer Pros & Cons
Pros
- Stunning 4K resolution and HDR support
- Long-lasting laser light source
- Flexible connectivity options
- User-friendly design
Cons
- May be too expensive for some users
- May be too large for some settings
Customer Reviews
Customers have praised the Epson L363 Exceed Your Vision Printer for its stunning image quality, flexible connectivity options, and user-friendly design. However, some have noted that it may be too expensive for some users and too large for some settings.
Faqs
How can I fill the Epson Exceed Your Vision Printer ink tanks again?
What is the Epson L363 Exceed Your Vision Printer print speed?
What sizes of paper work well with the Epson?
How do I fix the Epson paper jam problem?
What is the warranty period for the L363?
How can I check the nozzle on my Epson L363 Exceed Your Vision Printer?
Leave a Comment
