Epson Printer Stylus CX4600 User Manual | Installation & Usage
Content
Introduction Epson Printer Stylus CX4600
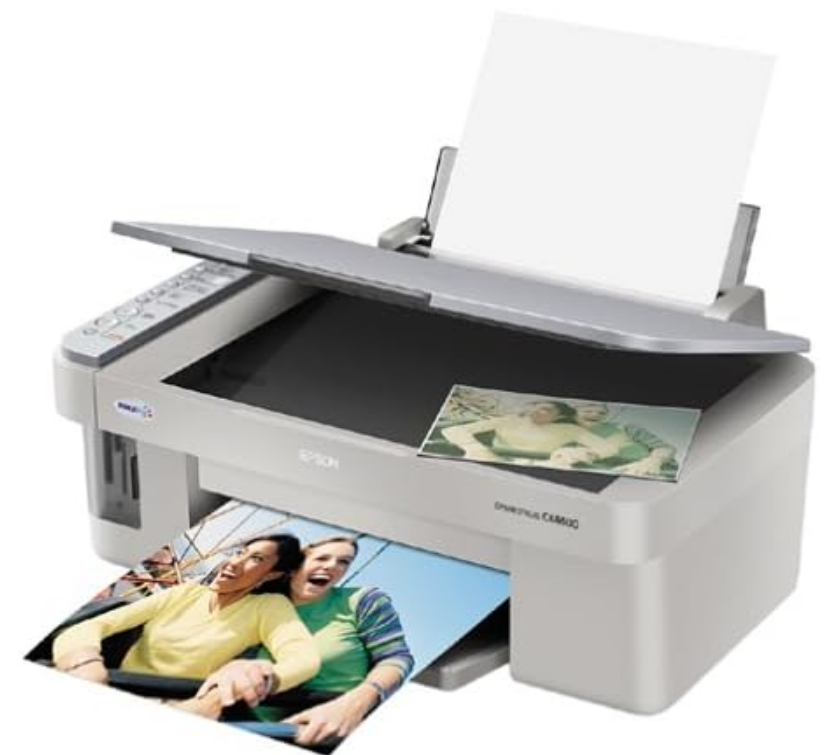
The Epson Printer Stylus CX4600 is a multifunctional device designed for home and small office use, offering printing, scanning, and copying capabilities in one compact unit. This printer utilizes advanced inkjet technology to produce high-quality prints with vibrant colors and sharp details. Its user-friendly interface and various connectivity options make it easy to operate, while the built-in scanner allows for quick digitization of documents. The Epson Stylus CX4600 is priced at approximately $99.99.
Detailed Specifications
The Epson Stylus CX4600 features a print resolution of up to 5760 x 1440 dpi for vibrant and detailed prints. It has a scan resolution of up to 1200 x 2400 dpi, ensuring clear and precise scans. The printer supports USB 1.1 connectivity for easy connection to computers. It also includes a built-in memory card slot for direct printing from memory cards.
The printer uses Epson's DURABrite Ultra ink, which is known for its water and smudge resistance. It has a paper tray capacity of 100 sheets and supports various paper sizes, including A4, Letter, and photo sizes.
After you have set up your Epson Stylus® CX4600 as described on the Start Here sheet, turn here to:
- Load paper
- Make a quick copy of a document or photo
- Print photos stored on a memory card
- Get the basic steps for printing from your computer
- Start scanning a document or photo
- Perform routine maintenance
- Solve simple problems
This book tells you how to do most of these things without ever turning on your computer! Of course your CX4600 can do lots more when you connect it to your Windows® or Macintosh® computer—such as improving the color and quality of your prints and scanned images or producing double-sided documents. For complete instructions on everything the CX4600 can do, see the on-screen CX4600 Reference Guide. An icon for the manual was automatically placed on your desktop when you installed the software.
Please follow these guidelines as you read your CX4600 instructions:
- Warning: Warnings must be followed carefully to avoid bodily injury.
- Caution: Cautions must be observed to avoid damage to your equipment.
- Note: Notes contain important information about your CX4600.
- Tip: Tips contain hints for better copying, scanning, and printing.
Loading Paper
Follow the steps below to load letter-size or 4 × 6-inch paper in your CX4600. (See the Reference Guide for instructions on loading other types of media.)
- Open the paper support and output tray, then slide out the extensions.
Flip the feeder guard forward.
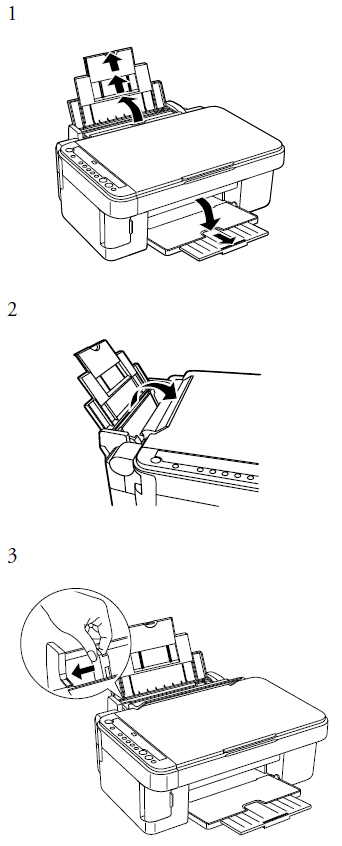
- Slide the left edge guide to the left.
Insert the paper, printable side up, against the right edge guide. Always load it short edge first, even for landscape printing.
You can load up to 100 sheets of plain paper and up to 20 sheets of photo paper. (See the Reference Guide for capacity guidelines on other media types.)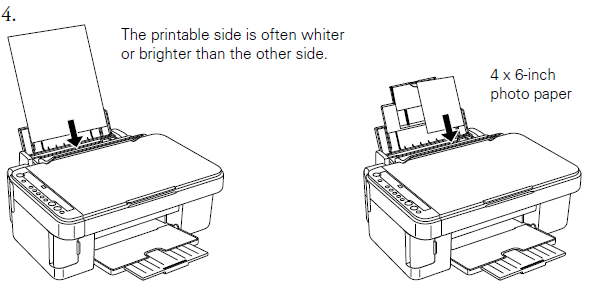
Note: The type of paper you choose affects the way your printout looks, so be sure to select the correct media for your job. If you are just making a copy or printing a rough draft of an image, plain paper is fine. However, for the best results, you’ll want to use one of Epson’s special ink jet papers designed for your printer. For example, your photos will look great printed on Epson DURABrite® Ink Glossy Photo Paper.
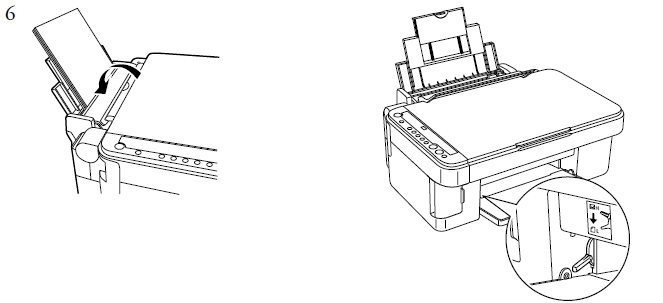
- Slide the left edge guide against the left edge of the paper (but not too tightly).
Flip the feeder guard back. Also make sure the paper thickness lever is set down to the m position.
Copying a Photo or Document
Placing the Original on the Glass
Open the document cover and place your original face-down on the glass, in the upper left corner. Move your original about 1/10 inch away from the top and left edges so all of it will be copied. Move the original about 1/10 inch (2.5 mm) away from the top and left edges to avoid cropping
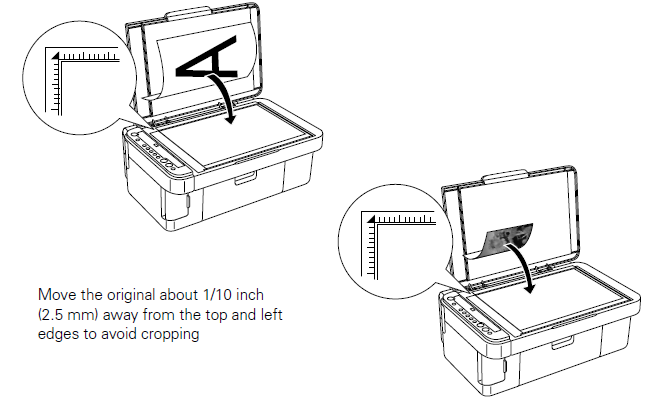
Close the cover gently so you don’t move the original.
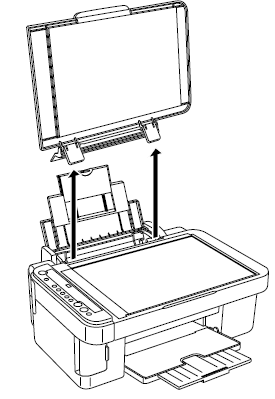
Caution:
Never open the document cover beyond where it stops and do not place heavy objects on top of the CX4600. If you need to copy or scan a thick or large document, you can remove the document cover. Just open it and pull it straight up. If you need to press the document flat while you copy or scan it, do not press too hard and be careful not to move it.
Caution: Do not use excessive force on the document cover, and do not twist it diagonally. You may damage the document cover. When you are done, replace the document cover by inserting the tabs back into the slots.
Simple Copying
You can make simple copies using either letter-size (8.5 × 11-inch) or 4 × 6-inch paper as described below. If you want to copy to a different size, you need to do it from your computer. See “Printing From Your Computer” on page 19 or your on-screen Reference Guide for instructions.
Copying a Letter-size Document

- Make sure the CX4600 is turned on.
- Place the document on the glass as described on page 6. Be sure to close the document cover.
- Load letter-size paper. (See page 4 if you need instructions.)
- Press the Copy button until you see the desired number of copies in the Copy window. You can select up to 9 copies at a time this way. To make more than 9 copies, see page 10.
- Press the paper type button to select Plain Paper. The light indicates which type is selected.
- Press the paper size button to select Letter.
- If you want your copies automatically reduced or enlarged to fit the loaded paper size, press the Fit to Page button.
- To make a color copy, press the x Start Color button.
To make a black and white copy, press the x Start B&W button.
The On light flashes and after a moment the CX4600 starts printing.
If you need to stop copying at any time, just press the y Stop button. Do not pull out paper that is being printed; it will be ejected automatically to the output tray.
Note: The copies may not be exactly the same size as the original.
Copying a Photo
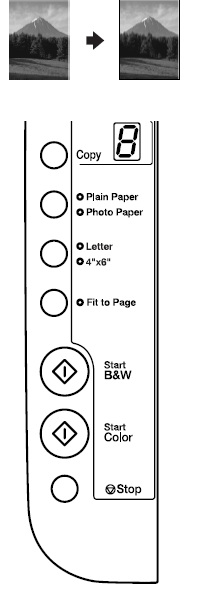
- Make sure the CX4600 is turned on.
- Place the photo on the glass as described on page 6. Be sure to close the document cover.
- Load up to 20 sheets of 4 × 6-inch photo paper. (See page 4 if you need instructions.)
- Press the Copy button until you see the correct number of copies in the Copy window. You can select up to 9 copies at a time this way. To make more than 9 copies, see page 10.
- Press the paper type button to select Photo Paper.
- Press the paper size button to select 4”x 6”.
- If you want your photos printed without a white border, press the Fit to Page button. (Otherwise, they are printed with a .06-inch [1.5 mm] margin.)
- To make a color copy, press the x Start Color button.
To make a black and white copy, press the x Start B&W button. The On light flashes and after a moment the CX4600 starts printing. If you need to stop copying at any time, just press the y Stop button. Do not pull out paper that is being printed; it will be ejected automatically to the output tray.
Note: The copies may not be exactly the same size as the original.
Making 10 or More Copies
- If you want to make 10 or more copies at a time, press the Copy button until you see “–” in the Copy window. This tells the CX4600 to print up to 100 copies.
- Load enough paper for the number of copies you want to make (up to 100) and start copying.
- The CX4600 will continue making copies until it runs out of paper. Then the red m Error light comes on. To make more copies, load more paper and press the x Start button to resume. If you don’t need any more copies, press the y Stop button.
Note: When making a lot of copies, it is a good idea to remove the printed copies from the output tray after every 10 sheets or so.
Speeding Up Printing
If you want to make a copy quickly and do not need high quality, you can print a “draft” copy. The print quality is reduced, but the copy is printed faster. Load plain, letter-size paper and select Plain Paper and Letter size on the control panel. When you are ready to copy, press and hold down the y Stop button, then press the x Start Color button (to copy in color) or the x Start B&W button (to copy in black and white). When the On light starts flashing, release both buttons.
Using the Computer to Copy
EPSON Smart Panel (installed on your computer when you installed your printer software), includes a Copy Utility that lets you control copying from your computer. Follow these steps to use it:
- Make sure the CX4600 is turned on.
- Place the original on the glass as described on page 6. Be sure to close the document cover.
Open EPSON Smart Panel.
Windows: Select EPSON Smart Panel from the desktop or click Start > All Programs or Programs > EPSON Smart Panel> EPSON Smart Panel.
Macintosh: Double-click EPSON Smart Panel on the desktop or select it in the Applications folder and then select EPSON Smart Panel.
You see this screen: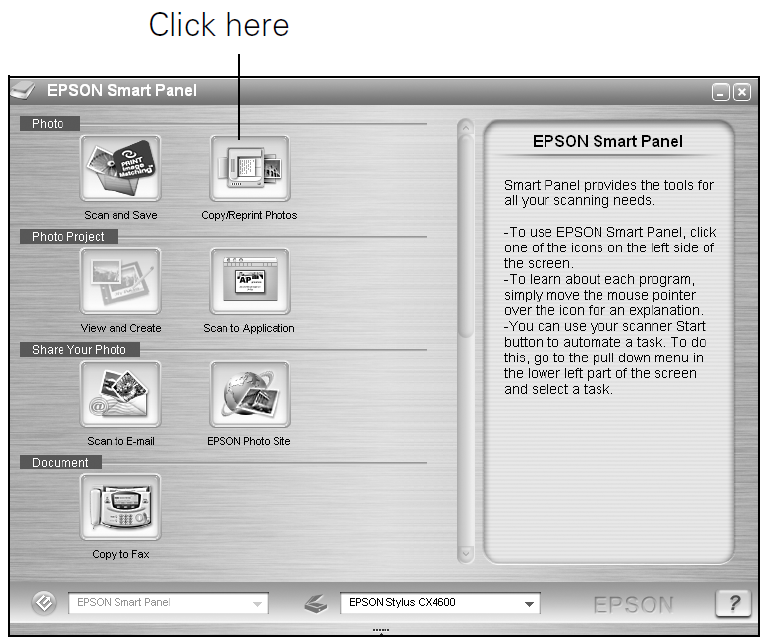
Click the Copy/Reprint Photos icon.
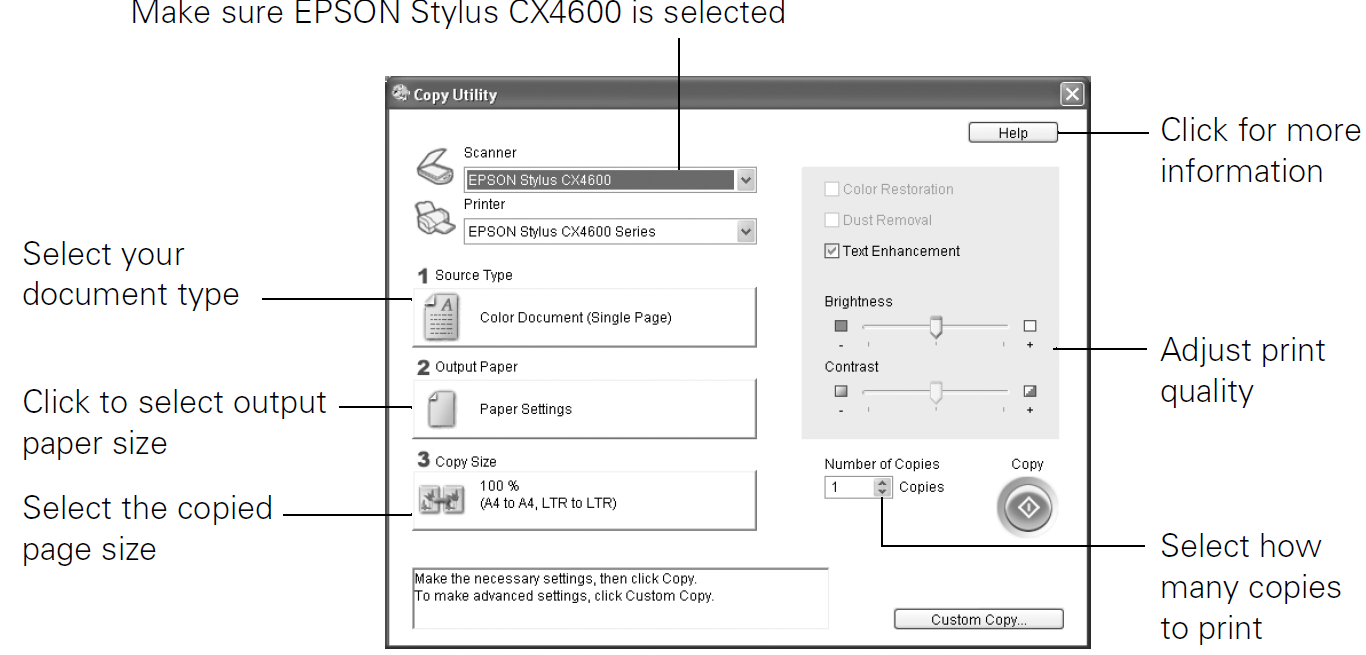
You see this screen: From here you can choose the size and number of copies you want to make and whether to print them in color or black and white. You can also lighten or darken the copies or enhance the image quality or color. For example, you can use the Color Restoration feature, as described on page 12, to bring faded photographs back to life.
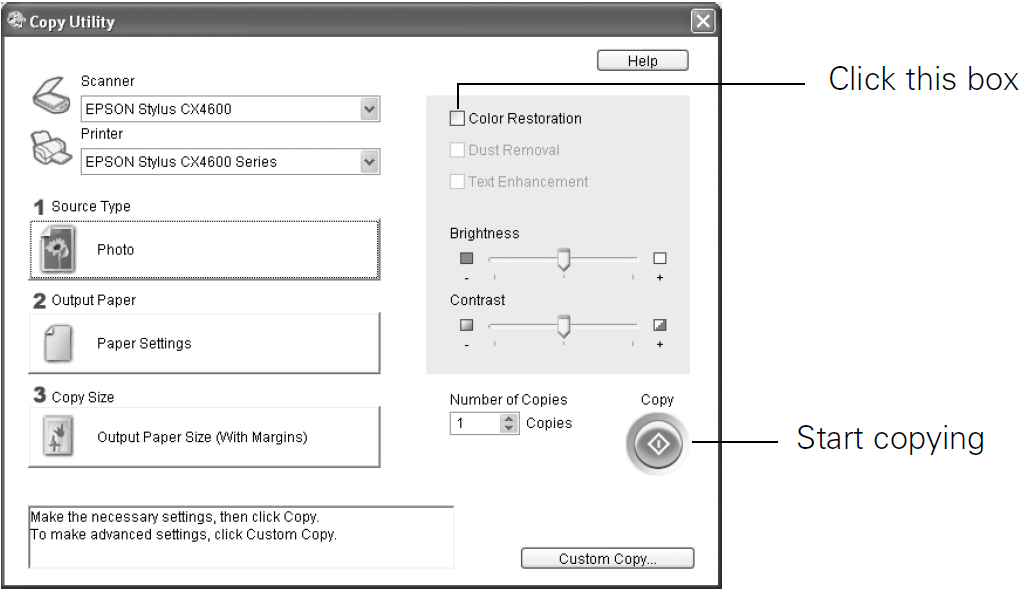
Restoring Color in Faded Photos
From the Copy Utility screen, click the Source Type box.
You see this screen:
- Choose Photo and click OK. You see this screen:
- Click the Color Restoration check box.
- Change any other copy settings, as necessary.
Click the Copy button on the screen to begin copying.
Printing From a Memory Card
The CX4600 lets you print photos directly from your digital camera’s memory card; just plug it into the CX4600’s memory card slot and you’re ready to print. If your digital camera supports DPOF (Digital Print Order Format), you can pre-select the photos you want to print while the card is still in the camera. Then, when you insert the card in the CX4600, it knows which photos to print and how many copies of each.
Compatible Cards and Image Formats
You can use the following types of cards with your CX4600:
| Slot | Type of card |
| A | Memory Stick MagicGateTM Memory Stick MultiMediaCard Memory Stick DuoTM* Memory Stick PROTM Memory StickPro DuoTM* SDTM Card miniSDTM Card * |
| B | SmartMediaTM xD-Picture Card |
| C | CompactFlashTM MicrodriveTM |
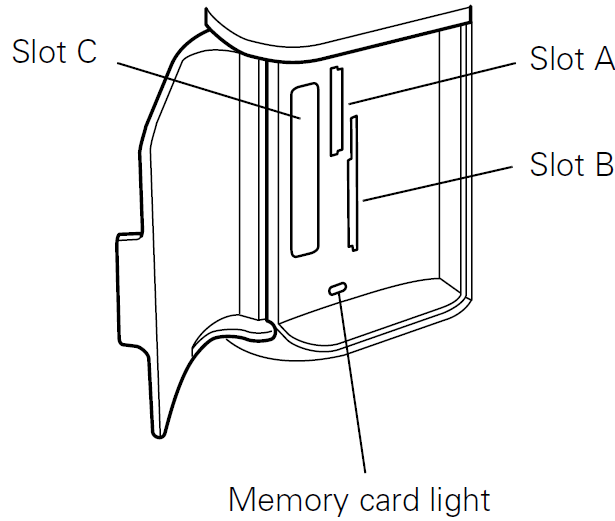
The CX4600 supports image files that meet the following requirements:
Media format | DCF version 1.0 compliant* |
File format | JPEG**, DOS FAT (FAT 12 or 16, one partition) taken with a DCF version 1.0 compliant digital camera |
Image size | Vertical 120 to 4600 pixels,horizontal 120 to 4600 pixels |
Number of files | Up to 999 |
- DCF is the “Design rule for Camera File system” standard, which is set by the Japan Electronics and Information Technology Industries Association (JEITA)
- Supports Exif Version 2.1/2.2
Description
The Epson Stylus CX4600 boasts a sleek and compact design, making it a perfect fit for any home or small office. The device is user-friendly with an intuitive control panel that includes buttons for common tasks like printing, scanning, and copying. The printer is lightweight and easy to move around, weighing about 6.4 kg. It measures approximately 17.7 inches in width, 12.2 inches in depth, and 7.6 inches in height, making it space-efficient.
Inserting the Card
- Make sure the CX4600 is turned on.
Note: When you are printing directly from a memory card, it is best if the CX4600 is not connected to your computer (or your computer should be turned off). Open the memory card door.
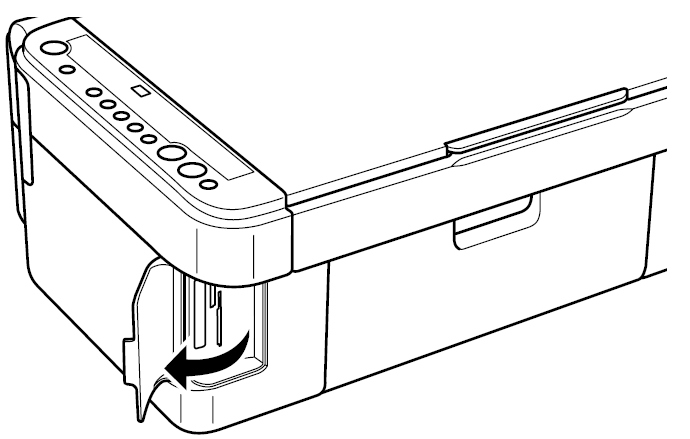
Make sure the memory card light is off and that no cards are in any of the slots. Then insert your card into the correct slot. (See page 13 for details.) The memory card light flashes and then stays on.
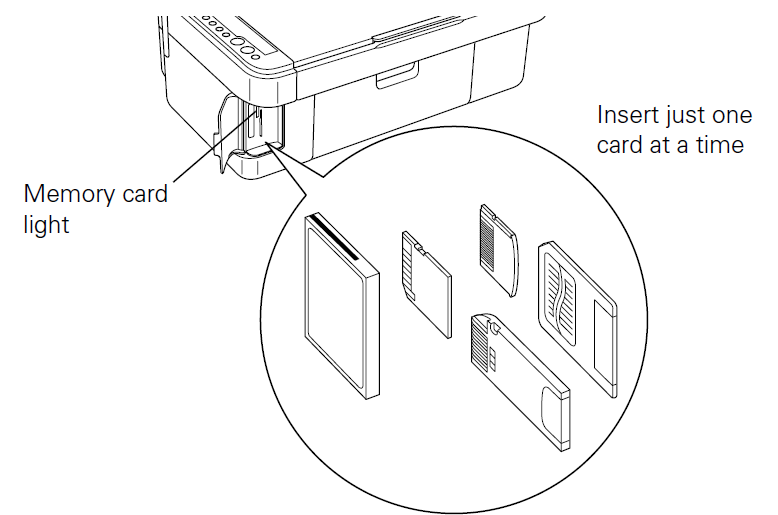
- Close the memory card door.
Now you can:
When you want to remove the card, make sure the memory card light is not flashing, then pull the card straight out of its slot.
Note: You can print only in color when printing directly from a memory card; you cannot print in black and white.
Caution: Do not remove the card or turn off the CX4600 while the memory card light is flashing; you may lose data on the card.
Printing an Index Sheet to Select Photos
You can print an index sheet (which is like a photographer’s contact or proof sheet) to see small “thumbnail” images of all the pictures on your card. Then you mark the pictures on the index sheet that you want to print, scan the sheet, and let the CX4600 automatically print the selected photos.
Printing the Index Sheet
- Make sure your CX4600 is not connected to your computer (or your computer is turned off ).
- Load several sheets of letter-size, plain paper. (Use only letter-size paper to print the index sheet.) Up to 30 images are printed on each page, so if there are more than 30 photos on the memory card, you’ll need enough sheets for all the index pages to be printed.
- Insert the memory card if it is not already in the slot (see page 14).
- Press the Memory Card button one or more times until the Print Index Sheet light comes on.
- Make sure Plain Paper and Letter are selected.
Press the x Start Color button. The On light flashes, and the CX4600 starts printing the index sheet(s). (This may take a few minutes.)
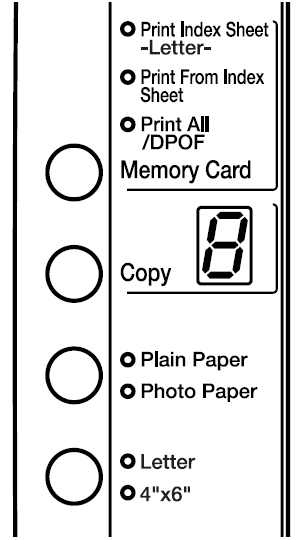
For multiple index sheets, the pages are printed from the last sheet to the first, so the most recent images are printed first. Now you can follow the instructions below to select which photos to print.
Selecting Photos on the Index Sheet
Once you have printed the index sheet, use a dark pen or pencil to fill in one of the ovals beneath each photo you want to print to indicate how many copies you want (1, 2, or 3).

Make sure just one oval is filled in for each selected photo and mark the sheet carefully; once it has been scanned you will not be able to change your selections.
Note: If you want one copy of all the photos on the index sheet, fill in the ALL oval at the top of the page.Place the index sheet face-down on the glass, in the upper left corner, so that the top of the sheet is aligned against the left edge of the glass.
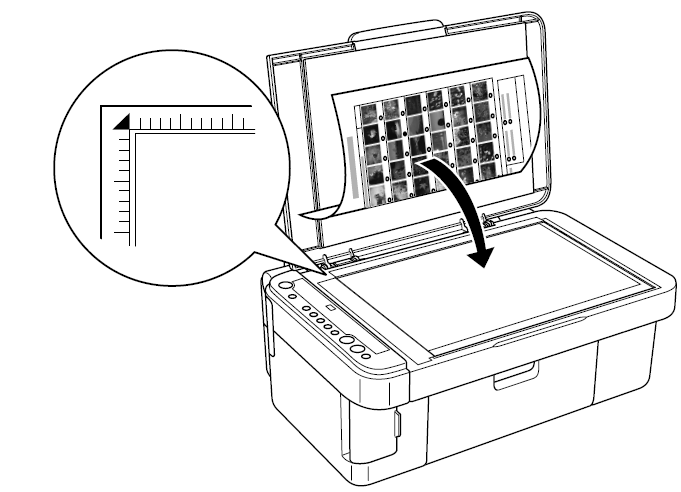
- Close the document cover.
- Load the type of paper you want to use (see page 4). Load enough sheets for the number of photos you’ll be printing.
- Make sure the Print From Index Sheet light is on.
- Select Plain Paper or Photo Paper (whichever you loaded).
- If you select Plain Paper, the photo(s) print with a white border. If you select Photo Paper, the photos print borderless, to the edge of the paper.
- Select Letter or 4”x 6” for the paper size.
- Press the x Start Color button to start printing.
Note: If you need to stop printing, press the y Stop button. When you are done printing, remove the memory card by pulling it straight out of its slot.

Printing All Photos or DPOF Photos
Follow the steps below to print one copy of each photo on the card or to print only those photos that were pre-selected with your camera’s DPOF feature.
- Insert the memory card (see page 14).
- Load the type of paper you want to use (see page 4). Load enough sheets for the number of photos you’ll be printing.
- Press the Memory Card button until the Print All/DPOF light comes on.
Note: If the memory card does not contain DPOF information, one copy of all the photos on the card will be printed. - Select Plain Paper or Photo Paper (whichever you loaded). If you select Photo Paper, the photos print borderless, to the edge of the paper.
- Select Letter or 4”x 6” for the paper size.
- Press the x Start Color button to start printing.
Note: If you need to stop printing, press the y Stop button. - When you are done printing, remove the memory card by pulling it straight out of its slot.

Printing From Your Computer
This section describes the basic steps for printing a photo or document stored on your Windows or Macintosh computer.
Note: For detailed instructions on printing, see the on-screen Reference Guide. Before you start, make sure you’ve installed your printer software and connected the CX4600 to your computer as described on the Start Here sheet. Also be sure to use the right paper and select the correct paper Type or Media setting in the printer driver.
Printing in Windows
- Load paper (see page 4).
- Open the photo or document in your application program.
Open the File menu and select Print. You see a window like this one:
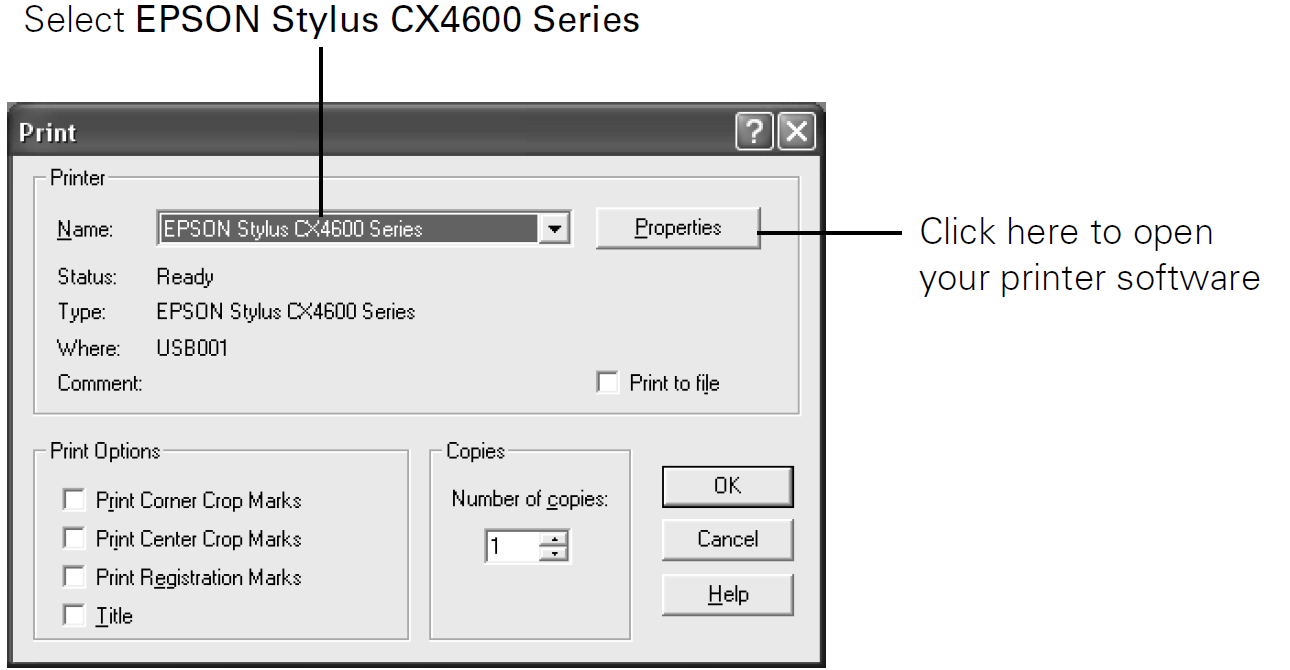
- Make sure EPSON Stylus CX4600 series is selected, then click the Preferences or Properties button. (If you see a Setup, Printer, or Options button, click it. Then click Preferences or Properties on the next screen.)
On the Main Properties window, select the basic print settings:
Make sure you choose the correct paper Type setting for the paper you are using.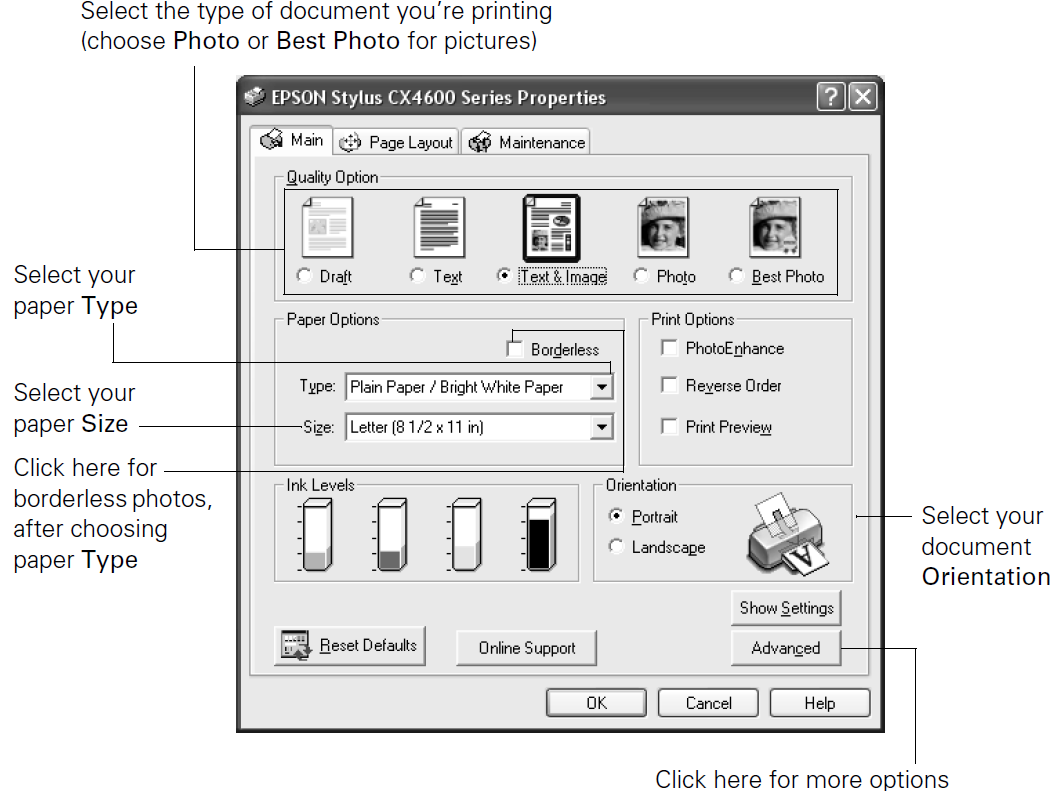
For more printing options, click the Advanced button. Then select the following settings as necessary:
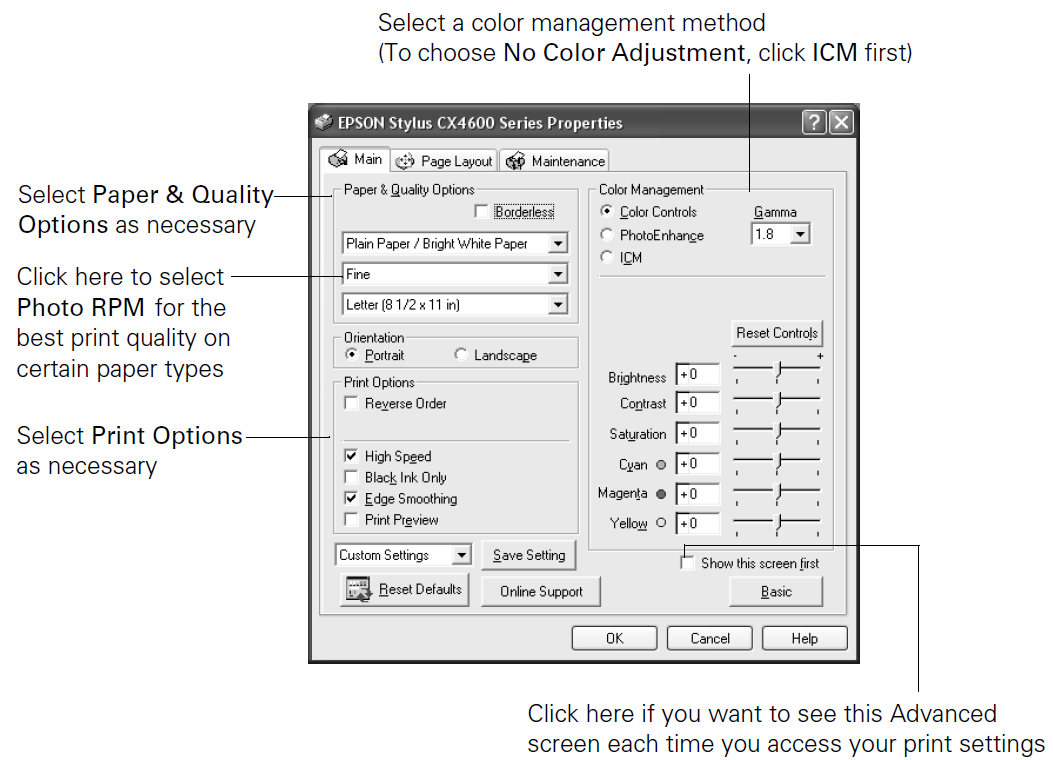
- If you want to change the layout settings, click the Page Layout tab and select settings as necessary.
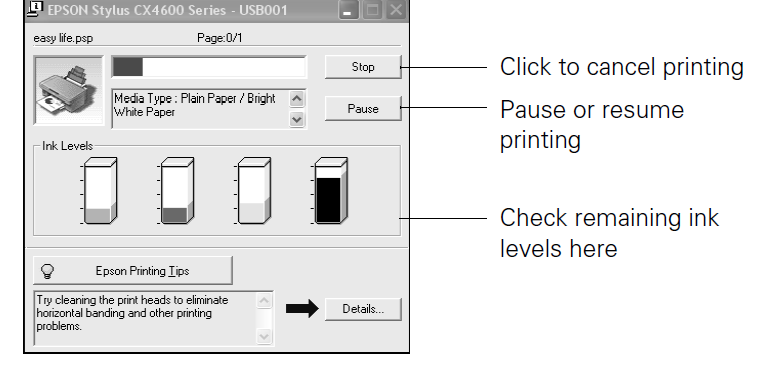
Click OK to save your settings, then click OK or Print to start printing. This window appears and shows the progress of your print job.
Printing With Macintosh OS X
If you’re using an OS X-compatible application, follow the steps below to print. (If you’re using OS 9 or an application that’s compatible only with Macintosh Classic mode, see the Reference Guide.)
- Load paper (see page 4).
- Open the photo or document in your application.
Select Page Setup from the File menu. Make the following settings:
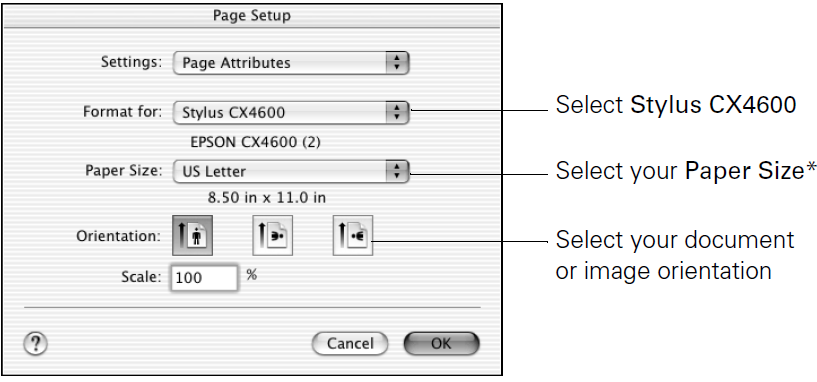
- For Borderless printing, choose the (Sheet Feeder - Borderless) option in the Paper Size list for your paper size (Letter, 8 x 10, or 4 x 6).
- Click OK to close the Page Setup window.
Select Print from the File menu. You see a window like this one:
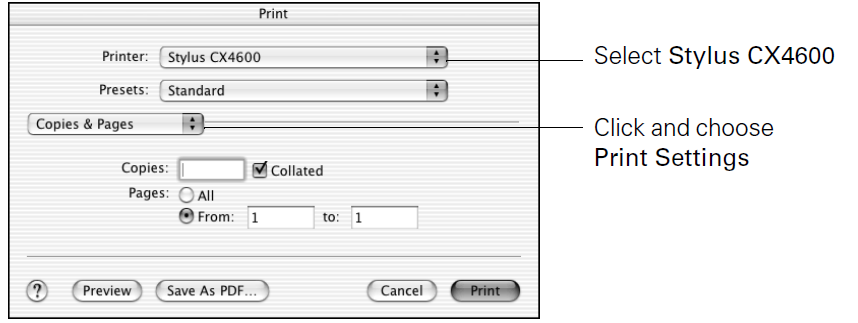
Choose Print Settings from the pull-down list and select the following settings as necessary:
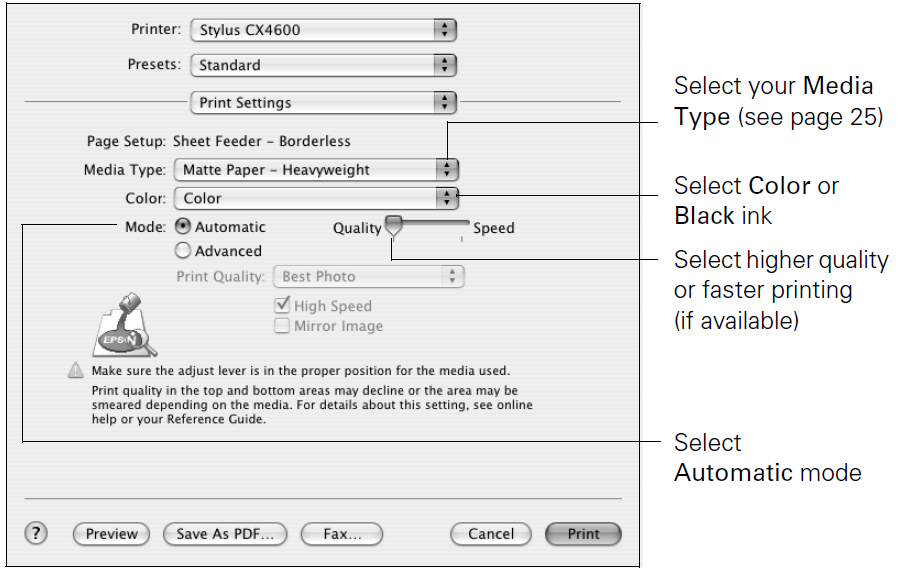
- Depending on your settings, you can choose other options from the pulldown list such as:
- Copies & Pages: Select the number of copies you want, or a page range.
- Layout: Select page layout options.
- Output Options: Save your print job as a PDF file.
- Expansion: Reduce or enlarge the image size for borderless printing.
- ColorSync or Color Management: Select ColorSync® or adjust the color controls, change the gamma setting, or turn off color adjustments in the printer software.
- Summary: View a list of all your selections.
Click the Advanced button to change these settings:
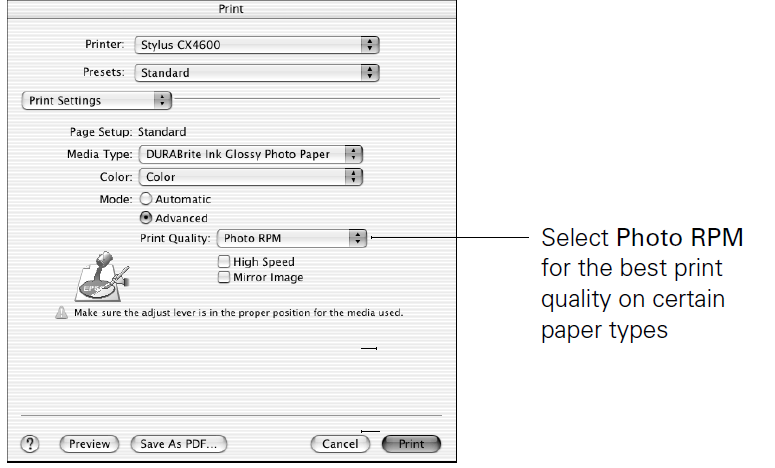
Note: For more information on advanced settings, or instructions on saving them as a group so you can reuse them later, click ?.
- Click Print.
To monitor the progress of your print job, click the CX4600 icon when it appears in the dock on the bottom of your desktop. If you’re using OS X 10.2.x, click the Print Center icon instead, then double-click Stylus CX4600 in the Printer List window.
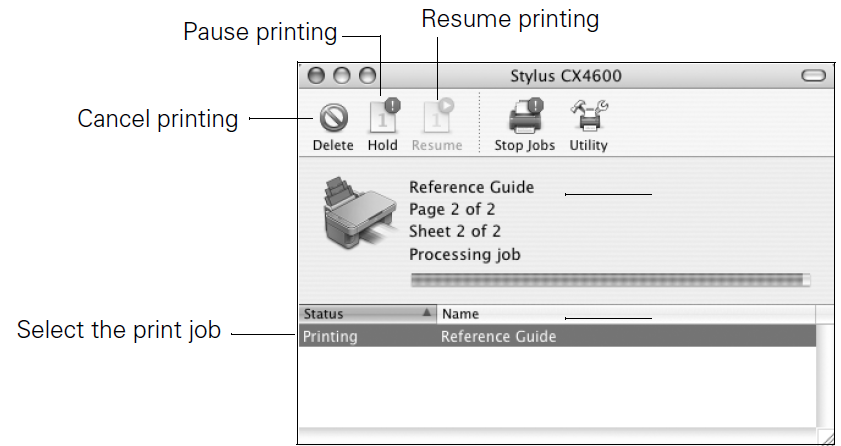
- When you’re finished, close the CX4600 window or Print Center.
Using Special Papers
Selecting Your Paper Type Be sure to select the correct Type or Media Type setting in your printer software
Paper name | Size | Part number |
Epson DURABrite Ink Glossy Photo Paper (recommended for photography) | Borderless4 × 6 inches | S041734 |
| Letter (8.5 × 11 inches) | S041731 | |
Epson Premium BrightWhite Paper | Letter (8.5× 11 inches) | S041586 |
Epson Glossy Photo Paper | Borderless 4 × 6 inches | S041809 |
| Letter (8.5× 11 inches) | S041141/S041649/ S041272/S041271 | |
Epson Matte Paper Heavyweight | Borderless 8 × 10 inches | S041467 |
| Letter (8.5× 11 inches) | S041257 | |
Epson Double-Sided Matte Paper | Letter (8.5 × 11 inches) | S041568 |
Epson Premium Semigloss Photo Paper | Letter (8.5× 11 inches) | S041331 |
Epson Photo QualitySelf Adhesive Sheets | A4 (8.3× 11.7 inches) | S041106 |
Epson Glossy Photo Greeting Card Kit | Letter (8.5 × 11 inches) | S041606 |
Epson Photo Quality Ink Jet Paper | Letter (8.5 × 11 inches) | S041062 |
| A4 (8.3× 11.7 inches) | S041061 | |
| Legal (8.3 × 14 inches) | S041067 | |
Epson Photo Quality Ink Jet Cards | A6 (4.1 × 5.8 inches) | S041054 |
Epson Photo Paper | Panoramic (8.3 × 23 inches) | S041145 |
Scanning a Photo or Document
You can use the CX4600 to scan a photo or document and save it on your computer or other device, or to fax or e-mail it to someone else. This section gets you started using EPSON Scan.
Note: You can also use EPSON Smart Panel to scan. See the Reference Guide (or Smart Panel Help) for more information. EPSON Scan provides three scanning modes for progressive levels of control over your scanned image:
For this paper | Select this setting |
DURABrite Ink GlossyPhoto Paper | DURABrite Ink Glossy PhotoPaper |
Plain paper sheetsor envelopes Epson Premium BrightWhite Paper | Plain Paper/Bright WhitePaper |
Epson Matte Paper Heavyweight Epson Double-Sided Matte Paper | Matte Paper- Heavyweight |
Epson Photo Paper or Glossy Photo Paper Epson Glossy PhotoGreeting Cards | Glossy Photo Paper |
Epson Premium Semigloss Photo Paper | Premium Semigloss Photo Paper |
- Full Auto Mode makes scanning quick and easy, with automatic image type and resolution settings.
- Home Mode provides a simple screen giving you automatic image adjustments, previewing and cropping capability, and preset configurations for various types of scans. Includes Color Restoration.
- Professional Mode lets you manually configure advanced image settings, including Color Restoration.
You can scan from any TWAIN-compliant application—such as Adobe® Photoshop®—using EPSON Scan. Or you can start EPSON Scan directly from your computer and save your image to a file.
Place your photo or document face-down on the glass in the upper left corner about 1/10 inch from the edges, as shown.
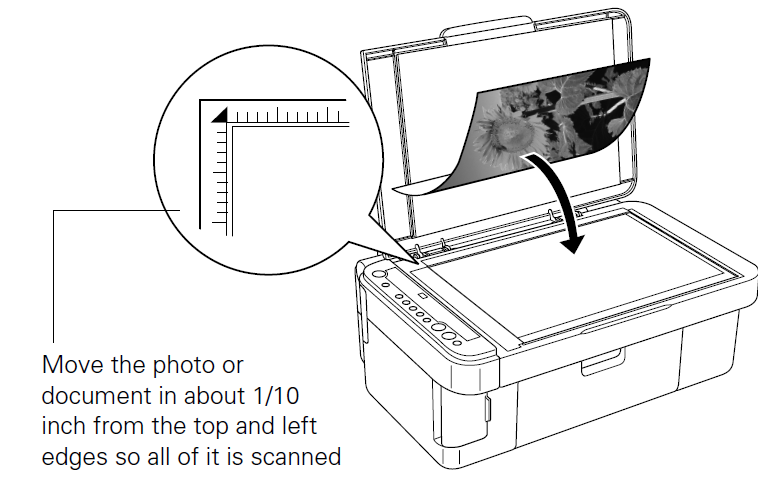
Note: If you need to scan a thick document, you can remove the document cover. See page 7.- Close the cover gently so you don’t move the original.
- If you are scanning from an application, start your application. Then open the File menu and choose Import or Acquire and select EPSON Stylus CX4600. If EPSON Scan is set to the default Full Auto Mode, it starts previewing your image. To switch modes, click the Pause button at the bottom of the screen. Then go to step 4.
If you are scanning directly from your desktop, do one of the following:- In Windows, select Start > All Programs or Programs > EPSON Scan > EPSON Scan.
On a Macintosh, double-click EPSON Scan in the Applications folder. If you see the File Save Settings window, choose the location where you want to save your scanned file and type a name for it in the Prefix box. Select a file format in the Image Format box. Then click OK. The image is scanned and you see its icon in the open folder.
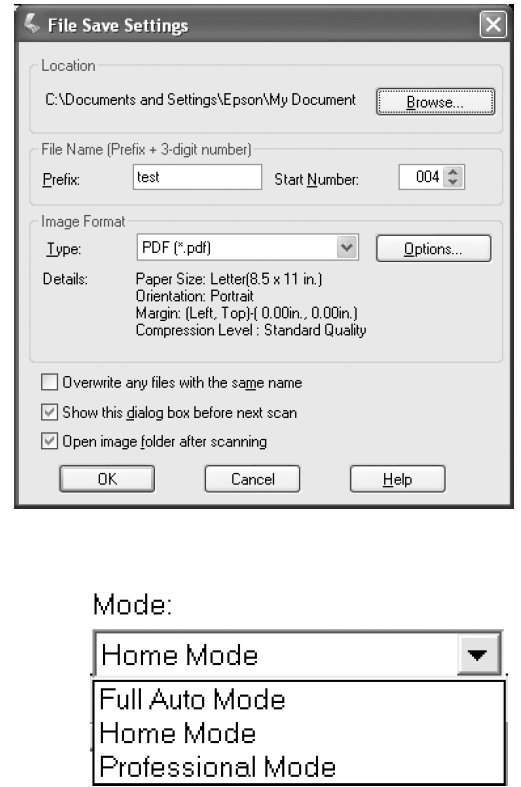
To change modes, select Home Mode or Professional Mode from the Mode pulldown menu at the top of the screen.
Note: EPSON Scan starts in the mode you used last, but you can change the mode at any time.
You see one of the following screens: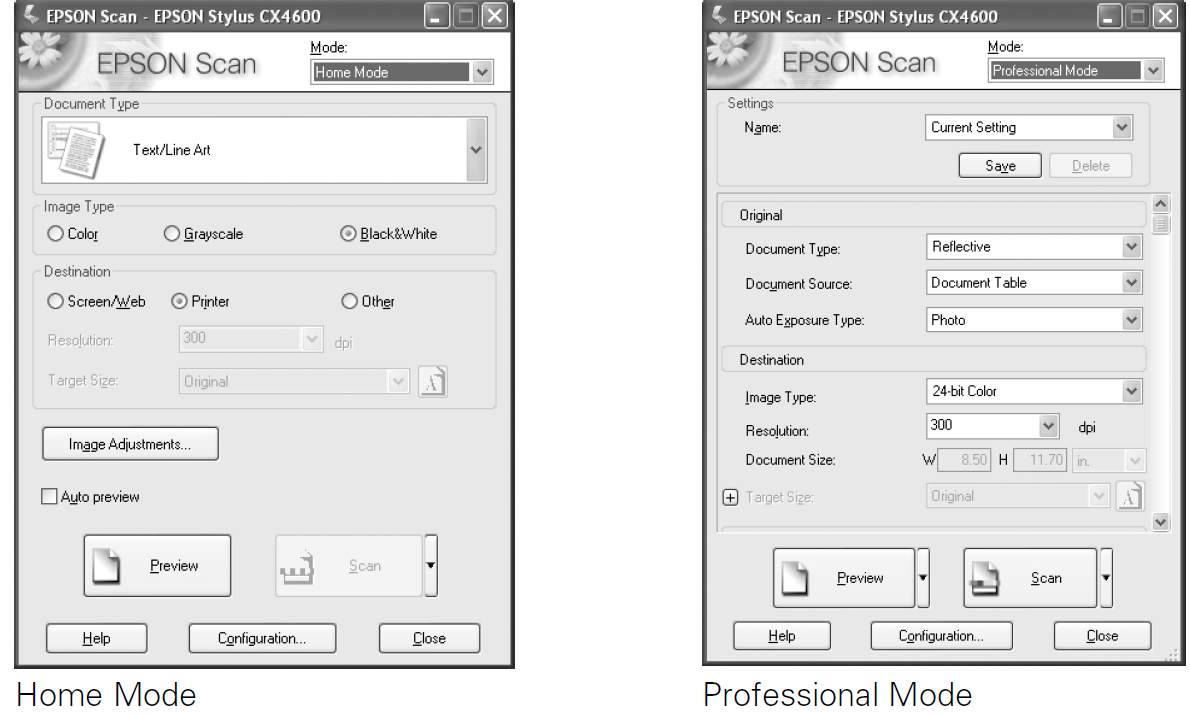
- Click the Preview button. After a moment, your image appears in the Preview window.
- Choose the Document Type, Image Type, and Destination settings (in Home mode) or the Original and Destination settings (Professional mode) that match the type of image you’re scanning and the way you want to print or view it. Size and adjust your image settings as necessary.
Note: Click Help for detailed information about all the available settings. You can restore the color in faded photographs in Home or Professional mode. If you’re using Professional mode, scroll down to the bottom of the screen, and click the Color Restoration check box. In Home mode, you need to Preview the photo first (step 5, above), then select Image Adjustments and click the Color Restoration check box. - Click the Scan button. If you scanned from an application like Photoshop, your scanned image opens in your application window.
If you opened EPSON Scan from the Start button or the Applications folder, and you did not already select a file name and destination (step 3), you see the File Save Settings window. Type a name for your file in the Prefix box, select a file format in the Image Format box, and click OK. The image is scanned and saved in the folder that opens. - Click Close to exit EPSON Scan.
Setup Guide
- To set up the Epson Stylus CX4600, start by unboxing the device and all included accessories. Connect the power cord to a power outlet and turn on the printer.
- Install the ink cartridges following the instructions provided in the user manual.
- Next, connect the printer to your computer via the USB cable. Install the Epson printer software from the included CD or download it from the official Epson website. Follow the on-screen instructions to complete the installation process.
- For direct printing from memory cards, insert the memory card into the built-in memory card slot. Use the control panel to select the desired photo and print settings.
Maintaining Your CX4600
Checking the Print Head Nozzles and Ink
If your printouts are faint or have gaps in them, some of the nozzles in the print head may be clogged or ink may be running low in one or more of the ink cartridges. Follow the steps below to check the print head nozzles and remaining ink levels using the control panel.
- Turn off the CX4600.
- Load letter-size paper in the sheet feeder.
- Press the B ink and P On buttons together and hold them down for about 5 seconds. The CX4600 turns on and prints a test pattern. It also shows the percentage of ink left in each cartridge:

If the pattern does not look good, try cleaning the print head as described in the next section.
Note: You can also check the ink level using Status Monitor 3; see the Reference Guide.
Cleaning the Print Head
If your printouts are unexpectedly light or faint, or you notice light or dark bands across your printout, you may need to clean the print head. This unclogs the nozzles so they can deliver ink properly. Run a nozzle check as described on page 29 to see if the print head needs cleaning.
Note: Print head cleaning uses ink, so clean it only if quality declines and the nozzle check indicates that the print head needs to be cleaned. If the red ![]() ink light comes on or flashes, you cannot clean the print head. In this case, replace the appropriate ink cartridge first. (See page 31.)
ink light comes on or flashes, you cannot clean the print head. In this case, replace the appropriate ink cartridge first. (See page 31.)
- Make sure the CX4600 is on and the
 ink light is off.
 - Hold down the
 ink button for 3 seconds until the On light starts flashing. The CX4600 runs a head cleaning cycle and the On light flashes.
Caution: Never turn off the CX4600 while head cleaning is in progress. You may damage it. - When the On light stops flashing, run a nozzle check (as described on page 29) to verify that the print head is clean.
- If there are still gaps or the test patterns are faint, run another cleaning cycle and check the nozzles again.
Note: If you don’t see any improvement after cleaning the print head four or five times, turn off the CX4600 and wait overnight. This lets any dried ink soften. Then try cleaning the print head again. If quality still does not improve, one of the ink cartridges may be old or damaged and needs to be replaced. See the next section.
Tip: If you do not use your CX4600 often, it is a good idea to print a few pages at least once a month to maintain good print quality.
Replacing Ink Cartridges
- When the red
 ink light starts flashing, one or more cartridges are low on ink.
 - When the red
 ink light stays on, you need to replace the cartridge(s).
 - You’ll also see a message on your screen when you print, telling you which cartridge is low or empty.
| Color | Part number |
| Black | T044120 |
| Cyan | T044220 |
| Magenta | T044320 |
| Yellow | T044420 |
Caution: Leave the empty cartridge installed until you have obtained a replacement, or the ink remaining in the print head nozzles may dry out. To ensure good results, use genuine Epson ink cartridges and do not refill them. Other products may cause damage to your CX4600 not covered by Epson’s warranty.
- Make sure the CX4600 is on.
Make sure that the document cover is closed, then open the scanner.
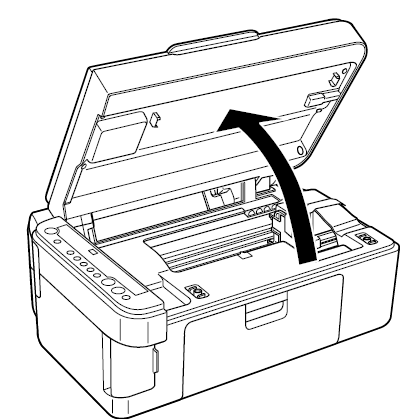
- Caution: Do not open the scanner when the document cover is open.
Press and release the
 ink button. The ink cartridge holder moves to the check position and the On and
  ink lights flash. If one of the cartridges is low or empty, the CX4600 moves that cartridge to the
  ink out mark.
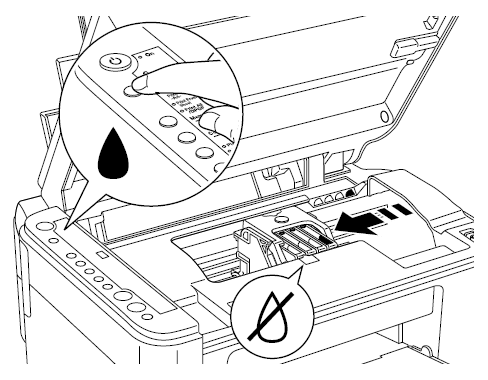
- Note: Do not hold down the
 ink button; when held down for 3 or more seconds, it tells the printer to start cleaning the print head.
 - Caution: Do not move the print head by hand; this may damage the CX4600. Always press the
 ink button to move it.
- Note: Do not hold down the
- Press the
 ink button again.
- If more than one cartridge is empty or low, the next cartridge moves to the
 ink out mark.
 If all of the empty or low ink cartridges have been identified, the print head moves to the ink cartridge replacement position when you press the Blink button.
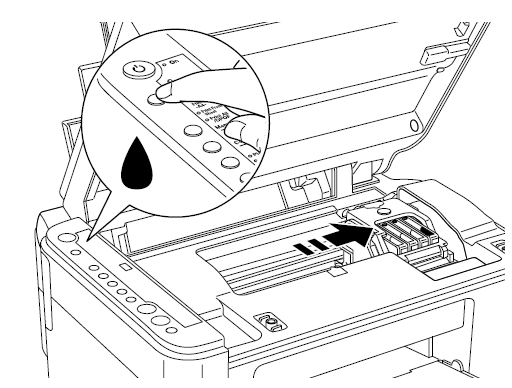
- If more than one cartridge is empty or low, the next cartridge moves to the
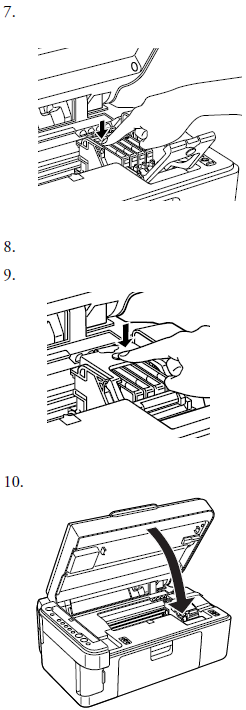
Open the cartridge cover and squeeze the tab at the back of the empty/low cartridge and lift it straight out. Dispose of it carefully. Do not take the used cartridge apart or try to refill it.
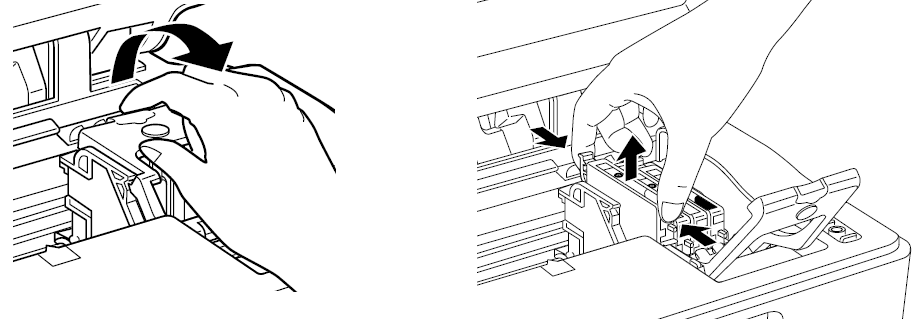
- Warning: If ink gets on your hands, wash them thoroughly with soap and water. If ink gets into your eyes, flush them immediately with water.
Before you open the new ink cartridge package, shake it four or five times. Then remove it from the package.
Caution:
Do not remove or tear the label on the cartridge; otherwise, ink will leak.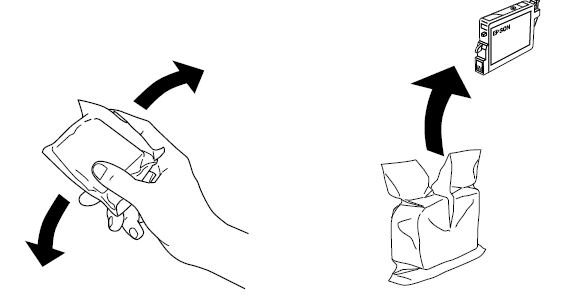
Do not touch the green chip on the side of the cartridge. This can damage the ink cartridge
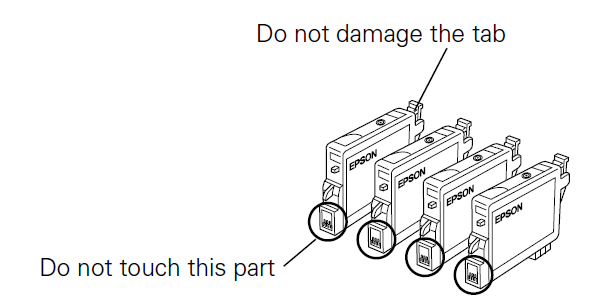
- Place the new ink cartridge into the cartridge holder and push it down until it clicks into place.
- Replace any other cartridges that need to be replaced.
- Close the ink cartridge cover and press it until it clicks into place.
Close the scanner.
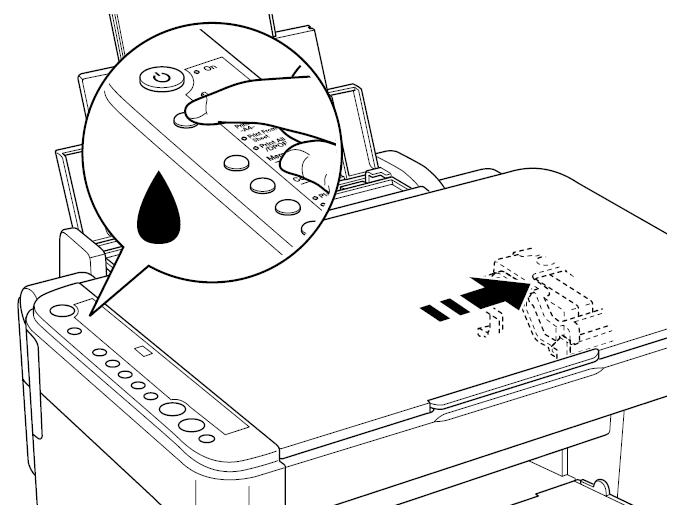
- Press the
 ink button. The CX4600 begins charging ink and the On light starts flashing. This takes about one minute. When it’s finished, the On light stops flashing and remains on, and the
  ink light goes out.
Caution: Never turn off the CX4600 while the On light is flashing or you’ll waste ink.
Note: If the ![]() ink light stays on (not flashing), the ink cartridge may not be installed correctly. Press the B ink button again and reinstall the ink cartridge until it clicks into place.
ink light stays on (not flashing), the ink cartridge may not be installed correctly. Press the B ink button again and reinstall the ink cartridge until it clicks into place.
Solving Problems
If you have a problem with your Stylus CX4600, check the lights on the control panel and the number or letter in the Copy window to diagnose what may be causing it. You can also check “Problems and Solutions” on page 38 for basic troubleshooting suggestions, or double-click the CX4600 Reference Guide icon on your computer desktop for more detailed help.
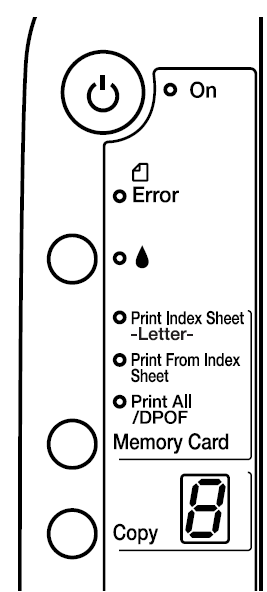
Error Indicators
Light: status | LED message | Cause | Solution |
Error: On On: Flashing | — | No paperis loaded in the sheet feeder. | Load paperin the sheetfeeder. Then press x Start Color to continue or y Stop to cancel. See page 4. |
— | Multiple pageshave been fed into the sheet feeder. | Remove andreload the paper. Then press x Start Colorto continue or y Stop to cancel. See page 4. | |
Error: Flashing | — | Paper is jammed. | See page 38. |
Ink: Flashing | — | An ink cartridge is running low on ink. | See “Replacing Ink Cartridges” on page 31. |
Ink: On | — | An ink cartridge is empty or not installed correctly. | See “Replacing Ink Cartridges” on page 31. |
Error: Flashing Print Index Sheet, Print From Index Sheet, and Print All/DPOF: Flashing | 1 | A memory card is inserted that is not supported by the CX4600. | Remove the incompatible memory card. (Seepage 13.) |
The inserted memory card does not contain any valid images. | See page 13. | ||
Error: Flashing Print From Index Sheet: Flashing | 2 | An index sheet was not recognized because it is not positioned correctly. | Position the index sheetcorrectly on the glass,aligning the top of it with the left edge of the glass. Then press x Start Color to continue or y Stop to cancel. |
3 | The index sheet is marked incorrectly. (No marks are detected or thesheet includes more than one mark for an image.) | Remove the index sheet,mark it correctly, and try again. (See page 16.) | |
4 | The index sheetdoes not match thephotos on the memory card. | Remove the memory card and insert the cardused to printthe index sheet (see page 14)—or place the correct index sheet on the glass. Then press x Start Color to continue or y Stop to cancel. | |
Error: Flashing fast | H | The paper thickness lever is setto the ^ position. | If you have set the leverto the ^ position because you are printing envelope(s), press x Start Color to continue. Otherwise, set the leverto the m position. |
Error: On Ink: On All otherlights: Flashing | E | A part on the CX4600 needs to be replaced. | Contact your local authorized servicer or contact Epson for a referral. (See “Where To Get Help” on page 40.) |
All lights: Flashing | E | There is a problem with the CX4600. | Turn the CX4600 off and then back on. If the error does not clear, contact your local authorized servicer or contact Epson for a referral. (See “Where To Get Help” on page 40.) |
Problems and Solutions
Check the solutions below if you’re having trouble using your CX4600.
Copying Problems
- Make sure your original is positioned in the top left corner of the glass. Place it 1/10 inch from the edges to avoid cropping.
- Make sure your paper is loaded short edge first and is positioned against the right edge guide with the left edge guide against its left side. Don’t load paper above the arrow mark inside the left edge guid
Paper Feeding Problems
- If paper doesn’t feed, remove it from the sheet feeder. Flip through the stack to separate the sheets a little. Then reload the paper against the right edge guide, and slide the left edge guide against the paper (but not too tightly). Make sure the paper is not in front of the feeder guard.
- Do not load too many sheets at once (up to 20 sheets of photo paper and 100 sheets of plain paper). See the Reference Guide for more information.
- If paper is jammed, the red m Error light flashes. Follow these steps to clear the jam:
- Press the x Start Color button to eject the jammed paper. If the jammed paper is not ejected, go on to the next step.
- If the paper is stuck near the sheet feeder or output tray, gently pull it out. If the paper is stuck inside the CX4600, press the POn button to turn it off. Open the scanner and remove any paper inside, including any torn pieces. Do not pull it backward however; this can damage the sheet feeder. Close the scanner, then turn the CX4600 back on.
Print Quality Problems
If you have any problems with the copy or print quality, try these solutions:
- Make sure the document is placed flat against the document table glass and the CX4600 is not tilted or placed on an uneven surface.
- Load the paper printable side up (usually the whiter, brighter, or glossy side).
- Make sure your paper isn’t damp or curled.
- Use a support sheet with special paper or load your paper one sheet at a time. Remove sheets from the output tray so not too many collect at a time.
- Make sure the type of paper you loaded matches the paper size and paper type settings on the control panel or in your printer software (see page 25).
- For the best print quality, use Epson special media (see page 25) and genuine Epson ink cartridges (see page 31).
- Set the paper thickness lever to the m position for most paper types. If you are printing on envelopes, set the lever to the ^ position.
- If you notice light or dark bands across your printouts or they are too faint, you may need to clean the print head. This unclogs the nozzles so they can deliver ink properly. Run a nozzle check as described on page 29 to see if the print head needs cleaning.
- Clean the print head as described on page 30.
- If you notice jagged vertical lines, you may need to align the print head. See your Reference Guide for instructions.
- The ink cartridges may be old or low on ink; see page 31 for instructions on replacing an ink cartridge.
- If a dotted line appears in the image, clean the scanner glass with a soft, dry, lint-free cloth (paper towels are not recommended), or use a small amount of glass cleaner on a soft cloth, if necessary. Don’t spray glass cleaner directly on the glass.
Troubleshooting
Common issues with the Epson Stylus CX4600 include paper jams, ink cartridge problems, and connection errors.
- To resolve paper jams, turn off the printer and carefully remove any jammed paper. For ink cartridge issues, ensure that the cartridges are properly seated and not empty.
- If you encounter connection errors, check that the USB cable is securely connected to both the printer and the computer. Restarting both devices can also resolve connectivity issues.
- Always refer to the user manual or Epson's official support website for detailed troubleshooting guides and instructions.
Epson Stylus CX4600 Warranty
Epson America, Inc. (“Epson”) warrants to the original retail purchaser that the Epson printer covered by this limited warranty statement, if purchased and operated only in the United States or Canada, conforms to the manufacturer’s specifications and will be free from defects in workmanship and materials for a period of one (1) year from the date of original purchase.
Pros & Cons
Pros
- Compact and lightweight design
- Multifunctional (print, scan, copy)
- High-quality print and scan resolutions
- Supports direct printing from memory cards
- Affordable price point
Cons
- Limited paper capacity
- No wireless connectivity option
- Slow print speeds for high-quality prints
- May require frequent ink cartridge replacements
Customer Reviews
Customers praise the Epson Stylus CX4600 for its ease of use and high-quality print output. Many users appreciate its compact size and multifunctional capabilities. However, some users have reported issues with paper jams and slow print speeds.
A common complaint is the lack of wireless connectivity, which limits its versatility in modern setups. Despite these minor drawbacks, the printer remains popular for its reliability and affordability.
Faqs
What is the maximum print resolution of the Epson Stylus?
What type of ink does the Epson Stylus CX4600 use?
How do I set up the Epson Stylus for the first time?
What are some common issues with the Epson Stylus CX4600?
Can I print directly from memory cards with the Epson Stylus CX4600?
What is the paper tray capacity of the Epson Stylus?
How do I resolve a paper jam in the Epson Stylus?
Where can I find drivers and software updates for the Epson Stylus CX4600?
Leave a Comment
