Specifications: Epson Small-in-One Printer XP-7100 User Manual
Content
Epson Printer XP-7100 Introduction
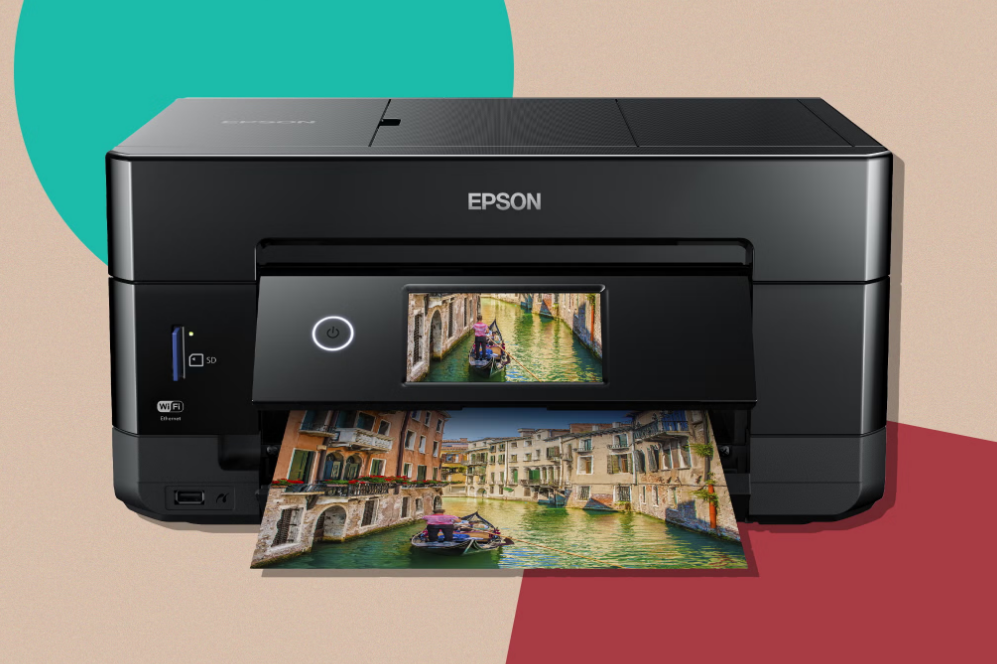
The Epson Expression Premium XP-7100 is a versatile all-in-one inkjet printer designed for home and office use. It excels in printing, scanning, and copying tasks while delivering high-quality results, particularly for photos. With a maximum print resolution of 5760 x 1440 dpi and speeds of up to 15 ppm for black and 11 ppm for color, it caters to various printing needs. The printer features a user-friendly 4.3-inch touchscreen, Wi-Fi connectivity, and is priced at approximately $199.99.
Technical Specifications
These sections list the technical specifications for your product.
Windows System Requirements
To use your product and its software, your computer should use one of these Microsoft operating systems:
- Windows 10
- Windows 8.x
- Windows 7
- Windows Vista
Mac System Requirements
To use your product and its software, your Mac should use one of these operating systems:
- macOS 10.13.x
- macOS 10.12.x
- OS X 10.11.x
- OS X 10.10.x
- OS X 10.9.x
- OS X 10.8.x
- OS X 10.7.x
- OS X 10.6.8
Paper Specifications
Note: Since the quality of any particular brand or type of paper may be changed by the manufacturer at any time, Epson cannot guarantee the quality of any non-Epson brand or type of paper. Always test a sample of paper stock before purchasing large quantities or printing large jobs.
Single-sheets
Size:
- A4 (8.3 × 11.7 inches [210 × 297 mm])
- A6 (4.1 × 5.8 inches [105 × 148 mm])
- Letter (8.5 × 11 inches [216 × 279 mm])
- Legal (8.5 × 14 inches [216 × 356 mm])
- 4 × 6 inches (102 × 152 mm)
- 5 × 7 inches (127 × 178 mm)
- 8 × 10 inches (203 × 254 mm)
- 3.5 × 5 inches (89 × 127 mm)
- 16:9 wide (4 × 7.1 inches [102 × 181 mm])
- Half Letter (5.5 × 8.5 inches [140 × 216 mm])
Paper Types:
- Plain paper
Note: Your product also supports compatible papers distributed by Epson. See the link at the end of this topic for a list of compatible Epson papers.
Weight:
- Plain paper: 17 lb (64 g/m²) to 24 lb (90 g/m²)
Envelopes:
- Size: No. 10 (4.1 × 9.5 inches [105 × 241 mm])
- Paper Types: Plain bond paper
- Weight: 20 lb (75 g/m²) to 24 lb (90 g/m²)
Printable Area Specifications
Note: When printing borderless, quality may decline in the expanded printable area.
Single sheets - borders
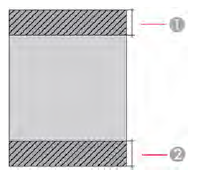
- Top/bottom/left/right margins: 0.12 inch (3 mm) minimum
- Reduced print quality area/top: 1.61 inches (41 mm) minimum
- Reduced print quality area/bottom: 1.46 inches (37 mm) minimum
Single sheets - borderless
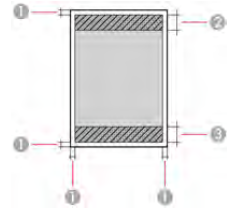
- Reduced print quality area/top: 1.73 inches (44 mm) minimum
- Reduced print quality area/bottom: 1.57 inches (40 mm) minimum
Envelopes
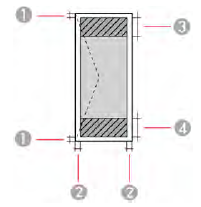
- Right/left margins: 0.12 inch (3 mm) minimum
- Top/bottom margins: 0.20 inch (5 mm) minimum
- Reduced print quality area/right: 0.71 inch (18 mm) minimum
- Reduced print quality area/left: 1.61 inches (41 mm) minimum
CD/DVD
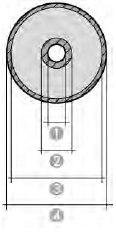
- Minimum inner margin: 0.71 inch (18 mm)
- Inner reduced print quality area: 1.69 inches (43 mm)
- Outer reduced print quality area: 4.57 inches (116 mm)
- Maximum outer margin: 4.72 inches (120 mm)
Scanning Specifications
Scanner Type:
- Flatbed, color
Photoelectric Device:
- CIS (Contact Image Sensor)
Document Size:
- Maximum: 8.5 × 11.7 inches (216 × 297 mm)
- Scanner glass: US Letter or A4
Scanning Resolution:
- 1200 dpi (main scan)
- 2400 dpi (sub scan)
Image Data:
- Color:
- 48 bits per pixel internal (16 bits per pixel per color)
- 24 bits per pixel external (8 bits per pixel per color)
- Grayscale:
- 16 bits per pixel internal
- 8 bits per pixel external
- Black and White:
- 16 bits per pixel internal
- 1 bit per pixel external
Light Source:
- LED
Automatic Document Feeder (ADF) Specifications
Paper Size:
- US Letter, Legal, or A4 size
Paper Type:
- Plain paper
Paper Weight:
- 17 lb (64 g/m²) to 25 lb (95 g/m²)
Sheet Feeding Capacity:
- Total thickness: 0.13 inch (3.3 mm)
- Approximately 30 sheets (US Letter or A4) or 10 sheets (Legal)
Ink Cartridge Specifications
Note: Your printer is designed to work only with genuine Epson-brand ink cartridges. Other brands of ink cartridges and ink supplies are not compatible and, even if described as compatible, may not function properly or at all. Epson periodically provides firmware updates to address issues of security, performance, minor bug fixes, and ensure the printer functions as designed. These updates may affect the functionality of third-party ink. Non-Epson branded or altered Epson cartridges that functioned prior to a firmware update may not continue to function.
The included initial cartridges are designed for reliable printer setup and cannot be used as replacement cartridges or resold. After setup, the remaining ink is available for printing. Yields are based on ISO 24711 in default mode, printing continuously. Yields vary due to print images, settings, and temperatures. Printing infrequently or primarily with one color reduces yields. All cartridges must be installed with ink for printing and printer maintenance. For print quality, some ink remains in replaced cartridges.
Color:
- Black, Cyan, Magenta, Yellow, Photo Black
Cartridge Life:
- Opened package: 6 months
- Unopened package: Do not use if the date on the package has expired
Temperature:
- Storage: –22 to 104 °F (–30 to 40 °C)
- 1 month at 104 °F (40 °C)
- Ink freezes at 3.2 °F (–16 °C)
- Ink thaws and is usable after 3 hours at 77 °F (25 °C)
Note: For best printing results, use up a cartridge within 6 months of opening the package.
Memory Card Specifications
Note: Cards marked with an asterisk (*) require an adapter; consult your adapter documentation for details on using it.
Compatible Types and Maximum Capacities
- SD: 2GB
- SDHC: 32GB
- SDXC: 64GB
- miniSD*: 2GB
- miniSDHC*: 32GB
- microSD*: 2GB
- microSDHC*: 32GB
- microSDXC*: 64GB
Media Format:
DCF JPEG with the exif Version 2.31 standard taken by digital cameras that are DCF (Design rule for Camera File system) version 1.0 or 2.0 compliant.
Photos stored in built-in digital camera memory are not supported.
Dimension Specifications
Height
- Stored: 7.5 inches (191 mm)
- Printing: 8.7 inches (221 mm)
Width
- Stored: 15.4 inches (390 mm)
- Printing: 15.4 inches (390 mm)
Depth
- Stored: 13.3 inches (339 mm)
- Printing: 23.5 inches (598 mm)
Weight (without ink cartridges, power cord, or CD/DVD tray)
- 18.5 lb (8.4 kg)
Electrical Specifications
- Power Supply Rating: 100 to 120 V
- Rated Frequency Range: 50/60 Hz
- Rated Current: 0.7 A
- Power Consumption
- Standalone copying: Approximately 16 W (ISO/IEC24712)
- Ready mode: Approximately 8.3 W
- Sleep mode: Approximately 1.4 W
- Power off mode: Approximately 0.2 W
Environmental Specifications
Temperature
- Operating: 50 to 95 °F (10 to 35 °C)
- Storage: –4 to 104 °F (–20 to 40 °C)
- 1 month at 104 °F (40 °C)
Humidity (without condensation)
- Operating: 20 to 80% RH
- Storage: 5 to 85% RH
Interface Specifications
Interface Type:
- Hi-Speed USB (Device Class for computers)
- Hi-Speed USB (for external USB devices and PictBridge)
Note: Epson cannot guarantee the operation of externally connected devices.
External USB Device Specifications
Do not use devices with the following requirements:
- Dedicated driver
- Security settings (password, encryption, etc.)
- Built-in USB hub
Note: Use only external storage devices with independent AC power sources. External storage devices powered via USB are not recommended. Epson cannot guarantee the operation of externally connected devices.
- CD-R, DVD-R, or Blu-ray Drive:
- CD-ROM/CD-R: 700MB maximum capacity
- DVD-ROM/DVD-R: 4.7GB maximum capacity
- Magneto-optical Drive: 1.3GB maximum capacity
- Hard Disk and USB Flash Drives:
- 2TB maximum capacity
- Must be formatted in FAT, FAT32, or exFAT.
Network Interface Specifications
- Wireless LAN Standard: IEEE 802.11 b/g/n
- Wireless Security:
- WEP (64/128 bit)
- WPA2-PSK (AES)
- WPA2 compliant with support for WPA/WPA2 Personal
- Frequency Band: 2.4 GHz
- Communication Mode:
- Infrastructure Mode
- Wi-Fi Direct (Simple AP); not supported for IEEE 802.11b
- Maximum Radio Frequency Power Transmitted: 20 dBm (EIRP)
- Security Protocol:
- SSL/TLS
- HTTPS Server/Client
- IPPS
Note: The wireless LAN standard complies with either IEEE 802.11 b/g or IEEE 802.11 b/g/n, depending on the purchase location.
Description
The Epson XP-7100 boasts a sleek and compact design, making it perfect for small spaces. The 4.3" touchscreen color LCD allows for easy navigation and setup. This all-in-one printer features a dedicated photo tray and a 200-sheet main paper tray, along with a 30-sheet ADF for convenient copying and scanning of multi-page documents.
With its advanced printing technology, the XP-7100 delivers sharp text and vibrant colors. It also supports borderless photo printing and has a range of creative printing options through the Epson Creative Print app.
Adjusting Control Panel Position
You can adjust the position of the control panel to make it easier to access. Raise or lower it to the desired angle as shown.
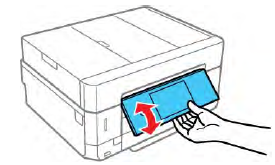
Note: The control panel rises and the output tray slides out automatically when printing starts.
Control Panel Buttons and Lights
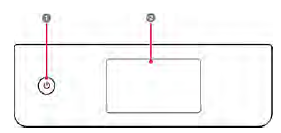
- The power button and light
- The LCD screen
The LCD Screen

- Displays various status information; select an icon to check its status or adjust its settings
- Menu options
- Select a tab to view different options and settings
- Displays available buttons
- Setting options
Entering Characters on the LCD Screen
Follow these guidelines to enter characters for passwords and other settings.
On-screen keyboard
- Displays the character count
- Moves the cursor left or right
- Switches between uppercase and lowercase characters
- Switches between characters and numbers or symbols
- Changes the keyboard layout
- Displays a list of common domain names to choose from
- Enters a space
- Select when you are finished
- Deletes the previous character
On-screen keypad
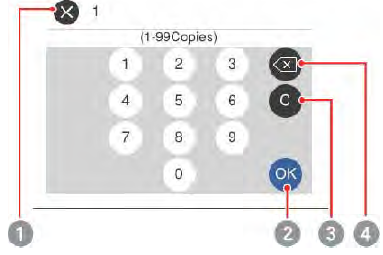
- Cancels entry and closes the keypad
- Select when you are finished
- Clears the entered number
- Deletes the previous number
Viewing Animations
You can view animations on the LCD screen to help guide you with a procedure or to troubleshoot a problem.
Select the help icon.
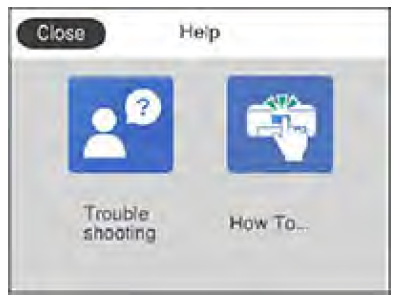
- Select Troubleshooting if you are experiencing a problem or How To to view instructions on common procedures.
Select a topic from the list of available topics and follow the on-screen instructions.
While viewing the topics, you may see screens like this: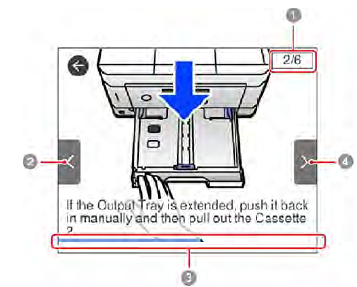
- Displays the current step number and the total number of steps
- Press the left arrow button to view the previous step
- Indicates your overall progress through the animation
- Press the right arrow button to view the next step
Changing LCD Screen Language
You can change the language used on the LCD screen.
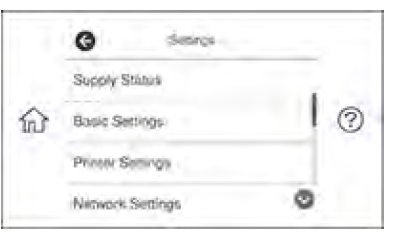
- Press the home icon, if necessary.
- Select Settings.
You see a screen like this: - Select Basic Settings.
- Scroll down and select Language.
- Select a language.
Press the home icon to exit.
Setup Guide
To set up the Epson XP-7100,
- Start by unpacking the printer and all included accessories.
- Connect the power cord and turn on the printer. Follow the on-screen instructions on the touchscreen LCD to select your language and country or region.
- Next, install the ink cartridges and load paper into the main tray.
- For wireless setup, select the Wi-Fi option on the touchscreen, choose your network, and enter your password.
- Download and install the Epson printer software from the official Epson website to complete the setup.
Epson XP-7100 Solving Problems
Checking for Software Updates
Note:
Your printer is designed to work only with genuine Epson-brand ink cartridges. Other brands of ink cartridges and ink supplies are not compatible. Even if described as compatible, they may not function properly or at all. Epson periodically provides firmware updates to address security issues, improve performance, fix minor bugs, and ensure the printer functions as designed. These updates may affect the functionality of third-party ink. Non-Epson branded or altered Epson cartridges that functioned prior to a firmware update may not continue to function.
Windows:
Your printer software automatically checks for updates. You can also manually update the software by following these steps:
- Access the Windows Desktop and right-click the icon for your product in the right side of the Windows taskbar (or click the up arrow and right-click the icon).
- On the Maintenance tab in the printer settings window, you can select Software Update.
- Alternatively, open EPSON Software Updater in the EPSON or EPSON Software program group, which can be accessed through the Start button or Start/Apps screens, depending on your version of Windows.
OS X (macOS):
You can manually update the software by:
- Opening the Applications > Epson Software folder and selecting EPSON Software Updater.
- For macOS 10.12.x or 10.13.x, open the App Store, select Updates, search for an Epson Software update, and click Update.
Product Status Messages
You can often diagnose problems with your printer by checking the messages on its LCD screen.
LCD screen message | Condition/solution |
Printer error.Turn on the printer again. See your documentation for more details. | A fatalerror has occurred. Turn the productoff and then back on again. If the error continues, check for a paper jam or any protective material inside the product. If there is no paper jam or protective material, contact Epson for support. |
Operation canceled. An error occurred while saving. | The memorycard or external USB device maybe damaged. Makesure the memory card or USB device is inserted correctly and meets the specifications for the product. |
Ink is low. | The ink cartridge is low. You can continue printing until you are prompted to replace the cartridge. Make sure youhave the replacement cartridge ready. |
You needto replace the following ink cartridge(s). | The ink cartridge is expended. Replacethe cartridge. |
| Paper Configuration is set to Off. Some features such as paper size and type settings may be unavailable. For details, see your documentation. | The Paper Configuration setting must be enabled to use AirPrint. |
| The printer's ink pad is nearing the end of its service life. Contact Epson support. | The ink pads are near the end of their servicelife and the message will be displayed until the ink pad is replaced. Contact Epson for support. (To resume printing, select OK.) |
| The printer's ink pad is atthe end of its service life. Please contact Epson support. | The ink pad is at the end of its servicelife. Turn off the productand contact Epson for support. |
| The printer's borderless printing ink pad is nearing the end of its service life. It is not a user-replaceable part. Please contact Epson support. | The ink pad is near the end of its servicelife and the message will be displayed until theink pad is replaced. Contact Epson for support. (To resume printing, select OK.) |
| The printer's borderless printing ink pad has reached the end of its service life. It is not a user-replaceable part. Please contact Epson support. | The ink pad is at the end of its servicelife. Turn off the productand contact Epson for support. |
| Communication error. Check if the computer is connected. | Connect thecomputer and theprinter correctly. If you areconnecting over a network, see the page that describes the network connection method from the computer. If the error message is still displayed, make sure that Epson Scan 2 and Epson Event Manager are installed on the computer. |
| The combination of the IP addressand subnet mask is invalid. See your documentation for more details. | There is a problem with the network connection to yourproduct. Check the solutions in this guide. |
| To use cloud services, update the root certificate from the Epson Web Config utility. | Access your product's built-in Web Config utilityand update the root certificate for your product. |
| Cannot recognize the media. See your documentation for more details about the media. | See thespecifications for external USB devices or memory cardsfor more information. |
| Cannot use the inserted Memory Device. See your documentation for details. | |
| Print HeadAdjustment Canceled. There is a problem with the print head. Contact Epson Support. | Clean the print head. If print quality does not improve after repeating the head cleaning 2 times, turn off the printer and wait for at least six hours without printing. Then run the nozzle check again and repeat the head cleaning if necessary. If printquality still doesnot improve, contact Epson for support. |
| Install the Epson Event Manager software in the computer to use this feature. See your documentation for more details. | Try uninstalling the Epson EventManager software andinstalling it again.If you still receive this error message, contact Epson for support. |
Check the following when the computer is not found.
See yourdocumentation for more details. | Check the connection between the printerand the computer and make sure all necessary software is installed. See the linksat the end of this section for more information. |
| Check that the printer driver is installed on the computer and that the port settings for the printer are correct. | Make surethe printer portis selected correctly on the Porttab of thePrinter Properties screen (Windows) or the System Properties > USB list (Mac). Select USBXXX for a USB connection or EpsonNetPrint Port fora network connection. |
| Check that the printer driver is installed on the computer and that the USB port settings for the printer are correct. | |
| Access the following or see documentation for details. SelectDismiss after confirming it. | See the instructions for using an external devicewith your product. |
| Paper settings for XX do not match the Print Settings. Pull out Paper Cassette 1 or Paper Cassette 2 to place the following paper. XX XX | Load paper that matches the print settings in the paper cassette, then change thepaper or printsettings. If youdo not wantto display thismessage next time, turn off the Paper Configuration setting on the control panel. |
| The papersize and type set in XX does not match specified Print Settings. | |
| No paper has been loaded thatmatches the paper size setting. | Change the print settings according to the paper size loaded in the paper cassette, then change the paper or print settings. If you do not want to display thismessage next time,turn off thePaper Mismatch setting on the control panel. |
| Recovery mode | An error has occurred duringfirmware updating. Connectyour product using aUSB cable andtry updating thefirmware again. If you stillreceive this error message, contact Epson for support. |
Note:
The ink pads in the printer collect, distribute, and contain unused ink. Over time, they may reach a point where satisfactory print quality cannot be maintained, or the ink pads may reach the end of their usable life. The Epson Status Monitor, the LCD screen, or the lights on the control panel will alert you when these parts need replacing. If this occurs during the product's standard warranty period, the exchange of the product or the replacement of the pads is covered. If the product is out of warranty, the pads can be replaced by any Epson authorized service provider. The waste ink pads are not a user-replaceable part.
Running a Product Check
Running a product check helps you determine if your printer is operating properly.
- Disconnect any interface cables connected to your product.
- Ensure there are no errors on the LCD screen and the CD/DVD tray is not inserted for printing.
- Load plain paper in Cassette 2.
- Press the home icon if necessary.
Select Maintenance.
You should see a screen like this: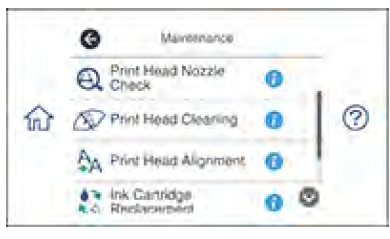
Select Print Head Nozzle Check.
You should see a screen like this: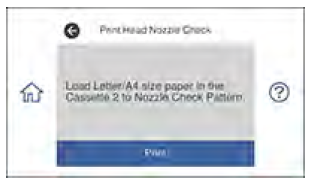
- Press Print to print the nozzle pattern.
What to Do Based on Results:
- If the page prints with a complete nozzle check pattern, the product is operating properly. Any issues you may have are likely due to your computer, cable, software, or settings. Check other solutions in this manual or try reinstalling your printer software.
- If the nozzle check pattern has gaps, clean the print head.
- If the page does not print, your product may have a problem. Follow other solutions in this manual, and if those do not resolve the issue, contact Epson.
Resetting Control Panel Defaults
If you encounter problems with settings on your printer's control panel, you can reset them to their factory defaults. You can choose which settings to reset, or reset all settings.
- Press the home icon if necessary.
- Select Settings.
Scroll down and select Restore Default Settings.
You should see a screen like this: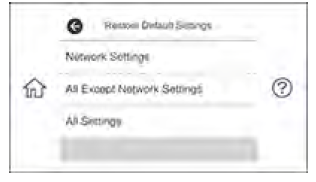
- Select one of these options:
- Network Settings: Resets all network settings.
- All Except Network Settings: Resets all settings except for network settings.
- All Settings: Resets all control panel settings.
- Select Yes to confirm the reset (select No to cancel the operation).
Solving Setup Problems
If you're experiencing issues while setting up your printer, check the following solutions:
Product Does Not Turn On or Off
- If you cannot turn the printer on, ensure the power cord is securely connected and hold down the power button for a little longer.
- If the printer does not turn off, press and hold the power button longer. If it still doesn't turn off, unplug the power cord, plug it back in, then try turning the printer on and off again.
Noise After Ink Installation
- When you first install ink cartridges, the printer will charge its print head. Wait until this process finishes before turning off the printer. If you turn off the printer too early, it may charge improperly and use excess ink when turned on again.
- If the print head stops moving or making noise after 5 minutes and the charging process has not finished, turn off the printer and turn it back on. If charging is still in progress, contact Epson for help.
Software Installation Problems
If you encounter issues while installing the printer software, try the following solutions:
- Ensure your printer is on and any required cables are securely connected at both ends. If problems persist, disconnect the cable and follow the Start Here sheet's instructions. Make sure your system meets the requirements for your operating system.
- Close other programs, including screen savers and antivirus software, then attempt to install the software again.
- In Windows, ensure your printer is set as the default printer and the correct port is selected in the printer properties.
- If you see an error message during installation, you may not have installation privileges. Contact your system administrator.
- If you're printing over a network, verify that your printer is properly set up on the network.
Solving Network Problems
If you have issues connecting your printer to a network, try the following solutions:
Note: Breakdown or repair of the printer may cause loss of network data and settings. Epson is not responsible for backing up or recovering data and settings. We recommend that you back up or print out your network data and settings.
Product Cannot Connect to a Wireless Router or Access Point
- If you're using Wi-Fi Protected Setup (WPS) and the Wi-Fi icon on the printer's LCD screen isn't lit, ensure that you select a WPS option from the product's control panel within 2 minutes of pressing the WPS button on your router.
- Place your product within range of your 2.4 GHz router or access point. Avoid placing the printer near a microwave oven, 2.4 GHz cordless phone, or large metal objects.
- If you're using a 5 GHz router, ensure it operates in dual-band mode (2.4 GHz and 5 GHz). Assign separate names (SSIDs) to each band.
- Verify that your router or access point is working by connecting to it from another device.
- Disable any firewall or antivirus software on the router or access point.
- If MAC address filtering is enabled on the router, add your printer's MAC address to the list. Print a network status sheet to obtain the MAC address.
Network Software Cannot Find Product on a Network
If EpsonNet Setup can't find your printer on the network, try these solutions:
- Ensure your printer is on and connected to the network. Verify the connection via the product control panel.
- If your network name (SSID) contains non-ASCII characters, your product may not display it.
- Ensure that your printer is not connected to a guest network.
If necessary, reinstall your product software:
- Reset your printer’s network settings to their factory defaults.
- Uninstall the software on Windows.
- Initialize the router as per its documentation (you will lose your internet connection temporarily).
- Download the latest software from the Epson website.
Solving Copying Problems
Product Makes Noise, But Nothing Copies
If your product makes a noise, but nothing copies, try these solutions:
- Run a nozzle check to see if any of the print head nozzles are clogged. Then clean the print head, if necessary.
- If the nozzle check page does not print, but the product's power is on, make sure your product software is installed correctly.
- Make sure your product is level (not tilted).
Product Makes Noise When It Sits for a While
Your product is performing routine maintenance. This is normal.
Solving Paper Problems
Check these sections if you have problems using paper with your product.
Paper Feeding Problems
If you have problems feeding paper, try these solutions:
- Place the product on a flat surface.
- If paper does not feed for printing, remove it. Then reload it in the middle of the rear paper feed. Slide the edge guide against the edge of the paper, making sure that the paper stack is not above the arrow mark on the edge guide.
- If multiple pages feed at once, remove the paper, fan the edges to separate the sheets, and reload it.
- If paper jams when you load only one or two sheets, try loading more sheets at a time. Do not load more than the recommended number of sheets.
- If paper jams when you print on both sides of the paper, try loading fewer sheets.
- Make sure your paper meets the specifications for your product.
- Make sure the paper size and paper type settings on the control panel are correct.
- Try cleaning the paper path.
For best results, follow these guidelines:
- Use new, smooth, high-quality paper that is not curled, creased, old, too thin, or too thick.
- Load paper in the rear paper feed printable side up.
- Follow any special loading instructions that came with the paper.
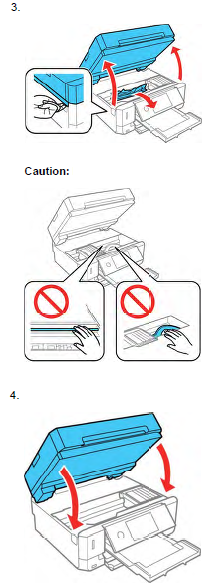
Paper Jam Problems Inside the Product
If you see a message that paper has jammed inside the product, follow the steps here or on the LCD screen to clear the jam:
- Cancel the print job, if necessary.
- Remove any jammed paper from the rear paper feed slot and the ADF.
- Lift the scanner unit and remove any jammed paper inside.
Caution: Do not touch the flat white cable or the translucent film inside your product. - Close the scanner unit.
Follow the prompts on the LCD screen to clear any error messages. If you still see a paper jam message, check the other paper jam solutions.
Paper Jam Problems in the Paper Cassette
If you see a message that paper has jammed in the paper cassette, follow the steps here or on the LCD screen to clear the jam.
- Cancel the print job, if necessary.
- Remove both paper cassettes and carefully remove any jammed paper.
Make sure the paper is loaded under the edge guides and does not stick out from the back of the cassettes.
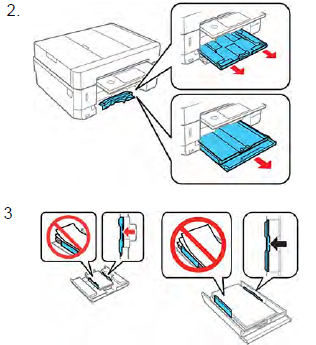
- Keep the cassettes flat as you insert them.
- Follow the prompts on the LCD screen to clear any error messages. If you still see a paper jam message, check the other paper jam solutions.
Paper Jam Problems in the Rear Cover
If you see a message that paper has jammed in the rear cover, follow the steps here or on the LCD screen to clear the jam.
- Cancel the print job, if necessary.
- Press the buttons to release the rear cover and remove it from your product. Carefully remove any jammed paper from inside the product.
- Remove any jammed paper from inside the rear cover.
Turn the rear cover over, open the cover, and remove any paper jammed inside.
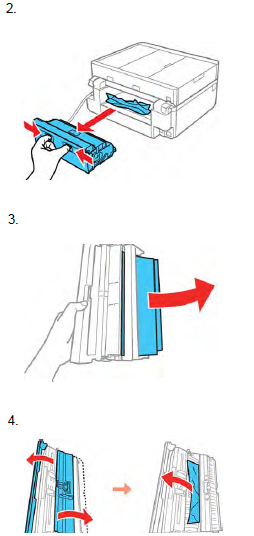
Reattach the rear cover
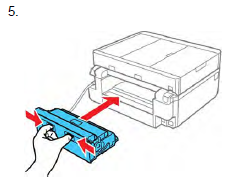
- Follow the prompts on the LCD screen to clear any error messages. If you still see a paper jam message, check the other paper jam solutions.
Paper Jams in the Automatic Document Feeder
If you have problems with paper jams in the automatic document feeder (ADF), follow the steps below or on the LCD screen to clear the jam.
- Cancel the print job, if necessary.
- Remove your originals from the ADF.
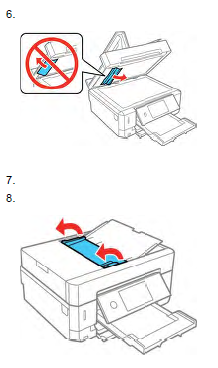
- Open the ADF cover and carefully remove any jammed paper.
Caution: Make sure you open the ADF cover before removing any jammed paper. Otherwise the product may be damaged. - Leave the ADF cover open and raise the scanner unit.
Press the tabs and remove the document mat.

- Carefully remove any jammed paper.
- Reattach the document mat, lower the scanner unit, and close the ADF cover.
Open the ADF input tray as shown.
Carefully remove any jammed paper from beneath the ADF input tray.
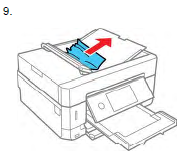
- Close the ADF input tray.
- Reload your originals.
Caution: Do not load the ADF beyond its capacity for your paper size. Also make sure your originals are not bent, folded, or curled and do not have tape, staples, or other materials that could obstruct the feeder. - Follow the prompts on the LCD screen to clear any error messages. If you still see a paper jam message, check the other paper jam solutions.
Paper Ejection Problems
If you have problems with paper ejecting properly, try these solutions:
- If paper does not eject fully, you may have set the wrong paper size. Cancel printing to eject the paper.
Select the correct paper size when you reprint. - If paper is wrinkled when it ejects, it may be damp or too thin. Load new paper and be sure to select the correct paper type setting when you reprint.
Solving Problems Printing from a Computer
Check these sections if you have problems while printing from your computer.
Note: When printing using AirPrint, the available print settings are different from those covered in this manual. See the Apple website for details.
Nothing Prints
If you have sent a print job and nothing prints, try these solutions:
- Make sure your product is turned on.
- Make sure any interface cables are connected securely at both ends.
- If you connected your product to a USB hub, make sure it is a first-tier hub. If it still does not print, connect your product directly to your computer instead of the hub.
- Make sure the printer status is not offline or pending.
- Run a product check to see if a test page prints. If the test page prints, check to see if your product software is installed correctly.
- Make sure your system meets the requirements for your operating system. If you are printing a high-resolution image, you may need more than the minimum requirements. If necessary, increase your system's memory.
- In Windows, make sure your product is selected as the default printer.
- In Windows, make sure the printer port setting matches the printer connection port.
- In Windows, delete all jobs from the Windows Spooler. Click Print Queue on the Maintenance tab in the printer settings window, and cancel any stalled print jobs.
- On a Mac, make sure the printer is added to the printer list.
- On a Mac, make sure the printer is not paused.
Product Icon Does Not Appear in Windows Taskbar
If you do not see your product icon in the Windows taskbar, first try restarting your computer. If that does not work, try this solution:
- Do one of the following:
- Windows 10: Click
 and select (Settings) > Devices > Printers & scanners. Select your product name and select Manage > Printing preferences.
 - Windows 8.x: Navigate to the Apps screen and select Control Panel > Hardware and Sound > Devices and Printers. Right-click your product name, select Printing Preferences, and select your product name again if necessary.
- Windows 7: Click
 and select Devices and Printers. Right-click your product name, select Printing Preferences, and select your product name again if necessary.
 - Windows Vista: Click
 , select Control Panel, and click Printer under Hardware and Sound. Right-click your product name, select Printing Preferences, and select your product name again if necessary.
- Windows 10: Click
- Click the Maintenance tab.
- Click the Extended Settings button.
- Select Enable EPSON Status Monitor 3 and click OK.
- Click the Monitoring Preferences button.
- Click the checkbox for the option that adds the shortcut icon to the taskbar.
- Click OK to close the open program windows.
Printing is Slow
If printing becomes slow, try these solutions:
- Make sure your system meets the requirements for your operating system. If you are printing a high-resolution image, you may need more than the minimum requirements. If necessary, increase your system's memory.
- If you are using Windows 7, close the Devices and Printers window before you print.
- On a Mac, make sure you download and install the Epson printer driver.
- Make sure Quiet Mode is turned off.
- Clear space on your hard drive or run a defragmentation utility to free up existing space.
- Close any programs you are not using when you print.
- If your product is connected to a USB hub, connect it directly to your computer instead.
- If printing becomes slower after printing continuously for a long time, the product may have automatically slowed down to protect the print mechanism from overheating or becoming damaged.
Let the product rest with the power on for 30 minutes, then try printing again. - If you are printing over a wireless network, factors such as interference, network traffic, or weak signal strength may affect your printing speed.
- If you are printing photos on plain paper, print speed may be reduced to maintain image quality.
For the fastest printing, select the following settings in your product software: - Make sure the paper type setting matches the type of paper you loaded.
- Turn on any high speed settings in your product software.
- Select a lower print quality setting.
- Make sure the ink drying time has not been increased for double-sided printing.
- Windows: Click the Maintenance or Utility tab, select Extended Settings or Speed and Progress, and select the following settings:
- Always Spool RAW Datatype
- Page Rendering Mode
- Print as Bitmap
- Windows: Select Printer Properties, click the More Options tab, and make sure the High Speed setting is enabled.
Mac: Select System Preferences, select Printers & Scanners, and select your product. Select Options & Supplies, select Options (or Driver), and enable the High Speed Printing setting. - Enable the bidirectional setting on the product control panel (Settings > Printer Settings >
Bidirectional).
If printing is still slow and you are using Windows 7 or Windows Vista, try the following:- Click
 and select Computer or My Computer. Double-click the C: drive and open these folders: ProgramData > EPSON > PRINTER.
Note: If you do not see the ProgramData folder, open the Organize menu and select Folder and search options. In the window that appears, click the View tab, select Show hidden files, folders, and drives in the Advanced settings list, and click OK. - Right-click the EPAUDF01.AUD file and select Delete.
- Restart your computer and try printing again.
- Click
Solving Page Layout and Content Problems
Check these sections if you have problems with the layout or content of your printed pages.
Note: When printing using AirPrint, the available print settings are different from those covered in this manual. See the Apple website for details.
Inverted Image
If your printed image is inverted unexpectedly, try these solutions:
- Turn off any mirror or inversion settings in your printing application.
- Turn off the Mirror Image, Flip horizontally, or Reverse page orientation settings in your printer software. (This option has different names, depending on your operating system version.)
Too Many Copies Print
Make sure that the Copies setting in your printing program or printer software is not set for multiple copies.
Blank Pages Print
If blank pages print unexpectedly, try these solutions:
- Make sure you selected the correct paper size settings in your printing program and printer software.
- If a blank page exists in a document you are printing and you want to skip printing it, select the Skip Blank Page setting in your printer software, if available.
- Run a print head nozzle check to see if any of the nozzles are clogged. Then clean the print head, if necessary.
- Make sure your product is selected as the printer in your printing program.
Incorrect Margins on Printout
If your printed page has incorrect margins, try these solutions:
- Make sure you selected the correct paper size settings in your printing program and printer software.
- Make sure you selected the correct margins for your paper size in your printing program.
- Make sure your paper is positioned correctly for feeding into the product.
- When placing originals on the scanner glass, align the corner of the original with the corner indicated by the arrow. If the edges of the copy are cropped, move the original slightly away from the corner.
- Clean the scanner glass and the document cover. If there is dust or stains on the glass, the copy area may extend to include the dust or stains.
- You can use the preview option in your printer software to check your margins before you print.
Border Appears on Borderless Prints
If you see a border on borderless prints, try these solutions:
- Make sure you are printing on a compatible borderless paper type and size.
Note: For custom paper sizes, make sure you select a supported borderless page width. - Windows: Make sure you selected the Borderless setting in your printer software.
- Mac: Make sure you selected the Borderless checkbox or a paper size with a Borderless option in your printer software.
- Adjust the Expansion setting to adjust the amount of image expansion on the edges of borderless prints.
- Make sure the image size and the paper size are set correctly; if the image is small, the enlargement may not be enough to cover the paper.
Incorrect Characters Print
If incorrect characters appear in your prints, try these solutions before reprinting:
- Make sure any cables are securely connected at both ends.
- In Windows, delete all jobs from the Windows Spooler. Click Print Queue on the Maintenance tab in the printer settings window, and cancel any stalled print jobs.
- If your product is connected to a USB hub, connect it directly to your computer instead.
- If your computer entered sleep mode the last time you printed, the next print job after your computer exits sleep mode may contain garbled characters. Print your document again.
- If incorrect characters still appear in your prints, try connecting your product using a different cable.
Incorrect Image Size or Position
If your printed image is the wrong size or in the wrong position, try these solutions:
- Make sure you selected the correct paper size and layout settings in your printing program and printer software.
- Make sure you selected the correct paper size on the control panel.
- Make sure your paper is positioned correctly for feeding into the printer.
- Slide the edge guides against the edges of the paper.
- Clean the scanner glass and document cover.
- If the edges of a copy are cropped, slightly move the original away from the edges of the scanner glass.
- Make sure you selected the correct margins for your paper size in your printing program.
- You can use the preview option in your printer software to check your margins before you print.
Slanted Printout
If your printouts are slanted, try these solutions:
- Slide the edge guides against the edges of the paper.
- Select a higher print quality setting in your printer software.
- Turn off any high-speed settings in your product software.
- Align the print head.
- Adjust the print quality.
- Make sure the product is not printing while tilted or at an angle.
Solving Print Quality Problems
Check these sections if your printouts have problems with print quality, but your image looks fine on your computer screen.
White or Dark Lines in Printout
If you notice white or dark lines in your prints (also called banding), try these solutions before you reprint:
- Run a nozzle check to see if any of the print head nozzles are clogged. Then clean the print head, if necessary.
- Make sure the paper type setting matches the type of paper you loaded.
- Make sure you loaded the printable side of the paper correctly for your product.
- Turn off any high-speed settings in your product software.
- Align the print head.
- Adjust the print quality in the product software.
- If you continue to see horizontal bands or streaks in your printouts after cleaning the print head and adjusting the print quality, make print quality adjustments for each paper type.
- You may need to replace the ink cartridges.
Blurry or Smeared Printout
If your printouts are blurry or smeared, try these solutions:
- Make sure your paper is not damp, curled, old, or loaded incorrectly in your product.
- Use a support sheet with special paper, or load special paper one sheet at a time.
- Make sure your paper meets the specifications for your product.
- Use Epson papers to ensure proper saturation and absorption of genuine Epson inks.
- Make sure the paper type setting in your product software matches the type of paper you loaded.
- Make sure you loaded the printable side of the paper correctly for your product.
- If you are printing on thick paper or envelopes, turn on the Thick Paper setting from the control panel or select Thick Paper and Envelopes in the Extended Settings of the printer software. (Turning this setting on will decrease print speed.)
- If you are printing on thick paper or envelopes, make sure you select the appropriate settings.
- Remove each sheet from the output tray as it is printed.
- Avoid handling printouts on glossy paper right after printing to allow the ink to set.
- Turn off any high-speed settings in your product software.
- If you print on both sides of a sheet of paper, smudges may appear on the reverse side of heavily saturated or dark images. If one side of a sheet will contain a lighter image or text, print that side first. Make sure the ink has dried before reloading the paper to print on the other side. Adjust the density and/or ink drying time settings.
- If printed copies are smeared, lower the copy density setting on the product control panel.
- Run a nozzle check to see if any of the print head nozzles are clogged. Then clean the print head, if necessary.
- Align the print head.
- Adjust the print quality in the product software.
- Clean the paper path.
- Do not press too hard on the original or the document cover when you are scanning originals on the scanner glass.
- Clean the scanner glass.
- Clean the ADF.
Faint Printout or Printout Has Gaps
If your printouts are faint or have gaps, try these solutions:
- Run a nozzle check to see if any of the print head nozzles are clogged. Then clean the print head, if necessary.
- The ink cartridges may be old or low on ink, and you may need to replace them.
- Make sure the paper type setting matches the type of paper you loaded.
- Make sure your paper is not damp, curled, old, or loaded incorrectly in your product.
- Align the print head.
- Adjust the print quality in the product software.
- Clean the paper path.
Grainy Printout
If your printouts are grainy, try these solutions:
- Make sure you loaded the printable side of the paper correctly for your product.
- Select a higher print quality setting and turn off any high-speed settings in your product software.
- Run a nozzle check to see if any of the print head nozzles are clogged. Then clean the print head, if necessary.
- Align the print head.
- Adjust the print quality.
- You may need to increase the image resolution or print a smaller size; see your software documentation.
Note: Images from the Internet may be low resolution and not result in a high-quality printout. - If you enlarged the image size in an image-editing program, you need to increase the image resolution setting to retain a high image quality. Increase the image resolution by the same amount you increase the image size. For example, if the image resolution is 300 dpi (dots per inch) and you will double the image size for printing, change the resolution setting to 600 dpi.
Note: Higher resolution settings result in larger file sizes, which take longer to process and print. Consider the limitations of your computer system when selecting a resolution, and select the lowest possible resolution that produces acceptable quality to keep file sizes manageable.
Incorrect Colors
If your printouts have incorrect colors, try these solutions:
- Make sure the paper type setting matches the paper you loaded.
- Make sure the Black/Grayscale or Grayscale setting is not selected in your printer software.
- Select EPSON Standard as the Color Mode in your product software.
- If the color ink cartridges are old or running low, you may need to replace them.
- Make sure the correct printer is selected in the printer software.
- Adjust the color settings on your computer.
Note: If you are printing images from the Internet, you may encounter issues with color profiles or incorrect file formats. - Ensure that the color profile and printer settings match the paper type and image quality settings in your printing program.
Pros & Cons
Pros:
- Compact and sleek design suitable for small spaces
- High-quality print, scan, and copy capabilities
- Wireless printing options for convenience
- Dedicated photo tray and borderless printing
- User-friendly 4.3" touchscreen LCD
Cons:
- Higher cost per page compared to some other models
- No Ethernet port for wired network connection
- ADF capacity is relatively small
Customer Reviews
Customers generally praise the Epson XP-7100 for its ease of use, high-quality prints, and compact design. However, some users have noted that the ink costs can be higher over time. Here are some common complaints:
- Ink costs can be expensive in the long run.
- Noisy during operation.
- ADF capacity is limited.
Faqs
How do I set up wireless printing on the Epson XP-7100?
What is the maximum paper capacity of the Epson XP-7100?
Can I print borderless photos with the Epson XP-7100?
How do I troubleshoot paper jams on the Epson XP-7100?
Is the Epson XP-7100 compatible with both Windows and macOS?
What is the print resolution of the Epson XP-7100?
How do I check ink levels on the Epson XP-7100?
Does the Epson XP-7100 come with a touchscreen display?
Can I copy multi-page documents with the Epson XP-7100?
Is there an Ethernet port on the Epson XP-7100 for wired network connection?
Leave a Comment
