
How to Use: Euro Cuisine Electric Pizza Oven PM600 Instruction Manual
Content
Euro Cuisine Electric Pizza Oven PM600
Introduction
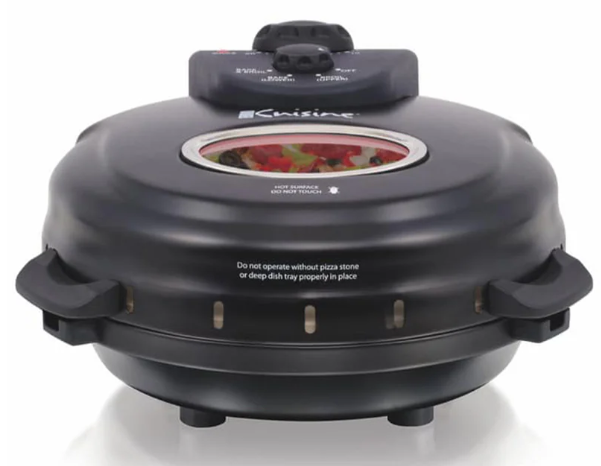
The Euro Cuisine Electric Pizza Oven PM600 offers a convenient and efficient way to enjoy delicious, homemade pizza right on your countertop. Designed for pizza lovers and casual cooks alike, this compact electric oven features a 360-degree rotating cooking surface that ensures even baking and perfectly crisp crusts every time. Its tabletop design saves energy compared to traditional ovens, making it ideal for small kitchens, dorm rooms, or quick meals.
This versatile pizza maker includes a 12-inch removable pizza stone and a non-stick 12-inch deep dish pan, allowing you to prepare everything from thin crust to deep-dish pizzas with ease. Beyond pizza, it can cook frozen snacks, potato skins, cinnamon rolls, and more, making it a multifunctional appliance for a variety of quick meals and appetizers. The oven offers three heat settings—Bake, Broil, and a combination of both—to tailor cooking styles to your recipe.
Targeted at home cooks seeking an easy, mess-free pizza solution, the PM600 also appeals to anyone craving fresh pizza without the wait or expense of delivery. It retails in the price range of approximately $130 to $180, widely available through major retailers and online stores. Overall, the Euro Cuisine Electric Pizza Oven PM600 combines functionality, space-saving design, and user-friendly features to bring pizzeria-quality pizza to your home.
Technical Specifications and Key Features of the Euro Cuisine Electric Pizza Oven PM600
- Power Source: Electric, 120 volts
- Heat Settings: Three modes—Bake, Broil, and Bake & Broil combination
- Cooking Surface: 360-degree rotating tray for even cooking
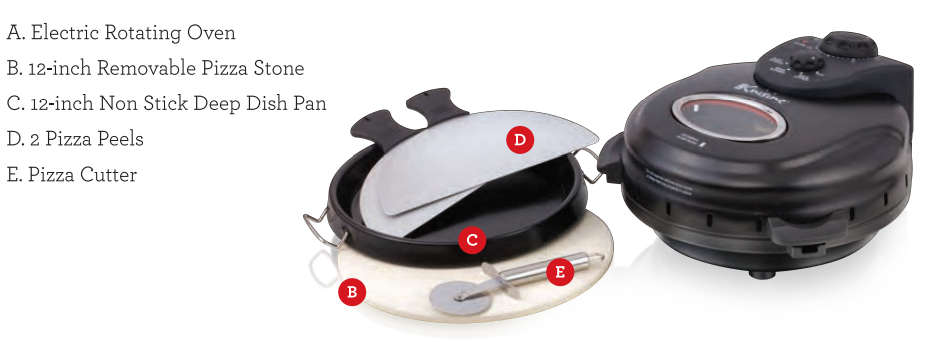
- Included Accessories: 12-inch removable pizza stone, 12-inch non-stick deep dish pan, 2 pizza spatulas (peels), and pizza cutter
- Timer: 30-minute adjustable timer with auto shut-off for safety
- Dimensions: Approximately 16" L x 14" W x 8" H
- Construction: Compact tabletop design, easy-to-clean removable parts
- Warranty: 3-year limited manufacturer warranty
Compared with similar countertop pizza makers, the Euro Cuisine PM600 stands out with its rotating stone feature, which promotes uniform heat distribution and consistent baking results. This is a key advantage over static tray models. The combination of both a pizza stone and a deep dish pan offers versatility in pizza styles, whereas many alternatives provide only one cooking surface type.
BEFORE THE FIRST USE
Before using your Pizza Maker, please read all safety and operating instructions thoroughly. Please ensure you follow the steps below before using this appliance.
- Remove and safely discard all packaging material and promotional labels, and ensure that the power cord is unplugged.
- Wipe the exterior housing and inner surface of the Pizza Maker with a soft, damp cloth. Dry thoroughly. Do not immerse in water or other liquids.
- Remove the Pizza Pan from the Pizza Maker and wash it in warm, soapy water. Dry thoroughly.
- Remove the Pizza Stone from the Pizza Maker and wipe it with a soft, damp cloth. Dry thoroughly.
- Re-insert the Pizza Stone on the Rotary Base and close the lid. There is no need to season the Pizza Stone before using it for the first time. The stone will season itself over time with repetitive use. Make sure the Pizza Stone or Pizza Pan is sitting correctly on the Rotary Base.
- Residue flour or semolina used to roll out the dough will be enough to prevent the pizza dough from sticking.
FIRST USE
- Insert the power plug into the power outlet.
- Select the Bake & Broil function (both green and red lights will illuminate to indicate that the Pizza Maker is in heating mode)
- Set the Timer Dial for 15 minutes
- The Pizza Stone or the Pizza Pan will rotate during operation.
Make sure the Pizza Stone or Pizza Pan is sitting correctly on the Rotary Base.
CAUTION:
- You may notice a slight odor being emitted from the Pizza Maker during the initial use. This is normal, and the odor will cease with continued use.
- Carefully open the lid using oven mitts. Do not lean or stand over the Pizza Maker when opening the lid, as steam may be released.
- Surfaces will get hot during use.
TIMER
The Timer Dial can be set for up to 30 minutes. The Heating Elements will only begin to heat once the timer has been set and the lid is closed. Once the timer has finished counting down, heating will automatically stop,p and the bell will ring to indicate the timer has elapsed.
HEATING ELEMENTS
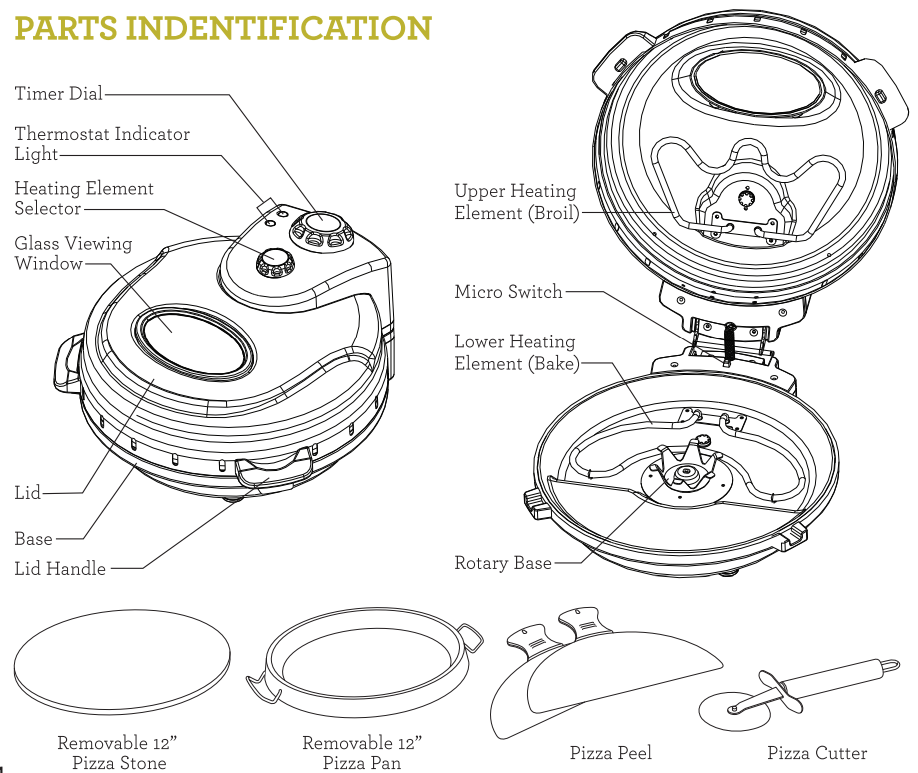
- Bake & Broil - Operates both the Lower and Upper Heating Elements.
- Bake - Operates the Lower Heating Element for cooking the base of the pizza.
- Broil - Operates the Upper Heating Element for cooking the toppings of the pizza.
- OFF - Turns off the heating elements.
- The thermostat heating lights may turn on and off during operation. This indicates that the correct temperature is being maintained.
- NOTE: When you are cooking pizzas with a thicker base and want more of a deep pan pizza, it is advised to use the Pizza Pan. For a crispier pizza base or when cooking with a thinner base, use the Pizza Stone.
COOKING ON THE PIZZA STONE
- Plug the power cord into a power outlet.
- The control dials should all be set at the OFF position - lift the lid and ensure that the Pizza Stone is sitting correctly on the Rotary Base, and that there is nothing else in the Pizza Maker.
- Pre-heat the Pizza Maker by setting your Timer Dial to at least 5 minutes. When cooking with the Pizza Stone, make sure Bake & Broil Mode is selected.
TIP: Pre-heating your Pizza Maker before use will ensure better results. - If you are cooking fresh dough pizza, lightly coat the surface of the Pizza Stone with some plain flour before placing the pizza directly onto the surface of the Pizza Stone.
CAUTION:
If making your own pizza, it is strongly recommended to roll it on a separate board and then transfer it to the Pizza Stone once you are ready to cook. Do not roll (make) the dough on the Pizza Stone. Be careful notto overfill or mount your toppings too high - the toppings should always be below the height of the Upper Heating Element to avoid burning them.
WARNING:
The Pizza Stone will be hot after pre-heating.
DO NOT TOUCH THE PIZZA STONE AT ANY TIME DURING THE COOKING PROCESS.
Never use a knife or pizza cutter on the Pizza Stone or Pizza Pan, as this could damage the cooking surface. Remove the pizza from the Pizza Stone or Pizza Pan before cutting. - If you are cooking frozen pizza, make sure it has completely thawed, then slide it directly onto the Pizza Stone.
- Close the lid of your Pizza Maker and then select the desired time. As a guide, for a pizza with a medium base, try 20 minutes. As every pizza will have different thickness and topping levels, some pizzas may cook faster than others. Make sure Bake & Broil Mode is selected.
TIP: When you see that the toppings have cooked, switch off the Upper Heating Element (Broil) by turning the dial to Bake, which leaves the Lower Heating Element (Bake) on for a further 3-5 minutes to finish cooking the base. - Once you have finished cooking your pizza, turn all the control dials to OFF, lift the li,d and remove the pizza with the pizza peel.
The Pizza Stone will darken in color with use. This is a normal part of the natural seasoning process. Scrape the Pizza Stone after each use.
COOKING ON THE PIZZA PAN
- Please ensure the Pizza Pan has been washed in wa,rm soapy water before using it for the first time.
- Place the Pizza Pan onto the Rotary Base, ensuring it sits correctly to allow rotation.
- Pre-heat the Pizza Maker for at least 5 minutes. Use both the Upper and Lower Heating Elements (Bake & Broil) when cooking with the Pizza Pan.
- Transfer your fresh pizza to the Pizza Pan after the pre-heat has completed.
- If you are cooking frozen pizza, make sure it has completely thawed, then slide it directly onto the Pizza Pan.
- Close the lid of your Pizza Maker and then select the desired time. As a guide, for a pizza with a medium base, try 20 minutes. As every pizza will have different thickness and topping levels, some pizzas may cook faster than others. Make sure Bake & Broil Mode is selected.
CLEANING & MAINTENANCE
- Clean after removing the plug from the power supply, and once the Pizza Maker, Pizza Stone,,e and Pizza Pan have cooled down.
- After each use, wipe the exterior housing with a soft, damp cloth and dry thoroughly. A non-abrasive liquid cleanser may be used to avoid id build-up of food residue and stains.
- To clean any food splattering, wipe the inner surface with a soft cloth dampened with warm water. Dry thoroughly. Caution must be taken to ensure the heating elements are not damaged in any way.
- The viewing window will darken from cooking vapors with ongoing use. To clean, make a paste using 2 teaspoons of baking soda, 1 teaspoon of white vinegar, and 1 teaspoon of water. Rub the paste onto the viewing window, and wipe clean with a damp cloth.
- Wash the Pizza Pan in warm, soapy water. Do not use hharsh materialsas the non-stick surface will be affected.
CARE AND CLEANING OF THE PIZZA STONE
Pizza stones are porous and will absorb fats and oils. It is normal for pizza stones to accumulate stains from dripping fatty toppings and cheese. This will not affect the taste of the pizza nor the performance of the stone; however, cooking residue may create excess smoke and odor.
To remove stains, let the Pizza Stone cool completely and follow the following instructions:
- Small stains can be cleaned easily by scrubbing with a toothbrush and a paste made from equal parts of baking soda and water. Work in small circles until stains are removed. Wipe clean with a damp cloth and dry completely
before reusing. - To remove burnt-on food, lightly use a scouring pad over stubborn areas.
- If the accumulation is heavy, use a hard-abrasive paper, like sandpaper, to clean the surface.
- Make sure to wipe the stone clean with a damp cloth, and allow plenty of time for the stone to dry out completely before using it.
- Do not use detergents or hard materials to clean the cooking base, and do not pour water on the Pizza Stone when it is still hot; the thermal shock might crack it.
- Never wash the Pizza Stone with water or any other liquid.
- Never use any detergent when cleaning the Pizza Stone. Cleaning liquids or detergents will absorb into the stone and transfer to the pizza during baking.
- It is normal for the Pizza Stone to become dark with use. This is typical of natural stone.
Pros & Cons of the Euro Cuisine Electric Pizza Oven PM600
Pros
- Even Cooking: The 360-degree rotating tray ensures uniform heat exposure for perfectly cooked pizzas without hot spots.
- Versatility: Comes with both a pizza stone and a non-stick deep dish pan, suitable for various recipes, including frozen snacks.
- Compact & Energy Efficient: Tabletop design uses less energy than full-sized ovens, ideal for small spaces.
- Complete Set: Includes helpful accessories like pizza peels and a cutter for convenience.
- Easy Cleanup: Removable cooking surfaces speed up post-use maintenance.
Cons
- Limited Capacity: Best suited for 12-inch pizzas, which may not suffice for larger gatherings.
- Build Origin: Manufactured in China;, some users note concerns about long-term durability.
- Mixed Reviews on Heating: Some users report uneven heating if not preheated properly, requiring careful monitoring.
- Price Point: Slightly higher than some basic countertop pizza makers, but justified by features.
Overall, the Euro Cuisine PM600 provides good value for money with its unique rotating cooking surface and accessory package, making it a strong choice for pizza enthusiasts compared to alternatives that lack these features.
Customer Reviews and Feedback on the Euro Cuisine Electric Pizza Oven PM600
The Euro Cuisine Electric Pizza Oven PM600 has received a mixed range of reviews, averaging around 2.3 out of 5 stars across various retailers. Customers praise the oven for its easy operation, compact size, and the ability to cook pizza with a crisp crust thanks to the rotating stone. Many appreciate the included accessories, which add value and convenience.
Common complaints involve the heating consistency, with some users mentioning that pizzas require careful attention to prevent undercooking or burning. A few reviewers noted that the oven can take slightly longer to reach optimal temperature compared to conventional ovens. Some customers also expressed concerns about the durability of the rotating mechanism over extended use.
Despite these issues, many buyers recommend the PM600 for casual pizza making and small households due to its convenience and compact footprint. The 3-year limited warranty provides additional purchase confidence. Prospective buyers are advised to preheat the oven fully and use the timer settings to optimize results.
Faqs
How do I properly set up the euro cuisine Electric Pizza Oven PM600 for first use?
What should I do if the rotating cooking surface on my euro cuisine Electric Pizza Oven PM600 stops turning?
Can I use frozen or take-n-bake pizzas with the euro cuisine Electric Pizza Oven PM600?
How do the three heat settings on the euro cuisine Electric Pizza Oven PM600 affect cooking performance?
What maintenance steps are recommended to keep my euro cuisine Electric Pizza Oven PM600 in good condition?
Is the pizza stone in the euro cuisine Electric Pizza Oven PM600 removable, and how do I clean it?
What are common problems users face with the euro cuisine Electric Pizza Oven PM600 and their solutions?
Does the euro cuisine Electric Pizza Oven PM600 require specific electrical requirements or accessories?
More euro cuisine manuals
Leave a Comment