Setup & Use: Evenflo AERIS BabySuite SoftTouch Mat Instruction Manual
Content
Introduction
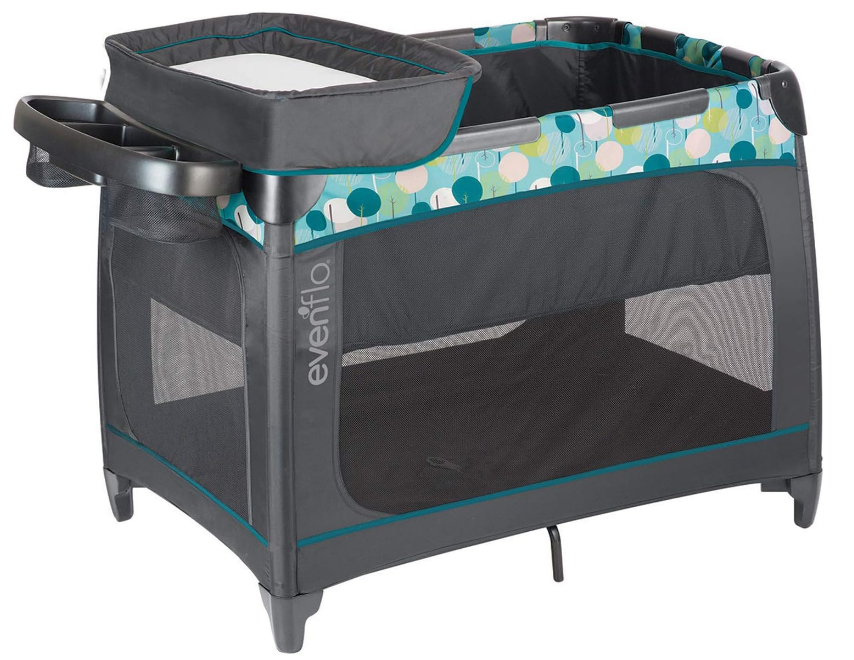
The Evenflo AERIS BabySuite SoftTouch Mat is a high-quality play mat that makes sure your baby has a secure and comfortable place to play. This article will teach you more about it. This play mat's soft, non-toxic fabrics provide comfort and security for both tummy time and playing. It provides a functional and fashionable answer for your baby's needs thanks to its easy-to-clean construction and eye-catching patterns, making it the ideal addition to any nursery or play area. The price of Evenflo AERIS BabySuite is $150
Detailed Specifications
Here are the key features of Evenflo AERIS BabySuite SoftTouch Mat:
- Infant car seat: Rear-facing from 4-35 pounds and up to 32 inches
- Toddler seat: Forward-facing from 22-65 pounds and up to 54 inches
- Stay-in-place base: With 6 recline positions and an easy-to-read level indicator
- SimpliSafe Adjust Harness System: For easy and secure harness adjustment
- Temperature-regulating fabric: For ultimate comfort and breathability
- Slim and compact design: For easy maneuverability and storage
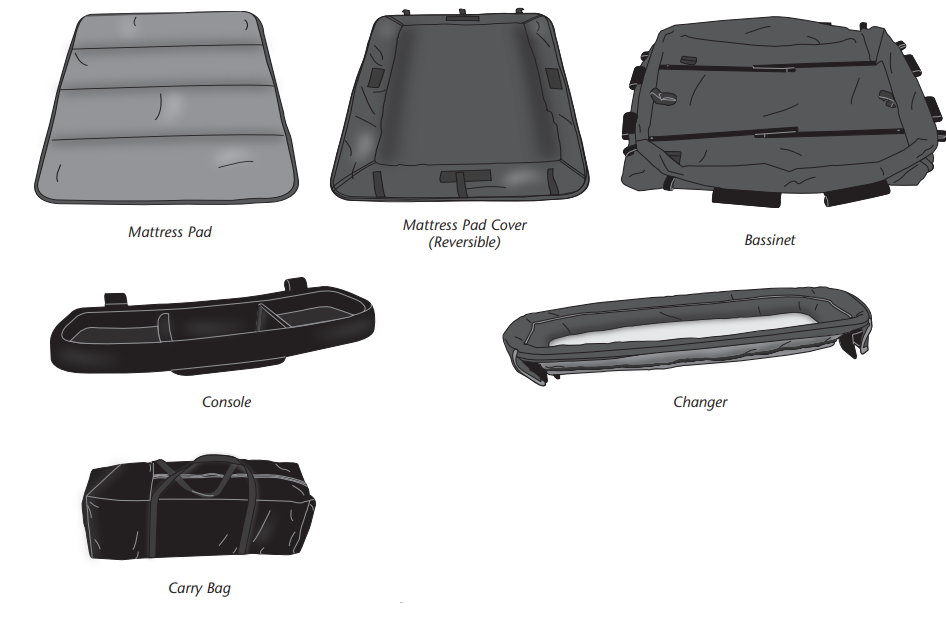
IDENTIFICATION OF PARTS
IMPORTANT INFORMATION
Child Requirements
- Maximum height: 35 inches (89 cm)
- Maximum weight: 30 lbs (13.6 kg)
- Maximum weight for Bassinet: 15 lbs (6.8 kg)
- Maximum weight for Changer: 25 lbs (11.3 kg)
- Maximum weight for Console (each pocket): 4.4 lbs (2 kg)
Description
High-end baby gear options that offer great comfort, safety, and convenience to parents and infants include the Evenflo AERIS BabySuite. With its specially designed newborn fit, the infant car seat can accommodate children up to 35 pounds in weight. You can quickly and securely adjust the harness with its SimplySafe Adjust Harness System to make sure your kid will fit correctly as they grow. With its 6-position reclining feature, the toddler seat is a safe and comfortable option for long car rides, fitting children weighing 22 to 65 pounds. The stay-in-place foundation is easy to install and has a level indication to ensure proper alignment. Furthermore, the fabric's capacity to regulate temperature will provide your youngster with the maximum level of comfort and breathability.
SETTING UP THE PLAYARD
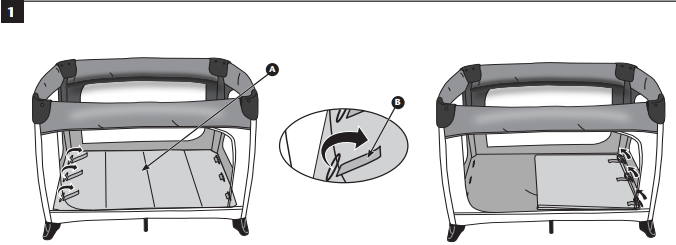
- Remove the playard from the bag. Unhook the two Velcro® tabs C to remove the mattress pad.
- Separate the corners to open the playard. Note: Do not push the center of the playard floor down yet.
- WARNING: To prevent injury or death, DO NOT leave the child in the product with SIDES DOWN. ALWAYS make sure sides are raised and all four rails are fully and securely locked by firmly pushing down on the center of each rail.
- Lift up both long top rails D until they securely lock into place with an audible click.
Note: The floor E must stay up, as shown, so the rails will lock properly. If the rails do not lock into place, pull up on the loop F, draw the feet together, and try to lock the rails again. Lift up both short top rails G until they lock into place with an audible click.
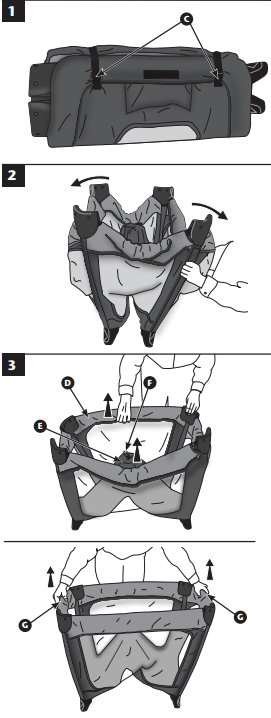
- Lift up both long top rails D until they securely lock into place with an audible click.
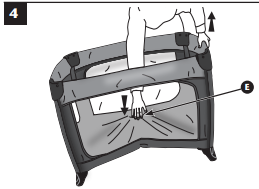
Pick up the end of the playard and push down on the center of the floor E until it locks into a flat position.
- Place the Mattress Pad Cover on the Mattress Pad
Stretch mattress pad cover over mattress pad and attach four Velcro strips A.
Note: The mattress pad cover is reversible.
WARNING: To avoid injury, NEVER use the mattress pad cover without the mattress pad. To Install the Mattress Pad
Place mattress pad H on the floor of the playard, cushion side up. Insert the six mattress straps I through the slots J in the floor of the playard and fasten them to the Velcro tabs on the underside of the playard floor.
Make sure all six straps are properly secured to the playard and the Velcro tabs are facing downward, securing the pad to the playard floor.
Note: The mattress pad must always be used with the cushion side up.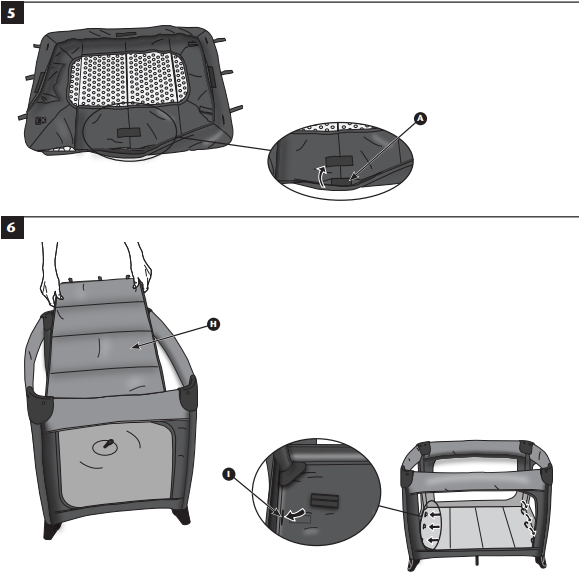
SETTING UP THE BASSINET
IMPORTANT: NEVER use the playard without the mattress pad securely installed on either the playard floor or in the bassinet.
- Remove the child and all accessories from the playard.
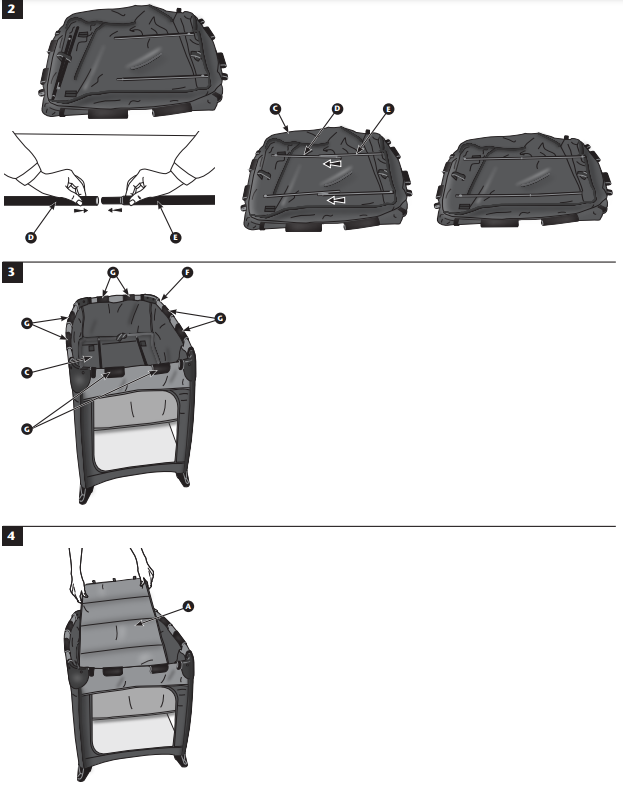
To remove the mattress pad A, disconnect three mattress straps B from each side of the playard, then remove the pad.
- Place the bassinet C on the floor with tubes and sleeves facing upward.
Note: Tubes are pre-installed on the bassinet and require only to be connected.- Connect one set of tubes D and E together, as shown. Make sure they are securely connected. Repeat for the other set of tubes.
- WARNING: To prevent injury or death, NEVER set up the bassinet with the child in the playard. ALWAYS remove the child from the playard before installing the bassinet.
- Place the bassinet C into the playard F with the tube assemblies on top, as shown.
- Make sure all eight hooks G are securely attached to the rails, as shown.
- WARNING: To avoid serious injury or death:
- NEVER use the mattress pad cover without the mattress pad.
- Check to ensure the bassinet is fully secure by firmly pressing down on all four corners of the mattress pad.
- DO NOT use bassinet with children over 15 lbs (6.8 kg). Discontinue use when the child begins to push up on hands and knees or can roll over.
- FALL HAZARD: To prevent falls, do not use this product when the infant begins to push up on hands and knees or has reached the manufacturer’s recommended maximum weight, whichever comes first.
Place mattress pad A on the bassinet, cushion side up. Push down firmly on all four corners of the mattress pad.
SETTING UP THE CHANGER
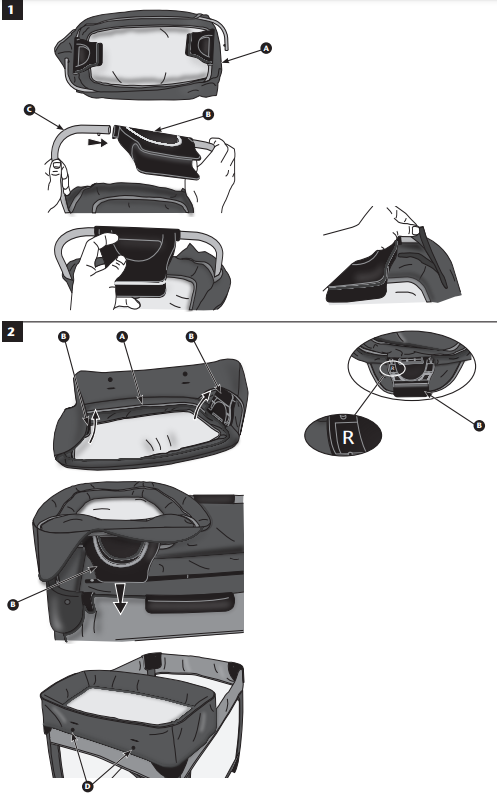
- Place the changer A on the floor, as shown.
Note: Tubes and fastening clips are pre-installed on the changer and require only to be connected.- Insert one tube C into its corresponding fastening clip B.
- Make sure the tube end locks into the fastening clip with an audible click. Repeat for the other tube and fastening clip.
- Fasten Velcro to cover tubes.
- WARNING: FALL HAZARD–To prevent death or serious injury, NEVER leave the child unattended. ALWAYS keep the child within arm’s reach.
- NEVER leave the changing table in place when the child is in the playard or bassinet. To avoid serious injury or death, ALWAYS remove the changer from the playard or bassinet after each use.
Note: Changer can be attached to either end of the playard. - To install the changer A to the playard, unfold the fastening clips B. Locate the “L” inside the Left clip, and the “R” inside the Right clip.
- Push each clip onto the top of the playard as shown. The Left clip attaches to the Left side of the playard, and the Right clip attaches to the Right side of the playard. Make sure both fastening clips lock securely into place with audible clicks.
Note: Changer will attach in one orientation only. If the changer will not attach to the playard, make sure you have the Left clip on the Left side and the Right clip on the Right side. After attaching the two clips to the playard, fasten the changer skirt to the playard with the two snaps D.
- NEVER leave the changing table in place when the child is in the playard or bassinet. To avoid serious injury or death, ALWAYS remove the changer from the playard or bassinet after each use.
To remove the changer A from the playard, unfasten the two snaps D on the changer skirt. Pull up on each fastening clip B. Raise the changer up and away from the playard.
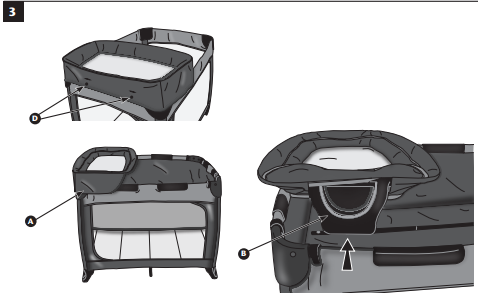
ATTACHING THE CONSOLE
Not available on all models.
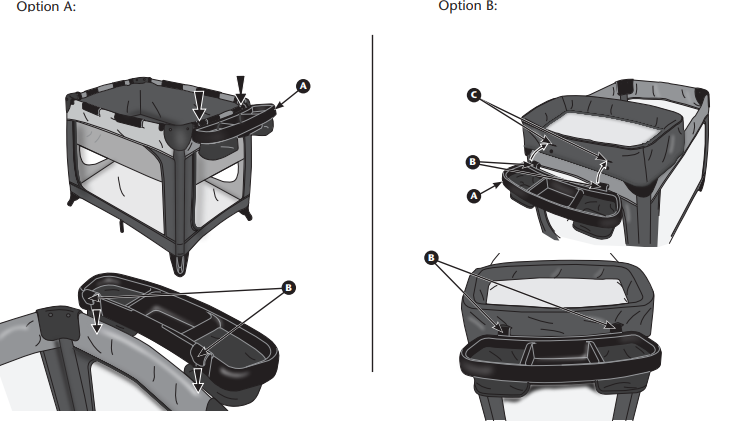
- Option A:
- To securely attach the console A to the playard, push each clip B onto the top of the playard, as shown.
- Option B:
To securely attach the console A to the playard, push clips B through the openings C in the changer and onto the top of the playard.
FOLDING UP YOUR PLAYARD
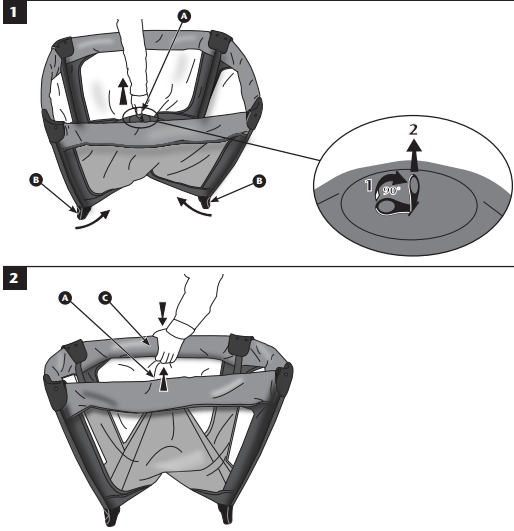
Remove the console, mattress pad, and/or bassinet.
- Rotate the loop A attached to the center of the floor up to 90°.
- Lift up on the loop until the feet B are drawn together, as shown.
Find the center of one of the top rails C. Lift up and squeeze hard on the fold lock release button inside the padded rail to release the lock. Make sure that both sides of the rail unlock properly, then push the rail downward and fold completely. Repeat for the remaining three top rails. Note: If the top rail will not fold completely, lift up on the loop A attached to the center of the floor and try again.
- Gather the sides of the playard together.
Note: If the sides do not easily fold up, repeat steps 1 and 2, making sure all side rails are unlocked. To disassemble the bassinet D, disconnect the tubes E, as shown.
Note: The tubes cannot be removed from the bassinet.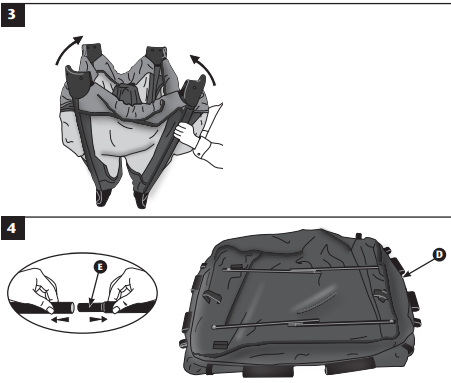
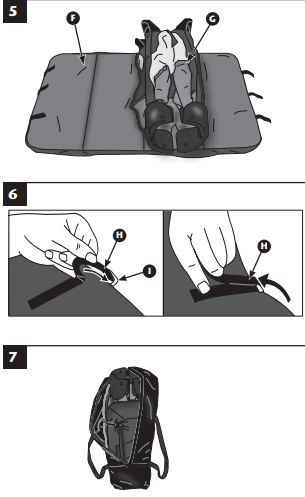
- Place the mattress pad F on the floor, cushion side up. Place the folded playard G on the mattress pad, as shown. Then place the bassinet assembly on top of the folded playard.
- Wrap the mattress pad around the playard and bassinet assembly. Then thread a Velcro strap H through a “D” ring I, fold over, and fasten. Repeat for the other “D” ring.
Place the playard in the carry bag.
REMOVING MATTRESS PAD COVER
To remove the mattress pad cover, pull back four Velcro strips A.
See Care and Maintenance for cleaning directions (page 9).
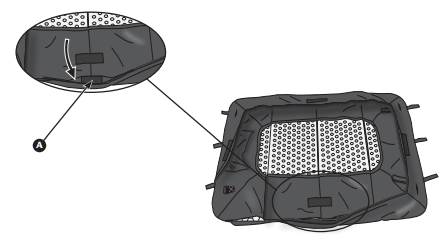
Note: The mattress pad cover is reversible.
CARE AND MAINTENANCE
To Clean Fabric and Vinyl
- Clean spills and stains on cloth, vinyl, or plastic surfaces with cold water and mild soap. Air dry.
- DO NOT machine wash or tumble dry accessories with plastic backing or vinyl coverings. These parts may be damaged by detergents and heat.
- The carry bag may be machine washed. Machine wash separately in cold water, delicate cycle. NO chlorine bleach. Air dry. DO NOT tumble dry. DO NOT iron or dry clean.
- The mattress pad cover may be machine washed. Machine wash separately in cold water, delicate cycle. NO chlorine bleach. Tumble dry: 10-15 minutes on low heat. DO NOT iron or dry clean.
To Clean and Maintain Frame
- Metal and plastic parts can be wiped clean with a soft damp cloth and dried with a soft cloth. DO NOT use abrasive cleaners or solvents.
- An occasional drop of vegetable oil may reduce wear on moving parts.
Troubleshooting
Here are some common problems and solutions for Evenflo AERIS BabySuite SoftTouch Mat:
- Problem: The harness is too tight or too loose.
Solution: Use the SimplySafe Adjust Harness System to adjust the harness to a proper fit. - Problem: The car seat is not level.
Solution: Adjust the recline position of the stay-in-place base and use the level indicator to ensure proper positioning. - Problem: The car seat is difficult to install.
Solution: Refer to the user manual for installation instructions and tips.
WARRANTY
For a period of 90 days from the original purchase of this product, Evenflo warrants to the original end user (“Purchaser”) this product (including any accessories) against defects in material or workmanship. Evenflo’s sole obligation under this express limited warranty shall be, at Evenflo’s option, to repair or replace any product that is determined to be defective by Evenflo and determined to be covered by this warranty.
Pros & Cons
Pros:
- Versatile 3-in-1 system
- Slim and compact design
- Superior comfort with temperature-regulating fabric
- Easy-to-use SimplySafe Adjust Harness System
Cons:
- Higher price point compared to other baby gear options
- May not accommodate larger toddlers
Customer Reviews
Customers have praised Evenflo AERIS BabySuite SoftTouch Mat for its versatility, comfort, and safety features. However, some have noted that the car seat may not be suitable for larger toddlers and that the price point is higher compared to other baby gear options.
Faqs
What are the Evenflo AERIS BabySuite SoftTouch Mat measurements?
What components make up the mat's construction?
Is it simple to clean the mat?
Can I use the mat outside as well as indoors?
Is the mat collapsible for convenient carrying and storing?
Are there various patterns or designs to choose from?
Are babies safe on the mat?
What is the price point for Evenflo AERIS BabySuite?
Is it possible to use the mat on wood floors?
What is the Evenflo AERIS BabySuite SoftTouch Mat warranty period?
Leave a Comment
