
Usage: Everlast Power i-MIG 275P Welder User Manual
Content
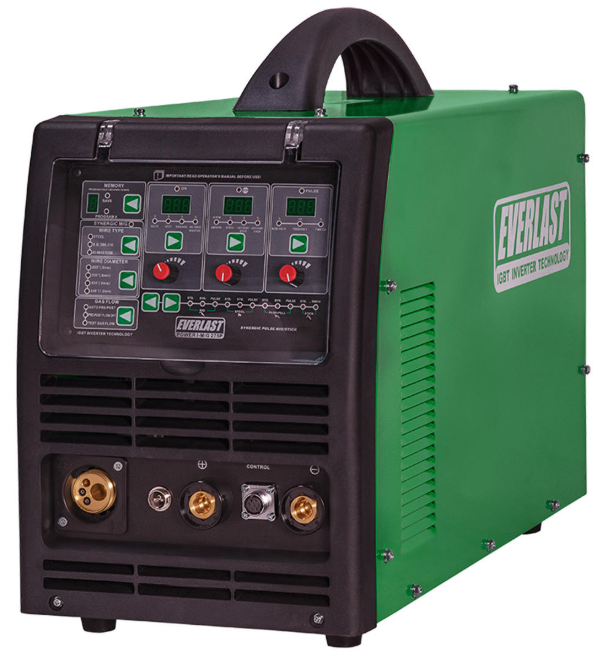
Everlast Power i-MIG 275P Welder
Introduction
The Everlast Power i-MIG 275P Welder is a premium, professional-grade welding machine designed to meet the demands of experienced welders and industrial fabricators. This compact yet powerful unit excels in MIG welding with its advanced pulse technology, delivering up to 275 amps of output power. Its innovative design supports pulse synergic MIG welding, enabling smoother arcs and superior bead control on thicker metals. Featuring IGBT inverter technology, the Power i-MIG 275P provides high efficiency, excellent arc stability, and precise heat control, making it ideal for structural fabrication, automotive repair, and heavy-duty maintenance tasks.
Key benefits include the unique pulse welding mode, adjustable pulse parameters (voltage, frequency, and duration), and compatibility with both spool and push-pull gun systems, a feature rarely available in this class of welders. Its dual voltage capability (220/240V single-phase) offers flexibility across different workshop environments. The welder also supports stick welding with E6010 electrodes, enhancing versatility for field repairs and construction work.
Targeted at professional welders, metal fabricators, and skilled hobbyists, this welder suits projects requiring high precision and power, from heavy steel fabrication to repair work on thick materials. The Everlast Power i-MIG 275P Welder typically ranges in price from approximately $2,500 to $3,000, depending on the retailer and included accessories. It is widely available through authorized Everlast distributors and specialized welding equipment retailers.
Specifications
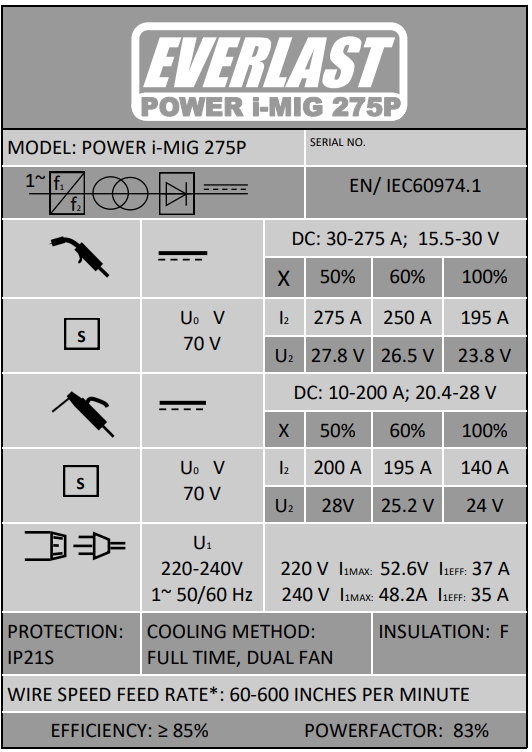
60 IPM is based on the minimum usable feed rate.
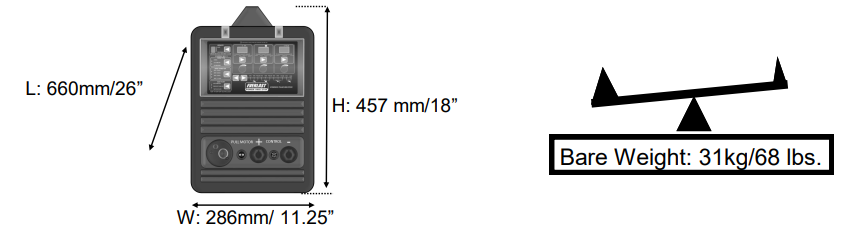
NOTE: Environment, Maintenance, and Safety: Keep this welder at least 12 inches away from all objects for proper cooling. Do not exceed 40° C in the environment, or the duty cycle will be reduced. Regularly inspect and clean the welder and circuitry on a monthly basis with dry compressed air. Remove the covers only after the unit has been turned off and unplugged for 30 minutes to discharge the capacitors and to prevent the possibility of electrocution. Do not grind or throw sparks near the welder to prevent damage to the panel face and internal components. Damage of this nature is not covered by the warranty.
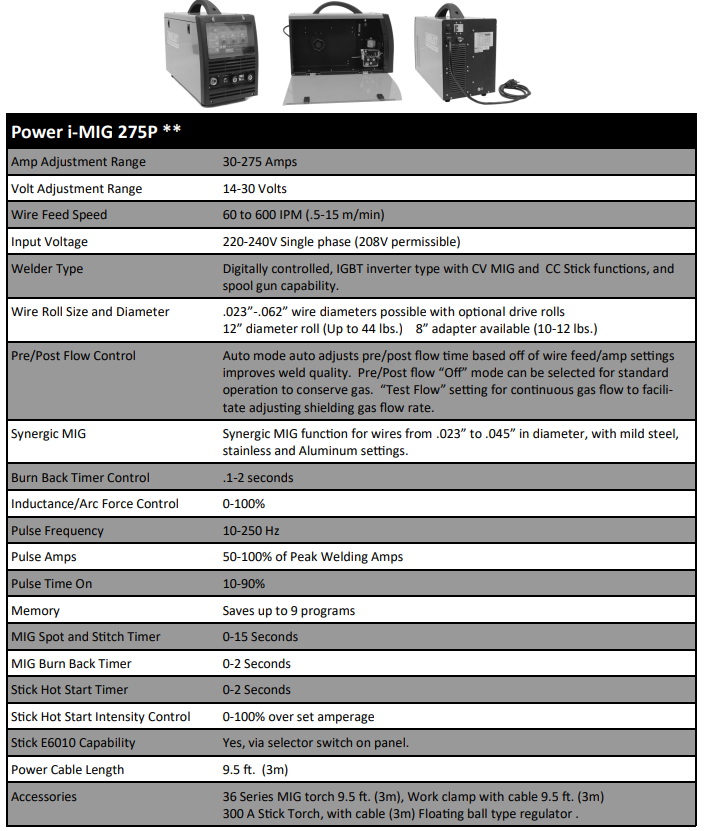
General Description, Purpose, and Features. The Power i-MIG 275P features a unique new Pulse design for MIG welders in the 250-350 amp class. The compact stature of the Power i-MIG 275P features faithful IGBT power components and a simplified digitally controlled inverter design. The welder’s Pulse MIG capability is geared towards providing maximum control over heat and fusion. The unit employs a single pulse design that features full manual control over the pulse parameters. This makes it ideal for use with Aluminum and Stainless steel in applications where heat and arc control are critical. To provide the best results while welding aluminum, the unit can be equipped with an optional 300 Amp Parker® push-pull gun (available from Everlast) or a spool gun, which can work in standard mode, synergic mode, or pulse mode. The Power i-MIG 275P also features a synergic function for non-pulse MIG operation, as well as independent manual control.
The added capability to weld stick, and even cellulosic-type rods, such as the E6010, makes it an excellent candidate for use in commercial fabrication chores. As a bonus feature, it does not have the traditional bulk of undercarriage,ichw which is normally associated with welders of this range of capability, making it the most portable MIG welder in its Amp class. In addition, the welder can accommodate full-size rolls of MIG wire up to 12” in diameter (up to 44 lbs. typically). A wire spool adapter is available, which will allow the unit to accept 8” spools. Although after-market 4” spool adapters can be purchased from many suppliers, Everlast does not supply a 4” adapter for the machine. If 4” rolls are typical of your use pattern, consider purchasing a spool gun, which is ideal for this type of application. The welder is capable of storing up to 9 programs for rapid setup and recall of favorite programming. This is helpful when storing favorite pulse programs. The unit also features a heavy-duty wire feeding mechanism with 4 driven drive rolls for maximum wire feeding capability. See below for an additional summary of features:
- GMAW Process (MIG). The digitally controlled MIG components precisely control arc functions and give real-time feedback about the welding output parameters. As already mentioned, the welder is also a spool gun (gun optional), ready for economical welding of Stainless and Aluminum wires if needed. It also features the capability to use an optional Parker® push-pull gun, which is the ideal solution to welding aluminum with MIG. Both the spool gun and the push-pull gun will function in all MIG modes and are ideal solutions when considering welding aluminum with MIG. The single pulse MIG design also further expands the capability of the welder. The welder can also be used with the flux core wire when equipped with optional flux core drive wheels. However, when used in synergic mode, Flux-Core operation will not be optimized, though the programmed ratio can be reset to function as desired and saved for future use.
- SMAW (Stick). In stick mode, the welder delivers a smooth DC low-spatter arc. Professional, high-quality welds are obtainable with E7018, 7014, 309L, 316, 6011, and many specialty rods that are designed for use with any stick welder. This unit also features an E6010 stick mode setting, which improves welding capability with welding rods that have a cellulose-based flux, such as the E6010 and E6011. The Stick mode also features adjustable Hot Start time and Hot Start intensity controls,, which are designed to help reduce sticking during arc starts while simultaneously reducing porosity or inclusions which during arc initiation.
- Arc Force Control. Used with both MIG and Stick functions, the arc force control adjusts the quality and feel of the welding arc. In MIG mode, the arc force control is used to adjust the current rise time. This determines how wet or stiff the arc feels and how the puddle wets in at the toes of the weld. In Stick mode, the arc force is used to adjust the arc reaction when the arc gap is shortened and the voltage drops. This helps to prevent rod sticking and helps keep the arc going as arc voltage falls. This action also boosts penetration and can be used to change the way the arc feels and acts.
- Burn Back Control. Burn back control is used to control the length of the wire stick-out after the trigger is released. It helps to prevent the welding wire from sticking in the coalescing weld puddle after the arc is terminated and saves the user from having to trim the wire before restarting the arc.
- Spot and Stitch Timers. The spot timer function is frequently used in fabrication applications where consistent tack welds are required. The Stitch timer is used in conjunction with the spot timer to create a regular on/off cycle of the arc while the MIG gun trigger is held to control heat input and to make a consistent seam weld during production.
- Synergic MIG Operation. Synergic mode may be engaged to simplify welder setup and adjustment. This mode will allow the customer to input basic parameters, and the machine will automatically set the wire feed speed (amps) and voltage based on the user input. The unit’s programming is easily overridden,, and the welder will remember the new ratio of voltage to wire feed setting during the active welding session until the process is changed, or until the Synergic mode is deselected. The machine has three modes for standard MIG operation, one for standard Spool gun operation, and one for standard push-pull gun operation.
- Pulse MIG operation. Pulse MIG operation is designed to help the user achieve several key goals while welding. Most often, the pulse MIG mode is employed as a modification of the Pulse process using a different blend of gas (≤10% CO2 typically, but as high as 20% CO2), than the standard 75/25 Ar/CO2 mix used in short circuit steel. The use of Pulse spray helps weld out-of-position
(positions other than flat/down hand welding), which is nearly impossible to do in true axial spray mode. It is also used to weld thinner material than typical with spray, while using a thicker wire diameter. The main advantages of the Everlast version of the single pulse MIG are that it offers control of the heat and arc cone while maintaining good wet in and travel speeds by pulsing voltage between two different values. Due to the unique design of the Everlast pulse MIG system, short circuit pulse is feasible with steel and stainless alloys and can be used successfully to weld materials as thin as .030” in thickness when properly adjusted. When coupled with either a push-pull gun, or a spool gun, the pulse feature is an excellent tool for use in the productionwelding or repair of Aluminum alloys. - Auto Pre/Post Flow Control. The auto pre and post flow control feature is designed to improve weld quality at the beginning and end of the weld w, where porosity from oxidation can be a problem. Pre and post flow time is automatically adjusted up or down based on selected wire speed settings. Of course, this mode can be deactivated an, and welding can be done without it to conserve gas on non-critical welds.
- Slow Run-in of Wire. This feature improves arc striking ability in MIG modes by helping prevent arc stuttering (machine gunning) and push-off during initiation by slowing the wire speed until the arc is established.
Note: This feature prevents the user from taking accurate measurements of wire feed speed manually,, as the wire will feed more slowly until the arc is struck and maintained. This is not an adjustable feature on the Power i-MIG 275P and cannot be deactivated. - Spool Gun and Push-Pull Gun Modes. The Power i-MIG 275P is well equipped to handle the aluminum. The welding needs of most customers are met by being both a spool gun and a push-pull gun, ready. The unit can handle several different Everlast spool gun models, but the most capable is the 300-amp, Parker® DSP 360A spool gun. Also,, the user may want to consider the Everlast SM200N-MTS gun,, which is a 200+ Amp gun with a 24 series barrel. These guns are good choices for light to medium duty applications when welding aluminum and stainless steel,, where only a few pounds at a time are welded. However, for serious and intensive welding needs, the Parker® SGP 360A Push-Pull Gun is an excellent choice to handle welding duties that require serious aluminum welding capability. The pull motor on the gun is used in conjunction with the main wire feeder in the cabinet to be able to weld seam-lessly with larger rolls of aluminum wire. When coupled with a push-pull gun, the pulse feature of the Power i-MIG 275P can greatly increase the quality and speed of out-of-position welds common in production welding of aluminum. NOTE: Operation of the welder with the Push-Pull gun also requires the purchase of additional drive rolls for the Power i-MIG 275P’s wire feeder to properly feed the wire to the gun. These drive rolls have a U-shaped groove, which prevents deformation of the soft aluminum wire as the wire is fed to the pull motor on the gun.
Basic Design and Construction.
The Power i-MIG 275P features an intuitive control panel and couples it with a digitally controlled IGBT inverter design that produces a stable arc while conserving energy. Everlast utilizes quality components from US, European, and Asian based companies to ensure reliability and parts compatibility. Major control components are of a plug-and-play design, which allows rapid diagnosis and repair of the welder. Welding parameters can be infinitely and continuously adjusted throughout the range, offering instant welding response for maximum control.
Installation.
The basic construction of the Power i-MIG 275P is rugged and durable. It is considered ideal for circumstances where portability is of concern. Criticacomponentsss are protected by coatings to make the welder environmentally resistant and have a water ingress rating of IP21S, (the standard in the welding industry to protect from vertically dripping water). However, some common sense care should be exercised to make sure that the welder offers the safest and best performance. Please note the following items regarding safe and proper operations to ensure the best service and results while welding:
- Do not use the welder in damp areas. Perspiration and other forms of water in contact with the body can increase the risk of electrocution.
- Do not use the welder in extremely corrosive environments. To maintain optimum power transfer, check main connections, clamps, and cables frequently to ensure that components are not corroded. Excessive dirt, corrosion, and oxidation can result in an unstable arc and excessive heat build-up. If the work clamp becomes corroded or damaged, be sure to replace it with a heavy-duty work clamp rated for at least 300 amps. If your work clamp appears to become extremely hot while welding, and all connections are clean and secure, replace the work clamp.
- Store the welder covered with a moisture and fire-resistant material.
- If used on a mobile cart, strap or fix the welder to the cart so that accidental overturn is not likely.
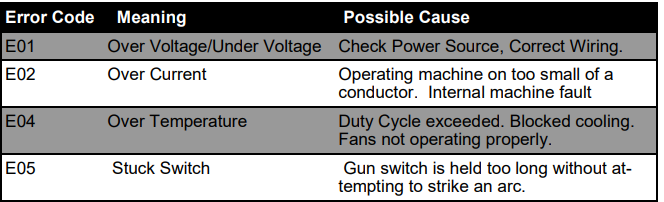
Duty Cycle/Overcurrent/Under Voltage/Overvoltage Warnings. Thanks to a dual cooling fan design, the Power i-MIG 275P has a duty cycle rating of 50% at 275 Amps while welding in MIG mode and a rating of 50% @ 200 Amps while welding in stick mode. The duty cycle rating is the amount of time (expressed as a percentage) out of 10 minutes the unit can weld without a rest. For MIG, the unit is capable of welding 5 minutes out of every 10 minutes at the maximum output of 275 Amps. For the balance of the 10-minute period, the unit should be allowed to rest and cool while running. This rating is based on a 40° C maximum temperature. If the unit’s duty cycle has been exceeded, the Stop LED will come on and the unit will cease welding output. An error code of “E04” will be displayed if a duty cycle event has occurred. Allow the unit to run and cool for 15 minutes. After 15 minutes of cooling the unit while switched on without welding, cycle the power switch to reset the unit. In the event of an overcurrent, the welding output will cease, and the “Stop” LED will come on,, and an error code of EO2 will be displayed. In duty cycle and overcurrent events, the wire may continue to feed without output. Overcurrent events can be caused by too low of supply voltage, running on undersized extension cords, too large of wire diameter, too high of settings for wire diameter, too high of input voltage, or internal or external electrical fault. When an overcurrent has occurred, turn the machine off immediately, then check and remedy the fault before switching the welder back on. Under or over-voltages will also trigger the Stop LED. The error code of E01 will be displayed. This is likely a result of a poor power supply, a long extension cable, or from running off of a generator that is malfunctioning.
Note: If a generator is going to be used with this unit, please make sure that it is certified by its manufacturer to be “clean power,” which is normally stated as less than 5% THD ( Total Harmonic Distortion). For proper operation with a generator, make sure you have at least a minimum 12,000 watts of surge capacity and 500 watts of continuous rated output capacity.
Overview of Parameters and Features
CONNECTIONS AND POLARITY
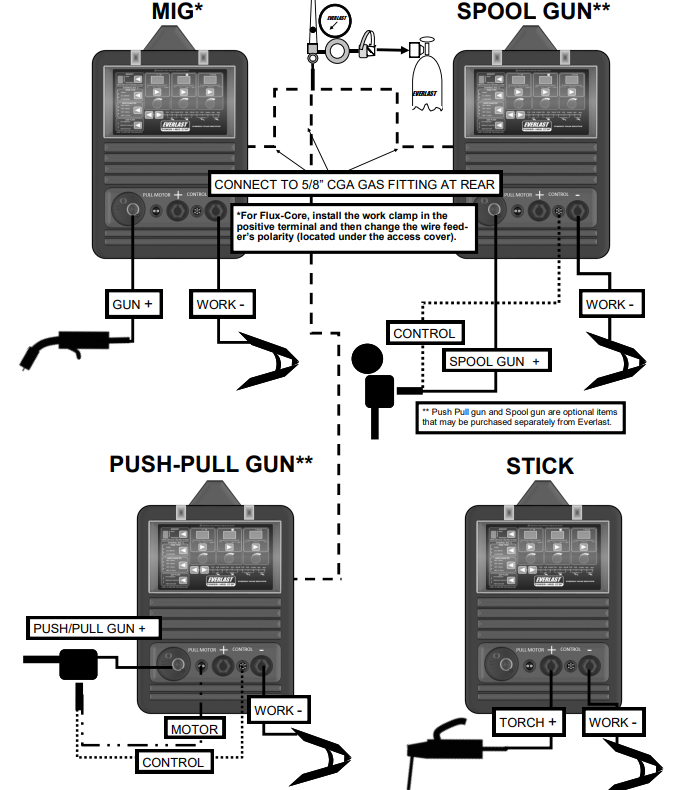
Setup Guide and Component Identification
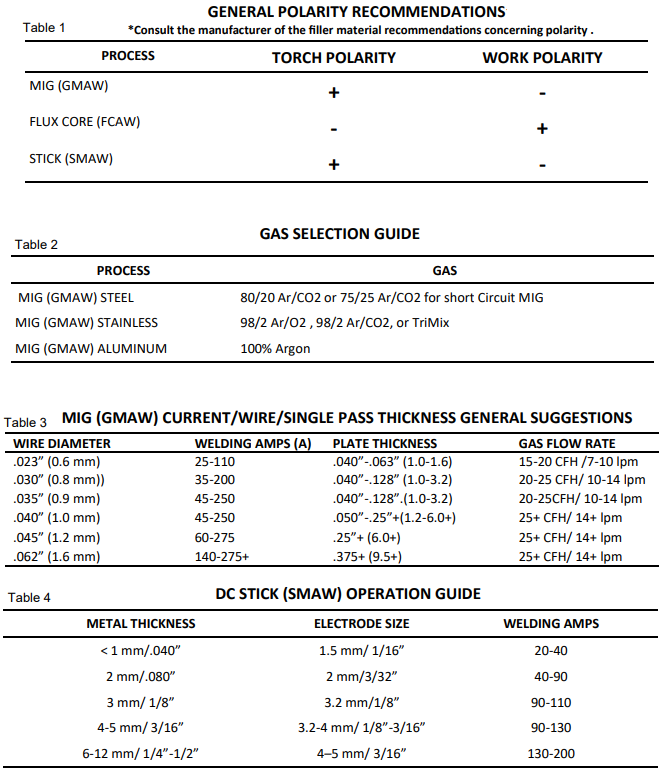
INSTALLING THE WIRE SPOOL
To thread the wire from the spool properly through the wire feeder into the gun:
- Install the MIG gun as instructed in “To install the MIG gun (torch)” above. Loosen the top idler roller tensioner, rotating the black tensioner knob counter-clockwise.
- Flip the tensioner down, toward you, releasing the carrier arm that holds the top drive rolls.
- Raise the carrier arm up. Inspect the drive rolls to make sure that each roller’s groove size matches the wire diameter. Also, make sure the correct type of drive roll is used., Flux-Core drive rolls use special serrated rolls. (Top-driven rollers do not have grooves and are not to be removed).
- Reversal of the lower drive rollers to select the right size drive groove may be necessary. To reverse the lower drive rolls: Remove the slotted screws securing each lower drive roll. Pull each retaining spacer. Remove the outer ring of the drive roll and flip the drive roll over. The drive roll is actually made of two pieces. Hold the inner assembly of the drive roll on with one finger (to prevent it from slipping off the shaft), while slipping the outer “rim” of the drive roll off with the other hand. NOTE: Both inner and outer parts of the assembly have locating keys. To reinstall: Line up the outer rim of the driver roll keyway with the locating key. Reassemble and tighten each roller. Make sure both rollers are matched in size. Also , make sure the locating keys are in place and have not pushed or slipped out of their grooves during assembly. Lightly coat the inner mating surfaces with light lube if necessary to prevent future seizure. Do not lubricate the surfaces of the drive rolls, or wire slipping and erratic feedin may result.
- Follow instructions above: “To Load Spool of Wire.” Make sure the spool of wire is loaded correctly so that the wire unrolls from the bottom of the spool (counter-clockwise). Thread the wire into the coiled guide and over the grooves in the lower drive rolls. Thread the wire fully through until it threads into the gun section 4”-6”. Lower the upper drive rolls into contact with the lower drive rolls, keeping the wire securely fixed in the grooves of the lower feed rollers. If needed, use a screwdriver with a fine blade or small pick to keep the wire from moving out of the grooves until step 6 is completed. Make sure one last time that the correct groove has been selected.
- Raise the drive roll tensioner back into place. Tighten it slightly so the wire will feed. Notice markings on the tensioner for future reference.
- Remove the contact tip from the torch. (Not Shown). Hold the torch cable and gun as straight as possible, in direct line with the unit, so that feeding of the wire through the gun liner is smooth and easy. Press the gun trigger to feed wire until the wire exits the end of the torch. Reinstall the contact tip over the wire over the wire and tighten it.
- To prevent bird nesting or slipping of the wire, adjust the tensioner clockwise until the drive rolls will not slip when the wire comes into contact with a hard surface. The wire will curl up on end while feeding under power. If you over-tension the wire, you will increase the chances of bird nesting of the wire being bird-nested (balling up of the wire or curling of the wire around the drive rolls), so it is best to tighten just until the wire stops slipping and is able to curl up. Extra tension can deform the wire and prematurely wear the drive rolls. Slowing of the feeder may result as well. Remember not to test on any metal attached to the work clamp to prevent the wire from arcing while performing this test.
FRONT VIEW/ MAIN PANEL POWER i-MIG 275P

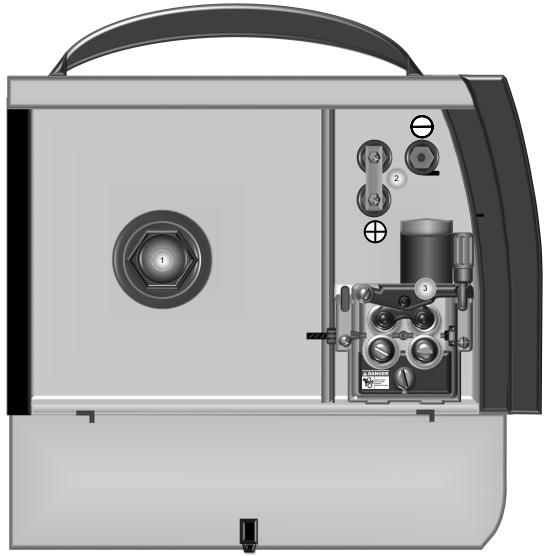
SIDE VIEW POWER i-MIG 275S
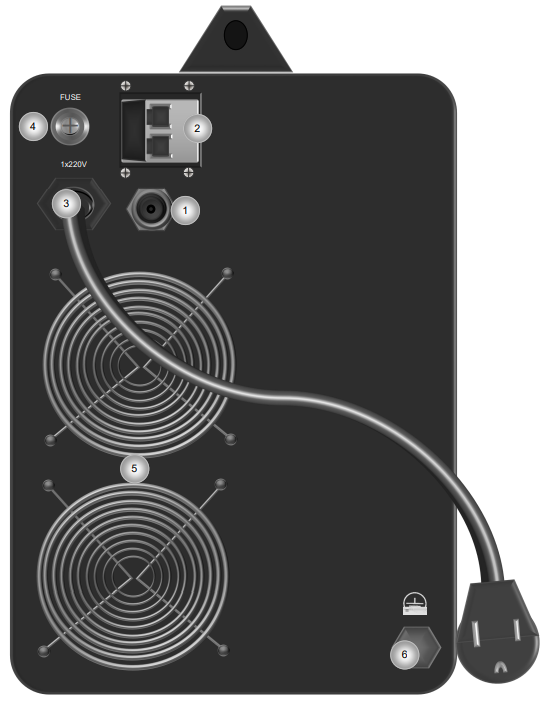
REAR VIEW/BACK PANEL POWER i-MIG 275S
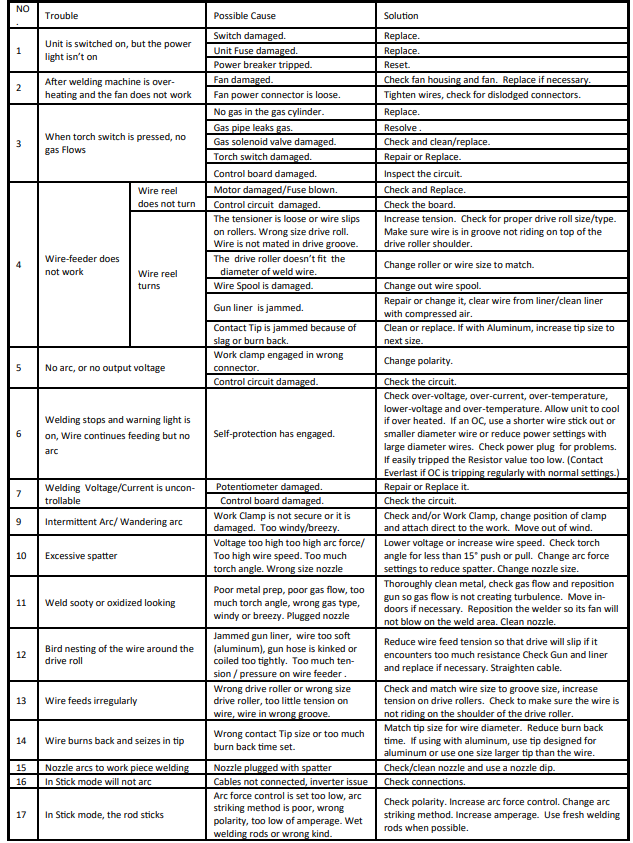
Trouble Shooting
Error Codes
Pros & Cons of the Everlast Power i-MIG 275P Welder
- Pros:
- Advanced pulse synergic MIG technology for superior weld quality and control.
- IGBT inverter design ensures efficient power use and stable arc performance.
- Supports push-pull and spool gun setups, enhancing wire feed versatility.
- Dual voltage operation (220/240V) provides adaptability for various job sites.
- Capable stick welding with E6010 electrode support adds multi-process functionality.
- Compact, robust build designed for professional, industrial use.
- Cons:
- Higher price point compared to entry-level MIG welders, limiting appeal to casual users.
- Learning curve for mastering pulse welding settings may challenge beginners.
- Discontinued model status in some markets may affect parts availability and warranty support.
- Weight and size may reduce portability compared to smaller inverter models.
In terms of value for money, the Everlast Power i-MIG 275P offers excellent performance for professional users but may be over-specification for light DIY tasks. Compared to alternatives like the Everlast Power i-MIG 230i or other brands in the 250-350 amp class, the 275P stands out with its pulse synergic MIG feature and push-pull gun compatibility.
Customer Reviews of the Everlast Power i-MIG 275P Welder
Users consistently praise the Everlast Power i-MIG 275P Welder for its reliable arc stability and clean weld beads, especially when utilizing the pulse mode. Many professionals note its robust build quality and versatility across MIG and stick welding processes. Typical star ratings range from 4 to 4.5 out of 5.
Common praises include the welder’s power output, precision control, and ability to handle thicker gauge metals with ease. However, some customers mention a learning curve with the pulse adjustments, requiring time to optimize settings for different materials. Others note that the welder's relatively high price and weight could be a drawback for occasional users or those needing frequent portability.
Purchase recommendations frequently highlight the welder’s value for professionals seeking a durable, multi-process machine with advanced features. Frequently mentioned issues focus on accessory compatibility and the need to familiarize oneself with all control options for best results.
Tags
More everlast manuals
Leave a Comment