
Startup: Feelworld Touch Screen Monitor LUT7-US Instruction Manual
Content
Feelworld Touch Screen Monitor LUT7-US
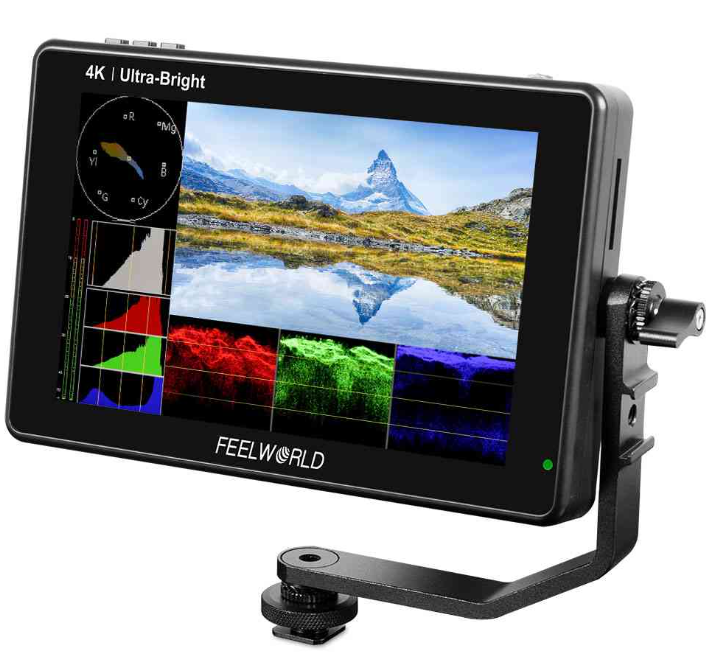
Introduction
The Feelworld Touch Screen Monitor LUT7-US is a cutting-edge display designed for professionals and enthusiasts alike, particularly in the fields of video production, photography, and live streaming. This monitor boasts a 7-inch touchscreen display with a high-resolution panel, offering vivid colors and precise touch control. The LUT7-US is estimated to be priced around $500, making it an affordable yet powerful tool for content creators.
Launched in recent years, this monitor has quickly gained popularity due to its versatility and user-friendly interface. It is ideal for on-set monitoring, field production, and even as a secondary display for editing and post-production work. The touchscreen functionality allows for intuitive navigation through menus and settings, enhancing the overall user experience.
The Feelworld Touch Screen Monitor LUT7-US also features multiple input options, including HDMI, SDI, and USB, making it compatible with a wide range of devices. Its compact size and lightweight design make it easy to carry around, perfect for mobile production setups..
To ensure the best use of the unit, please read the user’s manual carefully.
CAUTION.
- Please avoid the heavy impact and drop onto the ground when moving the product.
- The screen of this product is made of glass. Keep away from injury if the screen is broken.
- Keep the product away from the heat source, and avoid the prolonged exposure to the sun, as the LCD screen will be damaged.
- Please do NOT use chemical solutions to clean this product.
Please wipe the monitor with a clean soft cloth to maintain the brightness of the surface. - No adjustable components are in the monitor. Please do not take apart or repair the unit by yourself, to avoid the damage to the product.
Technical Parameters
- Panel Size: 7” touch screen
- Resolution: 1920 × 1200 pixels
- Dot Pitch: 0.07875 (H) x 0.07875 (W) (mm)
- Aspect Ratio: 16:10
- Brightness: 2200cd/m2 (Light Sensor)
- Contrast: 1200:1
- Viewing Angle: 80°/80°(L/R) 80°/80°(U/D)
- Backlight: LED
- Input: SDI (Optional), HDMI
- Output: SDI (Optional), HDMI, DC OUT 8.4V
- Audio: 3.5mm Stereo Headphone
- Power Input Voltage: 7~24V
- Power Consumption: ≦18W
- Unit Size: 190Lx126Hx27D (mm)
- Unit Weight: 460g
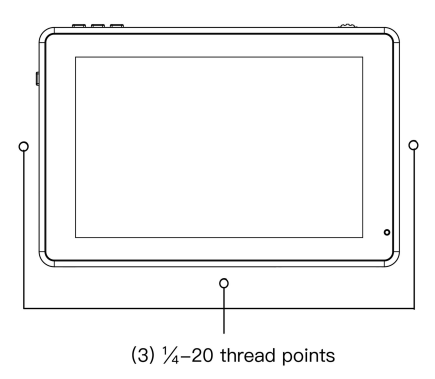
- Mount Points: (3) ¼-20 thread points (left, right, bottom)
- Working Temperature: -20℃~50℃
- Storage Temperature: -30℃~60℃
Features
- Touch screen menu operation
- Support HDR monitoring
- Support 3D LUT Log to REC.709 and user 3D LUT upload
- 1920x1200 full HD IPS screen
- 2200nits Daylight Viewable (Light Sensor)
- All Waves display, Parade, Vector, and RGB Histogram functions
- A histogram is a quantitative tool to inspect the image brightness, to guide the exposure control
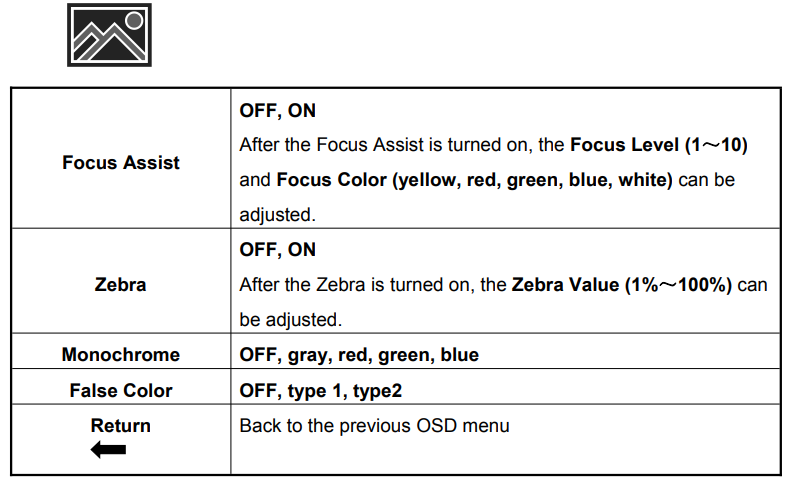
- Focus Assist (red, green, blue, white, yellow, five peaking colors optional)
- Audio Meter
- Zebra and False Color function, convenient to guide the use of light when shooting and the post-production
- Monochrome (gray, red, green, blue)
- Image Zoom-in function
- Anamorphic Mode
- Image Flip H and Flip V
- Image Freeze
- Pixel to Pixel
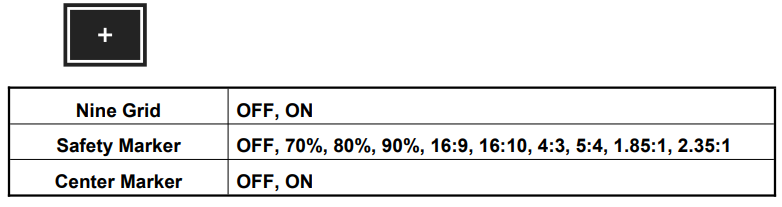
- Marker Mat, Center Mar,ker and Safety Marker
- Brightness, Contrast, Sharpness, Hue, Saturation, Tone, and Color Temp Adjustment.
- Stereo Earphone output
- DC 8.4V power out to power your DSLR camera or mirrorless camera
Product Description
Button Instruction
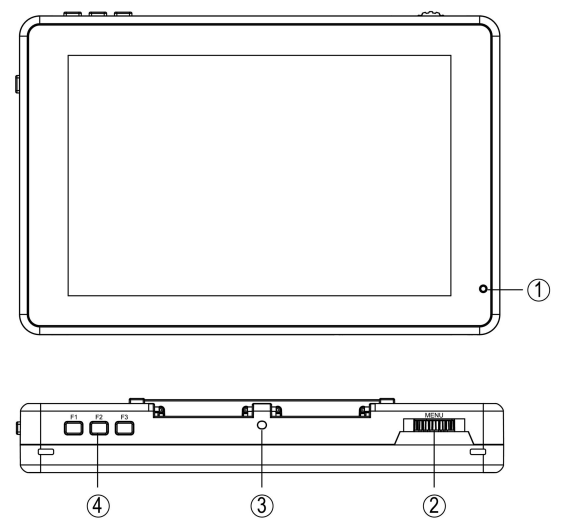
- Indicator Light: After connecting the power, the indicator light is on (long-press the Long Press
 button to turn on the monitor; it turns yellow. After the signal is connected, it turns green.]
 - MENU: See details: 3.1 MENU Wheel Menu Operation in 3.
Menu Operation Instruction. - Light Sensor: The backlight mode under the icon
is set to Auto, and the brightness of the backlight can be adjusted automatically by the light sensor.
- F1 ~ F3: Custom function buttons
Port Instruction
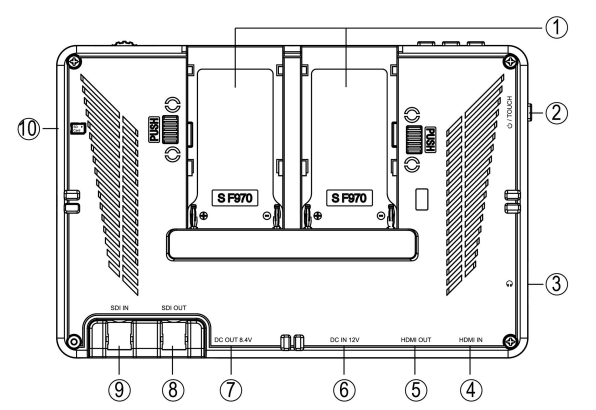
- Dual F970 Battery Plates
- Power / Touch Function Button
Long press to turn on / off; short press to turn on / off the screen touch function - 3.5mm Headphone Jack
- HDMI IN
- HDMI OUT
- DC 12V
- Power Input
- DC OUT 8.4V Power Output
Connect the optional dummy battery cable to the power camera. - SDI OUT (Optional)
- SDI IN (Optional)
- SD Card Slot
3DLUT upload via SD card and for firmware upgrade
Power Supply Way
The rear cover of the monitor is equipped with a dual F970 battery plate, which applies to the F970 series of batteries.
- Sony F970 battery plate for the battery of the Sony DV:
- Sony F970 F960 F950 F930 F770 F750 F730 F570 F550 F530 series
Remark: It is recommended to use standard original F970 batteries. Different specifications of the battery have different capabilities. The working time for the monitor will be different. Higher capability (working time) will be longer. Please take off the battery out of the monitor if you don’t use the monitor for a long time.
Battery switching instruction
- When the battery/s/are placed in the battery slot(s), the battery icon will appear on the upper right of the screen.
- White battery icon: working; Gray battery icon: not working.
- Manually switching: Double-tap the gray battery icon, and it will be switched to a working state in about 3 seconds, then it will be turned white.
- Automatically switching: Automatically switch to another charged battery when one battery is exhausted.
DC IN 12V: DC power input, polarity as the input power , Barrel (5.5mm outer, 2.1mm inner) at the bottom of the monitor, DC 7~24V Input.
DC OUT 8.4V: DC power output interface, polarity as the output power. Barrel output for powering your camera with a separately available DC coupler via adaptor (NP-FW50 Sony & LP-E6 Canon&DMW-BLF19 Panasonic). More adapters coming soon.
Mount Points
There are (3) ¼-20 thread points (bottom, right & left)that can be easily connected to the hot shoe mount, tripod fixed installation.
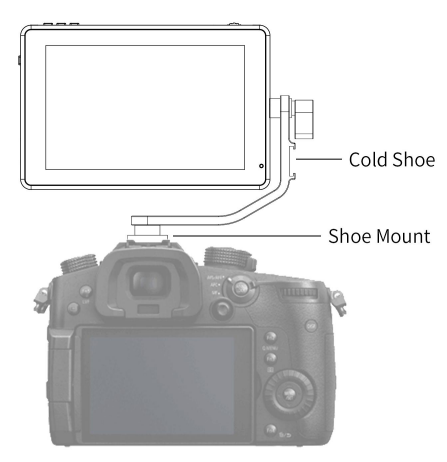
Tilt Arm Mounting
The monitor secures to your camera using the included Tilt Arm via a shoe mount or a 1/4"-20 thread. The Tilt Arm enables 360° of tilt for convenient monitoring at nearly any angle. A cold shoe on the Tilt Arm lets you secure equipment (like a microphone, LED light, or wireless receiver) that would otherwise be displaced from the camera's accessory shoe.
Menu Operation Instruction
After the monitor is properly connected to the power supply, the indicator light is on (red). Long-press press button to turn on the monitor; the indicator light turns yellow. After the signal is connected, the indicator light turns green. After startup, short-press to select to turn the screentouch function on or off.
Touch Screen Menu Operation (turn on the screen touch function)
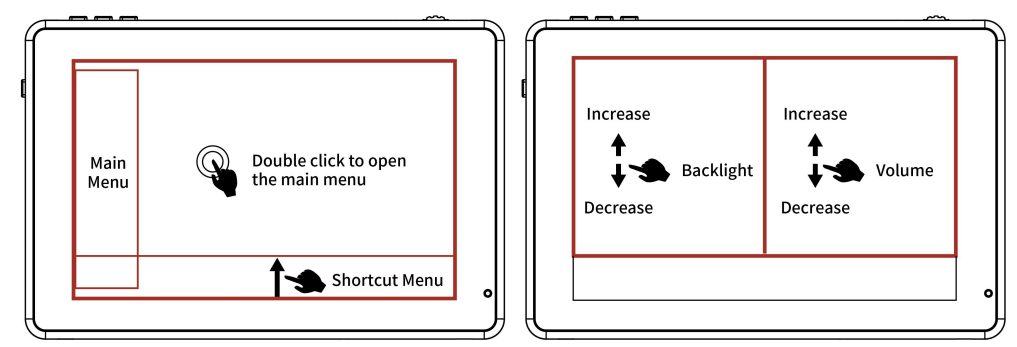
- Double-click on the screen to open the main menu (shown on the left side of the screen) and click on the corresponding menu item to display the secondary menu. You can enter the corresponding function option to select or set with the "<" or ">" key of the other option. Exit the menu and press
 the key of the main menu or click the touch screen
 - When the menu is not displayed, swipe up from the bottom of the screen to open the shortcut menu, and click on the corresponding menu box to open or set the corresponding function.
- When the menu is not displayed, on the left side of the screen (1/2 split screen), you can directly adjust the brightness of the screen backlight; on the right side of the screen (1/2 split screen), you can directly adjust the volume.
Figure:
MENU Wheel Menu Operation
- When the menu is not displayed, directly rotate the wheto backlight or volume adjustment. The wheel option can be set to backlight or volume in the menu .

- Long-press the MENU wheel to open the main menu (on the left side of the screen). Rotate the wheel to select the secondary function menu. After selecting it, press the wheel, then rotate the wheel to select or set the option function. Press the MENU wheel to open the shortcut menu (below the screen), rotate the wheel to select the shortcut menu option, and press the wheel to directly turn on/off the function. If you press the parameter selection, repeat the above operation. The shortcut menu will automatically exit after about 5 seconds of operation.
Menu Function Instruction
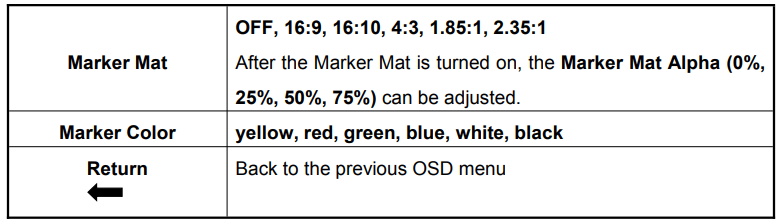
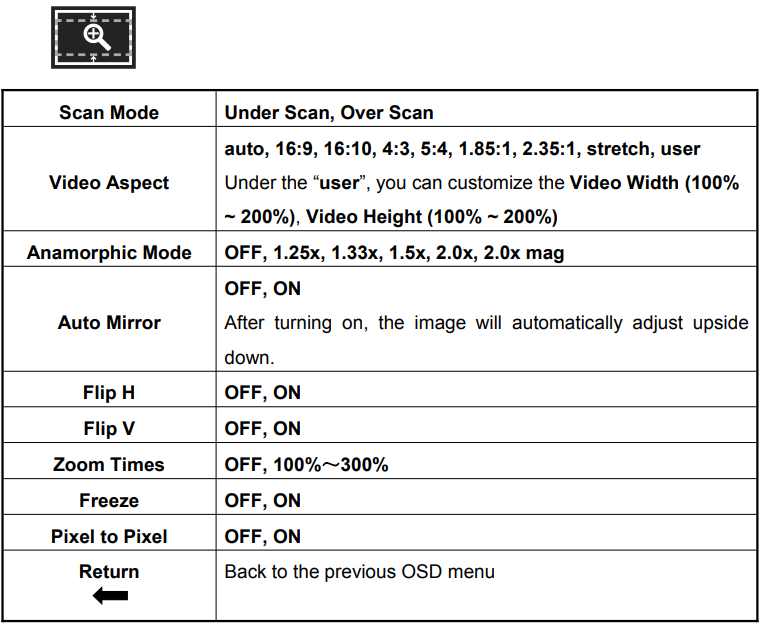

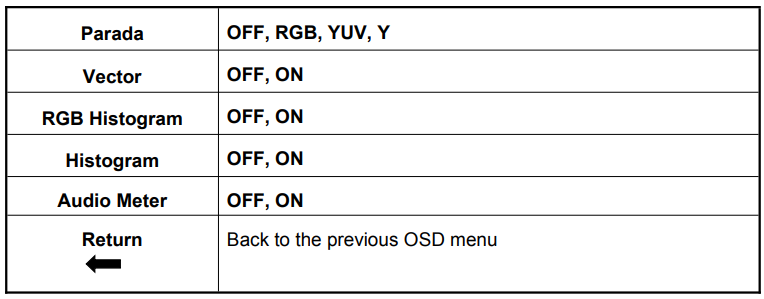
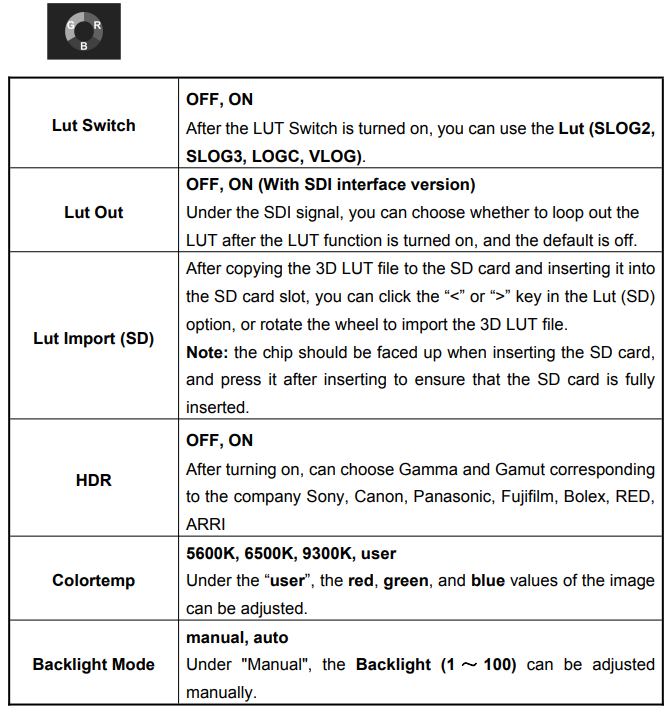
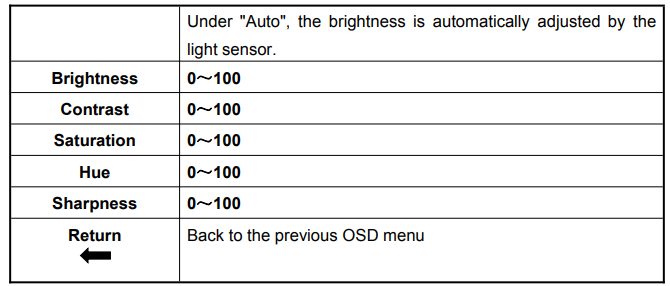
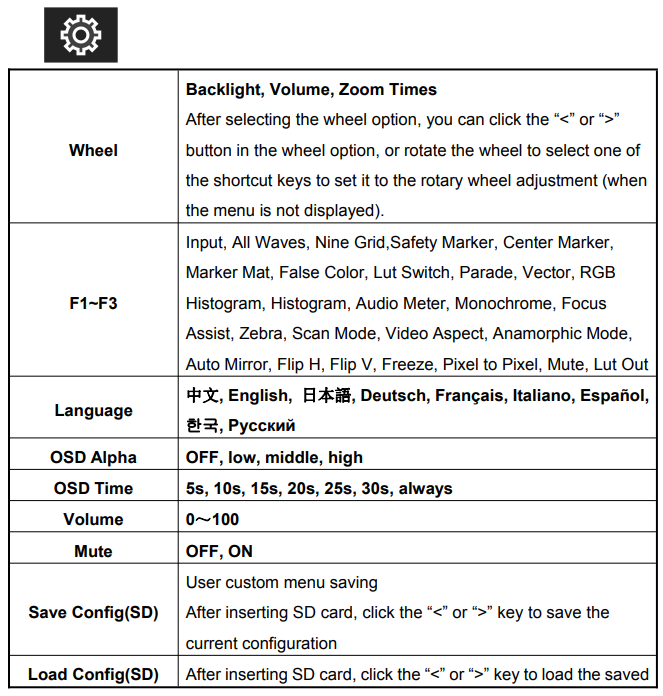
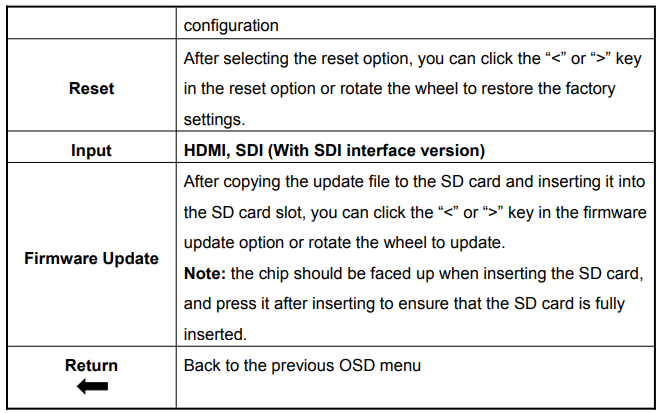
Troubleshooting
Only black and white or monochrome pictures. Please check saturation, brightness & contrast adjustment.
- Please check that "Monochrome" is in a black, white, or monochrome image or other condition.
NO Image after putting on the power
- Check if the signal cable connecting is in good condition.
- Check the signal cable connection, and make sure to use the standard adapter to connect the monitor. If power is supplied battery, please check if the battery is fully charged.
Earphone No sound
- Check if the Volume control does not open, press the volume button, and try to increase the volume.
- If there are still other problems, please contact with our related technologists.
- As we are improving product features and product performance , so if there may be any change in the specification without prior notice.
Pros & Cons
Pros:
- High-Resolution Display: Offers clear and detailed visuals with its 1920x1200 pixel resolution.
- Touchscreen Interface: Intuitive navigation through menus and settings.
- Multiple Input Options: Supports HDMI, SDI, and USB inputs for compatibility with various devices.
- Portable Design: Compact and lightweight, making it easy to carry around.
- Built-in LUT System: Allows users to apply custom color profiles directly to the monitor.
Cons:
- Limited Battery requires an ESA constant power supply, as battery life is limited.
- No Built-in Battery: Users need to carry a power adapter or external battery pack.
- Sensitivity Issues: Some users report sensitivity issues with the touchscreen.
- No Internal Storage: Does not have internal storage for saving settings or LUTs.
Customer Reviews
Customers have generally praised the Feelworld Touch Screen Monitor LUT7-US for its excellent image quality and user-friendly interface. Many have found it to be a valuable addition to their production kits, citing its portability and multiple input options as major advantages. However, some users have noted issues with touchscreen sensitivity and the lack of built-in battery life.
A common complaint is the need for a constant power supply, which can be inconvenient in field production scenarios. Despite these minor drawbacks, the monitor has received positive reviews overall for its performance and value.
Faqs
What is the resolution of the Feelworld Touch Screen Monitor LUT7-US?
Does the Feelworld LUT7-US support 4K video?
What types of inputs does the Feelworld LUT7-US have?
Is the Feelworld LUT7-US portable?
Does the Feelworld LUT7-US have built-in LUT capabilities?
How do I navigate through the menus on the Feelworld LUT7-US?
Can I use the Feelworld LUT7-US in outdoor environments?
Does the Feelworld LUT7-US have internal storage for saving settings or LUTs?
What are some common complaints about the Feelworld LUT7-US?
How do I set up and configure my Feelworld LUT7-US?
Leave a Comment