How to Use: Gevi Bullet Ice Maker GIMB-2104 User Manual
Content
Introduction
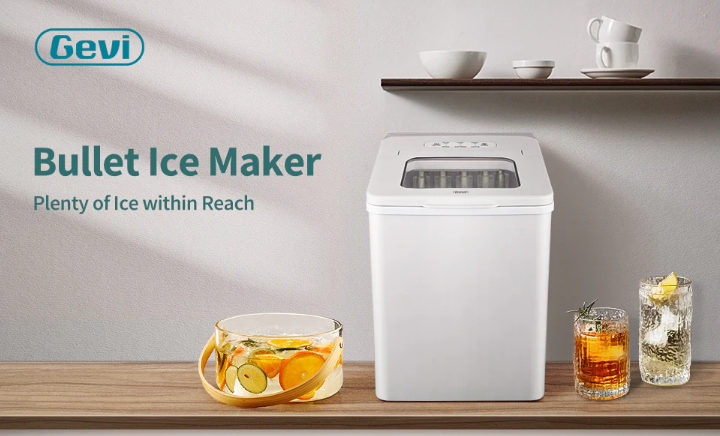
The Gevi Bullet Ice Maker GIMB-2104 is a compact and efficient appliance designed to quickly and easily produce bullet-shaped ice cubes for your drinks. This ice maker is perfect for use in homes, offices, or any space where you need a constant supply of fresh ice. With its sleek and modern design, the Gevi Bullet Ice Maker GIMB-2104 is not only functional but also aesthetically pleasing. It has an estimated price range of $100 to $150 and was launched in 2021.
Detailed Specifications
Model: GIMB-2104
Applicable Climate: ST/SN/N/T
Class: I
Power Source: 120V/60Hz
Rated Power: 120W
Refrigerant/Refrigerant Amount: R600a / 25g
Foaming Agent: C5H10
Net Weight: 7.7kg / 17lbs
Housing: ABS
Unit Size (DxWxH): 13 x 9 x 11.4 inch
GET YOUR ICE MAKER READY
Unpacking
IMPORTANT: Do not remove any safety, warning, or product information labels from your ice maker. Package includes: 1 ice maker, 1 ice basket, 1 ice scoop, 1 user manual. Remove tape and any labels from your ice maker before using (except for the labels listed above). Do not use sharp tools, alcohol, flammable fluids, or rough cleaners to remove tape or glue. These items can cause damage to the surface of your ice maker.
Know Your Ice Maker
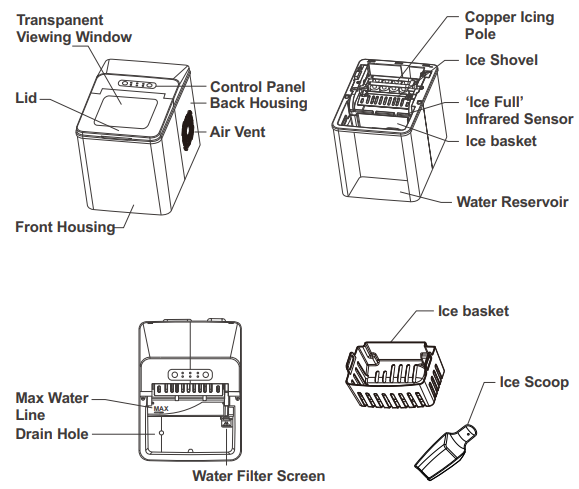
Description
The Gevi Bullet Ice Maker GIMB-2104 is a high-performance ice maker that produces up to 28 lbs of ice per day, making it perfect for busy households or offices. Its compact and lightweight design makes it easy to move and store, while its sleek stainless steel exterior gives it a modern and stylish look. The LCD control panel with touch buttons allows for easy and intuitive operation, while the self-cleaning function makes maintenance a breeze. The UV light sterilization system ensures that the ice produced is hygienic and safe to consume, making it a great choice for any setting.
Gevi Bullet Ice Maker GIMB-2104 HOW TO USE
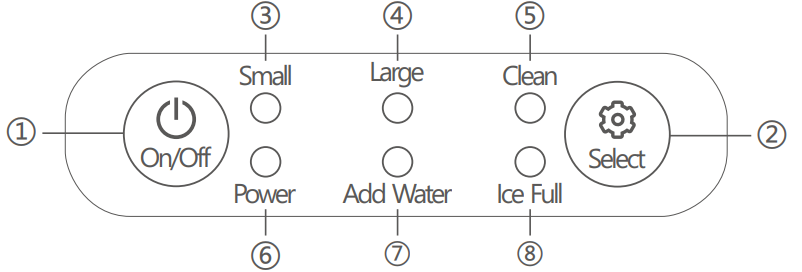
On/off button: Press to turn On/off the ice maker.
Select button: Press to select Small or Large ice size. Press to select Clean when the unit is plugged in but yet to turn on.
Small indicator: Indicates it's making ice in small size when it's on.
Large indicator: Indicates it's making ice in large size when it's on.
Clean indicator: Indicates it's running a self-cleaning program when it's on.
Power indicator: Flashes when the unit is connected to a power source. Glows green when the unit is On/making ice.
Add Water indicator: Pauses ice making; glows red when you need to add water to the unit.
Ice Full indicator: Pauses ice making; glows red to let you know the ice basket is full.
Before First Use
Unpack and check to make sure that the machine and accessories including ice basket and ice scoop are available. Please contact Customer Support if anything is missing. Please make sure that the ice maker is set upright on a level surface. Keep the environment dry and stay away from heat sources such as ovens, heaters, and corrosive gases. Maintain at least 6-inch clearance on all sides of the ice maker for proper ventilation. Please keep it still and wait for 2 hours before plugging in. The unit should be running between 50°F (10°C) and 90°F (32°C) air temperature. The water for ice making and cleaning should be between 46°F (8°C) and 82°F (28°C). Exceeding the limit may result in severe damage which is not covered by warranty. Add water into the reservoir half full and run the self-cleaning program twice. Get rid of the cleaning water. Clean the ice basket and scoop. It’s time to expect fresh clean ice from the comfort of your countertop.
Ice Making
Ensure the drain plug at the bottom of the unit is firmly inserted. Plug into a 120V/60Hz wall outlet, check if the ‘Making’ indicator is flashing. Open the transparent lid and remove the ice basket. Add potable water into the water reservoir, noting not to exceed the ‘MAX’ line. Put the ice basket back and close the lid. Press the ‘On/Off’ button and wait. Check if the ‘Making’ indicator is glowing green. Wait for approximately 7 minutes to enjoy fresh ice.
Setup Guide
Setting up the Gevi Bullet Ice Maker GIMB-2104 is simple and straightforward. Here's how to do it:
- Remove the ice maker from its packaging and place it on a flat and stable surface.
- Plug the power cord into a nearby electrical outlet and turn on the ice maker using the power button on the control panel.
- Add water to the water tank by removing the lid and pouring water into the designated area.
- Select your desired ice size using the ice size button on the control panel.
- Wait for the ice maker to produce ice, which typically takes about 10-15 minutes for the first batch.
Cleaning
Remove all of the ice.
Empty the unit via the drain plug at the bottom of the unit and insert it back afterward.
Obtain pre-mixed scale remover solution or mix a solution of scale remover with water according to solution direction. Approximately 16 fl. oz. solution is needed to complete the cleaning.
Fill the water reservoir with scale remover solution and close the lid. Press the ‘select’ button for the 'clean' indicator and then turn on the unit. The solution will run inside the machine through all the way that water goes when making ice, to remove the water scale. You may run the program twice for deep clean.
The self-clean program ends in 5 minutes, then empty the unit via step 2. Refill the water reservoir with water, and run the self-cleaning program again. Repeat steps 5 and 6 until the solution inside the unit is fully removed. Clean the water reservoir, ice basket, and ice scoop. This should be carried out on a regular basis.
Clean the exterior of the unit with a damp soft sponge.
Do not use organic solvent, boiled water, detergent, strong acid, or strong alkali, etc. for cleaning.
Notes for Daily Use
Although a heat insulation layer is used for the unit housing, it only helps in slowing down the ice melting speed. Transfer ice to the freezer if you wish to keep it for long. When the machine stops ice making triggered by ‘Ice Full,’ it will not go back to ice making unless the ice is removed or melted.
Do clean the ice maker periodically, ex. once a month, to obtain fresh ice and help the machine last longer.
The incline angle should not exceed 45° during transport. Turning upside down is strictly forbidden. Doing so can cause damage to the compressor or refrigerating system. After the jolt of transport, wait for 2 hours before plugging in.
If the ice maker is not to be used for some time, empty the water reservoir, and dry it for storage.
The ice maker is designed to work quietly but will make some noise during operation.
IMPORTANT SAFETY INSTRUCTIONS
READ ALL INSTRUCTIONS BEFORE USING
To reduce the risk of fire, explosion, electric shock, or injury when using your ice maker, follow these important safety instructions:
Before using, check that the voltage power corresponds to the one shown on the appliance nameplate.
Do not remove any safety, warning, or product information labels from your ice maker.
Plug the ice maker into an exclusive grounded outlet, do not use an adapter. No other appliance should be plugged into the same outlet. Be sure that the plug is fully inserted into the receptacle.
Do not operate any appliance with a damaged cord or plug or after the appliance malfunctions or has been damaged in any manner. Return the appliance to the nearest authorized service facility for examination, repair, or adjustment.
Do not store or use gasoline or other flammable materials and vapors around this appliance.
Avoid the use of an extension cord because it may overheat and cause a risk of fire. However, if it is necessary to use an extension cord:
Use only extension cords with a grounding plug.
The marked rating of an extension cord must be equal to or greater than the rating of this appliance.
It should be positioned such that it does not drape over the counter or tabletop where it can be pulled on by children intentionally.
Do not try to open the housing of the ice maker for repair, study, or other purposes. This action may result in frostbite, electrical shock, fire, property loss, or death.
The action of cleaning the ice maker requires a scale remover that contains acids. Acids can cause burns. If skin contact with concentrated cleaner occurs, flush with water. If swallowed, drink a large amount of water or milk and call a physician immediately. Keep scale remover out of reach of children.
Repair service shall be performed by qualified electric service personnel and component parts shall be replaced with manufacturer-authorized replacement components.
When handling, installing, and operating the appliance, care should be taken to avoid damage to the refrigerant tubing.
Outdoor Use Notice
Keep Cool: Operation in ambient temperature beyond the limits listed in this manual may result in severe damage which is not covered by warranty.
Keep Upright: Place on a level surface only; skewed placement may damage the refrigeration system.
Provide Shade: Heat from the sun will reduce the unit’s ability to make and store ice. UV radiation can potentially damage the plastic components.
Electricity
Do not, under any circumstances, remove the ground prong from the power cord or use an adaptor that prevents it from functioning. For personal safety, this unit must be properly grounded.
Do not plug or unplug the unit with wet hands.
Grounding is to minimize the possibility of electric shock hazard. The power cord of this appliance is equipped with a 3-prong plug which mates with a standard 3-prong wall outlet. Have your wall outlet and circuit checked by a qualified electrician to make sure it's properly grounded.
The appliance should not be plugged into a 2-prong outlet; it is the user's responsibility and obligation to replace it with a properly grounded 3-prong wall outlet.
The unit should always be plugged into its rated source, 120 volt, 60 Hz, 15 amp circuit. This helps the machine to provide the best performance and also prevents overloading wiring circuits which could potentially cause a fire hazard from overheated wires.
Repair or replace immediately all power cords that are frayed or otherwise damaged. Do not use a cord that has cracks or abrasion damage along its length or at either end.
Disposal of Your Appliance
All refrigeration products contain flammable refrigerants, which under federal law must be removed prior to disposal. Please check with the company handling the disposal for what to do if you are getting rid of a refrigeration product.
TROUBLESHOOTING
| Problem | Possible Causes | Solutions |
|---|---|---|
| ‘Add Water’ On | Water is not enough | Add water to reservoir manually |
| Water screen in the water reservoir is blocked | Clean water screen | |
| Pump malfunction | Call Gevi for service | |
| ‘Ice Full’ On | Ice basket is full | Empty the ice basket |
| Ambient temperature exceeds limited working temperature | Change the environment | |
| Infrared sensor blocked | Clean the infrared sensor | |
| NTC malfunction | Call Gevi for service | |
| No Ice | Poor heat dissipation | Keep a 15cm/6inch clearance on all sides of the ice maker for proper ventilation |
| The water temperature is too high | Use water with temperature between 46°F(8°C) and 82°F(28°C) | |
| The ambient temperature is too high | Operate the unit in an environment between 50°F (10°C) and 90°F (32°C) | |
| The ice-making system is malfunctioning | Call Gevi for service |
Warranty
Warranty service is provided by Gevi Customer Service Center. To contact customer service team, visit our website at household.gevi-tech.com
| Period | Gevi Will Replace |
|---|---|
| 30 Days | From the date of original purchase: Whole unit if the ice maker fails due to a defect in materials or workmanship. |
| 1 Year | From the date of original purchase: Any part of the ice machine which fails due to a defect in materials or workmanship. |
Pros & Cons
- Pros
- High ice production capacity
- Compact and lightweight design
- LCD control panel with touch buttons
- Self-cleaning function
- UV light sterilization system
- Cons
- May be too loud for some users
- Water tank capacity could be larger
Customer Reviews about Gevi Bullet Ice Maker GIMB-2104
Customers love the Gevi Bullet Ice Maker GIMB-2104 for its high ice production capacity, compact design, and ease of use. Some common complaints include the loud noise level and small water tank capacity. Overall, however, users are very satisfied with the performance and functionality of this ice maker.
Faqs
How do I start the Gevi Bullet Ice Maker GIMB-2104?
Why is my Gevi Bullet Ice Maker GIMB-2104 not producing ice?
How do I clean the Gevi Bullet Ice Maker GIMB-2104?
What should I do if the 'Warning' indicator is on?
How often should I clean the Gevi Bullet Ice Maker GIMB-2104?
What should I do if the Gevi Bullet Ice Maker GIMB-2104 cubes are too small?
Why do my Gevi Bullet Ice Maker GIMB-2104 cubes have a cloudy appearance?
How do I store the Gevi Bullet Ice Maker GIMB-2104 when not in use?
How do I reset the Gevi Bullet Ice Maker GIMB-2104 if it malfunctions?
What is the warranty period for the Gevi Bullet Ice Maker GIMB-2104?
Leave a Comment