
Installation: Glen Dimplex Electric Baseboard Heater Thermostat User Manual
Content
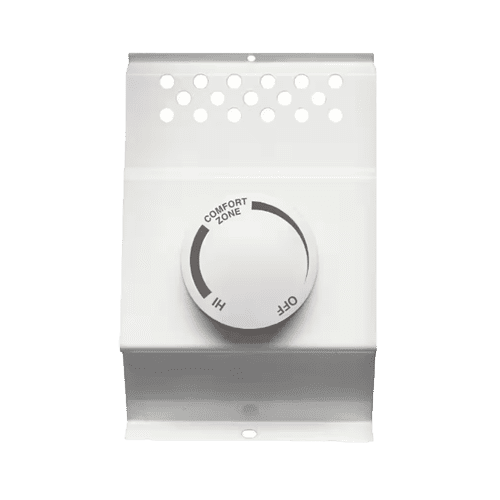
Overview
The Electric Baseboard Heater Thermostat is a built-in control designed for compatible series F baseboard heaters. It lets you set a comfortable room temperature directly from the heater and is intended for simple mechanical temperature control in home heating applications.
This guide is useful for homeowners, installers, and maintenance users who need a clear explanation of the thermostat’s wiring options, operating behavior, safety precautions, and warranty coverage.
Specifications
- Product type: Electric baseboard heater thermostat
- Compatible heaters: Series F baseboard heaters only
- Voltage versions: 120 V, 208 V, and 240 V configurations
- Thermostat styles: Single pole (2-wire) and double pole (4-wire)
- Installation locations supported: Left side or right side wiring entry on compatible heaters
- Multiple-heater use: Can control more than one baseboard heater wired in parallel on the same circuit, subject to code and load limits
- Construction note: Intended for copper conductors only
- Warranty coverage: Limited one-year warranty
Required Tools

- Wire Strippers
- Volt Meter
- Wire Connectors
- Straight and Phillips Screwdrivers
- ½" Cable Clamp Connector
Detailed Description
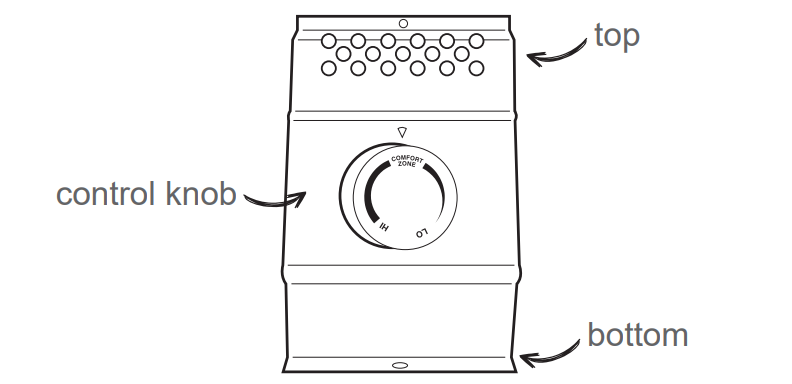
The Electric Baseboard Heater Thermostat uses a simple rotary control knob to manage heat output. Turning the control fully to the right starts the heater, and moving it left after the room warms up establishes the preferred comfort setting. Once adjusted, the thermostat automatically maintains that temperature by cycling the heater as needed.
The thermostat family includes two wiring styles. The single-pole version uses two thermostat wires, while the double-pole version uses four wires and provides a true off position. The unit is designed to connect inside the heater wiring compartment, with the supply wires, heater leads, and grounding conductors arranged according to the voltage and side chosen for installation.
Key part names used in the guide include the control knob, thermostat shaft on tamper-resistant models, red thermostat wires, black thermostat wires, heater wires, supply wires, ground screw, and the wiring compartments inside the baseboard heater.
Safety
Electric heating equipment must be installed and used carefully. All wiring must follow the National Electrical Code, OSHA requirements, and all state and local rules. If any part of the installation feels uncertain, a licensed electrician should handle the work.
- Read all instructions before installation or use.
- Use the thermostat only for the purpose described in the guide.
- Turn off power at the main disconnect panel before any wiring work.
- Use only copper conductors.
- Do not allow foreign objects into ventilation or exhaust openings.
- Do not use the thermostat if it has malfunctioned until it has been inspected by a qualified electrician.
- Do not install or operate the thermostat in areas where gasoline, paint, or other flammable liquids are stored.
- Verify that power is off before touching any wires.
Setup and Operation
Before installation, shut off power to the heater circuit and gather the required tools, including screwdrivers, wire strippers, wire connectors, a cable clamp connector, and a volt meter. The thermostat must be installed according to the heater owner’s guide, and wiring should only be completed when the directions call for thermostat connections.
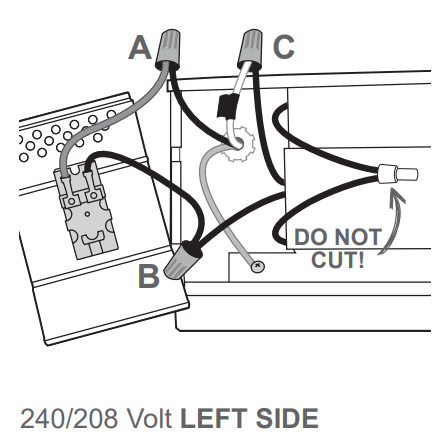
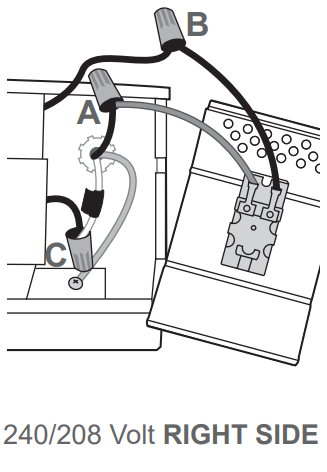
For a single heater installation, the wiring depends on voltage and on whether the unit is single pole or double pole. On the 240/208 V single-pole model, one supply wire connects to the red thermostat wire, the black thermostat wire connects to one heater wire, and the remaining supply wire connects to the remaining heater wire. On the 240/208 V double-pole model, the two black thermostat wires connect to the two heater wires, and the two red thermostat wires connect to the two supply wires.
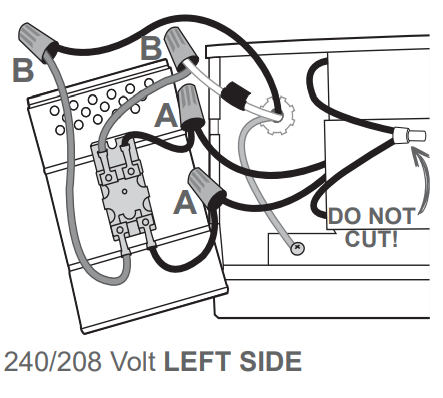
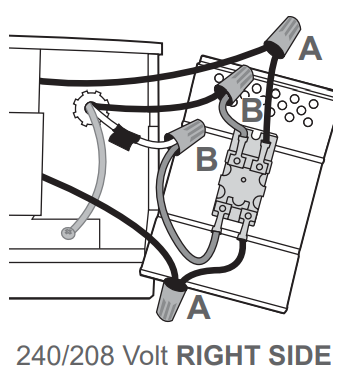
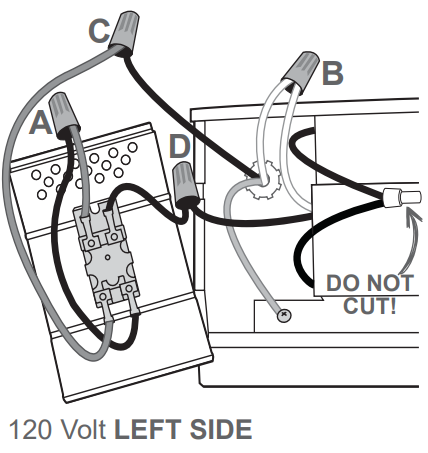
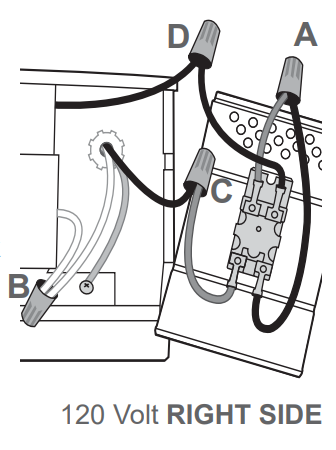
For 120 V versions, the single-pole model connects the red thermostat wire labeled L2 to the black thermostat wire labeled OFF, the neutral supply wire to the white heater wire, the hot supply wire to the remaining red thermostat wire, and the remaining black thermostat wire to the remaining heater wire. The double-pole 120 V arrangement uses a red thermostat wire labeled L2 with the black thermostat wire labeled OFF, plus the remaining supply and heater conductors as shown in the guide.
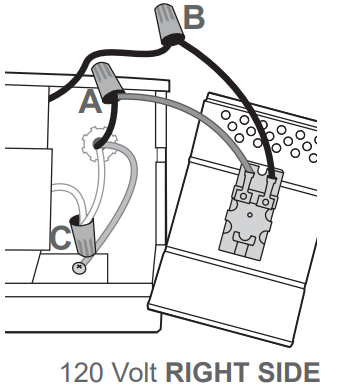
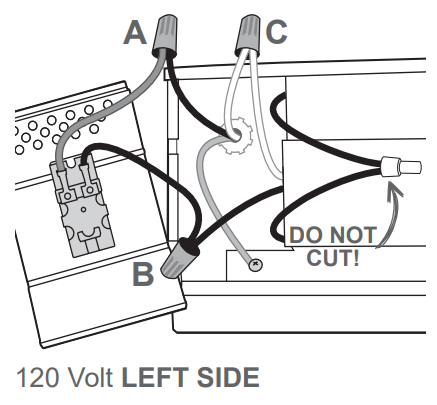
If the heater is wired on the left side, only the designated factory connection on that side is cut. If the heater is a 120 V model, only the factory connection that includes one black wire and one white wire is cut. For right-side wiring, the corresponding diagram is followed without cutting the wrong factory connection.
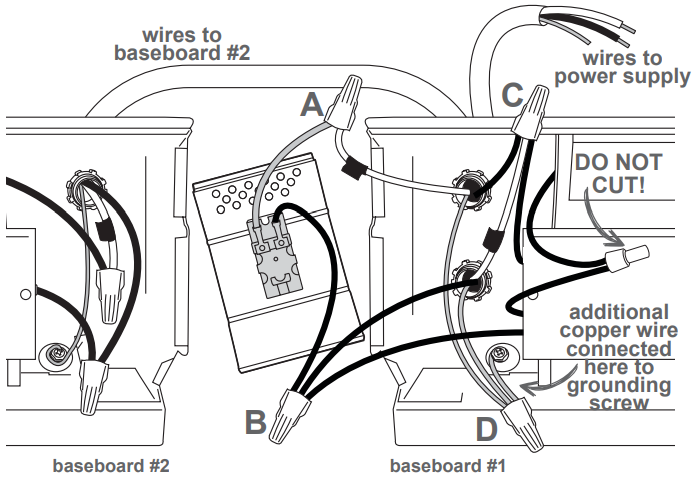
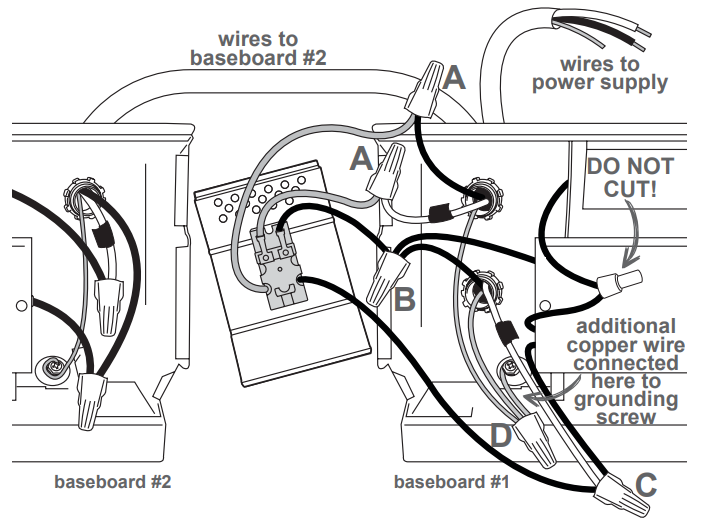
BTF1 & BTF2: Multiple baseboards can be controlled by one thermostat when they are on the same circuit and in the same room. The heaters are wired in parallel, and the total load must stay within the lower of 80% of breaker capacity or the thermostat’s rated amperage. For 240/208 V systems, both the black and white supply conductors are treated as hot and the white conductor must be marked with black tape.
After wiring is complete, make sure all connections are secure, tuck the wires into their compartments, fasten the bottom screw, and restore power at the main disconnect panel. To set the temperature, turn the knob or shaft fully to the right, wait until the room reaches the desired comfort level, then turn left until the heater clicks off. That position becomes the maintenance setting. Turn left for cooler operation and right for warmer operation.
On tamper-proof models, remove the small plastic plug before turning the shaft. This design prevents casual adjustment while still allowing the thermostat to be set to the desired room temperature.
Wiring Diagrams
Internal Heater
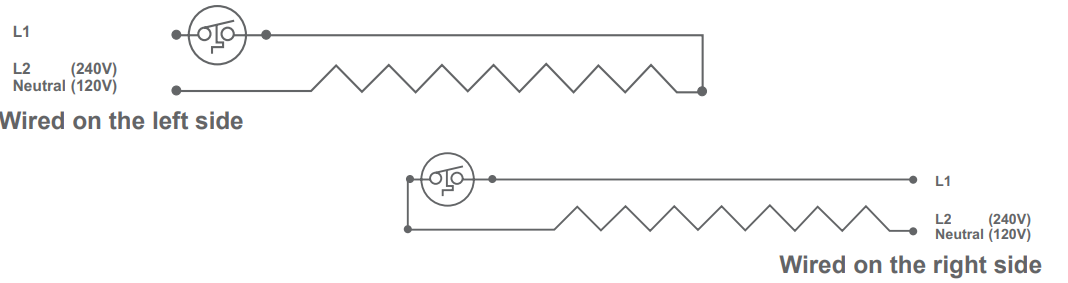
Internal Heater 8F2025 Only
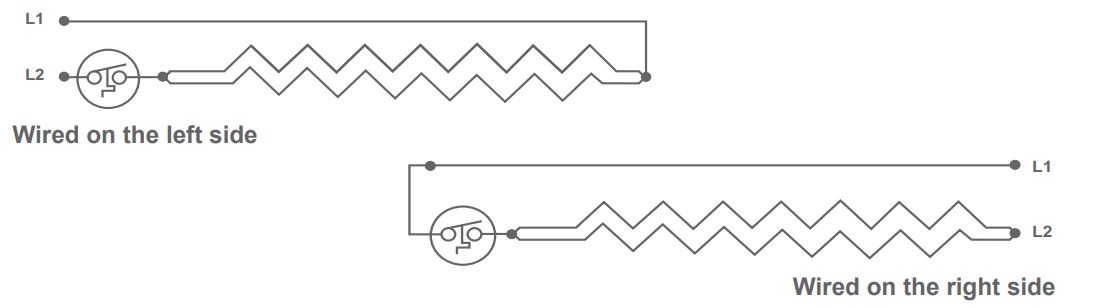
Troubleshooting
If the heater does not respond after installation, the first checks should be power, wiring tightness, and correct conductor placement. Confirm that the circuit breaker is on, the main disconnect is restored, and the wires are connected exactly as required for the voltage and model type.
If the thermostat malfunctions, disconnect power immediately and have the unit inspected by a qualified electrician before using it again. If the heater continues running unexpectedly, the control may be miswired or the thermostat may need replacement.
Warranty
The Electric Baseboard Heater Thermostat includes a limited one-year warranty that covers repair or replacement if the product is found defective within one year from the date of purchase.
- Coverage is voided by improper installation or incorrect supply voltage.
- Damage from misuse, abuse, accident, alteration, or poor maintenance is excluded.
- Use of unauthorized accessories or components voids the warranty.
- The remedy is limited to repair or replacement only.
- Replacement parts carry the same warranty terms as the original product.
Parts and Service: Visit gdaheat.com/parts for information on where to obtain parts and service.
Pros & Cons
- Simple mechanical control makes the thermostat easy to use.
- Works with both 120 V and 240/208 V baseboard setups.
- Supports single-heater and multiple-heater installations when code limits are followed.
- Tamper-proof versions add extra control protection.
- Installation requires careful electrical work and strict attention to wiring diagrams.
- Compatibility is limited to series F baseboard heaters.
Faqs
How do I install an Electric Baseboard Heater Thermostat on a series F baseboard heater?
What is the difference between single pole and double pole Electric Baseboard Heater Thermostat wiring?
Can one Electric Baseboard Heater Thermostat control multiple baseboard heaters in the same room?
How do I set the temperature on an Electric Baseboard Heater Thermostat after installation?
What should I do if my Electric Baseboard Heater Thermostat is not working correctly?
Is it safe to use an Electric Baseboard Heater Thermostat near flammable liquids?
What wiring checks should I make before turning the Electric Baseboard Heater Thermostat back on?
How can I avoid installation mistakes with an Electric Baseboard Heater Thermostat?
More glen dimplex manuals
Leave a Comment