Globe Label Printing Scale GSP30B Instruction Manual | Setup & Operations
Content
Introduction
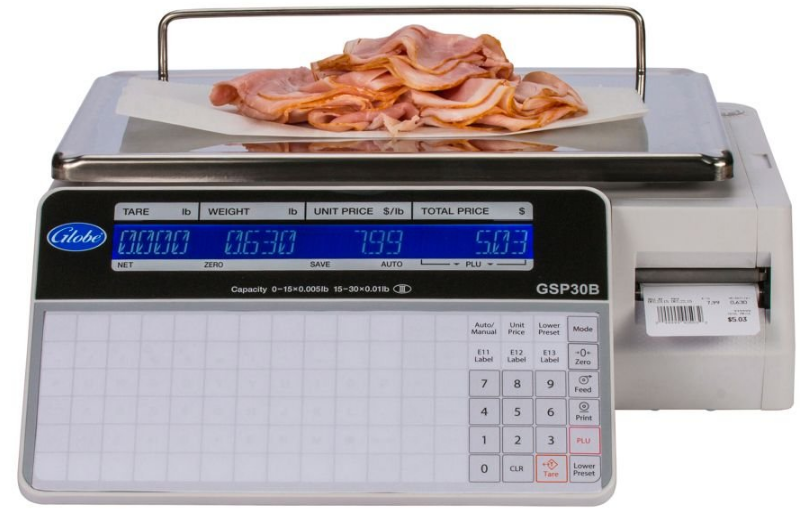
The Globe Label Printing Scale GSP30B is a multifunctional device designed for efficient labeling and weighing in retail and commercial settings. This scale features a built-in printer that allows users to create custom labels quickly, making it ideal for grocery stores, delis, and markets. With a user-friendly interface and high precision, it ensures accurate weight measurements and clear label printing. Priced at approximately $199.99, the GSP30B is a valuable tool for enhancing operational efficiency.
Detailed Specifications
The Globe Label Printing Scale GSP30B boasts several key features that make it an indispensable tool for any business:
- High-precision digital weight measurement up to 30 pounds (14 kg) with 0.01 lb (0.005 kg) increments.
- Integrated thermal label printer capable of printing labels up to 2.4 inches wide.
- Backlit LCD display for clear visibility in various lighting conditions.
- Multiple unit conversions (lb, oz, kg, g).
- Battery-powered with an estimated battery life of up to 100 hours on a single charge.
- Compact design with a small footprint, ideal for counter or tabletop use.
Important Notice
YOU MUST CALL YOUR LOCAL WEIGHTS AND MEASURES OFFICE BEFORE YOU USE YOUR NEW SCALE. USUALLY WEIGHTS AND MEASURES IS A DEPARTMENT OF THE COUNTY AUDITOR’S OFFICE. THIS SCALE MUST BE CERTIFIED BEFORE IT CAN BE USED. YOU RUN THE RISK OF BEING FINED IF THIS SCALE IS NOT CERTIFIED BY YOUR LOCAL WEIGHTS AND MEASURES. https:// www.ncwm.net/resource/state-directors-all
Safety Tips
This manual contains a number of precautions to follow in order to help promote safe use of this equipment.
Warnings affecting your personal safety are indicated by:
Warnings related to possible damage to the equipment are indicated by:
To ensure safe operation, the general safety tips below must be followed.
DISCONNECT the scale from the power source (unplug) before servicing or opening
ONLY trained and qualified service personnel should attempt repairs
ONLY use correct type and rating of fuses and parts
NEVER immerse the scale in water or spray with hose
DO NOT put the scale in a dishwasher
GROUNDING
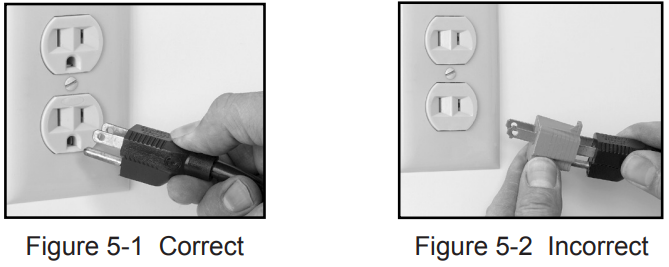
This machine is provided with a three prong grounding plug. The outlet to which this plug is connected must be properly grounded. If the receptacle is not the proper grounding type, contact an electrician. Do not, under any circumstances, cut or remove the third (ground prong) from the power cord or use any adapter plug (Figure 5-1 and Figure 5-2).
Description
The Globe Label Printing Scale GSP30B is built with durability and ease of use in mind. The stainless steel platform ensures longevity and resistance to wear and tear, while the ergonomic design makes it comfortable to operate for extended periods. The intuitive control panel allows users to quickly switch between different units of measurement and print labels with ease. The printer uses thermal labels, which are cost-effective and provide clear, smudge-free prints.
Installation
Make sure the scale is placed on a stable, flat surface. Avoid the following areas when installing the machine:
- Areas subject to high temperatures or high humidity
- Areas exposed to direct sunlight
- Areas where water or other liquids can be easily spilled on the machine
- Areas subject to excessive vibration or unstable surfaces
- Areas exposed to direct cold air
- Areas subject to low temperatures
- Areas subject to a lot of dirt
- Areas with large voltage fluctuations
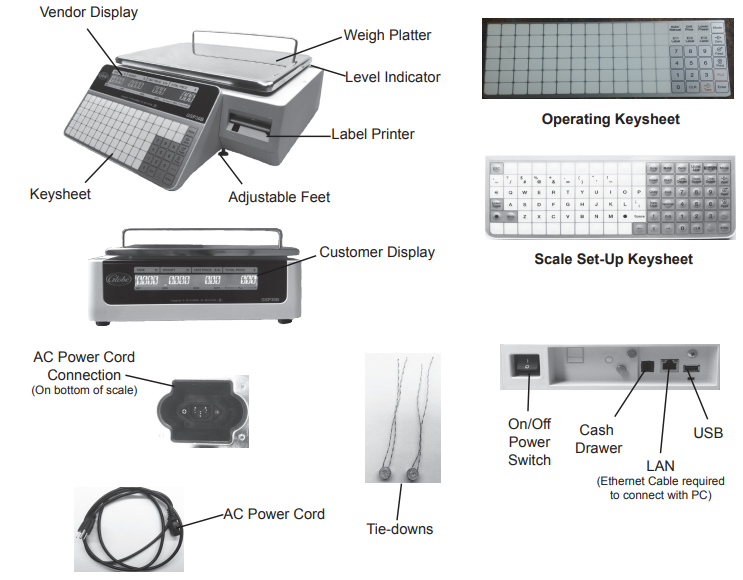
Check the level indicator to ensure the scale is level. If the machine is not level, weighing may not be accurate. To adjust the machine to a level position, rotate the four adjustment feet until the level bubble is centered in the round level indicator.
Plug the power cord into the AC power outlet on the bottom side of the scale.
Key Scale Components
Loading/Unloading Labels
Caution:
Use only Globe Food Labels. Damage to the thermal head can occur. To order labels, contact a local Globe Representative or Globe Food Equipment.
IMPORTANT:
Before installing a new roll of labels, remove 5 to 6 blank labels so only the backing paper is fed through the printer.
Loading Roll of Labels
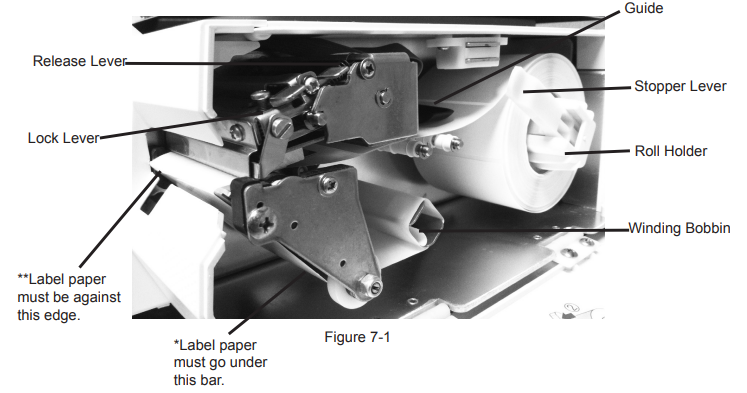
- Open the side cover.
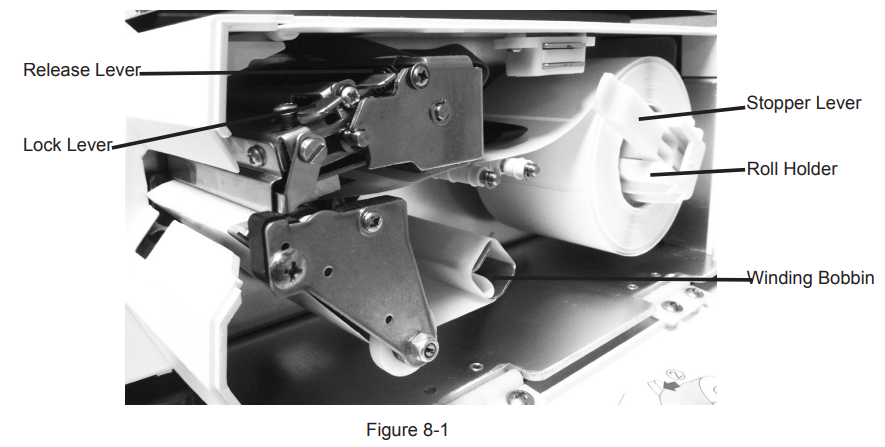
- Release the printer head by pushing the release lever down (Figure 7-1).
- Ensure the stopper lever of the roll holder is pulled down.
- Load the label roll onto the roll holder.
- Insert the label paper (label side up) under the guide.
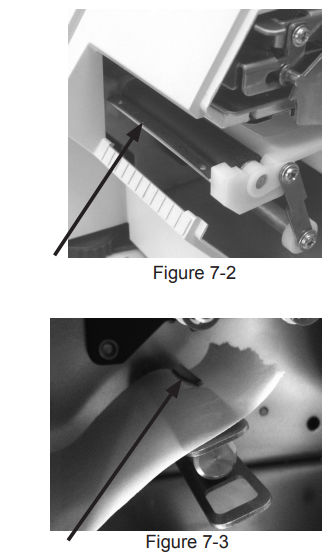
- Pull the label paper through, ensuring it is fed over the metal bar (Figure 7-2) and under the bar (Figure 7-1).
- Turn the winding bobbin counterclockwise so the slot is on top (Figure 7-3).
- Insert the paper under the slot on the winding bobbin (Figure 7-3).
- Pull up on the stopper lever, then slide it inward to secure the label roll.
- Ensure the label paper is against the edge (Figure 7-1).
- Push down on the lock lever until the print head locks into position.
With the scale plugged in and turned on, press the Feed key once or twice to securely turn the paper around the winding bobbin. Continue pressing the Feed button until labels are ejected from the printer.
NOTE:
If you receive an error message (1011), it indicates the label is not in the proper position. Press the CLR key, then press the Feed key again to feed the labels through the printer. You may need to repeat this step a few times.
Unloading Remaining Label Roll
- Open the side cover.
Release the printer head by pushing down on the release lever (Figure 8-1).
- Pull the winding bobbin lever outward to loosen the paper wound around the winding bobbin, then remove the paper from the winding bobbin.
- Pull the stopper lever of the roll holder to make it straight, then remove the label roll from the path and the roll holder.
Initial Scale Setup
Changing Current Date and Time
IMPORTANT:
Before using the scale for the first time, follow these steps to ensure the current date and time is displayed.
Ensure the scale is plugged in, turned on, and the weigh platter is empty.
NOTE: The “Clock Check” screen will display (Figure 8-2).
- Press the Enter key on the keypad to proceed.
- Key in 4000 and press the Mode key. The display will show: C00 ADJUST.
- Press the Enter key. The display will show: C01 DATE TIME.
- Key in 111111 and press the PLU key.
- Press the Enter key. The display will show: C01-01 DATE and the date displayed.
- Key in new date data.
Example: April 1, 2015 = 04012015. - Press the Enter key. The date will be displayed as month, day, and year.
- If the date is correct, press the Enter key.
- If not correct, key in the new date and press the Enter key.
- The time will be displayed as military time. If the time is correct, press the Enter key. If not, key in the new time (hour, minute, seconds) and press the Enter key.
- After entering the date and time, press the Mode key. The display will show 19001-000 ENT or CLR.
- Press the Mode key three times to return to normal operation.
NOTE:
To ensure the date and time are correct, power off the scale and then power it on to view the “Clock Check” screen.
Entering Shop Name and Address (Optional)
- Ensure the scale is plugged in, turned on, and the weigh platter is empty.
- Key in 9000 and press the Mode key. The display will show: P00 PROGRAM.
- Key in 5 and press the Enter key. The display will show: P06 STORE.
- Key in 111111 and press the PLU key. The display will show: P06 STORE.
- Press the Enter key. The display will show: P06-00 NO. 0001 >No<.
- Press the Enter key. The display will show P06-01 NAME >ED.
- Press the Edit key. The display will show 13001-0000 ENT or CLR.
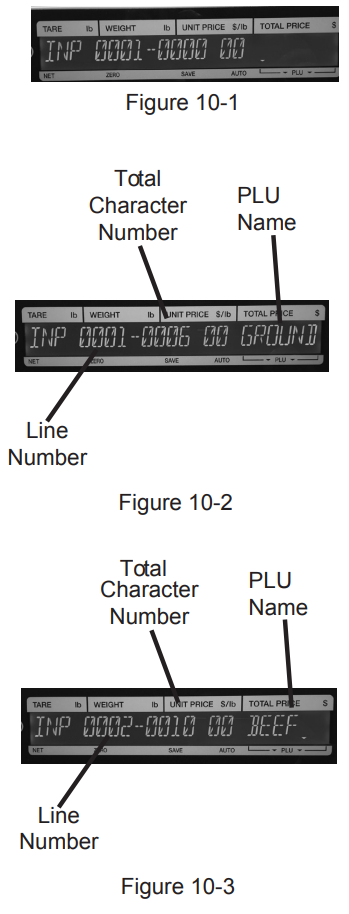
Press the Enter key. The display will show INP 0001-0000-00 (Figure 9-1).
_globe_label_printing_scale_gsp30b.png)
- Use the Scale Set-Up keysheet to key in the store name (48 characters maximum).
NOTE: Only one character of the store name will display at a time. Use the right arrow key to cycle through the letters of the store name.
NOTE: To enter a symbol, select the symbol key. If the symbol is on the top of the key, select the shift key first.
NOTE: To delete a character, press the Backspace or Char Delete key. - After entering the store name, press the Mode key. The display will show 19001-0000 ENT or CLR.
- Press Enter to save or CLR to cancel.
- Press the Enter key. The display will show: P06-00 NO. 0001 >No<.
- Press the down arrow two times. The display will show: P06-02 ADDRESS >ED.
- Press the Edit key. The display will show INP 0001-0000-00.
- Use the Scale Set-Up keysheet to key in the store address (street address, city, state, and zip; 48 characters maximum).
NOTE: To enter a symbol, select the symbol key. If the symbol is on the top of the key, select the shift key first. - After entering the store address, press the Mode key. The display will show 19001-0000 ENT or CLR.
- Press Enter to save or CLR to cancel.
- Press the Mode key three times to return to normal operation.
PLU (Price Look-up) Set Up
Setting Up PLUs
- Make sure the scale is plugged in, turned on, and there is nothing on the platter.
- Key in 9000 and press the Mode key. Display will show: P00 PROGRAM.
- Press the Enter key. Display will show: P01 PLU.
- Key in 111111 and press the PLU key.
- Press the Enter key. Display will show: P01-00 PLU >No<.
- Key in the PLU number (5 digits maximum) and press the PLU key. Display will show: 13001-0000 ENT OR CLR.
- Note: Press the Enter key to accept the PLU number or the CLR key to cancel. The CLR key returns you to the PLU number entry screen, and Enter moves forward to the top of the PLU entry menu.
- Display will show: P01-01 <SALE1>.
- Press the Edit key. Display will show: INP 0001-0000 00.
- Use the Scale Set-Up Keysheet to key in the PLU name (24 characters maximum per line, 2 line maximum, e.g. GROUND BEEF, BANANAS).
- Enter the first line of data. If you only want one line of data, press the Enter key. For a second line of data, press the New Line key. Enter the second line, then press the Enter key to complete. Display will show: P01-01 <SALE1>.
- Press the Enter key. Display will show: P01-01-01 SALES 0.
- Key in 0 for weighing price items or 1 for fixed price items.
- Note: Weighing price items continue to step 13, fixed price items proceed to step 18.
- Press the Enter key. Display will show: P01-01-04 PRICE 0.00.
- Key in the unit price (5 digits maximum, do not include decimal) and press the Enter key.
- Press the Enter key again. Display will show: P01-01-10 TARE 0.000.
- Key in the tare weight (4 digits maximum/2 digits minimum, tare weight is a three-place decimal ending in 0 or 5) or 0 if none, then press the Enter key two times. Display will show: P01-01-12 P TARE 0.0.
- Note: For tare weight details, refer to the Tare Weight section.
- Key in the tare percentage (3 digits maximum) or 0 if none, and press the Enter key.
- Note: Weighing price items proceed to step 26.
Fixed Price Items
- Press the Enter key. Display will show: P01-01-04 PRICE 0.00.
- Key in the unit price (5 digits maximum) and press the Enter key.
- Press the Enter key again. Display will show: P01-01-06 QTY 0.
- Key in the quantity and press the Enter key.
- Press the Enter key again. Display will show: P01-01-07 UNIT TYPE 0.
- Key in the unit type and press the Enter key.
- Press the Enter key again. Display will show: P01-01-09 FIX WGT 0.
- Key in the fixed weight and press the Enter key.
Final Steps
- Press the Enter key again. Display will show: P01-01 <SALE1>.
- Use the right arrow key to select the date. Display will show: P01-06 <DATE>.
- Press the Enter key. Display will show: P01-06-01 P/D PRN 2.
- Note: Select 1 for the package date to appear on the label or 2 to remove it.
- Key in 1 and press the Enter key.
- Press the Enter key again. Display will show: P01-06-04 SB DATE PRN 1.
- Note: Select 1 for the sell-by date to appear on the label or 2 to remove it.
- Key in 1 and press the Enter key.
- Press the Enter key again. Display will show: P01-06-07 SHELF LF 1.
- Key in the number of days to expire (3 digits maximum) and press the Enter key.
- Note: This will be used if the sell-by date is printed on the label.
- Press the Enter key. Display will show: P01-06 <DATE>.
- Use the right arrow key to select the code. Display will show: P01-07 <CODE>.
- Press the Enter key. Display will show: P01-07-01 CODE 00000000.
- Note: The barcode can be the PLU number (default) or the POS (point of sale) number. For the PLU number, press the Enter key. For the POS number, key in the POS number (5 digits maximum) and press the Enter key.
- Press the Mode key. Display will show: 19001-0000 ENT OR CLR.
- Note: Press Enter to save or CLR to cancel.
- Press the Mode key. Display will show: P01 PLU.
- Repeat steps 3 through 37 to enter additional PLU numbers. When complete, press the Mode key twice to return to normal operation.
Setting Up Default PLU
Note:
The scale is programmed to operate with the default PLU number 1. This PLU can operate with or without a product name, price, and/or tare. The default PLU can be used to bypass PLU entry for each transaction.
Default PLU Activation/Deactivation
- Make sure the scale is plugged in, turned on, and there is nothing on the platter.
- Key in 6000 and press the Mode key. Display will show: < B00 SETUP >.
- Key in 495344 and press the PLU key.
- Key in 17 and press Enter. Display will show: < OPERATION SETTINGS >.
- Press Enter two times. Display will show: < B17-01-02 OPEN PLU # >.
- Enter 1 to activate the default PLU function, or 2 to deactivate, then press Enter.
- Press the Mode key three times to return to normal operation.
Operating the Default PLU
- Ensure the labels are loaded, the scale is turned on, and the operating keyset is placed under the plastic covering.
- If a tare is needed:
- Place the empty container on the platter and press the Tare key or...
- Enter the tare amount and press the Tare key.
- Enter the product price and press the Unit Price key.
- Place the product on the platter. The display will show the tare, weight, unit price, and total price.
- Press the Print key for a label to print.
Deleting a PLU
- Make sure the scale is plugged in, turned on, and there is nothing on the platter.
- Key in 9000 and press the Mode key. Display will show: P00 PROGRAM.
- Key in 1 and press the Enter key. Display will show: P01 PLU.
- Key in 111111 and press the PLU key.
- Press the Enter key. Display will show: P01-00 PLU >No.<.
- Press the down arrow key two times. Display will show: P01-00 No. 1 >PL.
- Note: Use the down arrow to select the PLU number to delete.
- Press the →0← Zero key. Display will show: 13002-0000 ENT OR CLR.
- Note: Press the Enter key to save or the CLR key to cancel.
- Press the Enter key.
- Press the Mode key three times to return to normal operation.
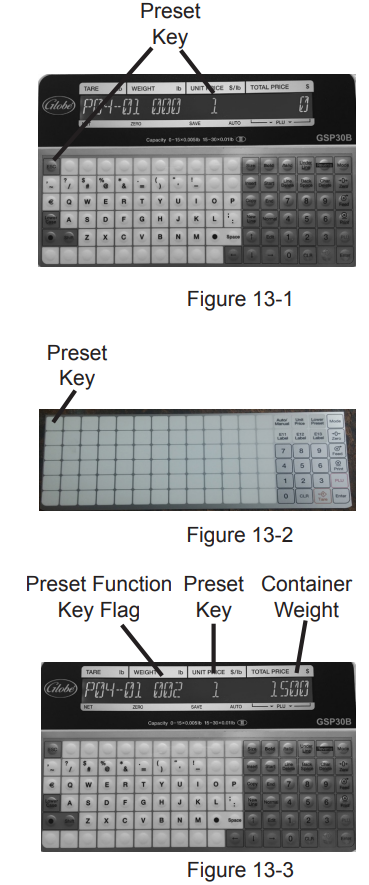
Preset Key Set Up
Setting Up PLU Preset Keys
- Make sure the scale is plugged in, turned on, and there is nothing on the weigh platter.
- Key in 9000 and press the Mode key. Display will show: P00 PROGRAM.
- Key in 4 and press the Enter key. Display will show: P04 PRESET KEY.
- Key in 111111 and press the PLU key. Display will show: P04 PRESET KEY.
- Press the Enter key. Display will show: P04-01 000 0 000.
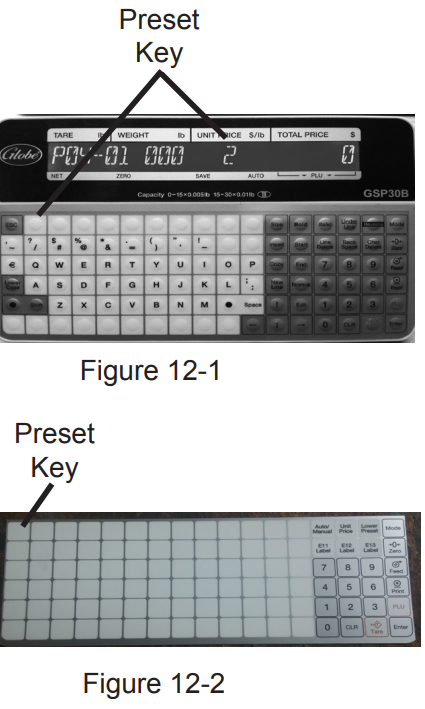
- Press the desired preset key.
- Note: Make sure to mark the selected preset key with the PLU name on the Operating Keysheet.
- Key in 1 for the preset function key flag number and press the Enter key.
- Key in the PLU number and press the desired preset key.
- Repeat steps 5 through 8 to set up additional keys. When complete, press the Mode key three times to return to normal operation.
Setting Up Cassette Preset Function Keys
- Make sure the scale is plugged in, turned on, and there is nothing on the weigh platter.
- Key in 9000 and press the Mode key. Display will show: P00 PROGRAM.
- Key in 4 and press the Enter key. Display will show: P04 PRESET KEY.
- Key in 111111 and press the PLU key.
- Press the Enter key. Display will show: P04-01 000 0 000.
- Press the desired preset key.
- Key in 435 for the preset function key flag number and press the Enter key. Display will show: P04-01 435 74 0.
- Key in the Cassette number. Press the desired preset key.
Press the Mode key three times to return to normal operation.
Setting Up Tare Preset Function Keys
- Make sure the scale is plugged in, turned on, and there is nothing on the weigh platter.
- Key in 9000 and press the Mode key. Display will show: P00 PROGRAM.
- Key in 4 and press the Enter key. Display will show: P04 PRESET KEY.
- Key in 111111 and press the PLU key. Display will show: P04 PRESET KEY.
- Press the Enter key. Display will show: P04-01 000 0 000.
- Press the desired preset key.
- Note: Make sure to mark the selected preset key with the PLU name on the Operating Keysheet.
- Key in 2 for the preset function key flag number and press the Enter key. Display will show: P04-01 002 “1” 0.
- Key in the weight of the container. Press the desired preset key.
- Note: The weight of the container must be entered in 3 or more decimal places (e.g., 0.5 pounds = 500 with no decimal places).
- Press the Mode key three times to return to normal operation.
Setting Up Preset Function Keys
- Make sure the scale is plugged in, turned on, and there is nothing on the weigh platter.
- Key in 9000 and press the Mode key. Display will show: P00 PROGRAM.
- Key in 4 and press the Enter key. Display will show: P04 PRESET KEY.
- Key in 111111 and press the PLU key. Display will show: P04 PRESET KEY.
- Press the Enter key. Display will show: P04-01 000 0 000.
- Place the Operating Keysheet over the Scale Set-Up Keysheet and press the desired preset key.
- Key in the desired preset function key flag number and press the Enter key.
- Key in 0 (Warning: Press the number 0, NOT the →0← Zero key) and press the preset key again.
Deleting Preset Keys
IMPORTANT: This procedure will delete ALL preset keys at once!
- Make sure the scale is plugged in, turned on, and there is nothing on the weigh platter.
- Key in 9000 and press the Mode key. Display will show: P00 PROGRAM.
- Key in 4 and press the Enter key. Display will show: P04 PRESET KEY.
- Key in 111111 and press the PLU key. Display will show: P04 PRESET KEY.
- Press the Enter key.
- Press the →0← Zero key. Display will show: 14033-0000 ENT OR CLR.
- Note: Press the Enter key to execute or the CLR key to stop.
- There will be a long beep signaling that all preset keys have been deleted.
- Press the Mode key three times to return to normal operation.
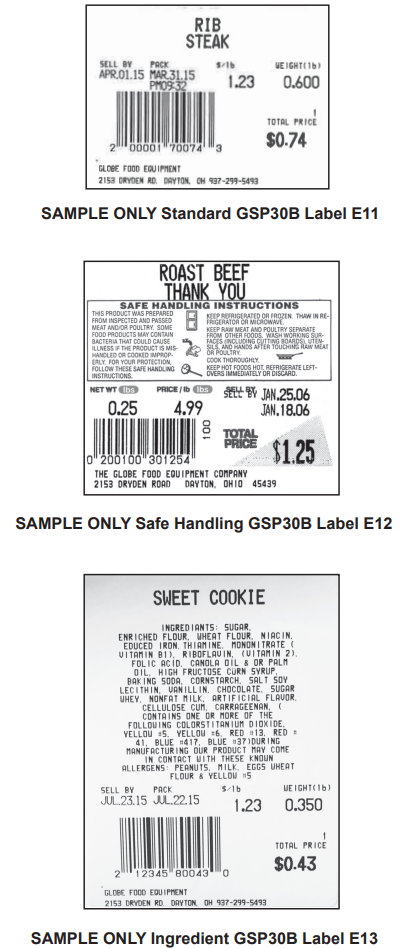
SAMPLES of all available labels for the GSP30B
Operating Instructions (PLU’s)
Manual Label Print
- Make sure the scale is plugged in, the weigh platter is on top of the scale, and the scale is turned on.
- Enter a PLU number and press the PLU key or press one of the PLU preset keys. The PLU information will be displayed.
Note: To access the lower level of preset keys, press the Lower Level preset function key and then the preset key. - If a tare weight was not programmed for the PLU and it is needed, do one of the following:
- Place the empty container on the weigh platter and press the Tare key, or...
- Enter the tare amount and press the Tare key.
- Place the product on the weigh platter and press the Print key for a label to print.
Note: If the PLU is for a fixed-price item, press the Print key for the label. The product does not have to be placed on the platter.
Note: The scale will go back to 0.00.
Automatic Label Print (Weighed Items)
Note: To print labels automatically when PLU is selected, you must first set up the AUTO/MANU preset function key.
- Press the Auto Manu preset function key.
Note: An arrow will show on the display pointing to the word AUTO. This indicates that the scale is in automatic label print mode. - Enter a PLU number and press the PLU key or press one of the PLU preset keys. The PLU information will display.
- If a tare weight was not programmed for the PLU and it is needed, do one of the following:
- Place the empty container on the weigh platter and press the Tare key, or...
- Enter the tare amount and press the Tare key.
- Place the product on the weigh platter and a label will automatically print.
Note: While in automatic label printing mode, the scale will not reset to 0.00. Continue entering PLU numbers and weighing products.
Note: To stop automatic label print mode, press the Auto Manu preset key. The arrow pointing to AUTO on the display will disappear, and the scale will reset to show all zeros.
Automatic Label Print (Fixed Priced Items)
Note: To print labels automatically when PLU is selected, you must first set up the AUTO/MANU preset function key.
- Press the Auto Manu preset key.
Note: An arrow will show on the display pointing to the word AUTO. This indicates that the scale is in automatic label print mode. - Enter a PLU number and press the PLU key or press one of the preset keys. The PLU information will display.
- Enter the number of labels you want printed for this item and press the Print key. The number of labels entered will be printed automatically.
Note: If you press the Print key without entering a number first, the scale will continue to automatically print labels until the Print key is pressed again.
Note: To stop automatic label print mode, press the Auto Manu preset key. The arrow pointing to AUTO will disappear.
Operating Instructions (Function Keys)
Using Function Keys
Note: Function keys must first be set up as preset keys.
PLU
Used to select a PLU preset function key.
- Press the PLU preset function key.
- Place the item to be weighed on the scale.
- Press the Print key to issue a label.
Auto Manu
Used to print labels automatically.
Note: Make sure to change the Auto Manu preset key to MANUAL before selecting a fixed price, multiple, special price, -$ Price Discount or -% Percent Discount preset function key. Labels will not print with the updated price if the scale is set to AUTO.
- Key in the PLU and press the PLU key.
- Press the Auto Manu preset key. The auto indicator on the display will be lit.
- Press the Auto Manu preset key again to deactivate. The auto indicator will go off.
- Press the Mode key to return to normal operation.
Unit Price
Used to print labels without the use of a PLU.
- Place the product on the scale.
- Enter the unit price and press the Unit Price preset key.
- Press the Print key two times.
Lower Level Preset Keys
Used to select lower level preset keys.
- Press the Lower Level preset function key to select a PLU preset key or preset function key.
- Press the PLU preset key or preset function key.
Note: The scale will return to the upper level preset keys after the product has been weighed and a label has been printed.
Cassette Preset Keys
Used to select label formats within a specified cassette.
- Press the Lower Preset key.
- Press the Cassette preset function key.
Note: The scale will beep two times to indicate the cassette has changed.
Tare
Used to find the weight of an empty container.
- Key in the PLU and press the PLU key or press one of the PLU preset keys.
- Press the Tare preset key.
- Press the Print key to issue a label.
Fixed Price
Used to temporarily change the selling price for a fixed price item.
- Key in the fixed price PLU and press the PLU key or press one of the PLU preset keys.
- Key in the temporary price.
- Press the Fixed Price preset key.
- Press the Print key to issue a label.
Multiple
Used to price multiple pieces of an item (fixed price items).
- Key in the fixed price PLU and press the PLU key or press one of the PLU preset keys.
- Key in the quantity.
Note: Maximum 99 pieces. - Press the Multiple preset key.
- Press the Print key to issue a label.
Special Price
Used to temporarily reduce the selling price.
- Key in the PLU and press the PLU key or press one of the PLU preset keys.
- If the PLU is a fixed price item, continue with step 3. If the PLU is a weighed item, place the product on the weigh platter so a total price is displayed.
- Key in the special price.
- Press the Special Price preset key.
Note: The display will not change; however, the label will print with the special price. - Press the Print key to issue a label.
-$ Price Discount
Used to temporarily subtract an amount from the total price.
- Key in the PLU and press the PLU key or press one of the PLU preset keys.
- If the PLU is a fixed price item, continue with step 3. If the PLU is a weighed item, place the product on the receiving tray so a total price is displayed.
- Key in the dollar amount to be discounted.
- Press the -$ Amount Discount preset key.
Note: The display will not change; however, the label will print with the discounted price. - Press the Print key to issue a label.
-% Percent Discount
Used to temporarily subtract a percentage from the total price.
- Key in the PLU and press the PLU key or press one of the PLU preset keys.
- If the PLU is a fixed price item, continue with step 3. If the PLU is a weighed item, place the product on the receiving tray so a total price is displayed.
- Key in the percentage amount to be discounted (3 digits maximum, do not include decimal).
- Press the % Percent Discount preset key.
Note: The display will not change; however, the label will print with the discounted price. - Press the Print key to issue a label.
Save
Used to maintain the called-up PLU data.
- Key in the PLU and press the PLU key or press one of the PLU preset keys.
- Press the Save preset key. The save indicator on the display will be lit.
- Press the Save preset key again to release the PLU data. The save indicator on the display will go off.
- Press the Mode key to return to normal operation.
Setup Guide
To set up and operate the Globe Label Printing Scale GSP30B, follow these steps:
- Place the scale on a level surface and ensure it is properly calibrated according to the user manual.
- Load the thermal labels into the printer compartment as instructed.
- Turn on the device and select the desired unit of measurement using the control panel.
- Place the item to be weighed on the stainless steel platform and take a reading.
- Use the print function to generate a label with the weight information.
- For pairing with other devices, refer to the user manual for specific instructions on connecting via Bluetooth or other available options.
Cleaning/Maintenance
Cleaning
- Disconnect the power supply before cleaning.
- Keep the machine and Operator Keysheet free of dust and dirt.
- Make sure that all spills are wiped clean, especially on the weigh platter.
- Do not put components in the dishwasher.
- Dilute detergent per supplier’s instruction.
- Do not hose down or pressure wash any part of the scale.
- Never use a scrubber pad, steel wool, or abrasive material to clean the scale.
- Clean the scale with a mild detergent and warm water solution.
- Do not allow moisture to get into the load cell mounted under the scale weigh platter. Water damage is not covered under the limited warranty.
- When cleaning the scale, only use a soft, damp cloth with a mild cleaner. Never use volatile or caustic liquids.
Cleaning the Print Head
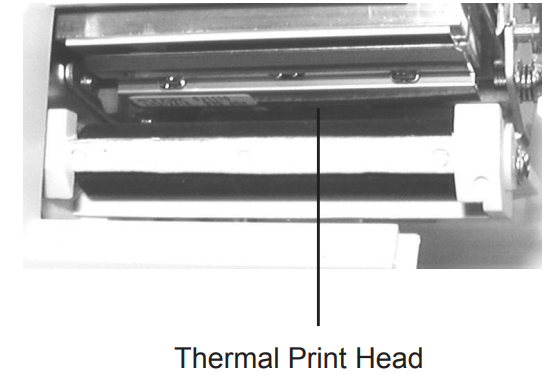
- Dip a cotton swab into the thermal print head cleaning solution provided with the scale. Isopropyl rubbing alcohol can also be used.
- Rub the cotton swab on the print head until debris is removed.
- Allow the alcohol to air dry.
Note:
Do not use cloth or other material to dry the print head, as this can damage the print head.
If labels have become stuck to the print head, never use any sharp or metal object to scrape labels from the print head, as doing so will damage it.
Maintenance
It is recommended that the following steps be performed on a daily basis:
- Ensure there are sufficient labels remaining in the machine.
- Clean the thermal head with a cotton swab, thermal head cleaning solution, or isopropyl rubbing alcohol only.
Globe Label Printing Scale GSP30B Troubleshooting
Scale Will Not Light Up
- Check to make sure the wall outlet has power.
- Ensure the power cord is plugged in.
- Turn the scale on by pushing the power switch on the left side of the scale.
- Call for service if the issue persists.
Scale Lights Up but All Functions Are Inoperable (Locked Up)
- Unplug the scale from the wall outlet, wait 10 seconds, plug it back in, and turn it on by pushing the power switch on the left side of the scale.
- Call for service if the issue persists.
Scale Not Weighing Properly
- Ensure the scale's weigh platter is mounted correctly.
- Make sure nothing is touching the weigh platter, as it may affect the weight display.
- Check if the tare is improperly set.
- Call for service if necessary.
Labels Automatically Printing When an Item Is Placed on the Weigh Platter
- The machine is set in automatic mode. Press the AUTO MANU preset key to switch the scale back to manual mode. The AUTO indicator will disappear.
Labels Will Not Come Out When Print Key Is Pushed
- Ensure labels are properly installed (refer to Loading/Unloading Labels).
- Check if labels have stuck to the print head area.
Multiple Labels Come Out, Followed by the 1011 Error Code
- Ensure labels are properly installed. Labels must be lined up before the print head.
- Ensure the print head is pressed down:
- Release the printer head by pushing the release lever down.
- Push down on the lock lever until the print head locks into position.
- Make sure the correct cassette is selected for the label size that is loaded.
Note: If labels have become stuck to the print head, never use any sharp or metal object to scrape them off. Doing so will damage the print head (refer to Cleaning/Maintenance).
Print on Labels Is Not Clear
- Refer to Cleaning/Maintenance.
Error Messages
- 312: Label is remaining.
- 316: Special price entered is equal to or over the preset PLU price.
- 396: No USB found.
- 710: Scale is out of labels.
- 1011: The label is not in the proper position (refer to Loading/Unloading Labels).
- 15029-0001: Power the scale off, then turn it back on.
Tare Weight
Tare is the weight of an empty container, used to weigh food by removing the container's weight from the total.
Example 1:
For a sundae bar where customers pay by weight, set the PLU to subtract the weight of the sundae dish so that only the sundae is weighed.
Example 2:
For items like potato salad sold in plastic containers, the container's weight can be programmed into the PLU so it is automatically deducted when the product is weighed.
Note: There are three ways to manage tare weight:
- Key in a PLU number or select a PLU preset key:
- Place the container on the weigh platter and select the Tare key.
- Add the product to the weigh platter and press the Print key.
- Program a Tare preset key (refer to Preset Key Set Up).
- Use ScaleLink Pro 5 Lite Software to set up the Tare preset key.
USB Scale Backup and Restore
Note: Data folders store/restore scale backup information (PLUs, store info, label formats, etc.). Up to 7 data folders can be used.
Scale to USB backs up configuration files to a USB device.
Steps:
- Ensure the scale is plugged in, turned on, and has the weigh platter on top.
- Key in 6000 and press the Mode key. Display will show: B00 SETUP.
- Key in 495344 and press the PLU key.
- Key in 27 and press the Enter key. Display will show: B27 FILE SAVE/LOAD.
- Press the Enter key. Display will show: B27-01 <USB-TO-SCALE>.
- Press the right arrow key on the Scale Set-Up Keysheet. Display will show: B27-02 <SCALE-TO-USB>.
- Press the Enter key.
- Note: Ensure the USB device is in the USB port.
- Select the folder (e.g., Data 01, 02, 03) and press the PLU key to store the data.
- Follow on-screen prompts to complete the backup
USB to Scale
This function restores configuration files from a USB device to the scale.
Steps:
- Ensure the scale is plugged in, turned on, and has the weigh platter on top.
- Key in 6000 and press the Mode key. Display will show: B00 SETUP.
- Key in 495344 and press the PLU key.
- Key in 27 and press the Enter key. Display will show: B27 FILE SAVE/LOAD.
- Press the Enter key. Display will show: B27-01 <USB-TO-SCALE>.
- Press the Enter key to begin the process.
Additional Features
Additional features are available with the ScaleLink Pro 5 Lite (SLP-V Lite) software, a PC program for creating, storing, and organizing ingredient labels. This optional software can be downloaded at www.GSP30B.gfesupport.com.
Limited Scale Warranty
Globe Food Equipment Company (“GFE”) warrants to the original purchaser of new equipment that the equipment, when installed in accordance with our instructions within North America and subjected to normal use, is free from defects in material or workmanship for a period of 1 year from the installation date or factory shipment date (not to exceed 18 months).
Pros & Cons
Pros:
- High-precision weight measurements.
- Convenient label printing feature.
- Compact and durable design.
- User-friendly interface.
- Affordable price point.
Cons:
- Limited to 30 pounds (14 kg) capacity.
- Dependent on thermal labels which may be more expensive than other types of labels.
- No advanced connectivity options like Wi-Fi or USB ports.
Customer Reviews
The Globe Label Printing Scale GSP30B has received positive reviews from customers for its accuracy, ease of use, and value for money. However, some users have noted that the thermal labels can be more expensive over time and that the device's capacity is somewhat limited. Common complaints include occasional paper jams in the printer and the need for frequent battery replacements if used extensively.
Faqs
What is the maximum weight capacity of the Globe Label Printing Scale GSP30B?
How do I calibrate the Globe Label Printing Scale GSP30B?
What type of labels does the Globe Label Printing Scale GSP30B use?
Is the Globe Label Printing Scale GSP30B battery-powered or does it require a power cord?
Can I connect the Globe Label Printing Scale GSP30B to my computer or smartphone?
How do I resolve paper jam issues with the printer?
What are some common maintenance tasks for the Globe Label Printing Scale GSP30B?
Can I use different types of labels with this scale?
Is there a warranty available for this product?
How does this scale compare to other similar products in terms of price?
Leave a Comment