How to Assemble: Grizzly Oscillating Spindle sander G9922 Manual

Content
Grizzly Oscillating Spindle Sander G9922
INTRODUCTION
We are proud to offer the Grizzly Model G9922 Oscillating Spindle Sander. The Grizzly Oscillating Spindle Sander G9922 is part of a growing Grizzly family of fine woodworking machinery. When used according to the guidelines set forth in this manual, you can expect years of trouble-free, enjoyable operation and proof of Grizzly’s commitment to customer satisfaction. The Grizzly Oscillating Spindle Sander is a stationary sander that is capable of a wide variety of operations. The 2" x 51⁄2" sanding spindle enables you to sand endless contours on the edge or surface of wood or plastic. The G9922 comes complete with a motor and electrical package. A number of sanding sleeves for the Oscillating Spindle Sander G9922 are available through the Grizzly catalog.
We are also pleased to provide this manual with the Model G9922. It was written to guide you through assembly, review safety considerations, and cover general operating procedures. It represents our effort to produce the best documentation possible. If
Detailed Specifications
The Grizzly Oscillating Spindle Sander is a powerful and versatile woodworking tool, featuring a 1/2 HP, 110V motor that delivers reliable performance. The spindle size ranges from 1/4" to 2" with six different sizes included, providing flexibility for various sanding tasks. The oscillating motion, combined with the spindle rotation, reduces heat buildup and produces a superior finish on your workpiece. The tool-free spindle changing system saves time and hassle during setup and transitions.
Description of Grizzly G9922
The Oscillating Spindle Sander G9922 is designed for sanding curved and irregular surfaces, providing a smooth and uniform finish. Its oscillating action reduces heat buildup and eliminates swirl marks, ensuring optimal results on your projects. The drastic reduction in vibration makes this sander comfortable to use for extended periods, while the durable construction ensures long-lasting performance. The Grizzly Oscillating Spindle Sander G9922 model is compact and easy to store, making it a perfect addition to any woodworking shop.
Unpacking
This Oscillating Spindle Sander is shipped from the manufacturer in a carefully packed carton. If you discover the machine is damaged after you’ve signed for delivery, and the truck and driver are gone, you will need to file a freight claim with the carrier. Save the containers and all pack-ing materials for possible inspection by the carrier or its agent. Without the packing materials, filing a freight claim can be difficult. If you need assistance determining whether you need to file a freight claim, or with the procedure to file one, please contact our Customer Service. When you are completely satisfied with the condition of your shipment, you should inventory its parts.
Parts Inventory
After all the parts have been removed from the carton, you should have
- Oscillating Spindle Sander
- Working Table
- Sanding Drum
- Sanding Sleeve
- 5mm Allen® Wrench
- Double End Wrench 17x19mm
- Double End Wrench 12x14mm
- Stand Brackets (12)
- Miter Gauge
- Fasteners
Hardware
- Hex Nut M8: 20
- Flat Washers M8: 20
- Lock Washer M8: 20
- Pan Head Screw M8 X 16mm: 20
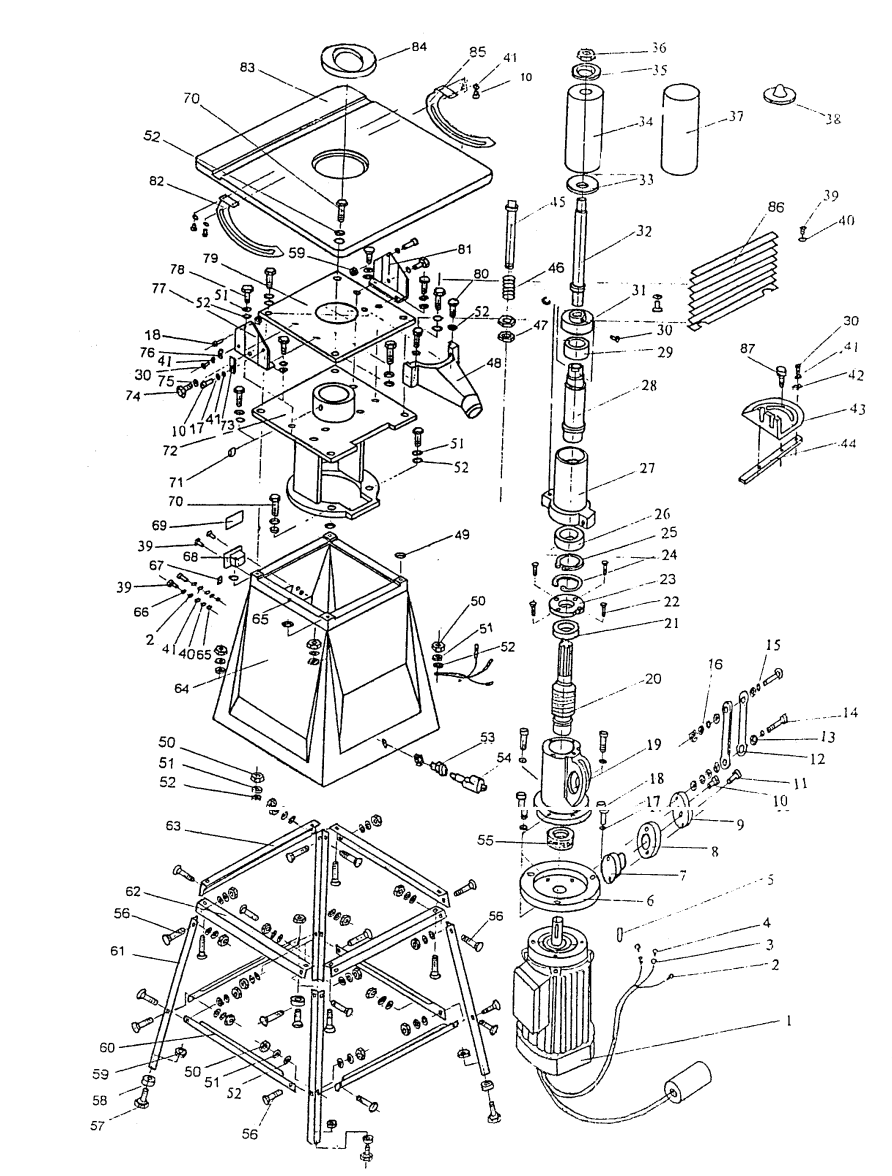
01 | G2902 | Motor |
02 | P992202 | Ground Ring Connector |
03 | P992203 | Power Fork Connector |
04 | P992204 | Plastic Connector Sleeve |
05 | P992205 | Flat Key |
06 | P992206 | Connection Plate |
07 | P992207 | Worm Gear Shaft |
08 | P992208 | Worm Gear |
09 | P992209 | End Cover of Worm Gear |
10 | P992210 | M5 x 10 Bolt |
11 | P992211 | M5 x 25 Bolt |
12 | P992212 | Connecting Bar |
13 | P992213 | Adopting Sleeve |
14 | P992214 | Longitudinal Screw |
15 | PW02M | M5 Washer |
16 | PN06M | M5 Nut |
17 | PW03M | M6 Washer |
18 | PB10M | M6 x 25 Screw |
19 | P992219 | Bearing Base |
20 | P992220 | Worm Shaft |
21 | P992221 | Ball Bearing 102 |
22 | PSB17M | M4 x 10 Screw |
23 | P992223 | Cover |
24 | P992224 | Retaining Ring (Internal) |
25 | P992225 | Retaining Ring (External) |
26 | P992226 | Bearing 80106 |
27 | P992227 | Spindle Sleeve Stabalizer |
28 | P992228 | Spindle Component |
29 | P992229 | Needle Bearing 4084103 |
30 | P992230 | M5 x 6 Screw |
31 | P992231 | Dust Cover |
32 | P992232 | Shaft of Sanding Drum |
33 | P992233 | Washer |
34 | P992234 | Sanding Drum |
35 | P992235 | Pad |
36 | P992236 | Nut |
37 | P992237 | Sanding Sleeve |
38 | P992238 | Top Cap |
39 | PSB17M | M4 x 10 Screw |
40 | PW05M | M4 Washer |
41 | PW02M | M5 Washer |
42 | P992242 | Needle (2) |
43 | P992243 | Angle Block |
44 | P992244 | Lock Pin |
45 | P992245 | Shaft |
46 | P992246 | Spring |
47 | P992247 | Nut |
48 | P992248 | Dust Collector Nozzle |
49 | P992249 | Rubber Pad |
50 | PN03M | M8 Nut |
51 | PW01M | M8 Washer |
52 | PW01M | M8 Washer |
53 | PSW04-1 | Cord Sleeve |
54 | PWRCRD110 | Power Cord |
55 | P992255 | Bearing 8205 |
56 | PSB11M | M8 x 16 Screw |
57 | PB29M | M6 x 30 Bolt |
58 | P992258 | Rubber Pad |
59 | PN01M | M6 Nut |
60 | P992260 | Lower Beam |
61 | P992261 | Supporting Beam |
62 | P992262 | Upper Beam |
63 | P992263 | Upper Beam |
64 | P992264 | Machine Base |
65 | PLN01M | M4 Nut |
66 | PW05M | M4 Washer |
67 | P992267 | Ground |
68 | PSW06 | Switch |
69 | P992269 | Label |
70 | PB07M | M8 x 25 Bolt |
71 | P992271 | Oil Cap |
72 | P992272 | Bracket |
73 | P992273 | Lock Block |
74 | P992274 | M6 x 10 Handle |
75 | PW03M | M6 Washer |
76 | P992276 | Needle |
77 | P992277 | Bracket |
78 | PB03M | M8 x 16 Bolt |
79 | P992279 | Faceplate |
80 | PB06M | M8 x 12 Bolt |
81 | P992281 | Bracket (2) |
82 | P992282 | Angle Bracket w/ Gauge |
83 | P992283 | Work Table |
84 | P992284 | Table Insert |
85 | P992285 | Angle Bracket w/o Gauge |
86 | P992286 | Dust Cover |
87 | P992287 | M6 x 16 Handle |
|
|
|
|
|
|
|
|
|
|
|
|
|
|
|
|
|
|
|
|
|
|
|
|
|
|
|
|
|
|
|
|
|
|
|
|
|
|
|
|
|
|
|
|
|
|
|
|
|
|
|
Clean Up
Unpainted machine surfaces may be coated with a waxy oil to protect them from corrosion during shipment. Remove this protective coating with a solvent cleaner or Grizzly’s G7895 citrus-based degreaser. Avoid chlorine-based solvents as they may damage painted surfaces should they come in contact. Always follow the usage instructions on the product you choose for cleanup.
Site Consideration
- WORKING CLEARANCES
Working clearances can be thought of as the distance between machines and obstacles that allow the safe operation of every machine without limitation. Ensure that your working area offers plenty of room for free movement and a substantial amount of distance between you and others that may be working in your shop area. - LIGHTING AND OUTLETS
Lighting should be bright enough to eliminate shadow and prevent eye strain. Electrical circuits should be dedicated or large enough to handle combined motor amp loads. Outlets should be located near each machine so power or extension cords are not obstructing high-traffic areas. Be sure to observe local electrical codes for proper installation of new lighting, outlets, or circuits.
CIRCUIT REQUIREMENTS
- 110V Operation
The Model G9922 is wired for 110/120V, single phase operation only. The 1⁄2 HP motor will safely draw 4.5 amps at 110V. If you operate this sander on any circuit that is already close to its capacity, it might blow a fuse or trip a circuit breaker. However, if an unusual load does not exist and a power failure still occurs, contact a qualified electrician or our service department. - Fusing
A 15-amp fuse or circuit breaker should be used when fusing this oscillating spindle sander. Circuits rated any higher are not adequate to protect the wiring. Equipment returned to us for service that shows evidence of being over-fused will be repaired or replaced totally at the customer’s expense, regardless of the present warranty status. - Extension Cords
If you find it necessary to use an extension cord with the Model G9922, make sure the cord is rated Hard Service (grade S) or better. Refer to the chart in the standard safety instructions to determine the minimum gauge for the extension cord. The extension cord must also contain a ground wire and plug pin. Always repair or replace extension cords when they become worn or damaged. - Grounding
In the event of an electrical short, grounding reduces the risk of electric shock by providing a path of least resistance to disperse electric cur-rent. This tool is equipped with a power cord hav-ing an equipment-grounding conductor. See Figure 1. The outlet must be properly installed and grounded in accordance with all local codes and ordinances.
Warning
This equipment must be grounded. Verify that any existing electrical outlet and circuit you intend to plug into is actually ground-ed. If it is not, it will be necessary to run a separate 12 A.W.G. copper grounding wire from the outlet to a known ground. Under no circumstances should the grounding pin from any three-pronged plug be removed. Serious injury may occur.

ASSEMBLY
Overview
Most of your G9922 Oscillating Spindle Sander has been assembled at the factory. The few pieces that remain should go together quickly and easily. Only a few common tools are required to assemble your oscillating spindle sander. 12 x 14mm and 17 x 19mm double-end wrenches, as well as an 8mm Allen® wrench are provided with the machine. The following list provides the recommended order in which the sander should be assembled:
- Steel Stand
- Sanding Unit and Stand
- Table and Sanding unit
- Spindle Sander
Before beginning the assembly process, we recommend you become familiar with the Model G9922 Oscillating Spindle Sander’s parts and controls. See the Parts Diagram at the end of the manual for details.All die-cut metal parts have a sharp edge (called “flashing”) on them after they are formed. This is generally removed at the factory. Sometimes a bit of flashing might escape inspection, and the sharp edge may cause cuts or lacerations when handled. Please examine the edges of all die-cut metal parts and file or sand the edge to remove the flashing before handling.
Operations
Test-Run
Before you put your oscillating spindle sander into use, give it a quick inspection. Before inspecting, ensure that the machine is switched off and disconnected from its power source.
- Are all fasteners tight?
- Is the sanding sleeve properly installed and secured?
- Rotate the spindle slowly by hand. Look and listen for any scraping noises or anything that impedes smooth movement. Make appropriate adjustments before attempting to run the machine.
- If the sander appears to be free of problems that might affect its operation, plug it into its power source and start the machine. Be sure to keep a finger on the OFF button, just in case of a problem with the machine. Allow to run briefly to allow inspection of spindle rotation.
- Turn off the machine, disconnect it from its power source, and re-inspect for loose fasteners.
Warning: Never use the Model G9922 for applications other than those for which it was made. DO NOT overload the machine or use excess force when sanding. Severe personal injury, damage to the machine, or damage to your workpiece could occur.
General Sanding
For general wood sanding, position and secure table, turn the machine on and place workpiece on table. While securely holding a workpiece, slowly feed against the spindle and maintain constant pressure against the table. Use caution when sanding end-grain. Table can be tilted at angles up to 45° to allow sanding of angled edges. Simply loosen the knobs located on either side of the table base and set to desired angle. Always check angle measurement against an adjustable angle finder.
SAFETY
For Your Own Safety Read Instruction Manual Before Operating This Equipment
The purpose of safety symbols is to attract your attention to possible hazardous conditions. This manual uses a series of symbols and signal words that are intended to convey the level of importance of the safety messages. The progression of symbols is described below. Remember that safety messages by themselves do not eliminate danger and are not a substitute for proper accident prevention measures.
- Danger: Indicates an imminently hazardous situation which, if not avoided, WILL result in death or serious injury.
- Warning: Indicates a potentially hazardous situation which, if not avoided, COULD result in death or serious injury.
- Caution: Indicates a potentially hazardous situation which, if not avoided, MAY result in minor or moderate injury. It may also be used to alert against unsafe practices.
- NOTICE: This symbol is used to alert the user to useful information about proper operation of the equipment.
Safety Instructions For Power Tools
- KEEP GUARDS IN PLACE and in working order.
- REMOVE ADJUSTING KEYS AND WRENCHES. Form a habit of checking to see that keys and adjusting wrenches are removed from tool before turning on.
- KEEP WORK AREA CLEAN. Cluttered areas and benches invite accidents.
- DON’T USE IN DANGEROUS ENVIRONMENT. Don’t use power tools in damp or wet locations, or where any flammable or noxious fumes may exist. Keep work area well-lighted.
- KEEP CHILDREN AND VISITORS AWAY. All children and visitors should be kept a safe distance from work area.
- MAKE WORK SHOP CHILD PROOF with padlocks, master switches, or by removing starter keys.
- DON’T FORCE TOOL. It will do the job better and safer at the rate for which it was designed.
- USE RIGHT TOOL. Don’t force tool or attachment to do a job for which it was not designed.
USE PROPER EXTENSION CORD. Make sure your extension cord is in good condition. Conductor size should be in accor-dance with the chart below. The amperage rating should be listed on the motor or tool nameplate. An undersized cord will cause a drop in line voltage resulting in loss of power and overheating. Your extension cord must also contain a ground wire and plug pin. Always repair or replace exten-sion cords if they become damaged.
Minimum Gauge for Extension Cords
AMP RATING 25ft 50ft 100ft 0-6 18 16 16 7-10 18 16 14 11-12 16 16 14 13-16 14 12 12 17-20 12 12 10 21-30 10 10 No - WEAR PROPER APPAREL. Do not wear loose clothing, gloves, neckties, rings, bracelets, or other jewelry which may get caught in moving parts. Non-slip footwear is recommended. Wear protective hair covering to contain long hair.
- ALWAYS USE SAFETY GLASSES. Also use face or dust mask if cutting operation is dusty. Everyday eyeglasses only have impact-resistant lenses, they are NOT safety glasses.
- SECURE WORK. Use clamps or a vise to hold work when practical. It’s safer than using your hand and frees both hands to operate tool.
- DON’T OVERREACH. Keep proper footing and balance at all times.
- MAINTAIN TOOLS WITH CARE. Keep tools sharp and clean for best and safest performance. Follow instructions for lubricating and changing accessories.
- DISCONNECT TOOLS before servicing and changing accessories, such as blades, bits, cutters, and the like.
- REDUCE THE RISK OF UNINTENTIONAL STARTING. Make sure switch is in off position before plugging in.
- USE RECOMMENDED ACCESSORIES. Consult the owner’s manual for recommended accessories. The use of improper accessories may cause risk of injury.
- CHECK DAMAGED PARTS. Before further use of the tool, a guard or other part that is damaged should be carefully checked to determine that it will operate properly and perform its intended function. Check for alignment of moving parts, binding of moving parts, breakage of parts, mounting, and any other conditions that may affect its operation. A guard or other part that is damaged should be properly repaired or replaced.
- NEVER LEAVE TOOL RUNNING UNATTENDED. TURN POWER OFF. Don’t leave tool until it comes to a complete stop.
Additional Safety Instructions For Sanders
- BE AWARE OF SPINDLE rotation when sanding.
- KEEP FINGERTIPS AWAY from the moving spindle. Serious injury could result if skin contacts abrasives or moving parts.
- NEVER USE EXCESSIVE FORCE when sanding. Doing this greatly increases the chances of personal injury and motor overload.
- ALWAYS FEED THE WORK against the direction of rotation.
- EVEN IF YOU HAVE A reliable method of dust collection, use a dust mask or respirator when sanding, as well as eye and ear protection.
- IF THERE IS ANY doubt as to the stability or integrity of the material to be sanded, don’t sand it.
- DO NOT OPERATE SANDER with a damaged or badly worn sanding sleeve.
- TIE BACK LONG HAIR and remove any loose-fitting clothing or jewelry that could be caught up in the sander’s spindle or other moving machine parts.
- HABITS — GOOD OR BAD — are hard to break. Develop good habits and safety will become second nature to you.
Warning
- Like all power tools, there is danger associated with the Model G9922 Oscillating Spindle Sander. Accidents are frequently caused by lack of familiarity or failure to pay attention. Use this tool with respect and caution to lessen the possibility of operator injury. If normal safety precautions are overlooked or ignored, serious personal injury may occur.
- Operation of this equipment has the potential to propel debris into the air which can cause eye injury. Always wear safety glasses or goggles when operating equipment. Everyday glasses or reading glasses only have impact-resistant lenses, they are not safety glasses. Be certain the safety glasses you wear meet the appropriate standards of the American National Standards Institute (ANSI).
- No list of safety guidelines can be complete. Every shop environment is different. Always consider safety first, as it applies to your individual working conditions. Use this and other machinery with caution and respect. Failure to follow guidelines could result in serious personal injury, damage to equipment or poor work results.
MAINTENANCE
General
Make a habit of inspecting your sander each time you use it. Check for the following conditions and repair or replace when necessary.
- Loose mounting bolts.
- Worn switch.
- Worn or damaged cords and plugs.
- Loose Sanding Spindle and Sleeve.
- Sander Tables
The working table and other non-painted surfaces on the Model G9922 should be protected against rust and pitting. Some woodworkers recommend using automotive paste wax on exposed steel and cast iron surfaces. If you use paste wax, make sure that it’s 100% Carnauba wax and does not contain silicone. - Lubrication
Shielded and pre-lubricated ball bearings require no lubrication. - Sanding Sleeves
The spindle accepts 2" x 51⁄2" sanding sleeves. For spindle sanding, we recommend a 100 grit (medium) material for general-purpose sanding, a 60 grit (coarse) material for rough work, and a 150 grit (fine) material for finish jobs.
CLOSURE
The following pages contain general machine data, parts diagrams/lists, troubleshooting guide and Warranty/Return information for your Model G9922 Oscillating Spindle Sander.
- If you need parts or help in assembling your machine, or if you need operational information, we encourage you to call our Service Department. Our trained service technicians will be glad to help you.
- If you have comments dealing specifically with this manual, please write to our Bellingham, Washington location using the address in Section 3: Introduction.
- We have included some important safety measures that are essential to this machine’s operation. While most safety measures are generally universal, Grizzly reminds you that each workshop is different and safety rules should be considered as they apply to your specific situation.
- We recommend you keep a copy of our current catalog for complete information regarding Grizzly's warranty and return policy. If you need additional technical information relating to this machine, or if you need general assistance or replacement parts, please contact the Service Department listed in Section 3: Introduction.
- Additional information sources are necessary to realize the full potential of this machine. Trade journals, woodworking magazines, and your local library are good places to start.
Warning
- The Model G9922 was specifically designed for sanding operations only. DO NOT MODIFY AND/OR USE THIS MACHINE FOR ANY OTHER PURPOSE. Modifications or improper use of this tool will void the warranty. If you are confused about any aspect of this machine, DO NOT use it until you have answered all your questions. Serious personal injury may occur.
- Like all power tools, there is danger associated with the Model G9922 Oscillating Spindle Sander. Accidents are frequently caused by lack of familiarity or failure to pay attention. Use this tool with respect and caution to lessen the possibility of operator injury. If normal safety precautions are overlooked or ignored, serious personal injury may occur.
- Operating this equipment has the potential to launch flying debris which could cause eye injury. Always wear safety glasses or goggles when operating equipment. Everyday glasses or reading glasses only have impact-resistant lenses, they are not safety glasses. Be certain the safety glasses you wear meet the appropriate standards of the American National Standards Institute (ANSI).
Troubleshooting
- Common Problem: The sander is not oscillating or rotating.
- Solution: Check the power supply and ensure the sander is properly plugged in. If the problem persists, inspect the drive belt for wear or damage and replace it if necessary.
- Instruction/Warning: Always wear safety glasses and dust masks while operating the sander to protect your eyes and respiratory system. Keep long hair, loose clothing, and accessories away from moving parts.
| SYMPTOM | POSSIBLE CAUSE | CORRECTIVE ACTION |
|---|---|---|
| Motor will not start. | 1. Low voltage. 2. Open circuit in motor or loose connections. | 1. Check power line for proper voltage. 2. Inspect all lead connections on motor for loose or open connections. |
| Motor will not start; fuses or circuit breakers blow. | 1. Short circuit in line cord or plug. 2. Short circuit in motor or loose connections. 3. Incorrect fuses or circuit breakers in power line. | 1. Inspect cord or plug for damaged insulation and shorted wires. 2. Inspect all connections on motor for loose or shorted terminals or worn insulation. 3. Install correct fuses or circuit breakers. |
| Motor fails to develop full power (power output of motor decreases as rapidly with decrease in voltage at motor terminals). | 1. Power line overloaded with lights, appliances, and other motors. 2. Undersized wires or circuits too long. 3. General overloading of power company facilities. | 1. Reduce load on power line. 2. Increase wire sizes or reduce length of wire. 3. Request a power check from the power company. |
| Motor overheats. | 1. Motor overloaded. 2. Air circulation through the motor restricted. | 1. Reduce load on motor. 2. Clean out motor to provide normal air circulation. |
| Motor stalls (resulting in blown fuses or tripped circuit). | 1. Short circuit in motor or loose connections. 2. Low voltage. 3. Incorrect fuses or circuit breakers in power line. 4. Motor overloaded. | 1. Inspect connections on motor for loose or shorted terminals or worn insulation. 2. Correct the low voltage conditions. 3. Install correct fuses or circuit breakers. 4. Reduce load on motor. |
| Machine slows down when operating. | Applying too much pressure to workpiece. | Feed workpiece slower. |
WARRANTY
Grizzly Industrial, Inc. warrants every product it sells for a period of 1 year to the original purchaser from the date of purchase. This warranty does not apply to defects due directly or indirectly to misuse, abuse, negligence, accidents, repairs or alterations or lack of maintenance. This is Grizzly’s sole written warranty and any and all warranties that may be implied by law, including any merchantability or fitness, for any particular purpose, are hereby limited to the duration of this written warranty. We do not warrant or represent that the merchandise complies with the provisions of any law or acts unless the manufacturer so warrants. In no event shall Grizzly’s liability under this warranty exceed the purchase price paid for the product and any legal actions brought against Grizzly shall be tried in the State of Washington, County of Whatcom.
Pros & Cons of Grizzly Oscillating Spindle Sander
Pros
- Powerful 1/2 HP motor
- Six different spindle sizes
- Oscillating action for better finish
- Tool-free spindle changing system
- Reduced vibration for comfortable use
Cons
- May be expensive for some users
- Not suitable for very large sanding tasks
Customer Reviews about Oscillating Spindle Sander G9922
Many users have praised the Oscillating Spindle Sander G9922 for its power, versatility, and ease of use. Its durable construction, smooth operation, and efficient dust collection have also been highlighted as notable advantages. However, some users have expressed concerns about the high cost, limited capacity for large sanding tasks, and the noise level during operation.
Faqs
What distinguishing characteristics does the Grizzly Oscillating Spindle Sander G9922 have?
For the first time, how should I assemble my Grizzly G9922 Spindle Sander?
Is it possible to sand both straight and curved edges with the Grizzly G9922?
How can I use the Grizzly Oscillating Spindle Sander G9922 to sand certain kinds of materials?
How can I replace the Grizzly G9922 Spindle Sander's sanding sleeves?
When using my Grizzly Spindle Sander, what should I do if it stops oscillating?
How can I extend the life of my Grizzly Oscillating Spindle Sander through maintenance?
Does the Grizzly G9922 have any safety measures that help prevent accidents?
What should I do if the Grizzly G9922's sanding drum becomes stuck?
What is covered by the Grizzly G9922 warranty, and how long is it valid for?
Leave a Comment