Operations: Gtopic Voice Recorder L87 Instruction Manual
Content
Introduction
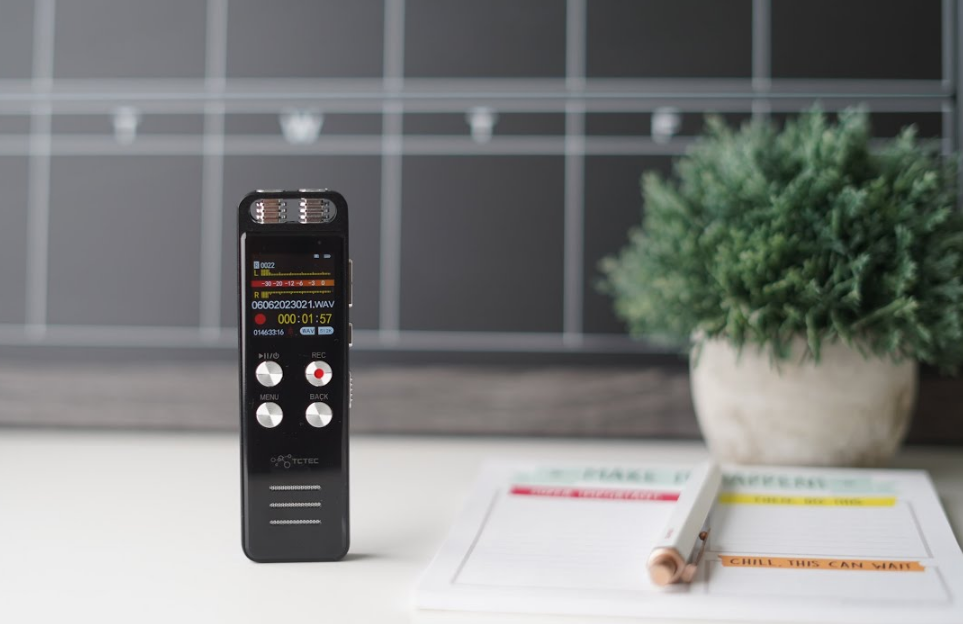
Gtopic Voice Recorder L87 is a compact and versatile digital voice recorder ideal for students, professionals, and anyone needing to capture audio on the go. With 8 GB of built-in memory and a 64 GB removable SD card, it offers ample storage for up to 3,343 hours of recordings. The device features dual microphones for clear sound capture, voice activation, and multiple recording formats, making it perfect for lectures, meetings, or personal notes. The Gtopic L87 is priced at approximately $39.99.
Package Information
The original package comes with film wrapped, and have bar code information.
Package List
- 1 x L87 16GB Voice Recorder
- 1 x 32GB TF Card
- 1 x Type-C USB Cable (for data transfer and charging)
- 1 x User Manual
Specifications
- High-sensitivity microphone with advanced noise reduction technology
- Supports up to 24-bit/192kHz audio recording
- Long battery life: up to 20 hours of continuous recording
- Compact and lightweight design: 3.5 inches x 1.2 inches x 0.5 inches, weighing 2.5 ounces
- 128GB expandable memory via microSD card slot
- USB-C port for easy data transfer and charging
- Built-in speaker for playback and headphone jack for private listening
- Multiple recording formats: WAV, MP3, and AAC
- Voice activation and timer recording options
Product Features
- Adopt professional voice recorder chip,Support 1536Kbps HD lossless linear recording.
- TF-Memory card: maximum support 128GB expansion;
- One-key quick recording (supports two formats of MP3 and WAV); adopts high-sensitivity microphone, with strong stereo reproduction;
- Support line-in recording and voice-activated recording;
- Support recording monitoring and segmented recording;
- Support timing recording, and set the recording time more rationally;
- Support WAV/APE/FLAC three loss less audio formats (support common audio formats: MP3, WMA, AAC-LC, M4A, OGG and other audio formats);
- Support loop function and A-B segment repeat playback and other functions; Play: support eight-level variable speed adjustment function;
- Built-in high-fidelity speakers (directly play music, share the wonderful sound as you like);
- (WAV: 512kbps mode) fully charged - screen off - continuous recording time: lithium battery about 14 hours.
- (WAV: 1536kbps mode) fully charged - screen off - continuous recording time: lithium battery about 12 hours.
- Long time recording, built-in large-capacity battery;
- Battery-low voltage automatic detection and protection function;
- With password boot function, protect the internal data of the machine - prevent leakage;
- Digital products integrating voice recorder, MP3, and flash drive;
- Built-in lithium battery, charge the product directly through the USB interface;
- Support USB2.0 computer connection, easy to upload and download voice or music.
Operation Guide Explain
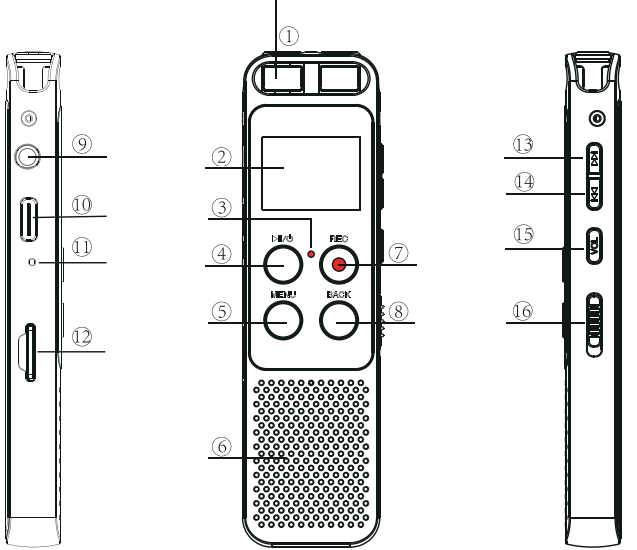
- Microphone
- LED Display
- Recording indicator
- Confim/Play/Pause
- M(Menu) key
- Speakers
- REC Recording
- Back/Save
- Earphone Jack
- USB/Charging port
- Reset hole
- Extemal expansion card
- Up Volume up/Fast forward
- DOWN Nolume downwind
- Volume keys / lock Button key
- Power Button
Description
The gtopic Voice Recorder L87 boasts a robust build with a durable aluminum body and a sleek black finish. The device features a large LCD display that shows real-time recording information, including the time, date, and remaining battery life. The intuitive controls make it easy to navigate through different modes and settings.
The recorder comes with a rechargeable lithium-ion battery that provides extended usage, making it perfect for long sessions or travel. It also includes a carrying pouch and a USB-C cable for convenient charging and data transfer.
Quick Start Guide
Learn how to operate the buttons in the product sketch.
- Built-in Mic: Captures the voice and records. Do not click on buttons when device is recording.
- Earphone: You may plug in earphones to hear the playback.
- USB: For charging or to download recordings to a computer.
- POWER Button: Switch on/off device power (we recommend you keep power button at ON position unless storing the device).
- PLAY/PAUSE: Play recordings or turn on/off the device (while power button is at the ON position).
- REC: Button for recording.
- STOP: Save recording, stop playback.
- M: Menu options. Use UP / DOWN to select, use PLAY Button to confirm. Press BACK/SAVE Button to return to main menu.
- Speaker: Device has a built-in speaker. You can hear the playback without earphones.
- UP/DOWN: Selects Menu Options.
- VOL+ / VOL- : Adjusts the speaker volume. When setting date and time, use this button.
Operational Explanations:
The words "short press" and "long press" often appear in this paper, The meanings are as follows:
- Short Press: A short press of the button less than 2 seconds.
- Long Press: Press and hold the button for more than 2 seconds until the screen displays the appropriate message.
Basic Operation Guide
Turn On Voice Recorder
- Simply push the power button (at right side ) to “ON” position, it will boot up ( screen light on, and see the recording menu ), and the startup is completed.(Make sure the machine battery is fully charged).
- When it is not turned off the machine, press and hold the "Play" button for 3 seconds to restart the device.
Turn off The Voice Recorder
- In the power-on state, switch it back to the "OFF" position to turn off the device.At this time, the screen displays the "Bye-Bye" icon, indicating that the machine is turned off .
- In the power-on state, press and hold the "Play" button for 3 seconds to power off, and the screen will display the "Bye-Bye" interface and then power off.
After the machine is turned on, it will automatically shut down within 3minutes without any operation, and it will also automatically shut down when the battery used when the machine is working is exhausted. Please refer to the battery power display section to charge in time.
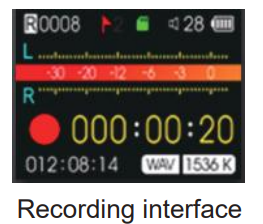
HOW to Record
- Press & hold “PLAY “button to power on the voice recorder
(NOTE: keep the right side POWER switch at “ON” position, if it is at “OFF” position, we need to push it to” ON “position first). - Press REC button to start a new recording.
- Press STOP button to save the recording after we finished recording.
Press PLAY button to play the recording file after saved successfully.
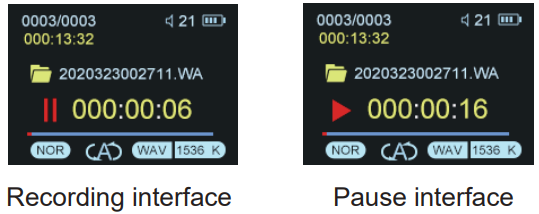
HOW to Play/Pause Your Recordings
- A) In playing mode, short press the "Play" button to start playback.We could press UP/DOWN button to select the recordings which need to playback.
B) During playback, short press “PLAY” button to pause playing,press PLAY again to resume recording.
How to Playback Music
Turn on the voice recorder,Press the Menu button, switch to music folder ( if you are at recordings folder) ,Press PLAY to playback music under the music mode .
Notice: if it shows “no songs” that mean there is no songs file in the recorder, or the song file format are not supported.
How to Charge Voice Recorder
Connect it to computer with enclosed cable, it will charge, and the screen display like below picture: the upper right corner battery icon will be flashing/moving, that means it is in charging.
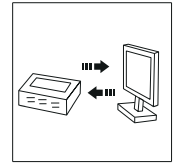
Once it has finished charging ( typically around 1.5-2 hours), the battery icon of the screen will be full, that means it was fully charged(See below picture). At this time, we could eject the device from the USB port.

We can also connect the voice recorder to other USB socket for charging (like USB wall charger, USB charge dock)
Charging Input: 5V 500mAh
How to switch to Play Next / Previous Recording
During playback,SHORT press the Up/Down button to switch recordings.
How to Fast Forward / Rewind
During playback, LONG press the Up/Down button to fast forward and rewind.
How to Delete Recording
Delete recordings, it could have 5 method.
- A. Format the recorder L87 disk on your WINDOWS computer directly (all data will be erased completely).
- B. From computer, go to L87 disk, find folder “RECORD”, select the recordings you want to delete on computer .
- C. Format the recorder on the device directly.
- D. Delete single file on the device by enter delete mode.
- E. Delete all recordings on the device by enter delete mode .
Now we introduce how to delete recordings on the device by enter delete mode. In pictures ,we introduced how to Delete single recordings, and how to delete all recordings.
Press M(menu) button -> Delete File -> you can choose Delete Single or Delete All,Select Yes, press PLAY Button to confirm your selection, it will delete the recordings as your selection.
Warning: The "Delete All" operation is permanent deletion, the file will not be recovered, please be careful if you want to delete the file.

Note: We could press UP/DOWN to select recordings firstly, and then press PLAY button to select delete file.
Setup Guide
To set up your gtopic Voice Recorder L87, follow these steps:
- Insert the microSD card into the slot if you wish to expand the storage capacity.
- Charge the device using the provided USB-C cable.
- Turn on the recorder by pressing the power button.
- Select your preferred recording mode (manual, voice activation, or timer) using the navigation buttons.
- Start recording by pressing the record button.
- For pairing with headphones or external speakers, plug them into the headphone jack.
Quick Menu Option Guide
Using UP/Down Button To select and confirm, press Menu (M) button.
Main Function Module

- Change Record Format/Quality: go to Menu (M) -> Up/Down button to select Record Setting -> Recording quality -> (1536kpbs WAV format, 128kpbs / 64kpbs MP3 format) .
- Voice Activated Mode (AVR mode): go to Menu (M) -> select Record Setting -> Up/Down button to Voice-activated mode-> M button to select AVR mode -> select ON.
- Voice Activated Level: go to Menu (M) -> Up/Down button to select Record Setting -> select Voice activated sensitivity -> select from levels 1 to7.
- Set Time: go to Menu (M) -> Up/Down button to select System setting -> Up/Down button to select Date and time -> select Set time -> use
Up/Down and VOL+ buttons to change time. Press PLAY button to confirm.
Set Time- Select Set time, Press M
- Press UP / DOWN to adjust hoer, Press VOL+/VOL-move to next
Press UP / DOWN to adjust Minutes, After setting Press M(menu) to confim

- Set Date: go to Menu (M)
-> Up/Down button to select System setting -> Up/Down button to select Date and time -> select Date -> with Up/Down and VOL+ buttons change date, and press PLAY button to confirm.
Set Date- Select Set Date, Press M
- Press UP / DOWN to adjust Year, Press VOL+/VOL- move to next mobth & day
After setting, Press M(menu) to confirm

Format L87 Drive on Computer Directly
->When successfully connected to computer, click the mouse right button, and format it, like below picture shows: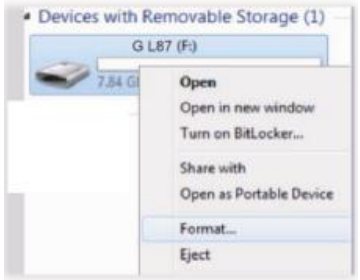
Restore to Factory Settings
Restores to factory default. Very helpful if confusion arises when creating settings.
Here is the steps to restore to factory settings
Press Play (turn on device) -> hit MENU Button -> use Up/Down to System Settings -> hit MENU
Find & select "Factory Settings"
Press M(menu), enter it, find & select “Yes”
Press PLAY button, confirm your selection, and it starts to restore to factory settings. When it succeed, screen will show “restored!”
Format Device
Format on the device directly
Here is the steps to format the recorder
Press Play (turn on device) -> hit M -> use Up/Down to System Settings -> hit M
Find & select "Format Device"
Press M , enter it, find & select "Yes"
Press M , confirm your selection, and it starts to format
Screen will show “please wait”, after format completed, the device will restore settings, and reboot.
Do not shut down the device, until this procedure completed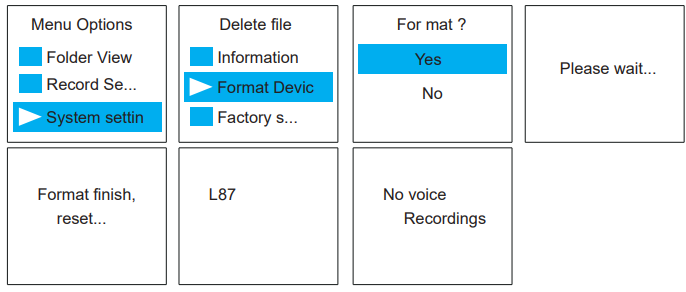
WARNNING: When format device, do not cut down the device power, unless formatting completed, and the device could operate again. Backup all files you need before format the device, once format completed, all data will be erased and cannot restore.
- Go to Setting (Menu Options)
At the status of stop recording and playback, you could press M (menu), enter menu options
The buttons will performs like this- UP, DOWN: for selection.
- VOL+, VOL-: for move to next when in time setting
- Play(Button): for confirm selections
- STOP: return back
Gtopic Voice Recorder L87 Troubleshooting
- No Voice Recordings
If there is no voice recordings, or you have deleted all recordings in your device, you will see “ no voice recordings” or “no songs” on the screen. Don’t worry, you could just go ahead to press REC. - How to Close Record Light
Go to record setting -> Record lndicator -> select close(OFF), so when recording, the record light will not light up or flash. - Format Error
Format Error, this usually happens from 3 aspect:- During recording, directly push down the POWER BUTTON to OFF position, that will cause file damage, we need to press STOP save the recordings firstly.
- The recordings time length is less than 5 seconds, like ZERO second recordings file.
- Computer do not support the wav file. The recordings were saved as .wav format. For WINDOWS 10 or MAC user may encounter with this issue. Don’t worry
- Try to Record at MP3 format, so it will be more widely supported by different computers.
- Disk Error
Due static shock, like over current charging, cut off its power when format device didn’t completed, so it lost system firmware.
How to Rescue:
Keep its power button at OFF position, connect to windows computer, and format the recorder disk again, things will be normal (for mac computer, contact customer support for tutorials) - How to connect to computer
Use the attached cable connect to your computer, or your android phone cable - Can I delete recordings from computer
Yes, when the recorder was successfully connected to your computer, you should find it as an removable drive names as “L87”, and all your recordings was saved in a folder names “RECORD” in the drive.
You could delete file or copy file into it, same as your ordinary USB Flash Drive. - When Connect to computer, the buttons not work
When connected to computer, it will enter connection mode, the device screen will show the “CONNECTION ICON” like the CHAPTER TWO, POINT 13 picture shows.
All buttons will not work at this situation, if you press M and hold it, it will exit connection mode, and will be failed to connect to your computer. - Cannot find my recordings in the recorder
This mainly caused by the device reading the MUSIC folder, you could press and hold STOP switch back to RECORD folder.
Or connecting computer, and check whether there is recordings in the device or not. - How to Turn ON Voice Activated Function
Go to Menu Options, find record setting, enter it -> Voice Activated
Setting -> AVR mode -> ON, and press M confirm it.
Now pressing REC, the screen will show VOX, it means you have successfully set voice activated recording function. - How to Use the AVR Mode (Voice Activated Function)
When AVR mode is ON, the recorder will enter voice activated recording mode.
It will only picks up loud enough decibels voice (any sounds).
So we could select the best AVR level as we want, and get the best effect of voice activated recording.
For L157 voice recorder, the AVR level could be selected from 1 -5;
The lower number means need higher decibels voice to activated the recorder, and it need louder voice; At level 5, it is very sensitivity, only a very low decibels or quiet speaking could be picked up.
Also, when voice activated function was ON, press REC, it will record 3 seconds, the device run 3 second to check the recorder was corrected entered recording mode. And then it will only pick up loud enough decibels voice / sound. - Press REC, it not recording
First check, the recording light blink or not.
Second, can you see VOX on the screen, If so, we suggest you could close the AVR mode, if you do not want this function
Third, confirm if there is enough free space on the device. - Press REC, it shows “OVER RECORD”
When press REC, it not records, it show “OVER RECORD”, that means the voice recorder memory is full, or you have too many “FOLDER” or “recordings” in the recorder.
Why this happened?
Although you may not record too long time. Sometimes mistakenly RECORD, and SAVE again and again, or copy or create too many “FOLDER” in the recorder disk. Maybe there is some files that cannot be read by the recorder, so you cannot find directly from the recorder
So you need to format the voice recorder, or connect to computer and have a check, after that format the recorder disk from your computer directly. - How to use the A-B repeat function
During playback, press and hold M, you will see A on the screen, and B is blink, it selected the start point Press and hold M again, select point B Now it will playback between Point A to B - The recording is noise
Don’t recording near computer, electric fans, air conditioner, sound bar that will easily cause noise, the recorder will pickup this statics noise. - The recorder auto shut down when I am recording
Why this happened?
The sleeper time function is ON, when set this, no matter you are operating the device, or recording or playing, it will force to shut down the device.
So you could go to System setting - > sleeper time, select OFF and confirm it. You will close the sleep time function. In default, it was at zero
So you could also try to restore to factory setting when this happened, if not sure how to set the sleeper time. - I Cannot Shut Off My Voice Recorder
When the recorder is charging, or connected to computer, even when the POWER BUTTON ON/OFF was at OFF position, it will still be ON, and you cannot shut off the voice recorder at this status (because the voice recorder directly get power from charging socket or computer). - Space is full
When space is full, you can connect to your computer and back up all the files to your computer, and then delete all the recordings in your voice recorder. (Do not cut off recordings from recorder to computer, this cannot delete file from recorder successfully, and still occupy the disk space)
The voice recorder has a limited storage at 48GB, so after a while of using, it may be full of storage, you need to back up it on your computer.
Pros & Cons
Pros:
- High-quality audio recordings with advanced noise reduction
- Long battery life and expandable storage
- Compact and lightweight design
- User-friendly interface and multiple recording modes
- Affordable price point
Cons:
- Limited built-in storage without microSD card
- No wireless connectivity options
- No built-in pop filter for wind noise reduction
Customer Reviews
Customers have praised the Gtopic Voice Recorder L87 for its clear audio quality and ease of use. Many have found it indispensable for lectures, meetings, and creative projects. However, some users have noted that the built-in storage is limited without an external microSD card.
Common Complaints: Some users have reported issues with file corruption when using low-quality microSD cards. It is recommended to use high-quality cards to avoid such problems.
Faqs
What is the maximum storage capacity of the gtopic Voice Recorder?
How long does the battery last on a single charge?
What are the different recording formats supported by the gtopic Voice?
Can I use the gtopic Voice Recorder L87 with external speakers or headphones?
How do I transfer files from the gtopic L87 to my computer?
Is there a voice activation feature on the gtopic?
What is the dimensions and weight of the Recorder?
Can I use the Voice while it is charging?
How do I prevent file corruption on my L87?
Leave a Comment
